- Mahotas - Home
- Mahotas - Introduction
- Mahotas - Computer Vision
- Mahotas - History
- Mahotas - Features
- Mahotas - Installation
- Mahotas Handling Images
- Mahotas - Handling Images
- Mahotas - Loading an Image
- Mahotas - Loading Image as Grey
- Mahotas - Displaying an Image
- Mahotas - Displaying Shape of an Image
- Mahotas - Saving an Image
- Mahotas - Centre of Mass of an Image
- Mahotas - Convolution of Image
- Mahotas - Creating RGB Image
- Mahotas - Euler Number of an Image
- Mahotas - Fraction of Zeros in an Image
- Mahotas - Getting Image Moments
- Mahotas - Local Maxima in an Image
- Mahotas - Image Ellipse Axes
- Mahotas - Image Stretch RGB
- Mahotas Color-Space Conversion
- Mahotas - Color-Space Conversion
- Mahotas - RGB to Gray Conversion
- Mahotas - RGB to LAB Conversion
- Mahotas - RGB to Sepia
- Mahotas - RGB to XYZ Conversion
- Mahotas - XYZ to LAB Conversion
- Mahotas - XYZ to RGB Conversion
- Mahotas - Increase Gamma Correction
- Mahotas - Stretching Gamma Correction
- Mahotas Labeled Image Functions
- Mahotas - Labeled Image Functions
- Mahotas - Labeling Images
- Mahotas - Filtering Regions
- Mahotas - Border Pixels
- Mahotas - Morphological Operations
- Mahotas - Morphological Operators
- Mahotas - Finding Image Mean
- Mahotas - Cropping an Image
- Mahotas - Eccentricity of an Image
- Mahotas - Overlaying Image
- Mahotas - Roundness of Image
- Mahotas - Resizing an Image
- Mahotas - Histogram of Image
- Mahotas - Dilating an Image
- Mahotas - Eroding Image
- Mahotas - Watershed
- Mahotas - Opening Process on Image
- Mahotas - Closing Process on Image
- Mahotas - Closing Holes in an Image
- Mahotas - Conditional Dilating Image
- Mahotas - Conditional Eroding Image
- Mahotas - Conditional Watershed of Image
- Mahotas - Local Minima in Image
- Mahotas - Regional Maxima of Image
- Mahotas - Regional Minima of Image
- Mahotas - Advanced Concepts
- Mahotas - Image Thresholding
- Mahotas - Setting Threshold
- Mahotas - Soft Threshold
- Mahotas - Bernsen Local Thresholding
- Mahotas - Wavelet Transforms
- Making Image Wavelet Center
- Mahotas - Distance Transform
- Mahotas - Polygon Utilities
- Mahotas - Local Binary Patterns
- Threshold Adjacency Statistics
- Mahotas - Haralic Features
- Weight of Labeled Region
- Mahotas - Zernike Features
- Mahotas - Zernike Moments
- Mahotas - Rank Filter
- Mahotas - 2D Laplacian Filter
- Mahotas - Majority Filter
- Mahotas - Mean Filter
- Mahotas - Median Filter
- Mahotas - Otsu's Method
- Mahotas - Gaussian Filtering
- Mahotas - Hit & Miss Transform
- Mahotas - Labeled Max Array
- Mahotas - Mean Value of Image
- Mahotas - SURF Dense Points
- Mahotas - SURF Integral
- Mahotas - Haar Transform
- Highlighting Image Maxima
- Computing Linear Binary Patterns
- Getting Border of Labels
- Reversing Haar Transform
- Riddler-Calvard Method
- Sizes of Labelled Region
- Mahotas - Template Matching
- Speeded-Up Robust Features
- Removing Bordered Labelled
- Mahotas - Daubechies Wavelet
- Mahotas - Sobel Edge Detection
Mahotas - Dilating an Image
Dilating an image in image processing refers to expanding the pixels of an image.
The dilation process will add pixels around the edges of an image. This happens because the algorithm looks at each pixel in the image and checks its neighboring pixels.
If any of the neighboring pixels are part of an object, it adds those pixels to the object's boundary.
Dilating an Image in Mahotas
By dilating an image in Mahotas, we refer to adding the number of pixels to the boundaries of regions in an image. This operation is commonly used to enhance or modify the shapes and structures in an image.
We can dilate an image in mahotas using the dilate() function. It is used to expand an element A by using structuring element B.
A structuring element is a small matrix or shape that defines the neighborhood around each pixel. It is used to determine which pixels should be considered during the dilation process.
The mahotas.dilate() function
The mahotas.dilate() function takes the input image and the structuring element as arguments, and returns a new Numpy array.
The value of the output pixel is determined as the maximum value of all the pixels in the neighborhood. If any neighboring pixels have a value of 1, the output pixel is set to 1.
The dilate() function scans the image, pixel by pixel, and checks the neighborhood defined by the structuring element.
If any neighboring pixels are part of an object, the dilation operation adds those pixels to the object's boundary, making it larger.
Syntax
Following is the basic syntax of the dilate() function in mahotas −
mahotas.dilate(A, Bc=None, out=None, output=None)
where,
A − It is the input image on which dilation will be performed. It can be a 2D or 3D NumPy array representing grayscale or binary image data.
Bc (optional) − It is the structuring element used for dilation. Default is None.
out (deprecated) / output (optional) − It specifies the output array to store the result. If not provided, a new array is created and returned as the output.
Example
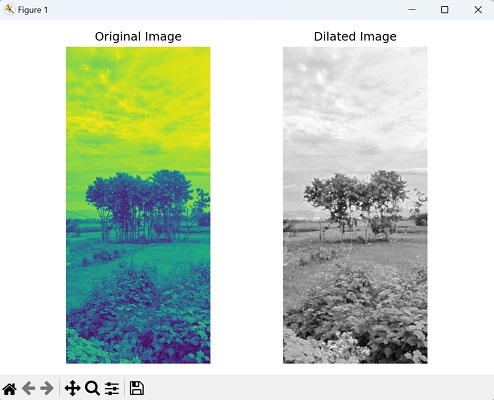
Following is the basic example to dilate an image in mahotas using the dilate() function −
import mahotas as mh
import matplotlib.pyplot as plt
import numpy as np
image = mh.imread('nature.jpeg', as_grey=True).astype(np.uint8)
# Performing dilation with a square kernel of size 3x3
dilated_image = mh.dilate(image, Bc=mh.disk(3))
# Create a figure with subplots
fig, axes = plt.subplots(1, 2, figsize=(7,5 ))
# Display the original image
axes[0].imshow(image)
axes[0].set_title('Original Image')
axes[0].axis('off')
# Display the dilated image
axes[1].imshow(dilated_image, cmap='gray')
axes[1].set_title('Dilated Image')
axes[1].axis('off')
# Adjust the layout and display the plot
plt.tight_layout()
plt.show()
Output
After executing the above code, we get the output as follows −
Dilation with Varying Structuring Element Sizes
We can also dilate an image using different structuring element sizes to enhance different aspects of the image. These elements are created with different sizes using the Mahotas disk() function.
By choosing different radii or sizes for the structuring elements, we can achieve diverse effects. To begin, we perform the dilation using the largest structuring element. Then, we continue with additional dilations using smaller structuring elements.
This approach allows us to modify the image in multiple ways, enhancing specific features and achieving the desired visual effects.
Example
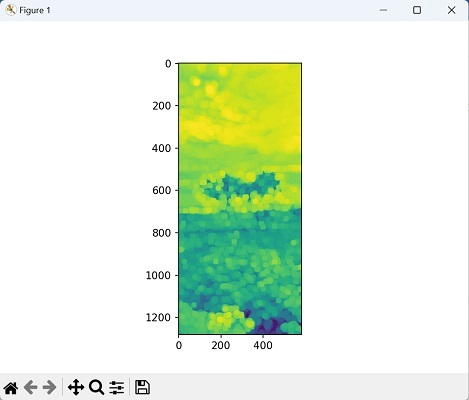
In here, we are trying to dilate an image with varying structuring element sizes −
import mahotas as mh
import numpy as np
from pylab import imshow, show
image = mh.imread('nature.jpeg', as_grey=True).astype(np.uint8)
# Performing dilation with the largest structuring element
largest_se = mh.disk(8)
dilated_image = mh.dilate(image, Bc=largest_se)
# Performing additional dilations with smaller structuring elements
smaller_se_1 = mh.disk(2)
smaller_se_2 = mh.disk(5)
dilated_image = mh.dilate(dilated_image, Bc=smaller_se_1)
dilated_image = mh.dilate(dilated_image, Bc=smaller_se_2)
# Displaying the dilated image
imshow(dilated_image)
show()
Output
The output obtained is as shown below −
Dilation with a Circular-shaped Kernel
To create a circular−shaped kernel, we can use the disk() function from Mahotas. By specifying the desired radius, this function generates a NumPy array representing the circular kernel.
Once we have the image and circular kernel ready, we can proceed to perform dilation. This operation applies the circular kernel to each pixel of the image, expanding the white regions accordingly.
In simpler terms, it enhances the bright areas in the image, making them larger.
Example
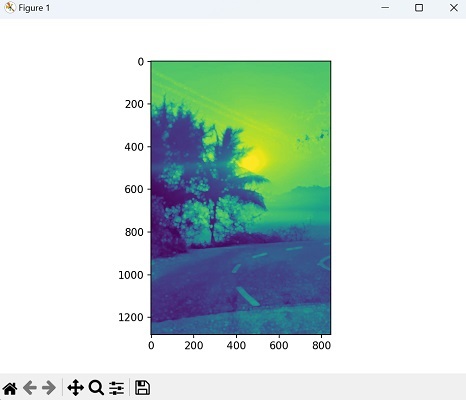
Now, we are dilating an image with a circular−shaped kernel −
import mahotas as mh
import numpy as np
from pylab import imshow, show
# Load image
image = mh.imread('sun.png', as_grey=True).astype(np.uint8)
# Circular kernel with radius 5
radius = 5
kernel = mh.disk(radius)
dilated_image = mh.dilate(image, kernel)
# Display the dilated image
imshow(dilated_image)
show()
Output
Following is the output of the above code −