- VersionOne - Home
- VersionOne - Introduction
- VersionOne - Features
- VersionOne - Free Trial Access
- VersionOne - Login
- VersionOne - Dashboard
- VersionOne - Invite Users
- VersionOne - Add a Project
- VersionOne - Portfolio Planner
- VersionOne - Product Planner
- VersionOne - Backlog
- VersionOne - Story
- VersionOne - Edit Story
- VersionOne - Defects
- VersionOne - Edit Defects
- VersionOne - Release Planner
- VersionOne - Sprint Planning
- VersionOne - Sprint Scheduling
- VersionOne - Detail Planning
- VersionOne - Issues
- VersionOne - Task
- VersionOne - Templates
- VersionOne - Import Data
- VersionOne - Team Rooms
- VersionOne - Storyboard
- VersionOne - Testboard
- VersionOne - Taskboard
- VersionOne - Filters
- VersionOne - Search
- VersionOne - Conversation
- VersionOne - Collaboration
- VersionOne - Notification
- VersionOne - Estimably
VersionOne - Quick Guide
VersionOne - Introduction
VersionOne is a web-based project management tool used by testers, developers and other stake holders to manage, track and organize software testing efforts. It follows and covers full life cycle of Agile Methodologies. It supports from first step as Product Backlog to the projects final step as completion and delivery.
Interesting Points
VersionOne supports a wide range of functionalities and is one of the best available project management tools for Agile. VersionOne is joining CollabNet to bring DevOps into the table.
Following are a few interesting facts about VersionOne −
VersionOne helped to bring the Agile Management tool in 2002.
VersionOne is also known as the Agile Management tool.
It is developed and copyright by VersionOne Inc.
VersionOne is a web based tool that supports all browsers especially Chrome, Firefox, IE etc.
It supports different windows OS like Windows XP, Vista, 7, Mac, etc.
VersionOne provides 30days trial period.
It supports all phases of planning, scheduling, collaborating, tracking and reporting for projects, releases, iterations, epics, stories, defects, tasks, tests, teams and team members.
VersionOne was named as one of the Best Places to Work by the Atlanta Business Chronicle.
Now, CollabNet and VersionOne have merged to accelerate innovation across Enterprise Software Development and Delivery in 2017.
VersionOne can be customized using various methodologies such as SAFe, Scrum, Kanban, Lean, XP, and DAD.
License and Free Trial
VersionOne is used at commercial level across various software industries. It allows the new users to go through the tool by providing limited free access. In this section, we will see how VersionOne connects with different user groups at personal and commercial level −
VersionOne is a commercial tool and available as Trial version for a limited period of 30 days. For personal use, a user can register and get a hands-on experience of VersionOne.
To utilize VersionOne services, a license is required. After 30 days, if a user wants to continue using VersionOne, a license is required. By purchasing one of the products, VersionOne provides license key to continue for a certain time period based on purchase agreements.
VersionOne provides free license for 30 days for cloud based access as well as local server set up. User can set up host server into his local machine as well by following installation guidelines and fulfilling pre-requisite.
VersionOne Uses
There are a wide range of benefits and usage of VersionOne depending on team size, type of work and other factors. The benefits and usage are listed below −
VersionOne is used in tracking all QA activities from the 1st phase of software testing lifecycle in Agile. Tracking can be started from adding the requirements to accepting the requirement by the Product Owner.
VersionOne is useful in Project Management, Defect Management and to customize into different agile methodologies as per the requirements. A user with proper role can customize the VersionOne fields, boards, reports, displays according to project requirement and standards.
In addition to the above, VersionOne also supports agile portfolio management, product road mapping, regression test management, customer idea management, agile visualizations and custom reporting and analytics.
It supports all macro level activities performed by QA.
VersionOne is very useful in performing QA tasks like planning, scheduling, collaborating, tracking and reporting for projects, etc.
VersionOne Specifications
The base of VersionOne is combined with different and latest technologies and ideas. To use a developed VersionOne tool, hardware and software supports are required at Server as well as Client side. Following table lists down important specification of VersionOne −
| Sr.No. | Specification | Description |
|---|---|---|
| 1 | Application copyright |
|
| 2 | Tool scope |
|
| 3 | Testing Methods |
|
| 4 | Tool Objectives |
|
| 5 | Management Features |
|
| 6 | Hardware Requirements for Server |
|
| 7 | Error Handling |
|
| 8 | User interface Available |
|
VersionOne - Features
In this chapter, we will discuss the different features of VersionOne. The main feature of VersionOne is to attract QAs and other stakeholders for Agile management.
VersionOne Core Features
VersionOne provides a wide range of features that prove beneficial to the Agile Project team. It does not only support Project management but also how to do day to day activities in case team is not situated locally. It provides a software solution to implement agile within the globally situated team.
Following table lists down the core features of VersionOne −
| Sr.No. | Core Features | Description |
|---|---|---|
| 1 | Testing Supports |
|
| 2 | Centralize & organize |
|
| 3 | Manage & Track Progress |
|
| 4 | Notification |
|
| 5 | Power Search |
|
| 6 | Reports |
|
| 7 | Scale with Team Growth |
|
| 8 | Integration |
|
| 9 | Common Features |
|
| 10 | Recover Data |
|
VersionOne - Free Trial Access
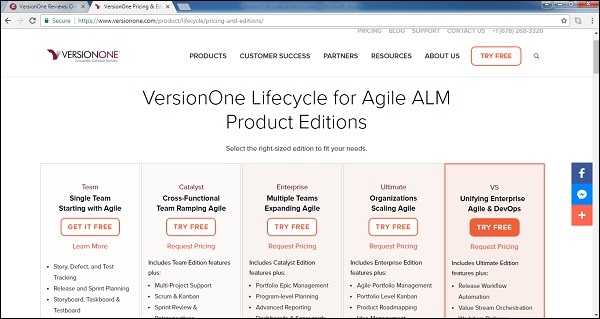
VersionOne provides free trial for 30 days to registered users. The free trial version of VersionOne comes with basic features. TestRail has other plans as well with different advanced features and add-ins. The cost depends on the products that come along.
VersionOne has the following different products −
- Team
- Ultimate
- Catalyst
- Enterprise
VersionOne Team is free for Single Team with basic features for other products VersionOne provides 30days trial period.
By visiting https://versionone.dev/ a user can see the different available plans for trying purpose.
Setup for Free Trials
To use the free trial version, one time basic setup is required. It includes registering into VersionOne by providing basic details and getting personal URL at email to access the VersionOne.
In the following steps, we will learn how to set up the VersionOne while accessing it for the first time −
Visit https://versionone.dev/ and click on Try Free at the top right as shown in the following screenshot −
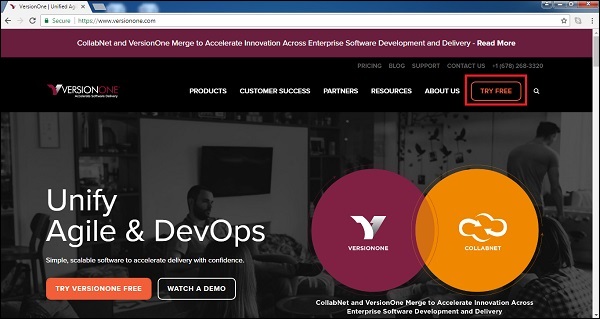
It opens a basic form to create a VersionOne account.
Enter the details at following fields as shown in the following screenshots −
Name, Organization, Designation, Number and Country. These are basic details of user and useful to set up profile after accessing the VersionOne. These details help to maintain unique user concept. A user cannot enter duplicate records to register.
Email − Please note, it accepts gmail, yahoo, outlook. It can be business email as well.
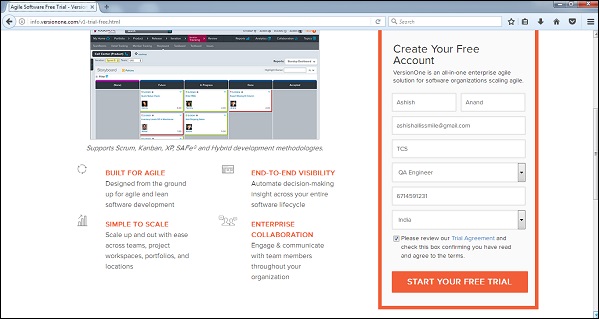
After entering all the details, check the checkbox for Term & Services and click on Start Your Free TRIAL.
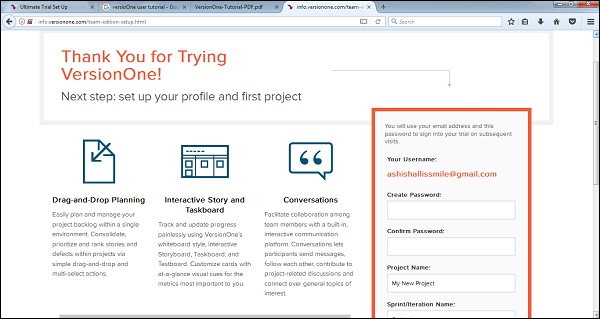
It will display the next page where a user should create password and provide Project/Sprint name. Now, click on Set Up.
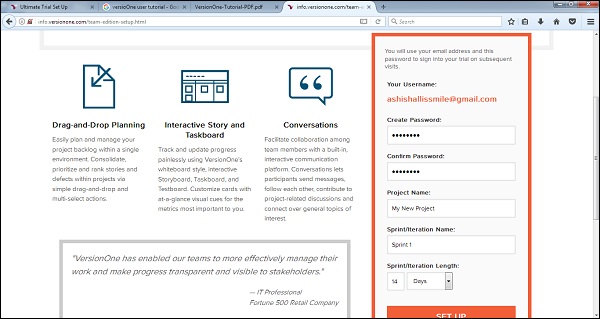
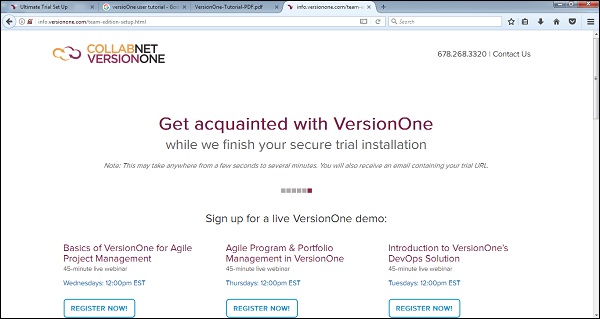
Upon clicking Set Up, VersionOne creates the personal URL and account to access free trial and send the email, provided into the form at the 1st page.
An Email will look like as in the following screenshot −
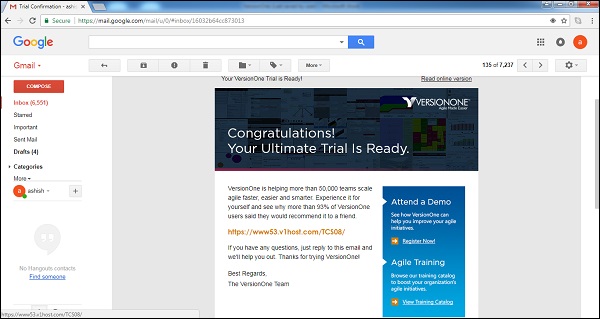
By visiting the given URL, a user will get login page for VersionOne.
VersionOne - Login
In this chapter, we will learn the steps involved to log into VersionOne.
Follow these steps to log into VersionOne.
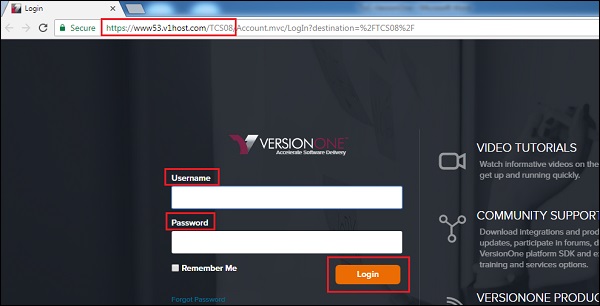
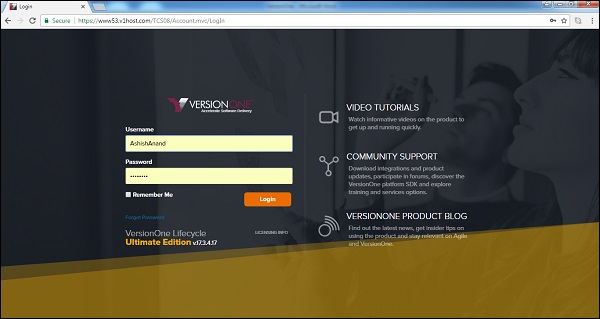
Step 1 − To login into VersionOne, go to your sample website, provided into email while creating the free trial. It will open a login page.
Step 2 − Enter your registered email address as Username and Password (selected while creating the account).
Step 3 − Click on the Login button.
Following screenshot shows how to login into VersionOne using credentials −
On Error
While logging in, a user can face errors due to wrong combination of username/password. A user can utilize different available features to reset password and login again. Here, we will see what errors a user can face and how to find resolution to such instances −
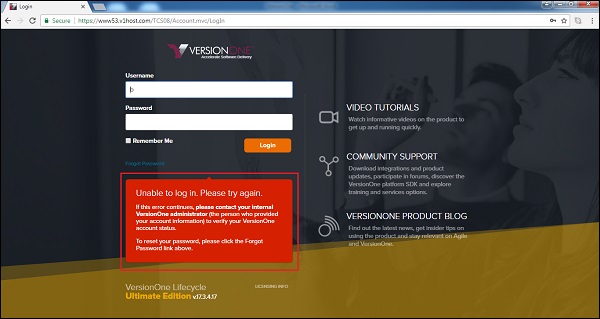
Due to unsuccessful login, a page as shown in the screenshot below might appear.
Error may occur due to wrong combination of email id or password.
Following screenshot shows the error message a user receives if the credentials are not correct −
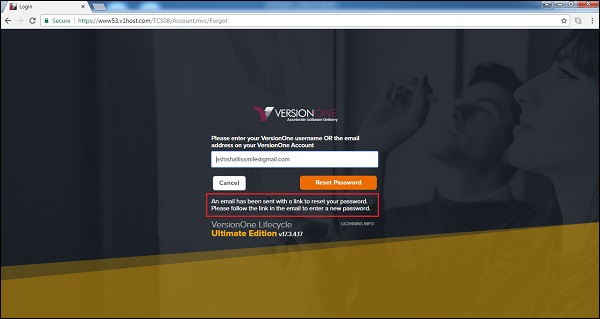
If you forgot the password, to recover it −
Click on Forget Password beside the Login button.
Enter the Login Email.
Click on the Reset Password button. It asks to enter registered email to send the password reset link.
The following screenshot shows how to recover the password if you forgot −


A user will get an email with details to reset the password.
On Successful Login
In this section, we will discuss how VersionOne works on successful login.
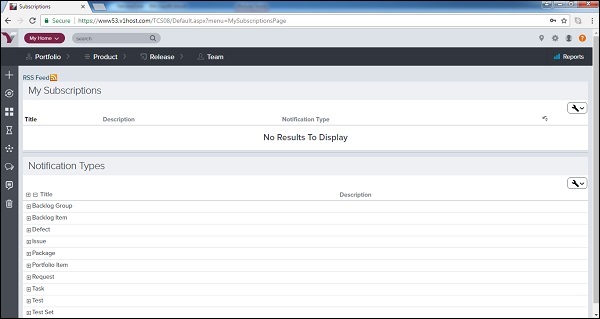
On successful login, the My Subscription page gets displayed. The following screenshot displays the welcome page of VersionOne on successful login
VersionOne - Dashboard
After logging into VersionOne, a user can navigate to Dashboard where progress of work is summarized and a user can customize reports and matrices as well. A Dashboard is customized by Admin. Based on roles, admin can set the access of VersionOne. Dashboard is similar to homepage that displays all important details and provides links to access of other modules. In this chapter, we will see features and customization of Dashboard.
Points to Note
By default, the Dashboard provides important details about project and the progress. It displays the data for different modules like Project Hierarchy, number of Open Issues, Backlog Count, Defects at project level in the hierarchy. In the following section, we will discuss the important features of Dashboard −
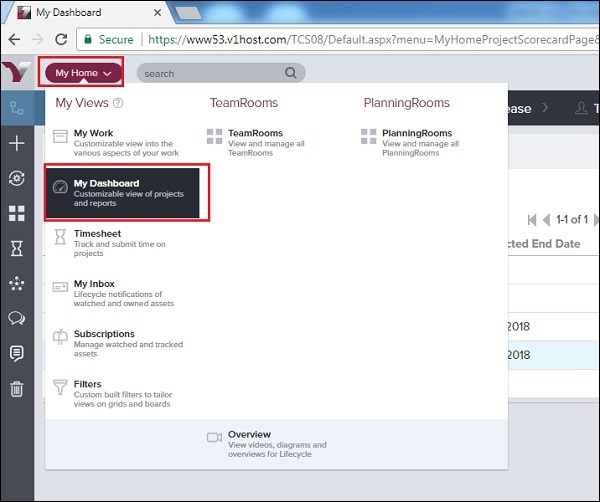
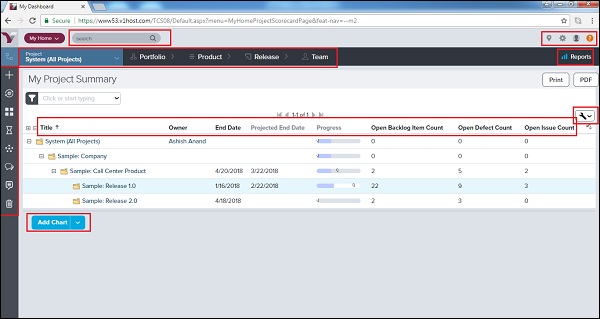
To navigate to the My Dashboard page, click on My Home → My Dashboard link as shown in the screenshot below. It displays the Dashboard page with the default set up.
In the Dashboard page, My Project Summary is located at the top of the page. It shows different metrics to evaluate the state of a project. Filters are also available to search specific projects details. By default, the following fields display for each project −
Project Title
Owner
End Date
Projected End Date
Progress Bars (hover to see Open and Closed Estimates)
Open Stories/Backlog Items
Open Defect Count
Open Issue Count
The navigation bar, present at the top of the page, will be same across all pages/screen of VersionOne Project, Portfolio, Product, Release and Team. The navigation bar has many sub links under each of these links. At the right side of the same navigation bar, Report section is also available. By clicking on these links and sub links, a user can get access to different modules/features supported by VersionOne
Dashboard has different links at the top right. These are same across all pages Site Navigator, Settings, User Profile and Help. These are the static feature of the VersionOne HTML design.
In the extreme left side, it displays few useful shortcut links as Add New Item for Backlog Item, Defect, Story, etc., My Recent Changes to view all recent changes, Rooms, Timesheet, Collaboration, Conversations, Topics and Deleted items. The following screenshot displays the Dashboard of VersionOne −
Add Chart
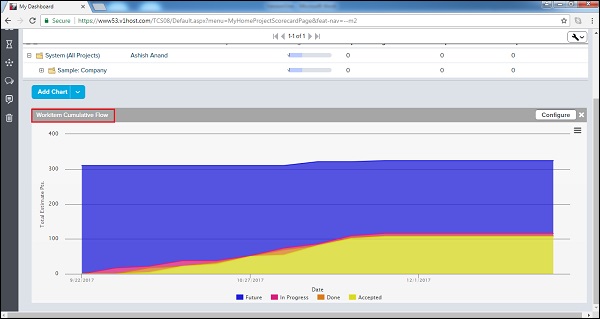
Dashboard can be customized by adding different available charts to track day to day progress of the project/sprint. A user can add any of the following charts to the My Dashboard page. These charts (displayed at the bottom of the page) help to track progress of the project, sprint/iteration, and team status.
Project Burndown
Sprint/Iteration Burndown
Work item Trend
Defect Priority Trend
Defect Priority Trend
Test Trend
Work item cycle time
Work item cumulative flow
To add a chart, click on the Add Chart button present at the My Dashboard page and select one of the charts as shown in the screenshot below. It displays all available charts to add into the dashboard.
After selection, the chart appears at the bottom of the page as shown below −
User Profile
A logged in user can view his profile in VersionOne. A user with admin role will have access to all users profiles and can edit/update as well. In this section, we will discuss how to view profile and update the details.
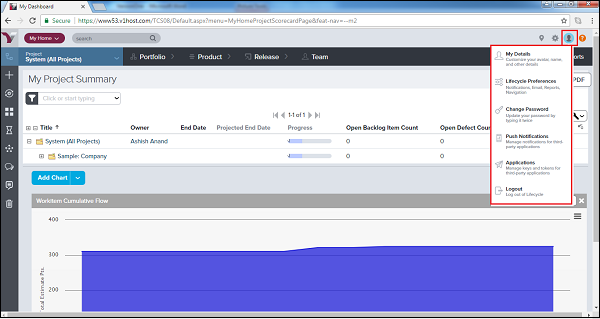
By clicking on the Profile icon, a user can view the following options −
My Details − user can view his personal profile as shown below −
It opens the profile details with the edit button on the right side. A user can view History and type of application by clicking on corresponding tab. In details, a user can see Project Membership, Owned Projects, Link and Attachments as well.
The following screenshot displays the user detail page −
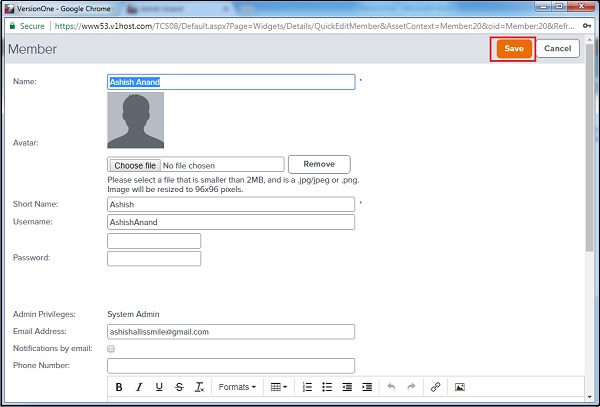
Edit the details on this page.

Once a user clicks on the Edit button, the user details open in a new window in the edit mode. A user can change the details and click on Save to save the changes as shown below −
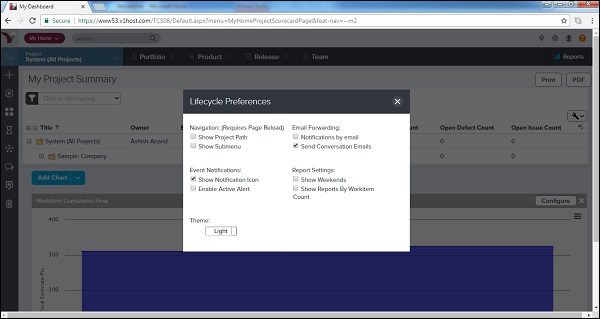
Lifecycle Preferences − A user can select Navigation, Email forwarding options, Event Notifications and Report Settings as shown in the screenshot below −
Change Password − Using this option, user can change the current password and set a new one.
Push Notifications − It manages notification from third party applications.
Applications − It manages keys and tokens from third party applications.
Logout − By clicking on Logout, a user will be get back to the login page and will not be able to access project details without logging in back as shown in the screenshot below.
VersionOne - Invite Users
VersionOne supports the invitation functionality. A logged in user can invite any number of users to join VersionOne. A user with Admin role can directly add the user into VersionOne. In this chapter, we will see steps about how to invite the user.
Follow these steps to invite new users into the VersionOne domain −
Navigate to the Setting icon present at top right of each page and select Members as shown in the screenshot below. It opens the Members page with the users details.
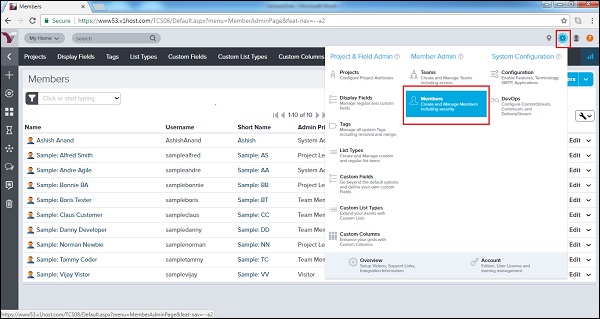
Login as System Admin is a prerequisite to view this option.
The Members page that opens up displays a list of members having the domain access.
At the right side, a user can view the Invite Member button where a user can select either Invite member or Add Member.
Invite Member − A user gets email to join the VersionOne
Add Member − The Admin provides Username and Password to add one of the team members who already has access to VersionOne for different domain. It is basically allowing access of the project to a team member
The following screenshot displays the Invite Member option −

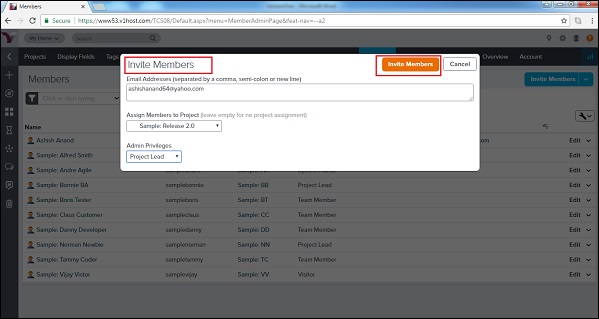
The following screenshot displays the Invite Members form where the Admin enters email of the invited member, the project to assign and the role to offer. After selecton, click on the Invite Members button.
The user will receive the email to join the VersionOne along with a link.
Add Member
An Admin User can directly add a user or group of users into VersionOne and can set up username and password on the user or the groups behalf. It is useful when a team member needs quick access to specific project.
Let us now see the steps to add a team member. The steps are as follows −
To add a single user, click on the Add Member option. It will open a form wherein you have to enter full name, short name, username, password, email address, notification, admin privilege, description, etc. as shown in the screenshot below −
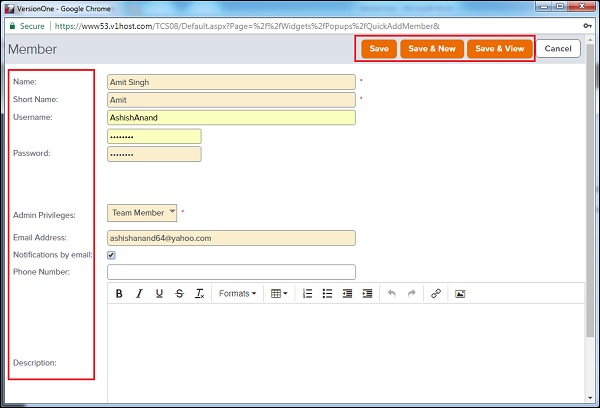
Now, click on Save/Save & New/Save & View button to complete the add process.
Save & New − It will add the user and open a new form to add another user.
Save & View − It will add the user and open the details of the added user.
VersionOne - Add a Project
In this chapter, we will see how to add a project in VersionOne.
Project is the backbone of a Project Management tool. Project represents a set of items and tasks that should be completed in a defined time to consider it as completed. Until a project finds its existence, none of other functionalities/tasks can be performed. Project groups all sprints/backlogs/tasks/issues etc. into one place. In this chapter, we will discuss about adding a project into VersionOne.
To add a project, a user should have the System Admin role.
Create a Project
Project helps to maintain hierarchy of all sub-items like backlog, defects and issues in order to complete it in the defined time. These are useful to centralize multiple backlog as well as relationship with project. In this section, we will discuss the steps performed to add a project into VersionOne. The steps are as follows
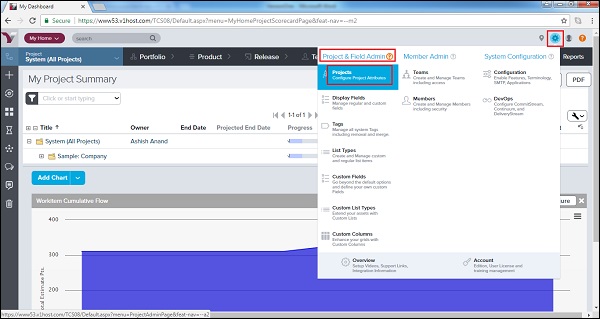
Login as Admin and Go to the Settings, present at right top,and select Project & Field Admin → Project as shown in below screenshot. It opens the Project page and displays all available projects in the hierarchy. It will not display any project in case none of the project is added before.
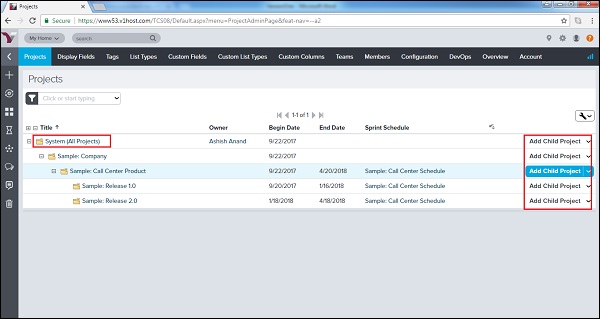
Expand the System (All Projects). Click on the Add Child Project button next to the parent project under which user wants to create the new project as shown below −
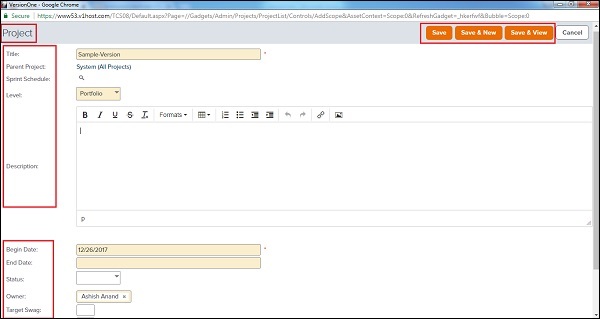
It opens the add project form where a user needs to enter the details in the different fields −
| Field | Action | Description |
|---|---|---|
| Title | Type the name of the project. | The name of the project/release as it displays in the Project Tree. |
| Parent Project | This field is pre-populated with the name of the parent project. Click on the name to view additional details. | The name of the project that is one level higher in the Project Tree hierarchy. |
| Iteration Schedule | Click on the magnifying glass to assign an Iteration Schedule to the project. | The Iteration Schedule assigned to the project.. |
| Planning Level | Select one of the following −
|
Indicates how the specific node is being used in the Project. When this attribute is set on a Project, any new child project will automatically be assigned the next value from the list. |
| Description | Type a narrative description of the project | This is a rich text field that allows to add expanded details about the project. |
| Budget | Type in the budget amount | The allocated budget amount for the project/release. |
| Begin Date | The date the project begins. | The date the project begins. This field is required. |
| End Date | The date the project ends. | The date the project ends. This field is optional. |
| Status | Select the status of the project. | Indicates the status of the project. |
| Owner | Type the first three characters of the project owner's name. | The person to contact if any questions. |
| Target Swag | Type in the Swag amount. | The amount of Swag user expects to be delivered in the project. Useful when planning. |
| Target Estimate Points | Type in the Target Estimate amount. | The amount of Estimate you expect to be delivered in the Project. Useful when planning. |
| Test Suite | Select a TestSuite from the dropdown list. | The TestSuite assigned to the project. |
| Pipelines | Select a Pipeline from the dropdown list. | Pipelines assigned to the project. |
| Reference | Type any additional project information. | Free form short text field for information about the project. |
Now click on Save/Save & New/Save & View as shown the screenshot below −
After clicking on Save, project gets listed as shown in the screenshot below.

There is Move, Edit, Close and Delete button as well to edit project details and delisted to the project.
VersionOne - Portfolio Planner
Portfolio Planning is used to focus on high level planning. It consolidates the Portfolio Planning, Prioritizing, Tracking and Estimating functionalities. In this chapter, we will discuss about Portfolio Tree, Roadmaps, Kanban board and Timeline. Portfolio Tree and Roadmaps are used at Planning phase while Kanban Board and Timeline are used to track the progress.
Points to Note
In this section, we will discuss how to access Portfolio and the different sub-items.
Portfolio consolidates portfolio planning, their tracking, prioritizing and estimating functions.
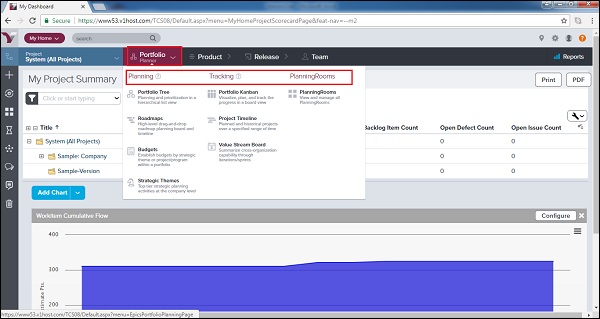
A user can access Portfolio planning by navigating Portfolio → Planning.
Similarly, tracking and planning rooms can be accessed as shown below −
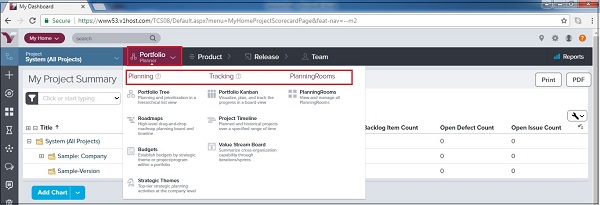
Portfolio Planning consists of Portfolio Tree, Roadmaps, Budgets and Strategic Themes.
Portfolio Tracking consists of Kanban Board, Project Timeline and Value Stream Board.
Portfolio Tree
Portfolio Tree represents the Portfolio items into hierarchy High level to Granular level. It is like Parent-child tree where each Portfolio item is situated under parent item. In the hierarchy/tree, the portfolio present at top is the highest level and decrease step by step for the next item present under that. In this section, we will discuss how the portfolio tree works.
The Portfolio Tree (formerly known as the Epic Tree) allows defining and evaluating the functional hierarchy of features.
A user can prioritize the features based on their relative value and high-level cost.
Whenever required, a user can decompose portfolio items into one to many detailed levels of sub-portfolio items and backlog items that can be delivered by the teams.
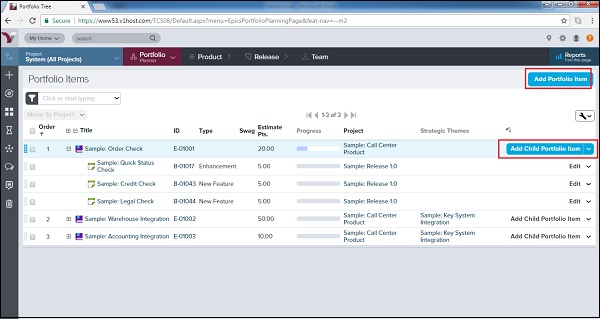
While the team works at the backlog items, the Portfolio Tree tracks the progress of the portfolio items. The following screenshot displays the Portfolio tree −
To add a new Portfolio hierarchy, user can click on Add Portfolio Item present at right top.
To add a portfolio item into existing hierarchy, click on the Add Child Portfolio Item on the corresponding level, present at the right side of each portfolio as shown below. It opens the Add Portfolio form where user provide details and click on Save.
Roadmaps
Roadmaps provide a flexible way to display important milestones to stakeholders. It is used to set high level target in defined time. In this section, we will discuss the features of Roadmaps and how it works.
Roadmap is used to keep update the team about progress.
It keeps stakeholders in the loop so that they can understand current priorities and timing and track how their needs will be fulfilled over time.
It provides better feedback into the planning cycle with respect to how stakeholder priorities the requirements.
To access the Roadmaps, navigate to Portfolio → Planning → Roadmaps.
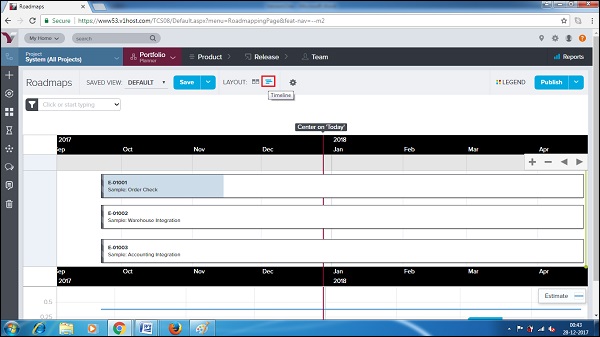
It has 2 different layouts − Board and Timeline
The following screenshot displays the Board Layout view −

The following screenshot dispalys the Timeline layout with respect to the start date and the end date −
Kanban Board
Kanban board is one of the important features designed to track the progress of any project. In Agile methodology, a team can track even day to day activities and progress at backlog items in the Kanban board. In this section, we will discuss the different features of Kanban board −
Kanban board is used to visualize, plan and track the progress of the portfolio items and the child items.
It provides a board view with categorization as None, Define, Breakdown, Build, Test and Deploy. Either of the backlog items/portfolio can be categorized among these based on the progress.
To access it, navigate to Portfolio → Tracking → Kanban Board.
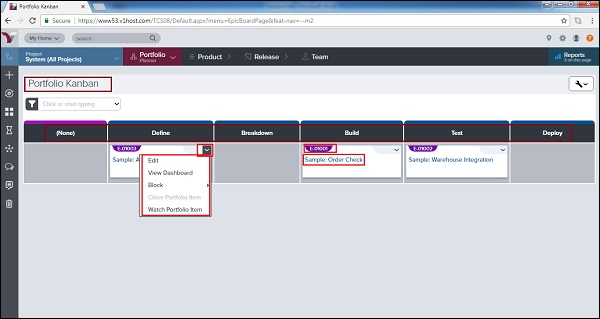
By default, each card shows the ID, title, owner (if applicable), and the Swag (high level size estimate). A user can have the basic details of the card by just viewing the Kanban board. By clicking on the card title, they can view the details of the item.
A user can drag and drop a portfolio item card to another place in the same column (to prioritize the ranking) or move it to another column (to update the status).
Click on the down arrow in the top right corner of a card for access to common the actions as follows −
Edit portfolio item details − It will allow to edit the details of the item.
View portfolio item dashboards − It will open all the details in the view mode.
Block portfolio items − It will block the portfolio item and ask the blocking reason. Even a user can link it with blocking issues/defects/dependent story.
Close portfolio items − It is used to close the item. Later, it can be re-opened if required.
Watch portfolio items − It is used to add the item in the watch list and get notification if there is any change; the change can be with the status too.
The following screenshot displays the Kanban Board −
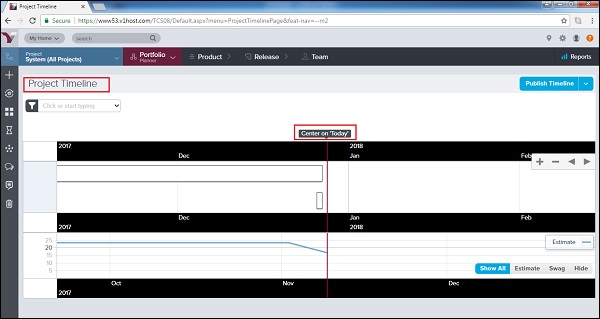
Project Timeline
Project Timeline can be accessed as Portfolio → Tracking → Project Timeline. Project Timeline can be used for the following −
Plan and communicate current and future project delivery.
View historical delivery of projects.
To see the next level of detail, priorities, and progress from a single view.
Understand the organizational velocity achieved in delivering previous projects that can be used as a guide in planning future work.
Project Timeline provides graphical view of projects. It displays the scheduling and delivery of work initiatives, features, and sub-features for specific projects.
The following screenshot displays the Project Timelines view −
VersionOne - Product Planner
Product Planning is the actual start of the project. In this phase, Product Owner works with backlog items to prioritize, groom and estimate.
In this chapter, we will discuss how to plan the backlog items and how to manage them in the sprint level.
Points to Note
In this section, we will go through some important points that need to be considered in product planning.
Product Planning is the activity where Product Owners identify, organize and groom the Backlog to prepare it. The development/testing/BA team(s) works on this aspect. If planning does not happen properly, sprint works affect the productivity and timeline of project..
It involves managing the backlog items, test sets and defects that define the updates going into the product.
These items form the backlog and are ranked by priority so they can be scheduled into releases/projects and sprints.
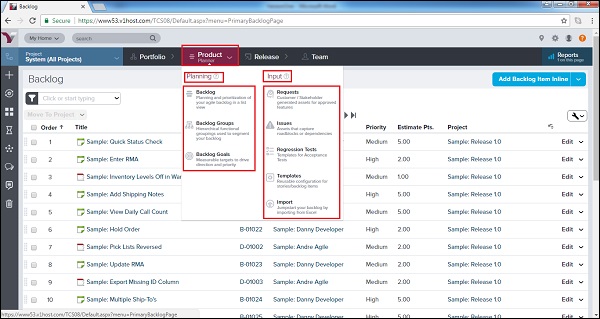
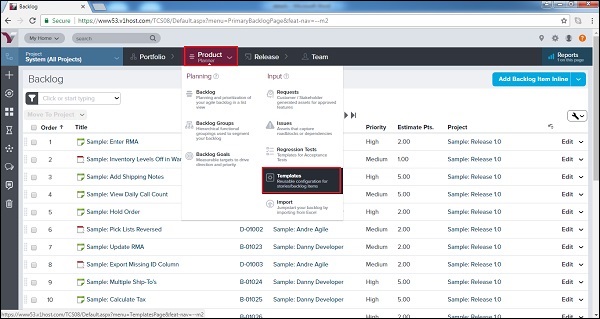
Product Planner is divided into two sections Planning and Input. The Planning section consists of −
Backlog − It is used for planning and prioritization of Agile backlog in list view.
Backlog Groups − It provides the hierarchical functional groupings used to segment the backlog.
Backlog Goals − It provides the measurable targets to drive the project effort into a proper direction.
The input section consists of −
Requests − These are generated by customers/stakeholders who approve the assets/backlog.
Issues − It captures roadblocks or dependencies or other issues that affect the project directly or indirectly.
Regression Tests − These are templates for Acceptance Tests.
Templates − It is the standard template that is used to configure stories/defects/backlog items.
Import − It is the standard template that is used to configure stories/defects/backlog items.
VersionOne - Backlog
Backlog is the list of all work items. Stories, Defects, Test sets are part of work items. Stories are primary items in backlog. Work items categorize and define all works to be done for a project and iteration/sprint level.
Access the Backlog Page
In this section, we will learn how to access the Backlog Page.
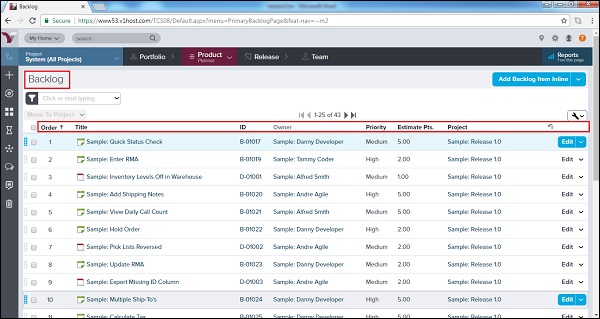
Backlog page can be accessed by navigating the Product Planner − Planning − Backlog as shown in the screenshot below. It opens the backlog page; the page consists of all available backlog items.
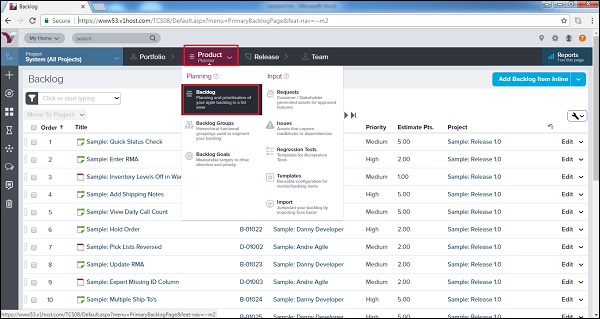
Backlog Page provides a flexible, editable grid of workitems associated with a project and all of its subprojects.
Here, a user can add new workitems, as well as edit, filter, sort, categorize, and prioritize existing items relative to one another.
In the backlog page, a user can see the following fields for each workitem −
Order − It shows priority of the workitems.
Title − Name of each workitems.
ID − It display unique id of workitems.
Owner − The person who owns the workitem.
Priority − It shows how prior the backlog item should consider.
Estimate Pts − It provides the complexity of workitem.
Project − It displays the associated project name.
The following screenshot displays the Backlog page view −
Add Backlog Item
A user with proper role can add the Backlog Item into a project. Usually issues and defects can be added by all users having access of project. Stories can be added by the product owner. Now, we will discuss how to add a backlog item.
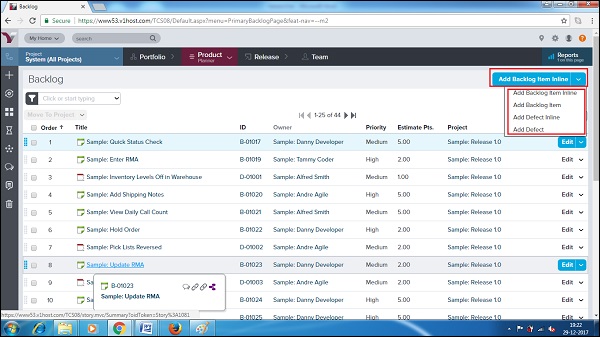
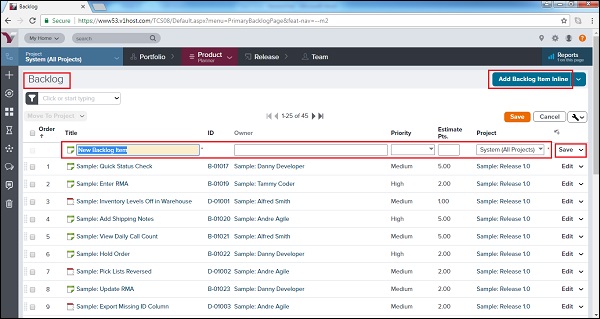
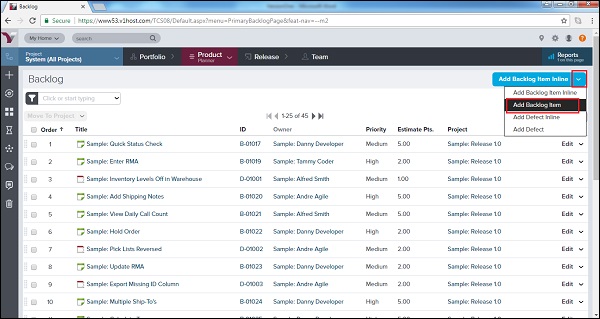
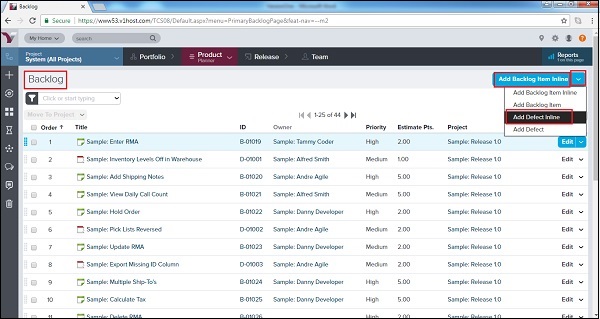
Go to the Backlog page and click on the arrow sign of the Add Backlog Item Inline button.
It provides 2 different options to add each backlog item or defect.
One option is Add Backlog/Defect Inline and the other is Add Backlog Item/Defect as shown in the screenshot below −
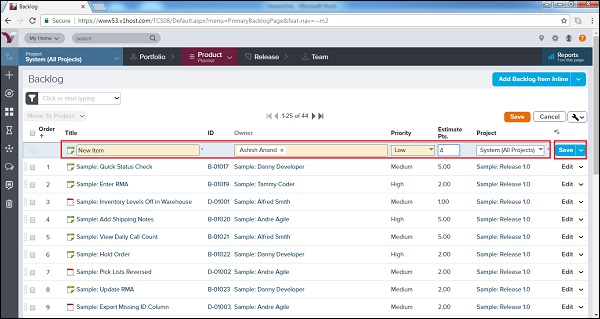
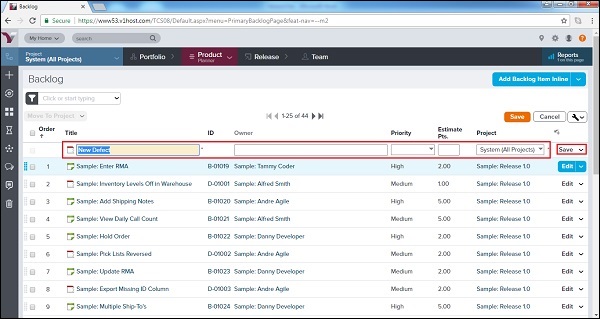
When a user selects the Inline option, a new row gets added as 1st row. Here, the mandatory details can be entered directly.
After that, click on the Save button present at the right side to keep the record of entered details as shown in the following screenshot −
Or,
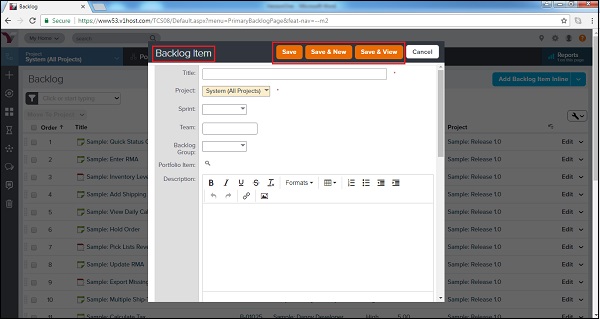
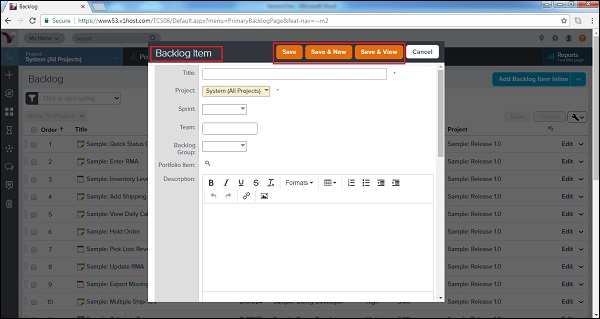
When a user clicks on Add Backlog Item/Defect, a new window opens along with the different fields to enter the details about workitem.
Once the details are entered, a user clicks on the Save/Save & View/Save & New button.
The following screenshot displays the Add Backlog Item/Defect page −
Backlog Goals
The Backlog Goal contains the group of stories or backlog items that provide the direction to the Project Team. It is usually the standard target (short and long term) to measure the direction of the project team. Consider the following important features of the backlog goal −
A Backlog Goal contains groups backlog workitems that display the progress of the project team.
It is measurable and specifies the direction and priorities of the project team.
It can have many-to-many relationship with workitems.
It allows free association between stories, defects or even portfolio items to Backlog goals.
To access the Backlog Goals, navigate to Product Planner → Planning → Backlog Goals.
To add a Backlog Goal, click on the Add Backlog Goal button present at the top right as shown in the following screenshot −
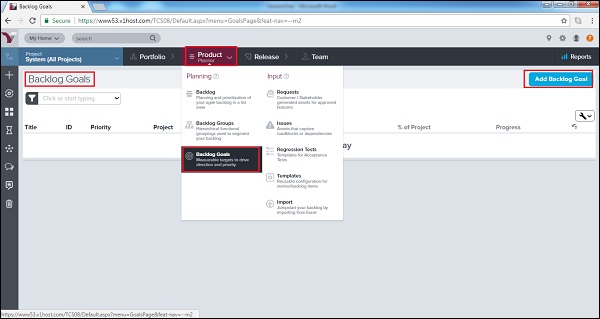
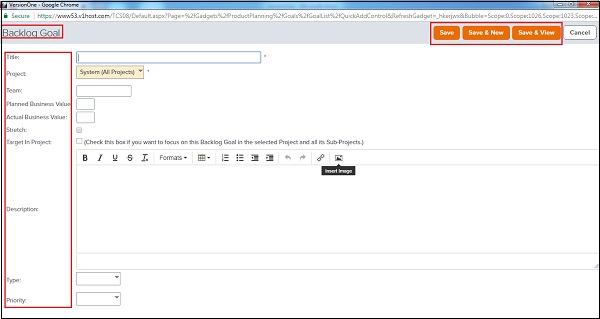
It opens a Backlog Goal form in new window.
A user enters the details as Title, Project, Team, Planned Business Value, Actual Business Value, Target in Project, Description, Type and Priority.
After that, click on the Save/Save & View/Save & New button as shown in the screenshot below. It saves the Backlog Goal. The goal can be viewed by a user at a later stage of the project to compare standard Vs actual.
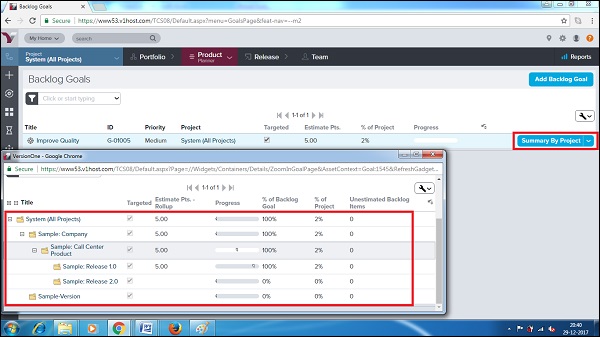
There is an option Summary by Project. When user clicks on this button, a new window opens and displays the progress of each project as % of Backlog Goal and % of Project.
The following screenshot displays the Summary by project −
VersionOne - Story
Story represents requirement, additional or change in existing functionality or new features. Stories are units of business values those can be estimated, tested and completed within a defined sprint.
Stories consist of mainly two aspects −
Acceptance criteria of the functionality to define acceptance tests.
All the tasks are required to be completed by the team to deliver the story.
Add a Story
In this section, we will learn how to add a story. Story can be added by the Product Owner. Usually a team member cannot add a story until he has special roles like that of an admin, product owner, team lead, etc. There are many ways to add a story. We will discuss the ways as options below.
After addition, a symbol in green color shows up. The symbol represents a Story.
Option 1
Go to the Product Planner → Backlog.
Click on the Add Backlog Item Inline button present at the top right.
It will quickly add a top row where a user needs to enter the detail and click on the Save button. It adds the story into backlog items as top row.
The following screenshot displays how to add a story inline −
Option 2
Go to Product Planner → Backlog
Click on arrow symbol of Add Backlog Item Inline button present at top right.
Click on Add Backlog Item option.
A new window opens along with different fields to enter details about story.
Once the details are entered, a user clicks on the Save/Save & View/Save & New button. It adds the story into the backlog items and appears based on applied sorting methods.
The following screenshot displays how to add a story detail −
The following screenshot displays the Story Details page −
Option 3
Click on the + icon at the sidebar menu. It opens the Add New options.
Click on the Backlog Item option as shown in the following screenshot.

A new window opens along with the different fields to enter the details about the story.
Once the details are entered, a user clicks on the Save/Save & View/Save & New button to add the story into the backlog item.
Access Story Details
After the addition of story, details can be accessed by any team member having the project access. In this section, we will discuss how to view all the details of the story.
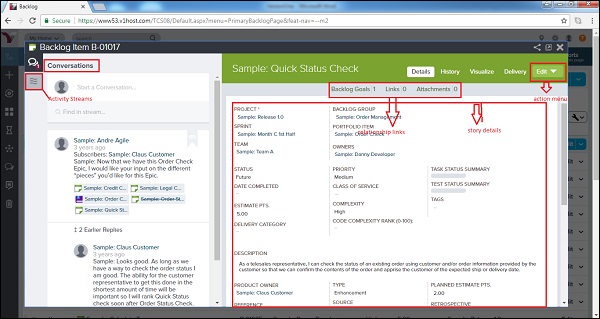
To view the story details, click on Title or ID anywhere it appears in VersionOne. It opens the story details in a new pop up window.
Conversations and Activity Stream are present at the left side of the page.
At the top right, the Action Menu is present.
Relationship Links are present at the top bar.
The main page consists of the story details.
The following screenshot shows the Story Details page −
From the Story Details page, the following high-level tasks can be performed using the tabs at the top right of the grid −
| If a user wants to... | Do this... |
|---|---|
| View or update story details | Click the Details tab. |
| View the change history for a story | Click the History tab. |
| View a graphical representation of the story's relationships to other workitems | Click the Visualize tab. |
| Edit story details | Click on the dropdown to select the Edit tab and later open the Story Edit window. A user can also open this dropdown menu to perform other actions (Plan Story, Add Task, Add Test, Generate Parent Epic, Copy, Sign Me Up, Block, Split, Quick Close, Close and Convert to Defect, Delete, and Watch Story). |
Following screenshot shows the tab of high level tasks −

Manage Story Details
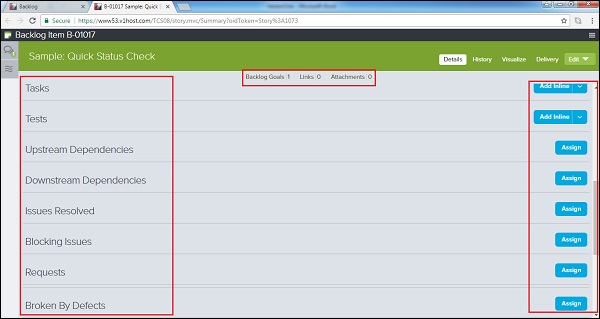
At the bottom of the Story Details page, a user can perform the following functions by clicking the Add or Assign buttons. To remove any items, a user can click Remove from the selected story.
| If a user wants to... | Do this... |
|---|---|
| Add a new task | Go to Tasks and click Add Inline. |
| Add a new test | Go to Tests and click Add Inline. |
| Assign upstream dependencies from available backlog | Go to Upstream Dependencies and click Assign. |
| Assign downstream dependencies from available backlog | Go to Downstream Dependencies and click Assign. |
| Identify (select) issue(s) have been resolved | Go to Issues Resolved and click Assign. |
| Select an existing issue to assign as a blocking issue | Go to Blocking Issues and click Assign. |
| Select existing Backlog items that are affected by the defect | Go to Breaks Workitems and click Assign. |
| Select an existing request | Go to Requests and click Assign. |
| Select an existing defect that breaks the selected story | Go to Broken By Defects and click Assign. |
| Designate the most current build(s) affected by the defect | Go to Last Affected Build Runs and click Assign. |
| Add a new link remote documentation | Go to Links and click Add.. |
| Add a new file attachement | Go to Attachments and click Add.. |
The following screenshot displays how to manage story details −
VersionOne - Edit Story
In this chapter, we will learn how to edit story in VersionOne. Editing a story consists of many actions. With the Edit Story feature, we can modify the details of the story, close it, delete it, add it into the watchlist, block it with issues or defects, convert into defect, etc. In this chapter, we will discuss how to go about editing story details, closing a story and deleting a story.
Edit Story Details
While editing the story details, a user can edit the details of the story including title, priority, estimation and dependencies. The only field that remains unmodified is the unique id of the story; it can never be changed or modified.
There are three ways to edit a story. The ways are described as options below −
Option 1
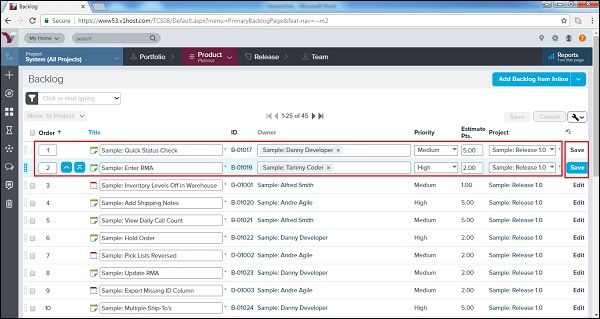
It is recommended to quickly edit title, story points, projects, priority, owner and order. Follow these steps in Option 1 for editing a story.
Go to the Product Planner → Backlog. It opens the backlog page.
Double-click on row to make the column editable. The column changes from view only to edit mode.
After editing, click on the Save button. It saves all the modified details of the corresponding row.
The following screenshot displays how to edit by taking up Option 1 −
Option 2
Follow these steps under Option 2 for editing a story.
Go to Product Planner → Backlog.
Click on the Edit button present corresponding to each row. It will open the story details in the Edit mode.
After editing, click on Save/Save & View. It saves all modified details of the corresponding story.
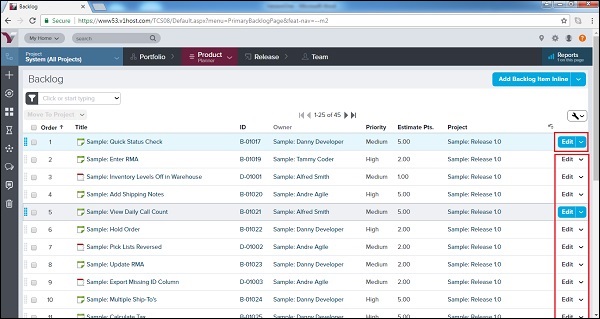
The following screenshot displays how to access the edit functionality −
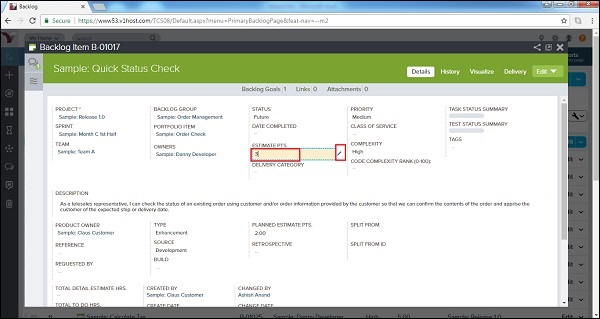
Option 3
Click on Story Title/ID to open the Story Details page.
Clicking on the Pencil icon next to the field makes the field editable.
Make the appropriate changes and then press Enter/Return on the keyboard. It saves the modified details of the respective field.
The following screenshot shows the edit functionality at the story detail page −
Close a Story
Once all tasks of a story complete, it can be closed to claim the work done in the sprint. A closed story can be re-opened later if required. In this section, we will discuss how to close a story.
Closing a story shows that all the work related to the story is complete.
Once a story is closed, a user can re-open it if additional changes are required in future.
Quick close updates the status of story and closes it in a single click.
There are many ways to close a story. We will discuss the ways as options below.
Option 1
Go to Product Planner → Backlog..
Click on the Edit dropdown present corresponding to each row.
Select Close or Quick Close as shown in the screenshot below:.
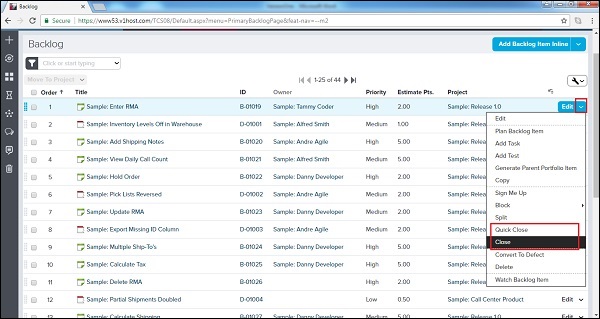
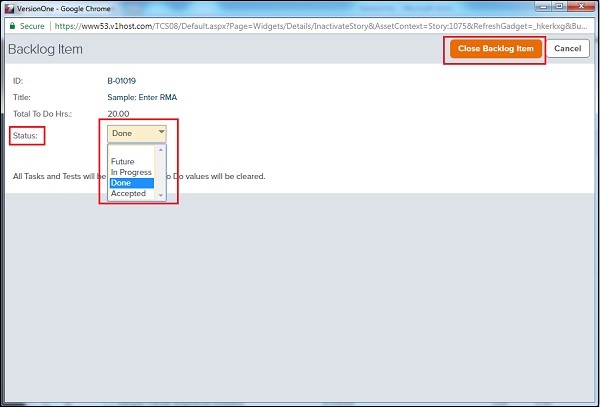
If a user selects Close, it opens an additional window. Here, select status and click on the Close Backlog Item button as shown in the screenshot below −
Option 2
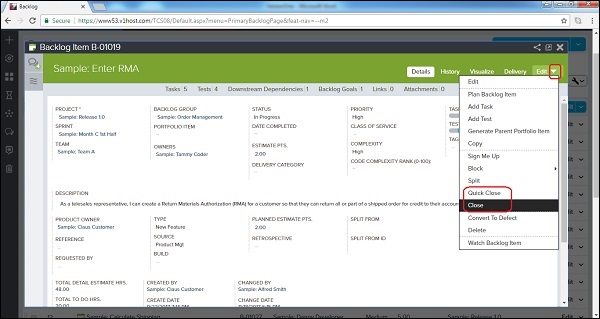
Click on Story Title/ID to open the Story Details page.
Click on the Edit dropdown. It displays all the available options.
Select Close or Quick Close as shown in the screenshot below.
If a user selects Close, it opens an additional window. Here, select a status and then click on the Close Backlog item. Upon selecting the Quick close option, it directly closes the story.
Delete a Story
A deleted story cannot be tracked and visualized later. Deletion usually happens if a story is not needed or if it is duplicate. In this section, we will discuss the deletion of a story.
If a story is created in error or duplicate, it should be deleted. For tracking the story, it must be closed instead of deleted.
Deleting a story hides all of its references.
If a story is deleted, the child items like link, attachments, task or test sets also get deleted.
Following are the steps to delete a story −
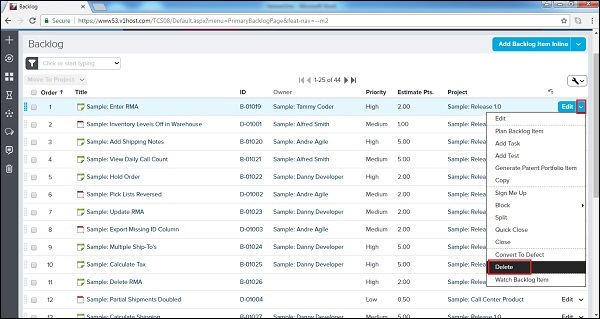
Go to Product Planner → Backlog..
Click on the Edit dropdown present corresponding to each row. It displays the available options to take action.
Select Delete as shown in the screenshot below −
It will open the read only detail of the story with Delete button. Click on the Delete button as shown below. As soon as the button is clicked, the story gets de-listed from the backlog item and all of its references will also be deleted.

Similar steps as performed above can be followed to delete the story from the Story Detail page.
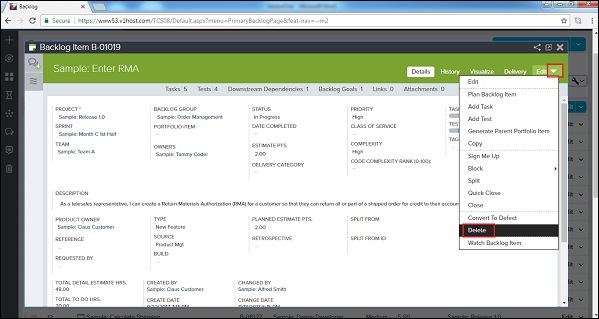
Click on the Story title/id to open the story detail page.
Click on the Edit dropdown and select Delete.
It will open the read only detail of the story with the Delete button. Click on the Delete button.
VersionOne - Defects
In STLC, a user can create defects to plan and track fixes. Defects are work items of the Backlog. Similar to stories/backlog items, a user can estimate points to defects that factor into the team's velocity. A user can break it into tasks and acceptance tests to allocate the work required to complete and deliver it.
Defects are flagged as red symbol to identify and differentiate from other backlog items.
Add a Defect
Defect can be added by all the team members having project access. There are many ways to log a defect into VersionOne. In this chapter, we will discuss how to add a defect.
Option 1
Go to Product Planner→ Backlog to open the backlog page.
Click on Add Backlog Item Inline dropdown present at top right. It displays all available options.
Click on Add Defect Inline option.
It will quickly add a top row where user needs to enter detail and click on Save button.
The following screenshot displays how to add a defect inline −
Option 2
Go to Product Planner → Backlog
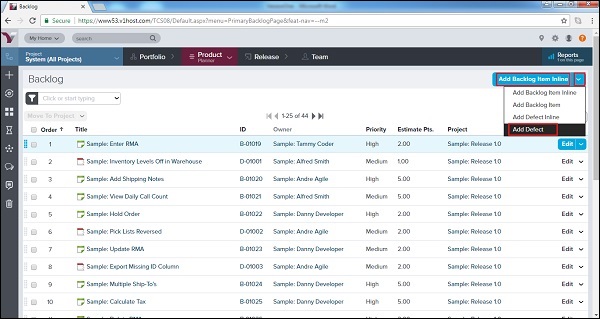
Click on the Add Backlog Item Inline dropdown present at the top right.
Click on the Add Defect option.
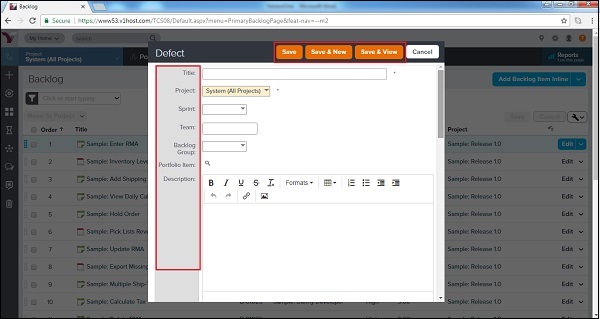
A new window opens along with the different fields to enter details about the defect.
Once the details are entered, a user clicks on the Save/Save & View/Save & New button.
The following screenshot displays how to add a defect −
The following screenshot displays the Defect Details page −
Option 3
Click on the + icon at the sidebar menu. It opens the Add New options.
Click on the Defect option as shown in the following screenshot −
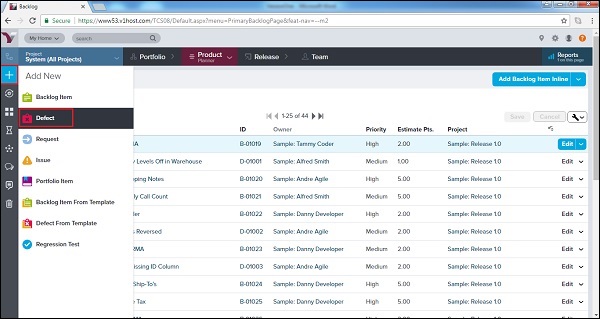
A new window opens along with the different fields to enter the details about the defect.
Once the details are entered, a user clicks on the Save/Save & View/Save & New button to save the defect
Access Defect Details
Once the defect is logged, a user can view the details. In this section, we will discuss how to view the details of a defect.
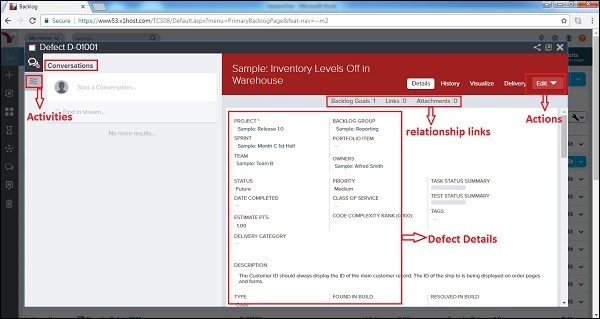
To view the defect details, click on Title or ID anywhere it appears in VersionOne. It opens the details of the defect in a pop-up window.
Conversations and Activity Stream are present at the left side of the page.
At the top right, the Action Menu is present.
The Relationship Links are present at the top bar.
The main page consists of the defect details.
The following screenshot shows the Defect Details page −
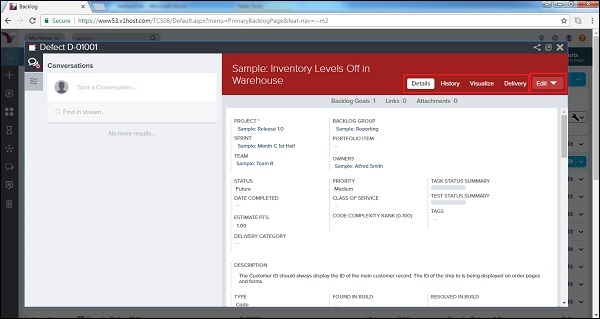
From the Defect Details page, the following high-level tasks can be performed using the tabs at the top right of the grid.
| If a user wants to... | Do this... |
|---|---|
| View all defect details | Click the Details tab. |
| View the change history for a story | Click the History tab. |
| View a graphical representation of the story's relationships to other workitems | Click the Visualize tab. |
| Edit defect details | Click the Dropdown arrow to select Edit tab to open the Defect Edit window. User can also open this dropdown menu to perform many other actions (Add Task, Add Test, Copy, Sign Me Up, Block, Split, Quick Close, Close, Delete and Watch Defect). |
Following screenshot shows the tab of high level tasks −
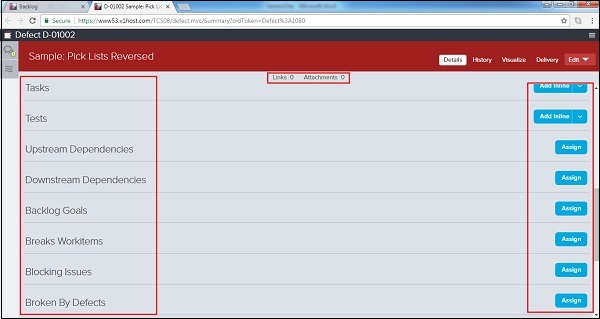
Manage Defect Details
At the bottom of the Defect Details page, a user can perform the following functions by clicking the Add or Assign buttons. To remove any item, a user can click Remove from the selected story.
| If a user wants to... | Do this... |
|---|---|
| Add a new task | Go to Tasks and click Add Inline. |
| Add a new test | Go to Tests and click Add Inline. |
| Assign upstream dependencies from available backlog | Go to Upstream Dependencies and clickAssign. |
| Assign downstream dependencies from available backlog | Go to Downstream Dependencies and click Assign. |
| Identify (select) issue(s) that have been resolved | Go to Issues Resolved and click Assign. |
| Select an existing issue to assign as a blocking issue | Go to Blocking Issues and click Assign. |
| Select existing backlog items that are affected by the defect | Go to Breaks Workitems and clickAssign. |
| Select an existing request | Go to Requests and click Assign. |
| Select an existing defect that breaks the selected story | Go to Broken By Defects and clickAssign. |
| Designate the most current build(s) affected by the defect | Go to Last Affected Build Runs and clickAssign. |
| Add a new link to remote documentation | Go to Links and click Add. |
| Add a new file attachment | Go to Attachments and click Add. |
The following screenshot displays how to manage story details −
VersionOne - Edit Defects
Editing a defect involves many actions. The different actions can be - modifying details of the defect, closing it, deleting it, add into the watch list, block it with issues or another defects, convert into story etc. In this chapter, we will discuss how to go about editing defect details, closing a defect and deleting a defect.
Edit Defect Details
While editing the defect details, a user can edit all the details of the defect including title, priority, estimation and dependencies. The only unmodified field is unique id of the defect, it can never change or modify.
There are three ways to edit a defect. The ways will be discussed as options below −
Option 1
The steps in this option are recommended to quickly edit the title, estimated points, projects, priority, owner and order.
Go to Product Planner → Backlog. It opens the backlog page.
Double-click on row to make the column editable. The column changes from the view only to edit mode.
After editing, click on Save. It saves all the modified details of the corresponding row.
The following screenshot displays how to edit the defect details −

Option 2
Go to Product Planner → Backlog
Click on the Edit button present corresponding to each row of the defect
It will open the defect details in the Edit mode.
After editing, click on Save/Save & View.
The following screenshot displays how to access the edit functionality −
Option 3
Click on Story Title/ID to open the Story Details page.
Click on the Pencil icon next to the field to enable editing. It makes the field editable.
Make the appropriate changes and then press Enter/Return on the keyboard. It saves the modified details of the respective field.
The following screenshot shows the edit functionality at the defect details page −
Close a Defect
Once all the tasks of a defect are completed, it can be closed to claim the work done in the sprint. A closed defect can be re-opened later if required. In this section, we will discuss how to close a defect.
Closing a defect tells that all the work related to it is completed and that the fixes are done.
Once a defect is closed, a user can re-open it if the same bug appears again.
Quick close update the status of defect and closes it in a single click.
There are many ways to close a defect. The ways will be discussed as options below.
Option 1
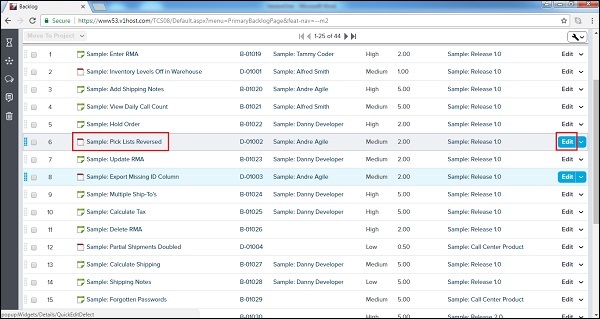
Go to Product Planner → Backlog.
Click on the Edit dropdown present corresponding to each row of the defect.
Select Close or Quick Close as shown in the screenshot below −
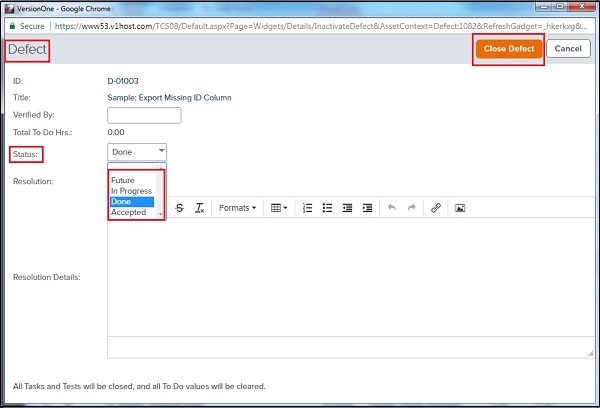
If a user selects Close, it opens an additional window. Here, select a status and click on Close Defect as shown below. If Quick Close is selected, it directly closes the defect without any additional input.
Option 2
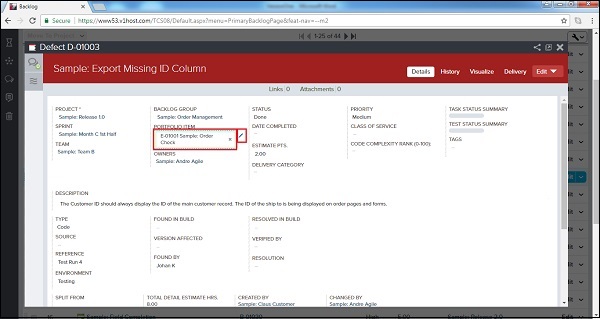
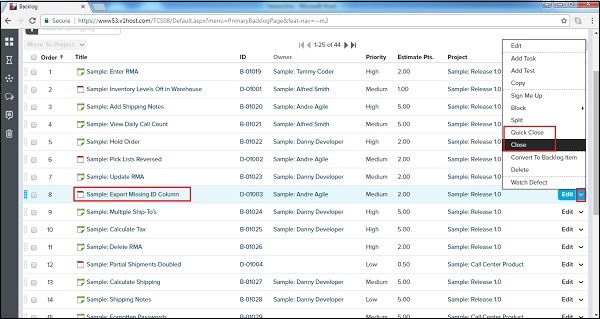
Click on the Defect Title/ID to open the Defect Details page.
Click on the Edit dropdown.
Select Close or Quick Close as shown in the screenshot below −
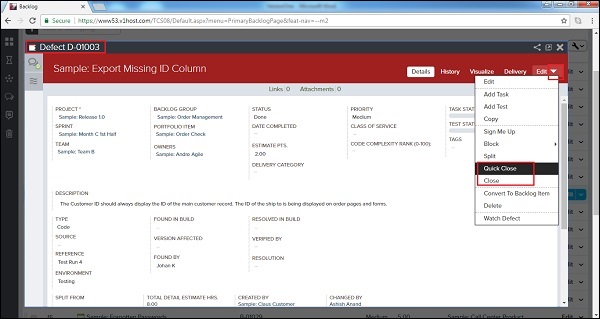
If a user selects Close, it opens an additional window. Here, select a status and click on Close Defect.
Delete a Defect
A deleted defect cannot be tracked and visualized later. Deletion usually happens if a defect is not needed or if it is duplicate. In this section, we will discuss the deletion of a defect.
If a defect is created in error or duplicate, then only it should be deleted. For tracking the defect, it must be closed instead of getting deleted.
Deleting a defect hides all of its references.
If a defect is deleted, all its child items such as link, attachments, task or test sets are also deleted.
Let us now see the different steps involved to delete a story −
Go to Product Planner → Backlog.
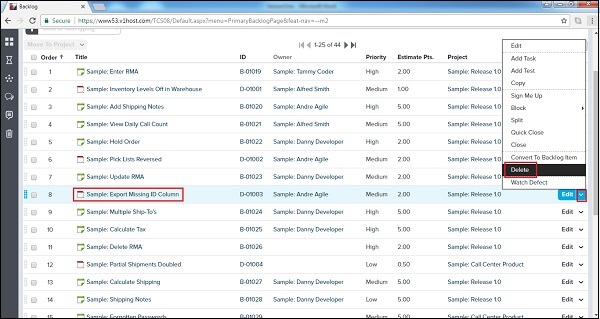
Click on the Edit dropdown present corresponding to each row. It displays all the available options to take action.
Select Delete as shown in the screenshot below −
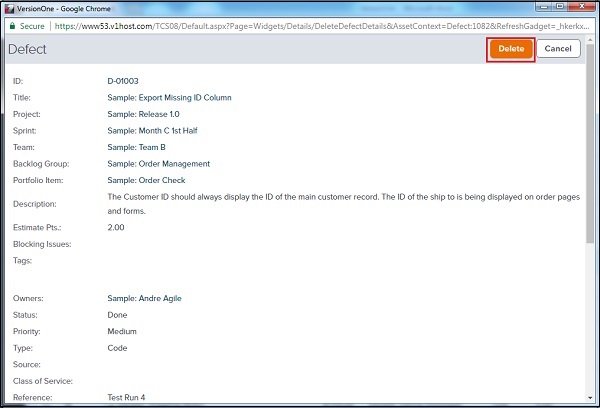
It will open the read only detail of the defect with the Delete button. Click on the Delete button as shown below −
Similar steps can be followed to delete the defect from the Defect Detail page −
Click on Defect title/id to open the defect detail page.
Click on the Edit dropdown and select Delete.
It will open the read only detail of the defect with the Delete button. Click on the Delete button to delete the record of defect.
VersionOne - Release Planner
Release Planning is an optional activity. In this planning, the development team schedules the work items to be delivered in a release, also called a project. As part of the effort, team estimates and prioritizes the backlog items and then breaks them down into a series of sprints/iterations.
In general, there are two types of release planning −
Tactical release planning is done at the backlog level. It schedules individual backlog items, defects or test sets for incorporation in a release.
Strategic release planning is done at the feature level. It schedules the entire portfolio items which automatically brings along the lower level backlog items. To drive strategic plans, a team can use factors such as business value, risk, team velocity, and cost (swag at the portfolio item level or Estimate at the backlog item level).
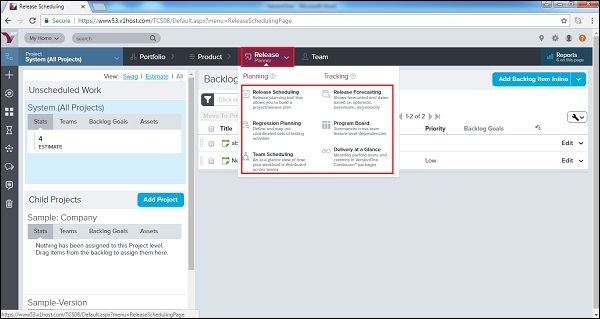
The Release Planner consists of Planning and Tracking activities. The planning activities group Release scheduling, Regression Planning and Team Scheduling while the tracking activities group Release Forecasting, Program Board and Delivery at a glance.
The Release Planner and its activities can be accessed by clicking on the Release Planner as shown in the screenshot below −
Release Scheduling
Release scheduling is part of Release Planning. In this scheduling, release is scheduled for the project. A project can have multiple releases and in this stage, all releases are scheduled like when a release will go live and when all the release related works will be completed.
The Lifecycle Release Scheduling feature is an optional release planning tool. It allows to build a release plan by scheduling stories/backlog items or portfolio items into releases.
Release schedules an end date of release as well.
To access Release Scheduling, from the main menu, select Release Planner → Release Scheduling.
The following screenshot displays the Release Scheduling page −
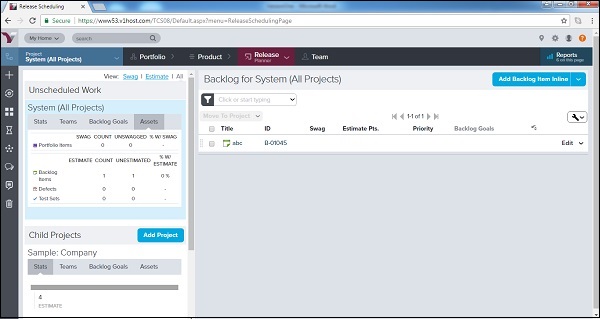
The items in the backlog grid on the left are "unscheduled". In other words, they have not been added to a project/release.
Note that once "scheduled", the work item is removed and no longer displays in the backlog grid on the right.
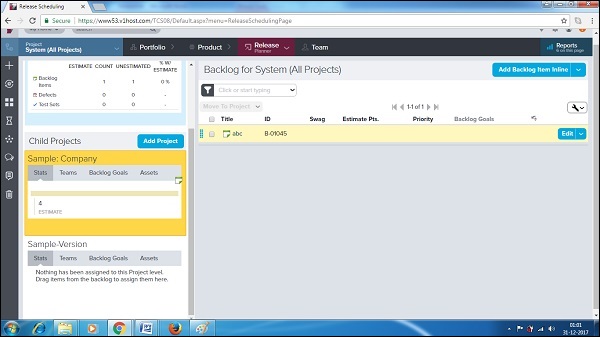
To add a backlog item into release, a user can drag and drop into Child Projects → <Release Name> at the left side as shown in the screenshot below −
Team Scheduling
Time Scheduling defines the timeline of the releases and completion as well as the start date of other backlog items. Timeline is the standard reference to re-distribute work items and resource allocation in the project.
Team Scheduling allows the user to allocate and view workload across assigned teams working on selected projects/releases.
In Agile, backlog is assigned to the team, not to individual team members.
Team Scheduling displays how workload is distributed across teams and the capability to redistribute the work based on needs.
The following screenshot displays the Team Scheduling page −
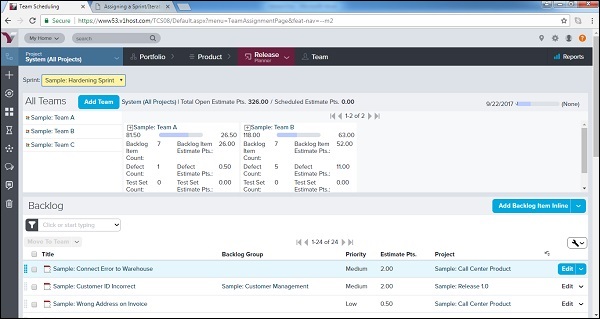
Note − The Team Scheduling feature is being deprecated in favor of new Iteration/Sprint Scheduling page.
Release Forecasting
Release Forecasting provides analyzed data based on the end dates. It also provides analyzed velocity of the team to achieve targets at various ends dates. It is basically forecasting of the entire project from high level to the granular level with respect to different target dates. Following are a few important features of Release Forecasting −
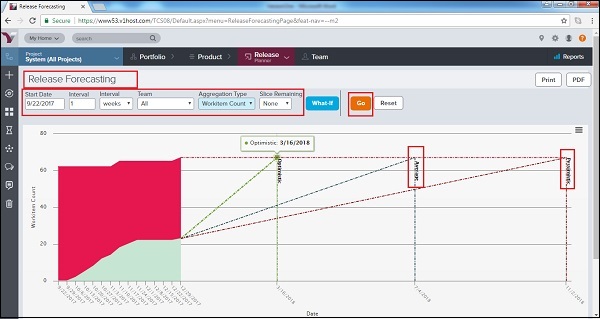
Release forecasting report simultaneously shows the forecasted end dates. This is based on optimistic, pessimistic and average velocity.
These velocity values are calculated from the visible historical data.
It also indicates the end date of the selected project; with this, a user can compare the forecasted dates to the planned end date.
In addition, a user can forecast the end dates based on total estimate or workitems count.
Release Forecasting can be accessed by navigating Release Planner → Release Forecasting.
After the selection of report fields, click on Go. It displays the forecasting report.
The following screenshot displays Release Forecasting −
VersionOne - Sprint Planning
Sprint Planning is also known as Iteration Planning. In this planning, agile team identifies the features to be worked on during a sprint. A planning meeting takes place at the beginning of every sprint. The team discusses the highest remaining prioritized backlog items and breaks them down into specific tasks and tests. Team also estimates the effort to complete them. Velocity and the teams past performance are used to determine the amount of work the team schedules into the sprint and commits to. Team members typically sign up for initial tasks during the meeting and later pick up additional tasks if time permits during the sprint.
Sprint Planning is based on three pillars −
Sprint Scheduling − In this phase, the team pulls the work that can be delivered from prioritize backlog.
Detail Planning − Workitem lists in the sprint with all the associated tasks and tests.
Member Planning − Current sprint work rolled up per member; it is the average capacity planning.
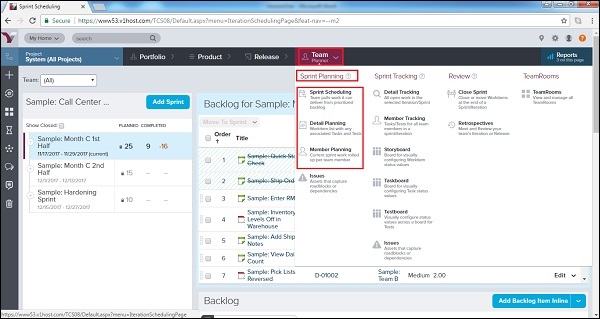
These can be accessed by navigating Team Planner → (Under Sprint Planning) Sprint Scheduling/Detail Planning/Member Planning as shown in the screenshot below −
VersionOne - Sprint Scheduling
The first step in the Iteration/Sprint planning process Iteration/Sprint Scheduling. In this step, the team selects the amount of work it can deliver from the prioritized backlog. The Team makes use of the historical velocity as a guide reference to commit the work. This helps the team determine how much to schedule in each sprint.
To access Sprint Scheduling, from the main menu, select Team Planner → Sprint Scheduling.
Add a Sprint
It is the job of a Project Owner or Scrum Master to add a sprint. Sprint is added well before the start date and it clearly mentions the start and end dates to achieve the committed goals. Follow these steps to add a sprint into the project −
Navigate to the Sprint Scheduling. It opens the Sprint Scheduling page.
Select the Project in Project Navigator. It selects the project where sprint has to add.
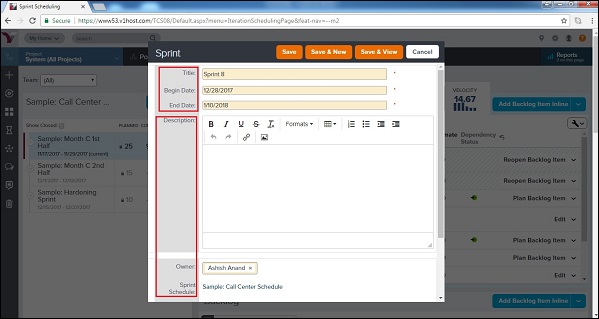
After that, click on the Add Sprint button present at the left side as shown in the screenshot below. It opens the Add Sprint form.

Enter the required and optional fields.
Required Fields − Title, Begin Date and End Date. The End Date should be a future date.
Optional Field − Description, Owner, Target Estimate Points, Change Comments.
After that, click on the Save button. It adds the new sprint into the project.
The following screenshot shows how to add sprint −
A user can start adding items into sprint by dragging from the right and dropping at the left.
View & Edit Sprint Details
From the Sprint Detail page, a user can view all the information associated with sprint and edit the information if required. While editing the sprint details, a user can edit all the details of the sprint including title, priority, date and description. Following are the important steps to view & edit the details −
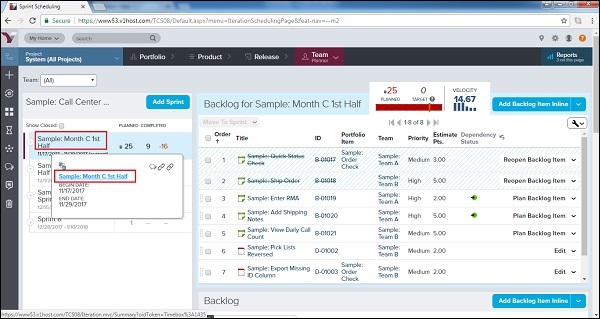
To access the Sprint Detail page, navigate to Sprint Scheduling and hover over on the Sprint Name at the left side.
It displays the sprint name and the limited details into additional pop-up. Click on the Sprint Name in the pop-up as shown in the screenshot below −
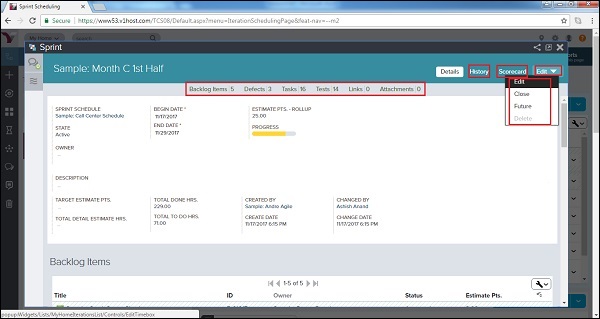
It displays the Sprint Details page. It has different links like Backlog, Defect, Tasks, Tests, Link and Attachment to view the respective details.
The Following functionalities can be used in the details page −
| If a user wants to... | Do this... |
|---|---|
| Access the Sprint Scorecard | Click the Scorecard tab. |
| View the sprint change history | Click the History tab. |
| Close the sprint | Select Close from the Edit dropdown button. |
| Change the state of the sprint to Future | Select Future from the Edit dropdown button. |
| Delete the sprint | Select Delete from the Edit dropdown button. If the Delete button is not available, it means that the sprint still contains items. |
The following screenshot displays the different functionalities of the Sprint Detail Page −
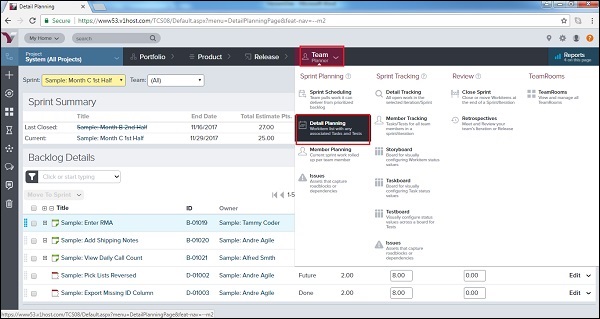
VersionOne - Detail Planning
In this chapter, we will see how Detail Planning works in VersionOne. The Detail Planning page helps display the list of all workitems in the current sprint. It also displays associated tasks and acceptance tests. The page makes it useful to identify, assign and estimate the activities those are required to complete the backlog scheduling in the sprint.
The Detail Planning Page can be accessed by navigating Team Planner → Detail Planning as shown in the screenshot below −
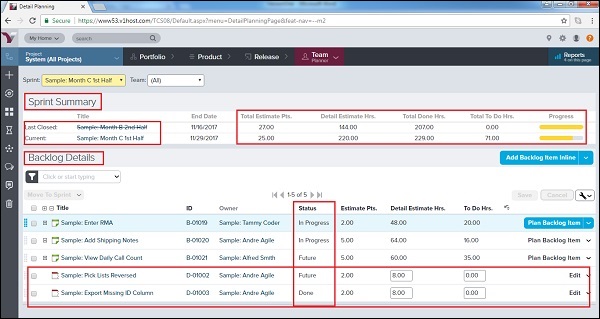
In the Sprint Summary section, a user can compare different values such as Total Estimate Pts, Detail Estimate Hrs, Total Done Hrs, Total To Do Hrs of the current sprint's contents with the last closed sprint.
In the Backlog Details section, a user can define Detailed Estimate and track progress directly at the backlog item or the defect level. A user can also create tasks or tests to further breakdown work for the team. The overall status can be seen by viewing the Status column of each item.
The following screenshot displays the Detail Planning page −
VersionOne - Issues
In VersionOne, we can track impediments slowing down or blocking the progress of workitems such as story, defect, portfolio item or test set with the use of the Issues Page. In many cases, the impediments are small issues belonging to BA, Dev or test team; document or requirement delays can also be considered as impediments. With a little bit of attention, most of the issues can be quickly resolved and the impact minimized. If issues are unresolved, it can have a huge impact on the team and there is high risk of not completing the committed task.
Access the Issue Page
In this section, we will discuss the various ways to access the Issue page. An Issue Page can be accessed by either of the following ways −
Product Planner → <Input> → Issues.
Team Planner → <Sprint Planning> → Issues.
Team Planner → <Sprint Tracking> → Issues.
The following screenshot displays issues page −
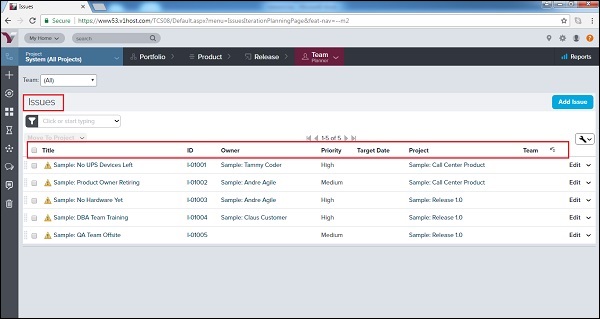
In this page, a user can view the summary of all issues like title, unique id, owner, priority, target date, projects and Team as shown in the above screenshot.
Add an Issue
All team members having project access can add issue and link with impacted backlog items. Issues can be logged not only related to backlog items but also process, delays in FSD or other documents, resource allocation and any other issue that is affecting the team to achieve their goal as a team. Issue also includes the Risk items. In this section, we will discuss how to add an issue.
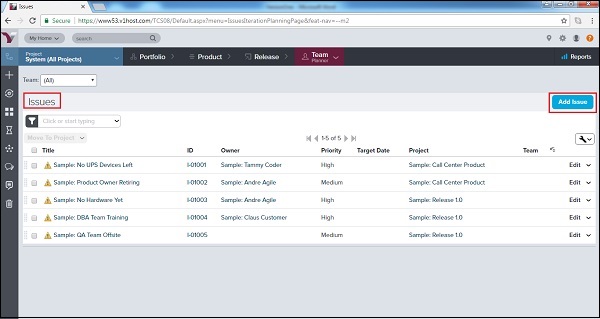
There are two ways to add issue −
Navigate to the Issue page and click on the Add Issue button present at the top right side as shown below −
Or,
Go to the side menu bar and click on the + icon. Select Issues options from the Add New field as shown below −
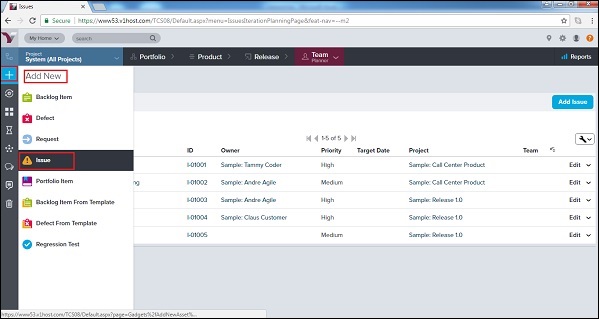
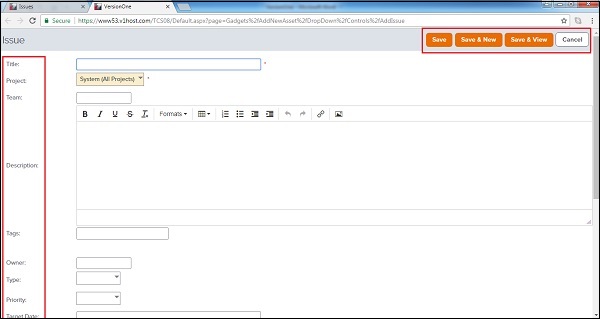
new window opens along with different fields to enter the details about issue.
Once the details are entered, a user clicks on Save/Save & View/Save & New button to save the issue into the project.
The following screenshot displays how to add an issue −
View Issue Details
All team members can view the details of the different issues. All issues have unique id and title. In this section we will discuss about issue details.
To view the issue details, click on Title or ID anywhere it appears in VersionOne.
Its unique ID starts with I and the yellow triangle that is an error symbol separates it from the story and the defect.
Conversations and Activity Stream are present at the left side of the page.
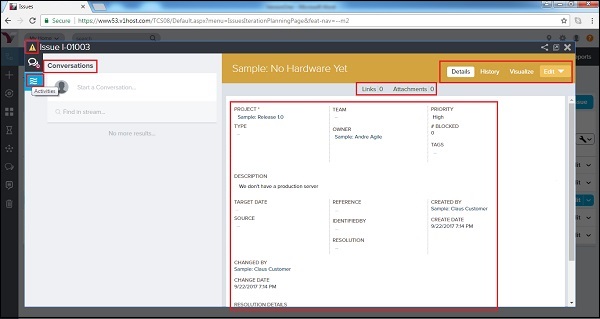
At the top right, the Action Menu is present.
Relationship Links are present at the top bar.
After that, the main page consists of the issue details.
The following screenshot shows the Issue Details page
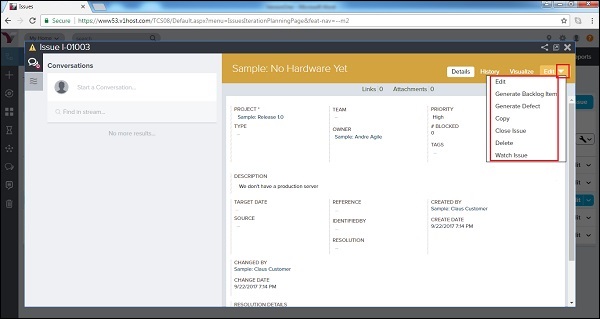
From the Issue Details page, following tasks can be done using the tabs at the top right of the grid −
| If a user wants to... | Do this... |
|---|---|
| View all issue details | Click the Details tab. |
| View the change history for a issue | Click the History tab. |
| View a graphical representation of the issue's relationships to other workitems | Click the Visualize tab. |
| Edit issue details | Click the Dropdown arrow to select the Edit tab to open the Issue Edit window. A user can also open this dropdown menu to perform many other actions (Generate Backlog Item, Generate Defect, Copy, Close Issue, Delete and Watch Issue). |
The following screenshot shows the tab of high level tasks −
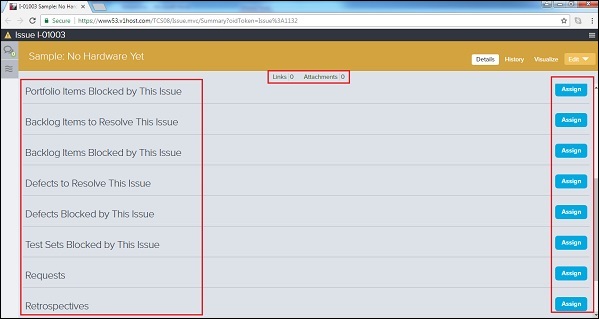
Manage Issue Details
At the bottom of the Issue Details page, a user can perform the following functions by clicking the Assign buttons. To remove any item, a user can click Remove from the selected field.
| If a user wants to... | Do this... |
|---|---|
| Assign the issue to a backlog item such as story, defects etc | Go to the Backlog Items Blocked by This Issue and click Assign. |
| Assign a defect to plan and track bug fixing work that was identified as a result of this issue. | Go to the Defects to Resolve This Issue and click Assign. |
| Assign a defect identified as blocked due to this issue. | Go to the Defects Blocked by This Issue and click Assign. |
| Assign a test set identified as blocked due to this issue. | Go to Test Sets Blocked by This Issue and click Assign. |
| Assign a request to this issue. | Go to Requests and click Assign. |
| Assign a retrospective to this issue. | Go to Retrospectives and click Assign. |
| Add a new link to remote documentation. | Go to Links and click Add. |
| Add a new file attachment | Go to Attachments and click Add. |
The following screenshot displays how to manage issue details −
VersionOne - Task
In this chapter, we will discuss what a task in VersionOne is. Tasks are related to the estimation in hours to achieve a backlog item. A backlog item can have any number of tasks to complete the item. It is a users responsibility to add all the tasks that need to be performed to complete the backlog item. All tasks should be added on day 1 of the sprint. However, tasks can be added and edited throughout the sprint if required.
Add Task
Task represents the work that is required to complete the backlog item. A user can add a task into backlog items such as story, defect, and test sets, etc.
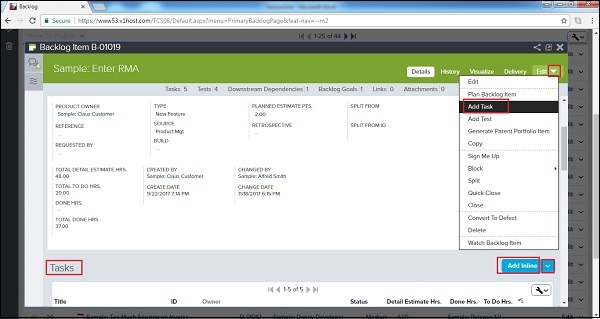
Follow these steps to add a task into backlog item −
Go to the backlog items by clicking on title, summary or unique id from anywhere in VersionOne.
It opens the backlog details page.
Now, click on Edit → Add Task at the right side.
Or,
Click on Show Relationship down the page. Go to the Task section, click on Add Inline or Add Task as shown in the screenshot below −
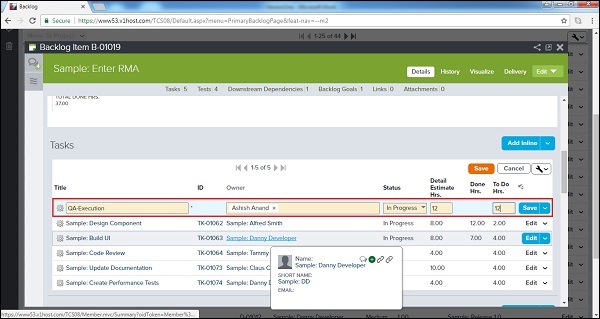
When a user selects Add Inline, it adds a row into task where a user enters Title, Owner, Status, Detail Estimated Hrs. and To Do Hrs.
After entering the details, click on the Save button as shown below −
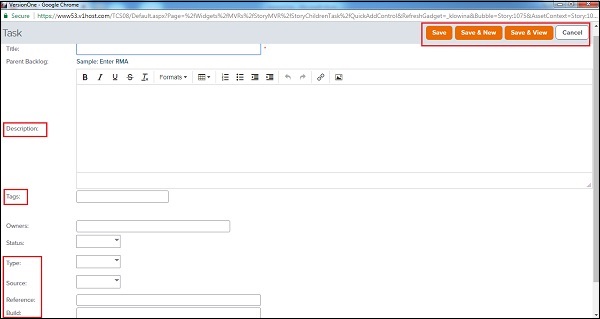
When a user selects Add Task, it opens a new window to add a task and ask to enter details. It has some additional details like Build, Description, Tag, Type, Source and References.
After entering the details, click on Save as shown in the screenshot below −
Burn Hours
Burn hours mean tracking the efforts put in for a task. For example, if a task has detailed estimated hours as 8hr and a user has spent 2 hours on a particular day for the same task, it is required to change the remaining hours for the task as 6hrs (8-2=6). With this, the hours automatically get updated to 2 hours.
Follow these steps to burn the hours −
Go to the task where a user has spent the time and click on the Edit link present against each row.
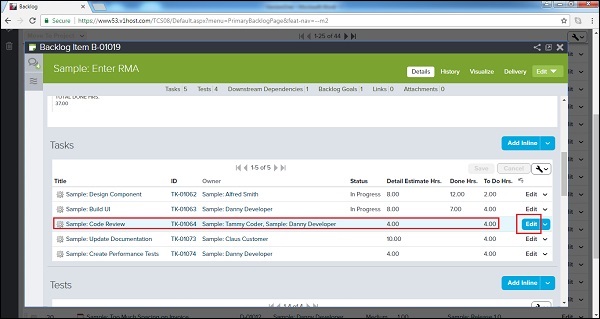
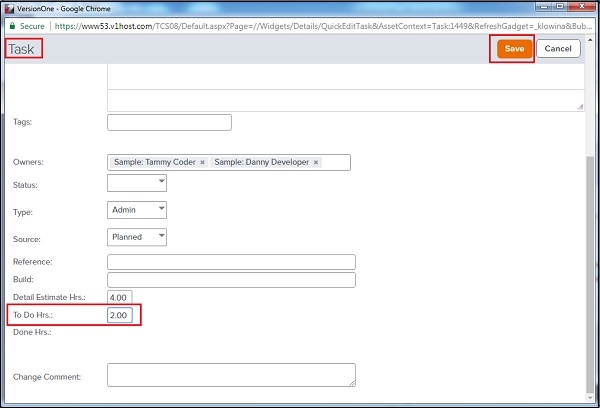
It opens the Task Details page in the edit mode. A user can edit the details of the task using this option.
Scroll down the page and find the To Do Hours field.
Replace the To Do hours with the remaining hours. (Detail Estimated Hrs Time Spent in this task).
After that click on the Save button as shown in the screenshot below −
Close/Quick Close a Task
Once all effort of a task is completed, it can be closed to claim the work done in the sprint as well as backlog item. A closed task can be re-opened later if require. In this section, we will discuss how to close a task.
Follow these steps to close a task −
Go to the Task and click on the Edit dropdown → Close Task or Quick Close Task option as shown below −

When a user selects Close Task, it opens a new window where a user enters the remaining To Do Hours usually as 0.00 and selects the status as Completed.
Now, click on the Close Task button as shown in the screenshot below −
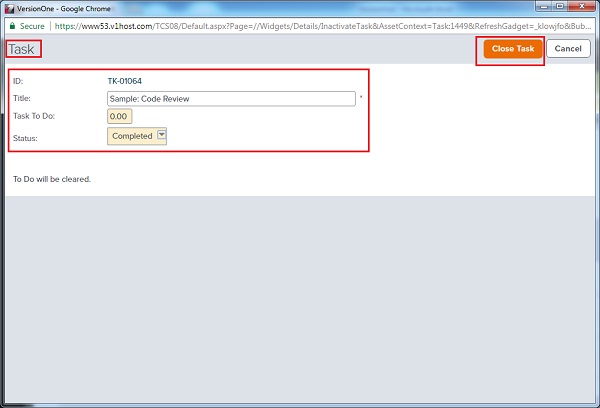
If a user selects the Quick Close option, it automatically changes the status as Completed and closes the task.
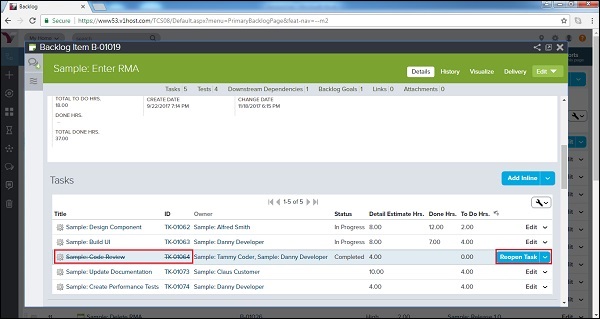
After getting closed, the task title and the id are struck out. The Edit button is replaced by the Reopen Task button as shown below −
VersionOne - Templates
VersionOne Templates allow creating and maintaining a grid-formatted repository. In this repository, it contains common, reusable stories/backlog items or defects. Using this grid, a user can −
Create and manage story templates.
Create and manage defect templates.
Assign common repetitive tasks and tests to existing backlog items.
Export templates to other projects.
Add a Template
Template helps to maintain uniformity throughout the project. It helps to write all the required and optional details at one place. Usually, the Project Leads or users in higher positions of the hierarchy can add a template. In this section, we will discuss about how to add a template −
Follow these steps to add a template −
Go to Product Planner → Templates as shown below. It opens the Template page.
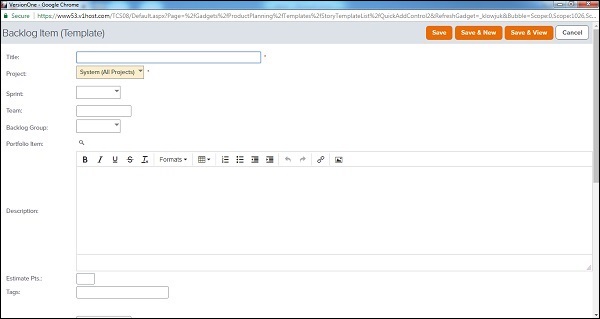
Click the Add Backlog Item Template or click the Add Defect Template. The Backlog Item (Template) or the Defect (Template) page opens.
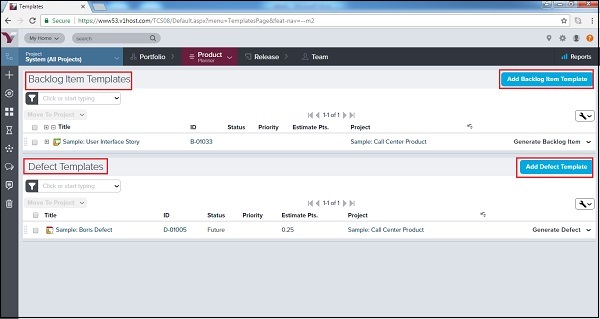
Enter the template information into the appropriate fields (the required fields are Title and Project).
In the Defect template, the Resolution and the Resolution Details are added.
Click on Save. The template gets added into the project.
Create a Story/Defect from Template
Once a template is created, user can add story/defect using the same. User can utilize template to add details. In this section, we will discuss how to create backlog item using the existing template.
Follow these steps to create a story/defect from the template −
Go to the Product Planners → Templates. It opens the template page.
To add a story, click on existing template from Backlog Item Templates. Or,
To add a defect, click on existing template from Defect Templates as shown below −
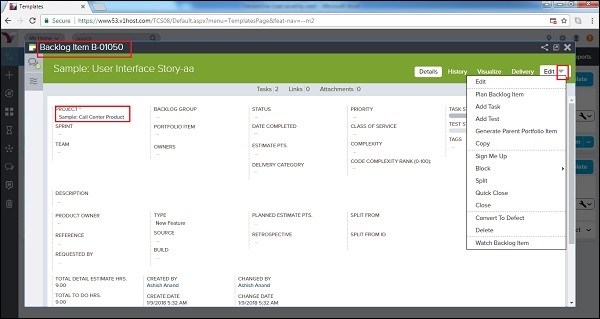
It displays the template details.
User can click on Edit and change the details if required.
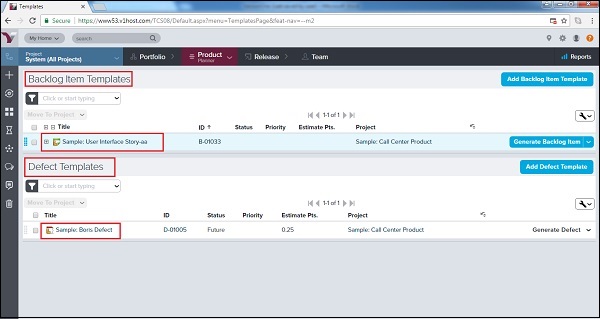
After editing click on Edit Dropdown → Generate Backlog Item to add a story.
It will add the story and move the story into project. Upon clicking Generate Backlog Item, a user can see a new Story ID.
Following screenshots display before generating a story from template −

Following screenshot displays after generating a story from template −
Similarly, a user can add a defect from the template.
Click on Edit to change details.
Now, click on Edit Dropdown → Generate Defect.
It provides a unique defect id and the defect moves to the project.
Move a Template to another Project
VersionOne provides unique feature to move an existing template to another project. One template can be used across all projects to maintain uniformity at the company level.
Follow these steps to move a template to another project −
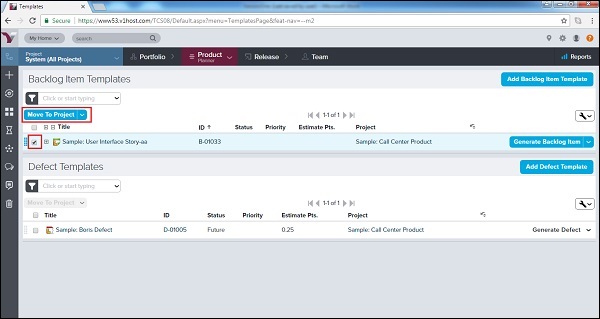
Go to Product Planner → Templates. It opens the Template page.
Check the checkbox of the template that needs to be moved.
After checking the checkbox, Click on the Move To Project button as shown below −
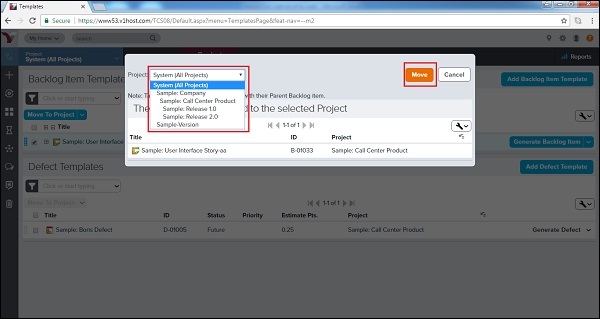
A pop-up window appears wherein, a user selects the project to move the template. Now, click on the Move button as shown below. It will move the current template to another project.
VersionOne - Import Data
VersionOne supports to import data to create stories, defects and other data from excel. Consider the following to import the data from excel.
Rules for Excel file.
Import the excel file into system.
Additionally, VersionOne provides a template to import data. A user can download the template to utilize.
Download Import Template
VersionOne provides sample template to import. It is a combination of required and optional fields. A user can enter the details based on the requirement. In the following section, we will discuss how to download the sample template.
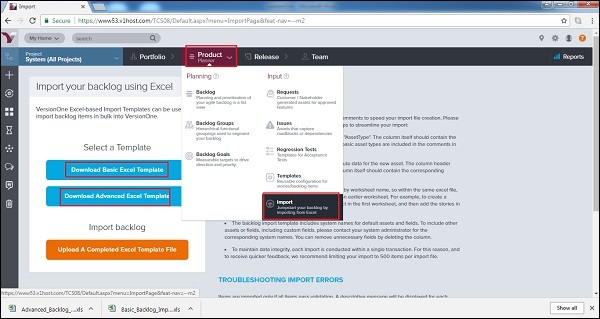
Select Product Planner → Import. It opens the Import page.
Click on the Download Basic Excel Template to download basic template. It is used to import the backlog items such as stories, defects, tests, tasks, etc.
Click on the Download Advanced Excel Template to download advanced template. It is used to import more complex system assets, such as projects, iteration schedules, change sets, requests, etc.
Following screenshot displays how to download template −
A basic Excel template looks like the following −
| AssetType | Name | Scope | Description | Estimate | Priority |
|---|---|---|---|---|---|
An advanced Excel Template looks like the following −

Rules for Excel File
Every template has some basic rules/checkpoints to be considered before importing the data. If these checkpoints fail, data will not be imported and error message displays. In this section, we will discuss the excel rules −
Consider the following points while creating an excel file −
The header of the first column should always be "AssetType". The column should have the system name for the asset type. The system names for basic asset types are included in the comments in the templates. For example, for story it should be Story, Defect for each Defect and Issue for each issue, etc.
The attribute data for the new backlog item should go to the remaining columns. The column header should be the name of the attributes. The column should contain the corresponding attribute value for that asset.
Worksheets are imported into alphabetical order of worksheet name. In the same excel file, a user can reference a work item that was created in an earlier worksheet. For example, to create a project and stories within the project, first add the project in the first worksheet and then add the stories in the new project in a second worksheet.
The backlog import template includes system names for default assets and fields. To include other assets or fields, including custom fields, please contact system administrator for the corresponding system names. User can remove unnecessary fields by deleting the column.
To maintain data integrity, each Import is conducted within a single transaction. For this reason import is limiting to 500 items per import file.
In the advanced template, there are 7 worksheets to upload 7 different items in single transaction. The Epics, Stories, Tasks, Tests, Defects, Requests and Issues form the order of the worksheet.
Import Excel File
Data can be imported into VersionOne using excel file. A user must check the checkpoints of the excel sheet before importing it. If the imports are successful, a user will get success message along with the imported count otherwise an error message displays. For partial successful import, both success and error message get displayed. In this section, we will discuss how to import the excel file.
Follow these steps to import the excel file −
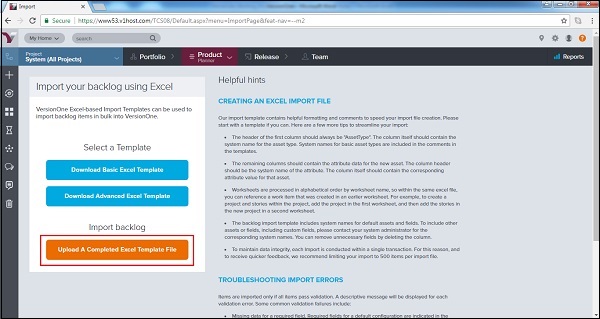
Go to Product Planner → Import and click on Upload A Completed Excel Template File as shown in the screenshot below −
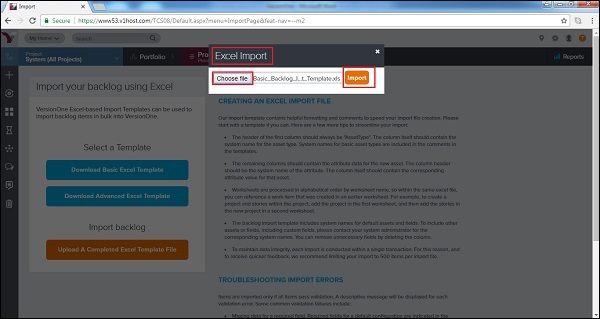
An Excel Import pop-up appears wherein, a user browses the file and uploads. Now, click on the Import button as shown below −
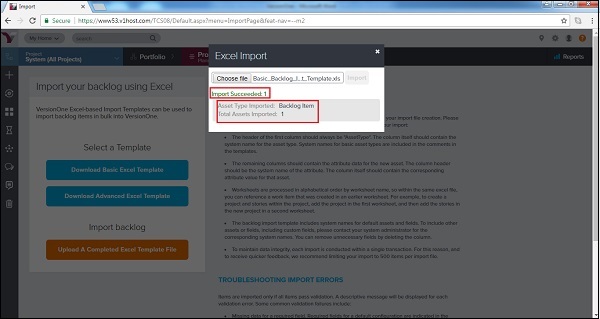
Once the import is done, a successful message displays or an error displays if there is any data issue.
It also displays the type of asset imported and the total number of assets imported.
The following screenshot shows a success message −
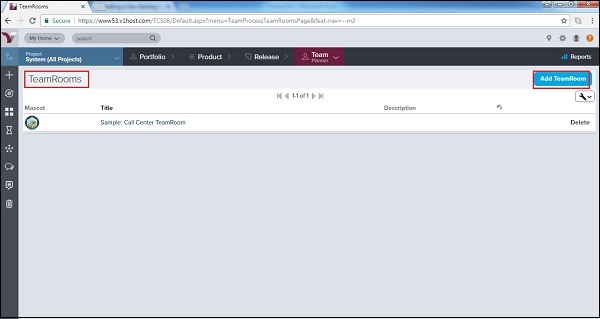
VersionOne - Team Rooms
TeamRooms is the place where a user can track and view the progress at the project level as well as sprint level. In TeamRoom, day to day progress can be tracked at the individual level.
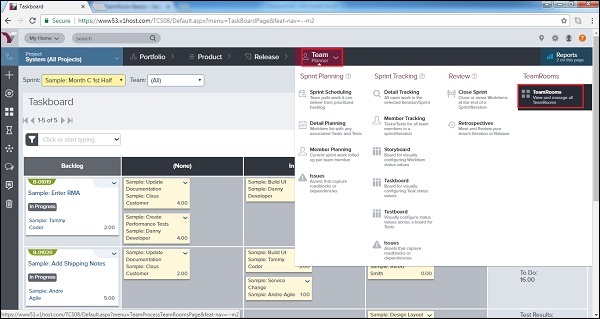
To access the team Rooms, go to Team Planner → TeamRooms as shown in the screenshot below −
It opens the TeamRooms created for different project/release. A user can click any of these to see the corresponding details.
Add a Team Room
Usually, a scrum master adds the TeamRoom. Let us now see the steps to add a TeamRoom.
Navigate to Team Planner → Team Rooms. It displays the Team Rooms page with all the available rooms.
To add a Team Room, click on the Add TeamRoom button present at the top right.
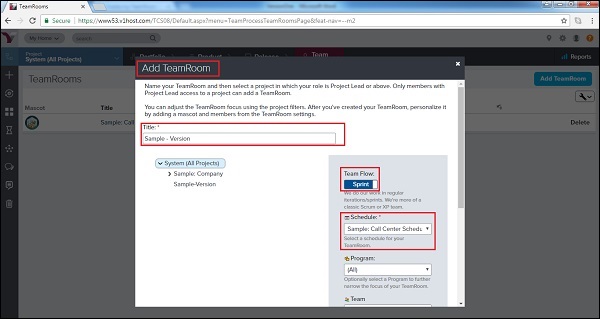
It opens the Add TeamRoom window, where a user can enter title, select Team Flow and schedule.
Now, click on the Save button present at the bottom of the page.
Note − Users having Team Lead or above roles can only add a TeamRoom.
The following screenshot displays how to add a TeamRoom −
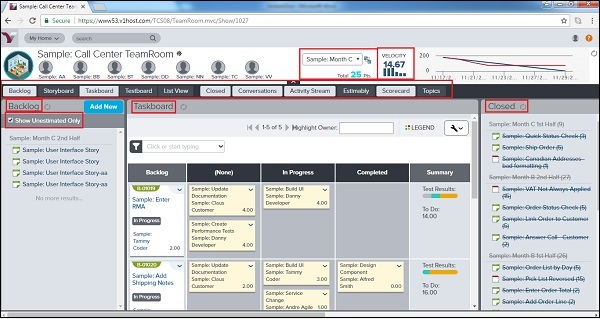
TeamRoom Panels
TeamRoom consists of many important details. In this section, we will discuss the details displaying into TeamRoom.
To view the TeamRoom detail, go to Team Planner → Team Rooms and click one of the available rooms.
By Default, Backlog is selected. Otherwise, click on backlog to display the backlog items in the left side.
Click on the additional panel tab to display the items as explained below −
| Sr.No | Panel & Description |
|---|---|
| 1 | Backlog
|
| 2 | Storyboard
|
| 3 | Taskboard
|
| 4 | Testboard
|
| 5 | List View
|
| 6 | Closed
|
| 7 | Conversations
|
| 8 | Activity Stream
|
| 9 | Estimably
|
| 10 | Scorecard
|
| 11 | Topics
|
The following screenshot displays the TeamRooms overview −
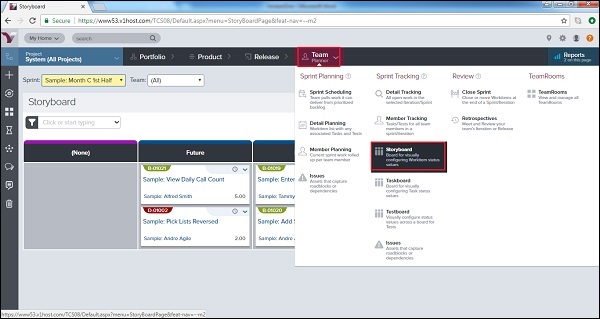
VersionOne - Storyboard
Storyboard displays the committed stories in the sprint. It displays the stories as card under different status categories. The Agile team uses the storyboard to track the progress of each story from the day 1 of the sprint to the completion of stories and acceptance by the product owner. Storyboards progress is highly visible and team members can identify easily the newly added stories in the sprint and what progress is done in the product development lifecycle.
To access the Storyboard, go to Team Planner → (Sprint Tracking)→ Storyboard as shown below −
View/Update Story Details
A user can view/edit all details of the story including title, priority, estimation and dependencies. The only unmodified field is the unique id of the story, it can never change or get modified. It is similar to the backlog section.
Follow these steps to update story details at Storyboard −
Go to Team Planner → Storyboard. It displays the Storyboard page.
The Storyboard page opens. Here, a user can see different categories as status and stories are placed under different status.
The following screenshot displays the storyboard details −
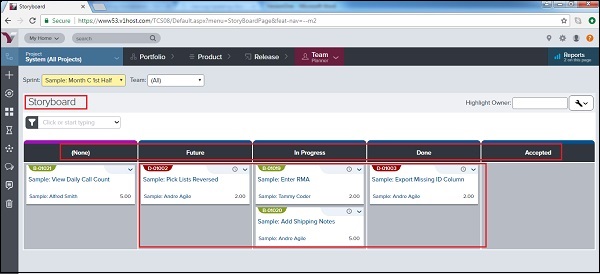
To view the basic details, hover over the title or ID. It displays the basic details of the story like title, id, description and estimation.
To see the full story details, click on the story title or ID.
Click the dropdown and select the Edit button, and then modify the story details.
The following screenshot displays the story details and options −
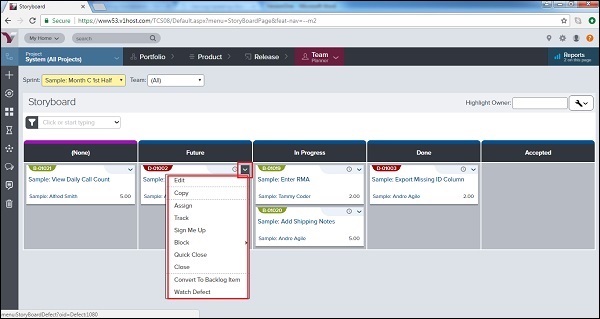
Along with edit, a user can copy, assign, close and rack the story using different options in the dropdown.
Update Story Status
The story status displays the current stage of story. Storyboard is categorized into various statuses to provide the current stage of the story. The status can be customized by the admin. In this section, we will discuss how to update the story status −
The status columns in the storyboard are as follows None, Future, In Progress, Done, Accepted.
To update the status of a story from storyboard, go to Team Planner → Storyboard.
Drag and Drop each story horizontally to a status column to update it.
A user can update the status of a story at the other board as well.
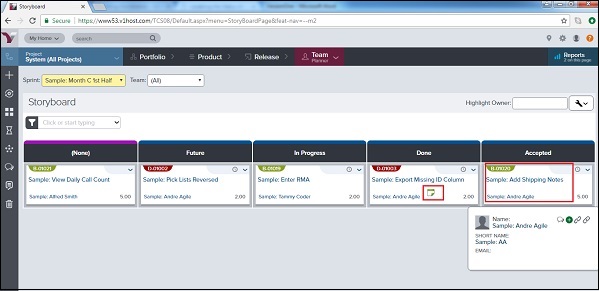
VersionOne - Testboard
Testboard displays the list of acceptance tests for each backlog item and/or defect. It displays the current status of test as well; whether passed, failed or none. It is useful to view the status of each test to track the progress of individual tests during the testing cycle.
To access Testboard, from the main menu, select Team Planner → Testboard as shown below −
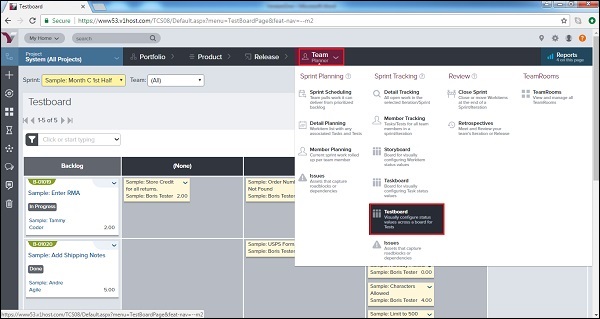
A user can select the Sprint from the top left side to see the details of the respective sprint.
Test Cards appear in different status columns on the board (for example, None, Passed and Failed).
It shows the test title, owner, and total work estimate.
Test cards are color-coded by test type (i.e., Method, Type, Manual, Automated) to give a look at the testing across project work functions.
Click the Legend button at the top right of the board to see the color representation and/or to customize the color-coding scheme by the test type.
The following screenshot displays the Testboard view −
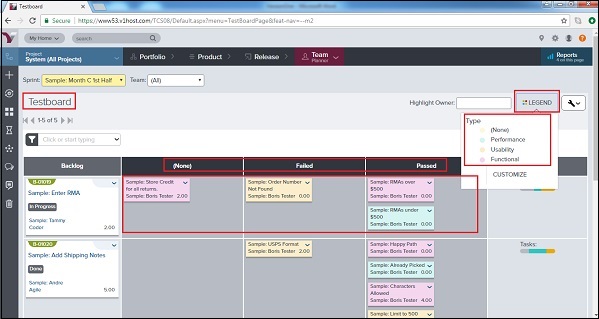
Update Test Status
In this section, we will discuss how to update test status.
The Testboard has the following status columns None, Passed and Failed.
To update the status of a test from Testboard, go to Team Planner → Testboard.
Drag and Drop each test horizontally to a status column to update it.
Following screenshot displays how to update status −
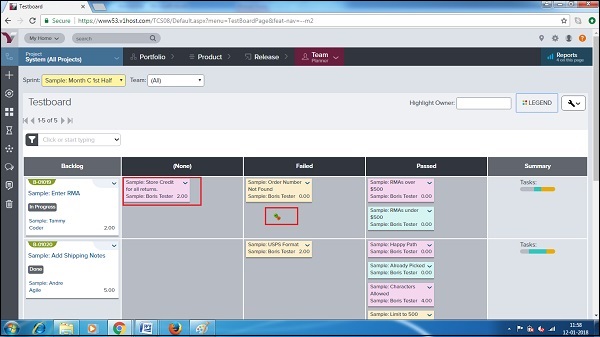
Reports on Testboard
Reports on Testboard are data displayed in trend/charts to analyze the continuous progress. There are usually four types of reports available on Testboard.
A user can access these reports by navigating to Testboard and clicking on Reports → Name of Report present at top right as shown in the screenshot below −
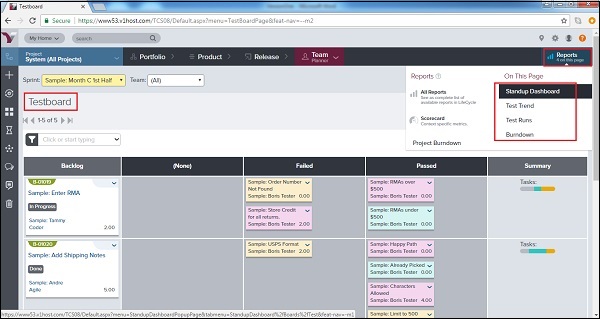
Standup Dashboard Report − It displays a high-level view of team progress through its sprint workload. The dashboard displays continuous graph of the remaining work To Do and the cumulative flow by status where date is x-axis. It also displays the current view of the Testboard. The following screenshot displays the Standup Dashboard Report −
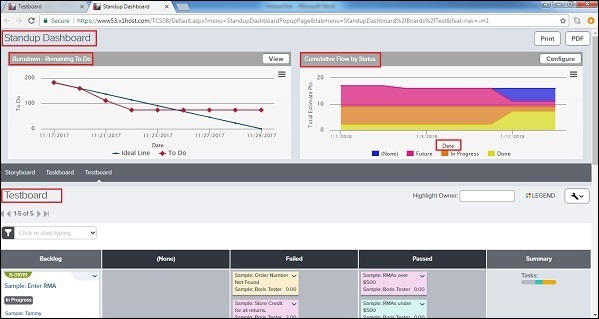
Test Trend Report − It displays the bar graph to show how the status of the tests has changed over a period of time. It displays color-coded bars; this indicates the number of tests in specific status (not yet run, passed, failed, etc.) at specific milestone dates. The following screenshot displays the Test Trend report −
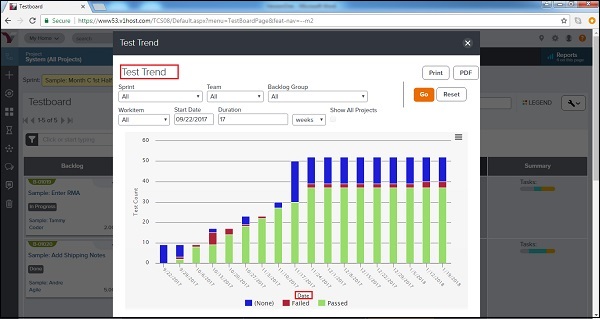
Test Runs Report − It displays the bar graph showing project-level test results from an external testing system by test status (for example, not yet run, passed, failed).
Burndown Report − It displays the progress of a team through its sprint workload. It displays the amount of work done and remaining to be done (To Do) versus the expected (ideal) schedule.
VersionOne - Taskboard
Task board represents the different tasks available in the sprint and grouped by backlog item and/or defect. Each task is associated or categorized by task status. Taskboard is used during the team's daily meeting to get a quick progress of the overall work within the team's sprint. A user can track the progress by moving tasks to a different status.
To access Taskboard, from the main menu, select Team Planner → Taskboard.
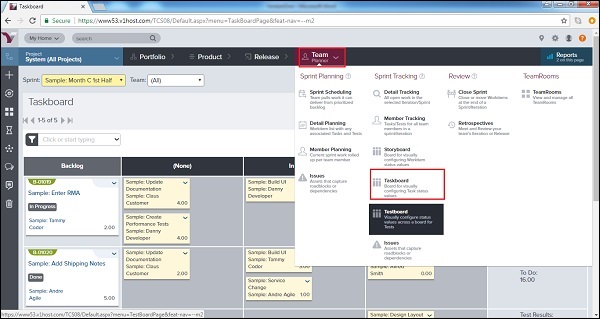
On the Taskboard, Tasks are displayed in different status columns (for example, None, In Progress, Completed).
Task card displays the task title, owner and total work estimate.
Task cards are color-coded by type (i.e., Design, Code, Admin) to provide an at-a-glance look at the balance of work across project work functions.
Click the Legend button at the top right of the board to see the color representation and to customize the color-coding scheme by task type.
The following screenshot displays the Taskboard −
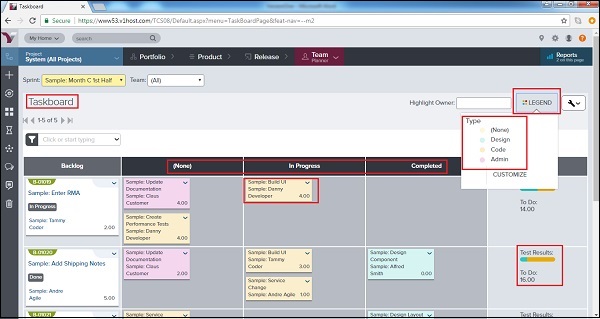
Track/Update a Task
A task can be updated from the Taskboard. A user can track and later update efforts spent for the task. A user can update the overall status of the task as well. Consider the following points related to the updation of a task.
When a user hovers over Task title, it displays a detailed description of the task. To update a task, open the dropdown menu in the top right corner of the card.
Select the appropriate action (edit, assign an owner, assign yourself, track the effort and To Do for the task, close, or watch the task) as shown below −
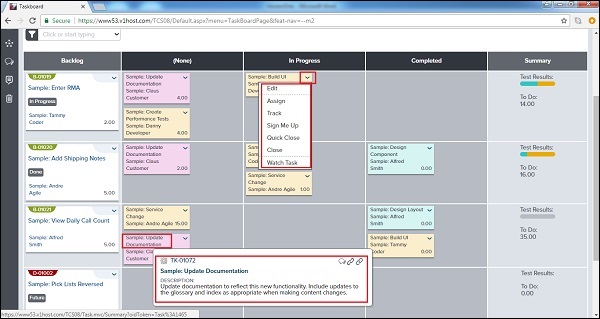
To change a task status, click and drag the Task Card to the appropriate status column in that row.
As work progresses, enter Effort and update the remaining To Do hours for each task via the Edit function on the Task Card dropdown menu. Now, click on Save as shown in the screenshot below −
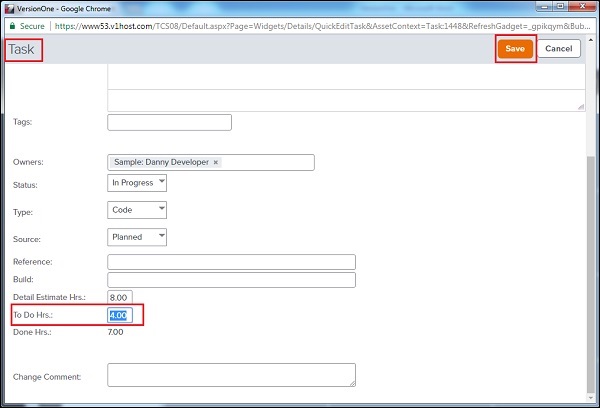
VersionOne - Filters
Filters are used to narrow down or expand the lists of items displayed in a page. It helps to focus on items that are important.
Filter is available on each page and section at the left side as shown in the screenshot below −
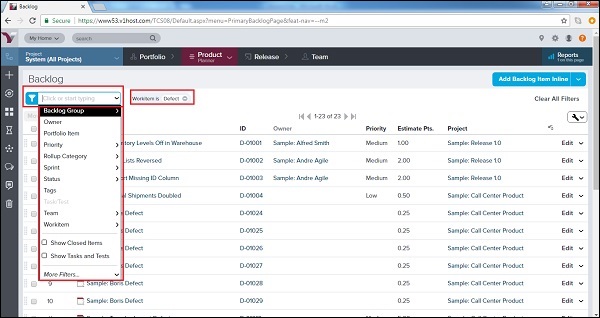
Filter Specifications
Filters come with a wide range of options and features. A user can make use of the filters according to his requirements. Consider the following are few important features of filters −
Select multiple filters at a time.
Add multiple values for each field.
Filter by more than one Owner, Team or Priority.
Filter checkboxes, dates and numbers.
Use LESS THAN and GREATER THAN.
Use BEFORE and AFTER, in addition to IS.
Press the Enter key while typing in the Find supported filter field.
Use the CTRL+SHIFT+F keyboard shortcut to invoke the filter options.
How to Use Filter
The use of filters helps to get the desired data on the page and trim off the unwanted data from the user perspective. Following steps display how a user can utilize the filter functionality −
Click on Filter dropdown that displays the all available option.
A user can select any of the option at a time.
If sub-options are available, a user can select those as well. For example, Status → Future, In Progress, Done, Accepted.
Priority → Unassigned, Low, Medium, High; Similarly, Team, Workitem, Rollup Category, Sprint, etc.
After selection, click on Apply (if sub-option is present), otherwise filter will be applied directly as soon as selected from dropdown as shown below −
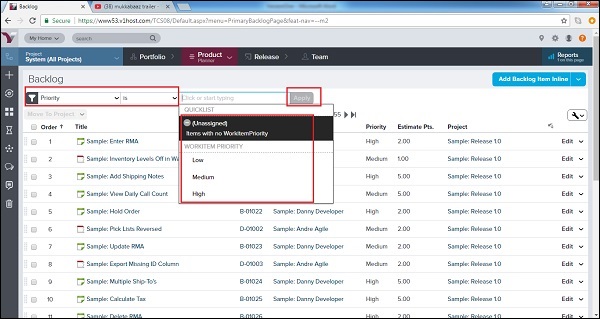
After selection, a user can see the selected filters at the right side of the filter as shown below −
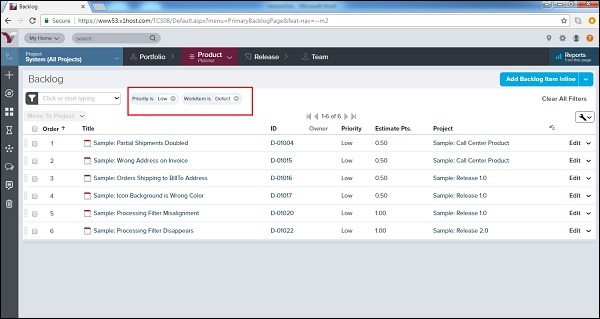
Clear Filter
After the application, a filter needs to be cleared as well. Next time, this makes it easy for the next user to fetch the details. In general terms, clear filter allows to display all details at the page.
To clear a single filter −
Click on the - symbol next to the name of the filter.
To remove the applied filters, restore the default settings −
Click Clear All Filters in the top right corner of the page.
The following screenshot displays how to clear the filters −
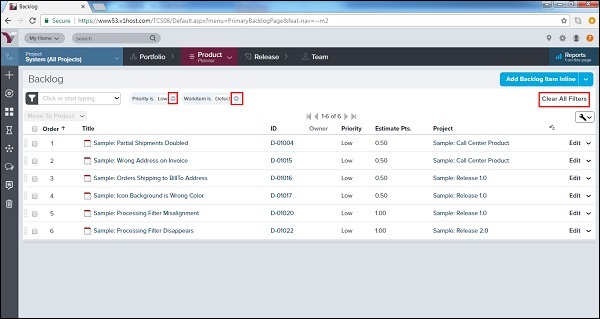
VersionOne - Search
VersionOne supports the search functionality, it helps to find specific details within VersionOne as well as narrow down the displayed details.
Search functionality is categorized into two −
Quick Search − Search for open workitems, Conversations and Community Topics.
Advanced Search − If a user wants to search Closed or Deleted Workitems, use Advanced Search.
Quick Search
Quick search is simply a wild card search where VersionOne tries to get all records that fulfil the text match. Follow these steps for quick search −
Quick Search is located at utility bar, on the top of every page.
It searches open workitems, conversations and community topics.
A user can type 3 characters or ID into the search text box. If a user pauses after typing 3 characters, a preview of matching Open workitems displays. If a user keeps typing, the matching results become more refined.
The following screenshot displays how to use quick search −
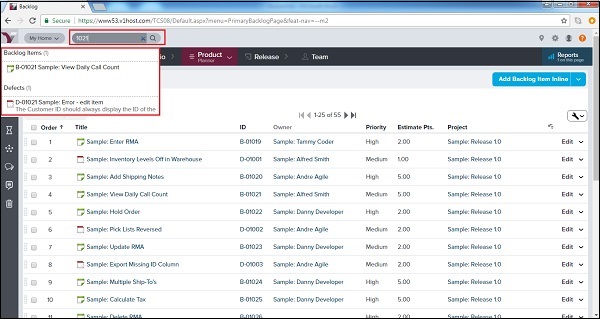
Advance Search
VersionOne supports the advance search functionality. It helps to provide specific data that a user wants to search. Follow these steps for advance search −
In advance search, a user can search specific asset type, closed and deleted workitems as well.
To open the Advanced Search page, click on Quick Search box and then press ENTER/RETURN key.
Alternatively, a user can click on the Search icon present after the search text box as shown below −
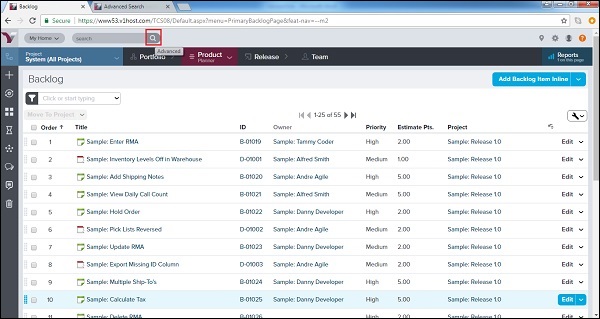
The Advanced Search page opens in a new window. A user can type a word that is to be searched and click on Search.
Additionally, before/after clicking search, a user can narrow down the search further by selecting the Open/Closed/Delete checkboxes. Following screenshot displays how to do advance search −
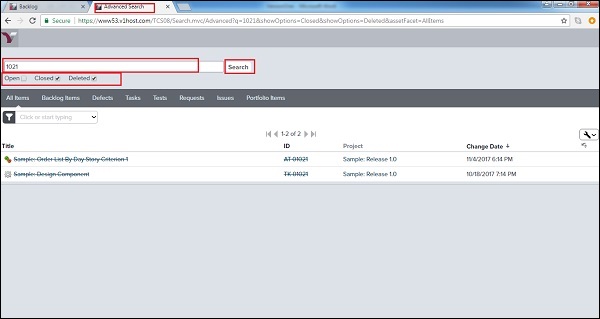
Additional Options
In this section, we will discuss the additional options to search data.
Change the sort order − Click on a column header to change the sort order. By default, the search results are sorted by the items most recently changed.
View results by asset type − Click on a tab to filter the list by asset type.
View item details − Click on an item to open the details page.
VersionOne - Conversation
Conversation is one of the important features of VersionOne. It connects all members, stakeholders and others to actively participate and collaborate.
Access and Participate
In this section, we will discuss how to access and participate in a conversation.
Conversation occurs at the left side of each backlog item and defect.
It appears in the Team Room and the Planning Room.
Conversation can be accessed through the Collaboration tab as well.
For starting and replying in a conversation, a user can enter the message in the left side of the conversation box.
To mention the team members in a conversation, type the first 3 characters of the name, it displays all the matched names.
Select the name. A user can select multiple team members one by one.
Once the selection is done, click on Share to start a conversation.
If the email notification is enabled in preferences, all added members will get an email for the conversation. They will receive the email if any other member comments/replies to the same conversation.
Following screenshot displays how to use conversations
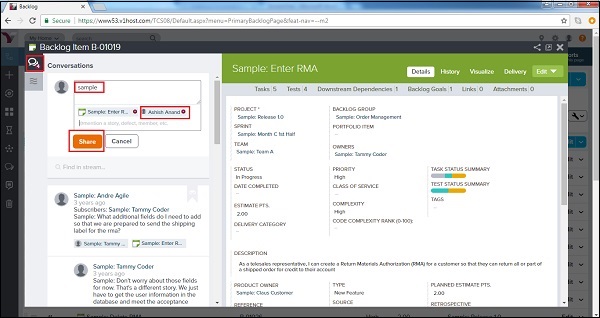
VersionOne - Collaboration
In this chapter, we will learn how collaboration takes place with VersionOne. As soon as sprint/project team is formatted, they can utilize the collaboration tools to keep update and track of sprint/project.
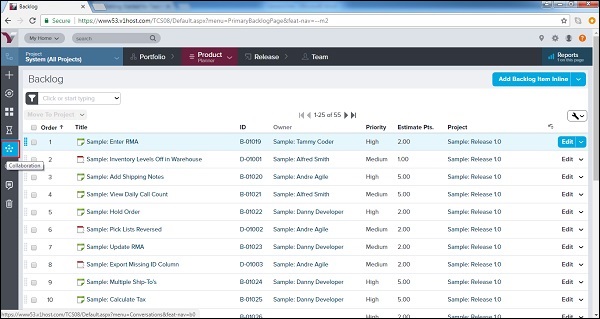
To access the collaboration tools, click on the Collaboration symbol present at the side menu bar as shown below −
A user can see the different communities at the left side along with where they are members of and conversation is another tool in collaboration.
Community
Community stands for VersionOne community. All members of VersionOne are part of this. They can access articles, blog or other important details here.
A Topic is an article content within a community. Topics contain agreements, best practices and documents that promote the Agile.
To view a topic, select the community present at the left side under Community section.
Click on View to view one of the topics with all its details. Consider the following screenshot to understand the step −
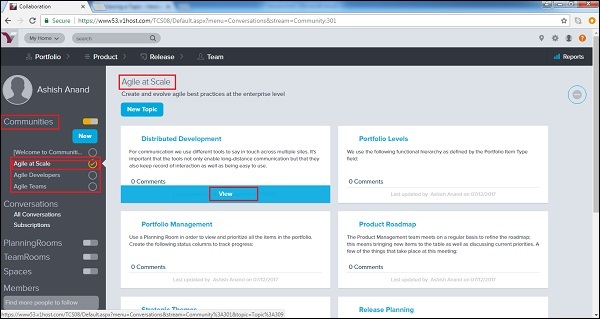
Once the details of the topic displays, double-click anywhere in the content or click on the edit symbol at the top right to start editing the content. After editing click on Save button. User even can edit title of the content.
At the bottom of the content, a user can attach paperwork by clicking on the Add Attachment button. The max file size is 4 MB.
A user can start a conversation under the conversation section.
The following screenshot displays how to work with content −
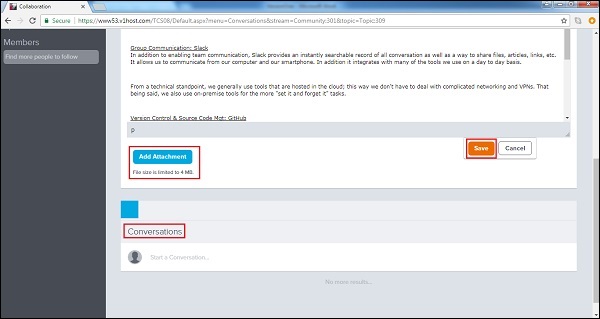
A user can even delete a topic with the required permission.
To delete a topic, click on View to expand the topic content.
At the top right, the delete symbol is present, click there as shown below −
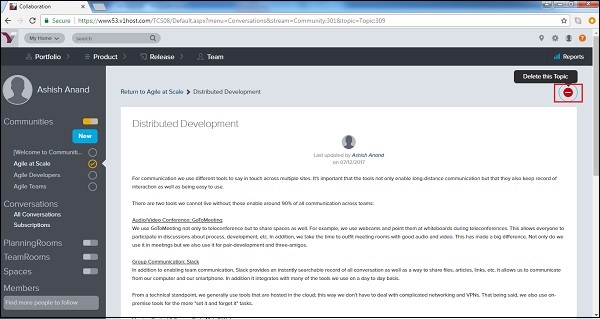
It opens the Delete Confirmation pop-up.
When a user clicks on Delete, it deletes the topic.
The following screenshot displays the delete pop-up −
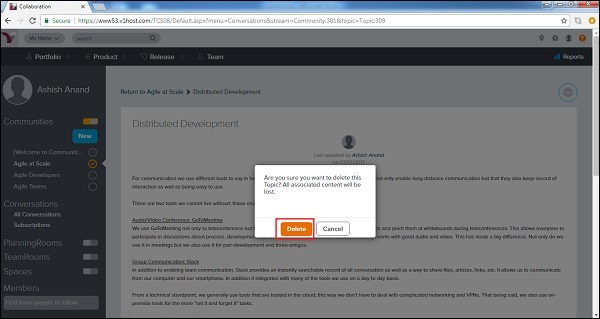
VersionOne - Notification
Notification is subscription based. Subscription allows controlling the types of notifications a user receives. It is based on the event types that a user subscribes to. For example, if a user wants to know when a work item is assigned to him, he can set up a subscription to notify. User can also subscribe when a story is closed or even when the status of a defect changes. This way, a user can keep track of the things.
Subscription
To get a notification, a user needs to subscribe to the notification service first. Until it is not subscribed, a user cannot receive any notification. In this section, we will discuss how to subscribe for a specific notification.
To view the users subscription for notification, go to My Home → Subscription as shown below −
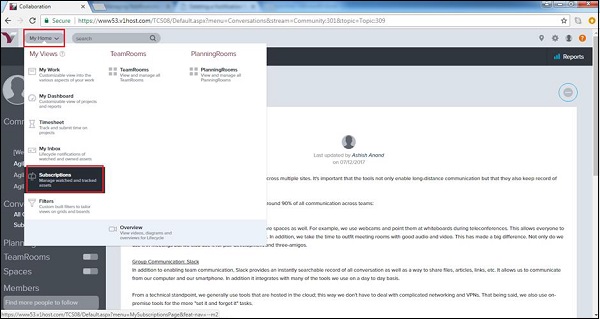
In the My Subscription page, a user can see the subscriptions made by him.
In the Notification Types, a user can see all type of notification that can be subscribed for.
To subscribe for a notification, click on the Subscribe button present at the right side as shown below −
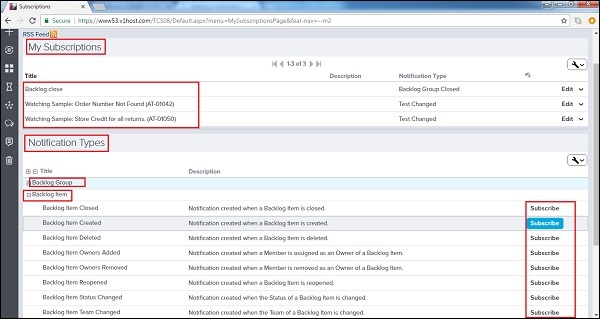
It opens a pop-up wherein, a user can enter Title, Description, select Project, Owner and Team to narrow down the subscription.
Now, click on the Subscribe button as shown below −
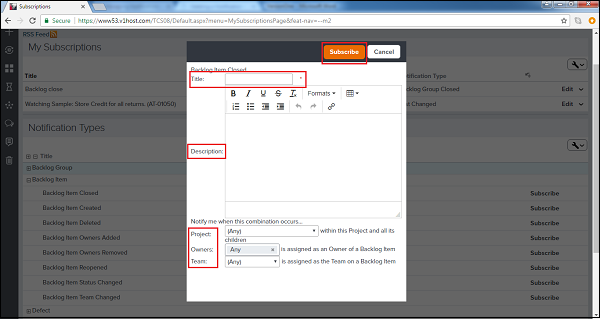
Delete a Subscription
Whenever a user wants to stop receive any notification, he should delete the notification at the subscription page. In this section, we will discuss how to delete a subscription.
To delete a subscription, go to My Home → Subscription.
At My Subscription, click on the Edit dropdown at the right side.
Select Delete from the available options and it de-subscribe the notification as shown in the screenshot below −
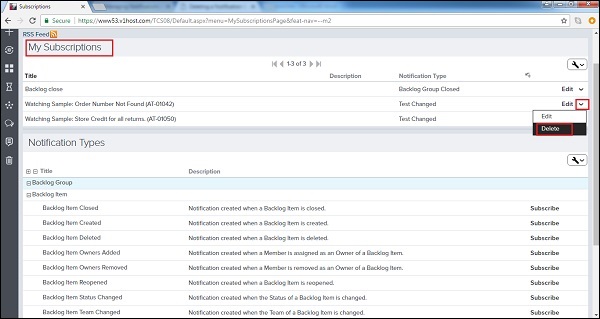
VersionOne - Estimably
Estimably is an estimation game. It is a cloud based estimation game that is used to play with sprint team to estimate the backlog items collectively. It helps in estimation for both co-located and remote team members. It works as group collaboration and combined with independent voting. When the team reaches a decision, it can automatically update the backlog items estimate.
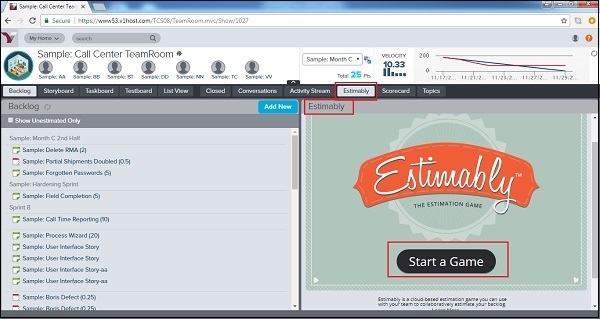
Estimably can be accessed in the Team Room by navigating Product Planner → Team Room. Now, click on Estimably as shown in the screenshot below −
Start a Game
There are some basic rules to play the estimation game. In this section, we will discuss how to start a game.
Only the facilitator should start a game by clicking on the Start a Game button.
The designated facilitator then communicates the URL and the Game ID to the participants.
The participants log in to the game using that information. When they do, they are visible to the facilitator.
The following screenshot displays how to start a game −
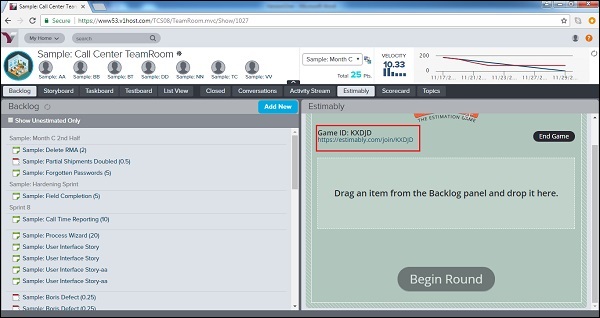
By navigating to URL, it asks details to join the game. Enter the name and the Game ID and click on Join Game as shown below −
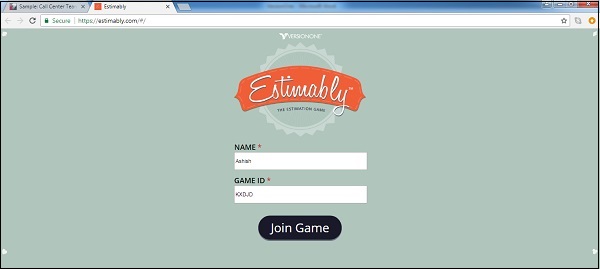
Play the Game
Once the game is started, all team members can play their part by choosing the estimation number. Here, facilitator plays an important role to start the round. Follow these steps to play the game.
The facilitator drags an un-estimated item from the Backlog panel into the game.
Click on the Begin Round button; this allows all participants to see numbers to estimate the item as shown below −
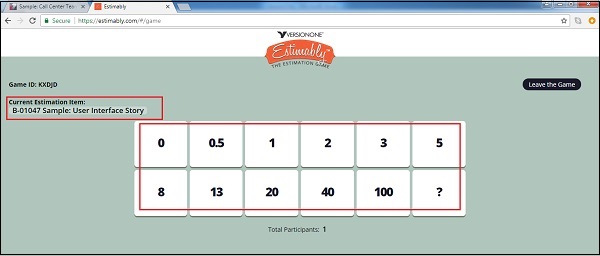
At this point, the Product Owner again describes the item and the acceptance criteria to provide a good understanding. The Team Members can ask questions if any for more clarity.
After that, the voting participants vote.
As the voting occurs, the facilitator can see who has voted. Each participant can see a running total of the number of votes.
When all participants have voted, the facilitator ends the voting round, which presents everyone the results as shown below −
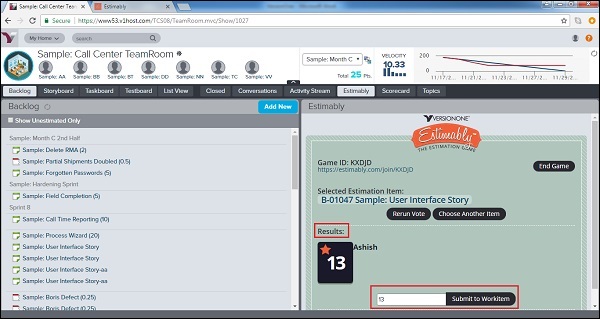
If there is agreement by all, then the facilitator simply submits the vote to save it to that work item and select another to estimate.
If there is some variation in the voting, the team members can discuss their reasoning. At this point, the facilitator can elect to run the vote again or can select a verbally agreed-upon value to submit as the estimate.
As soon as facilitator clicks on submit to workitem, the value gets updated as estimation into backlog item.