
- VersionOne - Home
- VersionOne - Introduction
- VersionOne - Features
- VersionOne - Free Trial Access
- VersionOne - Login
- VersionOne - Dashboard
- VersionOne - Invite Users
- VersionOne - Add a Project
- VersionOne - Portfolio Planner
- VersionOne - Product Planner
- VersionOne - Backlog
- VersionOne - Story
- VersionOne - Edit Story
- VersionOne - Defects
- VersionOne - Edit Defects
- VersionOne - Release Planner
- VersionOne - Sprint Planning
- VersionOne - Sprint Scheduling
- VersionOne - Detail Planning
- VersionOne - Issues
- VersionOne - Task
- VersionOne - Templates
- VersionOne - Import Data
- VersionOne - Team Rooms
- VersionOne - Storyboard
- VersionOne - Testboard
- VersionOne - Taskboard
- VersionOne - Filters
- VersionOne - Search
- VersionOne - Conversation
- VersionOne - Collaboration
- VersionOne - Notification
- VersionOne - Estimably
VersionOne - Edit Defects
Editing a defect involves many actions. The different actions can be - modifying details of the defect, closing it, deleting it, add into the watch list, block it with issues or another defects, convert into story etc. In this chapter, we will discuss how to go about editing defect details, closing a defect and deleting a defect.
Edit Defect Details
While editing the defect details, a user can edit all the details of the defect including title, priority, estimation and dependencies. The only unmodified field is unique id of the defect, it can never change or modify.
There are three ways to edit a defect. The ways will be discussed as options below −
Option 1
The steps in this option are recommended to quickly edit the title, estimated points, projects, priority, owner and order.
Go to Product Planner → Backlog. It opens the backlog page.
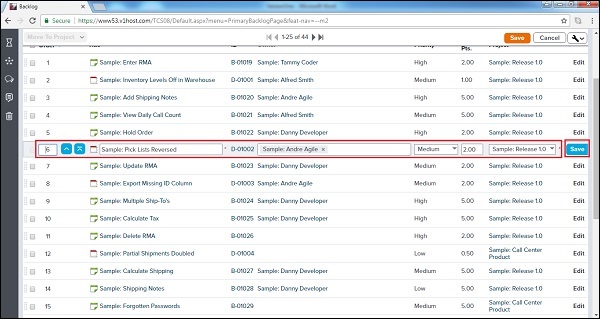
Double-click on row to make the column editable. The column changes from the view only to edit mode.
After editing, click on Save. It saves all the modified details of the corresponding row.
The following screenshot displays how to edit the defect details −
Option 2
Go to Product Planner → Backlog
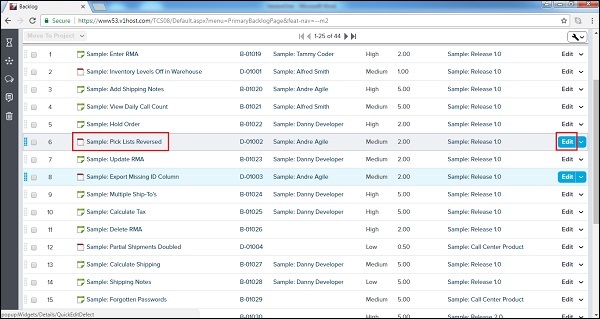
Click on the Edit button present corresponding to each row of the defect
It will open the defect details in the Edit mode.
After editing, click on Save/Save & View.
The following screenshot displays how to access the edit functionality −
Option 3
Click on Story Title/ID to open the Story Details page.
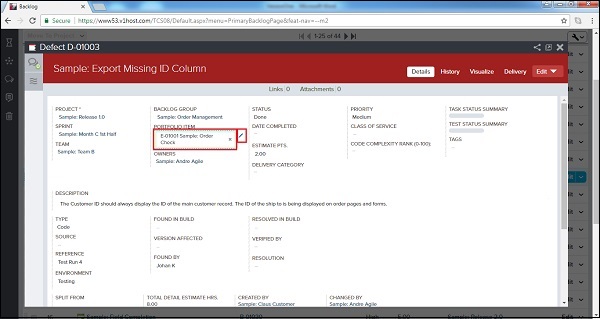
Click on the Pencil icon next to the field to enable editing. It makes the field editable.
Make the appropriate changes and then press Enter/Return on the keyboard. It saves the modified details of the respective field.
The following screenshot shows the edit functionality at the defect details page −
Close a Defect
Once all the tasks of a defect are completed, it can be closed to claim the work done in the sprint. A closed defect can be re-opened later if required. In this section, we will discuss how to close a defect.
Closing a defect tells that all the work related to it is completed and that the fixes are done.
Once a defect is closed, a user can re-open it if the same bug appears again.
Quick close update the status of defect and closes it in a single click.
There are many ways to close a defect. The ways will be discussed as options below.
Option 1
Go to Product Planner → Backlog.
Click on the Edit dropdown present corresponding to each row of the defect.
Select Close or Quick Close as shown in the screenshot below −
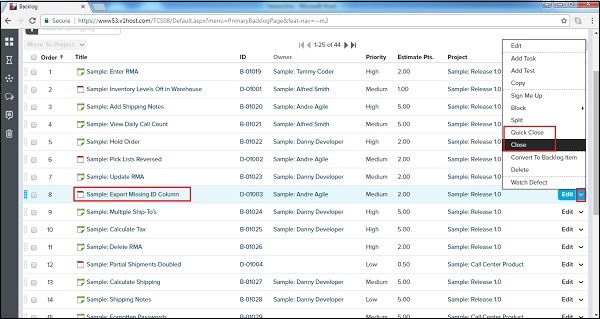
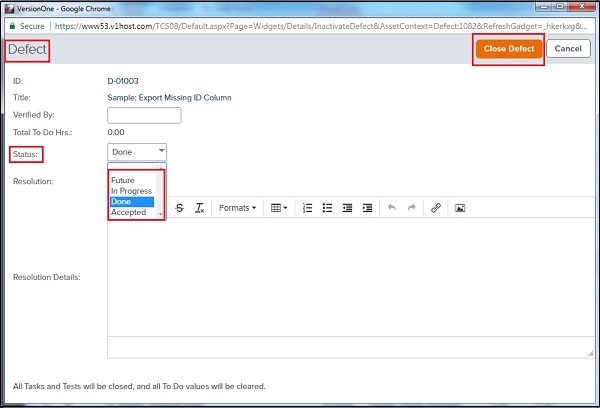
If a user selects Close, it opens an additional window. Here, select a status and click on Close Defect as shown below. If Quick Close is selected, it directly closes the defect without any additional input.
Option 2
Click on the Defect Title/ID to open the Defect Details page.
Click on the Edit dropdown.
Select Close or Quick Close as shown in the screenshot below −
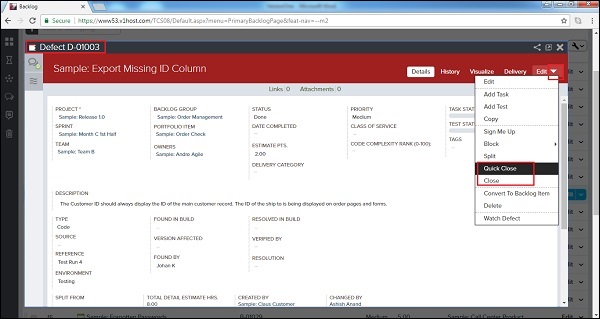
If a user selects Close, it opens an additional window. Here, select a status and click on Close Defect.
Delete a Defect
A deleted defect cannot be tracked and visualized later. Deletion usually happens if a defect is not needed or if it is duplicate. In this section, we will discuss the deletion of a defect.
If a defect is created in error or duplicate, then only it should be deleted. For tracking the defect, it must be closed instead of getting deleted.
Deleting a defect hides all of its references.
If a defect is deleted, all its child items such as link, attachments, task or test sets are also deleted.
Let us now see the different steps involved to delete a story −
Go to Product Planner → Backlog.
Click on the Edit dropdown present corresponding to each row. It displays all the available options to take action.
Select Delete as shown in the screenshot below −
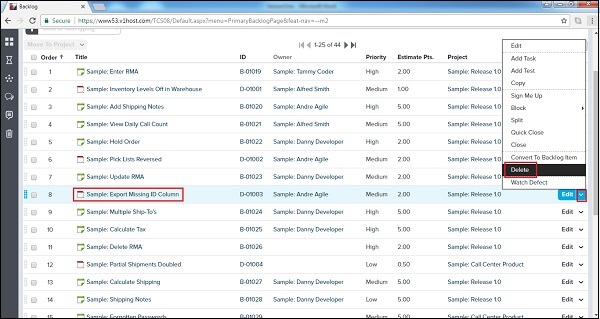
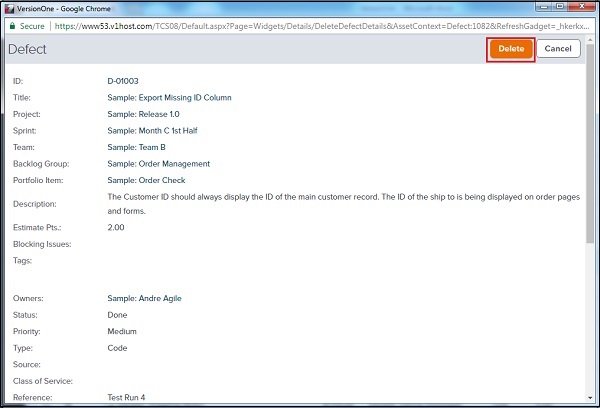
It will open the read only detail of the defect with the Delete button. Click on the Delete button as shown below −
Similar steps can be followed to delete the defect from the Defect Detail page −
Click on Defect title/id to open the defect detail page.
Click on the Edit dropdown and select Delete.
It will open the read only detail of the defect with the Delete button. Click on the Delete button to delete the record of defect.