- Kivy - Home
- Kivy Basics
- Kivy - Getting Started
- Kivy - Installation
- Kivy - Architecture
- Kivy - File Syntax
- Kivy - Applications
- Kivy - Hello World
- Kivy - App Life Cycle
- Kivy - Events
- Kivy - Properties
- Kivy - Inputs
- Kivy - Behaviors
- Kivy Buttons
- Kivy - Buttons
- Kivy - Button Events
- Kivy - Button Colors
- Kivy - Button Size
- Kivy - Button Position
- Kivy - Round Buttons
- Kivy - Disabled Buttons
- Kivy - Image Button
- Kivy Widgets
- Kivy - Widgets
- Kivy - Label
- Kivy - Text Input
- Kivy - Canvas
- Kivy - Line
- Kivy - Checkbox
- Kivy - Dropdown List
- Kivy - Windows
- Kivy - ScrollView
- Kivy - Carousel
- Kivy - Slider
- Kivy - Images
- Kivy - Popup
- Kivy - Switch
- Kivy - Spinner
- Kivy - Splitter
- Kivy - Progress Bar
- Kivy - Bubble
- Kivy - Tabbed Panel
- Kivy - Scatter
- Kivy - Accordion
- Kivy - File Chooser
- Kivy - Color Picker
- Kivy - Code Input
- Kivy - Modal View
- Kivy - Toggle Button
- Kivy - Camera
- Kivy - Tree View
- Kivy - reStructuredText
- Kivy - Action Bar
- Kivy - Video Player
- Kivy - Stencil View
- Kivy - VKeyboard
- Kivy - Touch Ripple
- Kivy - Audio
- Kivy - Videos
- Kivy - Spelling
- Kivy - Effects
- Kivy - Input Recorder
- Kivy - OpenGL
- Kivy - Text
- Kivy - Text Markup
- Kivy - Settings
- Kivy Layouts
- Kivy - Layouts
- Kivy - Float Layout
- Kivy - Grid Layouts
- Kivy - Box Layouts
- Kivy - Stack Layout
- Kivy - Anchor Layout
- Kivy - Relative Layout
- Kivy - Page Layout
- Kivy - Recycle Layout
- Kivy - Layouts in Layouts
- Kivy Advanced Concepts
- Kivy - Configuration Object
- Kivy - Atlas
- Kivy - Data Loader
- Kivy - Cache Manager
- Kivy - Console
- Kivy - Animation
- Kivy - Multistroke
- Kivy - Clock
- Kivy - SVGs
- Kivy - UrlRequest
- Kivy - Clipboard
- Kivy - Factory
- Kivy - Gesture
- Kivy - Language
- Kivy - Graphics
- Kivy - Drawing
- Kivy - Packaging
- Kivy - Garden
- Kivy - Storage
- Kivy - Vector
- Kivy - Utils
- Kivy - Inspector
- Kivy - Tools
- Kivy - Logger
- Kivy - Framebuffer
- Kivy Applications and Projects
- Kivy - Drawing App
- Kivy - Calculator App
- Kivy - Stopwatch App
- Kivy - Camera Handling
- Kivy - Image Viewer
- Kivy - Bezier
- Kivy - Canvas Stress
- Kivy - Circle Drawing
- Kivy - Widget Animation
- Kivy - Miscellaneous
- Kivy Useful Resources
- Kivy - Quick Guide
- Kivy - Useful Resources
- Kivy - Discussion
Kivy - Grid Layouts
GridLayout is one of the commonly used layout types in Kivy. A GridLayout object acts as a container grid. It divides the window area in specified number of rows and columns and puts other widgets in the cells.
GridLayout class is defined in kivy.uix.gridlayout module. The object must have at least one of the properties - rows and cols - defined. If you do not specify any of these two, Kivy throws GridLayoutException.
from kivy.uix.gridlayout import GridLayout
grid = GridLayout(**kwargs)
The properties of GridLayout object are as follows −
cols − Number of columns in the grid. You can no longer set this to a negative value. cols is a NumericProperty and defaults to None.
rows − Number of rows in the grid. You can no longer set this to a negative value. rows is a NumericProperty and defaults to None.
cols_minimum − Dict of minimum width for each column. The dictionary keys are the column numbers, (e.g. 0, 1, 2).It is a DictProperty and defaults to {}.
rows_minimum − Dict of minimum height for each row. The dictionary keys are the row numbers, (e.g. 0, 1, 2). It is a DictProperty and defaults to {}.
minimum_width − Automatically computed minimum width needed to contain all children. It is a NumericProperty and defaults to 0. It is read only.
minimum_height − Automatically computed minimum height needed to contain all children. It is a NumericProperty and defaults to 0. It is read only.
orientation − Orientation of the layout. This property determines how the widgets are placed in successive cells in the grid. "orientation" is an OptionProperty. Its valid values are −
'lr-tb' − cells filled in left to right and top to bottom order.
'tb-lr' − cells filled in top to bottom and left to right order.
'rl-tb' − cells filled in right to left and top to bottom order.
'tb-rl' − cells filled in top to bottom and right to left order.
'lr-bt' − cells filled in left to right and bottom to top order.
'bt-lr' − cells filled in bottom to top and left to right order.
'rl-bt' − cells filled in right to left and bottom to top order.
'bt-rl' − cells filled in bottom to top and right to left order.
Default value of orientation property is 'lr-tb'.
row_default_height − Default minimum size to use for row. row_default_height is a NumericProperty and defaults to 0.
row_force_default − If True, ignore the height and size_hint_y of the child and use the default row height. row_force_default is a BooleanProperty and defaults to False.
spacing −: Spacing between children: [spacing_horizontal, spacing_vertical]. spacing is a VariableListProperty and defaults to [0, 0].
padding − Padding between the layout box and its children: [padding_left, padding_top, padding_right, padding_bottom]. padding is a VariableListProperty and defaults to [0, 0, 0, 0].
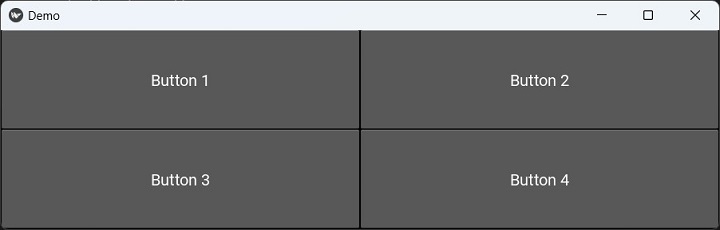
By default, all the widgets have the same size. This is because the default size_hint is (1,1).
def build(self):
   self.lo = GridLayout(cols=2)
   self.b1 = Button(text='Button 1', font_size=20)
   self.b2 = Button(text='Button 2', font_size=20)
   self.b3 = Button(text='Button 3', font_size=20)
   self.b4 = Button(text='Button 4', font_size=20)
   self.lo.add_widget(self.b1)
   self.lo.add_widget(self.b2)
   self.lo.add_widget(self.b3)
   self.lo.add_widget(self.b4)
   return self.lo
With this code, you will get the following layout −
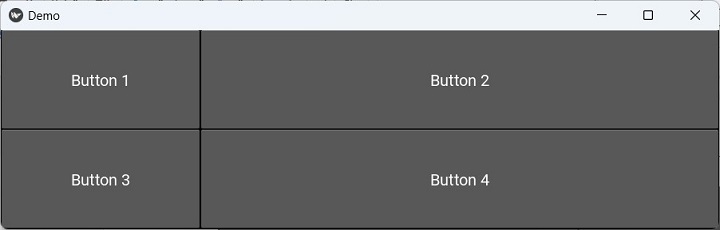
Now, let's fix the size of Hello buttons to 250px instead of using "size_hint_x=None".
self.lo = GridLayout(cols = 2)

self.b1 = Button(
   text='Button 1', font_size=20,
   size_hint_x=None, width=250
)

self.b2 = Button(text='Button 2', font_size=20)

self.b3 = Button(
   text='Button 3', font_size=20,
   size_hint_x=None, width=250
)

self.b4 = Button(text='Button 4', font_size=20
The App window appears as below −
If we define row_default_height to 100 and set "row_force_default=True" −
self.lo = GridLayout(
cols=2, row_force_default=True, row_default_height=100
)
self.b1 = Button(
text='Button 1', font_size=20, size_hint_x=None, width=250
)
self.b2 = Button(text='Button 2', font_size=20)
self.b3 = Button(
text='Button 3', font_size=20, size_hint_x=None, width=250
)
self.b4 = Button(text='Button 4', font_size=20)
Now the window appears like this −

Example 1
In this program, we add 15 buttons in a grid layout with four columns. The caption of each button is a unique but randomly generated number between 1 to 15. The randint() function in random module is used for this purpose.
from kivy.app import App
from kivy.uix.button import Button
from kivy.uix.gridlayout import GridLayout
from kivy.config import Config
import random

Config.set('graphics', 'width', '720')
Config.set('graphics', 'height', '400')
Config.set('graphics', 'resizable', '1')

class MyApp(App):
   def build(self):
      self.grid = GridLayout(cols = 4)
      nums=[]
      for i in range(1,16):
         while True:
            num = random.randint(1,15)
            if num not in nums:
               nums.append(num)
               self.grid.add_widget(Button(text = str(num)))
               break
      return self.grid

if __name__ == '__main__':
   MyApp().run()
Output
When you run this code, it will produce the following output window −

Example 2
The GridLayout in Kivy doesn't have the provision to span a widget across rows and/or columns. It is also not possible to place a widget by its row and column numbers.
It is required to arrange a few labels and text input boxes in a two column grid, but the submit button below should span across two columns. To achieve this, we place a 2 column grid inside a on column grid, and a button below it.
from kivy.app import App
from kivy.uix.label import Label
from kivy.uix.button import Button
from kivy.uix.textinput import TextInput
from kivy.uix.gridlayout import GridLayout
from kivy.core.window import Window

Window.size = (720, 400)

class DemoApp(App):
   def build(self):
      self.grid = GridLayout(rows=2)
      self.top_grid = GridLayout(
         cols=2, row_force_default=True,
         row_default_height=100
      )
      self.top_grid.cols = 2
      self.top_grid.add_widget(
         Label(text="Name: ", size_hint_x=None, width=250)
      )
      self.fname = TextInput(
         multiline=False, size_hint_x=None, width=650
      )
      self.top_grid.add_widget(self.fname)
      self.top_grid.add_widget(Label(text="Address: "))
      self.address = TextInput(multiline=True)
      self.top_grid.add_widget(self.address)
      self.top_grid.add_widget(Label(text="College: "))
      self.college = TextInput(multiline=False)
      self.top_grid.add_widget(self.college)
      self.grid.add_widget(self.top_grid)
      self.b1 = Button(text='Submit', size_hint_y=None, height=200)
      self.grid.add_widget(self.b1)
      return self.grid

if __name__ == '__main__':
   DemoApp().run()
Output
When you run this code, it will produce the following output window −
