- Matplotlib - Home
- Matplotlib - Introduction
- Matplotlib - Vs Seaborn
- Matplotlib - Environment Setup
- Matplotlib - Anaconda distribution
- Matplotlib - Jupyter Notebook
- Matplotlib - Pyplot API
- Matplotlib - Simple Plot
- Matplotlib - Saving Figures
- Matplotlib - Markers
- Matplotlib - Figures
- Matplotlib - Styles
- Matplotlib - Legends
- Matplotlib - Colors
- Matplotlib - Colormaps
- Matplotlib - Colormap Normalization
- Matplotlib - Choosing Colormaps
- Matplotlib - Colorbars
- Matplotlib - Working With Text
- Matplotlib - Text properties
- Matplotlib - Subplot Titles
- Matplotlib - Images
- Matplotlib - Image Masking
- Matplotlib - Annotations
- Matplotlib - Arrows
- Matplotlib - Fonts
- Matplotlib - Font Indexing
- Matplotlib - Font Properties
- Matplotlib - Scales
- Matplotlib - LaTeX
- Matplotlib - LaTeX Text Formatting in Annotations
- Matplotlib - PostScript
- Matplotlib - Mathematical Expressions
- Matplotlib - Animations
- Matplotlib - Celluloid Library
- Matplotlib - Blitting
- Matplotlib - Toolkits
- Matplotlib - Artists
- Matplotlib - Styling with Cycler
- Matplotlib - Paths
- Matplotlib - Path Effects
- Matplotlib - Transforms
- Matplotlib - Ticks and Tick Labels
- Matplotlib - Radian Ticks
- Matplotlib - Dateticks
- Matplotlib - Tick Formatters
- Matplotlib - Tick Locators
- Matplotlib - Basic Units
- Matplotlib - Autoscaling
- Matplotlib - Reverse Axes
- Matplotlib - Logarithmic Axes
- Matplotlib - Symlog
- Matplotlib - Unit Handling
- Matplotlib - Ellipse with Units
- Matplotlib - Spines
- Matplotlib - Axis Ranges
- Matplotlib - Axis Scales
- Matplotlib - Axis Ticks
- Matplotlib - Formatting Axes
- Matplotlib - Axes Class
- Matplotlib - Twin Axes
- Matplotlib - Figure Class
- Matplotlib - Multiplots
- Matplotlib - Grids
- Matplotlib - Object-oriented Interface
- Matplotlib - PyLab module
- Matplotlib - Subplots() Function
- Matplotlib - Subplot2grid() Function
- Matplotlib - Anchored Artists
- Matplotlib - Manual Contour
- Matplotlib - Coords Report
- Matplotlib - AGG filter
- Matplotlib - Ribbon Box
- Matplotlib - Fill Spiral
- Matplotlib - Findobj Method
- Matplotlib - Hyperlinks
- Matplotlib - Image Thumbnail
- Matplotlib - Plotting with Keywords
- Matplotlib - Create Logo
- Matplotlib - Multipage PDF
- Matplotlib - Multiprocessing
- Matplotlib - Print Stdout
- Matplotlib - Compound Path
- Matplotlib - Sankey Class
- Matplotlib - MRI with EEG
- Matplotlib - Stylesheets
- Matplotlib - Background Colors
- Matplotlib - Basemap
Matplotlib Events
- Matplotlib - Event Handling
- Matplotlib - Close Event
- Matplotlib - Mouse Move
- Matplotlib - Click Events
- Matplotlib - Scroll Event
- Matplotlib - Keypress Event
- Matplotlib - Pick Event
- Matplotlib - Looking Glass
- Matplotlib - Path Editor
- Matplotlib - Poly Editor
- Matplotlib - Timers
- Matplotlib - Viewlims
- Matplotlib - Zoom Window
Matplotlib Widgets
- Matplotlib - Cursor Widget
- Matplotlib - Annotated Cursor
- Matplotlib - Button Widget
- Matplotlib - Check Buttons
- Matplotlib - Lasso Selector
- Matplotlib - Menu Widget
- Matplotlib - Mouse Cursor
- Matplotlib - Multicursor
- Matplotlib - Polygon Selector
- Matplotlib - Radio Buttons
- Matplotlib - RangeSlider
- Matplotlib - Rectangle Selector
- Matplotlib - Ellipse Selector
- Matplotlib - Slider Widget
- Matplotlib - Span Selector
- Matplotlib - Textbox
Matplotlib Plotting
- Matplotlib - Line Plots
- Matplotlib - Area Plots
- Matplotlib - Bar Graphs
- Matplotlib - Histogram
- Matplotlib - Pie Chart
- Matplotlib - Scatter Plot
- Matplotlib - Box Plot
- Matplotlib - Arrow Demo
- Matplotlib - Fancy Boxes
- Matplotlib - Zorder Demo
- Matplotlib - Hatch Demo
- Matplotlib - Mmh Donuts
- Matplotlib - Ellipse Demo
- Matplotlib - Bezier Curve
- Matplotlib - Bubble Plots
- Matplotlib - Stacked Plots
- Matplotlib - Table Charts
- Matplotlib - Polar Charts
- Matplotlib - Hexagonal bin Plots
- Matplotlib - Violin Plot
- Matplotlib - Event Plot
- Matplotlib - Heatmap
- Matplotlib - Stairs Plots
- Matplotlib - Errorbar
- Matplotlib - Hinton Diagram
- Matplotlib - Contour Plot
- Matplotlib - Wireframe Plots
- Matplotlib - Surface Plots
- Matplotlib - Triangulations
- Matplotlib - Stream plot
- Matplotlib - Ishikawa Diagram
- Matplotlib - 3D Plotting
- Matplotlib - 3D Lines
- Matplotlib - 3D Scatter Plots
- Matplotlib - 3D Contour Plot
- Matplotlib - 3D Bar Plots
- Matplotlib - 3D Wireframe Plot
- Matplotlib - 3D Surface Plot
- Matplotlib - 3D Vignettes
- Matplotlib - 3D Volumes
- Matplotlib - 3D Voxels
- Matplotlib - Time Plots and Signals
- Matplotlib - Filled Plots
- Matplotlib - Step Plots
- Matplotlib - XKCD Style
- Matplotlib - Quiver Plot
- Matplotlib - Stem Plots
- Matplotlib - Visualizing Vectors
- Matplotlib - Audio Visualization
- Matplotlib - Audio Processing
Matplotlib Useful Resources
Matplotlib - Ellipse with Units
An ellipse is a geometric shape that looks like a stretched circle. It is defined by two key properties: its major axis (the longest diameter) and its minor axis (the shortest diameter). These axes intersect at the center of the ellipse, and the shape of an ellipse is determined by the lengths of these axes. Both the distance from the center to the edge along the major axis and the distance from the center to the edge along the minor axis are important.
In terms of units, you would measure these distances using some kind of unit, like inches, centimeters, or any other measurement you choose. So, when we say an ellipse with units, we mean that we are using specific measurements (units) to describe the size of the ellipse, considering both the length of the major axis and the length of the minor axis.

Ellipse with Units in Matplotlib
We can create an ellipse with units in Matplotlib using the "Ellipse" class in the "matplotlib.patches" module. The Ellipse class allows you to define the center, width and height (major and minor axes), angle of rotation, and other properties of the ellipse such as its rotation angle.
The units of measurement for the axes depend on the coordinate system you are using. For example, if you are working with a plot in inches, the major and minor axes lengths would be in inches.
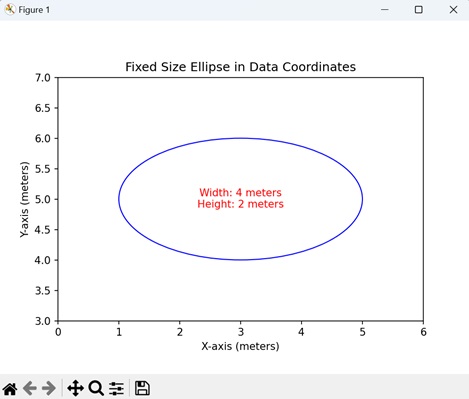
Fixed Size Ellipse in Data Coordinates
In Matplotlib, creating a fixed size ellipse in data coordinates involves drawing an ellipse on a plot with a specific size and position determined by data coordinates. This means that the dimensions of the ellipse are specified in the same units as your actual data.
For instance, if you have a dataset with x and y values, you can draw an ellipse where the center is located at a particular (x, y) point, and the width and height of the ellipse are defined in terms of the data coordinates.
Example - Fixed Size Ellipse
we are drawing a simple ellipse with a fixed size specified in data coordinates. The center of the ellipse is located at (3, 5) on the plot, and the width is set to "4" units in meters, while the height is set to "2" units −
import matplotlib.pyplot as plt
from matplotlib.patches import Ellipse

# Creating a plot
fig, ax = plt.subplots()

# Ellipse in data coordinates (units: meters)
ellipse = Ellipse((3, 5), width=4, height=2, edgecolor='b', facecolor='none')
ax.add_patch(ellipse)

# Setting plot title and labels
ax.set_title('Fixed Size Ellipse in Data Coordinates')
ax.set_xlabel('X-axis (meters)')
ax.set_ylabel('Y-axis (meters)')

# Setting aspect ratio to 'equal'
ax.set_aspect('equal')

# Adjusting axis limits
ax.set_xlim(0, 6)
ax.set_ylim(3, 7)

# Displaying dimensions
plt.text(3, 5, f'Width: 4 meters\nHeight: 2 meters', ha='center', va='center', color='red', fontsize=10)
plt.show()
Output
Following is the output of the above code −
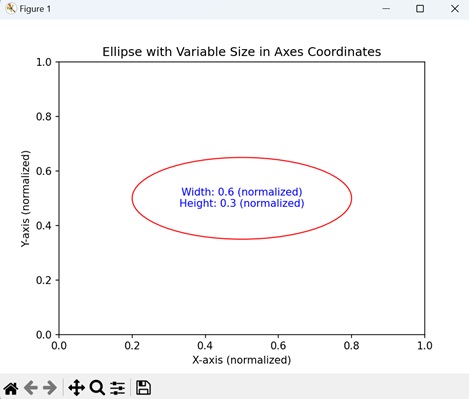
Ellipse with Variable Size in Axes Coordinates
Creating an ellipse with variable size in axes coordinates in Matplotlib involves drawing an ellipse on a plot where the dimensions are specified in terms of the axes, rather than the actual data. In other words, the width and height of the ellipse are given as a percentage of the total length of the x and y axes, respectively.
For example, if you want to visualize an ellipse that always covers 60% of the x-axis and 30% of the y-axis, regardless of the specific data values, you can use axes coordinates. This is particularly useful when you want the size of the ellipse to be relative to the overall dimensions of the plot.
Example - Variable Size Ellipse
In here, we are drawing a an ellipse with a variable size specified in axes coordinates. The center of the ellipse is placed at (0.5, 0.5), which corresponds to the center of the plot. The width and height are set to 60% and 30% of the respective axis lengths, allowing the ellipse to scale with changes in the axes −
import matplotlib.pyplot as plt
from matplotlib.patches import Ellipse

# Creating a plot
fig, ax = plt.subplots()

# Ellipse in axes coordinates
ellipse = Ellipse((0.5, 0.5), width=0.6, height=0.3, edgecolor='r', facecolor='none', transform=ax.transAxes)
ax.add_patch(ellipse)

# Setting plot title and labels
ax.set_title('Ellipse with Variable Size in Axes Coordinates')
ax.set_xlabel('X-axis (normalized)')
ax.set_ylabel('Y-axis (normalized)')

# Displaying dimensions in the output
plt.text(0.5, 0.5, f'Width: 0.6 (normalized)\nHeight: 0.3 (normalized)', ha='center', va='center', color='blue', fontsize=10, transform=ax.transAxes)
plt.show()
Output
On executing the above code we will get the following output −
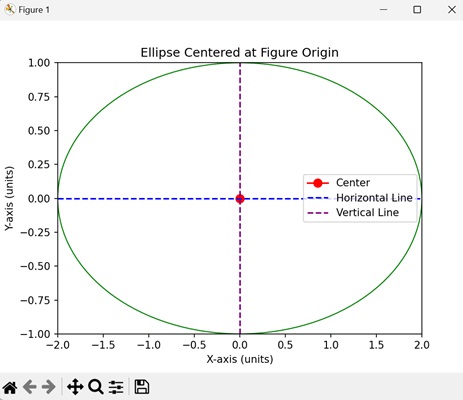
Ellipse Centered at Figure Origin
Creating an ellipse centered at figure origin in Matplotlib involves drawing an ellipse on a plot with its center positioned at the origin of the entire figure. The origin is the point (0, 0) in the coordinate system of the figure. In this case, the width and height of the ellipse are specified in the units of the figure, and the center of the ellipse is precisely at the origin.
This demonstrates how to position an ellipse with respect to the overall figure rather than the individual axes.
Example - Centered Ellipse
In the example below, we are creating an ellipse with its center at the origin of the figure (0, 0). The width is set to 4 units, and the height is set to 2 units −
import matplotlib.pyplot as plt
from matplotlib.patches import Ellipse
import numpy as np

# Creating a plot
fig, ax = plt.subplots()

# Ellipse centered at figure origin
ellipse = Ellipse((0, 0), width=4, height=2, edgecolor='g', facecolor='none', transform=ax.transData)
ax.add_patch(ellipse)

# Marking the center with a marker
center_x, center_y = 0, 0
ax.plot(center_x, center_y, marker='o', markersize=8, color='red', label='Center')

# Dotted line to represent the center
ax.plot([center_x, center_x], [center_y, center_y], 'r--')

# Horizontal and vertical lines passing through the center
ax.axhline(center_y, color='blue', linestyle='--', label='Horizontal Line')
ax.axvline(center_x, color='purple', linestyle='--', label='Vertical Line')

# Setting plot title and labels
ax.set_title('Ellipse Centered at Figure Origin')
ax.set_xlabel('X-axis (units)')
ax.set_ylabel('Y-axis (units)')

# Adjusting axis limits to make the ellipse and lines visible
ax.set_xlim(-2, 2)
ax.set_ylim(-1, 1)

# Adding legend
ax.legend()
plt.show()
Output
After executing the above code, we get the following output −
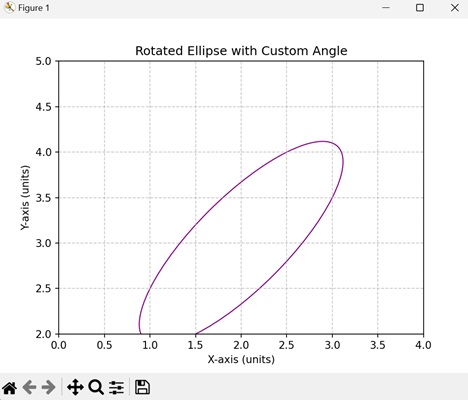
Rotated Ellipse with Custom Angle
Creating a rotated ellipse with custom angle in Matplotlib involves drawing an ellipse on a plot and specifying a custom angle to rotate it. The rotation angle determines how the ellipse is tilted or turned within the plot. This is useful when you want to highlight features in a specific orientation.
Example - Ellipse with Customized Angle
Now, we are creating a rotated ellipse with a custom angle of "45" degrees, resulting in an ellipse tilted at an angle. The center of the ellipse is located at (2, 3), and the width and height are specified in data coordinates −
import matplotlib.pyplot as plt
from matplotlib.patches import Ellipse

# Creating a plot
fig, ax = plt.subplots()

# Rotated ellipse with custom angle
ellipse = Ellipse((2, 3), width=3, height=1, angle=45, edgecolor='purple', facecolor='none', transform=ax.transData)
ax.add_patch(ellipse)

# Setting plot title and labels
ax.set_title('Rotated Ellipse with Custom Angle')
ax.set_xlabel('X-axis (units)')
ax.set_ylabel('Y-axis (units)')

# Setting aspect ratio to 'equal'
ax.set_aspect('equal')

# Adjusting axis limits
ax.set_xlim(0, 4)
ax.set_ylim(2, 5)

# Adding grid for better visualization
ax.grid(True, linestyle='--', alpha=0.7)
plt.show()
Output
On executing the above code we will get the following output −