Basic Image Operations
- Python Pillow - Working with Images
- Python Pillow - Resizing an Image
- Python Pillow - Flip and Rotate Images
- Python Pillow - Cropping an Image
- Python Pillow - Adding Borders to Images
- Python Pillow - Identifying Image Files
- Python Pillow - Merging Images
- Python Pillow - Cutting and Pasting Images
- Python Pillow - Rolling an Image
- Python Pillow - Writing text on image
- Python Pillow - ImageDraw Module
- Python Pillow - Concatenating two Images
- Python Pillow - Creating Thumbnails
- Python Pillow - Creating a Watermark
- Python Pillow - Image Sequences
Python Pillow Color Conversions
- Python Pillow - Colors on an Image
- Python Pillow - Creating Images With Colors
- Python Pillow - Converting Color String to RGB Color Values
- Python Pillow - Converting Color String to Grayscale Values
- Python Pillow - Change the Color by Changing the Pixel Values
Image Manipulation
- Python Pillow - Reducing Noise
- Python Pillow - Changing Image Modes
- Python Pillow - Compositing Images
- Python Pillow - Working with Alpha Channels
- Python Pillow - Applying Perspective Transforms
Image Filtering
- Python Pillow - Adding Filters to an Image
- Python Pillow - Convolution Filters
- Python Pillow - Blur an Image
- Python Pillow - Edge Detection
- Python Pillow - Embossing Images
- Python Pillow - Enhancing Edges
- Python Pillow - Unsharp Mask Filter
Image Enhancement and Correction
- Python Pillow - Enhancing Contrast
- Python Pillow - Enhancing Sharpness
- Python Pillow - Enhancing Color
- Python Pillow - Correcting Color Balance
- Python Pillow - Removing Noise
Image Analysis
Advanced Topics
- Python Pillow - Creating Animated GIFs
- Python Pillow - Batch Processing Images
- Python Pillow - Converting Image File Formats
- Python Pillow - Adding Padding to an Image
- Python Pillow - Color Inversion
- Python Pillow - M L with Numpy
- Python Pillow with Tkinter BitmapImage and PhotoImage objects
Python Pillow Useful Resources
Python Pillow - Working With Alpha Channels
An alpha channel in an image is a component that represents the level of transparency or opacity for each pixel. It is commonly used in RGBA images, where each pixel is defined by its Red, Green, Blue, and Alpha values. This channel determines how much of the background shows through an image. In simple terms we can say a pixel with an alpha value of 0 is fully transparent and while a pixel with an alpha value of 255 is fully opaque.
Here are visual representations of an image with different transparency levels −

The following are the breakdown of key concepts related to alpha channels in Pillow −
RGBA Mode
Images with an alpha channel are often represented in the RGBA mode.
Each pixel in an RGBA image has four components i.e. Red, Green, Blue and Alpha.
Transparency Levels
The alpha channel values typically range from 0 to 255.
0 indicates complete transparency i.e. fully see-through or invisible.
255 indicate complete opacity i.e. fully opaque or not see-through.
Accessing Alpha Channel
We can access the alpha channel using the split() function of the Pillow Image module. This function is used to separate the individual color channels of an image. It breaks down an image into its constituent channels by allowing us to access and manipulate each channel separately.
Splitting channels with split() function provides the flexibility to work with and manipulate individual color or alpha channels separately by enabling precise image adjustments and processing.
When the split() function is called on an image object, it returns a tuple of individual channel images. For an RGBA image, the tuple includes the Red, Green, Blue, and Alpha channels. For grayscale or single-channel images split() function still returns four identical copies of the same channel. By accessing the alpha channel specifically, you can manipulate the transparency of an image directly.
The following is the syntax and parameters of the of the split() function −
r,g,b,a = image.split()
Where,
image − This is the image object opened using Image.open() function.
r, g, b, a − These variables receive the separate bands representing Red, Green, Blue and Alpha i.e. transparency of channels respectively.
Example - Accessing Alpha Channel
In this example we are using the split() function to split and access the alpha channel.
main.py
from PIL import Image
# Open an image
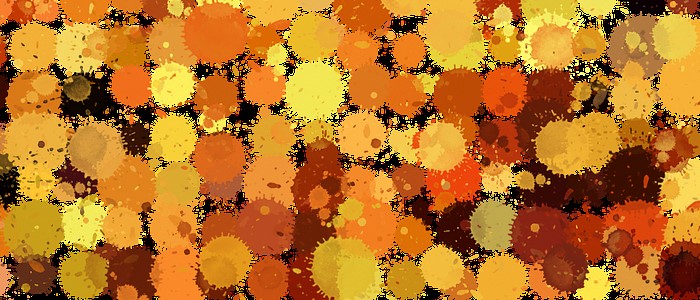
img_obj = Image.open('Images/colordots.png')
#Split the image into RGBA channels
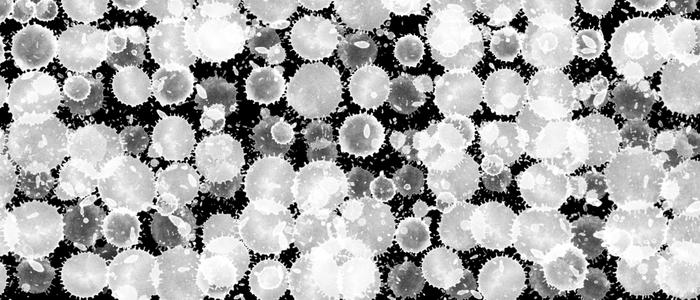
red, green, blue, alpha = img_obj.split()
# Alpha (transparency) channel
alpha.show()
Input RGBA Image to be used
Output alpha channel
Creating an Image with Alpha Channel
To create an image with an alpha channel, we can use the new() function. This function provides options like mode, width, height and the RGBA values for customizing the image. The last argument's last value defines the transparency i.e. alpha of the image.
Example - Creating Image with Alpha Channel
In this example we will create an image with alpha channel using the new() funtion.
main.py
from PIL import Image

# Create an RGBA image with Semi-transparent green
image = Image.new('RGBA', (700, 300), (10, 91, 51, 100))

# Display the resultant image with alpha channel
image.show()
Output
On executing the above program you will get output RGBA like below −

Modifying Alpha Channels
The individual alpha values for pixels can be set using the putpixel() function to apply modifications to the alpha channel of an image.
The putpixel() function of the Python Pillow is used to change the color of a single pixel at a specified position within an image. This function allows us to directly modify the color of a specific pixel by providing its coordinates and the desired color.
The below is the syntax and parameters of the putpixel() function.
image.putpixel((x, y), color)
image − This is the image object opened using Image.open() function.
(x, y) − These are the coordinates of the pixel where we want to set the color. x represents the horizontal position and y represents the vertical position.
color − The color value that we want to assign to the specified pixel. The format of the color value depends on the image mode.
Example - Modifying Alpha Channel
In this example we are using the putpixel() function of the pillow library for modifying the alpha values for pixels of the given input image.
main.py
from PIL import Image
# Open an image
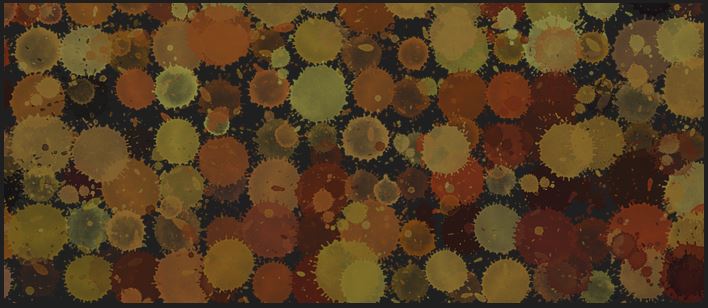
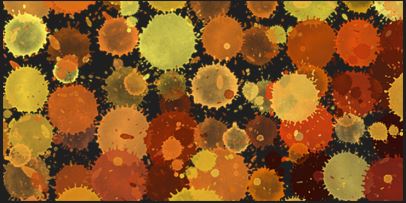
image = Image.open("Images/colordots.png")
width, height = image.size
# Modify alpha values of pixels
for y in range(height):
for x in range(width):
r, g, b, a = image.getpixel((x, y))
image.putpixel((x, y), (r, g, b, int(a * 0.5))) # Reduce alpha by 50%
# Display the modified image
image.show()
Input Image
Output modified image
Note
The putpixel() function directly modifies the image in memory. It is useful for making small modifications to individual pixels.
For large-scale pixel operations or more complex manipulations we have to consider using other Pillow functions that operate on larger regions or entire images for better performance.
Example - Composite Images with Alpha Channel
The Image.alpha_composite() function is used to composite two images with alpha channels. This function blends the images based on their alpha channels.
In this example we are using the Image.alpha_composite() function for blending two images based on their alpha channels.
main.py
from PIL import Image

# Open two images
img1 = Image.open('Images/tp_logo.png')
img2 = Image.open('Images/colordots_2.png')

# Composite the images
composite = Image.alpha_composite(img1, img2)

# Display the result
composite.show()
Input Images −
Output alpha composited image −

Example - Saving Images with Alpha Channel
To preserve transparency, save the image in a format that supports alpha channels such as PNG. Formats like JPEG do not support alpha channels and will discard transparency information. We can use the save() function available in pillow.
In this example we are using the Image.save() function for saving an image with alpha channel.
main.py
from PIL import Image

# Create a new image with alpha channel
new_img = Image.new('RGBA', (700, 300), (255, 0, 0, 128))

# Save the image with alpha channel
new_img.save("Output_Images/new_img.png", "PNG")
print("The image with alpha channel is saved.")
Output
After executing the above code, you will find the resulting PNG file 'new_img.png' saved in the current working directory −
The image with alpha channel is saved.