- Python Pillow - Home
- Python Pillow - Overview
- Python Pillow - Environment Setup
- Basic Image Operations
- Python Pillow - Working with Images
- Python Pillow - Resizing an Image
- Python Pillow - Flip and Rotate Images
- Python Pillow - Cropping an Image
- Python Pillow - Adding Borders to Images
- Python Pillow - Identifying Image Files
- Python Pillow - Merging Images
- Python Pillow - Cutting and Pasting Images
- Python Pillow - Rolling an Image
- Python Pillow - Writing text on image
- Python Pillow - ImageDraw Module
- Python Pillow - Concatenating two Images
- Python Pillow - Creating Thumbnails
- Python Pillow - Creating a Watermark
- Python Pillow - Image Sequences
- Python Pillow Color Conversions
- Python Pillow - Colors on an Image
- Python Pillow - Creating Images With Colors
- Python Pillow - Converting Color String to RGB Color Values
- Python Pillow - Converting Color String to Grayscale Values
- Python Pillow - Change the Color by Changing the Pixel Values
- Image Manipulation
- Python Pillow - Reducing Noise
- Python Pillow - Changing Image Modes
- Python Pillow - Compositing Images
- Python Pillow - Working with Alpha Channels
- Python Pillow - Applying Perspective Transforms
- Image Filtering
- Python Pillow - Adding Filters to an Image
- Python Pillow - Convolution Filters
- Python Pillow - Blur an Image
- Python Pillow - Edge Detection
- Python Pillow - Embossing Images
- Python Pillow - Enhancing Edges
- Python Pillow - Unsharp Mask Filter
- Image Enhancement and Correction
- Python Pillow - Enhancing Contrast
- Python Pillow - Enhancing Sharpness
- Python Pillow - Enhancing Color
- Python Pillow - Correcting Color Balance
- Python Pillow - Removing Noise
- Image Analysis
- Python Pillow - Extracting Image Metadata
- Python Pillow - Identifying Colors
- Advanced Topics
- Python Pillow - Creating Animated GIFs
- Python Pillow - Batch Processing Images
- Python Pillow - Converting Image File Formats
- Python Pillow - Adding Padding to an Image
- Python Pillow - Color Inversion
- Python Pillow - M L with Numpy
- Python Pillow with Tkinter BitmapImage and PhotoImage objects
- Image Module
- Python Pillow - Image Blending
- Python Pillow Useful Resources
- Python Pillow - Quick Guide
- Python Pillow - Function Reference
- Python Pillow - Useful Resources
- Python Pillow - Discussion
Python Pillow - Edge Detection
Edge detection is the process of identifying these boundaries or contours in an image using mathematical algorithms. The edge detection aims to locate the points in the image where the intensity changes suddenly, which usually corresponds to an edge or a boundary between two regions. In general, an edge defined as a boundary or a contour between two distinct regions in an image. These regions can differ in intensity, color, texture, or any other visual feature. Edges can represent important features in an image, such as object boundaries, shapes, and textures.
Edge detection is an essential step in many image-processing applications, such as object recognition, segmentation, tracking, and enhancement. In this tutorial, we will see different approaches to detect edges in an image using the Python pillow library.
Applying Edge Detection Filter to an Image
Detecting edges in an image can be done by using the ImageFilter.FIND_EDGES filter, which is one of the built-in filter options available in the current version of the Pillow library to detect edges in the image.
Following are the steps for detecting the edges in the image −
Load the input image using the Image.open() function.
Apply the filter() function to the loaded Image object and provide ImageFilter.FIND_EDGES as an argument to the function. The function will return the Output detected edges as a PIL.Image.Image object.
Example
The following example demonstrates how to use the ImageFilter.FIND_EDGES filter kernel with the filter() method to detect the edges in an image.
from PIL import Image, ImageFilter
# Open the image
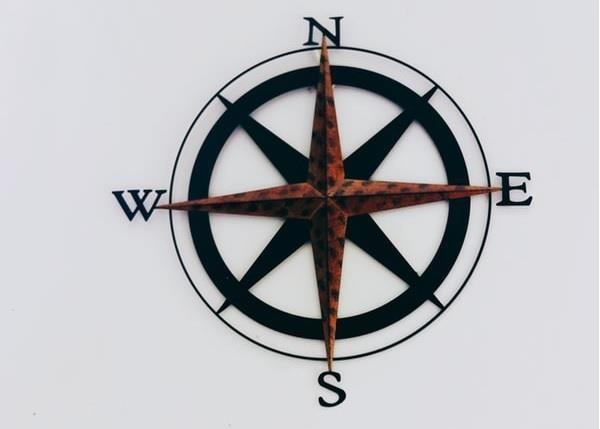
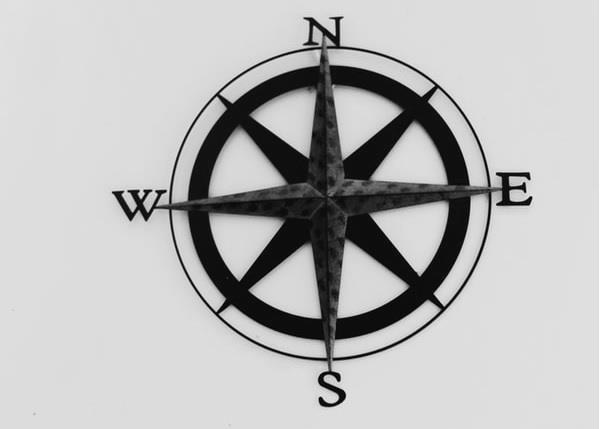
image = Image.open('Images/compass.jpg')
# Apply edge detection filter
edges = image.filter(ImageFilter.FIND_EDGES)
# Display the original image
image.show()
# Display the edges-detected image
edges.show()
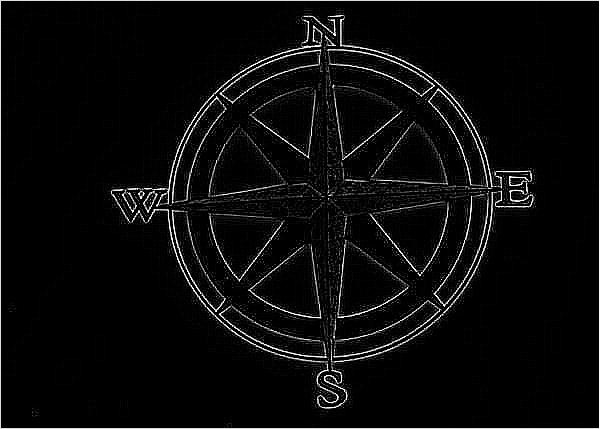
Input Image
Output Image
Output detected edges −
Example
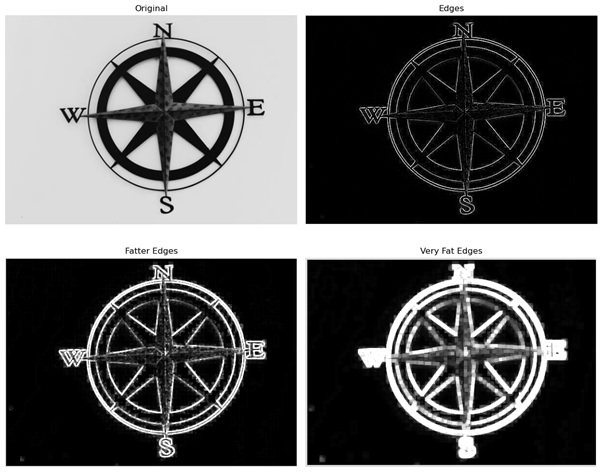
Here is an example that uses the ImageFilter.FIND_EDGES filter kernel to detect edges in the image. And then it applies ImageFilter.MaxFilter() class to flatten the detected edges.
import matplotlib.pyplot as plt
from PIL import Image, ImageFilter

# Open the image and convert it to grayscale
im = Image.open('Images/compass.jpg').convert('L')

# Detect edges
edges = im.filter(ImageFilter.FIND_EDGES)

# Make fatter edges
fatEdges = edges.filter(ImageFilter.MaxFilter)

# Make very fat edges
veryFatEdges = edges.filter(ImageFilter.MaxFilter(7))

# Create subplots for displaying the images
fig, axes = plt.subplots(2, 2, figsize=(12, 10))
ax = axes.ravel()

# Original image
ax[0].imshow(im, cmap='gray')
ax[0].set_title('Original')

# Detected edges
ax[1].imshow(edges, cmap='gray')
ax[1].set_title('Edges')

# Fatter edges
ax[2].imshow(fatEdges, cmap='gray')
ax[2].set_title('Fatter Edges')

# Very fat edges
ax[3].imshow(veryFatEdges, cmap='gray')
ax[3].set_title('Very Fat Edges')

for ax in axes.flatten():
   ax.axis('off')

# Display the images
plt.tight_layout()
plt.show()
Output Image
Detecting Edges using the ImageFilter.Kernel() Class
This class is used to create a convolution kernel.
In this approach we will define a 3X3 convolution kernel with some specified kernel values (-1, -1, -1, -1, 8, -1, -1, -1, -1). We will perform edge detection on an image.
Example
The following example demonstrates how to perform edge detection on an image using the convolution matrix and the ImageFilter.kernel() class.
from PIL import Image, ImageFilter

# Open the image and convert it to grayscale
image = Image.open('Images/compass.jpg').convert('L')

# Calculate edges using a convolution matrix
kernel = ImageFilter.Kernel((3, 3), (-1, -1, -1, -1, 8, -1, -1, -1, -1), scale=1, offset=0)
edges = image.filter(kernel)

# Display the original image
image.show()

# Display the edges
edges.show()
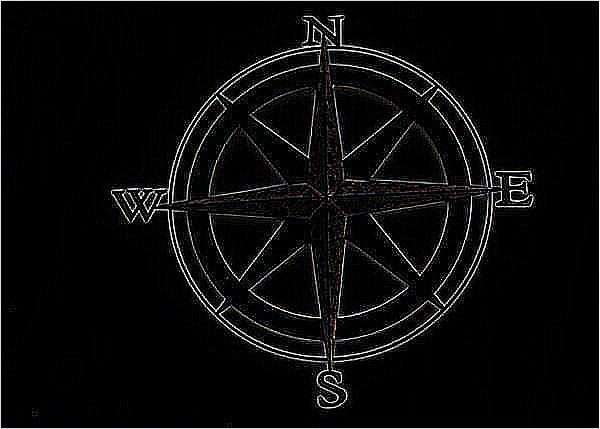
Input Image
Output Image
Output detected edges −