- Python Pillow - Home
- Python Pillow - Overview
- Python Pillow - Environment Setup
- Basic Image Operations
- Python Pillow - Working with Images
- Python Pillow - Resizing an Image
- Python Pillow - Flip and Rotate Images
- Python Pillow - Cropping an Image
- Python Pillow - Adding Borders to Images
- Python Pillow - Identifying Image Files
- Python Pillow - Merging Images
- Python Pillow - Cutting and Pasting Images
- Python Pillow - Rolling an Image
- Python Pillow - Writing text on image
- Python Pillow - ImageDraw Module
- Python Pillow - Concatenating two Images
- Python Pillow - Creating Thumbnails
- Python Pillow - Creating a Watermark
- Python Pillow - Image Sequences
- Python Pillow Color Conversions
- Python Pillow - Colors on an Image
- Python Pillow - Creating Images With Colors
- Python Pillow - Converting Color String to RGB Color Values
- Python Pillow - Converting Color String to Grayscale Values
- Python Pillow - Change the Color by Changing the Pixel Values
- Image Manipulation
- Python Pillow - Reducing Noise
- Python Pillow - Changing Image Modes
- Python Pillow - Compositing Images
- Python Pillow - Working with Alpha Channels
- Python Pillow - Applying Perspective Transforms
- Image Filtering
- Python Pillow - Adding Filters to an Image
- Python Pillow - Convolution Filters
- Python Pillow - Blur an Image
- Python Pillow - Edge Detection
- Python Pillow - Embossing Images
- Python Pillow - Enhancing Edges
- Python Pillow - Unsharp Mask Filter
- Image Enhancement and Correction
- Python Pillow - Enhancing Contrast
- Python Pillow - Enhancing Sharpness
- Python Pillow - Enhancing Color
- Python Pillow - Correcting Color Balance
- Python Pillow - Removing Noise
- Image Analysis
- Python Pillow - Extracting Image Metadata
- Python Pillow - Identifying Colors
- Advanced Topics
- Python Pillow - Creating Animated GIFs
- Python Pillow - Batch Processing Images
- Python Pillow - Converting Image File Formats
- Python Pillow - Adding Padding to an Image
- Python Pillow - Color Inversion
- Python Pillow - M L with Numpy
- Python Pillow with Tkinter BitmapImage and PhotoImage objects
- Image Module
- Python Pillow - Image Blending
- Python Pillow Useful Resources
- Python Pillow - Quick Guide
- Python Pillow - Function Reference
- Python Pillow - Useful Resources
- Python Pillow - Discussion
Python Pillow - ImageDraw.chord() Function
The ImageDraw.chord() method is used to draw a chord (a segment of a circle) inside a bounding box defined by two points(drawn from the start angle to the end angle). It is same as the arc() method but a straight line is connected between the endpoints. A chord of a circle is a straight line segment that connects two points on the circle's circumference.
Syntax
Following is the syntax of the function −
ImageDraw.chord(xy, start, end, fill=None, outline=None, width=1)
Parameters
Here are the details of this function parameters −
xy − Two points that define the bounding box of the chord. It can be specified as a sequence of two tuples [(x0, y0), (x1, y1)] or as a flat list [x0, y0, x1, y1]. In either case, the condition x1 >= x0 and y1 >= y0 must be satisfied.
start − The starting angle of the chord, measured in degrees. Angles are measured from 3 oclock, increasing clockwise.
end − The ending angle of the chord, also measured in degrees.
fill − The color to use for filling the chord.
outline − The color to use for the outline of the chord.
width − The line width of the chord's outline, in pixels. The default value is 1.
Examples
Example 1
This example draws a chord inside the specified bounding box with the default fill color, outline, and width.
from PIL import Image, ImageDraw

# Create a blank image
image = Image.new("RGB", (700, 300), "black")
draw = ImageDraw.Draw(image)

# Draw a chord inside a bounding box [(100, 10), (350, 250)]
draw.chord([(100, 10), (350, 250)], start=45, end=180)

# Display the image
image.show()
print('Chord is drawn successfully...')
Output
Chord is drawn successfully...
Output Image

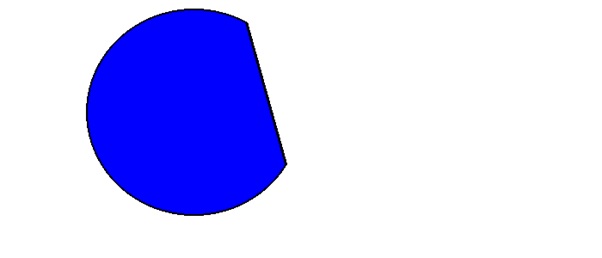
Example 2
This example draws a chord inside the specified bounding box with a blue fill, a black outline, and a width of 2 pixels for the outline.
from PIL import Image, ImageDraw

# Create a new image with a white background
image = Image.new("RGB", (700, 300), "white")
draw = ImageDraw.Draw(image)

# Draw a chord inside the bounding box
draw.chord([(100, 10), (350, 250)], start=30, end=300, fill="blue", outline="black", width=2)

# Display the images
image.show()
print('The Chord is drawn successfully...')
Output
The Chord is drawn successfully...
Output Image
Example 3
The following example demonstrates how to draw a chord on an existing image with different parameters.
from PIL import Image, ImageDraw

# Open an Image
image = Image.open('Images/ColorDots.png')

# Create the draw object
draw = ImageDraw.Draw(image)

# Draw a red chord inside a bounding box
draw.chord([(250, 130), (440, 260)], start=30, end=270, fill="red", width=10)

# Display the image
image.show()
print('The chord is drawn successfully...')
Output
The chord is drawn successfully...
Output Image
