- Javascript Basics Tutorial
- Javascript - Home
- JavaScript - Roadmap
- JavaScript - Overview
- JavaScript - Features
- JavaScript - Enabling
- JavaScript - Placement
- JavaScript - Syntax
- JavaScript - Hello World
- JavaScript - Console.log()
- JavaScript - Comments
- JavaScript - Variables
- JavaScript - let Statement
- JavaScript - Constants
- JavaScript - Data Types
- JavaScript - Type Conversions
- JavaScript - Strict Mode
- JavaScript - Reserved Keywords
- JavaScript Operators
- JavaScript - Operators
- JavaScript - Arithmetic Operators
- JavaScript - Comparison Operators
- JavaScript - Logical Operators
- JavaScript - Bitwise Operators
- JavaScript - Assignment Operators
- JavaScript - Conditional Operators
- JavaScript - typeof Operator
- JavaScript - Nullish Coalescing Operator
- JavaScript - Safe Assignment Operator
- JavaScript - Delete Operator
- JavaScript - Comma Operator
- JavaScript - Grouping Operator
- JavaScript - Yield Operator
- JavaScript - Spread Operator
- JavaScript - Exponentiation Operator
- JavaScript - Operator Precedence
- JavaScript Control Flow
- JavaScript - If...Else
- JavaScript - While Loop
- JavaScript - For Loop
- JavaScript - For...in
- Javascript - For...of
- JavaScript - Loop Control
- JavaScript - Break Statement
- JavaScript - Continue Statement
- JavaScript - Switch Case
- JavaScript - User Defined Iterators
- JavaScript Functions
- JavaScript - Functions
- JavaScript - Function Expressions
- JavaScript - Function Parameters
- JavaScript - Default Parameters
- JavaScript - Function() Constructor
- JavaScript - Function Hoisting
- JavaScript - Self-Invoking Functions
- JavaScript - Arrow Functions
- JavaScript - Function Invocation
- JavaScript - Function call()
- JavaScript - Function apply()
- JavaScript - Function bind()
- JavaScript - Closures
- JavaScript - Variable Scope
- JavaScript - Global Variables
- JavaScript - Smart Function Parameters
- JavaScript Objects
- JavaScript - Number
- JavaScript - Boolean
- JavaScript - Strings
- JavaScript - Arrays
- JavaScript - Date
- JavaScript - DataView
- JavaScript - Handler
- JavaScript - Math
- JavaScript - RegExp
- JavaScript - Symbol
- JavaScript - Sets
- JavaScript - WeakSet
- JavaScript - Maps
- JavaScript - WeakMap
- JavaScript - Iterables
- JavaScript - Reflect
- JavaScript - TypedArray
- JavaScript - Template Literals
- JavaScript - Tagged Templates
- Object Oriented JavaScript
- JavaScript - Objects
- JavaScript - Classes
- JavaScript - Object Properties
- JavaScript - Object Methods
- JavaScript - Static Methods
- JavaScript - Display Objects
- JavaScript - Object Accessors
- JavaScript - Object Constructors
- JavaScript - Native Prototypes
- JavaScript - ES5 Object Methods
- JavaScript - Encapsulation
- JavaScript - Inheritance
- JavaScript - Abstraction
- JavaScript - Polymorphism
- JavaScript - Destructuring
- JavaScript - Destructuring Assignment
- JavaScript - Object Destructuring
- JavaScript - Array Destructuring
- JavaScript - Nested Destructuring
- JavaScript - Optional Chaining
- JavaScript - Global Object
- JavaScript - Mixins
- JavaScript - Proxies
- JavaScript Versions
- JavaScript - History
- JavaScript - Versions
- JavaScript - ES5
- JavaScript - ES6
- ECMAScript 2016
- ECMAScript 2017
- ECMAScript 2018
- ECMAScript 2019
- ECMAScript 2020
- ECMAScript 2021
- ECMAScript 2022
- JavaScript Asynchronous
- JavaScript - Asynchronous
- JavaScript - Callback Functions
- JavaScript - Promises
- JavaScript - Async/Await
- JavaScript - Microtasks
- JavaScript - Promisification
- JavaScript - Promises Chaining
- JavaScript - Timing Events
- JavaScript - setTimeout()
- JavaScript - setInterval()
- JavaScript Cookies
- JavaScript - Cookies
- JavaScript - Cookie Attributes
- JavaScript - Deleting Cookies
- JavaScript Browser BOM
- JavaScript - Browser Object Model
- JavaScript - Window Object
- JavaScript - Document Object
- JavaScript - Screen Object
- JavaScript - History Object
- JavaScript - Navigator Object
- JavaScript - Location Object
- JavaScript - Console Object
- JavaScript Web APIs
- JavaScript - Web API
- JavaScript - History API
- JavaScript - Storage API
- JavaScript - Forms API
- JavaScript - Worker API
- JavaScript - Fetch API
- JavaScript - Geolocation API
- JavaScript Events
- JavaScript - Events
- JavaScript - DOM Events
- JavaScript - addEventListener()
- JavaScript - Mouse Events
- JavaScript - Keyboard Events
- JavaScript - Form Events
- JavaScript - Window/Document Events
- JavaScript - Event Delegation
- JavaScript - Event Bubbling
- JavaScript - Event Capturing
- JavaScript - Custom Events
- JavaScript Error Handling
- JavaScript - Error Handling
- JavaScript - try...catch
- JavaScript - Debugging
- JavaScript - Custom Errors
- JavaScript - Extending Errors
- JavaScript Important Keywords
- JavaScript - this Keyword
- JavaScript - void Keyword
- JavaScript - new Keyword
- JavaScript - var Keyword
- JavaScript HTML DOM
- JavaScript - HTML DOM
- JavaScript - DOM Methods & Properties
- JavaScript - DOM Document
- JavaScript - DOM Elements
- JavaScript - DOM Attributes (Attr)
- JavaScript - DOM Forms
- JavaScript - Changing HTML
- JavaScript - Changing CSS
- JavaScript - DOM Animation
- JavaScript - DOM Navigation
- JavaScript - DOM Collections
- JavaScript - DOM NodeList
- JavaScript - DOM DOMTokenList
- JavaScript Advanced Chapters
- JavaScript - Bubble Sort Algorithm
- JavaScript - Circular Reference Error
- JavaScript - Code Testing with Jest
- JavaScript - CORS Handling
- JavaScript - Data Analysis
- JavaScript - Dead Zone
- JavaScript - Design Patterns
- JavaScript - Engine and Runtime
- JavaScript - Execution Context
- JavaScript - Function Composition
- JavaScript - Immutability
- JavaScript - Kaboom.js
- JavaScript - Lexical Scope
- JavaScript - Local Storage
- JavaScript - Memoization
- JavaScript - Minifying JS
- JavaScript - Mutability vs Immutability
- JavaScript - Package Manager
- JavaScript - Parse S-Expressions
- JavaScript - Prototypal Inheritance
- JavaScript - Reactivity
- JavaScript - Require Function
- JavaScript - Selection API
- JavaScript - Session Storage
- JavaScript - SQL CRUD Operations
- JavaScript - Supercharged Sorts
- JavaScript - Temporal Dead Zone
- JavaScript - Throttling
- JavaScript - TRPC Library
- JavaScript - Truthy and Falsy Values
- JavaScript - Upload Files
- JavaScript - Date Comparison
- JavaScript - Recursion
- JavaScript - Data Structures
- JavaScript - Base64 Encoding
- JavaScript - Callback Function
- JavaScript - Current Date/Time
- JavaScript - Date Validation
- JavaScript - Filter Method
- JavaScript - Generating Colors
- JavaScript - HTTP Requests
- JavaScript - Insertion Sort
- JavaScript - Lazy Loading
- JavaScript - Linked List
- JavaScript - Nested Loop
- JavaScript - Null Checking
- JavaScript - Get Current URL
- JavaScript - Graph Algorithms
- JavaScript - Higher Order Functions
- JavaScript - Empty String Check
- JavaScript - Form Handling
- JavaScript - Functional Programming
- JavaScript - Parameters vs Arguments
- JavaScript - Prototype
- JavaScript - Reactive Programming
- JavaScript - Reduce Method
- JavaScript - Rest Operator
- JavaScript - Short Circuiting
- JavaScript - Undefined Check
- JavaScript - Unit Testing
- JavaScript - Validate URL
- JavaScript Miscellaneous
- JavaScript - Ajax
- JavaScript - Async Iteration
- JavaScript - Atomics Objects
- JavaScript - Rest Parameter
- JavaScript - Page Redirect
- JavaScript - Dialog Boxes
- JavaScript - Page Printing
- JavaScript - Validations
- JavaScript - Animation
- JavaScript - Multimedia
- JavaScript - Image Map
- JavaScript - Browsers
- JavaScript - JSON
- JavaScript - Multiline Strings
- JavaScript - Date Formats
- JavaScript - Get Date Methods
- JavaScript - Set Date Methods
- JavaScript - Modules
- JavaScript - Dynamic Imports
- JavaScript - BigInt
- JavaScript - Blob
- JavaScript - Unicode
- JavaScript - Shallow Copy
- JavaScript - Call Stack
- JavaScript - Reference Type
- JavaScript - IndexedDB
- JavaScript - Clickjacking Attack
- JavaScript - Currying
- JavaScript - Graphics
- JavaScript - Canvas
- JavaScript - Debouncing
- JavaScript - Performance
- JavaScript - Style Guide
- JavaScript Useful Resources
- JavaScript - Questions And Answers
- JavaScript - Quick Guide
- JavaScript - Cheatsheet
- JavaScript - Functions
- JavaScript - Resources
- JavaScript - Online Editor
JavaScript - Cookie Attributes
Cookie Attributes
The JavaScript cookie attributes are used to set additional information about a cookie such as path, domain, expiry date, etc. In JavaScript, you can specify the cookie attributes while setting up a new cookie or updating the cookie. For example, you can set the cookie's expiry date using the 'expires' attributes.
In simple terms, cookie attributes are used to control the behavior of the cookies and how the cookie is used in the browser.
Here, we have listed all cookie attributes in the table below with its description.
| Attribute | Description | Default Value |
|---|---|---|
| Name/Value | It is used to store the cookies in the browser. | |
| Domain | To specify the domain for whose cookie is valid. | Website of domain. For example, tutorialspoint.com |
| Path | The path to the directory or web page that sets the cookie. | / (entire domain) |
| Expires | It is used to specify the date and time when the cookie should expire. | Current session |
| Max-Age | It is used to specify the time limit after that cookie should expire. | Current session |
| Secure | If this field contains the word "secure", then the cookie may only be retrieved with a secure server. If this field is blank, no such restriction exists. | false |
| HttpOnly | It prevents accessing the cookies via JavaScript to make cookies secure. | false |
| SameSite | It is used to specify how third-party cookies should be handled. | Lax |
| Priority | It defines the priority of the cookies. | 1000 |
| Site/Service | To get information about the origin site of the cookie. | |
| SourcePort | To get the port of the source for the cookie. | |
| StoragePartition | It defines which storage partition is used to store cookies. | |
| Size | It represents the size of the cookies. | The size depends on the text length. |
However, above all, attributes are optional.
Also, you can't manipulate all attributes of the cookies. The browser sets some attributes.
Check the Attribute Value in the Browser
You can set the attributes to the cookie, but you can't access the attributes. To check whether the attribute is set, you can use the browser console.
Follow the steps below to check cookies in the browser console.
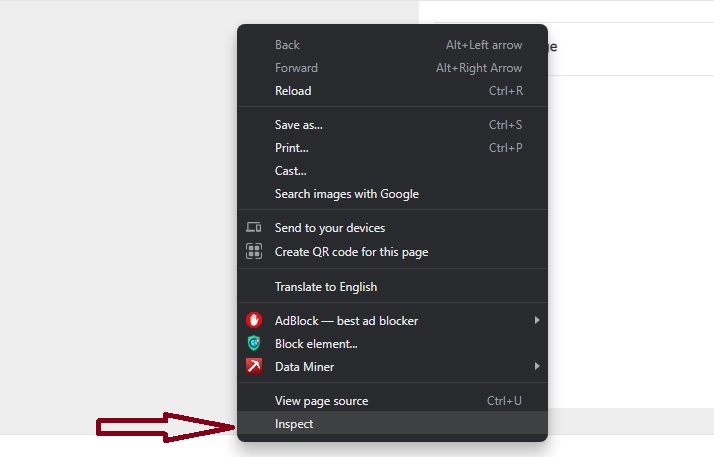
Step 1 − Right click in the browser. It will open the menu. You need to select the 'inspect' option. It will open the developer tool.
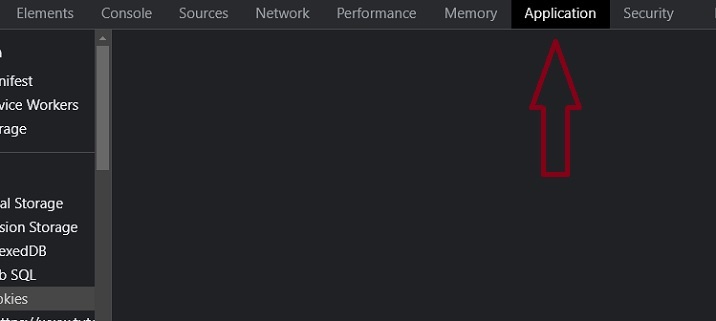
Step 2 − After that, you need to go to the Application/ Storage tab.
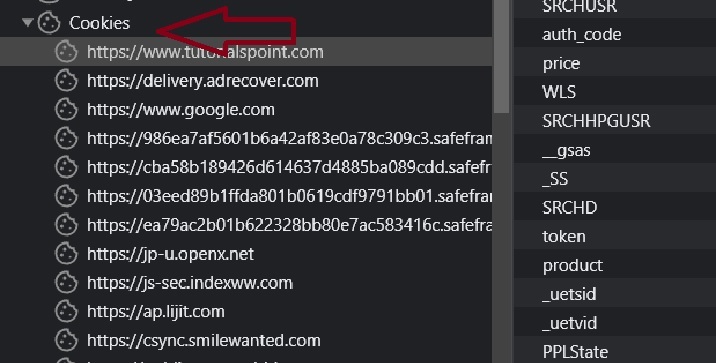
Step 3 − In the sidebar, select 'cookies.
Step 4 − Now, click on any cookies to check their name, value, and other attribute values.
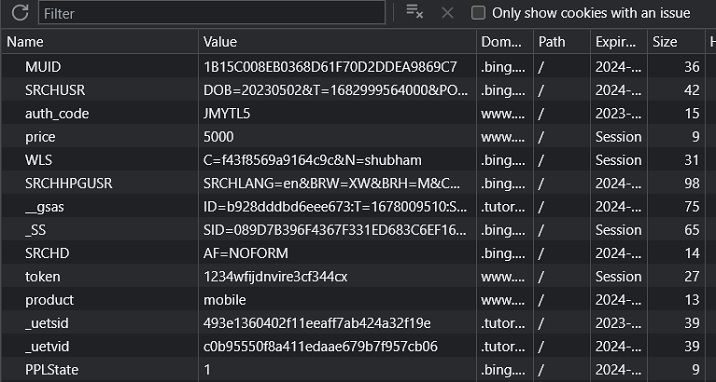
The above steps are only for the Chrome web browser. The step can differ according to what browser you are using.
Here, you will learn each attribute one by one with examples.
Cookie's Name/Value Attribute
The Name attribute is used to store the cookie data. It takes the data as a value. If you want to use the special characters in the value of the 'Name' attribute, you need to encode the text using the encodeURIComponent() method.
Syntax
Follow the syntax below to set the Name attribute of the cookie.
let value = encodeURIComponent(cookieValue);
document.cookie = "name=" + value + ";";
In the above syntax, we have encoded the 'cookieValue' using the encodeURIComponent() method and used the encoded value as a name attribute value.
Example
In the below code, we set the 'subscribed' cookie with a 'false' value. You can click the read cookies button to get the cookies.
<html>
<body>
	<p id = "output"> </p>
	<button onclick = "setCookies()"> Set Cookie </button> <br> <br>
	<button onclick = "readCookies()"> Read Cookies </button>
	<script>
		let output = document.getElementById("output");
		function setCookies() {
			document.cookie = "subscribed=false"; // name-value pair
			output.innerHTML = "Cookie setting successful!";
		}
		function readCookies() {
			const allCookies = document.cookie.split("; ");
			output.innerHTML = "The subscribed cookie is - <br>";
			for (const cookie of allCookies) {
				const [name, value] = cookie.split("=");
				if (name == "subscribed") {
					output.innerHTML += `${name} : ${decodeURIComponent(value)} <br>`;
				}
			}
		}
	</script>
  </body>
</html>
Cookie's Path Attribute
The Path attribute is used to set the scope of the cookie. It defines where cookies should be accessible on the website. You may set the relative or absolute path as a Path attribute value.
If you set the relative path, all the cookies can be accessible everywhere in the particular or sub-directory.
Syntax
Follow the syntax below to set the Path attribute in the cookie.
document.cookie = "name=value;path=pathStr";
In the above syntax, you need to replace the 'pathStr' with the actual path string.
Example
In the below code, we set the path for the cookie. Here, we set the / (home route). So, cookies can be accessible on each webpage of the website. You may try to get the cookie on the different web pages of the website.
<html>
<body>
	<button onclick = "setCookies()"> Set Cookie </button>
	<p id = "output"> </p>
	<button onclick = "readCookies()"> Read Cookies </button>
	<script>
		let output = document.getElementById("output");
		function setCookies() {
			document.cookie = "signIn=true; path=/";
			output.innerHTML = "Cookie set successful!";
		}
		function readCookies() {
			const allCookies = document.cookie.split("; ");
			output.innerHTML = "The cookie is : <br>";
			for (const cookie of allCookies) {
				const [key, value] = cookie.split("=");
				if (key == "signIn") {
					output.innerHTML += `${key} : ${decodeURIComponent(value)} <br>`;
				}
			}
		}
	</script>
</body>
</html>
Cookie Expires Attribute
The 'expires' attribute is used to set the expiry date for the cookie. It takes the date string as a value.
If you set 0 or past date as a value of the 'expires, the browser will automatically delete the cookie.
Syntax
Follow the syntax below to set the expires attribute in the cookie.
document.cookie = "name=value;expires=dateStr";
In the above syntax, you need to replace the 'dateStr' with the date string.
Example
In the code below, we set the product cookie. Also, we set the expiry date in 2050.
You may try to set the past expiry date and try to access the cookie. You won't be able to find the cookie.
<html>
<body>
	<p id = "output"> </p>
	<button onclick = "setCookies()"> Set Cookie </button> <br> <br>
	<button onclick = "readCookies()"> Read Cookies </button>
	<script>
		let output = document.getElementById("output");
		function setCookies() {
			document.cookie = "product=mobile;expires=12 Jan 2050 12:00:00 UTC";
			output.innerHTML = "Cookie Set Successful!";
		}
		function readCookies() {
			const allCookies = document.cookie.split("; ");
			output.innerHTML = "The cookie is : <br>";
			for (const cookie of allCookies) {
				const [key, value] = cookie.split("=");
				if (key == "product") {
					output.innerHTML += `${key} : ${decodeURIComponent(value)} <br>`;
				}
			}
		}
	</script>
</body>
</html>
Cookie's maxAge Attribute
The 'maxAge' attribute is an alternative to the 'expires' attribute. It is used to specify the lifetime of the cookie. It takes the seconds as a value.
When the lifetime of the cookie is finished, it will automatically get deleted.
Syntax
Follow the syntax below to pass the 'maxAge' attribute to the cookie.
document.cookie = "name=value;max-ge=age;";
In the above syntax, you need to replace the 'age' with the number of seconds.
Example
In the below code, we set the total number of seconds equal to 10 days as a value of the maxAge attribute. You can set the lifetime of 1 second for the cookie and try to access the cookie after 1 second.
<html>
<body>
	<button onclick = "setCookies()"> Set Cookie </button>
	<button onclick = "readCookies()"> Read Cookies </button>
	<p id = "output"> </p>
	<script>
		const output = document.getElementById("output");
		function setCookies() {
			document.cookie = "token=1234wfijdn;max-age=864000";
		}
		function readCookies() {
			const allCookies = document.cookie.split("; ");
			output.innerHTML = "The cookie is : <br>";
			for (const cookie of allCookies) {
				const [key, value] = cookie.split("=");
				if (key == "token") {
					output.innerHTML += `${key} : ${decodeURIComponent(value)} <br>`;
				}
			}
		}
	</script>
</body>
</html>
Cookie Domain Attribute
The domain attribute is used to specify the domain for which the cookie is valid. The default value of the domain from which you are making a request. You may set the domain attribute to set the subdomains.
Syntax
Follow the syntax below to set the value of the domain attribute in the cookie.
document.cookie = "name=value;domain:domain_name ";
In the above syntax, replace the 'domain_name' with the actual domain, like example.com.
Example
In the below code, we set the 'tutorialspoint.com' domain for the cookie.
<html>
<body>
	<p id = "output"> </p>
	<button onclick = "setCookies()"> Set Cookie </button>
	<button onclick = "readCookies()"> Read Cookies </button>
	<script>
		const output = document.getElementById("output");
		function setCookies() {
			document.cookie = "username=abcd;domain:tutorialspoint.com";
		}
		function readCookies() {
			const allCookies = document.cookie.split("; ");
			output.innerHTML = "The cookie is : <br>";
			for (const cookie of allCookies) {
				const [key, value] = cookie.split("=");
				if (key == "username") {
					output.innerHTML += `${key} : ${decodeURIComponent(value)} <br>`;
				}
			}
		}
	</script>
</body>
</html>
Similarly, you can also update the attribute values. For example, you can extend the expiry time of the cookie.
