- Swift - Home
- Swift - Overview
- Swift - Environment
- Swift - Basic Syntax
- Swift - Variables
- Swift - Constants
- Swift - Literals
- Swift - Comments
- Swift Operators
- Swift - Operators
- Swift - Arithmetic Operators
- Swift - Comparison Operators
- Swift - Logical Operators
- Swift - Assignment Operators
- Swift - Bitwise Operators
- Swift - Misc Operators
- Swift Advanced Operators
- Swift - Operator Overloading
- Swift - Arithmetic Overflow Operators
- Swift - Identity Operators
- Swift - Range Operators
- Swift Data Types
- Swift - Data Types
- Swift - Integers
- Swift - Floating-Point Numbers
- Swift - Double
- Swift - Boolean
- Swift - Strings
- Swift - Characters
- Swift - Type Aliases
- Swift - Optionals
- Swift - Tuples
- Swift - Assertions and Precondition
- Swift Control Flow
- Swift - Decision Making
- Swift - if statement
- Swift - if...else if...else Statement
- Swift - if-else Statement
- Swift - nested if statements
- Swift - switch statement
- Swift - Loops
- Swift - for in loop
- Swift - While loop
- Swift - repeat...while loop
- Swift - continue statement
- Swift - break statement
- Swift - fall through statement
- Swift Collections
- Swift - Arrays
- Swift - Sets
- Swift - Dictionaries
- Swift Functions
- Swift - Functions
- Swift - Nested Functions
- Swift - Function Overloading
- Swift - Recursion
- Swift - Higher-Order Functions
- Swift Closures
- Swift - Closures
- Swift-Escaping and Non-escaping closure
- Swift - Auto Closures
- Swift OOps
- Swift - Enumerations
- Swift - Structures
- Swift - Classes
- Swift - Properties
- Swift - Methods
- Swift - Subscripts
- Swift - Inheritance
- Swift-Overriding
- Swift - Initialization
- Swift - Deinitialization
- Swift Advanced
- Swift - ARC Overview
- Swift - Optional Chaining
- Swift - Error handling
- Swift - Concurrency
- Swift - Type Casting
- Swift - Nested Types
- Swift - Extensions
- Swift - Protocols
- Swift - Generics
- Swift - Access Control
- Swift - Function vs Method
- Swift - SwiftyJSON
- Swift - Singleton class
- Swift Random Numbers
- Swift Opaque and Boxed Type
- Swift - Compile Online
- Swift - Quick Guide
- Swift - Cheatsheet
- Swift - Useful Resources
- Swift - Discussion
Swift - Quick Guide
Swift - Overview
Swift 4 is a new programming language developed by Apple Inc for iOS and OS X development. Swift 4 adopts the best of C and Objective-C, without the constraints of C compatibility.
Swift 4 makes use of safe programming patterns.
Swift 4 provides modern programming features.
Swift 4 provides Objective-C like syntax.
Swift 4 is a fantastic way to write iOS and OS X apps.
Swift 4 provides seamless access to existing Cocoa frameworks.
Swift 4 unifies the procedural and object-oriented portions of the language.
Swift 4 does not need a separate library import to support functionalities like input/output or string handling.
Swift 4 uses the same runtime as the existing Obj-C system on Mac OS and iOS, which enables Swift 4 programs to run on many existing iOS 6 and OS X 10.8 platforms.
Swift 4 comes with playground feature where Swift 4 programmers can write their code and execute it to see the results immediately.
The first public release of Swift was released in 2010. It took Chris Lattner almost 14 years to come up with the first official version, and later, it was supported by many other contributors. Swift 4 has been included in Xcode 6 beta.
Swift designers took ideas from various other popular languages such as Objective-C, Rust, Haskell, Ruby, Python, C#, and CLU.
Swift - Environment
Local Environment Setup
Swift 4 provides a Playground platform for learning purpose and we are going to setup the same. You need xCode software to start your Swift 4 coding in Playground. Once you are comfortable with the concepts of Swift 4, you can use xCode IDE for iOS/OS x application development.
To start with, we consider you already have an account at Apple Developer website. Once you are logged in, go to the following link − Download for Apple Developers
This will list down a number of software available as follows −
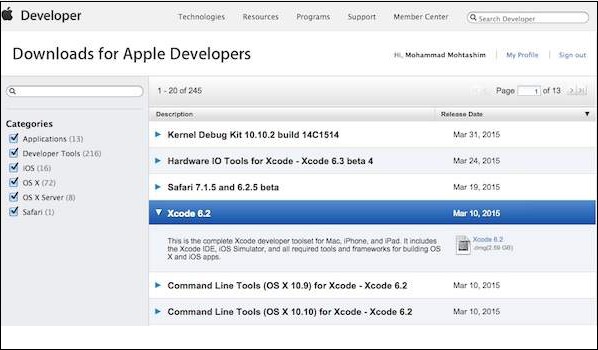
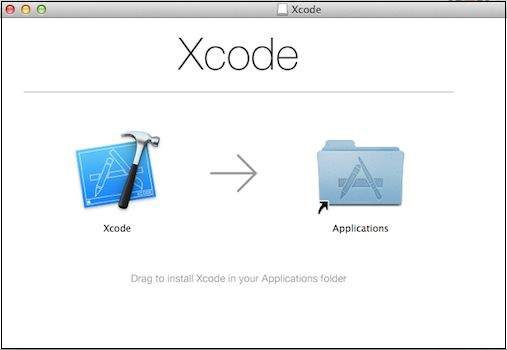
Now select xCode and download it by clicking on the given link near to disc image. After downloading the dmg file, you can install it by simply double-clicking on it and following the given instructions. Finally, follow the given instructions and drop xCode icon into the Application folder.
Now you have xCode installed on your machine. Next, open Xcode from the Application folder and proceed after accepting the terms and conditions. If everything is fine, you will get the following screen −
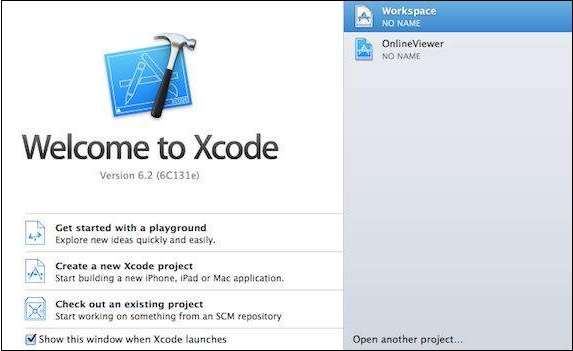
Select Get started with a playground option and enter a name for playground and select iOS as platform. Finally, you will get the Playground window as follows −
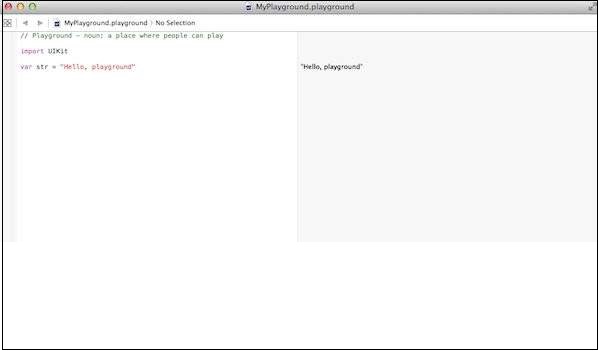
Following is the code taken from the default Swift 4 Playground Window.
import UIKit
var str = "Hello, playground"
If you create the same program for OS X program, then it will include import Cocoa and the program will look like as follows −
import Cocoa
var str = "Hello, playground"
When the above program gets loaded, it should display the following result in Playground result area (Right Hand Side).
Hello, playground
Congratulations, you have your Swift 4 programming environment ready and you can proceed with your learning vehicle "Tutorials Point".
Swift - Basic Syntax
We have already seen a piece of Swift 4 program while setting up the environment. Let's start once again with the following Hello, World! program created for OS X playground, which includes import Cocoa as shown below −
/* My first program in Swift 4 */
var myString = "Hello, World!"

print(myString)
If you create the same program for iOS playground, then it will include import UIKit and the program will look as follows −
import UIKit
var myString = "Hello, World!"
print(myString)
When we run the above program using an appropriate playground, we will get the following result −
Hello, World!
Let us now see the basic structure of a Swift 4 program, so that it will be easy for you to understand the basic building blocks of the Swift 4 programming language.
Import in Swift 4
You can use the import statement to import any Objective-C framework (or C library) directly into your Swift 4 program. For example, the above import cocoa statement makes all Cocoa libraries, APIs, and runtimes that form the development layer for all of OS X, available in Swift 4.
Cocoa is implemented in Objective-C, which is a superset of C, so it is easy to mix C and even C++ into your Swift 4 applications.
Tokens in Swift 4
A Swift 4 program consists of various tokens and a token is either a keyword, an identifier, a constant, a string literal, or a symbol. For example, the following Swift 4 statement consists of three tokens −
print("test!")
The individual tokens are:
print("test!")
Comments
Comments are like helping texts in your Swift 4 program. They are ignored by the compiler. Multi-line comments start with /* and terminate with the characters */ as shown below −
/* My first program in Swift 4 */
Multi-line comments can be nested in Swift 4. Following is a valid comment in Swift 4 −
/* My first program in Swift 4 is Hello, World!
/* Where as second program is Hello, Swift 4! */ */
Single-line comments are written using // at the beginning of the comment.
// My first program in Swift 4
Semicolons
Swift 4 does not require you to type a semicolon (;) after each statement in your code, though its optional; and if you use a semicolon, then the compiler does not complain about it.
However, if you are using multiple statements in the same line, then it is required to use a semicolon as a delimiter, otherwise the compiler will raise a syntax error. You can write the above Hello, World! program as follows −
/* My first program in Swift 4 */
var myString = "Hello, World!"; print(myString)
Identifiers
A Swift 4 identifier is a name used to identify a variable, function, or any other userdefined item. An identifier starts with an alphabet A to Z or a to z or an underscore _ followed by zero or more letters, underscores, and digits (0 to 9).
Swift 4 does not allow special characters such as @, $, and % within identifiers. Swift 4 is a case sensitive programming language. Thus, Manpower and manpower are two different identifiers in Swift 4. Here are some examples of acceptable identifiers −
Azad        zara   abc   move_name   a_123
myname50    _temp  j     a23b9       retVal
To use a reserved word as an identifier, you will need to put a backtick (`) before and after it. For example, class is not a valid identifier, but `class` is valid.
Keywords
The following keywords are reserved in Swift 4. These reserved words may not be used as constants or variables or any other identifier names, unless they're escaped with backticks −
Keywords used in declarations
| Class | deinit | Enum | extension |
| Func | import | Init | internal |
| Let | operator | private | protocol |
| public | static | struct | subscript |
| typealias | var |
Keywords used in statements
| break | case | continue | default |
| do | else | fallthrough | for |
| if | in | return | switch |
| where | while |
Keywords used in expressions and types
| as | dynamicType | false | is |
| nil | self | Self | super |
| true | _COLUMN_ | _FILE_ | _FUNCTION_ |
| _LINE_ |
Keywords used in particular contexts
| associativity | convenience | dynamic | didSet |
| final | get | infix | inout |
| lazy | left | mutating | none |
| nonmutating | optional | override | postfix |
| precedence | prefix | Protocol | required |
| right | set | Type | unowned |
| weak | willSet |
Whitespaces
A line containing only whitespace, possibly with a comment, is known as a blank line, and a Swift 4 compiler totally ignores it.
Whitespace is the term used in Swift 4 to describe blanks, tabs, newline characters, and comments. Whitespaces separate one part of a statement from another and enable the compiler to identify where one element in a statement, such as int, ends and the next element begins. Therefore, in the following statement −
var age
There must be at least one whitespace character (usually a space) between var and age for the compiler to be able to distinguish them. On the other hand, in the following statement −
int fruit = apples + oranges //get the total fruits
No whitespace characters are necessary between fruit and =, or between = and apples, although you are free to include some for better readability.
Space on both side of a operator should be equal, for eg.
int fruit = apples +oranges    //is a wrong statement
int fruit = apples + oranges   //is a Correct statement
Literals
A literal is the source code representation of a value of an integer, floating-point number, or string type. The following are examples of literals −
92               // Integer literal
4.24159          // Floating-point literal
"Hello, World!"  // String literal
Printing in Swift
To print anything in swift we have print keyword.
Print has three different properties.
Items Items to be printed
Separator separator between items
Terminator the value with which line should end, lets see a example and syntax of same.
print("Items to print", separator: "Value " , terminator: "Value")
// E.g. of print statement.

print("Value one")
// prints "Value one \n" Adds, \n as terminator and " " as separator by
default.

print("Value one","Value two", separator: " Next Value" , terminator: " End")
//prints "Value one Next Value Value two End"
In the above code first print statement adds \n , newline Feed as terminator by default, where as in second print statement weve given " End " as terminator, hence itll print "End " instead of \n.
We can give our custom separator and terminators according to our requirement.
Swift - Data Types
While doing programming in any programming language, you need to use different types of variables to store information. Variables are nothing but reserved memory locations to store values. This means that when you create a variable, you reserve some space in memory.
You may like to store information of various data types like string, character, wide character, integer, floating point, Boolean, etc. Based on the data type of a variable, the operating system allocates memory and decides what can be stored in the reserved memory.
Built-in Data Types
Swift 4 offers the programmer a rich assortment of built-in as well as user-defined data types. The following types of basic data types are most frequently when declaring variables −
Int or UInt − This is used for whole numbers. More specifically, you can use Int32, Int64 to define 32 or 64 bit signed integer, whereas UInt32 or UInt64 to define 32 or 64 bit unsigned integer variables. For example, 42 and -23.
Float − This is used to represent a 32-bit floating-point number and numbers with smaller decimal points. For example, 3.14159, 0.1, and -273.158.
Double − This is used to represent a 64-bit floating-point number and used when floating-point values must be very large. For example, 3.14159, 0.1, and -273.158.
Bool − This represents a Boolean value which is either true or false.
String − This is an ordered collection of characters. For example, "Hello, World!"
Character − This is a single-character string literal. For example, "C"
Optional − This represents a variable that can hold either a value or no value.
Tuples − This is used to group multiple values in single Compound Value.
We have listed here a few important points related to Integer types −
On a 32-bit platform, Int is the same size as Int32.
On a 64-bit platform, Int is the same size as Int64.
On a 32-bit platform, UInt is the same size as UInt32.
On a 64-bit platform, UInt is the same size as UInt64.
Int8, Int16, Int32, Int64 can be used to represent 8 Bit, 16 Bit, 32 Bit, and 64 Bit forms of signed integer.
UInt8, UInt16, UInt32, and UInt64 can be used to represent 8 Bit, 16 Bit, 32 Bit and 64 Bit forms of unsigned integer.
Bound Values
The following table shows the variable type, how much memory it takes to store the value in memory, and what is the maximum and minimum value which can be stored in such type of variables.
| Type | Typical Bit Width | Typical Range |
|---|---|---|
| Int8 | 1byte | -127 to 127 |
| UInt8 | 1byte | 0 to 255 |
| Int32 | 4bytes | -2147483648 to 2147483647 |
| UInt32 | 4bytes | 0 to 4294967295 |
| Int64 | 8bytes | -9223372036854775808 to 9223372036854775807 |
| UInt64 | 8bytes | 0 to 18446744073709551615 |
| Float | 4bytes | 1.2E-38 to 3.4E+38 (~6 digits) |
| Double | 8bytes | 2.3E-308 to 1.7E+308 (~15 digits) |
Type Aliases
You can create a new name for an existing type using typealias. Here is the simple syntax to define a new type using typealias −
typealias newname = type
For example, the following line instructs the compiler that Feet is another name for Int −
typealias Feet = Int
Now, the following declaration is perfectly legal and creates an integer variable called distance −
typealias Feet = Int
var distance: Feet = 100
print(distance)
When we run the above program using playground, we get the following result.
100
Type Safety
Swift 4 is a type-safe language which means if a part of your code expects a String, you can't pass it an Int by mistake.
As Swift 4 is type-safe, it performs type-checks when compiling your code and flags any mismatched types as errors.
var varA = 42
varA = "This is hello"
print(varA)
When we compile the above program, it produces the following compile time error.
main.swift:2:8: error: cannot assign value of type 'String' to type 'Int'
varA = "This is hello"
Type Inference
Type inference enables a compiler to deduce the type of a particular expression automatically when it compiles your code, simply by examining the values you provide. Swift 4 uses type inference to work out the appropriate type as follows.
// varA is inferred to be of type Int
var varA = 42
print(varA)

// varB is inferred to be of type Double
var varB = 3.14159
print(varB)

// varC is also inferred to be of type Double
var varC = 3 + 0.14159
print(varC)
When we run the above program using playground, we get the following result −
42
3.14159
3.14159
Swift - Variables
A variable provides us with named storage that our programs can manipulate. Each variable in Swift 4 has a specific type, which determines the size and layout of the variable's memory; the range of values that can be stored within that memory; and the set of operations that can be applied to the variable.
Swift 4 supports the following basic types of variables −
Int or UInt − This is used for whole numbers. More specifically, you can use Int32, Int64 to define 32 or 64 bit signed integer, whereas UInt32 or UInt64 to define 32 or 64 bit unsigned integer variables. For example, 42 and -23.
Float − This is used to represent a 32-bit floating-point number. It is used to hold numbers with smaller decimal points. For example, 3.14159, 0.1, and -273.158.
Double − This is used to represent a 64-bit floating-point number and used when floating-point values must be very large. For example 3.14159, 0.1, and -273.158.
Bool − This represents a Boolean value which is either true or false.
String − This is an ordered collection of characters. For example, "Hello, World!"
Character − This is a single-character string literal. For example, "C"
Swift 4 also allows to define various other types of variables, which we will cover in subsequent chapters, such as Optional, Array, Dictionaries, Structures, and Classes.
The following section will cover how to declare and use various types of variables in Swift 4 programming.
Variable Declaration
A variable declaration tells the compiler where and how much to create the storage for the variable. Before you use variables, you must declare them using var keyword as follows −
var variableName = <initial value>
The following example shows how to declare a variable in Swift 4 −
var varA = 42
print(varA)
When we run the above program using playground, we get the following result −
42
Type Annotations
You can provide a type annotation when you declare a variable, to be clear about the kind of values the variable can store. Here is the syntax −
var variableName:<data type> = <optional initial value>
The following example shows how to declare a variable in Swift 4 using Annotation. Here it is important to note that if we are not using type annotation, then it becomes mandatory to provide an initial value for the variable, otherwise we can just declare our variable using type annotation.
var varA = 42
print(varA)

var varB:Float

varB = 3.14159
print(varB)
When we run the above program using playground, we get the following result −
42
3.1415901184082
Naming Variables
The name of a variable can be composed of letters, digits, and the underscore character. It must begin with either a letter or an underscore. Upper and lowercase letters are distinct because Swift 4 is a case-sensitive programming language.
You can use simple or Unicode characters to name your variables. The following examples shows how you can name the variables −
var _var = "Hello, Swift 4!"
print(_var)

var  = ""
print()
When we run the above program using playground, we get the following result.
Hello, Swift 4!
Printing Variables
You can print the current value of a constant or variable with the print function. You can interpolate a variable value by wrapping the name in parentheses and escape it with a backslash before the opening parenthesis: Following are valid examples −
var varA = "Godzilla"
var varB = 1000.00

print("Value of \(varA) is more than \(varB) millions")
When we run the above program using playground, we get the following result.
Value of Godzilla is more than 1000.0 millions
Swift - Optionals
Swift 4 also introduces Optionals type, which handles the absence of a value. Optionals say either "there is a value, and it equals x" or "there isn't a value at all".
An Optional is a type on its own, actually one of Swift 4s new super-powered enums. It has two possible values, None and Some(T), where T is an associated value of the correct data type available in Swift 4.
Heres an optional Integer declaration −
var perhapsInt: Int?
Heres an optional String declaration −
var perhapsStr: String?
The above declaration is equivalent to explicitly initializing it to nil which means no value −
var perhapsStr: String? = nil
Let's take the following example to understand how optionals work in Swift 4 −
var myString:String? = nil

if myString != nil {
   print(myString)
} else {
   print("myString has nil value")
}
When we run the above program using playground, we get the following result −
myString has nil value
Optionals are similar to using nil with pointers in Objective-C, but they work for any type, not just classes.
Forced Unwrapping
If you defined a variable as optional, then to get the value from this variable, you will have to unwrap it. This just means putting an exclamation mark at the end of the variable.
Let's take a simple example −
var myString:String?

myString = "Hello, Swift 4!"

if myString != nil {
   print(myString)
} else {
   print("myString has nil value")
}
When we run the above program using playground, we get the following result −
Optional("Hello, Swift 4!")
Now let's apply unwrapping to get the correct value of the variable −
var myString:String?

myString = "Hello, Swift 4!"

if myString != nil {
   print( myString! )
} else {
   print("myString has nil value")
}
When we run the above program using playground, we get the following result.
Hello, Swift 4!
Automatic Unwrapping
You can declare optional variables using exclamation mark instead of a question mark. Such optional variables will unwrap automatically and you do not need to use any further exclamation mark at the end of the variable to get the assigned value. Let's take a simple example −
var myString:String!
myString = "Hello, Swift 4!"

if myString != nil {
   print(myString)
} else {
   print("myString has nil value")
}
When we run the above program using playground, we get the following result −
Hello, Swift 4!
Optional Binding
Use optional binding to find out whether an optional contains a value, and if so, to make that value available as a temporary constant or variable.
An optional binding for the if statement is as follows −
if let constantName = someOptional {
   statements
}
Let's take a simple example to understand the usage of optional binding −
var myString:String?
myString = "Hello, Swift 4!"

if let yourString = myString {
   print("Your string has - \(yourString)")
} else {
   print("Your string does not have a value")
}
When we run the above program using playground, we get the following result −
Your string has - Hello, Swift 4!
Swift - Tuples
Swift 4 also introduces Tuples type, which are used to group multiple values in a single compound Value.
The values in a tuple can be of any type, and do not need to be of same type.
For example, ("Tutorials Point", 123) is a tuple with two values, one of string Type, and other is integer type. It is a legal command.
let ImplementationError = (501, "Not implemented") is an error when something on the server is not implemented, It returns two values. Error Code, and Description.
You can create tuples from as many values as you want and from any number of different data types.
Heres the syntax of Tuple declaration −
var TupleName = (Value1, value2, any number of values)
Heres a Tuple declaration −
var error501 = (501, Not implemented)
You can access the values of tuple using the index numbers that start from 0.
Heres an example of accessing tuple Values −
print(The code is\(error501.0))
print(The definition of error is\(error501.1))
You can name the variables of a tuple while declaring , and you can call them using their names
var error501 = (errorCode: 501, description: Not Implemented)
print(error501.errorCode)   // prints 501.
Tuples are helpful in returning multiple values from a function. Like, a web application might return a tuple of type ("String", Int) to show whether the loading was successful or failed.
By returning different values in a tuple we can make decisions depending on different tuple types.
Note − Tuples are useful for temporary values and are not suited for complex data.
Swift - Constants
Constants refer to fixed values that a program may not alter during its execution. Constants can be of any of the basic data types like an integer constant, a floating constant, a character constant, or a string literal. There are enumeration constants as well.
Constants are treated just like regular variables except the fact that their values cannot be modified after their definition.
Constants Declaration
Before you use constants, you must declare them using let keyword as follows −
let constantName = <initial value>
Following is a simple example to show how to declare a constant in Swift 4 −
let constA = 42
print(constA)
When we run the above program using playground, we get the following result −
42
Type Annotations
You can provide a type annotation when you declare a constant, to be clear about the kind of values the constant can store. Following is the syntax −
var constantName:<data type> = <optional initial value>
The following example shows how to declare a constant in Swift 4 using Annotation. Here it is important to note that it is mandatory to provide an initial value while creating a constant −
let constA = 42
print(constA)

let constB:Float = 3.14159
print(constB)
When we run the above program using playground, we get the following result.
42
3.1415901184082
Naming Constants
The name of a constant can be composed of letters, digits, and the underscore character. It must begin with either a letter or an underscore. Upper and lowercase letters are distinct because Swift 4 is a case-sensitive programming language.
You can use simple or Unicode characters to name your variables. Following are valid examples −
let _const = "Hello, Swift 4!"
print(_const)

let  = ""
print()
When we run the above program using playground, we get the following result −
Hello, Swift 4!
Printing Constants
You can print the current value of a constant or variable using print function. You can interpolate a variable value by wrapping the name in parentheses and escape it with a backslash before the opening parenthesis: Following are valid examples −
let constA = "Godzilla"
let constB = 1000.00

print("Value of \(constA) is more than \(constB) millions")
When we run the above program using playground, we get the following result −
Value of Godzilla is more than 1000.0 millions
Swift - Literals
A literal is the source code representation of a value of an integer, floating-point number, or string type. The following are examples of literals −
42                // Integer literal
3.14159           // Floating-point literal
"Hello, world!"   // String literal
Integer Literals
An integer literal can be a decimal, binary, octal, or hexadecimal constant. Binary literals begin with 0b, octal literals begin with 0o, and hexadecimal literals begin with 0x and nothing for decimal.
Here are some examples of integer literals −
let decimalInteger = 17         // 17 in decimal notation
let binaryInteger = 0b10001     // 17 in binary notation
let octalInteger = 0o21         // 17 in octal notation
let hexadecimalInteger = 0x11   // 17 in hexadecimal notation
Floating-point Literals
A floating-point literal has an integer part, a decimal point, a fractional part, and an exponent part. You can represent floating point literals either in decimal form or hexadecimal form.
Decimal floating-point literals consist of a sequence of decimal digits followed by either a decimal fraction, a decimal exponent, or both.
Hexadecimal floating-point literals consist of a 0x prefix, followed by an optional hexadecimal fraction, followed by a hexadecimal exponent.
Here are some examples of floating-point literals −
let decimalDouble = 12.1875
let exponentDouble = 1.21875e1
let hexadecimalDouble = 0xC.3p0
String Literals
A string literal is a sequence of characters surrounded by double quotes, with the following form −
"characters"
String literals cannot contain an unescaped double quote ("), an unescaped backslash (\), a carriage return, or a line feed. Special characters can be included in string literals using the following escape sequences −
| Escape sequence | Meaning |
|---|---|
| \0 | Null Character |
| \\ | \character |
| \b | Backspace |
| \f | Form feed |
| \n | Newline |
| \r | Carriage return |
| \t | Horizontal tab |
| \v | Vertical tab |
| \' | Single Quote |
| \" | Double Quote |
| \000 | Octal number of one to three digits |
| \xhh... | Hexadecimal number of one or more digits |
The following example shows how to use a few string literals −
let stringL = "Hello\tWorld\n\nHello\'Swift 4\'"
print(stringL)
When we run the above program using playground, we get the following result −
Hello World

Hello'Swift 4'
Boolean Literals
There are three Boolean literals and they are part of standard Swift 4 keywords −
A value of true representing true.
A value of false representing false.
A value of nil representing no value.
Swift - Operators
An operator is a symbol that tells the compiler to perform specific mathematical or logical manipulations. Objective-C is rich in built-in operators and provides the following types of operators −
- Arithmetic Operators
- Comparison Operators
- Logical Operators
- Bitwise Operators
- Assignment Operators
- Range Operators
- Misc Operators
This tutorial will explain the arithmetic, relational, logical, bitwise, assignment and other operators one by one.
Arithmetic Operators
The following table shows all the arithmetic operators supported by Swift 4 language. Assume variable A holds 10 and variable B holds 20, then −
| Operator | Description | Example |
|---|---|---|
| + | Adds two operands | A + B will give 30 |
| Subtracts second operand from the first | A B will give -10 | |
| * | Multiplies both operands | A * B will give 200 |
| / | Divides numerator by denominator | B / A will give 2 |
| % | Modulus Operator and remainder of after an integer/float division | B % A will give 0 |
Comparison Operators
The following table shows all the relational operators supported by Swift 4 language. Assume variable A holds 10 and variable B holds 20, then −
| Operator | Description | Example |
|---|---|---|
| == | Checks if the values of two operands are equal or not; if yes, then the condition becomes true. | (A == B) is not true. |
| != | Checks if the values of two operands are equal or not; if values are not equal, then the condition becomes true. | (A != B) is true. |
| > | Checks if the value of left operand is greater than the value of right operand; if yes, then the condition becomes true. | (A > B) is not true. |
| < | Checks if the value of left operand is less than the value of right operand; if yes, then the condition becomes true. | (A < B) is true. |
| >= | Checks if the value of left operand is greater than or equal to the value of right operand; if yes, then the condition becomes true. | (A >= B) is not true. |
| <= | Checks if the value of left operand is less than or equal to the value of right operand; if yes, then the condition becomes true. | (A <= B) is true. |
Logical Operators
The following table shows all the logical operators supported by Swift 4 language. Assume variable A holds 1 and variable B holds 0, then −
| Operator | Description | Example |
|---|---|---|
| && | Called Logical AND operator. If both the operands are non-zero, then the condition becomes true. | (A && B) is false. |
| || | Called Logical OR Operator. If any of the two operands is non-zero, then the condition becomes true. | (A || B) is true. |
| ! | Called Logical NOT Operator. Use to reverses the logical state of its operand. If a condition is true, then the Logical NOT operator will make it false. | !(A && B) is true. |
Bitwise Operators
Bitwise operators work on bits and perform bit by bit operation. The truth tables for &, |, and ^ are as follows −
| p | q | p&q | p|q | p^q |
|---|---|---|---|---|
| 0 | 0 | 0 | 0 | 0 |
| 0 | 1 | 0 | 1 | 1 |
| 1 | 1 | 1 | 1 | 0 |
| 1 | 0 | 0 | 1 | 1 |
Assume A = 60; and B = 13;

In binary format, they will be as follows:

A = 0011 1100

B = 0000 1101

-----------------

A & B = 0000 1100

A|B = 0011 1101

A^B = 0011 0001

~A = 1100 0011
Bitwise operators supported by Swift 4 language are listed in the following table. Assume variable A holds 60 and variable B holds 13, then 7−
| Operator | Description | Example |
|---|---|---|
| & | Binary AND Operator copies a bit to the result, if it exists in both operands. | (A & B) will give 12, which is 0000 1100 |
| | | Binary OR Operator copies a bit, if it exists in either operand. | (A | B) will give 61, which is 0011 1101 |
| ^ | Binary XOR Operator copies the bit, if it is set in one operand but not both. | (A ^ B) will give 49, which is 0011 0001 |
| ~ | Binary Ones Complement Operator is unary and has the effect of 'flipping' bits. | (~A ) will give -61, which is 1100 0011 in 2's complement form. |
| << | Binary Left Shift Operator. The left operands value is moved left by the number of bits specified by the right operand. | (A << 2 will give 240, which is 1111 0000 |
| >> | Binary Right Shift Operator. The left operands value is moved right by the number of bits specified by the right operand. | A >> 2 will give 15, which is 0000 1111 |
Assignment Operators
SSwift 4 supports the following assignment operators −
| Operator | Description | Example |
|---|---|---|
| = | Simple assignment operator, Assigns values from right side operands to left side operand | C = A + B will assign value of A + B into C |
| += | Add AND assignment operator, It adds right operand to the left operand and assigns the result to left operand | C += A is equivalent to C = C + A |
| -= | Subtract AND assignment operator, It subtracts right operand from the left operand and assigns the result to left operand | C -= A is equivalent to C = C - A |
| *= | Multiply AND assignment operator, It multiplies right operand with the left operand and assigns the result to left operand | C *= A is equivalent to C = C * A |
| /= | Divide AND assignment operator, It divides left operand with the right operand and assigns the result to left operand | C /= A is equivalent to C = C / A |
| %= | Modulus AND assignment operator, It takes modulus using two operands and assigns the result to left operand | C %= A is equivalent to C = C % A |
| <<= | Left shift AND assignment operator | C <<= 2 is same as C = C << 2 |
| >>= | Right shift AND assignment operator | C >>= 2 is same as C = C >> 2 |
| &= | Bitwise AND assignment operator | C &= 2 is same as C = C & 2 |
| ^= | bitwise exclusive OR and assignment operator | C ^= 2 is same as C = C ^ 2 |
| |= | bitwise inclusive OR and assignment operator | C |= 2 is same as C = C | 2 |
Range Operators
Swift 4 includes two range operators, which are shortcuts for expressing a range of values. The following table explains these two operators.
| Operator | Description | Example |
|---|---|---|
| Closed Range | (a...b) defines a range that runs from a to b, and includes the values a and b. | 1...5 gives 1, 2, 3, 4 and 5 |
| Half-Open Range | (a..< b) defines a range that runs from a to b, but does not include b. | 1..< 5 gives 1, 2, 3, and 4 |
| One- sided Range |
a , defines a range that runs from a to end of elements a , defines a range starting from start to a |
1 gives 1 , 2,3 end of elements 2 gives beginning to 1,2 |
Misc Operators
Swift 4 supports a few other important operators including range and ? : which are explained in the following table.
| Operator | Description | Example |
|---|---|---|
| Unary Minus | The sign of a numeric value can be toggled using a prefixed - | -3 or -4 |
| Unary Plus | Returns the value it operates on, without any change. | +6 gives 6 |
| Ternary Conditional | Condition ? X : Y | If Condition is true ? Then value X : Otherwise value Y |
Operators Precedence
Operator precedence determines the grouping of terms in an expression. This affects how an expression is evaluated. Certain operators have higher precedence than others; for example, the multiplication operator has higher precedence than the addition operator.
For example, x = 7 + 3 * 2; here, x is assigned 13, not 20 because operator * has higher precedence than +, so it first gets multiplied with 3*2 and then adds into 7.
Here, operators with the highest precedence appear at the top of the table, those with the lowest appear at the bottom. Within an expression, higher precedence operators will be evaluated first.
| Operator | Description | Example |
|---|---|---|
| Primary Expression Operators | () [] . expr++ expr-- | left-to-right |
| Unary Operators |
* & + - ! ~ ++expr --expr * / % + - >> << < > <= >= == != |
right-to-left |
| Binary Operators |
& ^ | && || |
left-to-right |
| Ternary Operator | ?: | right-to-left |
| Assignment Operators | = += -= *= /= %= >>= <<= &=^= |= | right-to-left |
| Comma | , | left-to-right |
Swift - Decision Making
Decision making structures require that the programmer specifies one or more conditions to be evaluated or tested by the program, along with a statement or statements to be executed if the condition is determined to be true, and optionally, other statements to be executed if the condition is determined to be false.
Following is the general from of a typical decision making structure found in most of the programming languages −
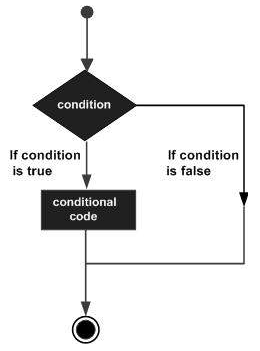
Swift 4 provides the following types of decision making statements. Click the following links to check their detail.
| Sr.No | Statement & Description |
|---|---|
| 1 | if statement
An if statement consists of a Boolean expression followed by one or more statements. |
| 2 | if...else statement
An if statement can be followed by an optional else statement, which executes when the Boolean expression is false. |
| 3 | if...else if...else Statement
An if statement can be followed by an optional else if...else statement, which is very useful to test various conditions using single if...else if statement. |
| 4 | nested if statements
You can use one if or else if statement inside another if or else if statement(s). |
| 5 | switch statement
A switch statement allows a variable to be tested for equality against a list of values. |
The ? : Operator
We have covered conditional operator ? : in the previous chapter which can be used to replace if...else statements. It has the following general form −
Exp1 ? Exp2 : Exp3;
Where Exp1, Exp2, and Exp3 are expressions. Notice the use and placement of the colon.
The value of a ? expression is determined like this: Exp1 is evaluated. If it is true, then Exp2 is evaluated and becomes the value of the entire ? expression. If Exp1 is false, then Exp3 is evaluated and its value becomes the value of the expression.
Swift - Loops
There may be a situation when you need to execute a block of code several number of times. In general, statements are executed sequentially: The first statement in a function is executed first, followed by the second, and so on.
Programming languages provide various control structures that allow for more complicated execution paths.
A loop statement allows us to execute a statement or group of statements multiple times. Following is the general from of a loop statement in most of the programming languages −
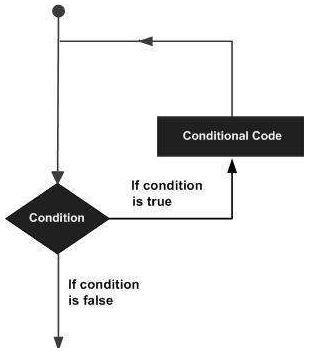
Swift 4 programming language provides the following kinds of loop to handle looping requirements. Click the following links to check their detail.
| Sr.No | Loop Type & Description |
|---|---|
| 1 | for-in
This loop performs a set of statements for each item in a range, sequence, collection, or progression. |
| 2 | while loop
Repeats a statement or group of statements while a given condition is true. It tests the condition before executing the loop body. |
| 3 | repeat...while loop
Like a while statement, except that it tests the condition at the end of the loop body. |
Loop Control Statements
Loop control statements change execution from its normal sequence. When execution leaves a scope, all automatic objects that were created in that scope are destroyed.
Swift 4 supports the following control statements. Click the following links to check their detail.
| Sr.No | Control Statement & Description |
|---|---|
| 1 | continue statement
This statement tells a loop to stop what it is doing and start again at the beginning of the next iteration through the loop. |
| 2 | break statement
Terminates the loop statement and transfers execution to the statement immediately following the loop. |
| 3 | fallthrough statement
The fallthrough statement simulates the behavior of Swift 4 switch to C-style switch. |
Swift - Strings
Strings in Swift 4 are an ordered collection of characters, such as "Hello, World!" and they are represented by the Swift 4 data type String, which in turn represents a collection of values of Character type.
Create a String
You can create a String either by using a string literal or creating an instance of a String class as follows −
// String creation using String literal
var stringA = "Hello, Swift 4!"
print( stringA )

// String creation using String instance
var stringB = String("Hello, Swift 4!")
print( stringB )

//Multiple line string

let stringC = """
Hey this is a
example of multiple Line
string by tutorialsPoint

"""
print(stringC)
When the above code is compiled and executed, it produces the following result
Hello, Swift 4!
Hello, Swift 4!
Hey this is a
example of multiple Line
string by tutorialsPoint
Empty String
You can create an empty String either by using an empty string literal or creating an instance of String class as shown below. You can also check whether a string is empty or not using the Boolean property isEmpty.
// Empty string creation using String literal
var stringA = ""

if stringA.isEmpty {
   print( "stringA is empty" )
} else {
   print( "stringA is not empty" )
}

// Empty string creation using String instance
let stringB = String()

if stringB.isEmpty {
   print( "stringB is empty" )
} else {
   print( "stringB is not empty" )
}
When the above code is compiled and executed, it produces the following result −
stringA is empty
stringB is empty
String Constants
You can specify whether your String can be modified (or mutated) by assigning it to a variable, or it will be constant by assigning it to a constant using let keyword as shown below −
// stringA can be modified
var stringA = "Hello, Swift 4!"
stringA + = "--Readers--"
print( stringA )

// stringB can not be modified
let stringB = String("Hello, Swift 4!")
stringB + = "--Readers--"
print( stringB )
When the above code is compiled and executed, it produces the following result −
Playground execution failed: error: <EXPR>:10:1: error: 'String' is not
convertible to '@lvalue UInt8'
stringB + = "--Readers--"
String Interpolation
String interpolation is a way to construct a new String value from a mix of constants, variables, literals, and expressions by including their values inside a string literal.
Each item (variable or constant) that you insert into the string literal is wrapped in a pair of parentheses, prefixed by a backslash. Here is a simple example −
var varA = 20
let constA = 100
var varC:Float = 20.0

var stringA = "\(varA) times \(constA) is equal to \(varC * 100)"
print( stringA )
When the above code is compiled and executed, it produces the following result −
20 times 100 is equal to 2000.0
String Concatenation
You can use the + operator to concatenate two strings or a string and a character, or two characters. Here is a simple example −
let constA = "Hello,"
let constB = "World!"

var stringA = constA + constB
print( stringA )
When the above code is compiled and executed, it produces the following result −
Hello,World!
String Length
Swift 4 strings do not have a length property, but you can use the global count() function to count the number of characters in a string. Here is a simple example −
var varA = "Hello, Swift 4!"

print( "\(varA), length is \((varA.count))" )
When the above code is compiled and executed, it produces the following result −
Hello, Swift 4!, length is 15
String Comparison
You can use the == operator to compare two strings variables or constants. Here is a simple example −
var varA = "Hello, Swift 4!"
var varB = "Hello, World!"

if varA == varB {
   print( "\(varA) and \(varB) are equal" )
} else {
   print( "\(varA) and \(varB) are not equal" )
}
When the above code is compiled and executed, it produces the following result −
Hello, Swift 4! and Hello, World! are not equal
String Iterating
Strings are again a collection of values in swift 4, so we can iterate over string using loops. −
for chars in "ThisString" {
   print(chars, terminator: " ")
}
When the above code is compiled and executed, it produces the following result −
T h i s S t r i n g
Unicode Strings
You can access a UTF-8 and UTF-16 representation of a String by iterating over its utf8 and utf16 properties as demonstrated in the following example −
var unicodeString = "Dog???"

print("UTF-8 Codes: ")
for code in unicodeString.utf8 {
   print("\(code) ")
}

print("\n")

print("UTF-16 Codes: ")
for code in unicodeString.utf16 {
   print("\(code) ")
}
When the above code is compiled and executed, it produces the following result −
UTF-8 Codes:
68
111
103
63
63
63


UTF-16 Codes:
68
111
103
63
63
63
String Functions & Operators
Swift 4 supports a wide range of methods and operators related to Strings −
| Sr.No | Functions/Operators & Purpose |
|---|---|
| 1 | isEmpty A Boolean value that determines whether a string is empty or not. |
| 2 | hasPrefix(prefix: String) Function to check whether a given parameter string exists as a prefix of the string or not. |
| 3 | hasSuffix(suffix: String) Function to check whether a given parameter string exists as a suffix of the string or not. |
| 4 | toInt() Function to convert numeric String value into Integer. |
| 5 | count() Global function to count the number of Characters in a string. |
| 6 | utf8 Property to return a UTF-8 representation of a string. |
| 7 | utf16 Property to return a UTF-16 representation of a string. |
| 8 | unicodeScalars Property to return a Unicode Scalar representation of a string. |
| 9 | + Operator to concatenate two strings, or a string and a character, or two characters. |
| 10 | += Operator to append a string or character to an existing string. |
| 11 | == Operator to determine the equality of two strings. |
| 12 | < Operator to perform a lexicographical comparison to determine whether one string evaluates as less than another. |
| 13 | startIndex To get the value at starting index of string. |
| 14 | endIndex To get the value at ending index of string. |
| 15 | Indices To access the indeces one by one. i.e all the characters of string one by one. |
| 16 | insert("Value", at: position) To insert a value at a position. |
| 17 |
remove(at: position) removeSubrange(range) to remove a value at a position, or to remove a range of values from string. |
| 18 | reversed() returns the reverse of a string |
Swift - Characters
A character in Swift is a single character String literal, addressed by the data type Character. Take a look at the following example. It uses two Character constants −
let char1: Character = "A"
let char2: Character = "B"

print("Value of char1 \(char1)")
print("Value of char2 \(char2)")
When the above code is compiled and executed, it produces the following result −
Value of char1 A
Value of char2 B
If you try to store more than one character in a Character type variable or constant, then Swift 4 will not allow that. Try to type the following example in Swift 4 Playground and you will get an error even before compilation.
// Following is wrong in Swift 4
let char: Character = "AB"

print("Value of char \(char)")
Empty Character Variables
It is not possible to create an empty Character variable or constant which will have an empty value. The following syntax is not possible −
// Following is wrong in Swift 4
let char1: Character = ""
var char2: Character = ""

print("Value of char1 \(char1)")
print("Value of char2 \(char2)")
Accessing Characters from Strings
As explained while discussing Swift 4's Strings, String represents a collection of Character values in a specified order. So we can access individual characters from the given String by iterating over that string with a for-in loop −
for ch in "Hello" {
   print(ch)
}
When the above code is compiled and executed, it produces the following result −
H
e
l
l
o
Concatenating Strings with Characters
The following example demonstrates how a Swift 4's Character can be concatenated with Swift 4's String.
var varA:String = "Hello "
let varB:Character = "G"

varA.append( varB )

print("Value of varC = \(varA)")
When the above code is compiled and executed, it produces the following result −
Value of varC = Hello G
Swift - Arrays
Swift 4 arrays are used to store ordered lists of values of the same type. Swift 4 puts strict checking which does not allow you to enter a wrong type in an array, even by mistake.
If you assign a created array to a variable, then it is always mutable, which means you can change it by adding, removing, or changing its items; but if you assign an array to a constant, then that array is immutable, and its size and contents cannot be changed.
Creating Arrays
You can create an empty array of a certain type using the following initializer syntax −
var someArray = [SomeType]()
Here is the syntax to create an array of a given size a* and initialize it with a value −
var someArray = [SomeType](count: NumbeOfElements, repeatedValue: InitialValue)
You can use the following statement to create an empty array of Int type having 3 elements and the initial value as zero −
var someInts = [Int](count: 3, repeatedValue: 0)
Following is one more example to create an array of three elements and assign three values to that array −
var someInts:[Int] = [10, 20, 30]
Accessing Arrays
You can retrieve a value from an array by using subscript syntax, passing the index of the value you want to retrieve within square brackets immediately after the name of the array as follows −
var someVar = someArray[index]
Here, the index starts from 0 which means the first element can be accessed using the index as 0, the second element can be accessed using the index as 1 and so on. The following example shows how to create, initialize, and access arrays −
var someInts = [Int](count: 3, repeatedValue: 10)

var someVar = someInts[0]
print( "Value of first element is \(someVar)" )
print( "Value of second element is \(someInts[1])" )
print( "Value of third element is \(someInts[2])" )
When the above code is compiled and executed, it produces the following result −
Value of first element is 10
Value of second element is 10
Value of third element is 10
Modifying Arrays
You can use append() method or addition assignment operator (+=) to add a new item at the end of an array. Take a look at the following example. Here, initially, we create an empty array and then add new elements into the same array −
var someInts = [Int]()

someInts.append(20)
someInts.append(30)
someInts += [40]

var someVar = someInts[0]

print( "Value of first element is \(someVar)" )
print( "Value of second element is \(someInts[1])" )
print( "Value of third element is \(someInts[2])" )
When the above code is compiled and executed, it produces the following result −
Value of first element is 20
Value of second element is 30
Value of third element is 40
You can modify an existing element of an Array by assigning a new value at a given index as shown in the following example −
var someInts = [Int]()

someInts.append(20)
someInts.append(30)
someInts += [40]

// Modify last element
someInts[2] = 50

var someVar = someInts[0]

print( "Value of first element is \(someVar)" )
print( "Value of second element is \(someInts[1])" )
print( "Value of third element is \(someInts[2])" )
When the above code is compiled and executed, it produces the following result −
Value of first element is 20
Value of second element is 30
Value of third element is 50
Iterating Over an Array
You can use for-in loop to iterate over the entire set of values in an array as shown in the following example −
var someStrs = [String]()

someStrs.append("Apple")
someStrs.append("Amazon")
someStrs += ["Google"]
for item in someStrs {
   print(item)
}
When the above code is compiled and executed, it produces the following result −
Apple
Amazon
Google
You can use enumerate() function which returns the index of an item along with its value as shown below in the following example −
var someStrs = [String]()

someStrs.append("Apple")
someStrs.append("Amazon")
someStrs += ["Google"]

for (index, item) in someStrs.enumerated() {
   print("Value at index = \(index) is \(item)")
}
When the above code is compiled and executed, it produces the following result −
Value at index = 0 is Apple
Value at index = 1 is Amazon
Value at index = 2 is Google
Adding Two Arrays
You can use the addition operator (+) to add two arrays of the same type which will yield a new array with a combination of values from the two arrays as follows −
var intsA = [Int](count:2, repeatedValue: 2)
var intsB = [Int](count:3, repeatedValue: 1)

var intsC = intsA + intsB
for item in intsC {
   print(item)
}
When the above code is compiled and executed, it produces the following result −
2
2
1
1
1
The count Property
You can use the read-only count property of an array to find out the number of items in an array shown below −
var intsA = [Int](count:2, repeatedValue: 2)
var intsB = [Int](count:3, repeatedValue: 1)

var intsC = intsA + intsB

print("Total items in intsA = \(intsA.count)")
print("Total items in intsB = \(intsB.count)")
print("Total items in intsC = \(intsC.count)")
When the above code is compiled and executed, it produces the following result −
Total items in intsA = 2
Total items in intsB = 3
Total items in intsC = 5
The empty Property
You can use the read-only empty property of an array to find out whether an array is empty or not as shown below −
var intsA = [Int](count:2, repeatedValue: 2)
var intsB = [Int](count:3, repeatedValue: 1)
var intsC = [Int]()

print("intsA.isEmpty = \(intsA.isEmpty)")
print("intsB.isEmpty = \(intsB.isEmpty)")
print("intsC.isEmpty = \(intsC.isEmpty)")
When the above code is compiled and executed, it produces the following result −
intsA.isEmpty = false
intsB.isEmpty = false
intsC.isEmpty = true
Swift - Sets
Swift 4 sets are used to store distinct values of same types but they dont have definite ordering as arrays have.
You can use sets instead of arrays if ordering of elements is not an issue, or if you want to ensure that there are no duplicate values. (sets allow only distinct values.)
A type must be hashable to be stored in a set. A hash value is a Int value that is equal for equal objects. For example, if x == y, then x.hashvalue == y.hashvalue.
All the basic swift values are of hashable type by default and may be used as set values.
Creating Sets
You can create an empty set of a certain type using the following initializer syntax −
var someSet = Set<Character>() //Character can be replaced by data type of set.
Accessing and modifying Sets
You can access or modify a set using its methods and properties −
"count" method can be used to show the number of elements in the set.
someSet.count // prints the number of elements
"insert" method can be used to insert values in set.
someSet.insert("c") // adds the element to Set.
Similarly, isEmpty can be used to check if set is empty.
someSet.isEmpty // returns true or false depending on the set Elements.
"remove" method can be used to remove value in set.
someSet.remove("c") // removes a element , removeAll() can be used to remove all elements
"contains" method can be used to check existence of value in a set.
someSet.contains("c") // to check if set contains this value.
Iterating over a Set
You can iterate over a set using for-in loop −
for items in someSet {
   print(someSet)
}

//Swift sets are not in an ordered way, to iterate over a set in ordered way use

for items in someSet.sorted() {
   print(someSet)
}
Performing Set Operations
You can perform basic set operations on swift Sets.
Following are the methods for performing set operations −
- Intersection
- Union
- subtracting
let evens: Set = [10,12,14,16,18]
let odds: Set = [5,7,9,11,13]
let primes = [2,3,5,7]
odds.union(evens).sorted()
// [5,7,9,10,11,12,13,14,16,18]
odds.intersection(evens).sorted()
//[]
odds.subtracting(primes).sorted()
//[9, 11, 13]
Swift - Dictionaries
Swift 4 dictionaries are used to store unordered lists of values of the same type. Swift 4 puts strict checking which does not allow you to enter a wrong type in a dictionary even by mistake.
Swift 4 dictionaries use unique identifier known as a key to store a value which later can be referenced and looked up through the same key. Unlike items in an array, items in a dictionary do not have a specified order. You can use a dictionary when you need to look up values based on their identifiers.
A dictionary key can be either an integer or a string without a restriction, but it should be unique within a dictionary.
If you assign a created dictionary to a variable, then it is always mutable which means you can change it by adding, removing, or changing its items. But if you assign a dictionary to a constant, then that dictionary is immutable, and its size and contents cannot be changed.
Creating Dictionary
You can create an empty dictionary of a certain type using the following initializer syntax −
var someDict = [KeyType: ValueType]()
You can use the following simple syntax to create an empty dictionary whose key will be of Int type and the associated values will be strings −
var someDict = [Int: String]()
Here is an example to create a dictionary from a set of given values −
var someDict:[Int:String] = [1:"One", 2:"Two", 3:"Three"]
Sequence Based Initialization
Swift 4 allows you to create Dictionary from arrays (Key-Value Pairs.)
var cities = [Delhi,Bangalore,Hyderabad]
You can use the following simple syntax to create an empty dictionary whose key will be of Int type and the associated values will be strings −
var Distance = [2000,10, 620]
Here is an example to create a dictionary from a set of given values −
let cityDistanceDict = Dictionary(uniqueKeysWithValues: zip(cities, Distance))
The above lines of code will create a dictionary with Cities as key and Distance as Value −
Filtering
Swift 4 allows you to filter values from a dictionary.
var closeCities = cityDistanceDict.filter { $0.value < 1000 }
If we run the above code our closeCities Dictionary will be.
["Bangalore" : 10 , "Hyderabad" : 620]
Dictionary Grouping
Swift 4 allows you to create grouping of Dictionary values.
var cities = ["Delhi","Bangalore","Hyderabad","Dehradun","Bihar"]
You can use the following simple syntax to group the values of dictionary according to first alphabet.
var GroupedCities = Dictionary(grouping: cities ) { $0.first! }
The result of above code will be
["D" :["Delhi","Dehradun"], "B" : ["Bengaluru","Bihar"], "H" : ["Hyderabad"]]
Accessing Dictionaries
You can retrieve a value from a dictionary by using subscript syntax, passing the key of the value you want to retrieve within square brackets immediately after the name of the dictionary as follows −
var someVar = someDict[key]
Let's check the following example to create, initialize, and access values from a dictionary −
var someDict:[Int:String] = [1:"One", 2:"Two", 3:"Three"]
var someVar = someDict[1]

print( "Value of key = 1 is \(someVar)" )
print( "Value of key = 2 is \(someDict[2])" )
print( "Value of key = 3 is \(someDict[3])" )
When the above code is compiled and executed, it produces the following result −
Value of key = 1 is Optional("One")
Value of key = 2 is Optional("Two")
Value of key = 3 is Optional("Three")
Modifying Dictionaries
You can use updateValue(forKey:) method to add an existing value to a given key of the dictionary. This method returns an optional value of the dictionary's value type. Here is a simple example −
var someDict:[Int:String] = [1:"One", 2:"Two", 3:"Three"]
var oldVal = someDict.updateValue("New value of one", forKey: 1)
var someVar = someDict[1]

print( "Old value of key = 1 is \(oldVal)" )
print( "Value of key = 1 is \(someVar)" )
print( "Value of key = 2 is \(someDict[2])" )
print( "Value of key = 3 is \(someDict[3])" )
When the above code is compiled and executed, it produces the following result −
Old value of key = 1 is Optional("One")
Value of key = 1 is Optional("New value of one")
Value of key = 2 is Optional("Two")
Value of key = 3 is Optional("Three")
You can modify an existing element of a dictionary by assigning new value at a given key as shown in the following example −
var someDict:[Int:String] = [1:"One", 2:"Two", 3:"Three"]
var oldVal = someDict[1]
someDict[1] = "New value of one"
var someVar = someDict[1]

print( "Old value of key = 1 is \(oldVal)" )
print( "Value of key = 1 is \(someVar)" )
print( "Value of key = 2 is \(someDict[2])" )
print( "Value of key = 3 is \(someDict[3])" )
When the above code is compiled and executed, it produces the following result −
Old value of key = 1 is Optional("One")
Value of key = 1 is Optional("New value of one")
Value of key = 2 is Optional("Two")
Value of key = 3 is Optional("Three")
Remove Key-Value Pairs
You can use removeValueForKey() method to remove a key-value pair from a dictionary. This method removes the key-value pair if it exists and returns the removed value, or returns nil if no value existed. Here is a simple example −
var someDict:[Int:String] = [1:"One", 2:"Two", 3:"Three"]
var removedValue = someDict.removeValue(forKey: 2)

print( "Value of key = 1 is \(someDict[1])" )
print( "Value of key = 2 is \(someDict[2])" )
print( "Value of key = 3 is \(someDict[3])" )
When the above code is compiled and executed, it produces the following result −
Value of key = 1 is Optional("One")
Value of key = 2 is nil
Value of key = 3 is Optional("Three")
You can also use subscript syntax to remove a key-value pair from a dictionary by assigning a value of nil for that key. Here is a simple example −
var someDict:[Int:String] = [1:"One", 2:"Two", 3:"Three"]

someDict[2] = nil

print( "Value of key = 1 is \(someDict[1])" )
print( "Value of key = 2 is \(someDict[2])" )
print( "Value of key = 3 is \(someDict[3])" )
When the above code is compiled and executed, it produces the following result −
Value of key = 1 is Optional("One")
Value of key = 2 is nil
Value of key = 3 is Optional("Three")
Iterating Over a Dictionary
You can use a for-in loop to iterate over the entire set of key-value pairs in a Dictionary as shown in the following example −
var someDict:[Int:String] = [1:"One", 2:"Two", 3:"Three"]

for (index, keyValue) in someDict.enumerated() {
   print("Dictionary key \(index) - Dictionary value \(keyValue)")
}
When the above code is compiled and executed, it produces the following result −
Dictionary key 2 - Dictionary value Two
Dictionary key 3 - Dictionary value Three
Dictionary key 1 - Dictionary value One
You can use enumerate() function which returns the index of the item along with its (key, value) pair as shown below in the example −
var someDict:[Int:String] = [1:"One", 2:"Two", 3:"Three"]
for (key, value) in someDict.enumerated() {
   print("Dictionary key \(key) - Dictionary value \(value)")
}
When the above code is compiled and executed, it produces the following result −
Dictionary key 0 - Dictionary value (key: 2, value: "Two")
Dictionary key 1 - Dictionary value (key: 3, value: "Three")
Dictionary key 2 - Dictionary value (key: 1, value: "One")
Convert to Arrays
You can extract a list of key-value pairs from a given dictionary to build separate arrays for both keys and values. Here is an example −
var someDict:[Int:String] = [1:"One", 2:"Two", 3:"Three"]

let dictKeys = [Int](someDict.keys)
let dictValues = [String](someDict.values)

print("Print Dictionary Keys")

for (key) in dictKeys {
   print("\(key)")
}
print("Print Dictionary Values")

for (value) in dictValues {
   print("\(value)")
}
When the above code is compiled and executed, it produces the following result −
Print Dictionary Keys
2
3
1
Print Dictionary Values
Two
Three
One
The count Property
You can use the read-only count property of a dictionary to find out the number of items in a dictionary as shown below −
var someDict1:[Int:String] = [1:"One", 2:"Two", 3:"Three"]
var someDict2:[Int:String] = [4:"Four", 5:"Five"]

print("Total items in someDict1 = \(someDict1.count)")
print("Total items in someDict2 = \(someDict2.count)")
When the above code is compiled and executed, it produces the following result −
Total items in someDict1 = 3
Total items in someDict2 = 2
The empty Property
You can use read-only empty property of a dictionary to find out whether a dictionary is empty or not, as shown below −
var someDict1:[Int:String] = [1:"One", 2:"Two", 3:"Three"]
var someDict2:[Int:String] = [4:"Four", 5:"Five"]
var someDict3:[Int:String] = [Int:String]()

print("someDict1 = \(someDict1.isEmpty)")
print("someDict2 = \(someDict2.isEmpty)")
print("someDict3 = \(someDict3.isEmpty)")
When the above code is compiled and executed, it produces the following result −
someDict1 = false
someDict2 = false
someDict3 = true
Swift - Functions
A function is a set of statements organized together to perform a specific task. A Swift 4 function can be as simple as a simple C function to as complex as an Objective C language function. It allows us to pass local and global parameter values inside the function calls.
Function Declaration − tells the compiler about a function's name, return type, and parameters.
Function Definition − It provides the actual body of the function.
Swift 4 functions contain parameter type and its return types.
Function Definition
In Swift 4, a function is defined by the "func" keyword. When a function is newly defined, it may take one or several values as input 'parameters' to the function and it will process the functions in the main body and pass back the values to the functions as output 'return types'.
Every function has a function name, which describes the task that the function performs. To use a function, you "call" that function with its name and pass input values (known as arguments) that match the types of the function's parameters. Function parameters are also called as 'tuples'.
A function's arguments must always be provided in the same order as the function's parameter list and the return values are followed by →.
Syntax
func funcname(Parameters) -> returntype {
   Statement1
   Statement2
   ---
   Statement N
   return parameters
}
Take a look at the following code. The students name is declared as string datatype declared inside the function 'student' and when the function is called, it will return students name.
func student(name: String) -> String {
   return name
}

print(student(name: "First Program"))
print(student(name: "About Functions"))
When we run the above program using playground, we get the following result −
First Program
About Functions
Calling a Function
Let us suppose we defined a function called 'display' to Consider for example to display the numbers a function with function name 'display' is initialized first with argument 'no1' which holds integer data type. Then the argument 'no1' is assigned to argument 'a' which hereafter will point to the same data type integer. Now the argument 'a' is returned to the function. Here display() function will hold the integer value and return the integer values when each and every time the function is invoked.
func display(no1: Int) -> Int {
   let a = no1
   return a
}

print(display(no1: 100))
print(display(no1: 200))
When we run above program using playground, we get the following result −
100
200
Parameters and Return Values
Swift 4 provides flexible function parameters and its return values from simple to complex values. Similar to that of C and Objective C, functions in Swift 4 may also take several forms.
Functions with Parameters
A function is accessed by passing its parameter values to the body of the function. We can pass single to multiple parameter values as tuples inside the function.
func mult(no1: Int, no2: Int) -> Int {
   return no1*no2
}

print(mult(no1: 2, no2: 20))
print(mult(no1: 3, no2: 15))
print(mult(no1: 4, no2: 30))
When we run above program using playground, we get the following result −
40
45
120
Functions without Parameters
We may also have functions without any parameters.
Syntax
func funcname() -> datatype {
   return datatype
}
Following is an example having a function without a parameter −
func votersname() -> String {
   return "Alice"
}
print(votersname())
When we run the above program using playground, we get the following result −
Alice
Functions with Return Values
Functions are also used to return string, integer, and float data type values as return types. To find out the largest and smallest number in a given array function 'ls' is declared with large and small integer datatypes.
An array is initialized to hold integer values. Then the array is processed and each and every value in the array is read and compared for its previous value. When the value is lesser than the previous one it is stored in 'small' argument, otherwise it is stored in 'large' argument and the values are returned by calling the function.
func ls(array: [Int]) -> (large: Int, small: Int) {
   var lar = array[0]
   var sma = array[0]

   for i in array[1..<array.count] {
      if i < sma {
         sma = i
      } else if i > lar {
         lar = i
      }
   }
   return (lar, sma)
}

let num = ls(array: [40,12,-5,78,98])
print("Largest number is: \(num.large) and smallest number is: \(num.small)")
When we run the above program using playground, we get the following result −
Largest number is: 98 and smallest number is: -5
Functions without Return Values
Some functions may have arguments declared inside the function without any return values. The following program declares a and b as arguments to the sum() function. inside the function itself the values for arguments a and b are passed by invoking the function call sum() and its values are printed thereby eliminating return values.
func sum(a: Int, b: Int) {
   let a = a + b
   let b = a - b
   print(a, b)
}

sum(a: 20, b: 10)
sum(a: 40, b: 10)
sum(a: 24, b: 6)
When we run the above program using playground, we get the following result −
30 20
50 40
30 24
Functions with Optional Return Types
Swift 4 introduces 'optional' feature to get rid of problems by introducing a safety measure. Consider for example we are declaring function values return type as integer but what will happen when the function returns a string value or either a nil value. In that case compiler will return an error value. 'optional' are introduced to get rid of these problems.
Optional functions will take two forms 'value' and a 'nil'. We will mention 'Optionals' with the key reserved character '?' to check whether the tuple is returning a value or a nil value.
func minMax(array: [Int]) -> (min: Int, max: Int)? {
   if array.isEmpty { return nil }
   var currentMin = array[0]
   var currentMax = array[0]

   for value in array[1..<array.count] {
      if value < currentMin {
         currentMin = value
      } else if value > currentMax {
         currentMax = value
      }
   }
   return (currentMin, currentMax)
}

if let bounds = minMax(array: [8, -6, 2, 109, 3, 71]) {
   print("min is \(bounds.min) and max is \(bounds.max)")
}
When we run above program using playground, we get following result −
min is -6 and max is 109
''Optionals' are used to check 'nil' or garbage values thereby consuming lot of time in debugging and make the code efficient and readable for the user.
Functions Local Vs External Parameter Names
Local Parameter Names
Local parameter names are accessed inside the function alone.
func sample(number: Int) {
   print(number)
}
Here, the func sample argument number is declared as internal variable since it is accessed internally by the function sample(). Here the 'number' is declared as local variable but the reference to the variable is made outside the function with the following statement −
func sample(number: Int) {
   print(number)
}

sample(number: 1)
sample(number: 2)
sample(number: 3)
When we run the above program using playground, we get the following result −
1
2
3
External Parameter Names
External parameter names allow us to name a function parameters to make their purpose more clear. For example below you can name two function parameters and then call that function as follows −
func pow(firstArg a: Int, secondArg b: Int) -> Int {
   var res = a
   for _ in 1..<b {
      res = res * a
   }
   print(res)
   return res
}

pow(firstArg:5, secondArg:3)
When we run the above program using playground, we get the following result −
125
Variadic Parameters
When we want to define function with multiple number of arguments, then we can declare the members as 'variadic' parameters. Parameters can be specified as variadic by () after the parameter name.
func vari<N>(members: N...){
   for i in members {
      print(i)
   }
}

vari(members: 4,3,5)
vari(members: 4.5, 3.1, 5.6)
vari(members: "Swift 4", "Enumerations", "Closures")
When we run the above program using playground, we get the following result −
4
3
5
4.5
3.1
5.6
Swift 4
Enumerations
Closures
Constant, Variable and I/O Parameters
Functions by default consider the parameters as 'constant', whereas the user can declare the arguments to the functions as variables also. We already discussed that 'let' keyword is used to declare constant parameters and variable parameters is defined with 'var' keyword.
I/O parameters in Swift 4 provide functionality to retain the parameter values even though its values are modified after the function call. At the beginning of the function parameter definition, 'inout' keyword is declared to retain the member values.
It derives the keyword 'inout' since its values are passed 'in' to the function and its values are accessed and modified by its function body and it is returned back 'out' of the function to modify the original argument.
Variables are only passed as an argument for in-out parameter since its values alone are modified inside and outside the function. Hence no need to declare strings and literals as in-out parameters. '&' before a variable name refers that we are passing the argument to the in-out parameter.
func temp(a1: inout Int, b1: inout Int) {
   let t = a1
   a1 = b1
   b1 = t
}

var no = 2
var co = 10
temp(a1: &no, b1: &co)
print("Swapped values are \(no), \(co)")
When we run the above program using playground, we get the following result −
Swapped values are 10, 2
Function Types & its Usage
Each and every function follows the specific function by considering the input parameters and outputs the desired result.
func inputs(no1: Int, no2: Int) -> Int {
   return no1/no2
}
Following is an example −
func inputs(no1: Int, no2: Int) -> Int {
   return no1/no2
}

print(inputs(no1: 20, no2: 10))
print(inputs(no1: 36, no2: 6))
When we run the above program using playground, we get the following result −
2
6
Here the function is initialized with two arguments no1 and no2 as integer data types and its return type is also declared as 'int'
Func inputstr(name: String) -> String {
   return name
}
Here the function is declared as string datatype.
Functions may also have void data types and such functions won't return anything.
func inputstr() {
   print("Swift 4 Functions")
   print("Types and its Usage")
}
inputstr()
When we run the above program using playground, we get the following result −
Swift 4 Functions
Types and its Usage
The above function is declared as a void function with no arguments and no return values.
Using Function Types
Functions are first passed with integer, float or string type arguments and then it is passed as constants or variables to the function as mentioned below.
var addition: (Int, Int) -> Int = sum
Here sum is a function name having 'a' and 'b' integer variables which is now declared as a variable to the function name addition. Hereafter both addition and sum function both have same number of arguments declared as integer datatype and also return integer values as references.
func sum(a: Int, b: Int) -> Int {
   return a + b
}
var addition: (Int, Int) -> Int = sum
print("Result: \(addition(40, 89))")
When we run the above program using playground, we get the following result −
Result: 129
Function Types as Parameter Types & Return Types
We can also pass the function itself as parameter types to another function.
func sum(a: Int, b: Int) -> Int {
   return a + b
}
var addition: (Int, Int) -> Int = sum
print("Result: \(addition(40, 89))")

func another(addition: (Int, Int) -> Int, a: Int, b: Int) {
   print("Result: \(addition(a, b))")
}
another(sum, 10, 20)
When we run the above program using playground, we get the following result −
Result: 129
Result: 30
Nested Functions
A nested function provides the facility to call the outer function by invoking the inside function.
func calcDecrement(forDecrement total: Int) -> () -> Int {
   var overallDecrement = 0
   func decrementer() -> Int {
      overallDecrement -= total
      return overallDecrement
   }
   return decrementer
}

let decrem = calcDecrement(forDecrement: 30)
print(decrem())
When we run the above program using playground, we get the following result −
-30
Swift - Closures
Closures in Swift 4 are similar to that of self-contained functions organized as blocks and called anywhere like C and Objective C languages. Constants and variable references defined inside the functions are captured and stored in closures. Functions are considered as special cases of closures and it takes the following three forms −
| Global Functions | Nested Functions | Closure Expressions |
|---|---|---|
| Have a name. Do not capture any values | Have a name. Capture values from enclosing function | Unnamed Closures capture values from the adjacent blocks |
Closure expressions in Swift 4 language follow crisp, optimization, and lightweight syntax styles which includes.
- Inferring parameter and return value types from context.
- Implicit returns from single-expression closures.
- Shorthand argument names and
- Trailing closure syntax
Syntax
Following is a generic syntax to define closure which accepts parameters and returns a data type −
{
   (parameters) −> return type in
   statements
}
Following is a simple example −
let studname = { print("Welcome to Swift Closures") }
studname()
When we run the above program using playground, we get the following result −
Welcome to Swift Closures
The following closure accepts two parameters and returns a Bool value −
{
   (Int, Int) −> Bool in
   Statement1
   Statement 2
   ---
   Statement n
}
Following is a simple example −
let divide = {
   (val1: Int, val2: Int) -> Int in
   return val1 / val2
}

let result = divide(200, 20)
print (result)
When we run the above program using playground, we get the following result −
10
Expressions in Closures
Nested functions provide a convenient way of naming and defining blocks of code. Instead of representing the whole function declaration and name constructs are used to denote shorter functions. Representing the function in a clear brief statement with focused syntax is achieved through closure expressions.
Ascending Order Program
Sorting a string is achieved by the Swift 4s key reserved function "sorted" which is already available in the standard library. The function will sort the given strings in the ascending order and returns the elements in a new array with same size and data type mentioned in the old array. The old array remains the same.
Two arguments are represented inside the sorted function −
Values of Known type represented as arrays.
Array contents (Int, Int) and returns a Boolean value (Bool) if the array is sorted properly it will return true value otherwise it will return false.
A normal function with input string is written and passed to the sorted function to get the strings sorted to new array which is shown below −
func ascend(s1: String, s2: String) -> Bool {
   return s1 > s2
}

let stringcmp = ascend(s1: "Swift 4", s2: "great")
print (stringcmp)
When we run above program using playground, we get following result −
true
The initial array to be sorted for icecream is given as "Swift 4" and "great". Function to sort the array is declared as string datatype and its return type is mentioned as Boolean. Both the strings are compared and sorted in ascending order and stored in a new array. If the sorting is performed successful the function will return a true value else it will return false.
Closure expression syntax uses −
- constant parameters,
- variable parameters, and
- inout parameters.
Closure expression did not support default values. Variadic parameters and Tuples can also be used as parameter types and return types.
let sum = {
   (no1: Int, no2: Int) -> Int in
   return no1 + no2
}

let digits = sum(10, 20)
print(digits)
When we run the above program using playground, we get the following result −
30
The parameters and return type declarations mentioned in the function statement can also be represented by the inline closure expression function with 'in' keyword. Once declaring parameter and return types 'in' keyword is used to denote that the body of the closure.
Single Expression Implicit Returns
Here, the function type of the sorted function's second argument makes it clear that a Bool value must be returned by the closure. Because the closure's body contains a single expression (s1 > s2) that returns a Bool value, there is no ambiguity, and the return keyword can be omitted.
To return a Single expression statement in expression closures 'return' keyword is omitted in its declaration part.
var count:[Int] = [5, 10, -6, 75, 20]
let descending = count.sorted(by: { n1, n2 in n1 > n2 })
let ascending = count.sorted(by: { n1, n2 in n1 < n2 })

print(descending)
print(ascending)
When we run the above program using playground, we get the following result −
[75, 20, 10, 5, -6]
[-6, 5, 10, 20, 75]
The statement itself clearly defines that when string1 is greater than string 2 return true otherwise false hence return statement is omitted here.
Known Type Closures
Consider the addition of two numbers. We know that addition will return the integer datatype. Hence known type closures are declared as −
let sub = {
   (no1: Int, no2: Int) -> Int in
   return no1 - no2
}

let digits = sub(10, 20)
print(digits)
When we run the above program using playground, we get the following result −
-10
Declaring Shorthand Argument Names as Closures
Swift 4 automatically provides shorthand argument names to inline closures, which can be used to refer to the values of the closure's arguments by the names $0, $1, $2, and so on.
var shorthand: (String, String) -> String
shorthand = { $1 }
print(shorthand("100", "200"))
Here, $0 and $1 refer to the closure's first and second String arguments.
When we run the above program using playground, we get the following result −
200
Swift 4 facilitates the user to represent Inline closures as shorthand argument names by representing $0, $1, $2 --- $n.
Closures argument list is omitted in definition section when we represent shorthand argument names inside closure expressions. Based on the function type the shorthand argument names will be derived. Since the shorthand argument is defined in expression body the 'in' keyword is omitted.
Closures as Operator Functions
Swift 4 provides an easy way to access the members by just providing operator functions as closures. In the previous examples keyword 'Bool' is used to return either 'true' when the strings are equal otherwise it returns 'false'.
The expression is made even simpler by operator function in closure as −
let numb = [98, -20, -30, 42, 18, 35]
var sortedNumbers = numb.sorted ({
   (left: Int, right: Int) -> Bool in
   return left < right
})

let asc = numb.sorted(<)
print(asc)
When we run the above program using playground, we get the following result −
[-30, -20, 18, 35, 42, 98]
Closures as Trailers
Passing the function's final argument to a closure expression is declared with the help of 'Trailing Closures'. It is written outside the function () with {}. Its usage is needed when it is not possible to write the function inline on a single line.
reversed = sorted(names) { $0 > $1}
where {$0 > $1} are represented as trailing closures declared outside (names).
import Foundation
var letters = ["North", "East", "West", "South"]

let twoletters = letters.map({
   (state: String) -> String in
   return state.substringToIndex(advance(state.startIndex, 2)).uppercaseString
})

let stletters = letters.map() {
   $0.substringToIndex(advance($0.startIndex, 2)).uppercaseString
}
print(stletters)
When we run the above program using playground, we get the following result −
[NO, EA, WE, SO]
Capturing Values and Reference Types
In Swift 4, capturing constants and variables values is done with the help of closures. It further refers and modify the values for those constants and variables inside the closure body even though the variables no longer exists.
Capturing constant and variable values is achieved by using nested function by writing function with in the body of other function.
A nested function captures −
- Outer function arguments.
- Capture constants and variables defined within the Outer function.
In Swift 4, when a constant or a variable is declared inside a function, reference to that variables are also automatically created by the closure. It also provides the facility to refer more than two variables as the same closure as follows −
let decrem = calcDecrement(forDecrement: 18)
decrem()
Here oneDecrement and Decrement variables will both point the same memory block as closure reference.
func calcDecrement(forDecrement total: Int) -> () -> Int {
   var overallDecrement = 100
   func decrementer() -> Int {
      overallDecrement -= total
      print(overallDecrement)
      return overallDecrement
   }
   return decrementer
}

let decrem = calcDecrement(forDecrement: 18)
decrem()
decrem()
decrem()
When we run the above program using playground, we get the following result −
82
64
46
When each and every time the outer function calcDecrement is called it invokes the decrementer() function and decrements the value by 18 and returns the result with the help of outer function calcDecrement. Here calcDecrement acts as a closure.
Even though the function decrementer() does not have any arguments closure by default refers to variables 'overallDecrement' and 'total' by capturing its existing values. The copy of the values for the specified variables are stored with the new decrementer() function. Swift 4 handles memory management functions by allocating and deallocating memory spaces when the variables are not in use.
Swift - Enumerations
An enumeration is a user-defined data type which consists of set of related values. Keyword enum is used to defined enumerated data type.
Enumeration Functionality
Enumeration in Swift 4 also resembles the structure of C and Objective C.
It is declared in a class and its values are accessed through the instance of that class.
Initial member value is defined using enum intializers.
Its functionality is also extended by ensuring standard protocol functionality.
Syntax
Enumerations are introduced with the enum keyword and place their entire definition within a pair of braces −
enum enumname {
   // enumeration values are described here
}
For example, you can define an enumeration for days of week as follows −
enum DaysofaWeek {
   case Sunday
   case Monday
   ---
   case Saturday
}
Example
enum names {
   case Swift
   case Closures
}

var lang = names.Closures
lang = .Closures

switch lang {
   case .Swift:
      print("Welcome to Swift")
   case .Closures:
      print("Welcome to Closures")
   default:
      print("Introduction")
}
When we run the above program using playground, we get the following result −
Welcome to Closures
Swift 4 enumeration does not assign its members default value like C and Objective C. Instead the members are explicitly defined by their enumeration names. Enumeration name should start with a capital letter (Ex: enum DaysofaWeek).
var weekDay = DaysofaWeek.Sunday
Here the Enumeration name 'DaysofaWeek' is assigned to a variable weekday.Sunday. It informs the compiler that the datatype belongs to Sunday will be assigned to subsequent enum members of that particular class. Once the enum member datatype is defined, the members can be accessed by passing values and further computations.
Enumeration with Switch Statement
Swift 4 'Switch' statement also follows the multi way selection. Only one variable is accessed at a particular time based on the specified condition. Default case in switch statement is used to trap unspecified cases.
enum Climate {
   case India
   case America
   case Africa
   case Australia
}

var season = Climate.America
season = .America
switch season {
   case .India:
      print("Climate is Hot")
   case .America:
      print("Climate is Cold")
   case .Africa:
      print("Climate is Moderate")
   case .Australia:
      print("Climate is Rainy")

}
When we run the above program using playground, we get the following result −
Climate is Cold
The program first defines Climate as the enumeration name. Then its members like 'India', 'America', 'Africa' and 'Australia' are declared belonging to class 'Climate'. Now the member America is assigned to a Season Variable. Further, Switch case will see the values corresponding to .America and it will branch to that particular statement. The output will be displayed as "Climate is Cold". Likewise all the members can be accessed through switch statements. When the condition is not satisfied it prints by default 'Climate is not predictable'.
Enumeration can be further classified in to associated values and raw values.
Difference between Associated Values and Raw Values
| Associated Values | Raw Values |
| Different Datatypes | Same Datatypes |
| Ex: enum {10,0.8,"Hello"} | Ex: enum {10,35,50} |
| Values are created based on constant or variable | Prepopulated Values |
| Varies when declared each time | Value for member is same |
Enum with Associated Values
enum Student {
   case Name(String)
   case Mark(Int,Int,Int)
}

var studDetails = Student.Name("Swift 4")
var studMarks = Student.Mark(98,97,95)

switch studMarks {
   case .Name(let studName):
      print("Student name is: \(studName).")
   case .Mark(let Mark1, let Mark2, let Mark3):
      print("Student Marks are: \(Mark1),\(Mark2),\(Mark3).")
}
When we run the above program using playground, we get the following result −
Student Marks are: 98,97,95.
Consider for example to access the students name and marks secured in three subjects enumeration name is declared as student and the members present in enum class are name which belongs to string datatype, marks are represented as mark1, mark2 and mark3 of datatype Integer. To access either the student name or marks they have scored
var studDetails = Student.Name("Swift")
var studMarks = Student.Mark(98,97,95)
Now, the switch case will print student name if that case block is executed otherwise it will print the marks secured by the student. If both the conditions fail, the default block will be executed.
Enum with Raw Values
Raw values can be strings, characters, or any of the integer or floating-point number types. Each raw value must be unique within its enumeration declaration. When integers are used for raw values, they auto-increment if no value is specified for some of the enumeration members.
enum Month: Int {
   case January = 1, February, March, April, May, June, July, August,
      September, October, November, December
}

let yearMonth = Month.May.rawValue
print("Value of the Month is: \(yearMonth).")
When we run the above program using playground, we get the following result −
Value of the Month is: 5.
Swift - Structures
Swift 4 provides a flexible building block of making use of constructs as Structures. By making use of these structures once can define constructs methods and properties.
Unlike C and Objective C
Structure need not require implementation files and interface.
Structure allows us to create a single file and to extend its interface automatically to other blocks.
In Structure the variable values are copied and passed in subsequent codes by returning a copy of the old values so that the values cannot be altered.
Syntax
Structures are defined with a 'Struct' Keyword.
struct nameStruct {
   Definition 1
   Definition 2
   ---
   Definition N
}
Definition of a Structure
Consider for example, suppose we have to access students record containing marks of three subjects and to find out the total of three subjects. Here markStruct is used to initialize a structure with three marks as datatype 'Int'.
struct MarkStruct {
   var mark1: Int
   var mark2: Int
   var mark3: Int
}
Accessing the Structure and its Properties
The members of the structure are accessed by its structure name. The instances of the structure are initialized by the 'let' keyword.
struct studentMarks {
   var mark1 = 100
   var mark2 = 200
   var mark3 = 300
}

let marks = studentMarks()
print("Mark1 is \(marks.mark1)")
print("Mark2 is \(marks.mark2)")
print("Mark3 is \(marks.mark3)")
When we run the above program using playground, we get the following result −
Mark1 is 100
Mark2 is 200
Mark3 is 300
Students marks are accessed by the structure name 'studentMarks'. The structure members are initialized as mark1, mark2, mark3 with integer type values. Then the structure studentMarks() is passed to the 'marks' with 'let' keyword. Hereafter 'marks' will contain the structure member values. Now the values are printed by accessing the structure member values by '.' with its initialized names.
struct MarksStruct {
   var mark: Int

   init(mark: Int) {
      self.mark = mark
   }
}

var aStruct = MarksStruct(mark: 98)
var bStruct = aStruct     // aStruct and bStruct are two structs with the same value!
bStruct.mark = 97

print(aStruct.mark)      // 98
print(bStruct.mark)      // 97
When we run the above program using playground, we get the following result −
98
97
Best Usage Practices of Structures
Swift 4 language provides the functionality to define structures as custom data types for building the function blocks. The instances of structure are passed by its value to the defined blocks for further manipulations.
Need for having structures
To encapsulate simple data values.
To copy the encapsulated data and its associated properties by 'values' rather than by 'references'.
Structure to 'Copy' and 'Reference'.
Structures in Swift 4 pass their members with their values rather than by its references.
struct markStruct {
   var mark1: Int
   var mark2: Int
   var mark3: Int

   init(mark1: Int, mark2: Int, mark3: Int) {
      self.mark1 = mark1
      self.mark2 = mark2
      self.mark3 = mark3
   }
}

var marks = markStruct(mark1: 98, mark2: 96, mark3:100)
print(marks.mark1)
print(marks.mark2)
print(marks.mark3)
When we run the above program using playground, we get the following result −
98
96
100
Another Example
struct markStruct {
   var mark1: Int
   var mark2: Int
   var mark3: Int

   init(mark1: Int, mark2: Int, mark3: Int) {
      self.mark1 = mark1
      self.mark2 = mark2
      self.mark3 = mark3
   }
}

var fail = markStruct(mark1: 34, mark2: 42, mark3: 13)

print(fail.mark1)
print(fail.mark2)
print(fail.mark3)
When we run the above program using playground, we get the following result −
34
42
13
The structure 'markStruct' is defined first with its members mark1, mark2 and mark3. Now the variables of member classes are initialized to hold integer values. Then the copy of the structure members are created with 'self' Keyword. Once the copy of the structure members are created structure block with its parameter marks are passed to 'marks' variable which will now hold the students marks. Then the marks are printed as 98, 96, 100. Next step for the same structure members another instance named 'fail' is used to point the same structure members with different marks. Then the results are now printed as 34, 42, 13. This clearly explains that structures will have a copy of the member variables then pass the members to their upcoming function blocks.
Swift - Classes
Classes in Swift 4 are building blocks of flexible constructs. Similar to constants, variables and functions the user can define class properties and methods. Swift 4 provides us the functionality that while declaring classes the users need not create interfaces or implementation files. Swift 4 allows us to create classes as a single file and the external interfaces will be created by default once the classes are initialized.
Benefits of having Classes
Inheritance acquires the properties of one class to another class
Type casting enables the user to check class type at run time
Deinitializers take care of releasing memory resources
Reference counting allows the class instance to have more than one reference
Common Characteristics of Classes and structures
- Properties are defined to store values
- Subscripts are defined for providing access to values
- Methods are initialized to improve functionality
- Initial state are defined by initializers
- Functionality are expanded beyond default values
- Confirming protocol functionality standards
Syntax
Class classname {
   Definition 1
   Definition 2
   ---
   Definition N
}
Class Definition
class student {
   var studname: String
   var mark: Int
   var mark2: Int
}
The syntax for creating instances
let studrecord = student()
Example
class MarksStruct {
   var mark: Int
   init(mark: Int) {
      self.mark = mark
   }
}

class studentMarks {
   var mark = 300
}

let marks = studentMarks()
print("Mark is \(marks.mark)")
When we run the above program using playground, we get the following result −
Mark is 300
Accessing Class Properties as Reference Types
Class properties can be accessed by the '.' syntax. Property name is separated by a '.' after the instance name.
class MarksStruct {
   var mark: Int
   init(mark: Int) {
      self.mark = mark
   }
}

class studentMarks {
   var mark1 = 300
   var mark2 = 400
   var mark3 = 900
}

let marks = studentMarks()
print("Mark1 is \(marks.mark1)")
print("Mark2 is \(marks.mark2)")
print("Mark3 is \(marks.mark3)")
When we run the above program using playground, we get the following result −
Mark1 is 300
Mark2 is 400
Mark3 is 900
Class Identity Operators
Classes in Swift 4 refers multiple constants and variables pointing to a single instance. To know about the constants and variables pointing to a particular class instance identity operators are used. Class instances are always passed by reference. In Classes NSString, NSArray, and NSDictionary instances are always assigned and passed around as a reference to an existing instance, rather than as a copy.
| Identical to Operators | Not Identical to Operators |
|---|---|
| Operator used is (===) | Operator used is (!==) |
| Returns true when two constants or variables pointing to a same instance | Returns true when two constants or variables pointing to a different instance |
class SampleClass: Equatable {
   let myProperty: String
   init(s: String) {
      myProperty = s
   }
}

func ==(lhs: SampleClass, rhs: SampleClass) -> Bool {
   return lhs.myProperty == rhs.myProperty
}

let spClass1 = SampleClass(s: "Hello")
let spClass2 = SampleClass(s: "Hello")

spClass1 === spClass2 // false
print("\(spClass1)")

spClass1 !== spClass2 // true
print("\(spClass2)")
When we run the above program using playground, we get the following result −
main.SampleClass
main.SampleClass
Swift - Properties
Swift 4 language provides properties for class, enumeration or structure to associate values. Properties can be further classified into Stored properties and Computed properties.
Difference between Stored Properties and Computed Properties
| Stored Property | Computed Property |
|---|---|
| Store constant and variable values as instance | Calculate a value rather than storing the value |
| Provided by classes and structures | Provided by classes, enumerations and structures |
Both Stored and Computed properties are associated with instances type. When the properties are associated with its type values then it is defined as 'Type Properties'. Stored and computed properties are usually associated with instances of a particular type. However, properties can also be associated with the type itself. Such properties are known as type properties. Property observers are also used
- To observe the value of the stored properties
- To observe the property of inherited subclass derived from superclass
Stored Properties
Swift 4 introduces Stored Property concept to store the instances of constants and variables. Stored properties of constants are defined by the 'let' keyword and Stored properties of variables are defined by the 'var' keyword.
- During definition Stored property provides 'default value'
- During Initialization the user can initialize and modify the initial values
struct Number {
   var digits: Int
   let pi = 3.1415
}

var n = Number(digits: 12345)
n.digits = 67

print("\(n.digits)")
print("\(n.pi)")
When we run the above program using playground, we get the following result −
67
3.1415
Consider the following line in the above code −
let pi = 3.1415
Here, the variable pi is initialized as a stored property value with the instance pi = 3.1415. So, whenever the instance is referred it will hold the value 3.1415 alone.
Another method to have stored property is to have as constant structures. So the whole instance of the structures will be considered as 'Stored Properties of Constants'.
struct Number {
   var digits: Int
   let numbers = 3.1415
}

var n = Number(digits: 12345)
n.digits = 67

print("\(n.digits)")
print("\(n.numbers)")
n.numbers = 8.7
When we run the above program using playground, we get the following result −
error: cannot assign to 'numbers' in 'n'
n.numbers = 8.7
Instead of reinitializing the 'number' to 8.7 it will return an error message indicating that the 'number' is declared as constant.
Lazy Stored Property
Swift 4 provides a flexible property called 'Lazy Stored Property' where it won't calculate the initial values when the variable is initialized for the first time. 'lazy' modifier is used before the variable declaration to have it as a lazy stored property.
Lazy Properties are used −
- To delay object creation.
- When the property is dependent on other parts of a class, that are not known yet
class sample {
   lazy var no = number()    // `var` declaration is required.
}

class number {
   var name = "Swift 4"
}

var firstsample = sample()
print(firstsample.no.name)
When we run the above program using playground, we get the following result −
Swift 4
Instance Variables
In Objective C, Stored properties also have instance variables for back up purposes to store the values declared in stored property.
Swift 4 integrates both these concepts into a single 'stored property' declaration. Instead of having a corresponding instance variable and back up value 'stored property' contains all integrated information defined in a single location about the variables property by variable name, data type and memory management functionalities.
Computed Properties
Rather than storing the values computed properties provide a getter and an optional setter to retrieve and set other properties and values indirectly.
class sample {
   var no1 = 0.0, no2 = 0.0
   var length = 300.0, breadth = 150.0

   var middle: (Double, Double) {
      get {
         return (length / 2, breadth / 2)
      }

      set(axis){
         no1 = axis.0 - (length / 2)
         no2 = axis.1 - (breadth / 2)
      }
   }
}

var result = sample()
print(result.middle)
result.middle = (0.0, 10.0)

print(result.no1)
print(result.no2)
When we run the above program using playground, we get the following result −
(150.0, 75.0)
-150.0
-65.0
When a computed property left the new value as undefined, the default value will be set for that particular variable.
Computed Properties as Read-Only Properties
A read-only property in computed property is defined as a property with getter but no setter. It is always used to return a value. The variables are further accessed through a '.' Syntax but cannot be set to another value.
class film {
   var head = ""
   var duration = 0.0
   var metaInfo: [String:String] {
      return [
         "head": self.head,
         "duration":"\(self.duration)"
      ]
   }
}

var movie = film()
movie.head = "Swift 4 Properties"
movie.duration = 3.09

print(movie.metaInfo["head"]!)
print(movie.metaInfo["duration"]!)
When we run the above program using playground, we get the following result −
Swift 4 Properties
3.09
Computed Properties as Property Observers
In Swift 4 to observe and respond to property values Property Observers are used. Each and every time when property values are set property observers are called. Except lazy stored properties we can add property observers to 'inherited' property by method 'overriding'.
Property Observers can be defined by either
Before Storing the value - willset
After Storing the new value - didset
When a property is set in an initializer willset and didset observers cannot be called.
class Samplepgm {
   var counter: Int = 0 {
      willSet(newTotal){
         print("Total Counter is: \(newTotal)")
      }

      didSet {
         if counter > oldValue {
            print("Newly Added Counter \(counter - oldValue)")
         }
      }
   }
}

let NewCounter = Samplepgm()
NewCounter.counter = 100
NewCounter.counter = 800
When we run the above program using playground, we get the following result −
Total Counter is: 100
Newly Added Counter 100
Total Counter is: 800
Newly Added Counter 700
Local and Global Variables
Local and global variable are declared for computing and observing the properties.
| Local Variables | Global Variables |
|---|---|
| Variables that are defined within a function, method, or closure context. | Variables that are defined outside function, method, closure, or type context. |
| Used to store and retrieve values. | Used to store and retrieve values. |
| Stored properties is used to get and set the values. | Stored properties is used to get and set the values. |
| Computed properties are also used. | Computed properties are also used. |
Type Properties
Properties are defined in the Type definition section with curly braces {} and scope of the variables are also defined previously. For defining type properties for value types 'static' keyword is used and for class types 'class' keyword is used.
Syntax
struct Structname {
   static var storedTypeProperty = " "
   static var computedTypeProperty: Int {
      // return an Int value here
   }
}

enum Enumname {
   static var storedTypeProperty = " "
   static var computedTypeProperty: Int {
      // return an Int value here
   }
}

class Classname {
   class var computedTypeProperty: Int {
      // return an Int value here
   }
}
Querying and Setting Properties
Just like instance properties Type properties are queried and set with '.' Syntax just on the type alone instead of pointing to the instance.
struct StudMarks {
   static let markCount = 97
   static var totalCount = 0

   var InternalMarks: Int = 0 {
      didSet {
         if InternalMarks > StudMarks.markCount {
            InternalMarks = StudMarks.markCount
         }
         if InternalMarks > StudMarks.totalCount {
            StudMarks.totalCount = InternalMarks
         }
      }
   }
}

var stud1Mark1 = StudMarks()
var stud1Mark2 = StudMarks()

stud1Mark1.InternalMarks = 98
print(stud1Mark1.InternalMarks)

stud1Mark2.InternalMarks = 87
print(stud1Mark2.InternalMarks)
When we run the above program using playground, we get the following result −
97
87
Swift - Methods
In Swift 4 language Functions associated with particular types are referred to as Methods. In Objective C Classes are used to define methods, whereas Swift 4 language provides the user flexibility to have methods for Classes, Structures and Enumerations.
Instance Methods
In Swift 4 language, Classes, Structures and Enumeration instances are accessed through the instance methods.
Instance methods provide functionality
- To access and modify instance properties
- functionality related to the instance's need
Instance method can be written inside the {} curly braces. It has implicit access to methods and properties of the type instance. When a specific instance of the type is called it will get access to that particular instance.
Syntax
func funcname(Parameters) -> returntype {
   Statement1
   Statement2
   ---
   Statement N
   return parameters
}
Example
class calculations {
   let a: Int
   let b: Int
   let res: Int

   init(a: Int, b: Int) {
      self.a = a
      self.b = b
      res = a + b
   }

   func tot(c: Int) -> Int {
      return res - c
   }

   func result() {
      print("Result is: \(tot(c: 20))")
      print("Result is: \(tot(c: 50))")
   }
}
let pri = calculations(a: 600, b: 300)
pri.result()
When we run the above program using playground, we get the following result −
Result is: 880
Result is: 850
Class Calculations defines two instance methods −
- init() is defined to add two numbers a and b and store it in result 'res'
- tot() is used to subtract the 'res' from passing 'c' value
Finally, to print the calculations methods with values for a and b is called. Instance methods are accessed with '.' dot syntax
Local and External Parameter Names
Swift 4 Functions describe both local and global declarations for their variables. Similarly, Swift 4 Methods naming conventions also resembles as that of Objective C. But the characteristics of local and global parameter name declarations are different for functions and methods. The first parameter in Swift 4 are referred by preposition names as 'with', 'for' and 'by' for easy to access naming conventions.
Swift 4 provides the flexibility in methods by declaring first parameter name as local parameter names and the remaining parameter names to be of global parameter names. Here 'no1' is declared by Swift 4 methods as local parameter names. 'no2' is used for global declarations and accessed through out the program.
class division {
   var count: Int = 0
   func incrementBy(no1: Int, no2: Int) {
      count = no1 / no2
      print(count)
   }
}

let counter = division()
counter.incrementBy(no1: 1800, no2: 3)
counter.incrementBy(no1: 1600, no2: 5)
counter.incrementBy(no1: 11000, no2: 3)
When we run the above program using playground, we get the following result −
600
320
3666
External Parameter Name with # and _ Symbol
Even though Swift 4 methods provide first parameter names for local declarations, the user has the provision to modify the parameter names from local to global declarations. This can be done by prefixing '#' symbol with the first parameter name. By doing so, the first parameter can be accessed globally throughout the modules.
When the user needs to access the subsequent parameter names with an external name, the methods name is overridden with the help of '_' symbol.
class multiplication {
   var count: Int = 0
   func incrementBy(no1: Int, no2: Int) {
      count = no1 * no2
      print(count)
   }
}

let counter = multiplication()

counter.incrementBy(no1: 800, no2: 3)
counter.incrementBy(no1: 100, no2: 5)
counter.incrementBy(no1: 15000, no2: 3)
When we run the above program using playground, we get the following result −
2400
500
45000
Self property in Methods
Methods have an implicit property known as 'self' for all its defined type instances. 'Self' property is used to refer the current instances for its defined methods.
class calculations {
   let a: Int
   let b: Int
   let res: Int

   init(a: Int, b: Int) {
      self.a = a
      self.b = b
      res = a + b
      print("Inside Self Block: \(res)")
   }

   func tot(c: Int) -> Int {
      return res - c
   }

   func result() {
      print("Result is: \(tot(c: 20))")
      print("Result is: \(tot(c: 50))")
   }
}

let pri = calculations(a: 600, b: 300)
let sum = calculations(a: 1200, b: 300)

pri.result()
sum.result()
When we run the above program using playground, we get the following result −
Inside Self Block: 900
Inside Self Block: 1500
Result is: 880
Result is: 850
Result is: 1480
Result is: 1450
Modifying Value Types from Instance Methods
In Swift 4 language structures and enumerations belong to value types which cannot be altered by its instance methods. However, Swift 4 language provides flexibility to modify the value types by 'mutating' behavior. Mutate will make any changes in the instance methods and will return back to the original form after the execution of the method. Also, by the 'self' property new instance is created for its implicit function and will replace the existing method after its execution
struct area {
   var length = 1
   var breadth = 1

   func area() -> Int {
      return length * breadth
   }
   mutating func scaleBy(res: Int) {
      length *= res
      breadth *= res
      print(length)
      print(breadth)
   }
}

var val = area(length: 3, breadth: 5)
val.scaleBy(res: 3)
val.scaleBy(res: 30)
val.scaleBy(res: 300)
When we run the above program using playground, we get the following result −
9
15
270
450
81000
135000
Self Property for Mutating Method
Mutating methods combined with 'self' property assigns a new instance to the defined method.
struct area {
   var length = 1
   var breadth = 1
   func area() -> Int {
      return length * breadth
   }
   mutating func scaleBy(res: Int) {
      self.length *= res
      self.breadth *= res
      print(length)
      print(breadth)
   }
}

var val = area(length: 3, breadth: 5)
val.scaleBy(res: 13)
When we run the above program using playground, we get the following result. −
39
65
Type Methods
When a particular instance of a method is called, it is called as an Instance method; and when the method calls a particular type of a method, it is called as 'Type Methods'. Type methods for 'classes' are defined by the 'func' keyword and structures and enumerations type methods are defined with the 'static' keyword before the 'func' keyword.
Type methods are called and accessed by '.' syntax where instead of calling a particular instance the whole method is invoked.
class Math {
   class func abs(number: Int) -> Int {
      if number < 0 {
         return (-number)
      } else {
         return number
      }
   }
}

struct absno {
   static func abs(number: Int) -> Int {
      if number < 0 {
         return (-number)
      } else {
         return number
      }
   }
}

let no = Math.abs(number: -35)
let num = absno.abs(number: -5)

print(no)
print(num)
When we run the above program using playground, we get the following result. −
35
5
Swift - Subscripts
Accessing the element members of a collection, sequence and a list in Classes, Structures and Enumerations are carried out with the help of subscripts. These subscripts are used to store and retrieve the values with the help of index. Array elements are accessed with the help of someArray[index] and its subsequent member elements in a Dictionary instance can be accessed as someDicitonary[key].
For a single type, subscripts can range from single to multiple declarations. We can use the appropriate subscript to overload the type of index value passed to the subscript. Subscripts also ranges from single dimension to multiple dimension according to the users requirements for their input data type declarations.
Subscript Declaration Syntax and its Usage
Let's have a recap to the computed properties. Subscripts too follow the same syntax as that of computed properties. For querying type instances, subscripts are written inside a square bracket followed with the instance name. Subscript syntax follows the same syntax structure as that of 'instance method' and 'computed property' syntax. 'subscript' keyword is used for defining subscripts and the user can specify single or multiple parameters with their return types. Subscripts can have read-write or read-only properties and the instances are stored and retrieved with the help of 'getter' and 'setter' properties as that of computed properties.
Syntax
subscript(index: Int) −> Int {
   get {
      // used for subscript value declarations
   }
   set(newValue) {
      // definitions are written here
   }
}
Example1
struct subexample {
   let decrementer: Int
   subscript(index: Int) -> Int {
      return decrementer / index
   }
}
let division = subexample(decrementer: 100)

print("The number is divisible by \(division[9]) times")
print("The number is divisible by \(division[2]) times")
print("The number is divisible by \(division[3]) times")
print("The number is divisible by \(division[5]) times")
print("The number is divisible by \(division[7]) times")
When we run the above program using playground, we get the following result −
The number is divisible by 11 times
The number is divisible by 50 times
The number is divisible by 33 times
The number is divisible by 20 times
The number is divisible by 14 times
Example2
class daysofaweek {
   private var days = ["Sunday", "Monday", "Tuesday", "Wednesday",
      "Thursday", "Friday", "saturday"]
   subscript(index: Int) -> String {
      get {
         return days[index]
      }
      set(newValue) {
         self.days[index] = newValue
      }
   }
}
var p = daysofaweek()

print(p[0])
print(p[1])
print(p[2])
print(p[3])
When we run the above program using playground, we get the following result −
Sunday Monday Tuesday Wednesday
Options in Subscript
Subscripts takes single to multiple input parameters and these input parameters also belong to any datatype. They can also use variable and variadic parameters. Subscripts cannot provide default parameter values or use any in-out parameters.
Defining multiple subscripts are termed as 'subscript overloading' where a class or structure can provide multiple subscript definitions as required. These multiple subscripts are inferred based on the types of values that are declared within the subscript braces.
struct Matrix {
let rows: Int, columns: Int
var print: [Double]
init(rows: Int, columns: Int) {
self.rows = rows
self.columns = columns
print = Array(count: rows * columns, repeatedValue: 0.0)
}
subscript(row: Int, column: Int) -> Double {
get {
return print[(row * columns) + column]
}
set {
print[(row * columns) + column] = newValue
}
}
}
var mat = Matrix(rows: 3, columns: 3)
mat[0,0] = 1.0
mat[0,1] = 2.0
mat[1,0] = 3.0
mat[1,1] = 5.0
print("\(mat[0,0])")
When we run the above program using playground, we get the following result −
1.0
Swift 4 subscript supports single parameter to multiple parameter declarations for appropriate data types. The program declares 'Matrix' structure as a 2 * 2 dimensional array matrix to store 'Double' data types. The Matrix parameter is inputted with Integer data types for declaring rows and columns.
New instance for the Matrix is created by passing row and column count to the initialize as shown below.
var mat = Matrix(rows: 3, columns: 3)
Matrix values can be defined by passing row and column values into the subscript, separated by a comma as shown below.
mat[0,0] = 1.0 mat[0,1] = 2.0 mat[1,0] = 3.0 mat[1,1] = 5.0
Swift - Inheritance
The ability to take than more form is defined as Inheritance. Generally a class can inherit methods, properties and functionalities from another class. Classes can be further categorized in to sub class and super class.
Sub Class − when a class inherits properties, methods and functions from another class it is called as sub class
Super Class − Class containing properties, methods and functions to inherit other classes from itself is called as a super class
Swift 4 classes contain superclass which calls and access methods, properties, functions and overriding methods. Also, property observers are also used to add a property and modify the stored or computed property methods.
Base Class
A Class that does not inherit methods, properties or functions from another class is called as 'Base Class'.
class StudDetails {
var stname: String!
var mark1: Int!
var mark2: Int!
var mark3: Int!
init(stname: String, mark1: Int, mark2: Int, mark3: Int) {
self.stname = stname
self.mark1 = mark1
self.mark2 = mark2
self.mark3 = mark3
}
}
let stname = "Swift 4"
let mark1 = 98
let mark2 = 89
let mark3 = 76
print(stname)
print(mark1)
print(mark2)
print(mark3)
When we run the above program using playground, we get the following result −
Swift 4 98 89 76
Class with classname StudDetails are defined as a base class here which is used to contain students name, and three subjects mark as mark1, mark2 and mark3. 'let' keyword is used to initialize the value for the base class and base class value is displayed in the playground with the help of 'print' function.
Subclass
The act of basing a new class on an existing class is defined as 'Subclass'. The subclass inherits the properties, methods and functions of its base class. To define a subclass ':' is used before the base class name
class StudDetails {
var mark1: Int;
var mark2: Int;
init(stm1:Int, results stm2:Int) {
mark1 = stm1;
mark2 = stm2;
}
func print() {
print("Mark1:\(mark1), Mark2:\(mark2)")
}
}
class display : StudDetails {
init() {
super.init(stm1: 93, results: 89)
}
}
let marksobtained = display()
marksobtained.print()
When we run the above program using playground, we get the following result −
Mark1:93, Mark2:89
Class 'StudDetails' is defined as super class where student marks are declared and the subclass 'display' is used to inherit the marks from its super class. Sub class defines students marks and calls the print() method to display the students mark.
Overriding
Accessing the super class instance, type methods, instance, type properties and subscripts subclass provides the concept of overriding. 'override' keyword is used to override the methods declared in the superclass.
Access to Super class Methods, Properties and Subscripts
'super' keyword is used as a prefix to access the methods, properties and subscripts declared in the super class
| Overriding | Access to methods,properties and subscripts |
| Methods | super.somemethod() |
| Properties | super.someProperty() |
| Subscripts | super[someIndex] |
Methods Overriding
Inherited instance and type methods can be overridden by the 'override' keyword to our methods defined in our subclass. Here print() is overridden in subclass to access the type property mentioned in the super class print(). Also new instance of cricket() super class is created as 'cricinstance'.
class cricket {
func print() {
print("Welcome to Swift 4 Super Class")
}
}
class tennis: cricket {
override func print() {
print("Welcome to Swift 4 Sub Class")
}
}
let cricinstance = cricket()
cricinstance.print()
let tennisinstance = tennis()
tennisinstance.print()
When we run the above program using playground, we get the following result −
Welcome to Swift Super Class Welcome to Swift Sub Class
Property Overriding
You can override an inherited instance or class property to provide your own custom getter and setter for that property, or to add property observers to enable the overriding property to observe when the underlying property value changes.
Overriding Property Getters and Setters
Swift 4 allows the user to provide custom getter and setter to override the inherited property whether it is a stored or computed property. The subclass does not know the inherited property name and type. Therefore it is essential that the user needs to specify in subclass, the name and type of the overriding property specified in super class.
This can be done in two ways −
When setter is defined for overriding property the user has to define getter too.
When we don't want to modify the inherited property getter, we can simply pass the inherited value by the syntax 'super.someProperty' to the super class.
class Circle {
var radius = 12.5
var area: String {
return "of rectangle for \(radius) "
}
}
class Rectangle: Circle {
var print = 7
override var area: String {
return super.area + " is now overridden as \(print)"
}
}
let rect = Rectangle()
rect.radius = 25.0
rect.print = 3
print("Radius \(rect.area)")
When we run the above program using playground, we get the following result −
Radius of rectangle for 25.0 is now overridden as 3
Overriding Property Observers
When a new property needs to be added for an inherited property, 'property overriding' concept is introduced in Swift 4. This notifies the user when the inherited property value is altered. But overriding is not applicable for inherited constant stored properties and inherited read-only computed properties.
class Circle {
var radius = 12.5
var area: String {
return "of rectangle for \(radius) "
}
}
class Rectangle: Circle {
var print = 7
override var area: String {
return super.area + " is now overridden as \(print)"
}
}
let rect = Rectangle()
rect.radius = 25.0
rect.print = 3
print("Radius \(rect.area)")
class Square: Rectangle {
override var radius: Double {
didSet {
print = Int(radius/5.0)+1
}
}
}
let sq = Square()
sq.radius = 100.0
print("Radius \(sq.area)")
When we run the above program using playground, we get the following result −
Radius of rectangle for 25.0 is now overridden as 3 Radius of rectangle for 100.0 is now overridden as 21
Final Property to prevent Overriding
When the user need not want others to access super class methods, properties or subscripts Swift 4 introduces 'final' property to prevent overriding. Once 'final' property is declared the subscripts won't allow the super class methods, properties and its subscripts to be overridden. There is no provision to have 'final' property in 'super class'. When 'final' property is declared the user is restricted to create further sub classes.
final class Circle {
final var radius = 12.5
var area: String {
return "of rectangle for \(radius) "
}
}
class Rectangle: Circle {
var print = 7
override var area: String {
return super.area + " is now overridden as \(print)"
}
}
let rect = Rectangle()
rect.radius = 25.0
rect.print = 3
print("Radius \(rect.area)")
class Square: Rectangle {
override var radius: Double {
didSet {
print = Int(radius/5.0)+1
}
}
}
let sq = Square()
sq.radius = 100.0
print("Radius \(sq.area)")
When we run the above program using playground, we get the following result −
<stdin>:14:18: error: var overrides a 'final' var
override var area: String {
^
<stdin>:7:9: note: overridden declaration is here
var area: String {
^
<stdin>:12:11: error: inheritance from a final class 'Circle'
class Rectangle: Circle {
^
<stdin>:25:14: error: var overrides a 'final' var
override var radius: Double {
^
<stdin>:6:14: note: overridden declaration is here
final var radius = 12.5
Since the super class is declared as 'final' and its data types are also declared as 'final' the program won't allow to create subclasses further and it will throw errors.
Swift - Initialization
Classes, structures and enumerations once declared in Swift 4 are initialized for preparing instance of a class. Initial value is initialized for stored property and also for new instances too the values are initialized to proceed further. The keyword to create initialization function is carried out by 'init()' method. Swift 4 initializer differs from Objective-C that it does not return any values. Its function is to check for initialization of newly created instances before its processing. Swift 4 also provides 'deinitialization' process for performing memory management operations once the instances are deallocated.
Initializer Role for Stored Properties
Stored property have to initialize the instances for its classes and structures before processing the instances. Stored properties use initializer to assign and initialize values thereby eradicating the need to call property observers. Initializer is used in stored property
To create an initial value.
To assign default property value within the property definition.
To initialize an instance for a particular data type 'init()' is used. No arguments are passed inside the init() function.
Syntax
init() {
//New Instance initialization goes here
}
Example
struct rectangle {
var length: Double
var breadth: Double
init() {
length = 6
breadth = 12
}
}
var area = rectangle()
print("area of rectangle is \(area.length*area.breadth)")
When we run the above program using playground, we get the following result −
area of rectangle is 72.0
Here the structure 'rectangle' is initialized with members length and breadth as 'Double' datatypes. Init() method is used to initialize the values for the newly created members length and double. Area of rectangle is calculated and returned by calling the rectangle function.
Setting Property Values by Default
Swift 4 language provides Init() function to initialize the stored property values. Also, the user has provision to initialize the property values by default while declaring the class or structure members. When the property takes the same value alone throughout the program we can declare it in the declaration section alone rather than initializing it in init(). Setting property values by default enables the user when inheritance is defined for classes or structures.
struct rectangle {
var length = 6
var breadth = 12
}
var area = rectangle()
print("area of rectangle is \(area.length*area.breadth)")
When we run the above program using playground, we get the following result −
area of rectangle is 72
Here instead of declaring length and breadth in init() the values are initialized in declaration itself.
Parameters Initialization
In Swift 4 language the user has the provision to initialize parameters as part of the initializer's definition using init().
struct Rectangle {
var length: Double
var breadth: Double
var area: Double
init(fromLength length: Double, fromBreadth breadth: Double) {
self.length = length
self.breadth = breadth
area = length * breadth
}
init(fromLeng leng: Double, fromBread bread: Double) {
self.length = leng
self.breadth = bread
area = leng * bread
}
}
let ar = Rectangle(fromLength: 6, fromBreadth: 12)
print("area is: \(ar.area)")
let are = Rectangle(fromLeng: 36, fromBread: 12)
print("area is: \(are.area)")
When we run the above program using playground, we get the following result −
area is: 72.0 area is: 432.0
Local & External Parameters
Initialization parameters have both local and global parameter names similar to that of function and method parameters. Local parameter declaration is used to access within the initialize body and external parameter declaration is used to call the initializer. Swift 4 initializers differ from function and method initializer that they do not identify which initializer are used to call which functions.
To overcome this, Swift 4 introduces an automatic external name for each and every parameter in init(). This automatic external name is as equivalent as local name written before every initialization parameter.
struct Days {
let sunday, monday, tuesday: Int
init(sunday: Int, monday: Int, tuesday: Int) {
self.sunday = sunday
self.monday = monday
self.tuesday = tuesday
}
init(daysofaweek: Int) {
sunday = daysofaweek
monday = daysofaweek
tuesday = daysofaweek
}
}
let week = Days(sunday: 1, monday: 2, tuesday: 3)
print("Days of a Week is: \(week.sunday)")
print("Days of a Week is: \(week.monday)")
print("Days of a Week is: \(week.tuesday)")
let weekdays = Days(daysofaweek: 4)
print("Days of a Week is: \(weekdays.sunday)")
print("Days of a Week is: \(weekdays.monday)")
print("Days of a Week is: \(weekdays.tuesday)")
When we run the above program using playground, we get the following result −
Days of a Week is: 1 Days of a Week is: 2 Days of a Week is: 3 Days of a Week is: 4 Days of a Week is: 4 Days of a Week is: 4
Parameters without External Names
When an external name is not needed for an initialize underscore '_' is used to override the default behavior.
struct Rectangle {
var length: Double
init(frombreadth breadth: Double) {
length = breadth * 10
}
init(frombre bre: Double) {
length = bre * 30
}
init(_ area: Double) {
length = area
}
}
let rectarea = Rectangle(180.0)
print("area is: \(rectarea.length)")
let rearea = Rectangle(370.0)
print("area is: \(rearea.length)")
let recarea = Rectangle(110.0)
print("area is: \(recarea.length)")
When we run the above program using playground, we get the following result −
area is: 180.0 area is: 370.0 area is: 110.0
Optional Property Types
When the stored property at some instance does not return any value that property is declared with an 'optional' type indicating that 'no value' is returned for that particular type. When the stored property is declared as 'optional' it automatically initializes the value to be 'nil' during initialization itself.
struct Rectangle {
var length: Double?
init(frombreadth breadth: Double) {
length = breadth * 10
}
init(frombre bre: Double) {
length = bre * 30
}
init(_ area: Double) {
length = area
}
}
let rectarea = Rectangle(180.0)
print("area is: \(rectarea.length)")
let rearea = Rectangle(370.0)
print("area is: \(rearea.length)")
let recarea = Rectangle(110.0)
print("area is: \(recarea.length)")
When we run the above program using playground, we get the following result −
area is: Optional(180.0) area is: Optional(370.0) area is: Optional(110.0)
Modifying Constant Properties During Initialization
Initialization also allows the user to modify the value of constant property too. During initialization, class property allows its class instances to be modified by the super class and not by the subclass. Consider for example in the previous program 'length' is declared as 'variable' in the main class. The below program variable 'length' is modified as 'constant' variable.
struct Rectangle {
let length: Double?
init(frombreadth breadth: Double) {
length = breadth * 10
}
init(frombre bre: Double) {
length = bre * 30
}
init(_ area: Double) {
length = area
}
}
let rectarea = Rectangle(180.0)
print("area is: \(rectarea.length)")
let rearea = Rectangle(370.0)
print("area is: \(rearea.length)")
let recarea = Rectangle(110.0)
print("area is: \(recarea.length)")
When we run the above program using playground, we get the following result −
area is: Optional(180.0) area is: Optional(370.0) area is: Optional(110.0)
Default Initializers
Default initializers provide a new instance to all its declared properties of base class or structure with default values.
class defaultexample {
var studname: String?
var stmark = 98
var pass = true
}
var result = defaultexample()
print("result is: \(result.studname)")
print("result is: \(result.stmark)")
print("result is: \(result.pass)")
When we run above program using playground, we get following result. −
result is: nil result is: 98 result is: true
The above program is defined with class name as 'defaultexample'. Three member functions are initialized by default as 'studname?' to store 'nil' values, 'stmark' as 98 and 'pass' as Boolean value 'true'. Likewise the member values in the class can be initialized as default before processing the class member types.
Memberwise Initializers for Structure Types
When the custom initializers are not provided by the user, Structure types in Swift 4 will automatically receive the 'memberwise initializer'. Its main function is to initialize the new structure instances with the default memberwise initialize and then the new instance properties are passed to the memberwise initialize by name.
struct Rectangle {
var length = 100.0, breadth = 200.0
}
let area = Rectangle(length: 24.0, breadth: 32.0)
print("Area of rectangle is: \(area.length)")
print("Area of rectangle is: \(area.breadth)")
When we run the above program using playground, we get the following result −
Area of rectangle is: 24.0 Area of rectangle is: 32.0
Structures are initialized by default for their membership functions during initialization for 'length' as '100.0' and 'breadth' as '200.0'. But the values are overridden during the processing of variables length and breadth as 24.0 and 32.0.
Initializer Delegation for Value Types
Initializer Delegation is defined as calling initializers from other initializers. Its main function is to act as reusability to avoid code duplication across multiple initializers.
struct Stmark {
var mark1 = 0.0, mark2 = 0.0
}
struct stdb {
var m1 = 0.0, m2 = 0.0
}
struct block {
var average = stdb()
var result = Stmark()
init() {}
init(average: stdb, result: Stmark) {
self.average = average
self.result = result
}
init(avg: stdb, result: Stmark) {
let tot = avg.m1 - (result.mark1 / 2)
let tot1 = avg.m2 - (result.mark2 / 2)
self.init(average: stdb(m1: tot, m2: tot1), result: result)
}
}
let set1 = block()
print("student result is: \(set1.average.m1, set1.average.m2)
\(set1.result.mark1, set1.result.mark2)")
let set2 = block(average: stdb(m1: 2.0, m2: 2.0),
result: Stmark(mark1: 5.0, mark2: 5.0))
print("student result is: \(set2.average.m1, set2.average.m2)
\(set2.result.mark1, set2.result.mark2)")
let set3 = block(avg: stdb(m1: 4.0, m2: 4.0),
result: Stmark(mark1: 3.0, mark2: 3.0))
print("student result is: \(set3.average.m1, set3.average.m2)
\(set3.result.mark1, set3.result.mark2)")
When we run the above program using playground, we get the following result −
(0.0,0.0) (0.0,0.0) (2.0,2.0) 5.0,5.0) (2.5,2.5) (3.0,3.0)
Rules for Initializer Delegation
| Value Types | Class Types |
|---|---|
| Inheritance is not supported for value types like structures and enumerations. Referring other initializers is done through self.init | Inheritance is supported. Checks all stored property values are initialized |
Class Inheritance and Initialization
Class types have two kinds of initializers to check whether defined stored properties receive an initial value namely designated initializers and convenience initializers.
Designated Initializers and Convenience Initializers
| Designated Initializer | Convenience Initializer |
|---|---|
| Considered as primary initializes for a class | Considered as supporting initialize for a class |
| All class properties are initialized and appropriate superclass initializer are called for further initialization | Designated initializer is called with convenience initializer to create class instance for a specific use case or input value type |
| At least one designated initializer is defined for every class | No need to have convenience initializers compulsory defined when the class does not require initializers. |
| Init(parameters) { statements } | convenience init(parameters) { statements } |
Program for Designated Initializers
class mainClass {
var no1 : Int // local storage
init(no1 : Int) {
self.no1 = no1 // initialization
}
}
class subClass : mainClass {
var no2 : Int // new subclass storage
init(no1 : Int, no2 : Int) {
self.no2 = no2 // initialization
super.init(no1:no1) // redirect to superclass
}
}
let res = mainClass(no1: 10)
let print = subClass(no1: 10, no2: 20)
print("res is: \(res.no1)")
print("res is: \(print.no1)")
print("res is: \(print.no2)")
When we run the above program using playground, we get the following result −
res is: 10 res is: 10 res is: 20
Program for Convenience Initializers
class mainClass {
var no1 : Int // local storage
init(no1 : Int) {
self.no1 = no1 // initialization
}
}
class subClass : mainClass {
var no2 : Int
init(no1 : Int, no2 : Int) {
self.no2 = no2
super.init(no1:no1)
}
// Requires only one parameter for convenient method
override convenience init(no1: Int) {
self.init(no1:no1, no2:0)
}
}
let res = mainClass(no1: 20)
let print = subClass(no1: 30, no2: 50)
print("res is: \(res.no1)")
print("res is: \(print.no1)")
print("res is: \(print.no2)")
When we run the above program using playground, we get the following result −
res is: 20 res is: 30 res is: 50
Initializer Inheritance and Overriding
Swift 4 does not allow its subclasses to inherit its superclass initializers for their member types by default. Inheritance is applicable to Super class initializers only to some extent which will be discussed in Automatic Initializer Inheritance.
When the user needs to have initializers defined in super class, subclass with initializers has to be defined by the user as custom implementation. When overriding has to be taken place by the sub class to the super class 'override' keyword has to be declared.
class sides {
var corners = 4
var description: String {
return "\(corners) sides"
}
}
let rectangle = sides()
print("Rectangle: \(rectangle.description)")
class pentagon: sides {
override init() {
super.init()
corners = 5
}
}
let bicycle = pentagon()
print("Pentagon: \(bicycle.description)")
When we run the above program using playground, we get the following result −
Rectangle: 4 sides Pentagon: 5 sides
Designated and Convenience Initializers in Action
class Planet {
var name: String
init(name: String) {
self.name = name
}
convenience init() {
self.init(name: "[No Planets]")
}
}
let plName = Planet(name: "Mercury")
print("Planet name is: \(plName.name)")
let noplName = Planet()
print("No Planets like that: \(noplName.name)")
class planets: Planet {
var count: Int
init(name: String, count: Int) {
self.count = count
super.init(name: name)
}
override convenience init(name: String) {
self.init(name: name, count: 1)
}
}
When we run the above program using playground, we get the following result −
Planet name is: Mercury No Planets like that: [No Planets]
Failable Initializer
The user has to be notified when there are any initializer failures while defining a class, structure or enumeration values. Initialization of variables sometimes become a failure one due to−
- Invalid parameter values.
- Absence of required external source.
- Condition preventing initialization from succeeding.
To catch exceptions thrown by initialization method, Swift 4 produces a flexible initialize called 'failable initializer' to notify the user that something is left unnoticed while initializing the structure, class or enumeration members. Keyword to catch the failable initializer is 'init?'. Also, failable and non failable initializers cannot be defined with same parameter types and names.
struct studrecord {
let stname: String
init?(stname: String) {
if stname.isEmpty {return nil }
self.stname = stname
}
}
let stmark = studrecord(stname: "Swing")
if let name = stmark {
print("Student name is specified")
}
let blankname = studrecord(stname: "")
if blankname == nil {
print("Student name is left blank")
}
When we run the above program using playground, we get the following result −
Student name is specified Student name is left blank
Failable Initializers for Enumerations
Swift 4 language provides the flexibility to have Failable initializers for enumerations too to notify the user when the enumeration members are left from initializing values.
enum functions {
case a, b, c, d
init?(funct: String) {
switch funct {
case "one":
self = .a
case "two":
self = .b
case "three":
self = .c
case "four":
self = .d
default:
return nil
}
}
}
let result = functions(funct: "two")
if result != nil {
print("With In Block Two")
}
let badresult = functions(funct: "five")
if badresult == nil {
print("Block Does Not Exist")
}
When we run the above program using playground, we get the following result −
With In Block Two Block Does Not Exist
Failable Initializers for Classes
A failable initializer when declared with enumerations and structures alerts an initialization failure at any circumstance within its implementation. However, failable initializer in classes will alert the failure only after the stored properties have been set to an initial value.
class studrecord {
let studname: String!
init?(studname: String) {
self.studname = studname
if studname.isEmpty { return nil }
}
}
if let stname = studrecord(studname: "Failable Initializers") {
print("Module is \(stname.studname)")
}
When we run the above program using playground, we get the following result −
Module is Optional("Failable Initializers")
Overriding a Failable Initializer
Like that of initialize the user also has the provision to override a superclass failable initializer inside the sub class. Super class failable initialize can also be overridden with in a sub class non-failable initializer.
Subclass initializer cannot delegate up to the superclass initializer when overriding a failable superclass initializer with a non-failable subclass initialize.
A non-failable initializer can never delegate to a failable initializer.
The program given below describes the failable and non-failable initializers.
class Planet {
var name: String
init(name: String) {
self.name = name
}
convenience init() {
self.init(name: "[No Planets]")
}
}
let plName = Planet(name: "Mercury")
print("Planet name is: \(plName.name)")
let noplName = Planet()
print("No Planets like that: \(noplName.name)")
class planets: Planet {
var count: Int
init(name: String, count: Int) {
self.count = count
super.init(name: name)
}
override convenience init(name: String) {
self.init(name: name, count: 1)
}
}
When we run the above program using playground, we get the following result −
Planet name is: Mercury No Planets like that: [No Planets]
The init! Failable Initializer
Swift 4 provides 'init?' to define an optional instance failable initializer. To define an implicitly unwrapped optional instance of the specific type 'init!' is specified.
struct studrecord {
let stname: String
init!(stname: String) {
if stname.isEmpty {return nil }
self.stname = stname
}
}
let stmark = studrecord(stname: "Swing")
if let name = stmark {
print("Student name is specified")
}
let blankname = studrecord(stname: "")
if blankname == nil {
print("Student name is left blank")
}
When we run the above program using playground, we get the following result −
Student name is specified Student name is left blank
Required Initializers
To declare each and every subclass of the initialize 'required' keyword needs to be defined before the init() function.
class classA {
required init() {
var a = 10
print(a)
}
}
class classB: classA {
required init() {
var b = 30
print(b)
}
}
let res = classA()
let print = classB()
When we run the above program using playground, we get the following result −
10 30 10
Swift - Deinitialization
Before a class instance needs to be deallocated 'deinitializer' has to be called to deallocate the memory space. The keyword 'deinit' is used to deallocate the memory spaces occupied by the system resources. Deinitialization is available only on class types.
Deinitialization to Deallocate Memory Space
Swift 4 automatically deallocates your instances when they are no longer needed, to free up resources. Swift 4 handles the memory management of instances through automatic reference counting (ARC), as described in Automatic Reference Counting. Typically you don't need to perform manual clean-up when your instances are deallocated. However, when you are working with your own resources, you might need to perform some additional clean-up yourself. For example, if you create a custom class to open a file and write some data to it, you might need to close the file before the class instance is deallocated.
var counter = 0; // for reference counting
class baseclass {
init() {
counter++;
}
deinit {
counter--;
}
}
var print: baseclass? = baseclass()
print(counter)
print = nil
print(counter)
When we run the above program using playground, we get the following result −
1 0
When print = nil statement is omitted the values of the counter retains the same since it is not deinitialized.
var counter = 0; // for reference counting
class baseclass {
init() {
counter++;
}
deinit {
counter--;
}
}
var print: baseclass? = baseclass()
print(counter)
print(counter)
When we run the above program using playground, we get the following result −
1 1
Swift - ARC Overview
Memory management functions and its usage are handled in Swift 4 language through Automatic reference counting (ARC). ARC is used to initialize and deinitialize the system resources thereby releasing memory spaces used by the class instances when the instances are no longer needed. ARC keeps track of information about the relationships between our code instances to manage the memory resources effectively.
Functions of ARC
ARC allocates a chunk of memory to store the information each and every time when a new class instance is created by init().
Information about the instance type and its values are stored in memory.
When the class instance is no longer needed it automatically frees the memory space by deinit() for further class instance storage and retrieval.
ARC keeps in track of currently referring class instances properties, constants and variables so that deinit() is applied only to those unused instances.
ARC maintains a 'strong reference' to those class instance property, constants and variables to restrict deallocation when the class instance is currently in use.
ARC Program
class StudDetails {
var stname: String!
var mark: Int!
init(stname: String, mark: Int) {
self.stname = stname
self.mark = mark
}
deinit {
print("Deinitialized \(self.stname)")
print("Deinitialized \(self.mark)")
}
}
let stname = "Swift 4"
let mark = 98
print(stname)
print(mark)
When we run the above program using playground, we get the following result −
Swift 4 98
ARC Strong Reference Cycles Class Instances
class studmarks {
let name: String
var stud: student?
init (name: String) {
print("Initializing: \(name)")
self.name = name
}
deinit {
print("Deallocating: \(self.name)")
}
}
class student {
let name: String
var strname: studmarks?
init (name: String) {
print("Initializing: \(name)")
self.name = name
}
deinit {
print("Deallocating: \(self.name)")
}
}
var shiba: studmarks?
var mari: student?
shiba = studmarks(name: "Swift 4")
mari = student(name: "ARC")
shiba!.stud = mari
mari!.strname = shiba
When we run the above program using playground, we get the following result −
Initializing: Swift 4 Initializing: ARC
ARC Weak and Unowned References
Class type properties has two ways to resolve strong reference cycles −
- Weak References
- Unowned References
These references are used to enable one instance to refer other instances in a reference cycle. Then the instances may refer to each and every instances instead of caring about strong reference cycle. When the user knows that some instance may return 'nil' values we may point that using weak reference. When the instance going to return something rather than nil then declare it with unowned reference.
Weak Reference Program
class module {
let name: String
init(name: String) { self.name = name }
var sub: submodule?
deinit { print("\(name) Is The Main Module") }
}
class submodule {
let number: Int
init(number: Int) { self.number = number }
weak var topic: module?
deinit { print("Sub Module with its topic number is \(number)") }
}
var toc: module?
var list: submodule?
toc = module(name: "ARC")
list = submodule(number: 4)
toc!.sub = list
list!.topic = toc
toc = nil
list = nil
When we run the above program using playground, we get the following result −
ARC Is The Main Module Sub Module with its topic number is 4
Unowned Reference Program
class student {
let name: String
var section: marks?
init(name: String) {
self.name = name
}
deinit { print("\(name)") }
}
class marks {
let marks: Int
unowned let stname: student
init(marks: Int, stname: student) {
self.marks = marks
self.stname = stname
}
deinit { print("Marks Obtained by the student is \(marks)") }
}
var module: student?
module = student(name: "ARC")
module!.section = marks(marks: 98, stname: module!)
module = nil
When we run the above program using playground, we get the following result −
ARC Marks Obtained by the student is 98
Strong Reference Cycles for Closures
When we assign a closure to the class instance property and to the body of the closure to capture particular instance strong reference cycle can occur. Strong reference to the closure is defined by 'self.someProperty' or 'self.someMethod()'. Strong reference cycles are used as reference types for the closures.
class HTMLElement {
let samplename: String
let text: String?
lazy var asHTML: () -> String = {
if let text = self.text {
return "<\(self.samplename)>\(text)</\(self.samplename)>"
} else {
return "<\(self.samplename) />"
}
}
init(samplename: String, text: String? = nil) {
self.samplename = samplename
self.text = text
}
deinit {
print("\(samplename) is being deinitialized")
}
}
var paragraph: HTMLElement? = HTMLElement(samplename: "p", text: "Welcome to Closure SRC")
print(paragraph!.asHTML())
When we run the above program using playground, we get the following result −
<p>Welcome to Closure SRC</p>
Weak and Unowned References
When the closure and the instance refer to each other the user may define the capture in a closure as an unowned reference. Then it would not allow the user to deallocate the instance at the same time. When the instance sometime return a 'nil' value define the closure with the weak instance.
class HTMLElement {
let module: String
let text: String?
lazy var asHTML: () -> String = {
[unowned self] in
if let text = self.text {
return "<\(self.module)>\(text)</\(self.module)>"
} else {
return "<\(self.module) />"
}
}
init(module: String, text: String? = nil) {
self.module = module
self.text = text
}
deinit {
print("\(module) the deinit()")
}
}
var paragraph: HTMLElement? = HTMLElement(module: "Inside", text: "ARC Weak References")
print(paragraph!.asHTML())
paragraph = nil
When we run the above program using playground, we get the following result −
<Inside>ARC Weak References</Inside> Inside the deinit()
Swift - Optional Chaining
The process of querying, calling properties, subscripts and methods on an optional that may be 'nil' is defined as optional chaining. Optional chaining return two values −
if the optional contains a 'value' then calling its related property, methods and subscripts returns values
if the optional contains a 'nil' value all its its related property, methods and subscripts returns nil
Since multiple queries to methods, properties and subscripts are grouped together failure to one chain will affect the entire chain and results in 'nil' value.
Optional Chaining as an Alternative to Forced Unwrapping
Optional chaining is specified after the optional value with '?' to call a property, method or subscript when the optional value returns some values.
| Optional Chaining '?' | Access to methods,properties and subscriptsOptional Chaining '!' to force Unwrapping |
| ? is placed after the optional value to call property, method or subscript | ! is placed after the optional value to call property, method or subscript to force unwrapping of value |
| Fails gracefully when the optional is 'nil' | Forced unwrapping triggers a run time error when the optional is 'nil' |
Program for Optional Chaining with '!'
class ElectionPoll {
var candidate: Pollbooth?
}
lass Pollbooth {
var name = "MP"
}
let cand = ElectionPoll()
let candname = cand.candidate!.name
When we run the above program using playground, we get the following result −
fatal error: unexpectedly found nil while unwrapping an Optional value 0 Swift 4 0x0000000103410b68 llvm::sys::PrintStackTrace(__sFILE*) + 40 1 Swift 4 0x0000000103411054 SignalHandler(int) + 452 2 libsystem_platform.dylib 0x00007fff9176af1a _sigtramp + 26 3 libsystem_platform.dylib 0x000000000000000b _sigtramp + 1854492939 4 libsystem_platform.dylib 0x00000001074a0214 _sigtramp + 1976783636 5 Swift 4 0x0000000102a85c39 llvm::JIT::runFunction(llvm::Function*, std::__1::vector > const&) + 329 6 Swift 4 0x0000000102d320b3 llvm::ExecutionEngine::runFunctionAsMain(llvm::Function*, std::__1::vector<std::__1::basic_string, std::__1::allocator >, std::__1::allocator<std::__1::basic_string, std::__1::allocator > > > const&, char const* const*) + 1523 7 Swift 4 0x000000010296e6ba Swift 4::RunImmediately(Swift 4::CompilerInstance&, std::__1::vector<std::__1::basic_string, std::__1::allocator >, std::__1::allocator<std::__1::basic_string, std::__1::allocator > > > const&, Swift 4::IRGenOptions&, Swift 4::SILOptions const&) + 1066 8 Swift 4 0x000000010275764b frontend_main(llvm::ArrayRef, char const*, void*) + 5275 9 Swift 4 0x0000000102754a6d main + 1677 10 libdyld.dylib 0x00007fff8bb9e5c9 start + 1 11 libdyld.dylib 0x000000000000000c start + 1950751300 Stack dump: 0. Program arguments: /Applications/Xcode.app/Contents/Developer/Toolchains/XcodeDefault.xctoolchain/ usr/bin/Swift 4 -frontend -interpret - -target x86_64-apple-darwin14.0.0 - target-cpu core2 -sdk /Applications/Xcode.app/Contents/Developer/Platforms/MacOSX.platform/Developer/ SDKs/MacOSX10.10.sdk -module-name main /bin/sh: line 47: 15672 Done cat <<'SWIFT 4' import Foundation </std::__1::basic_string</std::__1::basic_string</std::__1::basic_string</std:: __1::basic_string
The above program declares 'election poll' as class name and contains 'candidate' as membership function. The subclass is declared as 'poll booth' and 'name' as its membership function which is initialized as 'MP'. The call to the super class is initialized by creating an instance 'cand' with optional '!'. Since the values are not declared in its base class, 'nil' value is stored thereby returning a fatal error by the force unwrapping procedure.
Program for Optional Chaining with '?'
class ElectionPoll {
var candidate: Pollbooth?
}
class Pollbooth {
var name = "MP"
}
let cand = ElectionPoll()
if let candname = cand.candidate?.name {
print("Candidate name is \(candname)")
} else {
print("Candidate name cannot be retreived")
}
When we run the above program using playground, we get the following result −
Candidate name cannot be retreived
The program above declares 'election poll' as class name and contains 'candidate' as membership function. The subclass is declared as 'poll booth' and 'name' as its membership function which is initialized as 'MP'. The call to the super class is initialized by creating an instance 'cand' with optional '?'. Since the values are not declared in its base class 'nil' value is stored and printed in the console by the else handler block.
Defining Model Classes for Optional Chaining & Accessing Properties
Swift 4 language also provides the concept of optional chaining, to declare more than one subclasses as model classes. This concept will be very useful to define complex models and to access the properties, methods and subscripts sub properties.
class rectangle {
var print: circle?
}
class circle {
var area = [radius]()
var cprint: Int {
return area.count
}
subscript(i: Int) -> radius {
get {
return area[i]
}
set {
area[i] = newValue
}
}
func circleprint() {
print("The number of rooms is \(cprint)")
}
var rectarea: circumference?
}
class radius {
let radiusname: String
init(radiusname: String) { self.radiusname = radiusname }
}
class circumference {
var circumName: String?
var circumNumber: String?
var street: String?
func buildingIdentifier() -> String? {
if circumName != nil {
return circumName
} else if circumNumber != nil {
return circumNumber
} else {
return nil
}
}
}
let rectname = rectangle()
if let rectarea = rectname.print?.cprint {
print("Area of rectangle is \(rectarea)")
} else {
print("Rectangle Area is not specified")
}
When we run the above program using playground, we get the following result −
Rectangle Area is not specified
Calling Methods Through Optional Chaining
class rectangle {
var print: circle?
}
class circle {
var area = [radius]()
var cprint: Int {
return area.count
}
subscript(i: Int) -> radius {
get {
return area[i]
}
set {
area[i] = newValue
}
}
func circleprint() {
print("Area of Circle is: \(cprint)")
}
var rectarea: circumference?
}
class radius {
let radiusname: String
init(radiusname: String) { self.radiusname = radiusname }
}
class circumference {
var circumName: String?
var circumNumber: String?
var circumarea: String?
func buildingIdentifier() -> String? {
if circumName != nil {
return circumName
} else if circumNumber != nil {
return circumNumber
} else {
return nil
}
}
}
let circname = rectangle()
if circname.print?.circleprint() != nil {
print("Area of circle is specified)")
} else {
print("Area of circle is not specified")
}
When we run the above program using playground, we get the following result −
Area of circle is not specified
The function circleprint() declared inside the circle() sub class is called by creating an instance named 'circname'. The function will return a value if it contains some value otherwise it will return some user defined print message by checking the statement 'if circname.print?.circleprint() != nil'.
Accessing Subscripts through Optional Chaining
Optional chaining is used to set and retrieve a subscript value to validate whether call to that subscript returns a value. '?' is placed before the subscript braces to access the optional value on the particular subscript.
Program 1
class rectangle {
var print: circle?
}
class circle {
var area = [radius]()
var cprint: Int {
return area.count
}
subscript(i: Int) -> radius {
get {
return area[i]
}
set {
area[i] = newValue
}
}
func circleprint() {
print("The number of rooms is \(cprint)")
}
var rectarea: circumference?
}
class radius {
let radiusname: String
init(radiusname: String) { self.radiusname = radiusname }
}
class circumference {
var circumName: String?
var circumNumber: String?
var circumarea: String?
func buildingIdentifier() -> String? {
if circumName != nil {
return circumName
} else if circumNumber != nil {
return circumNumber
} else {
return nil
}
}
}
let circname = rectangle()
if let radiusName = circname.print?[0].radiusname {
print("The first room name is \(radiusName).")
} else {
print("Radius is not specified.")
}
When we run the above program using playground, we get the following result −
Radius is not specified.
In the above program the instance values for the membership function 'radiusName' is not specified. Hence program call to the function will return only else part whereas to return the values we have to define the values for the particular membership function.
Program 2
class rectangle {
var print: circle?
}
class circle {
var area = [radius]()
var cprint: Int {
return area.count
}
subscript(i: Int) -> radius {
get {
return area[i]
}
set {
area[i] = newValue
}
}
func circleprint() {
print("The number of rooms is \(cprint)")
}
var rectarea: circumference?
}
class radius {
let radiusname: String
init(radiusname: String) { self.radiusname = radiusname }
}
class circumference {
var circumName: String?
var circumNumber: String?
var circumarea: String?
func buildingIdentifier() -> String? {
if circumName != nil {
return circumName
} else if circumNumber != nil {
return circumNumber
} else {
return nil
}
}
}
let circname = rectangle()
circname.print?[0] = radius(radiusname: "Diameter")
let printing = circle()
printing.area.append(radius(radiusname: "Units"))
printing.area.append(radius(radiusname: "Meter"))
circname.print = printing
if let radiusName = circname.print?[0].radiusname {
print("Radius is measured in \(radiusName).")
} else {
print("Radius is not specified.")
}
When we run the above program using playground, we get the following result −
Radius is measured in Units.
In the above program, the instance values for the membership function 'radiusName' is specified. Hence program call to the function will now return values.
Accessing Subscripts of Optional Type
class rectangle {
var print: circle?
}
class circle {
var area = [radius]()
var cprint: Int {
return area.count
}
subscript(i: Int) -> radius {
get {
return area[i]
}
set {
area[i] = newValue
}
}
func circleprint() {
print("The number of rooms is \(cprint)")
}
var rectarea: circumference?
}
class radius {
let radiusname: String
init(radiusname: String) { self.radiusname = radiusname }
}
class circumference {
var circumName: String?
var circumNumber: String?
var circumarea: String?
func buildingIdentifier() -> String? {
if circumName != nil {
return circumName
} else if circumNumber != nil {
return circumNumber
} else {
return nil
}
}
}
let circname = rectangle()
circname.print?[0] = radius(radiusname: "Diameter")
let printing = circle()
printing.area.append(radius(radiusname: "Units"))
printing.area.append(radius(radiusname: "Meter"))
circname.print = printing
var area = ["Radius": [35, 45, 78, 101], "Circle": [90, 45, 56]]
area["Radius"]?[1] = 78
area["Circle"]?[1]--
print(area["Radius"]?[0])
print(area["Radius"]?[1])
print(area["Radius"]?[2])
print(area["Radius"]?[3])
print(area["Circle"]?[0])
print(area["Circle"]?[1])
print(area["Circle"]?[2])
When we run the above program using playground, we get the following result −
Optional(35) Optional(78) Optional(78) Optional(101) Optional(90) Optional(44) Optional(56)
The optional values for subscripts can be accessed by referring their subscript values. It can be accessed as subscript[0], subscript[1] etc. The default subscript values for 'radius' are first assigned as [35, 45, 78, 101] and for 'Circle' [90, 45, 56]]. Then the subscript values are changed as Radius[0] to 78 and Circle[1] to 45.
Linking Multiple Levels of Chaining
Multiple sub classes can also be linked with its super class methods, properties and subscripts by optional chaining.
Multiple chaining of optional can be linked −
If retrieving type is not optional, optional chaining will return an optional value. For example if String through optional chaining it will return String? Value
class rectangle {
var print: circle?
}
class circle {
var area = [radius]()
var cprint: Int {
return area.count
}
subscript(i: Int) -> radius {
get {
return area[i]
}
set {
area[i] = newValue
}
}
func circleprint() {
print("The number of rooms is \(cprint)")
}
var rectarea: circumference?
}
class radius {
let radiusname: String
init(radiusname: String) { self.radiusname = radiusname }
}
class circumference {
var circumName: String?
var circumNumber: String?
var circumarea: String?
func buildingIdentifier() -> String? {
if circumName != nil {
return circumName
} else if circumNumber != nil {
return circumNumber
} else {
return nil
}
}
}
let circname = rectangle()
if let radiusName = circname.print?[0].radiusname {
print("The first room name is \(radiusName).")
} else {
print("Radius is not specified.")
}
When we run the above program using playground, we get the following result −
Radius is not specified.
In the above program, the instance values for the membership function 'radiusName' is not specified. Hence, the program call to the function will return only else part whereas to return the values we have to define the values for the particular membership function.
If the retrieving type is already optional, then optional chaining will also return an optional value. For example if String? Is accessed through optional chaining it will return String? Value..
class rectangle {
var print: circle?
}
class circle {
var area = [radius]()
var cprint: Int {
return area.count
}
subscript(i: Int) -> radius {
get {
return area[i]
}
set {
area[i] = newValue
}
}
func circleprint() {
print("The number of rooms is \(cprint)")
}
var rectarea: circumference?
}
class radius {
let radiusname: String
init(radiusname: String) { self.radiusname = radiusname }
}
class circumference {
var circumName: String?
var circumNumber: String?
var circumarea: String?
func buildingIdentifier() -> String? {
if circumName != nil {
return circumName
} else if circumNumber != nil {
return circumNumber
} else {
return nil
}
}
}
let circname = rectangle()
circname.print?[0] = radius(radiusname: "Diameter")
let printing = circle()
printing.area.append(radius(radiusname: "Units"))
printing.area.append(radius(radiusname: "Meter"))
circname.print = printing
if let radiusName = circname.print?[0].radiusname {
print("Radius is measured in \(radiusName).")
} else {
print("Radius is not specified.")
}
When we run the above program using playground, we get the following result −
Radius is measured in Units.
In the above program, the instance values for the membership function 'radiusName' is specified. Hence, the program call to the function will now return values.
Chaining on Methods with Optional Return Values
Optional chaining is used to access subclasses defined methods too.
class rectangle {
var print: circle?
}
class circle {
var area = [radius]()
var cprint: Int {
return area.count
}
subscript(i: Int) -> radius {
get {
return area[i]
}
set {
area[i] = newValue
}
}
func circleprint() {
print("Area of Circle is: \(cprint)")
}
var rectarea: circumference?
}
class radius {
let radiusname: String
init(radiusname: String) { self.radiusname = radiusname }
}
class circumference {
var circumName: String?
var circumNumber: String?
var circumarea: String?
func buildingIdentifier() -> String? {
if circumName != nil {
return circumName
} else if circumNumber != nil {
return circumNumber
} else {
return nil
}
}
}
let circname = rectangle()
if circname.print?.circleprint() != nil {
print("Area of circle is specified)")
} else {
print("Area of circle is not specified")
}
When we run the above program using playground, we get the following result −
Area of circle is not specified
Swift - Type Casting
To validate the type of an instance 'Type Casting' comes into play in Swift 4 language. It is used to check whether the instance type belongs to a particular super class or subclass or it is defined in its own hierarchy.
Swift 4 type casting provides two operators 'is' to check the type of a value and 'as' and to cast the type value to a different type. Type casting also checks whether the instance type follows particular protocol conformance standard.
Defining a Class Hierarchy
Type casting is used to check the type of instances to find out whether it belongs to particular class type. Also, it checks hierarchy of classes and its subclasses to check and cast those instances to make it as a same hierarchy.
class Subjects {
var physics: String
init(physics: String) {
self.physics = physics
}
}
class Chemistry: Subjects {
var equations: String
init(physics: String, equations: String) {
self.equations = equations
super.init(physics: physics)
}
}
class Maths: Subjects {
var formulae: String
init(physics: String, formulae: String) {
self.formulae = formulae
super.init(physics: physics)
}
}
let sa = [ Chemistry(physics: "solid physics", equations: "Hertz"),
Maths(physics: "Fluid Dynamics", formulae: "Giga Hertz")]
let samplechem = Chemistry(physics: "solid physics", equations: "Hertz")
print("Instance physics is: \(samplechem.physics)")
print("Instance equation is: \(samplechem.equations)")
let samplemaths = Maths(physics: "Fluid Dynamics", formulae: "Giga Hertz")
print("Instance physics is: \(samplemaths.physics)")
print("Instance formulae is: \(samplemaths.formulae)")
When we run the above program using playground, we get the following result −
Instance physics is: solid physics Instance equation is: Hertz Instance physics is: Fluid Dynamics Instance formulae is: Giga Hertz
Type Checking
Type checking is done with the 'is' operator. The 'is' type check operator checks whether the instance belongs to particular subclass type and returns 'true' if it belongs to that instance else it will return 'false'.
class Subjects {
var physics: String
init(physics: String) {
self.physics = physics
}
}
class Chemistry: Subjects {
var equations: String
init(physics: String, equations: String) {
self.equations = equations
super.init(physics: physics)
}
}
class Maths: Subjects {
var formulae: String
init(physics: String, formulae: String) {
self.formulae = formulae
super.init(physics: physics)
}
}
let sa = [
Chemistry(physics: "solid physics", equations: "Hertz"),
Maths(physics: "Fluid Dynamics", formulae: "Giga Hertz"),
Chemistry(physics: "Thermo physics", equations: "Decibels"),
Maths(physics: "Astro Physics", formulae: "MegaHertz"),
Maths(physics: "Differential Equations", formulae: "Cosine Series")]
let samplechem = Chemistry(physics: "solid physics", equations: "Hertz")
print("Instance physics is: \(samplechem.physics)")
print("Instance equation is: \(samplechem.equations)")
let samplemaths = Maths(physics: "Fluid Dynamics", formulae: "Giga Hertz")
print("Instance physics is: \(samplemaths.physics)")
print("Instance formulae is: \(samplemaths.formulae)")
var chemCount = 0
var mathsCount = 0
for item in sa {
if item is Chemistry {
++chemCount
} else if item is Maths {
++mathsCount
}
}
print("Subjects in chemistry contains \(chemCount) topics and maths contains \(mathsCount) topics")
When we run the above program using playground, we get the following result −
Instance physics is: solid physics Instance equation is: Hertz Instance physics is: Fluid Dynamics Instance formulae is: Giga Hertz Subjects in chemistry contains 2 topics and maths contains 3 topics
Downcasting
Downcasting the subclass type can be done with two operators (as? and as!).'as?' returns an optional value when the value returns nil. It is used to check successful downcast.
'as!' returns force unwrapping as discussed in the optional chaining when the downcasting returns nil value. It is used to trigger runtime error in case of downcast failure
class Subjects {
var physics: String
init(physics: String) {
self.physics = physics
}
}
class Chemistry: Subjects {
var equations: String
init(physics: String, equations: String) {
self.equations = equations
super.init(physics: physics)
}
}
class Maths: Subjects {
var formulae: String
init(physics: String, formulae: String) {
self.formulae = formulae
super.init(physics: physics)
}
}
let sa = [
Chemistry(physics: "solid physics", equations: "Hertz"),
Maths(physics: "Fluid Dynamics", formulae: "Giga Hertz"),
Chemistry(physics: "Thermo physics", equations: "Decibels"),
Maths(physics: "Astro Physics", formulae: "MegaHertz"),
Maths(physics: "Differential Equations", formulae: "Cosine Series")]
let samplechem = Chemistry(physics: "solid physics", equations: "Hertz")
print("Instance physics is: \(samplechem.physics)")
print("Instance equation is: \(samplechem.equations)")
let samplemaths = Maths(physics: "Fluid Dynamics", formulae: "Giga Hertz")
print("Instance physics is: \(samplemaths.physics)")
print("Instance formulae is: \(samplemaths.formulae)")
var chemCount = 0
var mathsCount = 0
for item in sa {
if let print = item as? Chemistry {
print("Chemistry topics are: '\(print.physics)', \(print.equations)")
} else if let example = item as? Maths {
print("Maths topics are: '\(example.physics)', \(example.formulae)")
}
}
When we run the above program using playground, we get the following result −
Instance physics is: solid physics Instance equation is: Hertz Instance physics is: Fluid Dynamics Instance formulae is: Giga Hertz Chemistry topics are: 'solid physics', Hertz Maths topics are: 'Fluid Dynamics', Giga Hertz Chemistry topics are: 'Thermo physics', Decibels Maths topics are: 'Astro Physics', MegaHertz Maths topics are: 'Differential Equations', Cosine Series
Typecasting: Any and Any Object
The keyword 'Any' is used to represent an instance which belongs to any type including function types.
class Subjects {
var physics: String
init(physics: String) {
self.physics = physics
}
}
class Chemistry: Subjects {
var equations: String
init(physics: String, equations: String) {
self.equations = equations
super.init(physics: physics)
}
}
class Maths: Subjects {
var formulae: String
init(physics: String, formulae: String) {
self.formulae = formulae
super.init(physics: physics)
}
}
let sa = [
Chemistry(physics: "solid physics", equations: "Hertz"),
Maths(physics: "Fluid Dynamics", formulae: "Giga Hertz"),
Chemistry(physics: "Thermo physics", equations: "Decibels"),
Maths(physics: "Astro Physics", formulae: "MegaHertz"),
Maths(physics: "Differential Equations", formulae: "Cosine Series")]
let samplechem = Chemistry(physics: "solid physics", equations: "Hertz")
print("Instance physics is: \(samplechem.physics)")
print("Instance equation is: \(samplechem.equations)")
let samplemaths = Maths(physics: "Fluid Dynamics", formulae: "Giga Hertz")
print("Instance physics is: \(samplemaths.physics)")
print("Instance formulae is: \(samplemaths.formulae)")
var chemCount = 0
var mathsCount = 0
for item in sa {
if let print = item as? Chemistry {
print("Chemistry topics are: '\(print.physics)', \(print.equations)")
} else if let example = item as? Maths {
print("Maths topics are: '\(example.physics)', \(example.formulae)")
}
}
var exampleany = [Any]()
exampleany.append(12)
exampleany.append(3.14159)
exampleany.append("Example for Any")
exampleany.append(Chemistry(physics: "solid physics", equations: "Hertz"))
for print in exampleany {
switch print {
case let someInt as Int:
print("Integer value is \(someInt)")
case let someDouble as Double where someDouble > 0:
print("Pi value is \(someDouble)")
case let someString as String:
print("\(someString)")
case let phy as Chemistry:
print("Topics '\(phy.physics)', \(phy.equations)")
default:
print("None")
}
}
When we run the above program using playground, we get the following result −
Instance physics is: solid physics Instance equation is: Hertz Instance physics is: Fluid Dynamics Instance formulae is: Giga Hertz Chemistry topics are: 'solid physics', Hertz Maths topics are: 'Fluid Dynamics', Giga Hertz Chemistry topics are: 'Thermo physics', Decibels Maths topics are: 'Astro Physics', MegaHertz Maths topics are: 'Differential Equations', Cosine Series Integer value is 12 Pi value is 3.14159 Example for Any Topics 'solid physics', Hertz
AnyObject
To represent the instance of any class type, 'AnyObject' keyword is used.
class Subjects {
var physics: String
init(physics: String) {
self.physics = physics
}
}
class Chemistry: Subjects {
var equations: String
init(physics: String, equations: String) {
self.equations = equations
super.init(physics: physics)
}
}
class Maths: Subjects {
var formulae: String
init(physics: String, formulae: String) {
self.formulae = formulae
super.init(physics: physics)
}
}
let saprint: [AnyObject] = [Chemistry(physics: "solid physics", equations: "Hertz"),
Maths(physics: "Fluid Dynamics", formulae: "Giga Hertz"),
Chemistry(physics: "Thermo physics", equations: "Decibels"),
Maths(physics: "Astro Physics", formulae: "MegaHertz"),
Maths(physics: "Differential Equations", formulae: "Cosine Series")]
let samplechem = Chemistry(physics: "solid physics", equations: "Hertz")
print("Instance physics is: \(samplechem.physics)")
print("Instance equation is: \(samplechem.equations)")
let samplemaths = Maths(physics: "Fluid Dynamics", formulae: "Giga Hertz")
print("Instance physics is: \(samplemaths.physics)")
print("Instance formulae is: \(samplemaths.formulae)")
var chemCount = 0
var mathsCount = 0
for item in saprint {
if let print = item as? Chemistry {
print("Chemistry topics are: '\(print.physics)', \(print.equations)")
} else if let example = item as? Maths {
print("Maths topics are: '\(example.physics)', \(example.formulae)")
}
}
var exampleany = [Any]()
exampleany.append(12)
exampleany.append(3.14159)
exampleany.append("Example for Any")
exampleany.append(Chemistry(physics: "solid physics", equations: "Hertz"))
for print in exampleany {
switch print {
case let someInt as Int:
print("Integer value is \(someInt)")
case let someDouble as Double where someDouble > 0:
print("Pi value is \(someDouble)")
case let someString as String:
print("\(someString)")
case let phy as Chemistry:
print("Topics '\(phy.physics)', \(phy.equations)")
default:
print("None")
}
}
When we run the above program using playground, we get the following result −
Instance physics is: solid physics Instance equation is: Hertz Instance physics is: Fluid Dynamics Instance formulae is: Giga Hertz Chemistry topics are: 'solid physics', Hertz Maths topics are: 'Fluid Dynamics', Giga Hertz Chemistry topics are: 'Thermo physics', Decibels Maths topics are: 'Astro Physics', MegaHertz Maths topics are: 'Differential Equations', Cosine Series Integer value is 12 Pi value is 3.14159 Example for Any Topics 'solid physics', Hertz
Swift - Extensions
Functionality of an existing class, structure or enumeration type can be added with the help of extensions. Type functionality can be added with extensions but overriding the functionality is not possible with extensions.
Swift Extension Functionalities −
- Adding computed properties and computed type properties
- Defining instance and type methods.
- Providing new initializers.
- Defining subscripts
- Defining and using new nested types
- Making an existing type conform to a protocol
Extensions are declared with the keyword 'extension'
Syntax
extension SomeType {
// new functionality can be added here
}
Existing type can also be added with extensions to make it as a protocol standard and its syntax is similar to that of classes or structures.
extension SomeType: SomeProtocol, AnotherProtocol {
// protocol requirements is described here
}
Computed Properties
Computed 'instance' and 'type' properties can also be extended with the help of extensions.
extension Int {
var add: Int {return self + 100 }
var sub: Int { return self - 10 }
var mul: Int { return self * 10 }
var div: Int { return self / 5 }
}
let addition = 3.add
print("Addition is \(addition)")
let subtraction = 120.sub
print("Subtraction is \(subtraction)")
let multiplication = 39.mul
print("Multiplication is \(multiplication)")
let division = 55.div
print("Division is \(division)")
let mix = 30.add + 34.sub
print("Mixed Type is \(mix)")
When we run the above program using playground, we get the following result −
Addition is 103 Subtraction is 110 Multiplication is 390 Division is 11 Mixed Type is 154
Initializers
Swift 4 provides the flexibility to add new initializers to an existing type by extensions. The user can add their own custom types to extend the types already defined and additional initialization options are also possible. Extensions supports only init(). deinit() is not supported by the extensions.
struct sum {
var num1 = 100, num2 = 200
}
struct diff {
var no1 = 200, no2 = 100
}
struct mult {
var a = sum()
var b = diff()
}
let calc = mult()
print ("Inside mult block \(calc.a.num1, calc.a.num2)")
print("Inside mult block \(calc.b.no1, calc.b.no2)")
let memcalc = mult(a: sum(num1: 300, num2: 500),b: diff(no1: 300, no2: 100))
print("Inside mult block \(memcalc.a.num1, memcalc.a.num2)")
print("Inside mult block \(memcalc.b.no1, memcalc.b.no2)")
extension mult {
init(x: sum, y: diff) {
let X = x.num1 + x.num2
let Y = y.no1 + y.no2
}
}
let a = sum(num1: 100, num2: 200)
print("Inside Sum Block:\( a.num1, a.num2)")
let b = diff(no1: 200, no2: 100)
print("Inside Diff Block: \(b.no1, b.no2)")
When we run the above program using playground, we get the following result −
Inside mult block (100, 200) Inside mult block (200, 100) Inside mult block (300, 500) Inside mult block (300, 100) Inside Sum Block:(100, 200) Inside Diff Block: (200, 100)
Methods
New instance methods and type methods can be added further to the subclass with the help of extensions.
extension Int {
func topics(summation: () -> ()) {
for _ in 0..<self {
summation()
}
}
}
4.topics(summation: {
print("Inside Extensions Block")
})
3.topics(summation: {
print("Inside Type Casting Block")
})
When we run the above program using playground, we get the following result −
Inside Extensions Block Inside Extensions Block Inside Extensions Block Inside Extensions Block Inside Type Casting Block Inside Type Casting Block Inside Type Casting Block
topics() function takes argument of type '(summation: () → ())' to indicate the function does not take any arguments and it won't return any values. To call that function multiple number of times, for block is initialized and call to the method with topic() is initialized.
Mutating Instance Methods
Instance methods can also be mutated when declared as extensions.
Structure and enumeration methods that modify self or its properties must mark the instance method as mutating, just like mutating methods from an original implementation.
extension Double {
mutating func square() {
let pi = 3.1415
self = pi * self * self
}
}
var Trial1 = 3.3
Trial1.square()
print("Area of circle is: \(Trial1)")
var Trial2 = 5.8
Trial2.square()
print("Area of circle is: \(Trial2)")
var Trial3 = 120.3
Trial3.square()
print("Area of circle is: \(Trial3)")
When we run the above program using playground, we get the following result −
Area of circle is: 34.210935 Area of circle is: 105.68006 Area of circle is: 45464.070735
Subscripts
Adding new subscripts to already declared instances can also be possible with extensions.
extension Int {
subscript(var multtable: Int) -> Int {
var no1 = 1
while multtable > 0 {
no1 *= 10
--multtable
}
return (self / no1) % 10
}
}
print(12[0])
print(7869[1])
print(786543[2])
When we run the above program using playground, we get the following result −
2 6 5
Nested Types
Nested types for class, structure and enumeration instances can also be extended with the help of extensions.
extension Int {
enum calc {
case add
case sub
case mult
case div
case anything
}
var print: calc {
switch self {
case 0:
return .add
case 1:
return .sub
case 2:
return .mult
case 3:
return .div
default:
return .anything
}
}
}
func result(numb: [Int]) {
for i in numb {
switch i.print {
case .add:
print(" 10 ")
case .sub:
print(" 20 ")
case .mult:
print(" 30 ")
case .div:
print(" 40 ")
default:
print(" 50 ")
}
}
}
result(numb: [0, 1, 2, 3, 4, 7])
When we run the above program using playground, we get the following result −
10 20 30 40 50 50
Swift - Protocols
Protocols provide a blueprint for Methods, properties and other requirements functionality. It is just described as a methods or properties skeleton instead of implementation. Methods and properties implementation can further be done by defining classes, functions and enumerations. Conformance of a protocol is defined as the methods or properties satisfying the requirements of the protocol.
Syntax
Protocols also follow the similar syntax as that of classes, structures, and enumerations −
protocol SomeProtocol {
// protocol definition
}
Protocols are declared after the class, structure or enumeration type names. Single and Multiple protocol declarations are also possible. If multiple protocols are defined they have to be separated by commas.
struct SomeStructure: Protocol1, Protocol2 {
// structure definition
}
When a protocol has to be defined for super class, the protocol name should follow the super class name with a comma.
class SomeClass: SomeSuperclass, Protocol1, Protocol2 {
// class definition
}
Property and Method Requirements
Protocol is used to specify particular class type property or instance property. It just specifies the type or instance property alone rather than specifying whether it is a stored or computed property. Also, it is used to specify whether the property is 'gettable' or 'settable'.
Property requirements are declared by 'var' keyword as property variables. {get set} is used to declare gettable and settable properties after their type declaration. Gettable is mentioned by {get} property after their type declaration.
protocol classa {
var marks: Int { get set }
var result: Bool { get }
func attendance() -> String
func markssecured() -> String
}
protocol classb: classa {
var present: Bool { get set }
var subject: String { get set }
var stname: String { get set }
}
class classc: classb {
var marks = 96
let result = true
var present = false
var subject = "Swift 4 Protocols"
var stname = "Protocols"
func attendance() -> String {
return "The \(stname) has secured 99% attendance"
}
func markssecured() -> String {
return "\(stname) has scored \(marks)"
}
}
let studdet = classc()
studdet.stname = "Swift 4"
studdet.marks = 98
studdet.markssecured()
print(studdet.marks)
print(studdet.result)
print(studdet.present)
print(studdet.subject)
print(studdet.stname)
When we run the above program using playground, we get the following result −
98 true false Swift 4 Protocols Swift 4
Mutating Method Requirements
protocol daysofaweek {
mutating func print()
}
enum days: daysofaweek {
case sun, mon, tue, wed, thurs, fri, sat
mutating func print() {
switch self {
case sun:
self = sun
print("Sunday")
case mon:
self = mon
print("Monday")
case tue:
self = tue
print("Tuesday")
case wed:
self = wed
print("Wednesday")
case mon:
self = thurs
print("Thursday")
case tue:
self = fri
print("Friday")
case sat:
self = sat
print("Saturday")
default:
print("NO Such Day")
}
}
}
var res = days.wed
res.print()
When we run the above program using playground, we get the following result −
Wednesday
Initializer Requirements
Swing allows the user to initialize protocols to follow type conformance similar to that of normal initializers.
Syntax
protocol SomeProtocol {
init(someParameter: Int)
}
For example
protocol tcpprotocol {
init(aprot: Int)
}
Class Implementations of Protocol Initializer Requirements
Designated or convenience initializer allows the user to initialize a protocol to conform its standard by the reserved 'required' keyword.
class SomeClass: SomeProtocol {
required init(someParameter: Int) {
// initializer implementation statements
}
}
protocol tcpprotocol {
init(aprot: Int)
}
class tcpClass: tcpprotocol {
required init(aprot: Int) {
}
}
Protocol conformance is ensured on all subclasses for explicit or inherited implementation by 'required' modifier.
When a subclass overrides its super class initialization requirement it is specified by the 'override' modifier keyword.
protocol tcpprotocol {
init(no1: Int)
}
class mainClass {
var no1: Int // local storage
init(no1: Int) {
self.no1 = no1 // initialization
}
}
class subClass: mainClass, tcpprotocol {
var no2: Int
init(no1: Int, no2 : Int) {
self.no2 = no2
super.init(no1:no1)
}
// Requires only one parameter for convenient method
required override convenience init(no1: Int) {
self.init(no1:no1, no2:0)
}
}
let res = mainClass(no1: 20)
let print = subClass(no1: 30, no2: 50)
print("res is: \(res.no1)")
print("res is: \(print.no1)")
print("res is: \(print.no2)")
When we run the above program using playground, we get the following result −
res is: 20 res is: 30 res is: 50
Protocols as Types
Instead of implementing functionalities in a protocol they are used as types for functions, classes, methods etc.
Protocols can be accessed as types in −
Function, method or initialize as a parameter or return type
Constant, variable or property
Arrays, dictionaries or other containers as items
protocol Generator {
typealias members
func next() -> members?
}
var items = [10,20,30].generate()
while let x = items.next() {
print(x)
}
for lists in map([1,2,3], {i in i*5}) {
print(lists)
}
print([100,200,300])
print(map([1,2,3], {i in i*10}))
When we run the above program using playground, we get the following result −
10 20 30 5 10 15 [100, 200, 300] [10, 20, 30]
Adding Protocol Conformance with an Extension
Existing type can be adopted and conformed to a new protocol by making use of extensions. New properties, methods and subscripts can be added to existing types with the help of extensions.
protocol AgeClasificationProtocol {
var age: Int { get }
func agetype() -> String
}
class Person {
let firstname: String
let lastname: String
var age: Int
init(firstname: String, lastname: String) {
self.firstname = firstname
self.lastname = lastname
self.age = 10
}
}
extension Person : AgeClasificationProtocol {
func fullname() -> String {
var c: String
c = firstname + " " + lastname
return c
}
func agetype() -> String {
switch age {
case 0...2:
return "Baby"
case 2...12:
return "Child"
case 13...19:
return "Teenager"
case let x where x > 65:
return "Elderly"
default:
return "Normal"
}
}
}
Protocol Inheritance
Swift 4 allows protocols to inherit properties from its defined properties. It is similar to that of class inheritance, but with the choice of listing multiple inherited protocols separated by commas.
protocol classa {
var no1: Int { get set }
func calc(sum: Int)
}
protocol result {
func print(target: classa)
}
class student2: result {
func print(target: classa) {
target.calc(sum: 1)
}
}
class classb: result {
func print(target: classa) {
target.calc(sum: 5)
}
}
class student: classa {
var no1: Int = 10
func calc(sum: Int) {
no1 -= sum
print("Student attempted \(sum) times to pass")
if no1 <= 0 {
print("Student is absent for exam")
}
}
}
class Player {
var stmark: result!
init(stmark: result) {
self.stmark = stmark
}
func print(target: classa) {
stmark.print(target: target)
}
}
var marks = Player(stmark: student2())
var marksec = student()
marks.print(target: marksec)
marks.print(target: marksec)
marks.print(target: marksec)
marks.stmark = classb()
marks.print(target: marksec)
marks.print(target: marksec)
marks.print(target: marksec)
When we run the above program using playground, we get the following result −
Student attempted 1 times to pass Student attempted 1 times to pass Student attempted 1 times to pass Student attempted 5 times to pass Student attempted 5 times to pass Student is absent for exam Student attempted 5 times to pass Student is absent for exam
Class Only Protocols
When protocols are defined and the user wants to define protocol with classes it should be added by defining class first followed by protocol's inheritance list.
protocol tcpprotocol {
init(no1: Int)
}
class mainClass {
var no1: Int // local storage
init(no1: Int) {
self.no1 = no1 // initialization
}
}
class subClass: mainClass, tcpprotocol {
var no2: Int
init(no1: Int, no2 : Int) {
self.no2 = no2
super.init(no1:no1)
}
// Requires only one parameter for convenient method
required override convenience init(no1: Int) {
self.init(no1:no1, no2:0)
}
}
let res = mainClass(no1: 20)
let print = subClass(no1: 30, no2: 50)
print("res is: \(res.no1)")
print("res is: \(print.no1)")
print("res is: \(print.no2)")
When we run the above program using playground, we get the following result −
res is: 20 res is: 30 res is: 50
Protocol Composition
Swift 4 allows multiple protocols to be called at once with the help of protocol composition.
Syntax
protocol<SomeProtocol, AnotherProtocol>
Example
protocol stname {
var name: String { get }
}
protocol stage {
var age: Int { get }
}
struct Person: stname, stage {
var name: String
var age: Int
}
func print(celebrator: stname & stage) {
print("\(celebrator.name) is \(celebrator.age) years old")
}
let studname = Person(name: "Priya", age: 21)
print(studname)
let stud = Person(name: "Rehan", age: 29)
print(stud)
let student = Person(name: "Roshan", age: 19)
print(student)
When we run the above program using playground, we get the following result −
Person(name: "Priya", age: 21) Person(name: "Rehan", age: 29) Person(name: "Roshan", age: 19)
Checking for Protocol Conformance
Protocol conformance is tested by 'is' and 'as' operators similar to that of type casting.
The is operator returns true if an instance conforms to protocol standard and returns false if it fails.
The as? version of the downcast operator returns an optional value of the protocol's type, and this value is nil if the instance does not conform to that protocol.
The as version of the downcast operator forces the downcast to the protocol type and triggers a runtime error if the downcast does not succeed.
import Foundation
@objc protocol rectangle {
var area: Double { get }
}
@objc class Circle: rectangle {
let pi = 3.1415927
var radius: Double
var area: Double { return pi * radius * radius }
init(radius: Double) { self.radius = radius }
}
@objc class result: rectangle {
var area: Double
init(area: Double) { self.area = area }
}
class sides {
var rectsides: Int
init(rectsides: Int) { self.rectsides = rectsides }
}
let objects: [AnyObject] = [Circle(radius: 2.0),result(area:198),sides(rectsides: 4)]
for object in objects {
if let objectWithArea = object as? rectangle {
print("Area is \(objectWithArea.area)")
} else {
print("Rectangle area is not defined")
}
}
When we run the above program using playground, we get the following result −
Area is 12.5663708 Area is 198.0 Rectangle area is not defined
Swift - Generics
Swift 4 language provides 'Generic' features to write flexible and reusable functions and types. Generics are used to avoid duplication and to provide abstraction. Swift 4 standard libraries are built with generics code. Swift 4s 'Arrays' and 'Dictionary' types belong to generic collections. With the help of arrays and dictionaries the arrays are defined to hold 'Int' values and 'String' values or any other types.
func exchange(a: inout Int, b: inout Int) {
let temp = a
a = b
b = temp
}
var numb1 = 100
var numb2 = 200
print("Before Swapping values are: \(numb1) and \(numb2)")
exchange(a: &numb1, b: &numb2)
print("After Swapping values are: \(numb1) and \(numb2)")
When we run the above program using playground, we get the following result −
Before Swapping values are: 100 and 200 After Swapping values are: 200 and 100
Generic Functions: Type Parameters
Generic functions can be used to access any data type like 'Int' or 'String'.
func exchange<T>(a: inout T, b: inout T) {
let temp = a
a = b
b = temp
}
var numb1 = 100
var numb2 = 200
print("Before Swapping Int values are: \(numb1) and \(numb2)")
exchange(a: &numb1, b: &numb2)
print("After Swapping Int values are: \(numb1) and \(numb2)")
var str1 = "Generics"
var str2 = "Functions"
print("Before Swapping String values are: \(str1) and \(str2)")
exchange(a: &str1, b: &str2)
print("After Swapping String values are: \(str1) and \(str2)")
When we run the above program using playground, we get the following result −
Before Swapping Int values are: 100 and 200 After Swapping Int values are: 200 and 100 Before Swapping String values are: Generics and Functions After Swapping String values are: Functions and Generics
The function exchange() is used to swap values which is described in the above program and <T> is used as a type parameter. For the first time, function exchange() is called to return 'Int' values and second call to the function exchange() will return 'String' values. Multiple parameter types can be included inside the angle brackets separated by commas.
Type parameters are named as user defined to know the purpose of the type parameter that it holds. Swift 4 provides <T> as generic type parameter name. However type parameters like Arrays and Dictionaries can also be named as key, value to identify that they belong to type 'Dictionary'.
struct TOS<T> {
var items = [T]()
mutating func push(item: T) {
items.append(item)
}
mutating func pop() -> T {
return items.removeLast()
}
}
var tos = TOS<String>()
tos.push(item: "Swift 4")
print(tos.items)
tos.push(item: "Generics")
print(tos.items)
tos.push(item: "Type Parameters")
print(tos.items)
tos.push(item: "Naming Type Parameters")
print(tos.items)
let deletetos = tos.pop()
When we run the above program using playground, we get the following result −
[Swift 4] [Swift 4, Generics] [Swift 4, Generics, Type Parameters] [Swift 4, Generics, Type Parameters, Naming Type Parameters]
Extending a Generic Type
Extending the stack property to know the top of the item is included with 'extension' keyword.
struct TOS<T> {
var items = [T]()
mutating func push(item: T) {
items.append(item)
}
mutating func pop() -> T {
return items.removeLast()
}
}
var tos = TOS<String>()
tos.push(item: "Swift 4")
print(tos.items)
tos.push(item: "Generics")
print(tos.items)
tos.push(item: "Type Parameters")
print(tos.items)
tos.push(item: "Naming Type Parameters")
print(tos.items)
extension TOS {
var first: T? {
return items.isEmpty ? nil : items[items.count - 1]
}
}
if let first = tos.first {
print("The top item on the stack is \(first).")
}
When we run the above program using playground, we get the following result −
["Swift 4"] ["Swift 4", "Generics"] ["Swift 4", "Generics", "Type Parameters"] ["Swift 4", "Generics", "Type Parameters", "Naming Type Parameters"] The top item on the stack is Naming Type Parameters.
Type Constraints
Swift 4 language allows 'type constraints' to specify whether the type parameter inherits from a specific class, or to ensure protocol conformance standard.
func exchange<T>(a: inout T, b: inout T) {
let temp = a
a = b
b = temp
}
var numb1 = 100
var numb2 = 200
print("Before Swapping Int values are: \(numb1) and \(numb2)")
exchange(a: &numb1, b: &numb2)
print("After Swapping Int values are: \(numb1) and \(numb2)")
var str1 = "Generics"
var str2 = "Functions"
print("Before Swapping String values are: \(str1) and \(str2)")
exchange(a: &str1, b: &str2)
print("After Swapping String values are: \(str1) and \(str2)")
When we run the above program using playground, we get the following result −
Before Swapping Int values are: 100 and 200 After Swapping Int values are: 200 and 100 Before Swapping String values are: Generics and Functions After Swapping String values are: Functions and Generics
Associated Types
Swift 4 allows associated types to be declared inside the protocol definition by the keyword 'associatedtype'.
protocol Container {
associatedtype ItemType
mutating func append(item: ItemType)
var count: Int { get }
subscript(i: Int) -> ItemType { get }
}
struct TOS<T>: Container {
// original Stack<T> implementation
var items = [T]()
mutating func push(item: T) {
items.append(item)
}
mutating func pop() -> T {
return items.removeLast()
}
// conformance to the Container protocol
mutating func append(item: T) {
self.push(item: item)
}
var count: Int {
return items.count
}
subscript(i: Int) -> T {
return items[i]
}
}
var tos = TOS<String>()
tos.push(item: "Swift 4")
print(tos.items)
tos.push(item: "Generics")
print(tos.items)
tos.push(item: "Type Parameters")
print(tos.items)
tos.push(item: "Naming Type Parameters")
print(tos.items)
When we run the above program using playground, we get the following result −
[Swift 4] [Swift 4, Generics] [Swift 4, Generics, Type Parameters] [Swift 4, Generics, Type Parameters, Naming Type Parameters]
Where Clauses
Type constraints enable the user to define requirements on the type parameters associated with a generic function or type. For defining requirements for associated types 'where' clauses are declared as part of type parameter list. 'where' keyword is placed immediately after the list of type parameters followed by constraints of associated types, equality relationships between types and associated types.
protocol Container {
associatedtype ItemType
mutating func append(item: ItemType)
var count: Int { get }
subscript(i: Int) -> ItemType { get }
}
struct Stack<T>: Container {
// original Stack<T> implementation
var items = [T]()
mutating func push(item: T) {
items.append(item)
}
mutating func pop() -> T {
return items.removeLast()
}
// conformance to the Container protocol
mutating func append(item: T) {
self.push(item: item)
}
var count: Int {
return items.count
}
subscript(i: Int) -> T {
return items[i]
}
}
func allItemsMatch<
C1: Container, C2: Container
where C1.ItemType == C2.ItemType, C1.ItemType: Equatable>
(someContainer: C1, anotherContainer: C2) -> Bool {
// check that both containers contain the same number of items
if someContainer.count != anotherContainer.count {
return false
}
// check each pair of items to see if they are equivalent
for i in 0..<someContainer.count {
if someContainer[i] != anotherContainer[i] {
return false
}
}
// all items match, so return true
return true
}
var tos = Stack<String>()
tos.push(item: "Swift 4")
print(tos.items)
tos.push(item: "Generics")
print(tos.items)
tos.push(item: "Where Clause")
print(tos.items)
var eos = ["Swift 4", "Generics", "Where Clause"]
print(eos)
When we run the above program using playground, we get the following result −
[Swift 4] [Swift 4, Generics] [Swift 4, Generics, Where Clause] [Swift 4, Generics, Where Clause]
Swift - Access Control
To restrict access to code blocks, modules and abstraction is done through access control. Classes, structures and enumerations can be accessed according to their properties, methods, initializers and subscripts by access control mechanisms. Constants, variables and functions in a protocol are restricted and allowed access as global and local through access control. Access control applied to properties, types and functions can be referred as 'entities'.
Access control model is based on modules and source files.
Module is defined as a single unit of code distribution and can be imported using the keyword 'import'. A source file is defined as a single source code file with in a module to access multiple types and functions.
Three different access levels are provided by Swift 4 language. They are Public, Internal and Private access.
| S.No | Access Levels & Definition |
|---|---|
| 1 | Public Enables entities to be processed with in any source file from their defining module, a source file from another module that imports the defining module. |
| 2 | Internal Enables entities to be used within any source file from their defining module, but not in any source file outside of that module. |
| 3 | Private Restricts the use of an entity to its own defining source file. Private access plays role to hide the implementation details of a specific code functionality. |
Syntax
public class SomePublicClass {}
internal class SomeInternalClass {}
private class SomePrivateClass {}
public var somePublicVariable = 0
internal let someInternalConstant = 0
private func somePrivateFunction() {}
Access Control for Function types
Some functions may have arguments declared inside the function without any return values. The following program declares a and b as arguments to the sum() function. Inside the function itself the values for arguments a and b are passed by invoking the function call sum() and its values are printed thereby eliminating return values. To make the function's return type as private, declare the function's overall access level with the private modifier.
private func sum(a: Int, b: Int) {
let a = a + b
let b = a - b
print(a, b)
}
sum(a: 20, b: 10)
sum(a: 40, b: 10)
sum(a: 24, b: 6)
When we run the above program using playground, we get the following result −
30 20 50 40 30 24
Access Control for Enumeration types
public enum Student {
case Name(String)
case Mark(Int,Int,Int)
}
var studDetails = Student.Name("Swift 4")
var studMarks = Student.Mark(98,97,95)
switch studMarks {
case .Name(let studName):
print("Student name is: \(studName).")
case .Mark(let Mark1, let Mark2, let Mark3):
print("Student Marks are: \(Mark1),\(Mark2),\(Mark3).")
}
When we run the above program using playground, we get the following result −
Student Marks are: 98,97,95
Enumeration in Swift 4 language automatically receive the same access level for individual cases of an enumeration. Consider for example to access the students name and marks secured in three subjects enumeration name is declared as student and the members present in enum class are name which belongs to string datatype, marks are represented as mark1, mark2 and mark3 of datatype Integer. To access either the student name or marks they have scored. Now, the switch case will print student name if that case block is executed otherwise it will print the marks secured by the student. If both condition fails the default block will be executed.
Access Control for SubClasses
Swift 4 allows the user to subclass any class that can be accessed in the current access context. A subclass cannot have a higher access level than its superclass. The user is restricted from writing a public subclass of an internal superclass.
public class cricket {
internal func printIt() {
print("Welcome to Swift 4 Super Class")
}
}
internal class tennis: cricket {
override internal func printIt() {
print("Welcome to Swift 4 Sub Class")
}
}
let cricinstance = cricket()
cricinstance.printIt()
let tennisinstance = tennis()
tennisinstance.printIt()
When we run the above program using playground, we get the following result −
Welcome to Swift Super Class Welcome to Swift Sub Class
Access Control for Constants, variables, properties and subscripts
Swift 4 constant, variable, or property cannot be defined as public than its type. It is not valid to write a public property with a private type. Similarly, a subscript cannot be more public than its index or return type.
When a constant, variable, property, or subscript makes use of a private type, the constant, variable, property, or subscript must also be marked as private −
private var privateInstance = SomePrivateClass()
Getters and Setters
Getters and setters for constants, variables, properties, and subscripts automatically receive the same access level as the constant, variable, property, or subscript they belong to.
class Samplepgm {
var counter: Int = 0{
willSet(newTotal) {
print("Total Counter is: \(newTotal)")
}
didSet {
if counter > oldValue {
print("Newly Added Counter \(counter - oldValue)")
}
}
}
}
let NewCounter = Samplepgm()
NewCounter.counter = 100
NewCounter.counter = 800
When we run the above program using playground, we get the following result −
Total Counter is: 100 Newly Added Counter 100 Total Counter is: 800 Newly Added Counter 700
Access Control for Initializers and Default Initializers
Custom initializers can be assigned an access level less than or equal to the type that they initialize. A required initializer must have the same access level as the class it belongs to. The types of an initializer's parameters cannot be more private than the initializer's own access level.
To declare each and every subclass of the initialize 'required' keyword needs to be defined before the init() function.
class classA {
required init() {
let a = 10
print(a)
}
}
class classB: classA {
required init() {
let b = 30
print(b)
}
}
let res = classA()
let print = classB()
When we run the above program using playground, we get the following result −
10 30 10
A default initializer has the same access level as the type it initializes, unless that type is defined as public. When default initialize is defined as public it is considered internal. When the user needs a public type to be initializable with a no-argument initializer in another module, provide explicitly a public no-argument initializer as part of the type's definition.
Access Control for Protocols
When we define a new protocol to inherit functionalities from an existing protocol, both has to be declared the same access levels to inherit the properties of each other. Swift 4 access control wont allow the users to define a 'public' protocol that inherits from an 'internal' protocol.
public protocol tcpprotocol {
init(no1: Int)
}
public class mainClass {
var no1: Int // local storage
init(no1: Int) {
self.no1 = no1 // initialization
}
}
class subClass: mainClass, tcpprotocol {
var no2: Int
init(no1: Int, no2 : Int) {
self.no2 = no2
super.init(no1:no1)
}
// Requires only one parameter for convenient method
required override convenience init(no1: Int) {
self.init(no1:no1, no2:0)
}
}
let res = mainClass(no1: 20)
let print = subClass(no1: 30, no2: 50)
print("res is: \(res.no1)")
print("res is: \(print.no1)")
print("res is: \(print.no2)")
When we run the above program using playground, we get the following result −
res is: 20 res is: 30 res is: 50
Access Control for Extensions
Swift 4 does not allow the users to provide an explicit access level modifier for an extension when the user uses that extension to add protocol conformance. The default access level for each protocol requirement implementation within the extension is provided with its own protocol access level.
Access Control for Generics
Generics allow the user to specify minimum access levels to access the type constraints on its type parameters.
public struct TOS<T> {
var items = [T]()
mutating func push(item: T) {
items.append(item)
}
mutating func pop() -> T {
return items.removeLast()
}
}
var tos = TOS<String>()
tos.push(item: "Swift 4")
print(tos.items)
tos.push(item: "Generics")
print(tos.items)
tos.push(item: "Type Parameters")
print(tos.items)
tos.push(item: "Naming Type Parameters")
print(tos.items)
let deletetos = tos.pop()
When we run the above program using playground, we get the following result −
[Swift 4] [Swift 4, Generics] [Swift 4, Generics, Type Parameters] [Swift 4, Generics, Type Parameters, Naming Type Parameters]
Access Control for Type Aliases
The user can define type aliases to treat distinct access control types. Same access level or different access levels can be defined by the user. When type alias is 'private' its associated members can be declared as 'private, internal of public type'. When type alias is public the members cannot be alias as an 'internal' or 'private' name
Any type aliases you define are treated as distinct types for the purposes of access control. A type alias can have an access level less than or equal to the access level of the type it aliases. For example, a private type alias can alias a private, internal, or public type, but a public type alias cannot alias an internal or private type.
public protocol Container {
associatedtype ItemType
mutating func append(item: ItemType)
var count: Int { get }
subscript(i: Int) -> ItemType { get }
}
struct Stack<T>: Container {
// original Stack<T> implementation
var items = [T]()
mutating func push(item: T) {
items.append(item)
}
mutating func pop() -> T {
return items.removeLast()
}
// conformance to the Container protocol
mutating func append(item: T) {
self.push(item: item)
}
var count: Int {
return items.count
}
subscript(i: Int) -> T {
return items[i]
}
}
func allItemsMatch<
C1: Container, C2: Container
where C1.ItemType == C2.ItemType, C1.ItemType: Equatable>
(someContainer: C1, anotherContainer: C2) -> Bool {
// check that both containers contain the same number of items
if someContainer.count != anotherContainer.count {
return false
}
// check each pair of items to see if they are equivalent
for i in 0..<someContainer.count {
if someContainer[i] != anotherContainer[i] {
return false
}
}
// all items match, so return true
return true
}
var tos = Stack<String>()
tos.push(item: "Swift 4")
print(tos.items)
tos.push(item: "Generics")
print(tos.items)
tos.push(item: "Where Clause")
print(tos.items)
var eos = ["Swift 4", "Generics", "Where Clause"]
print(eos)
When we run the above program using playground, we get the following result −
[Swift 4] [Swift 4, Generics] [Swift 4, Generics, Where Clause] [Swift 4, Generics, Where Clause]
Swift Encoding and Decoding
Swift 4 introduces a new Codable Protocol, that lets you serialize and De-serialize custom data types without writing any special code and without having to worry about losing your value types.
struct Language: Codable {
var name: String
var version: Int
}
let swift = Language(name: "Swift", version: 4)
let java = Language(name: "java", version: 8)
let R = Language(name: "R", version: 3
Notice that Langauage is conforming to Codable Protocol. Now well convert it to a Json Data Representation using one simple line.
let encoder = JSONEncoder()
if let encoded = try? encoder.encode(java) {
//Perform some operations on this value.
}
Swift will automatically encode all the values inside your data type.
You can decode the data using Decoder function like
let decoder = JSONDecoder()
if let decoded = try? decoder.decode(Language.self, from: encoded) {
//Perform some operations on this value.
}
Both JSONEncoder and its property list counterpart PropertyListEncoder have lots of options for customizing how they work.
