
- Selenium - Home
- Selenium - Overview
- Selenium - Components
- Selenium - Automation Testing
- Selenium - Environment Setup
- Selenium - Remote Control
- Selenium - IDE Introduction
- Selenium - Features
- Selenium - Limitations
- Selenium - Installation
- Selenium - Creating Tests
- Selenium - Creating Script
- Selenium - Control Flow
- Selenium - Store Variables
- Selenium - Alerts & Popups
- Selenium - Selenese Commands
- Selenium - Actions Commands
- Selenium - Accessors Commands
- Selenium - Assertions Commands
- Selenium - Assert/Verify Methods
- Selenium - Locating Strategies
- Selenium - Script Debugging
- Selenium - Verification Points
- Selenium - Pattern Matching
- Selenium - JSON Data File
- Selenium - Browser Execution
- Selenium - User Extensions
- Selenium - Code Export
- Selenium - Emitting Code
- Selenium - JavaScript Functions
- Selenium - Plugins
- Selenium WebDriver Tutorial
- Selenium - Introduction
- Selenium WebDriver vs RC
- Selenium - Installation
- Selenium - First Test Script
- Selenium - Driver Sessions
- Selenium - Browser Options
- Selenium - Chrome Options
- Selenium - Edge Options
- Selenium - Firefox Options
- Selenium - Safari Options
- Selenium - Double Click
- Selenium - Right Click
- HTML Report in Python
- Handling Edit Boxes
- Selenium - Single Elements
- Selenium - Multiple Elements
- Selenium Web Elements
- Selenium - File Upload
- Selenium - Locator Strategies
- Selenium - Relative Locators
- Selenium - Finders
- Selenium - Find All Links
- Selenium - User Interactions
- Selenium - WebElement Commands
- Selenium - Browser Interactions
- Selenium - Browser Commands
- Selenium - Browser Navigation
- Selenium - Alerts & Popups
- Selenium - Handling Forms
- Selenium - Windows and Tabs
- Selenium - Handling Links
- Selenium - Input Boxes
- Selenium - Radio Button
- Selenium - Checkboxes
- Selenium - Dropdown Box
- Selenium - Handling IFrames
- Selenium - Handling Cookies
- Selenium - Date Time Picker
- Selenium - Dynamic Web Tables
- Selenium - Actions Class
- Selenium - Action Class
- Selenium - Keyboard Events
- Selenium - Key Up/Down
- Selenium - Copy and Paste
- Selenium - Handle Special Keys
- Selenium - Mouse Events
- Selenium - Drag and Drop
- Selenium - Pen Events
- Selenium - Scroll Operations
- Selenium - Waiting Strategies
- Selenium - Explicit/Implicit Wait
- Selenium - Support Features
- Selenium - Multi Select
- Selenium - Wait Support
- Selenium - Select Support
- Selenium - Color Support
- Selenium - ThreadGuard
- Selenium - Errors & Logging
- Selenium - Exception Handling
- Selenium - Miscellaneous
- Selenium - Handling Ajax Calls
- Selenium - JSON Data File
- Selenium - CSV Data File
- Selenium - Excel Data File
- Selenium - Cross Browser Testing
- Selenium - Multi Browser Testing
- Selenium - Multi Windows Testing
- Selenium - JavaScript Executor
- Selenium - Headless Execution
- Selenium - Capture Screenshots
- Selenium - Capture Videos
- Selenium - Page Object Model
- Selenium - Page Factory
- Selenium - Record & Playback
- Selenium - Frameworks
- Selenium - Browsing Context
- Selenium - DevTools
- Selenium Grid Tutorial
- Selenium - Overview
- Selenium - Architecture
- Selenium - Components
- Selenium - Configuration
- Selenium - Create Test Script
- Selenium - Test Execution
- Selenium - Endpoints
- Selenium - Customizing a Node
- Selenium Reporting Tools
- Selenium - Reporting Tools
- Selenium - TestNG
- Selenium - JUnit
- Selenium - Allure
- Selenium & Other Technologies
- Selenium - Java Tutorial
- Selenium - Python Tutorial
- Selenium - C# Tutorial
- Selenium - Javascript Tutorial
- Selenium - Kotlin Tutorial
- Selenium - Ruby Tutorial
- Selenium - Maven & Jenkins
- Selenium - LogExpert Logging
- Selenium - Log4j Logging
- Selenium - Robot Framework
- Selenium - Github Tutorial
- Selenium - IntelliJ
- Selenium - XPath
- Selenium Miscellaneous Concepts
- Selenium - IE Driver
- Selenium - Automation Frameworks
- Selenium - Keyword Driven Framework
- Selenium - Data Driven Framework
- Selenium - Hybrid Driven Framework
- Selenium - SSL Certificate Error
- Selenium - Alternatives
Selenium - Allure
Allure can be used to create a detailed automation test report. It is an open source framework which can be integrated with Selenium tests and used for reporting purposes.
Prerequisites to Create Allure Report
Install Java (version above 8) in the system and check if it is present with the command: java -version. The java version installed will be visible if installation has been completed successfully. Java can be downloaded and installed using the link Java Downloads.
To get more knowledge on setting up of Java, refer to the below link −
https://www.youtube.com/watch?v=bxIZ1GVWYkQ.
Install maven in the system and check if it is present with the command: mvn -version. The maven version installed will be visible if installation has been completed successfully. Maven can be downloaded and installed using the link Apache Maven.
To get more knowledge on setting up of Maven, refer to the link Maven Environment Setup.
Install IntelliJ. To get more knowledge on setting up of IntelliJ, refer to the link Selenium IntelliJ.
Steps to Create Allure Report
Step 1 − Create a maven project and add the dependencies to the pom.xml file for the below items −
Add the TestNG dependencies from the link TestNG.
Add the Selenium Java dependencies from the link Selenium Java
Add the Allure TestNG dependencies from the link Allure TestNG
Save the pom.xml with all the dependencies and update the maven project.
Step 2 − Download the Allure in the system. For Mac, and Linux, run the command: brew install allure. This should work provided Homebrew is installed in the system. For Windows, run the command: scoop install allure. This should work provided Scoop is installed in the system. Check if Allure is present with the command: allure version. The Allure version installed will be visible if installation has been completed successfully.
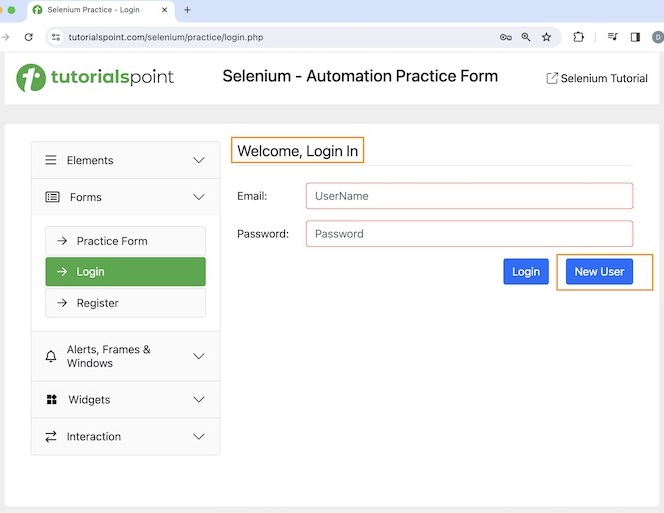
Step 3 − Create a TestNG test class taking care of the below example. Click on New User button on the Welcome Page.
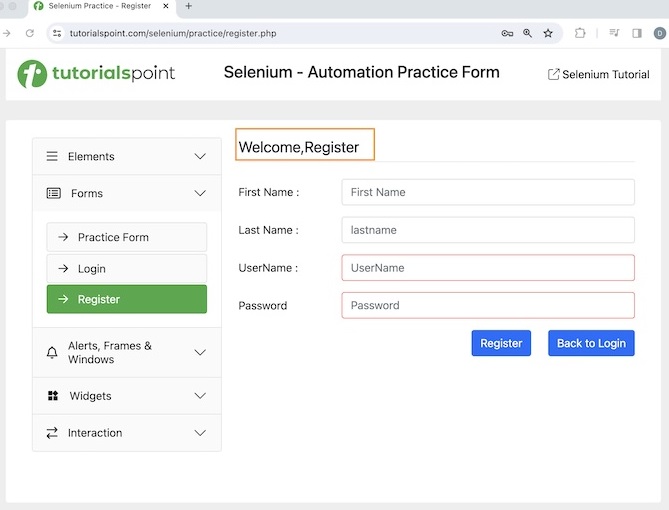
After clicking New User, we will have the Registration page, with Welcome, Register text as shown in the below image.
Code Implementation
package Report;

import org.openqa.selenium.By;
import org.openqa.selenium.WebDriver;
import org.openqa.selenium.WebElement;
import org.openqa.selenium.chrome.ChromeDriver;
import org.testng.annotations.*;
import java.util.concurrent.TimeUnit;
import static org.testng.Assert.assertEquals;

public class AllureTest {

   WebDriver driver;
   @BeforeTest
   public void setup(@Optional String browser) throws Exception{

      // Initiate browser driver
      driver = new ChromeDriver();

      // adding implicit wait of 12 secs
      driver.manage().timeouts().implicitlyWait(10, TimeUnit.SECONDS);

      // Opening the webpage
      driver.get("https://www.tutorialspoint.com/selenium/practice/login.php");
   }
   @Test(priority = 1)
   public void verifyWelcomePageHeading() {

      // identify header then get text
      WebElement header = driver.findElement
         (By.xpath("//*[@id='signInForm']/h1"));
      String text = header.getText();

      // assertion to verify login page header
      assertEquals("Welcome, Login In", text);
   }
   @Test(priority = 2)
   public void moveToRegisterPage() {

      // identify button then click
      WebElement btn = driver.findElement
         (By.xpath("//*[@id='signInForm']/div[3]/a"));
      btn.click();
   }
   @Test(priority = 3)
   public void verifyRegisterPageHeading() {

      // identify header then get text
      WebElement heder = driver.findElement
         (By.xpath("//*[@id='signupForm']/h1"));
      String text = heder.getText();

      // assertion to verify register page header
      assertEquals("Welcome,Register", text);
   }

   @AfterTest
   public void teardown() {

      // quitting browser
      driver.quit();
   }
}
Configurations in testng.xml file.
<?xml version="1.0" encoding="UTF-8"?>
<!DOCTYPE suite SYSTEM "http://testng.org/testng-1.0.dtd">
<suite name="All Test Suite">
   <test verbose="2" preserve-order="true" name="AllureTest.java">
      <classes>
         <class name="Report.AllureTest">
            <methods>
               <include name="verifyWelcomePageHeading"/>
               <include name="moveToRegisterPage"/>
               <include name="verifyRegisterPageHeading"/>
            </methods>
         </class>
      </classes>
   </test>
</suite>
Dependencies in pom.xml file.
<?xml version="1.0" encoding="UTF-8"?>
<project xmlns="http://maven.apache.org/POM/4.0.0"
   xmlns:xsi="http://www.w3.org/2001/XMLSchema-instance"
   xsi:schemaLocation="http://maven.apache.org/POM/4.0.0
   http://maven.apache.org/xsd/maven-4.0.0.xsd">

   <modelVersion>4.0.0</modelVersion>
   <groupId>org.example</groupId>
   <artifactId>SeleniumJava</artifactId>
   <version>1.0-SNAPSHOT</version>

   <properties>
      <maven.compiler.source>16</maven.compiler.source>
      <maven.compiler.target>16</maven.compiler.target>
      <project.build.sourceEncoding>UTF-8</project.build.sourceEncoding>
   </properties>

   <!-- https://mvnrepository.com/artifact/org.seleniumhq.selenium/selenium-java -->
   <dependencies>
      <dependency>
         <groupId>org.seleniumhq.selenium</groupId>
         <artifactId>selenium-java</artifactId>
         <version>4.11.0</version>
      </dependency>

      <!-- https://mvnrepository.com/artifact/org.testng/testng -->
      <dependency>
         <groupId>org.testng</groupId>
         <artifactId>testng</artifactId>
         <version>7.9.0</version>
         <scope>test</scope>
      </dependency>

      <!-- https://mvnrepository.com/artifact/io.qameta.allure/allure-testng -->
      <dependency>
         <groupId>io.qameta.allure</groupId>
         <artifactId>allure-testng</artifactId>
         <version>2.25.0</version>
      </dependency>
   </dependencies>
</project>
Project structure of the above implementation is shown in the below image −
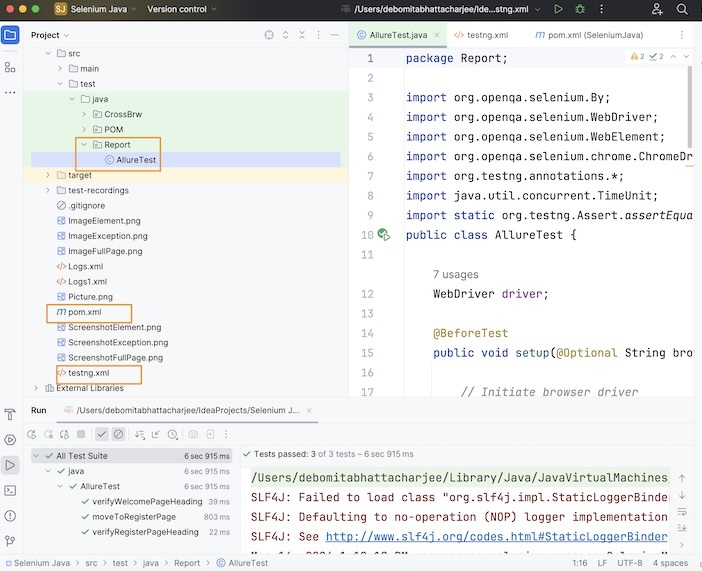
Step 4 − Run the test using the testng.xml.
It will show the following output −
===============================================
All Test Suite
Total tests run: 3, Passes: 3, Failures: 0, Skips: 0
===============================================
Process finished with exit code 0
We had used the TestNG framework, to design the test and obtained the page headers, finally verified them.
The result in the console shows Total tests run: 3, as there are three methods with @Test annotations - verifyWelcomePageHeading(), moveToRegisterPage(), and verifyRegisterPageHeading().
Finally, the message Passes: 3, and Process finished with exit code 0 was received, signifying successful execution of the code.
Step 5 − Refresh the project folder and a new folder called the allure-results should get generated.
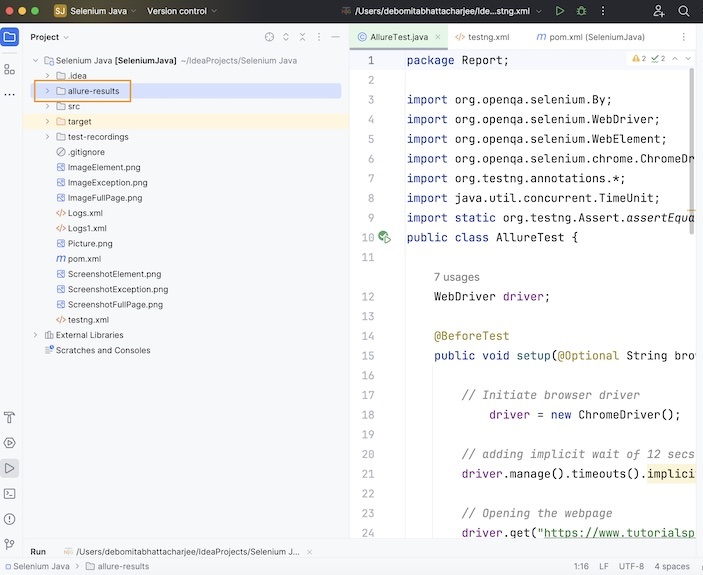
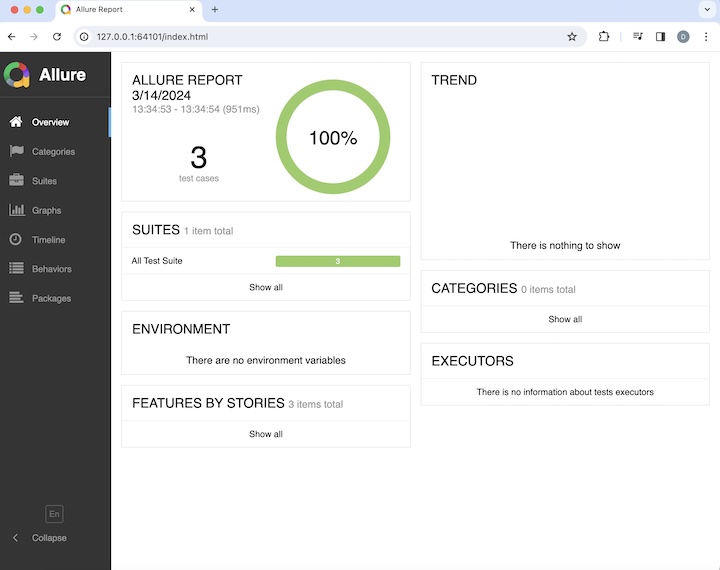
Step 6 − Run the command: allure serve from the project folder location. Here, the project folder name is Selenium Java. After running the command, a server gets started, along with that the Allure report will be opened in the browser with the total number of test methods(or cases) as 3, having the pass percentage as 100.
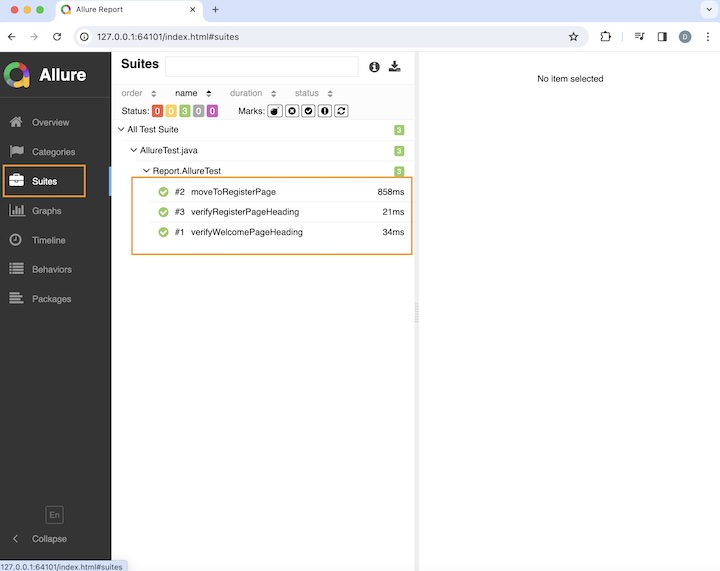
On clicking the Suites tab on the left, we will get the information about the duration of execution for the test methods - moveToRegisterPage(), verifyPageHeading(), and verifyWelcomePageHeading() and their results.
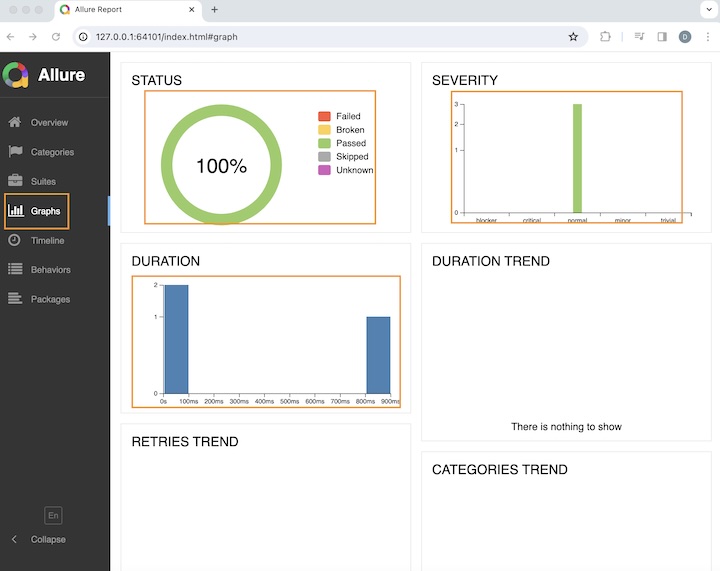
On moving to the Graphs tab on the left, we will get all information about STATUS, SEVERITY, DURATION, and so on.
Conclusion
This concludes our comprehensive take on the tutorial on Selenium Allure. Weve started with describing an Allure report, prerequisites to set up an Allure report, and walked through steps to create an Allure report with an example illustrating how to use it along with Selenium. This equips you with in-depth knowledge of the Allure. It is wise to keep practicing what youve learned and exploring others relevant to Selenium to deepen your understanding and expand your horizons.