- Python XlsxWriter - Home
- Python XlsxWriter - Overview
- Python XlsxWriter - Environment Setup
- Python XlsxWriter - Hello World
- Python XlsxWriter - Important classes
- Python XlsxWriter - Cell Notation & Ranges
- Python XlsxWriter - Defined Names
- Python XlsxWriter - Formula & Function
- Python XlsxWriter - Date and Time
- Python XlsxWriter - Tables
- Python XlsxWriter - Applying Filter
- Python XlsxWriter - Fonts & Colors
- Python XlsxWriter - Number Formats
- Python XlsxWriter - Border
- Python XlsxWriter - Hyperlinks
- Python XlsxWriter - Conditional Formatting
- Python XlsxWriter - Adding Charts
- Python XlsxWriter - Chart Formatting
- Python XlsxWriter - Chart Legends
- Python XlsxWriter - Bar Chart
- Python XlsxWriter - Line Chart
- Python XlsxWriter - Pie Chart
- Python XlsxWriter - Sparklines
- Python XlsxWriter - Data Validation
- Python XlsxWriter - Outlines & Grouping
- Python XlsxWriter - Freeze & Split Panes
- Python XlsxWriter - Hide/Protect Worksheet
- Python XlsxWriter - Textbox
- Python XlsxWriter - Insert Image
- Python XlsxWriter - Page Setup
- Python XlsxWriter - Header & Footer
- Python XlsxWriter - Cell Comments
- Python XlsxWriter - Working with Pandas
- Python XlsxWriter - VBA Macro
Python XlsxWriter - Fonts & Colors
Working with Fonts
To perform formatting of worksheet cell, we need to use Format object with the help of add_format() method and configure it with its properties or formatting methods.
f1 = workbook.add_format()
f1 = set_bold(True)
# or
f2 = wb.add_format({'bold':True})
This format object is then used as an argument to worksheet's write() method.
ws.write('B1', 'Hello World', f1)
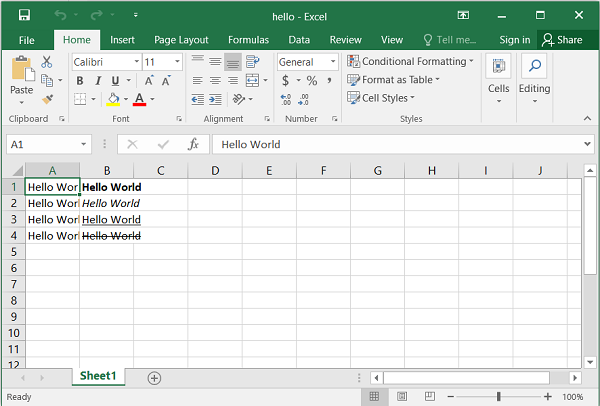
Example
To make the text in a cell bold, underline, italic or strike through, we can either use these properties or corresponding methods. In the following example, the text Hello World is written with set methods.
import xlsxwriter

wb = xlsxwriter.Workbook('hello.xlsx')
ws = wb.add_worksheet()

for row in range(4):
   ws.write(row,0, "Hello World")

f1=wb.add_format()
f2=wb.add_format()
f3=wb.add_format()
f4=wb.add_format()

f1.set_bold(True)
ws.write('B1', '=A1', f1)

f2.set_italic(True)
ws.write('B2', '=A2', f2)

f3.set_underline(True)
ws.write('B3', '=A3', f3)

f4.set_font_strikeout(True)
ws.write('B4', '=A4', f4)

wb.close()
Output
Here is the result −
Example
On the other hand, we can use font_color, font_name and font_size properties to format the text as in the following example −
import xlsxwriter

wb = xlsxwriter.Workbook('hello.xlsx')
ws = wb.add_worksheet()

for row in range(4):
   ws.write(row,0, "Hello World")

f1=wb.add_format({'bold':True, 'font_color':'red'})
f2=wb.add_format({'italic':True,'font_name':'Arial'})
f3=wb.add_format({'font_size':20})
f4=wb.add_format({'font_color':'blue','font_size':14,'font_name':'Times New Roman'})

ws.write('B1', '=A1', f1)
ws.write('B2', '=A2', f2)
ws.write('B3', '=A3', f3)
ws.write('B4', '=A4', f4)

wb.close()
Output
The output of the above code can be verified by opening the worksheet with Excel −
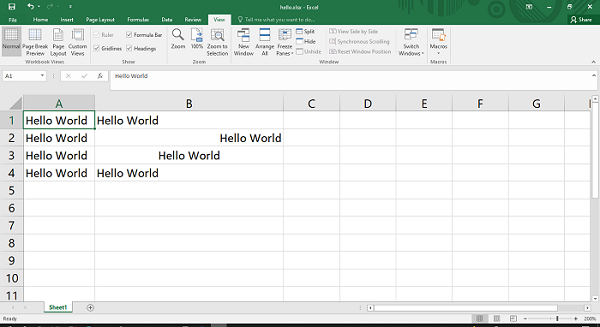
Text Alignment
XlsxWriter's Format object can also be created with alignment methods/properties. The align property can have left, right, center and justify values.
Example
import xlsxwriter
wb = xlsxwriter.Workbook('hello.xlsx')
ws = wb.add_worksheet()
for row in range(4):
   ws.write(row,0, "Hello World")
ws.set_column('B:B', 30)

f1=wb.add_format({'align':'left'})
f2=wb.add_format({'align':'right'})
f3=wb.add_format({'align':'center'})
f4=wb.add_format({'align':'justify'})
ws.write('B1', '=A1', f1)
ws.write('B2', '=A2', f2)
ws.write('B3', '=A3', f3)
ws.write('B4', 'Hello World', f4)

wb.close()
Output
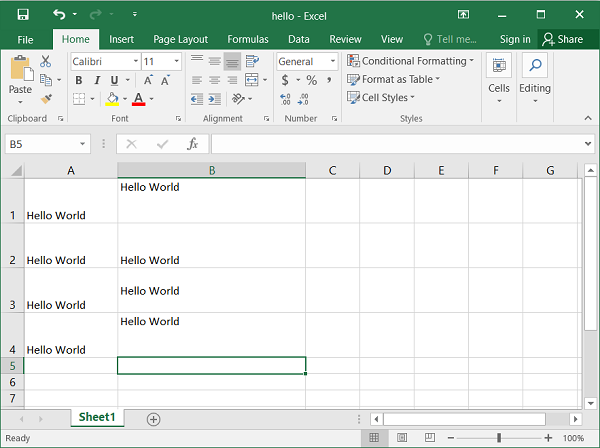
The following output shows the text "Hello World" with different alignments. Note that the width of B column is set to 30 by set_column() method of the worksheet object.
Example
Format object also has valign properties to control vertical placement of the cell.
import xlsxwriter

wb = xlsxwriter.Workbook('hello.xlsx')
ws = wb.add_worksheet()

for row in range(4):
   ws.write(row,0, "Hello World")

ws.set_column('B:B', 30)

for row in range(4):
   ws.set_row(row, 40)
f1=wb.add_format({'valign':'top'})
f2=wb.add_format({'valign':'bottom'})
f3=wb.add_format({'align':'vcenter'})
f4=wb.add_format({'align':'vjustify'})

ws.write('B1', '=A1', f1)
ws.write('B2', '=A2', f2)
ws.write('B3', '=A3', f3)
ws.write('B4', '=A4', f4)

wb.close()
Output
In the above code, the height of rows 1 to 4 is set to 40 with set_row() method.
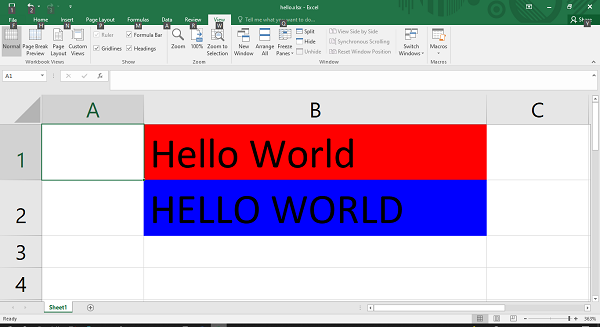
Cell Background and Foreground Colors
Two important properties of Format object are bg_color and fg_color to set the background and foreground color of a cell.
Example
import xlsxwriter

wb = xlsxwriter.Workbook('hello.xlsx')
ws = wb.add_worksheet()
ws.set_column('B:B', 30)

f1=wb.add_format({'bg_color':'red', 'font_size':20})
f2=wb.add_format({'bg_color':'#0000FF', 'font_size':20})

ws.write('B1', 'Hello World', f1)
ws.write('B2', 'HELLO WORLD', f2)
wb.close()
Output
The result of above code looks like this −