- Puppeteer - Home
- Puppeteer - Introduction
- Puppeteer - Element Handling
- Puppeteer - Usage of Google
- Puppeteer - NodeJS Installation
- Puppeteer VS Code Configuration
- Puppeteer - Installation
- Puppeteer - Basic Test
- Puppeteer - Non Headless Execution
- Comparison Between Puppeteer & Selenium
- Comparison Between Puppeteer & Protractor
- Comparison Between Puppeteer & Cypress
- Puppeteer - Browser Operations
- Puppeteer - Handling Tabs
- Puppeteer - Basic Commands
- Puppeteer - Firefox
- Puppeteer - Chrome
- Puppeteer - Handling Confirm Alerts
- Puppeteer - Handling Drop-downs
- Puppeteer - Locators
- Puppeteer - Xpath Functions
- Puppeteer - Xpath Attributes
- Puppeteer - Xpath Grouping
- Puppeteer - Absolute Xpath
- Puppeteer - Relative Xpath
- Puppeteer - Xpath Axes
- Puppeteer - Type Selector
- Name Selector & Class Name Selector
- Puppeteer - Id Selector
- Puppeteer - Attribute Selector
- Puppeteer - Handling Links/Button
- Handling Edit Boxes & Checkboxes
- Puppeteer - Handling Frames
- Puppeteer - Keyboard Simulation
- Puppeteer - Getting Element Text
- Puppeteer - Getting Element Attribute
- Puppeteer - Device Emulation
- Puppeteer - Disable JavaScript
- Puppeteer - Synchronization
- Puppeteer - Capture Screenshot
- Puppeteer Useful Resources
- Puppeteer - Quick Guide
- Puppeteer - Useful Resources
- Puppeteer - Discussion
Puppeteer - Firefox
We can run the tests developed in Puppeteer in Firefox. It must be remembered that while executing the test in Firefox, Puppeteer uses its internal Firefox browser and not the Firefox browser installed in the local system.
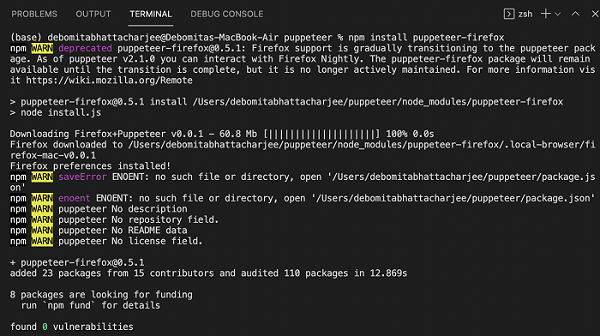
Step 1 − We have to first install Puppeteer for the Firefox browser by executing the below command −
npm install puppeteer-firefox
Also, we have to add the Firefox-Puppeteer library in the code.
const f = require('puppeteer-firefox')
To begin, follow Steps 1 to 2 from the Chapter of Basic Test on Puppeteer which are as follows −
Step 1 − Create a new file within the directory where the node_modules folder is created (location where the Puppeteer and Puppeteer core have been installed).
The details on Puppeteer installation is discussed in the Chapter of Puppeteer Installation.
Right-click on the folder where the node_modules folder is created, then click on the New file button.
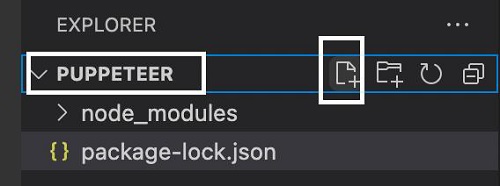
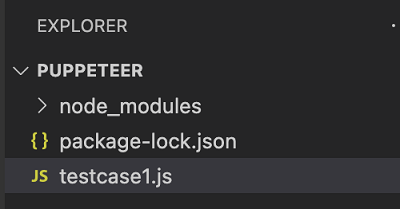
Step 2 − Enter a filename, say testcase1.js.
Step 3 − Add the below code within the testcase1.js file created.
//adding Puppeteer- Firefox library
const pt = require('puppeteer-firefox');
//adding headless flag to false
pt.launch().then(async browser => {
   //browser new page
   const p = await browser.newPage();
   //set viewpoint of browser page
   await p.setViewport({ width: 1000, height: 500 })
   //launch URL
   await p.goto('https://www.tutorialspoint.com/about/about_careers.htm')
   //get browser
   const v = await p.browser().version();
   console.log("Browser: " + v)
   //browser close
   await browser.close()
})
Step 4 − Execute the code with the command given below −
node <filename>
So in our example, we shall run the following command −
node testcase1.js

After the command has been successfully executed, the browser in which the test is executed - Firefox/65.0 gets printed in the console.