- Puppeteer - Home
- Puppeteer - Introduction
- Puppeteer - Element Handling
- Puppeteer - Usage of Google
- Puppeteer - NodeJS Installation
- Puppeteer VS Code Configuration
- Puppeteer - Installation
- Puppeteer - Basic Test
- Puppeteer - Non Headless Execution
- Comparison Between Puppeteer & Selenium
- Comparison Between Puppeteer & Protractor
- Comparison Between Puppeteer & Cypress
- Puppeteer - Browser Operations
- Puppeteer - Handling Tabs
- Puppeteer - Basic Commands
- Puppeteer - Firefox
- Puppeteer - Chrome
- Puppeteer - Handling Confirm Alerts
- Puppeteer - Handling Drop-downs
- Puppeteer - Locators
- Puppeteer - Xpath Functions
- Puppeteer - Xpath Attributes
- Puppeteer - Xpath Grouping
- Puppeteer - Absolute Xpath
- Puppeteer - Relative Xpath
- Puppeteer - Xpath Axes
- Puppeteer - Type Selector
- Name Selector & Class Name Selector
- Puppeteer - Id Selector
- Puppeteer - Attribute Selector
- Puppeteer - Handling Links/Button
- Handling Edit Boxes & Checkboxes
- Puppeteer - Handling Frames
- Puppeteer - Keyboard Simulation
- Puppeteer - Getting Element Text
- Puppeteer - Getting Element Attribute
- Puppeteer - Device Emulation
- Puppeteer - Disable JavaScript
- Puppeteer - Synchronization
- Puppeteer - Capture Screenshot
- Puppeteer Useful Resources
- Puppeteer - Quick Guide
- Puppeteer - Useful Resources
- Puppeteer - Discussion
Handling Edit Boxes & Checkboxes
Let us understand how Puppeteer can handle edit boxes.
Handling Edit Boxes
Puppeteer is capable of handling edit boxes. An edit box has an HTML tag as input and its type attribute is set to the value as text.
Some methods to work with edit boxes are listed below −
type()
This method is used to input text into an edit box and text area without replacing the already present content.
Syntax
The syntax for type() is as follows −
const n = await page.$("#txt")
await n.type("Puppeteer")
We can enter text in an edit box with some delay. This is done by adding the parameter {delay:time interval}. The time interval is expressed in the milliseconds.
Syntax
The syntax for the same is as follows −
await page.type("[class='loc']", "Tutorialspoint", {delay:700})
To delete a text entered in an edit box, we have to perform the click event three times on the field(with the parameter clickCount) and then press backspace. It is similar to selecting all values in an edit box and then pressing backspace.
Syntax
The syntax is given below −
const n = await page.$("#txt")
await n.type("Puppeteer")
await n.click({clickCount: 3});
await page.keyboard.press('Backspace')
To get value entered in an edit box, we have to use the getProperty method and pass value as a parameter to this field.
const v = await (await n.getProperty("value")).jsonValue()
console.log(v)
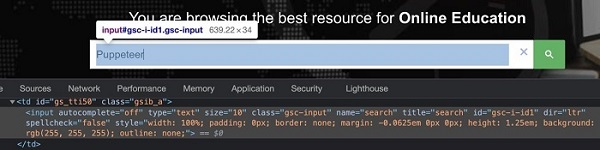
In the below image, let us input the text Puppeteer and then clear it.
To begin, follow Steps 1 to 2 from the Chapter of Basic Test on Puppeteer which is as follows −
Step 1 − Create a new file within the directory where the node_modules folder is created (location where the Puppeteer and Puppeteer core have been installed).
The details on Puppeteer installation is discussed in the Chapter of Puppeteer Installation.
Right-click on the folder where the node_modules folder is created, then click on the New file button.
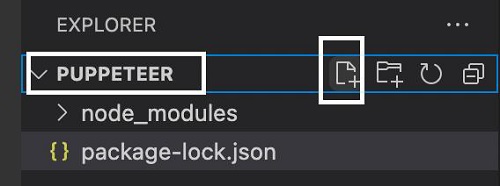
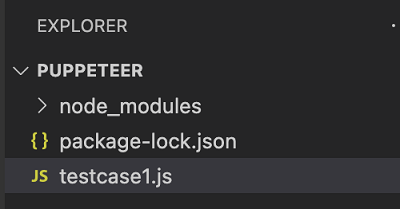
Step 2 − Enter a filename, say testcase1.js.
Step 3 − Add the below code within the testcase1.js file created.
//Puppeteer library
const pt= require('puppeteer')
async function enterText(){
   //launch browser in headless mode
   const browser = await pt.launch()
   //browser new page
   const page = await browser.newPage();
   //launch URL
   await page.goto('https://www.tutorialspoint.com/index.htm')
   //identify edit box
   const f = await page.$("#gsc-i-id1")
   //enter text
   f.type("Puppeteer")
   //clear text entered
   await f.click({clickCount: 3})
   //wait for sometime
   await page.waitForTimeout(4000)
   await page.keyboard.press('Backspace')
   //browser close
   await browser.close()
}
enterText()
Step 4 − Execute the code with the command given below −
node <filename>
So in our example, we shall run the following command −
node testcase1.js
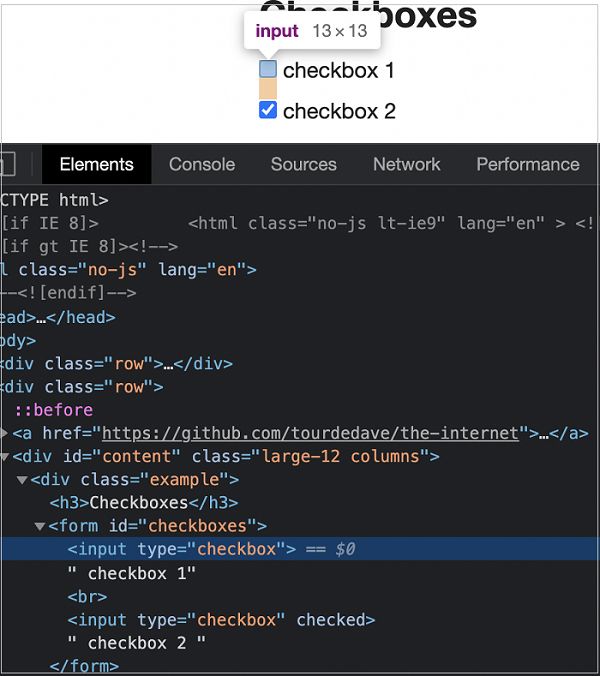
Handling Checkboxes
We can handle checkboxes in the UI while automating a test using Puppeteer. The checkboxes are identified in the html code with the tagname as input and type as checkbox.
Some methods to work with checkboxes are given below −
click()
It is used to check and uncheck a checkbox. This method is a part of the ElementHandle class.
Syntax
The syntax of click() is as follows −
const n = await page.$("#txt")
n.click()
To verify if a checkbox is checked, we have to use the getProperty method and pass value as a parameter to this field. It returns a Boolean value(true if checked, false if not).
const v = await (await n.getProperty("checked")).jsonValue()
console.log(v)
To begin, follow Steps 1 to 2 from the Chapter of Basic Test on Puppeteer which are as follows −
Step 1 − Create a new file within the directory where the node_modules folder is created (location where the Puppeteer and Puppeteer core have been installed).
The details on Puppeteer installation is discussed in the Chapter of Puppeteer Installation.
Right-click on the folder where the node_modules folder is created, then click on the New file button.
Step 2 − Enter a filename, say testcase1.js.
Step 3 − Add the below code within the testcase1.js file created.
//Puppeteer library
const pt= require('puppeteer')
async function checkBoxHandle(){
   //launch browser in headless mode
   const browser = await pt.launch()
   //browser new page
   const page = await browser.newPage()
   //launch URL
   await page.goto('https://the-internet.herokuapp.com/checkboxes')
   //identify element then click
   const n = await page.$("input[type='checkbox']")
   n.click()
   //wait for sometime
   await page.waitForTimeout(4000)
   //verify if checkbox is checked
   const v = await (await n.getProperty("checked")).jsonValue()
   console.log(v)
}
checkBoxHandle()
Step 4 − Execute the code with the command given below −
node <filename>
So in our example, we shall run the following command −
node testcase1.js

After the command has been executed successfully, the boolean value true is printed in the console. This is returned by the getProperty("checked") which returns true as the checkbox is selected.