at Command in Linux
The at is a command-line utility used in Linux systems for scheduling tasks or jobs to run at specific times. Whether the task is related to backing up the data, executing scripts, or commands at specific times, the at command will come in handy. It is the most straightforward way to schedule your tasks or jobs and run them at their desired times.
The at command is different from the commonly used cron tab command because it focuses on one-time execution, rather than recurring the tasks multiple times.
Table of Contents
- How to Install at Command in Linux?
- Syntax for at Command in Linux
- Options Available for at Command in Linux
- Examples of at Command in Linux
How to Install at Command in Linux?
By default, the at command is not installed on most Linux systems, including Ubuntu, Debian, Linux Mint and other such systems. This results in at command not found error when you run it. However, you can install this command directly from the Linux repository.
On Debian-based systems like Ubuntu, Debian and Linux Mint, the at utility can be installed from the following command −
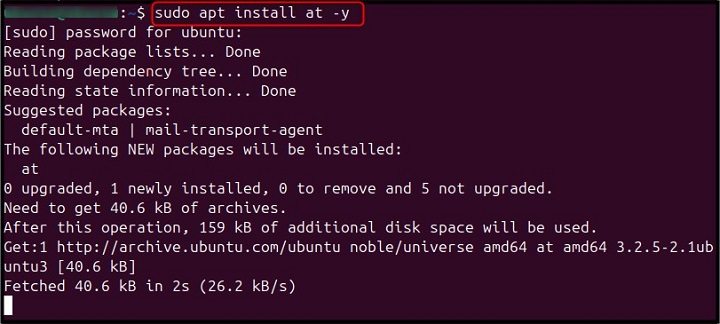
sudo apt install at -y
The CentOS and REHL users can install the at command utility using the below-given command −
sudo yum install at
Or try the below-mentioned command −
sudo dnf install at
If you are using Alpine Linux, you can install the at utility through the following command −
apk add at
Once you have installed the at command, make sure that the scheduling daemon is enabled on your system, this can be done using the below-provided command −
sudo systemctl enable --now atd
Syntax for at Command in Linux
The basic syntax of at command on Linux is provided below −
at [options] time
Where time is a specific time and date for executing a job. While options are different flags that you can use with the at command and schedule your job execution according to your need.
Options Available for at Command in Linux
You can use several options with the at command in Linux, these are provided below −
| Options | Description |
|---|---|
| -V | Displays the version of at command on the terminal. |
| -f file | Reads the commands from a specific file. |
| -l | Lists the all scheduled at jobs in the queue. |
| -m | Sends a mail to the server once the job execution is done. |
| -d | Deletes the scheduled job specified by the job number. |
| -q | Specifies the job queue. |
| -b | Submits a batch job. |
| -v | Displays verbose output about the job. |
Examples of at Command in Linux
There are multiple examples of at command in Linux that you can work on, some of the widely used examples are described below −
- Scheduling a Job
- Listing Scheduled Jobs
- Scheduling a Job from a File
- Email Notification After Job Completion
- Specifying a Queue
- Specifying Execution Time
- Viewing Execution Time Before Submitting
- Deleting Scheduled Job
Lets discuss those examples in details.
Schedule a Job
One of the basic example of at command on Linux is to schedule a job by specifying a given time frame. Doing this will allow the job to execute at the given time. You can schedule a job on Linux with at command using the following syntax −
at time
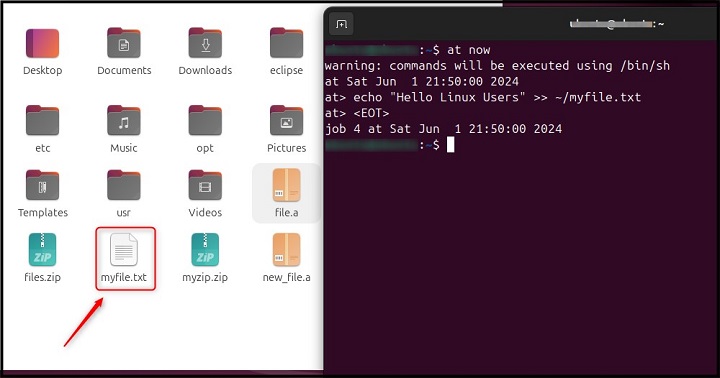
Here, you can replace the time with the time of your choice. As an example, we are executing the at command immediately using the now option −

When you run the at command, you will be provided with a prompt with a warning message command will be executed using /bin/sh. Right below this warning, you will be provided with the at interpreter, where you can type the command to execute at the required time. As an example, we have used the below-given echo command that will input the text Hello Linux Users into the text file created with the name myfile.txt −
echo "Hello Linux Users" >> ~/myfile.txt

Once the command is executed, simply use CTRL+D to save the job and exit the at command prompt −

Here, we have successfully executed the job that creates a text file myfile.txt and insert the text into the file.
You can specify time like 9:00, 9:00 AM, Monday, or any time you like. You can also add time right after the now command like +5 hours that will run the command after five hours from the given time.
Alternatively, if you want to avoid the at command prompt, you can pipe your specified command with the at command and specify your time according to your choice. For example, lets run the echo "Hello" >> ~/file.txt command immediately with the at command using the following syntax −
echo "Hello" >> ~/file.txt | at now

List Scheduled Jobs
If you want to view the list of pending at jobs on Linux, you can use the atq command provided below −
atq

Alternatively, you can also use the at command followed by the -l flag to list schdeuled jobs on Linux −
at -l
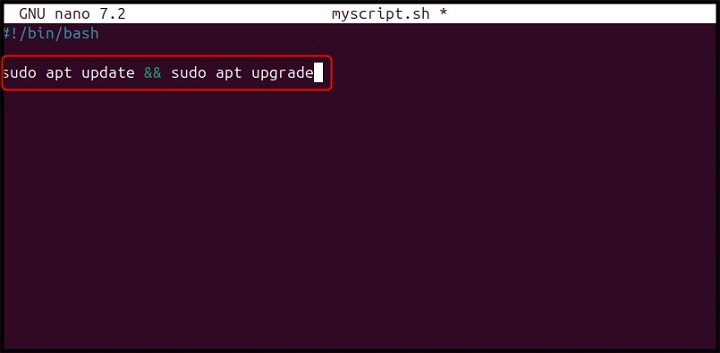
Schedule a Job from a File
If you have a script file that includes commands ready to be executed, you can schedule the file to run on the terminal at a specified time using the at command. However, if you dont have a script file, you can create one using the nano editor from the following command −
sudo nano myscript.sh
Then inside the file, add, the following bash line at the top −
#!/bin/bash
Then add the commands you want to execute. As an example, we are adding update and upgrade commands −
sudo apt update && sudo apt upgrade
Save the file and make it executable using the chmod command on Linux −
sudo chmod +x myscript.sh

Once you create the script and make it executable, its now time to schedule a job for this script file named myscript.sh. You can do this by using the at command with the specific time, -f flag, and script name −
at now +1 minutes -f myscript.sh

Email Notification After Job Completion
Sometimes, it is compulsory to receive an email notification that confirms your job is successfully executed. With the at command, its possible by using -m option. Follow the below-given example that sends an email notification about the scheduled job at 4:30 PM −
echo "The Task completed" | at 4:30 PM -m

Note − Make sure your system is configured to send emails (usually through a local mail server or an external SMTP server) for this feature to work.
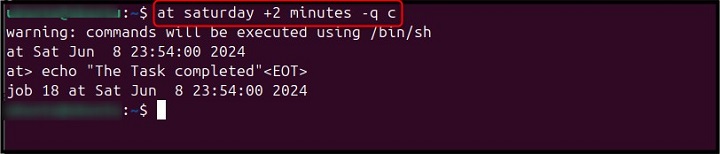
Specify a Queue
The at command will also allow you to assign a job to a specific queue, and each queue has different priority levels that allow the system to process the job accordingly. For specifying a queue with the at command, use the -q option with the desired queue name. For example, to set a job in the c queue, run the below-given command −
at saturday +2 minutes -q c
Specify Execution Time
With the apt command on Linux, you can specify different times, dates, and years. For example, to schedule the job to run 10 minutes after the current time on the next Sunday, use the below-given command −
at sunday +10 minutes
To schedule a job at 4 pm 3 days from now, use the following command −
at 4pm + 3 days
If you want to schedule a job at 12:15 June 02 2024, use the below-given command −
at 12:15 60224
View Execution Time Before Submitting
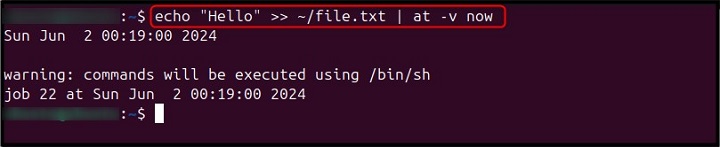
If you want to view the execution time of the scheduled job before executing, use the -v flag with the at command, the example is provided below −
echo "Hello" >> ~/file.txt | at -v now
Delete Scheduled Job
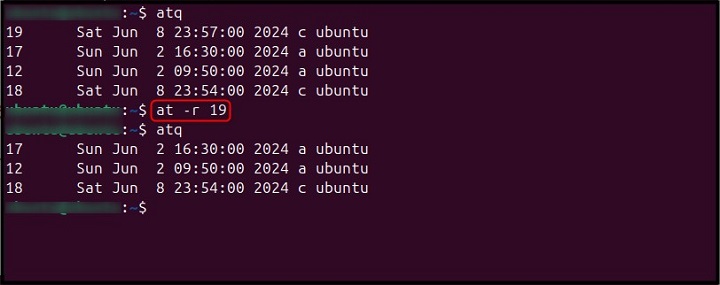
If you have a pending job on Linux and want to remove that job from the list, you can do it easily with the at command. For that purpose, use the -r option with the at command followed by the job number you want to remove. Before deleting the pending job, first run the atq command to view the list of pending jobs, then use the at -r command with the job number to remove the job.
In the following example, we have removed job number 19 from the at -r command provided below −
at -r 19
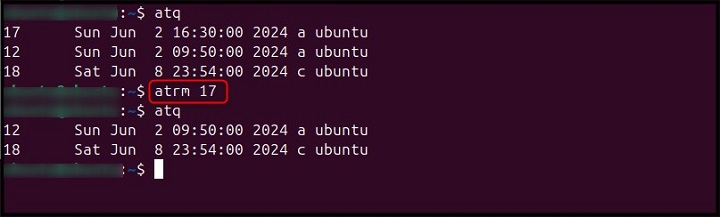
Alternatively, atrm command can also be used instead of at -r followed by the job number you want to remove. In the following example, we have removed job number 17 from the pending list −
atrm 17
Bonus Method: List Restricted Users
When you install at command on Linux, you may find files, such as at.deny and at.allow. Both files or one between those files exists in the /etc directory. Such types of files manage users that have given access to use at command on the system. It contains the list of usernames, each username per line. You can open any of the files and check whether this file exists. If the at.deny file exists, you can add a username into the file, and save it to prevent the specified user from using the at command. The at.deny file can be opened with the nano editor through the following command −
sudo nano /etc/at.deny
The same goes for at.allow file, if exists and includes usernames, it means that these users are allowed to use the at command. If both files are missing, all users are allowed to use the at command on Linux.
Conclusion
Mastering the at command on Linux will empower you to schedule your tasks or jobs in a precise manner. In this guide, we have covered the installation of at utility for all Linux systems, then provided the basic syntax of at command on Linux. Apart from that, we have discussed in detail different options that you can use with the at command and proved them through the examples. Whether, you are a developer, or a curious learner, understanding the at command will be crucial to manage your workload on the system more effectively.