agetty Command in Linux
agetty is a command line tool that manages the log in process on a terminal or a serial line. It is one of the most important parts of the Linux terminal that provides a crucial link between the operating system and the physical terminals. It is a daemon that runs in your system background and is responsible for managing terminal lines, initializing and resetting terminals, displaying login prompts, and handling login and logout procedures.
Table of Contents
- How to Install agetty Command in Linux?
- Syntax to agetty Command in Linux
- Different Options Available for agetty Command
- Examples for the agetty Command
How to Install agetty Command in Linux?
By default, agetty command is installed on all Linux systems. However, in case you accidentally remove the command, you must install the util-linux package on the Linux system from the following command −
sudo apt install util-linux -y
The CentOS and REHL users can install the util-linux utility using the following command −
yum install util-linux
If you are a Fedora user, you can use the below-given command to install the util-linux package on the system −
sudo dnf install util-linux
The util-linux package includes the agetty command. Once you complete the util-linux package installation on Linux, run the below-given command to confirm agetty is installed on the system −
agetty --version

Syntax to agetty Command in Linux
The basic syntax to use agetty command in Linux is provided below −
agetty [options] port [baud_rate...] [term]
Where,
- port specifies the path name relative to the /dev directory. If you use hyphen (-), it assumes that that standard input is already connected to a tty port with an established connection to a remote user.
- baud_rate is a comma separate list of baud rates that should be specified in descending order.
- term specifies the value that is used for the Term environment variable.
- options are the additional parameters that can be used with the agetty command and are provided in the table given below −
Note − You can use agetty command without sudo privileges if you are a root user. Otherwise, you must use sudo with agetty command if you are using Ubuntu as a regular user. If you dont use sudo with regular users, you wont be able to set up terminal sessions for users to log in.
Different Options Available for agetty Command
| Options | Description |
|---|---|
| -8 or --8bits | This option assumes that the tty is 8-bit clean (disables the parity detection). |
| -a or --autologin |
Perform auto-login for a specified user without any prompt. |
| -c or --noreset | It doesnt reset the control mode, maintaining the current settings without any modifications. |
| -E or --remote | This option allows the agetty to pass the hostname it is using to log in for use in the utmp database. |
| -h or --flow-control | It enables flow control during the login sessions. It prevents data overflow when transmitting the data between the terminal and the system. |
| -i or --noissue | Suppresses the issue of the issue file. You wont be able to see any additional information beyond the login prompt. |
| -J or -noclear | Prevents clearing the screen after the user logs out. |
| -m or --extract-baud | Extract the baud rate from the modern control lines. It is useful for finding the actual information between the terminal and your system. |
| -n or --skip-login | Skips the login process entirely. |
| -p or --login-pause | Add a pause of a few seconds after displaying the login prompt. |
| -R or --hangup | Sends a hang-up signal to the terminal once a user logs out. |
| -s or --keep-baude | Retains the baud rate even if it is changed during the login process. |
| -t or --timeout | Sets a timeout of a few seconds for user input. |
| -U or -detect-case | Enables case-insensitive username matching during login. |
Examples for the agetty Command
Lets discuss a few examples to help you get used to the agetty command in Linux.
Basic Example
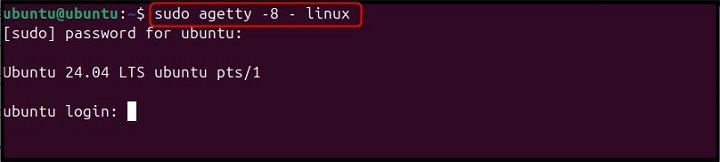
The first example is the basic one that opens a virtual terminal by assuming an 8-bit tty and sets the environment variable as linux, as given below −
sudo agetty -8 - linux
This command will open up a prompt for a login name and invoke the /bin/login command, thus allowing you to log in −
Timeout
Now lets move towards the second example that adds another option, such as time out of 10 seconds, here is the command −
sudo agetty -8 -t 10 - linux

Additional Example
Now, lets consider another example where we want to configure agetty for a specific terminal device (tty), a baud rate of 9600, and a vtxx as a terminal type (which is linux). The command is provided below −
sudo agetty -h -t 60 tty 9600 vtxxx

In the above command,
- -h option enables the CTS/RTS handshaking
- -t 60 option specifies a time out of 60 seconds, a duration for the user to log in at the given time.
- tty refers to the device /dev/tty.
Auto Login
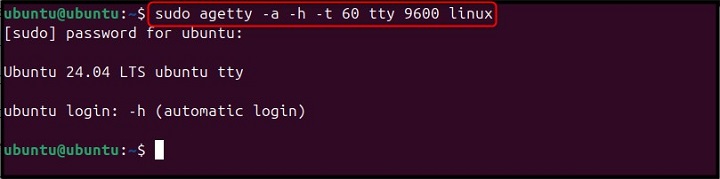
If you want to enable auto-login for a specific user on Linux with agetty command, you can use an additional -a option with the command discussed earlier. For example −
sudo agetty -a -h -t 60 tty 9600 vtxxx
Detecting Upper Case Letters
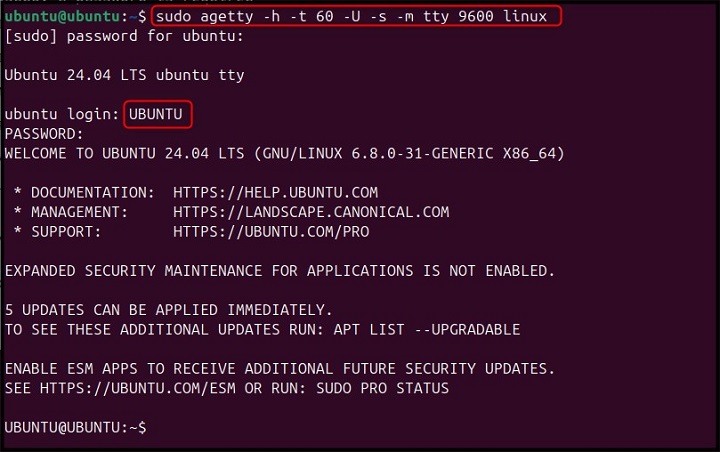
If your login name contains only capital letters, you can use the -U option with the agetty command, as given below −
sudo agetty -h -t 60 -U -s -m tty 9600 vtxxx
This command will accept the login name in capital letters and treat it as case-sensitive, as a result, you will be able to log in to the terminal.
Conclusion
agetty command is a powerful program on Linux used for managing the login process on the terminal or serial line. It acts like a gatekeeper that ensures secure access to your Linux system. This command is included in the util-linux package and preinstalled on almost all Linux systems.
This guide has provided you with multiple options and descriptions that you can use with the agetty command. These options help you in setting up terminal sessions for users to log in according to your choice. Further, a few examples are also provided to guide beginners learn the use of agetty command on Linux.