Google Tag Manager - Quick Guide
Google Tag Manager Overview
To understand Google Tag Manager, we first need to understand a few related concepts.
Product Marketing - Background
With the advent of the Internet and the web, there has been an immense necessity to stand out from the rest for promoting your product. This era has surpassed the times when advertising and marketing used to work in a fantastic way with paper media.
With the requirement of marketing the product becoming a focused and skillful task, there is a new breed of professionals called Product Marketers. These folks are required to be updated with the market trend, user behavior, and the likes and dislikes of their audience.
The product marketer, donning the hat of an analyst and an advertiser, needs to know many things to be on top of things. One such thing is creating a marketing campaign for successful user engagement.
If we go with the Wikipedia definition for product marketing Product Marketing is the process of promoting and selling a product to an audience.
In short, a product marketer needs to create various promotional campaigns to stay on top of the competition, thereby increasing the sales.
Since the dot com boom, for a successful product marketing, the presence of a product is required not only in the real world but also in the web world. The presence and acceptance in the web world is directly proportional to the success of the product.
Product Marketing Tools
In this quest of increasing product sales along with being creative, a product marketer needs to be aware of certain effective tools. These tools by themselves prove helpful to market the product and analyze the user trend accordingly.
Following are some commonly used product marketing tools −
- Google Analytics
- Chartbeat
- Kissmetrics
- Sprint Metrics
- Woopra
- Clicky
- User Testing
- Crazy Egg
- Mouseflow
- Mint
Google, obviously tops the list with their offering Google Analytics. Google introduced this analytics tool very early during the product marketing evolution. Indeed, it is the most reliable and highly used tool in the product marketing community.
The tool has its unique way of operation using a user-friendly interface. The user has to add the Google Analytics Account Number to their respective website/blog pages. Accordingly, the user visits and the clicks are tracked by Google Analytics.
Using Different Analytics Tools
Similar to Google Analytics, every other tool as provided in the above list has a different way of functioning. When it comes to using a particular tool, it calls for having the website/blog code modified in order to start tracking the behavior of the user.
These tools provide an analysis on which page was used at most times, what were the activities performed by the user, etc. Also, these tools can provide a quick feedback in the form of data for the newly launched features.
The way Google Analytics works is quite similar to how most of the other listed tools would work. Now, consider a relatively large product organization, focused on building a new feature to enhance their customer experience. For such large scale organization, it is useful to have huge release processes/pipelines, which get the desired feature out in a seamless way.
Enter Google Analytics. For Google Analytics to be useful, it is required that all the pages in the product website code should have this account number. However simple it sounds, for large product organizations, sometimes, adding a small piece of code in the page can be cumbersome and it calls for rigorous testing after creating this feature.
If the product organization aims to use multiple data analytics tools as given in the above list, then multiply the effort in terms of time and cost by the number of tools in use. This becomes painful as the product matures. Eventually, gauging the user behavior also becomes a must. In such cases, it is important to have a one-for-all mechanism, so that it becomes easier for product marketers to create different campaigns on the fly.
As different tools use different techniques for tracking the user behavior, there is a need to go for a single medium, which accounts for these different techniques with different tools.
Google Tag Manager - Introduction
For a product marketer, to use different tools calls for respective learning curve. Having different tools entails different codes to be entered and hence the changes in the website. If there is a simple and straightforward process of changing the website code, it becomes a bliss for adding the different codes related to different analytical tools.
Google Tag Manager (GTM) is a free tool that makes it easy for marketers to add and update website tags. The tags enable site page views monitoring, conversion tracking, etc. Using Google Tag Manager, one can have an effective tag management solution that allows for quick and easy updates in website tags. Tags are basically code snippets, which are intended for traffic analytics and marketing optimization.
For a product marketer engaged in different product analytics solutions, Google Tag Manager is a must have, as it covers many aspects of product marketing under one roof. You can add and update AdWords, Google Analytics, Firebase Analytics, Floodlight and other third party tags using Google Tag Manager.
Google Tag Manager - Set Up
For setting up Google Tag Manager, having a website is a must. For the purpose of the tutorial, we will go through the following process to set up Google Tag Manager.
- Set up a blog with Blogger.com
- Create an account with Google Tag Manager
- Install a tag on the blog
Create a Blog with Blogger.com
Step 1 − To get started with creating a blog, follow this link https://blogger.com. The homepage for blogger will pop up as shown in the following screenshot.

Step 2 − Click the button CREATE YOUR BLOG to start creating a blog.
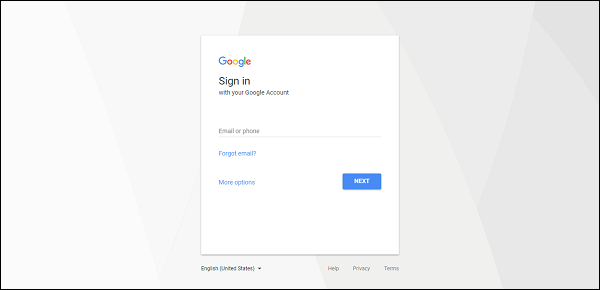
As the next step, Blogger will ask you for your Google account. Blogger, being one of the Google products, makes your life easy by allowing Google account to create a blog online.
Step 3 − Enter your credentials for Google, and you will see the following screen for creating your blog.
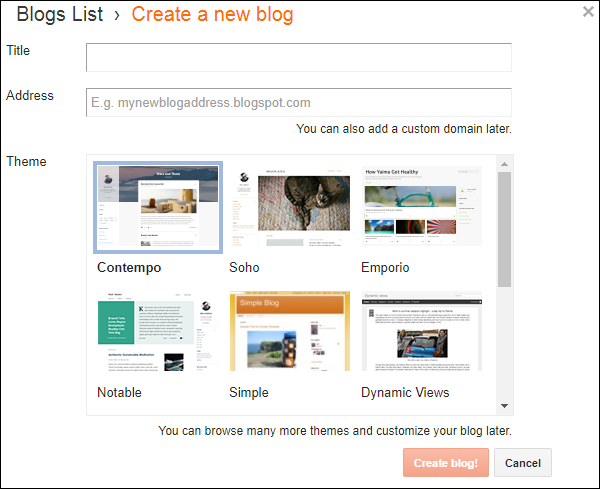
Step 4 − Choose a title, address, and blog theme of your choice.
Entering a title is pretty straight forward, you may provide any title as you like. With the address, as you start typing the desired blog address, the interface will start searching for availability. Following screenshot shows how a blog address is being searched.
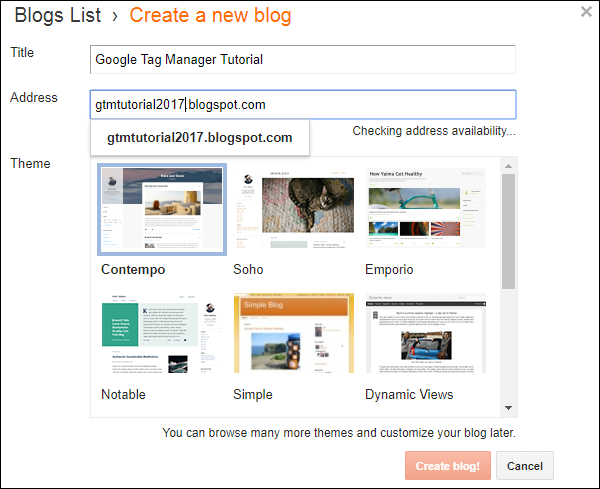
Once you are through with this process and the blog address is available, you will see the following message in the text box.

As shown in the above screenshot, the blog address https://gtmtutorial2017.blogspot.com is selected.
Step 5 − Once you have selected the required design, click the red button Create blog!
The system will take a few seconds and your new blog will be ready. Once done, you will be presented with the following interface to start writing a blog.
At least one post is required to see Google Tag Manager working effectively.
Step 6 − Create your first post on the blog by clicking the link button in blue Create a new post.
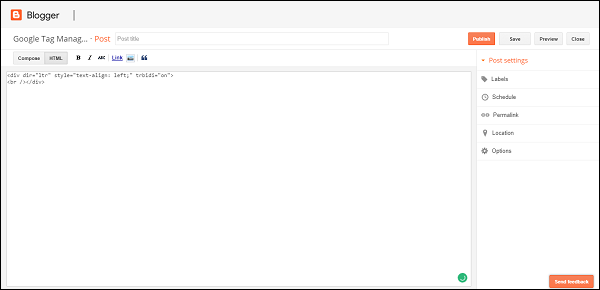
Step 7 − You can start writing the contents of your first blog post. Provide a post title as required at the top of the screen.
Many a times, blogger makes it easy to compose both HTML and rich text content. This is possible by using the toggle button Compose/HTML at the top left corner of the screen. Let us see how to use Compose option as an example.
Step 8 − Click Compose, a rich text editor will be shown. Start adding some content.
Step 9 − Once done, click the Publish button on top right section of the screen.
You will be redirected back to the screen as shown in the above screenshot, with a new post visible in the list. This concludes the site creation in Blogger.com
Next step, is to create a Google Tag Manager account. Then, we will add the container code to the website. Finally, we will be able to track the page views/corresponding events with GTM.
Create an Account with Google Tag Manager (GTM)
Step 1 − To get started with Google Tag Manager, use this link: Google Tag Manager. You will see the following homepage for Google Tag Manager.

Step 2 − Click any of the links for SIGN UP FOR FREE. The links are available on the page at the center and at the top right corner.
Step 3 − Go ahead and explore the page as you like as it provides very useful information about Google Tag Manager.
Once youve clicked SIGN UP FOR FREE, you will be presented with the following screen and the URL will change to - https://tagmanager.google.com/?hl=en. This will show up below the screen for logging in with your Google Account.
Once youve entered your credentials for Google, the tag manager interface will show up.
Step 4 − GTM will require you to Add your New Account. There are two steps −
- Setup Account
- Setup Container
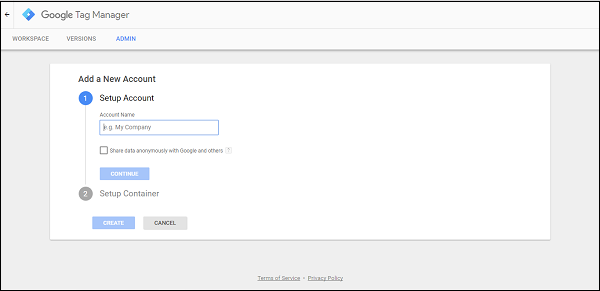
Step 5 − As a first step, add the Account Name. For the purpose of this tutorial, we will use the name Google Tag Manager Tutorial. You may choose to Share data anonymously with Google and others, to enhance your product marketing experience.
Step 6 − Click Continue.
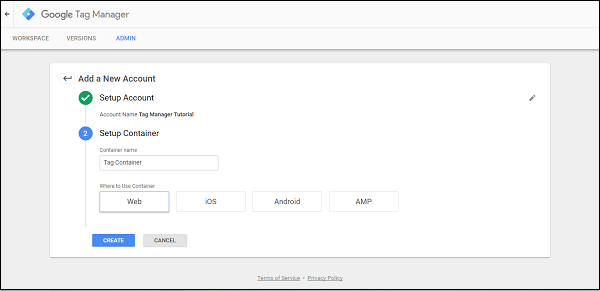
Step 7 − Next step is to Setup Container. Provide a name for the container. Let us add the name as Tag Container. Under Where to Use Container as shown in the following screenshot, select Web.
Step 8 − Click CREATE.
You will then be presented with a screen to accept Google Tag Manager Terms of Service Agreement.
Step 9 − Click YES to proceed.
Step 10 − Finally, you will be presented with a set of code snippets as shown in the following screenshot, which are to be added under head and body tags.
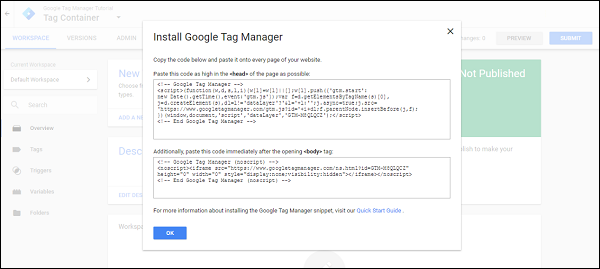
These code snippets are required so that the data from the blog created can flow into Google Tag Manager Interface.
We will go through the tag creation and the respective processes in a subsequent chapter.
Google Tag Manager Interface
Let us take some time to get acquainted with the different sections on the Google Tag Manager interface.

First, let us understand how to manage the following sections −
- Workspace
- Versions
- Admin
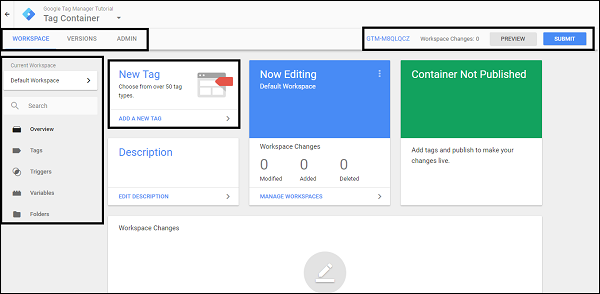
Workspace
The workspace section shows the active work in progress. This section has different sub-sections such as −
- Overview
- Tags
- Triggers
- Variables
- Folders
We will learn more about these sub-sections in subsequent chapters.
Versions
It is very common for large organizations to create few tags and have them for review or approval process.
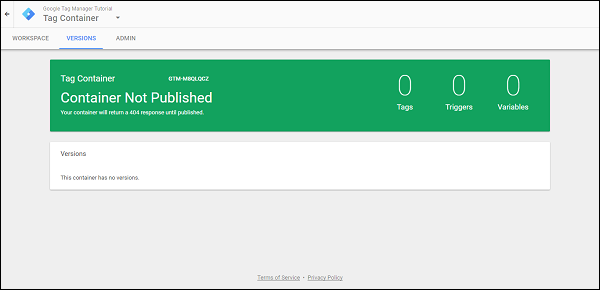
At the same time, one might need to have an understanding of the previous tags published on the website. For all these purposes, we can use Versions section. This shows every possible tag published in the current workspace and allows to roll back the changes, if required.
Admin
If you wish to configure your Google Tag Manager account for different environment or different users, you can use this section.
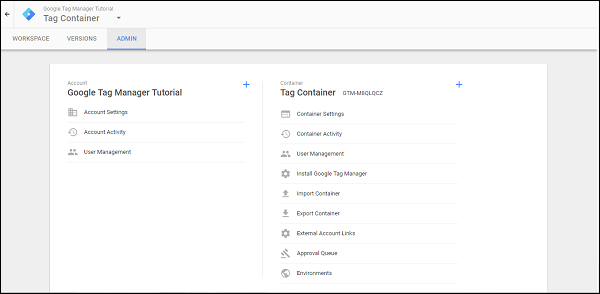
You can also configure the account details and review the activities related to the account, if there are multiple users associated with this account.
Google Tag Manager - Getting Started
This chapter provides an overview of how to get started with Google Tag Manager, add a tag and analyze it for completeness.
While going through the process, we will use the blog (created in the previous chapter) for demonstration of different steps.
Step 1 − As shown in the above screenshot, click the container code (GTM-XXXXXXX) at the top right corner besides the label Workspace Changes: 0.
You will get to see the Install Google Tag Manager dialog box.
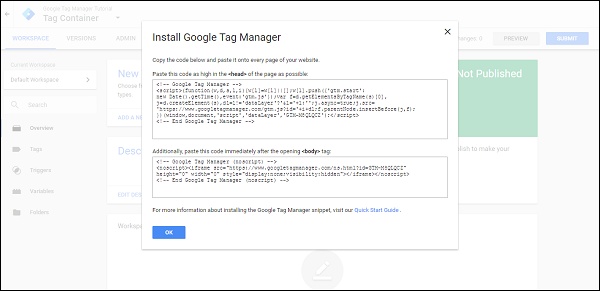
Now, here we want to install the Google Tag Manager code on our blog.
Step 2 − To get the GTM code in the above figure added on the blog, go to https://Blogger.com and log in with your credentials.
You will be presented with a screen as shown below with your blog post name in the list.

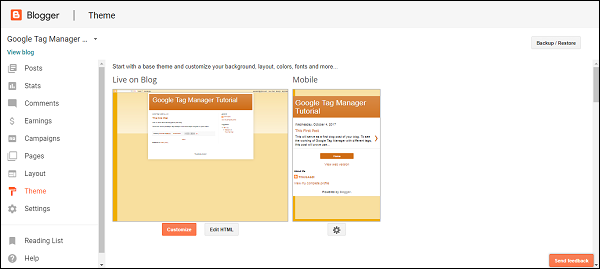
Step 3 − From the panel on the left, locate the option: Theme.
You will see the following screen.
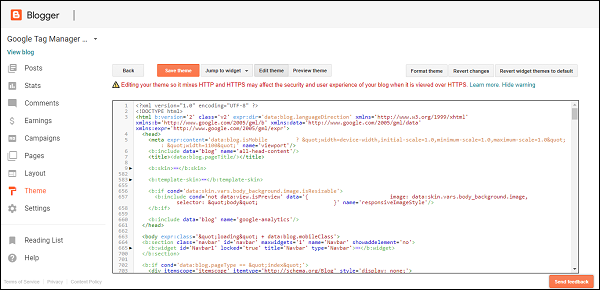
Step 4 − Click Edit HTML to edit the HTML code for the blog. An HTML source code for your blog will be visible, as shown in the following figure.
Here, we want to install the code Google Tag Manager. As instructed by GTM, we are required to insert the code at the following locations −
- As high as possible in the <head> tag
- In the <body> tag
Step 5 − Locate the <head> tag in the HTML code above. Go back to https://tagmanager.google.com and copy the code in the Install Google Tag Manager dialog box under step 1 above. Paste the copied code exactly under the <head> tag opening.
Step 6 − Similarly, locate the <body> tag in the HTML code.
Note − You can use shortcut key Ctrl + F to find the <head> and <body> tag. The browser search functionality will come in handy to find the tags.
Once you have located the <body> tag, repeat the procedure to copy the code associated with <body> tag from Google Tag Manager.
For ease of locating the tag, typically, <body> tag will begin with <body expr:class = '"loading" + data:blog.mobileClass'>.
Paste the required code under the <body> tag and then click Save theme.
It will show the following error, and it is normal to see that error.

Step 7 − To address this issue, in the Google Tag Manager code under the <head> tag, locate the line with −
j = d.createElement(s),dl = l != 'dataLayer'?' &l = '+l:'';j.async = true;j.src =
Replace the & as underlined in the line above with & and click Save theme. The error will be resolved.
This concludes the process of adding Google Tag Manager Code to your blog.
Introduction to Tag
As put simply on Google Tag Manager Support website, a tag is a piece of code that sends information to a third party, such as Google Analytics.
Taking a cue from there, with respect to a particular analytical tool, there can be multiple tags associated. Having them all in one page is indeed a plus, as the product marketer will get to see multiple metrics associated with the page.
However, there is an equally important point to note here, one should not overdo the tags on a website. This not only increases the confusion while managing the tag but also makes it cumbersome to differentiate the data coming from various tags.
The following code, as we have seen on the Install Google Tag Manager dialog, is actually a Tag.
<!-- Google Tag Manager -->
<script>
   (function(w,d,s,l,i){
      w[l] = w[l]||[];w[l].push({'gtm.start':
      new Date().getTime(),event:'gtm.js'});
      var f = d.getElementsByTagName(s)[0], j = d.createElement(s),
      dl = l != 'dataLayer'?' &l = '+l:'';
      j.async = true;
      j.src = 'https://www.googletagmanager.com/gtm.js?id='+i+dl;
      f.parentNode.insertBefore(j,f);
   })
   (window,document,'script','dataLayer','GTM-M8QLQCZ');
</script>
<!-- End Google Tag Manager -->
Location of a Tag
The location of a tag can be anywhere in the page source code. It can very much be at the top as the one above or it can sit in the footer transmitting the information that is required.
This concludes a quick introduction to a Tag and how it can be created.
Triggers
Triggers actually detect when a tag will be fired. These are a set of rules to configure a tag to be fired. For instance, the triggers may decide that a particular tag X will be fired when a user performs Y action. More specifically, a trigger can direct a tag to fire when a particular button in a particular form is clicked.
Triggers are conditions which can be attached to a tag to function the desired way. A real world example will be, consider that a tag is being configured for a successful transaction on an ecommerce page.
The tag will indicate whether the transaction was carried out successfully. To do so, a trigger will be created, which will say, fire the tag only when the transaction confirmation page is displayed to the user.
More prominently, consider you want to track all the page views of a blog/website. So, specifically, you can create a tag with Google Analytics, which will get fired when the user accesses any page on your blog/website. A trigger in this case, will be generic, saying fire this tag on all pages. The trigger will be set accordingly.
The trigger sometimes can get complicated. For example, if someone clicks a button on a specific page, then fire a tag.
As shown in the following figure, you can access triggers by clicking Triggers on the left side panel of the screen.

As there are no any triggers configured as yet, you will see no results on the triggers.

Variables
Essentially, variables are values that can be changed.
For instance, let us consider a simple link click. When a link is clicked, there are several built-in variables that are collected with this click event. These variables can eventually be used to record the link, which is redirected when a user clicks on the particular link button.
Going in a bit detail, you can also record the particular div class of the element that was clicked, using variables. They are called variables, because if there are 10 different link buttons on the page, the redirection from these link buttons is going to change, depending on which of the elements are clicked on.
You can access variables by using the left panel and clicking Variables.

Google Tag Manager offers two types of variables −
- Built-in variables
- User-defined variables
As the names indicates, you have a scope of using the existing variables as offered by Google Tag Manager or you can create your own variables.
Let us consider an example and see how a tag functions. We will be debugging the tag now with Google Tag Manager.
Debugging a Tag
In the initial section of this chapter, we took time to add Google Tag Manager Tracking Code to our blog on Blogger.com.
This was the first step to have Google Tag Manager identify our tracking code. If you observe closely, in the script that has got included in the <head> tag, there exists a Google Tag Manager Tracking Code in the format GTM-XXXXXXX.
Now, when it comes to debugging a tag, it is fairly simple with the Google Tag Manager Interface. We will use the Basic Google Analytics tag for the demonstration. We are assuming that a Google Analytics Account already exists.
Creating a Basic Google Analytics Tag
In Google Tag Manager, to create a tag, there are various steps involved. To get into the details of each one of them, let us consider the following screen.

Step 1 − Click the button ADD A NEW TAG.
A panel from the right will slide to start the process of creating a new tag. This will show an untitled, blank tag for you to configure.
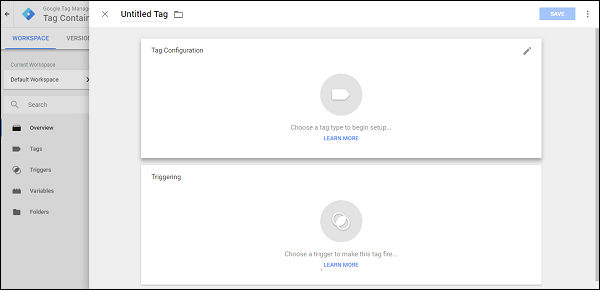
Step 2 − Provide a name to your tag. Let us give it the name First Tag.
Step 3 − Once done, click the text/icon Choose a tag type to begin setup.
Another panel will slide from the right, which will have the following tag types displayed.

As we have seen in the definition, there are different tags associated with different analytical tool. In this particular step, Google Tag Manager requires you to specify the exact type of tag you wish to create.
You will notice some tag types as follows −
- Universal Analytics
- Classic Google Analytics
- AdWords Remarketing
- Google Optimize
Note − Universal analytics is the enhanced and most popular version of Google Analytics. However, there are many sites, which employ Classic Google Analytics.
For this example, let us proceed specify Universal Analytics.
Step 4 − Click Universal Analytics to continue. The control will switch back to the previous screen and you will be required to select what do you want to track. See the following screenshot for reference.
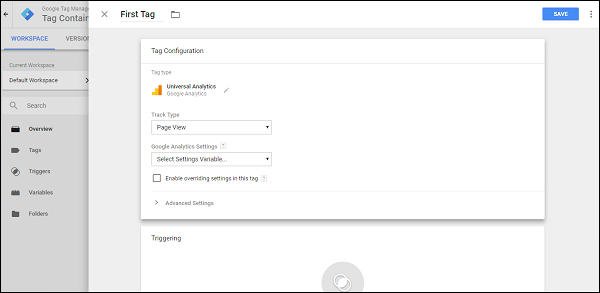
Step 5 − Check Enable overriding settings in this tag.
Note − We are using this step so as to get acquainted with Tag Creation at a faster pace. You may go ahead and create a Google Analytics settings variable without checking the above checkbox as well.
Step 6 − Open the Google Analytics interface. In Google Analytics, locate the button ADMIN on the front page. Under Property section, click Property Settings. You will be able to see the screen similar to the following.
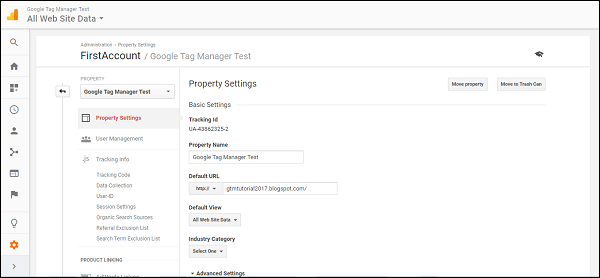
Step 7 − Copy the Tracking Id. The tracking Id will have the format UA-XXXXX-X.
Step 8 − Once you have copied the tracking ID, return to the Google Tag Manager interface. As already shown earlier, paste the Tracking Id in the associated text box.
Now, we are about to configure the important element of tag a trigger.
We are going to direct Google Tag Manager that the tag should get fired if the page is viewed by the user. In order to do that, we should have the trigger configured using the next section on the screen.
Step 9 − Click Choose a trigger to make this tag fire
A dialog box will slide from the left, requiring you to select a trigger. It will show the trigger as shown in the following screenshot.
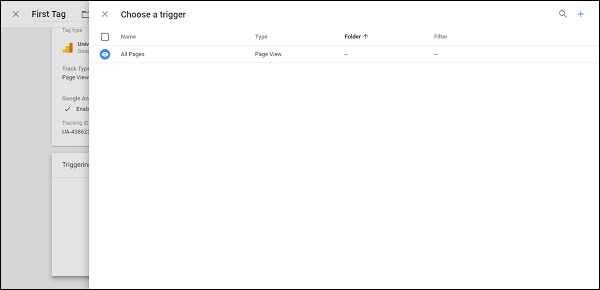
Step 10 − Click All Pages.
The control will return back to the tag configuration screen. Click the blue SAVE button at the top right corner. You have successfully configured your first tag!
Step 11 − Now for the debugging mode, click the PREVIEW button in grey.
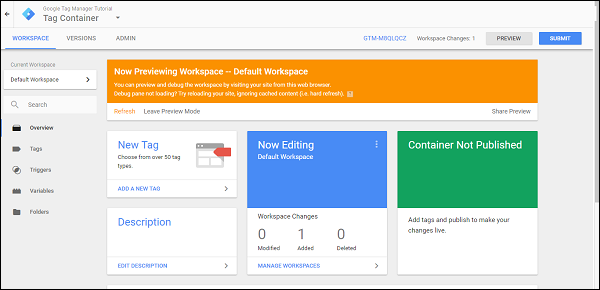
As shown in the above screenshot, an orange box will show up. This indicates that the debugging mode is on. Access your blog using the link available.
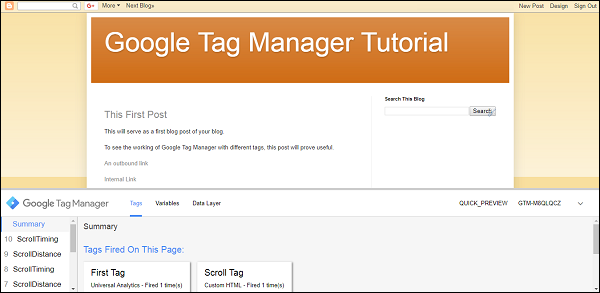
Step 12 − Now, when you access the blog, you should be able to see a section on your blog showing the Google Tag Manager Debug section.
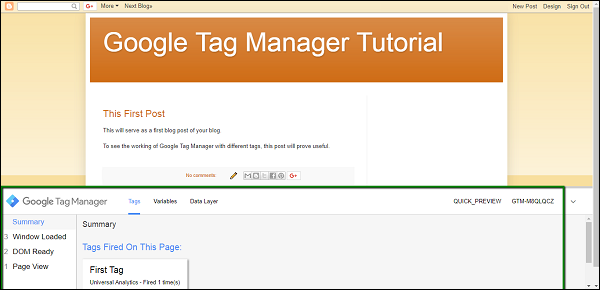
Also, if you observe closely, there is First Tag being displayed under Tags Fired On This Page. This indicates that our tag got fired on successful page view.
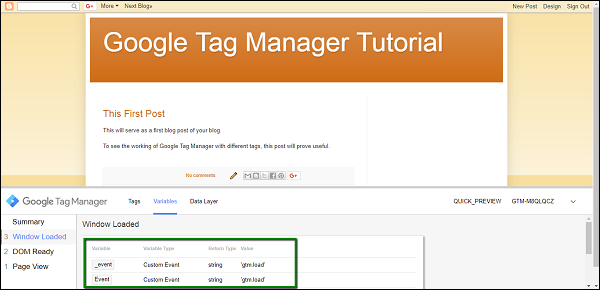
Step 13 − From the debug section, click Variables. Then, click Window Loaded on the left panel. This action means that we are selecting an action for analyzing the variables loaded as a result of that action.
It will show the Variables section as seen marked in a green box in the following screenshot.
You can analyze the variables more clearly as we move on to the next chapter.
Google Tag Manager - Track Tags
Once you have understood the process of creating a tag, it makes sense to dive in deep and see how tracking is achieved using different approaches.
Page View Tag
A product marketer needs to understand the count of visitors for the product website/blog. This is really critical as it helps understand the visitor trend. It can be to know whether a particular enhancement/feature added in the website/blog is appreciated by the visitor, are the visitors accessing the website on a daily/weekly basis, etc.
Considering Page View carried an enormous importance in understanding the likeability of the website/blog, let us see how a Page View can be tracked using a tag.
Step 1 − As we have followed the steps in the previous chapter, let us access the tag section in Google Tag Manager.
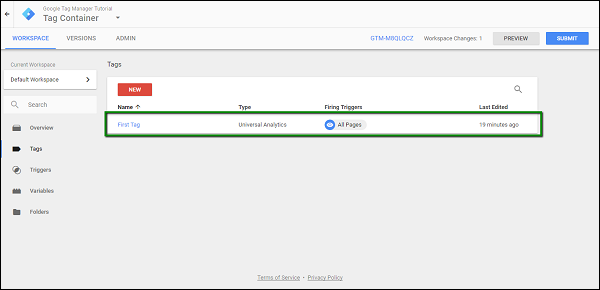
It will show the recently created tag First Tag.
Step 2 − Click First Tag, it will show the dialog box with the configured triggers, etc.
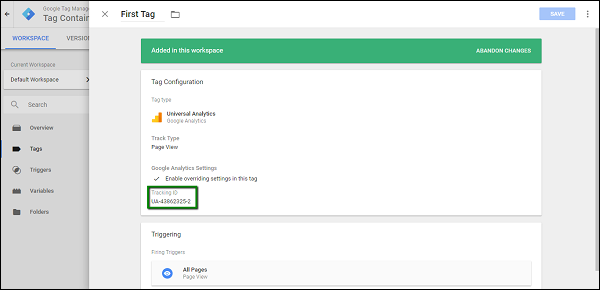
As highlighted in the above screenshot, let us focus our attention towards Tracking ID.
This tracking ID is associated with Google Analytics. When we start the debugging mode, and visit the blog, it will be counted as a single page view.
At this particular moment, Google Analytics will record the page view in its interface.
Step 3 − Debug using Google Tag Manager, and open the Google Analytics dashboard, under Traffic Sources → Overview, you will see the following statistics.
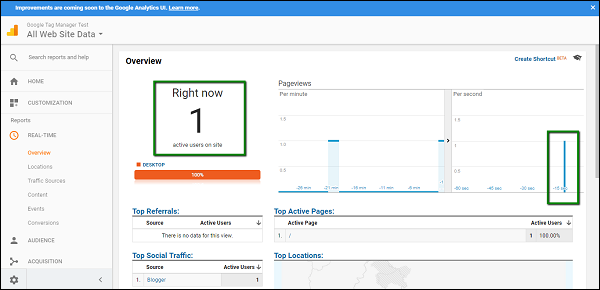
This shows that a page view is recorded and the corresponding page views will be tracked further in Google Analytics.
Link Tags
Many a times there will be certain promotional offers for which a user may be required to leave the blog or website. Along with promotions, these can be some third party surveys that a user may be required to take. These surveys will yield certain statistics, which will be different from the data that is coming in via different tags.
For this purpose, it is useful to have tracking enabled on how many times the link is getting clicked and the user is directed away from the website. Such links are termed as outbound links and these links can be tracked easily using Google Tag Manager.
To demonstrate this, we will be creating a link in our blog.
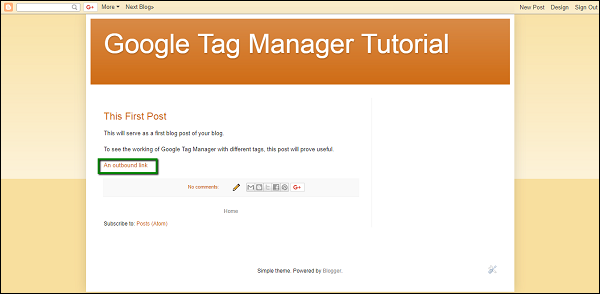
The above screenshot shows a link called An outbound link. This link will be used for tracking in Google Tag Manager. It redirects to https://www.google.com
Step 1 − Head to the Google Tag Manager workspace. Click Tags from the left panel. Click NEW button on the page to start creating the outbound link tag.
Let us name the tag as Outbound Link Tag.
Step 2 − Follow the same process as the initial tag setup for having the Google Analytics code entered in the correct field Tracking Id.
Step 3 − Select Track Type field as Event. You will be able to see the following options further.
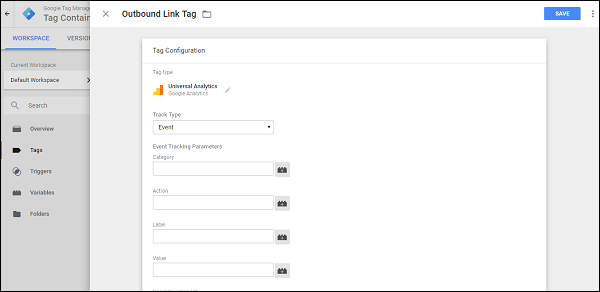
These options are in accordance with Track Type Event. Notice that these options wont be available at all under Track Type Page View. This is because, as we are attaching the Google Analytics code with the Google Tag Manager, to see the details of the event in real time, we need certain parameters.
Step 4 − Fill in the form details as below. Text in bold are the values to be entered in the textboxes.
Category Outbound
Action - Click
Leave Label and Value fields blank
Keep Non-Interaction Hit as False
Step 5 − Next, under the Triggering section, click Choose a trigger to make this tag fire
Step 6 − Click the blue + icon at the top right corner. It will open the custom trigger section. Provide a name to this trigger as Click Trigger.
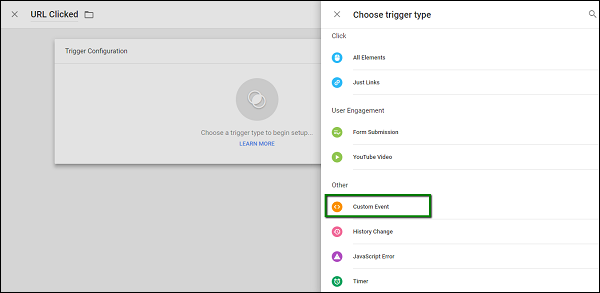
Step 7 − Click Choose a trigger type to begin setup
It will show the following trigger types as shown in the following screenshot.
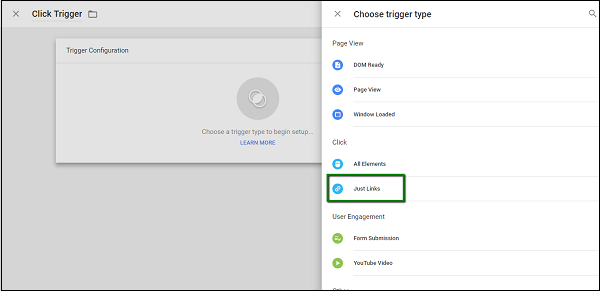
Step 8 − As highlighted in the figure above, click Just Links under Click trigger type. This will show the different options to configure the newly created trigger type.
Now, we need to configure the trigger to fire if the clicked URL has a Page Path as https://www.google.com. Note that we have configured the link on our blog to redirect to the same URL.
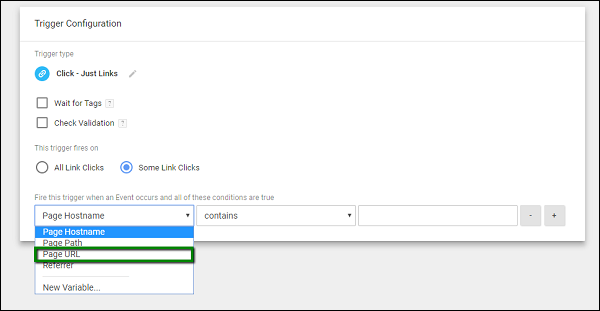
Step 9 − Configure the trigger as provided exactly in the above figure.
We want to configure this trigger to fire on Some Link Clicks when the Page URL equals https://www.google.com. Once done, the screen should look like the following.
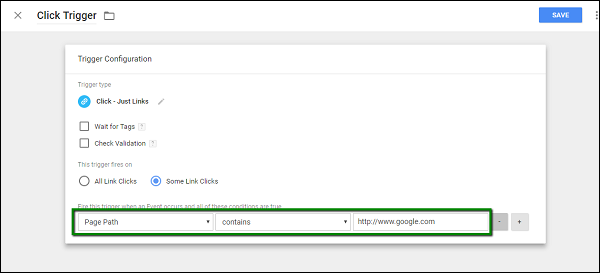
Step 10 − Click the SAVE button to save this newly created trigger. The screen will return back to tag configuration for Outbound Link Tag.
Step 11 − Click SAVE to complete the configuration.
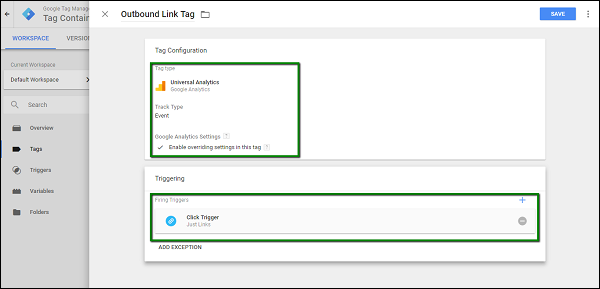
As highlighted in the above figure, a complete tag for outbound link should look like the above.
Now, let us have the tag in action.
Step 12 − From the workspace, click the PREVIEW button. The debug mode will start.
Step 13 − In your browser, in another tab, open your blog. The debug window will be shown at the bottom of the screen.
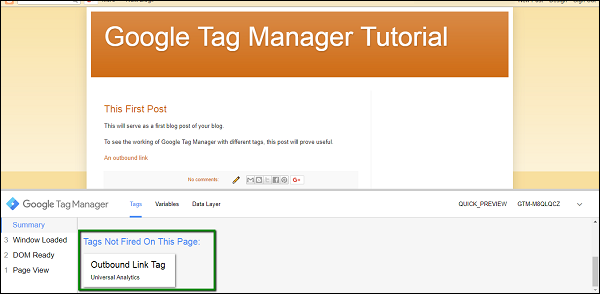
As shown above, since we have not yet clicked the link, the tag still appears under Tags Not Fired On This Page.
Step 14 − Click the outbound link as created in the previous step, the tag will get fired. You can see it appearing under Tags Fired on This Page.

This concludes the approach for creating a tag for an outbound link to track the links on the blog/website.
Event Tracking
Event tracking stands for any action that is different than a page load. The browser has a specific response to any action that you take on the page. For instance, the action can be as simple as clicking a link or submitting a form to a complex one such as tracking file views and downloads.
With the Google Tag Manager, you can easily track the events generated in the browser. It records the responses from the browser for potential action, thereby getting the particular event track easily.
We will use the above example to see event tracking in action. In the previous example we have created a link, which redirects away from our blog. In this example, we will create another link, which will be pointing towards our blog. We are using this example, in order to demonstrate how the links going away from the blog can be tracked seamlessly.
I have created a link called Internal Link in the blog. This link will redirect to the same blog page.
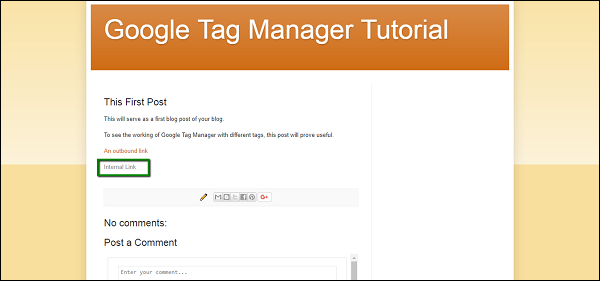
Let us go to Google Tag Manager Dashboard and create a new trigger for the outbound link. We will be using in-built variable Click URL for this. Using Click URL, we are going to detect whether the link being clicked, is redirecting the user outside the blog or not.
To enable in-built variable Click URL, following are the steps.
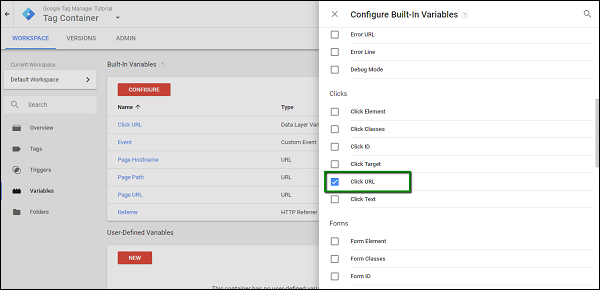
Step 1 − Under Variables section, click the button in red, CONFIGURE. It will show the available built-in variables. There are different built-in variables available, which are Pages, Utilities, Errors, Clicks, etc.
Step 2 − From the Clicks category, check the box Click URL. This will show the available variables in Click URL immediately. See the following screen for reference.
Now that the variable is configured, we can configure the trigger.
The trigger will be enabled when a user clicks all the URLs, which are redirecting outside the blog. Creating this trigger is fairly simple.
Step 3 − Go to Triggers, click New. Provide a name to the trigger. Let us say, the name is External Link Trigger.
Step 4 − Under Trigger configuration, click Choose a trigger type to begin setup
Step 5 − From the available options, under Click, select Just Links. See the following screen for the steps so far.
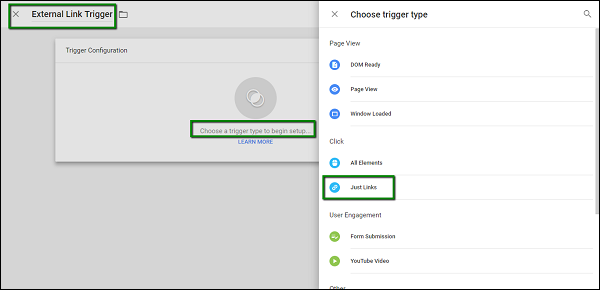
When Just Links is clicked, you are directed back to the first section, where you will need to provide the URL exception. Following are the steps to do it.
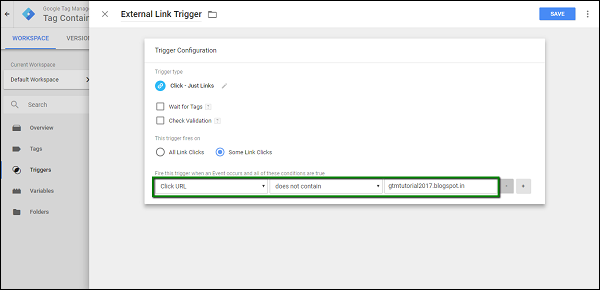
Step 6 − For the option, This trigger fires on, select Some Link Clicks.
Step 7 − Under the conditions, select Click URL, which should be previously selected. Select the value does not contain from the condition options.
Step 8 − In the text box for value, enter a value which is your blog URL. In our case, we will enter gtmtutorial2017.blogspot.in. Once finished, the screen will look similar to the following.
Step 9 − Click the Save button in blue to save your new trigger.
Now it is time to configure our tag, which we will use to track the click event, which will redirect the user outside the blog.
Step 10 − Open the Tags section, click the NEW button. Provide a name to your tag, let us call it External Link Tag.
Step 11 − Under Tag Configuration, click Choose a tag type to begin setup Select tag type as Universal Analytics and enter the following details on the screen.
- Under Track Type, select Event
- For Category enter External Link
- In Action enter Click
- For label, click the options icon
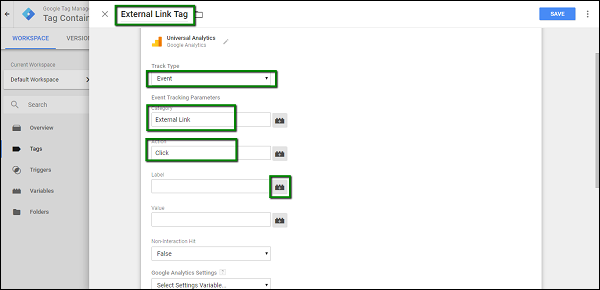
Step 12 − On the side panel displayed, select Click URL.
Step 13 − Once done, check the box Enable overriding settings in this tag. In the Tracking ID text box, enter your Google Analytics Tracking Code.
Step 14 − Scroll down to configure Triggering. We are going to use our newly created trigger.
Step 15 − Click Choose a trigger to make this tag fireIt will display the available triggers. Select External Link Trigger, which we have created earlier.
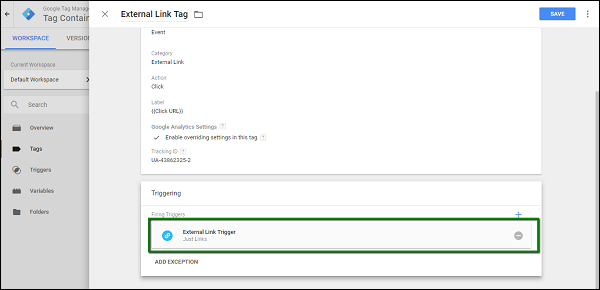
This concludes the configuration of the tag. Click the Save button.
Step 16 − Now, to debug the tag, click the Preview button in grey. It will start the Google Tag Manager in the debug mode.
Step 17 − Go back to your blog and refresh the blog for Google Tag Manager Debugger to start. Considering the example above, there are two links being shown in the page. Also, there is the External Link Tag, which is shown under Tags Not Fired On This Page.
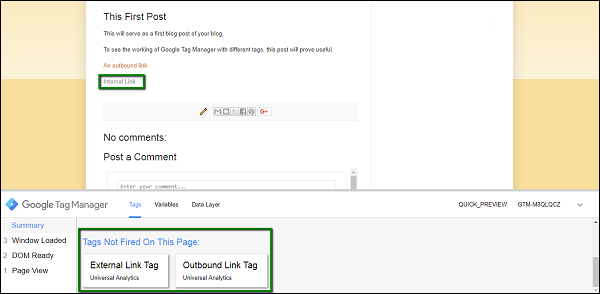
Now it is time to test the configuration of the tag. We will use Ctrl + Click in both the scenarios to check whether the tag is fired. Ctrl + Click will have the link opened in the new tab, without refreshing the current page. We need to have the page intact, as we wont be able to see the tags fired, if the page refreshes.
Step 18 − First, use Ctrl + Click on the Internal Link as highlighted in the above figure. Ideally, the tag should not get fired, as the link is directing the user on the same blog itself.
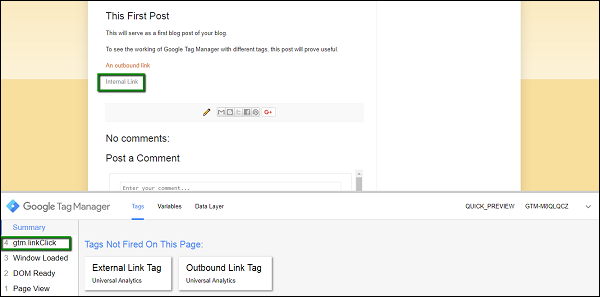
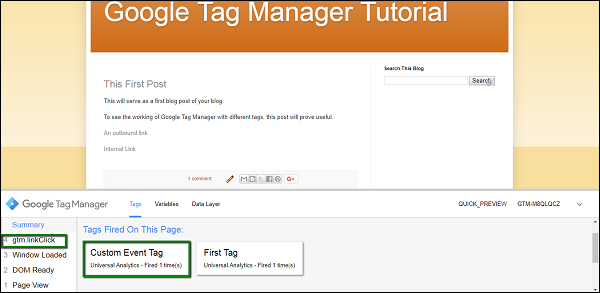
As shown in the above figure, under Summary section in the debugger, you will see another event gtm.linkClick. This means that GTM has recorded the click event.
But, you wont see any change in the Tags Fired On This Page section. This is because we have configured the tab for outbound links.
Step 19 − Now Ctrl + Click An outbound link (this was created in the previous section).
Observe the summary section, it will again get updated for another event gtm.linkClick.
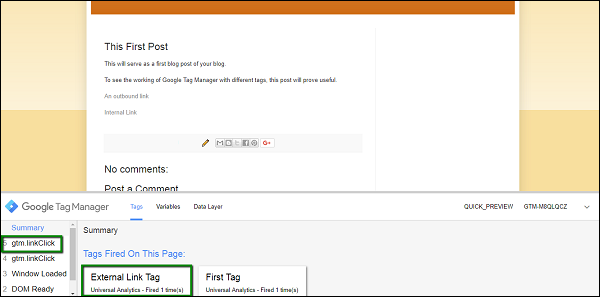
As shown in the above figure, for the next event recorded, there will be a tag fired External Link Tag. You will be able to see it under Tags Fired On This Page.
In this way, you can employ event tracking with Google Tag Manager and configure tags for critical data that you need from your website/blog.
Form Tracking
More often than not, on any website/blog you will see a form, which will capture certain details from the user. As a product marketer, it becomes tedious to know whether the Form is getting used by the visitors.
It can be a good approach to know how many times a user has filled in information on this form and how many times they came across an error. With Google Tag Manager, you can easily track the form submissions. This section will take you through the process.
For this example, we will have a Contact Us form created on our blog.
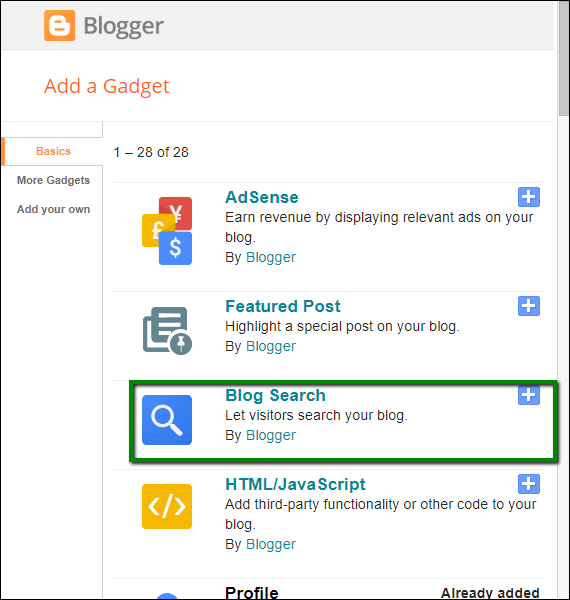
Step 1 − For blogger, to have a contact form created, use the Layout option → Add a Gadget. Once you click Add a Gadget, you will see the following screen, where you will find Blog Search gadget. Click the blue plus (+) icon to insert it in the blog.
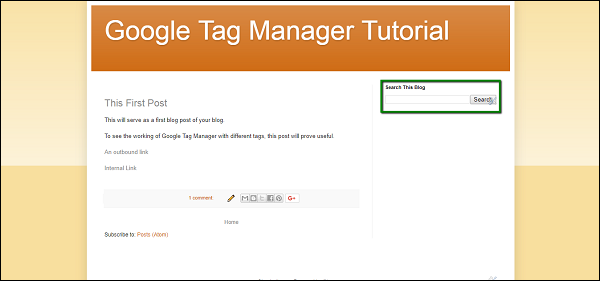
Once done, it will show up on your blog as shown in the following screenshot.
Now, let us configure the related triggers and the tag.
To start with the trigger, we will follow the same steps. We will first add enable a built-in variable called Form ID, then we will create a trigger which will utilize this newly created variable.
Once done, we will use this new trigger to configure a tag for tracking the interactions with the form.
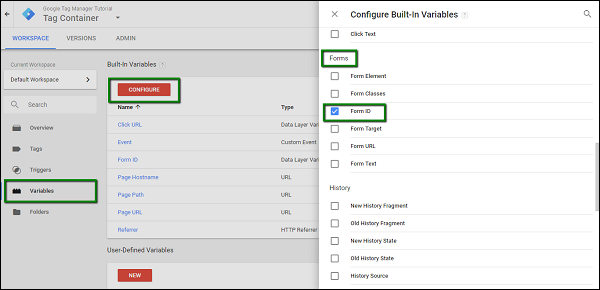
To enable the built-in variable Form ID, following are the steps.
Step 2 − Under Variables section, click the button in red, CONFIGURE. From the Forms category, check the box Form ID. This will show Form ID in the available variables immediately. See the following screen for reference.
Now that the variable is configured, we can configure the trigger.
The trigger will be enabled when the user submits any data in the Contact Us form.
Step 3 − To do so, go to Triggers, click New. Provide a name to the trigger. Let us name it as Form Submission Trigger.
Step 4 − Under Trigger configuration, click Choose a trigger type to begin setup
Step 5 − From the available options, under User Engagement, select Form Submission. See the following screen for the steps so far.
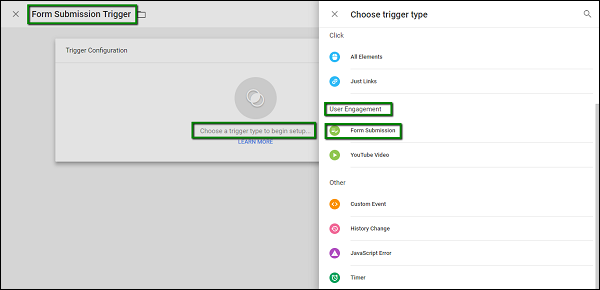
When Form Submission is clicked, you are directed back to the first section, where you will need to provide the Form ID.
Step 6 − For the option, This trigger fires on, select All Forms.
Once you are done with the above step, it will enable tracking for all the forms submitted on the blog page. You can also use a specific Form ID, which can be configured when you created your blog.
For configuring a specific Form ID, you may take the support of your website/blog developer to get more details. After completion of these steps, see the following screen for complete reference.

Step 7 − Click the Save button in blue to save your new trigger.
Now it is time to configure our tag, which we will use to track the click event that will redirect the user outside the blog.
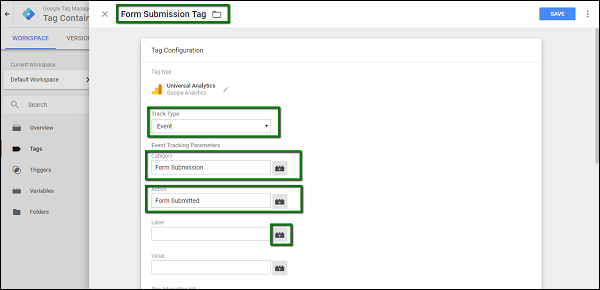
Step 8 − Open the Tags section, click the NEW button. Provide a name to your tag, let us call it Form Submission Tag.
Step 9 − Under Tag Configuration, click Choose a tag type to begin setup Select tag type as Universal Analytics and fill the following details −
- Under Track Type, select Event
- For Category enter Form Submission
- In Action enter Form Submitted
- For label, click the options icon
Step 10 − On the side panel displayed, select Form ID.
Step 11 − Once done, check select Enable overriding settings in this tag. In Tracking ID text box, enter your Google Analytics Tracking Code.
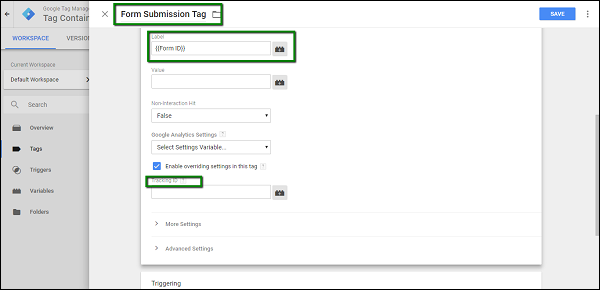
Scroll down to configure Triggering. We are going to use our newly created trigger.
Step 12 − Click Choose a trigger to make this tag fireIt will display the available triggers. Select Form Submission Trigger, which we have created earlier.
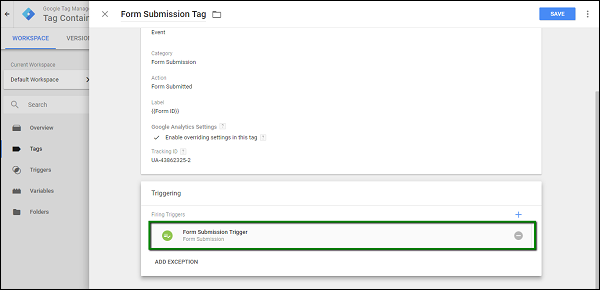
This concludes the configuration of the tag. Click the Save button.
Step 13 − Now, to debug the tag, click the Preview button in grey. It will start the Google Tag Manager in the debug mode.
Step 14 − Go back to your blog and refresh the blog for Google Tag Manager Debugger to start. There will be the Form Submission Tag, which is shown under Tags Not Fired On This Page.
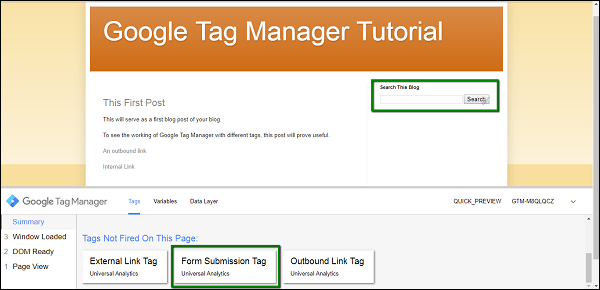
Step 15 − Now interact with the Search This Blog form by entering some values in it. Let us type in First, as our first blog post contains the word First.
Step 16 − Click Search. The new event will be seen under Summary, and the Form Submission Tag will show up under Tags Fired On This Page.
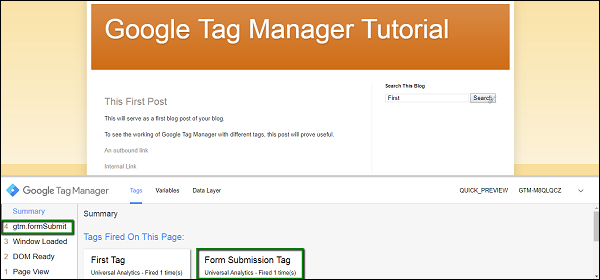
In this way, we can have Form Submission Tags created using Google Tag Manager.
Google Tag Manager - Organize the Interface
Along with creating the tags and managing the associated triggers and variables, Google Tag Manager has some more features to offer. This includes the housekeeping stuff such as organizing users, folders which are used for organizing the tags as per the desired order, etc.
In this section, we will get an overview on how to manage the users and different folders related to the tags.
User Management
It is not an uncommon scenario for a product marketing team to use a single Google Tag Manager account to manage different marketing campaigns. There will be different roles, which will have certain permissions such as creating a tag, deleting/modifying a tag, creating another user, etc.
User Management provides a full-fledged portal for managing the users utilizing GTM features. User management works at two levels −
- Account Level
- Container Level
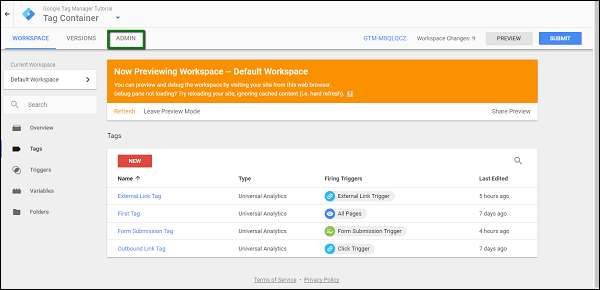
To access User Management, click ADMIN from the top left menu bar.
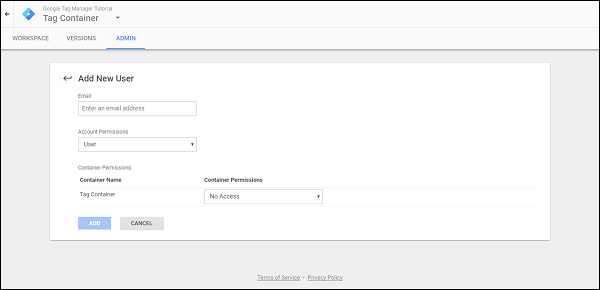
As shown in the following figure, you will be able to see User Management associated with Account and Container.
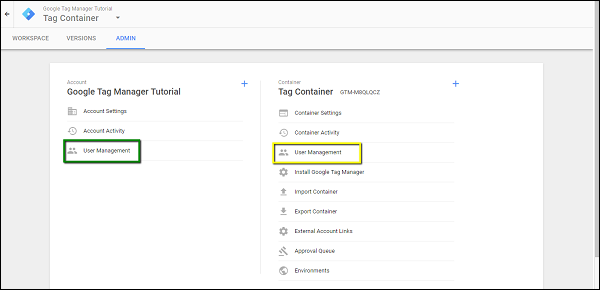
The important difference between the two is if you provide access to a user at an account level, the user has an access to all the containers under that account. Whereas, if the access is provided to the user at a container level, the user can modify/add/delete the tags under only that container.
To see the details of what all access levels are available, click User Management under the Container level (highlighted in yellow above).
This will show the available accounts with the permissions they are provided with. Mostly, it will be the Google Account that you are using to log in to GTM.
Click the NEW button in red. It will show the following screen.
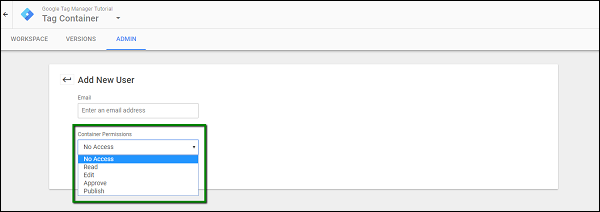
As shown in the figure, you can add an email address of your choice, to whom you want to assign permissions to access and then provide the desired permissions at the container level.
Following are the available permissions −
No Access − Block the user from accessing the container tags.
Read − The user will be able to only read the tags. No modifications or delete operation can be performed.
Edit − The user can add/modify/delete the available tags.
Approve − The user has an elevated permission to approve the tags to the live environment. More on environments later in the tutorial.
Publish − All permissions, similar to an admin user.
This concludes the overview of user management at the Container level.
At the account level, one can configure a user as a general user or admin user.
Similar permissions can be allotted to the user being added; only difference is the user will have an access to all the containers under this account.
This concludes an overview of user management at the account level.
Folders
Folders are required especially when you have numerous tags and triggers in your account. Folders can prove useful when you have such a large number or tags/triggers to handle.
For organizing the tags and triggers in these folders, one can use his/her own creativity. The folders can be created on the basis of different application areas or the users or maybe the purpose why they are being created. The produce marketing team can take their own decision of having a specific folder structure in place.
Another way of looking at folders can be from an aspect of analytical tools in use. On the basis of the analytical tool, one can create a tag, which will be helpful in the long run.
For creating different folders, click Folders from the left panel. You will see the following screen.
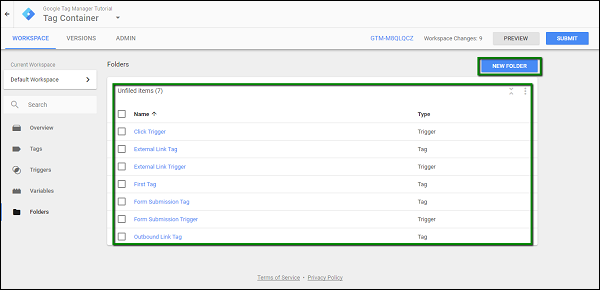
The tags created till now will be displayed on the screen. You may have the tags organized by creating different folders using the option NEW FOLDER displayed on the top right corner of the screen.
Once you click NEW FOLDER, a quick popup will open as follows.
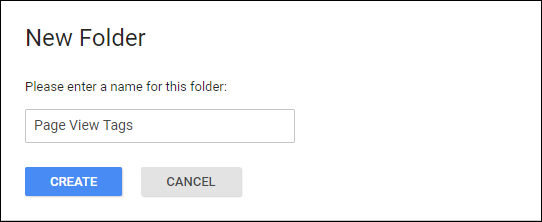
From the previous screen, you can always move the tags as per your requirement into the desired folder.
This concludes the introduction to creating folders in Google Tag Manager.
Google Tag Manager - Publish a Tag
We have been creating, modifying, and debugging the tags in our debugger environment. Till now, we havent seen the tags live on our blog.
To have the tags live on the blog, we need to Publish the tags. We will want to have the tags Published than to have Preview mode always.
Publishing the tags is fairly simple.
Step 1 − Click the SUBMIT button at the top right corner of the screen.
It will show the following screen.
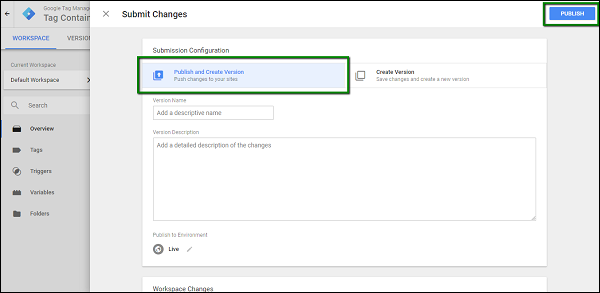
Step 2 − Enter an identifiable Version name so that it can be easily understood for the changes made.
With the version description, you can be as elaborate as possible on the changes/additions of the tag in that particular version.
Step 3 − Scroll down to the Workspace Changes, you will see all the changes made in the tags, which are unpublished or in the PREVIEW mode.
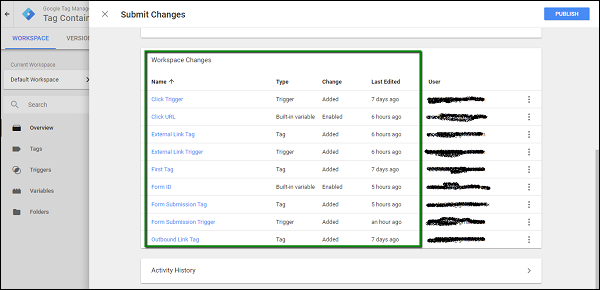
Similarly, under Activity History, you can get an exact understanding of the changes/updates that were done in the account since the beginning of time.
Step 4 − Provide a version name, description. You might want to provide the version name as First Version and you can provide the description as First Google Tag Manager Update.
For the moment, we will leave Publish to Environment as Live. This is because we dont have any other environment apart from Live yet.
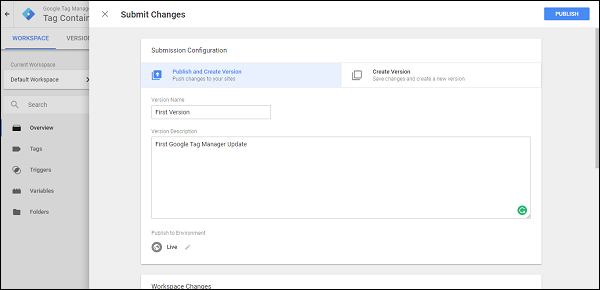
Step 5 − Click PUBLISH and you will be presented with a summary for this particular version.
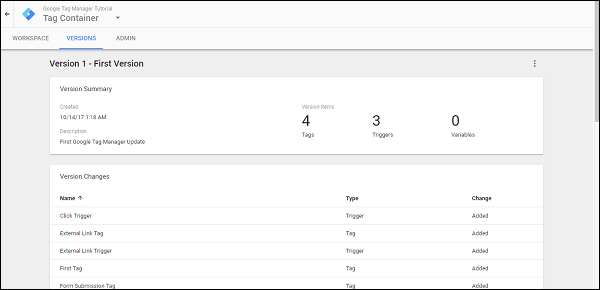
This is how you can publish the changes done in the workspace for Google Tag Manager.
You can use a Google Chrome plugin Google Tag Assistant to see the tags getting fired without the preview mode on.
Creating Environments in Google Tag Manager
There are different ways in which we can configure an environment to be used with Google Tag Manager.
Usually, in the software world, the word Environment is used in the context of where the particular feature is being tested/reviewed.
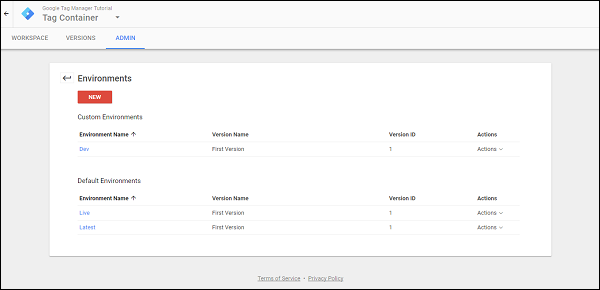
Step 1 − To view the available environments in Google Tag Manager, click ADMIN.
Step 2 − Under Container section, click Environments.

You will be able to see the screen as shown above.
Typically, large software companies have their website divided in different environments to ease the process of releasing a feature. Developers work on their development website, then the feature changes are pushed to the staging site. Finally, when the changes are verified in the staging site, the changes are pushed to Live environment.
In the context of Google Tag Manager, there is a flexibility to add different environments, which will allow you to validate your tag completely before they are on the Live website. For this tutorial, we will create an environment, called Dev environment. Following are the steps.
Step 3 − Click the NEW button in red. You will be able to see the following dialog box.
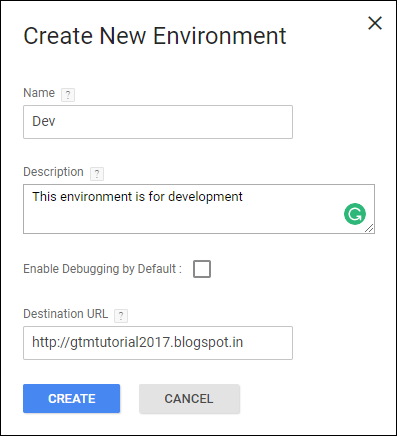
Step 4 − Fill up the details as shown in the above figure. We will pretend that our dev site is the same site where we are working right now, in order to push the changes accordingly.
Step 5 − Click CREATE and you will see a prompt as the following.
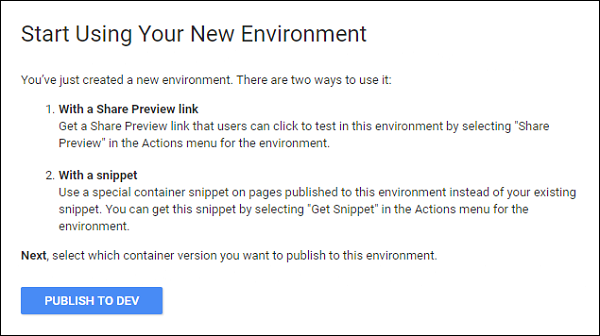
As shown in the above figure, the prompt shows two ways to use the environment.
Using a Share Preview Link − This link comes handy when you want to circulate the changes in your tags to your team members, when there are larger teams.
With a snippet − If you are clear that a particular site is going to work as your development/staging environment, then you can use this snippet option. A snippet for this environment is available, so that you can reach the website to see any changes that have been done lately.
Step 6 − Click PUBLISH TO DEV to see these in action. The next screen will ask for the available changes to push in the newly created environment.
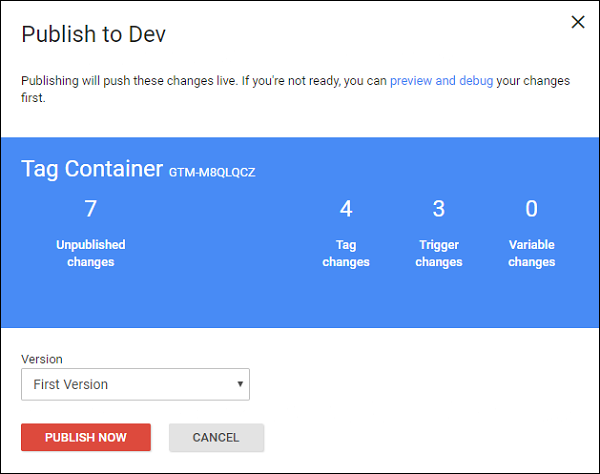
The changes that are not yet sent to the respective environment will be shown. Also, the version name is shown, so that the user is clear which version is being published to the respective environment.
Step 7 − Click PUBLISH NOW to see the changes available on your newly created environment. It will show the success message with a date and time stamp.
From the available list of environments, click the name of the new environment, in our case Dev.
The available options to share the environment link will be displayed, as shown below.
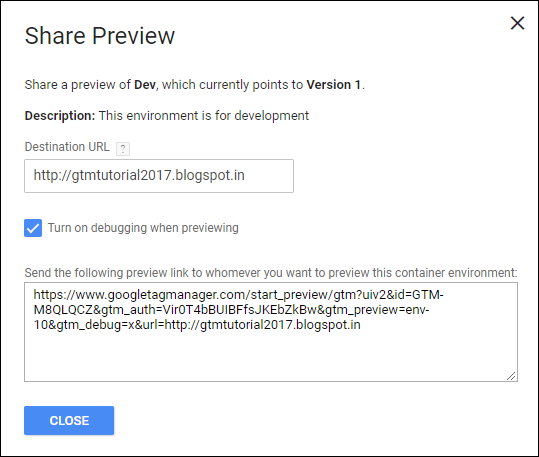
Using any of the above approaches, you will be able to see the changes in your tag on your development (Dev) environment.
Google Tag Manager - The Data Layer
A data layer can be seen as an object holding all the information to pass and process with Google Tag Manager. This is a bit technical concept. The term data layer is used to denote the data structure used by Google Tag Manager for storing, processing and passing data between your website/blog and the tag manager.
To elaborate it further, a Data Layer can feed the data into your analytics tool about your visitor. Taking another perspective for the definition, Data Layer is actually a list of business requirements and goals for each subset of the digital context.
Let us take an example of ecommerce website, business requirements might include −
Transactional information, having the details about what was purchased
Visitor data, regarding who purchased
Other details about the purchase, such as where was the purchase made and at what time
Lastly, the information about other factors, such as whether the visitor subscribed for the email updates or not
So, in a nutshell, the data layer carries information that can be used by different tools/users/stakeholders as required.
In Google Tag Manager, dataLayer is a JavaScript array. It consists of key-value pairs. Following is a quick example of dataLayer with different data types −
dataLayer = [{
   'products': [{
      'name': 'Western Cotton',
      'tuning': 'High-G',
      'price': 49.75
   },
   {
      'name': 'Fenda Speakers',
      'tuning': 'Drop-C',
      'price': 199
   }],
   'stores': ['Hyderabad', 'Bangloer],
   'date': Sat Sep 13 2017 17:05:32 GMT+0530 (IST),
   'employee': {'name': 'Raghav}
}];
Here, we have different values such as an array of objects (the products), numerical values (the price), an array of strings (stores), a date object and an object (name).
On another note, when you place Google Tag Manager Container Code in your website, the data layer is automatically created.
In itself, data layer is a pretty complex concept to understand in the first go. This chapter will provide more insights on how to interact with the data layer.
Data Layer Events
A quick example of data layer event can be, a newsletter signup form, which cant be easily tracked with automatic GTM listeners. A website developer can support you to push a data layer event once a new subscriber has entered his/her email on your website. The code of this event should look like this −
push({event: new_subscriber});
If you require, you can ask your developer for some more information, such as the form location. This is required if there are more than one form on your website. It can be achieved using the following code.
window.dataLayer = window.dataLayer || [];
window.dataLayer.push({
   'formLocation': footer,
   'event': new_subscriber
});
Also, Google Tag Manager pushes a certain set of values to the data layer of web applications by default. These values are −
gtm.js − Pushed to the data layer as soon as Google Tag Manager is ready to run
gtm.dom − Pushed to the data layer when the DOM is ready
gtm.load − Pushed to the data layer when the window is fully loaded
Inspecting the Data Layer
As we already know by now, there are certain events that are created as a result of any interaction on the screen.
For instance, let us consider this simple page load event. To look at the events, you need to have the debugger running. Once you have the debugger running (in preview mode), visit the blog. If you look at the summary window at the bottom left corner, this is what you will see −
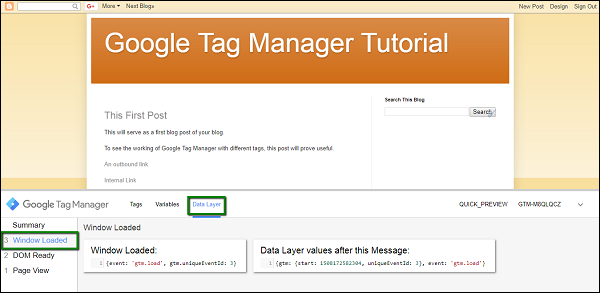
Step 1 − Click Window Loaded and then Data Layer.
The information shown in the Data Layer tab is about the Window Loaded event.
It is shown as {event: gtm.load, gtm.uniqueEventId: 3}
Further, if you want to take a closer look, you need to take support from Chromes console tab. Inspecting a data layer becomes easy when you know how to use Chrome debugger in the correct way.
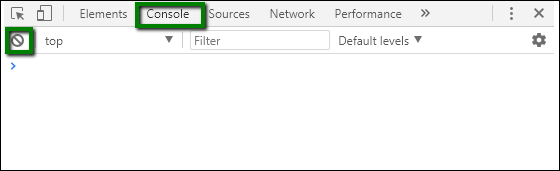
Step 2 − When you are on your blog, right-click at any part in the page. In the context menu displayed, click Inspect. The panel will be displayed at the right side of the screen, with Elements tab activated.
Step 3 − Click Console. When in the console mode, click the top left corner icon to clear all the messages shown. See the following screenshot for reference.
Step 4 − Once the window is cleared for any previous messages, type in dataLayer, make sure the capitalization for L is done. This name is provided by Google Tag Manager to its data layer. However, your developers may assign it a different name as and when required.
Step 5 − Press enter after dataLayer. It will show the following details.
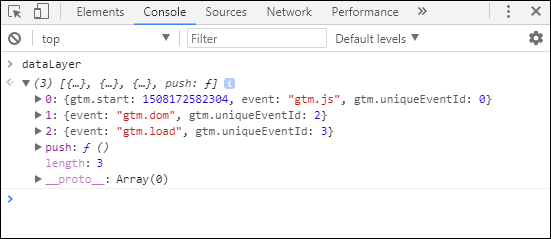
There are three objects, and each object contains some information. Now, these objects might not be the same for you, as they are shown in the above screenshot. The dataLayer is configurable and it is very much in the developers control to configure it as per the requirement.
The values that are present, are due to the Blogger gadget that is in use at that particular position/space. This is the reason why there is certain information there.
If you look at object 1, you will notice that the event that is fired, is gtm.dom. It is fired by GTM while loading the page.
In this way, you can inspect the data layer and add information in it as and when needed.
Variables in the Data Layer
Now that we are acquainted with the data layer, let us try and read one of the variables using Google Tag Manager Interface.
Here, we are going to try and read the event using a data layer variable.
If we see the above figure, the variable event holds the gtm.dom. We are going to create a variable from GTM interface and see how it reflects in the Variables tab under Google Tag Manager.
Step 1 − In Google Tag Manager Interface, go to Variables. Scroll down to the user-defined variables. Click NEW.
Step 2 − Provide a name to this new variable, let us call it as varEvent.
Step 3 − Click Choose a variable type to begin setup
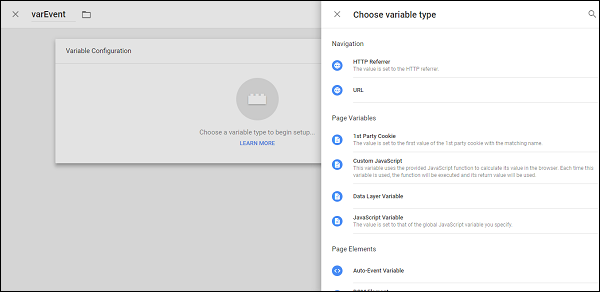
Step 4 − Select Data Layer Variable from the list.
Step 5 − When you select Data Layer Variable, you will be required to provide the name and version.
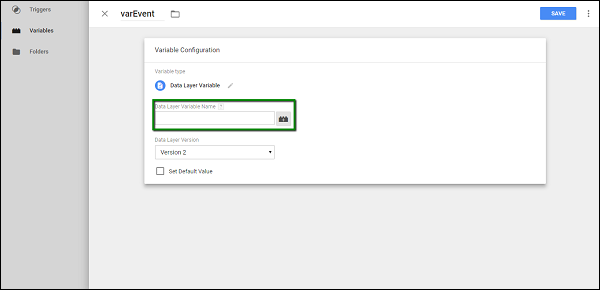
This name will be from the actual Data Layer of Google Tag Manager. As mentioned previously, the variable that we will track is event.
Step 6 − Enter event in Data Layer Variable Name.
Step 7 − Click SAVE.
Step 8 − Click Preview to see the changes reflected in the debugger.
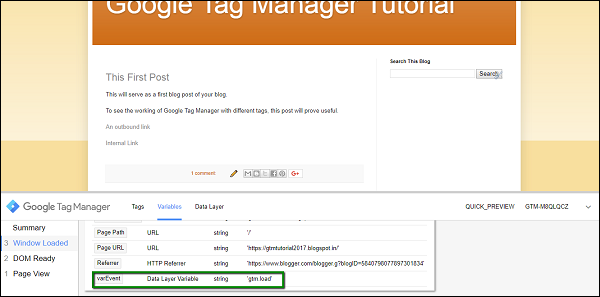
Step 9 − Once the page is loaded, click Window Loaded and then Variables. Scroll to the very bottom of Variables section, you will see varEvent, as highlighted in the above screenshot.
As seen in the above screenshot, the value will be gtm.load.
In this way, one can inspect the data layer and capture the values in the data layer as required.
Google Tag Manager - Advanced Tracking
It is time to look at some complex scenarios, where you can track critical elements for the business. We will look into how to create a custom event, which is not pre-defined or available by default.
In this chapter, we will look at −
- Implementing Custom Events
- Mouse Scroll Tracking
Implementing Custom Events
There will be instances where you might want to create an event, which is different than the available events in GTM. To achieve this, we will need to create a custom event, which utilizes the existing variables from the data layer.
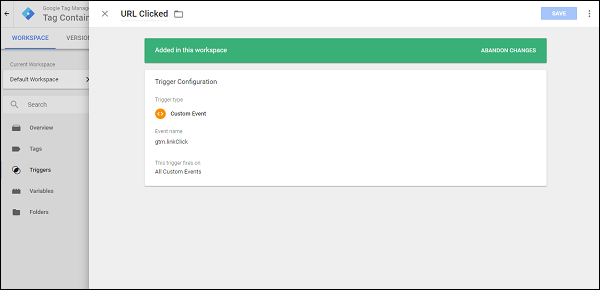
Consider the scenario when we click the Internal Link created earlier. Let us create a custom event called urlClick, which will read the data layer variable gtm.elementurl.
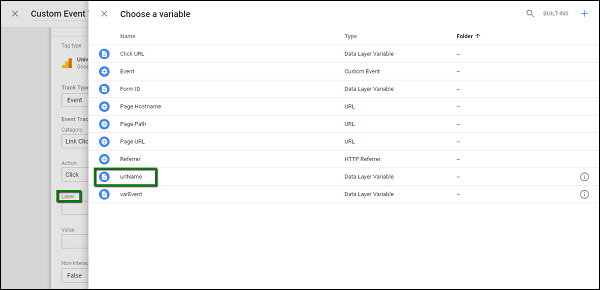
Step 1 − To do so, let us create a variable called urlName from the Variables section. Using the usual process, create the variable.
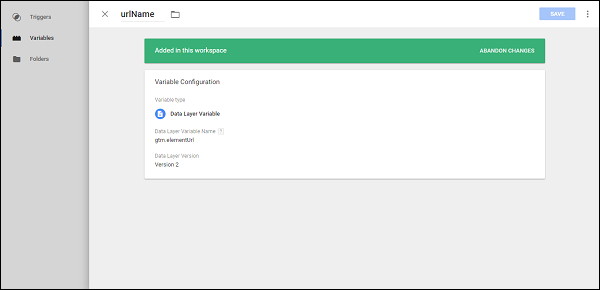
Shown above is an example of data layer variable urlName.
Now, we will use this variable to create our custom event. Custom event will be used when we create the trigger. See the following screenshot for reference.
Step 2 − Create a trigger to fire on the event that is already present, by clicking the Internal Link. Under Event Name, specify gtm.linkClick.
Now, let us create the tag.
Step 3 − Follow the same process for creating the tag. Here are the details −
- Tag Type Universal Analytics
- Track Type Event
- Category Link Click
- Action Click
Step 4 − For label, use the recently created label, urlName.
Step 5 − Once done, check Enable overriding settings in this tag. In the Tracking ID text box, enter your Google Analytics Tracking Code.
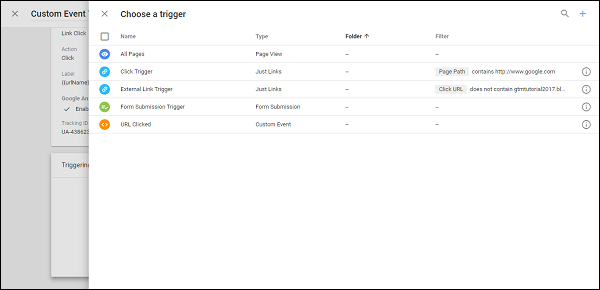
When selecting a trigger, make sure you select the recently created trigger URL Clicked.
Step 6 − Save the tag. Click Preview to see the changes in your blog.
Step 7 − Ctrl + Click on the Internal Link. You should be able to see the gtm.linkClick event in the Summary box. Also, you should see the tag fired as shown in the following screenshot.
In this way, we can use the existing events to create custom events of our own and have successful tracking for the controls that we want.
Mouse Scroll Tracking
When it comes to engaging the users on the blog, a product marketer may want to detect a mouse scroll. The detection of mouse scroll is critical as it will call for further actions, such as show a newsletter link or trigger a popup that provides some sort of discount on the product.
Using Google Tag Manager, we can easily track the scroll event. For this purpose, we need to use a third-party code, which we will use while creating a tag.
The code is available at this location. We will use it when creating a tag.
Step 1 − Create a trigger. We will call this trigger a scroll trigger.
Refer to the following image for the trigger configuration.
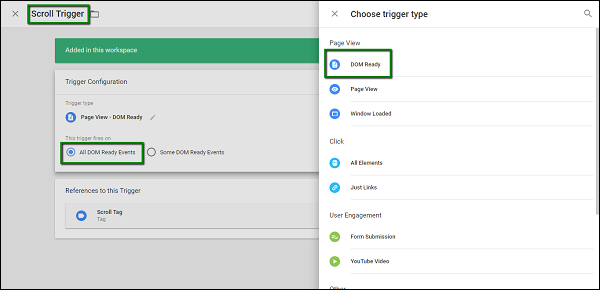
Step 2 − Configure Trigger Type DOM Ready. Allow this trigger to be fired on All DOM Ready Events.
Step 3 − Click SAVE once done with the above steps.
Now let us create the tag.
Step 4 − This time, when creating a tag, select a different type of Tracking as shown in the following screenshot.
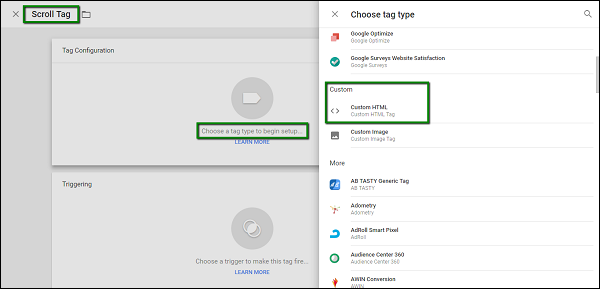
Step 5 − When custom HTML is selected, it will show up a space for entering the HTML code.
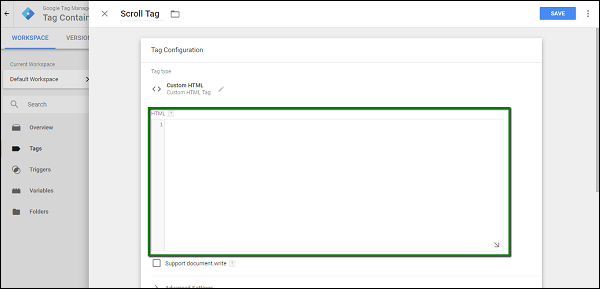
Step 6 − Enter the code as copied from this link.
Step 7 − Scroll down to configure the trigger. The trigger that we recently created (Scroll Trigger above), needs to be selected.
Step 8 − Click SAVE.
Step 9 − Now, start the GTM Debugger and refresh the blog page. You will see two major changes in the Summary and Tag section.
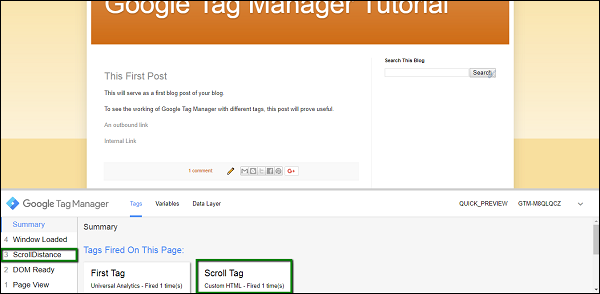
Step 10 − Now, scroll down to see the rest of the blog, a couple of more events will get triggered.
- ScrollDistance
- ScrollTiming
These events will eventually be used to detect the location of mouse scroll and take further action accordingly.