Google Tag Manager - The Data Layer
A data layer can be seen as an object holding all the information to pass and process with Google Tag Manager. This is a bit technical concept. The term data layer is used to denote the data structure used by Google Tag Manager for storing, processing and passing data between your website/blog and the tag manager.
To elaborate it further, a Data Layer can feed the data into your analytics tool about your visitor. Taking another perspective for the definition, Data Layer is actually a list of business requirements and goals for each subset of the digital context.
Let us take an example of ecommerce website, business requirements might include −
Transactional information, having the details about what was purchased
Visitor data, regarding who purchased
Other details about the purchase, such as where was the purchase made and at what time
Lastly, the information about other factors, such as whether the visitor subscribed for the email updates or not
So, in a nutshell, the data layer carries information that can be used by different tools/users/stakeholders as required.
In Google Tag Manager, dataLayer is a JavaScript array. It consists of key-value pairs. Following is a quick example of dataLayer with different data types −
dataLayer = [{
   'products': [{
      'name': 'Western Cotton',
      'tuning': 'High-G',
      'price': 49.75
   },
   {
      'name': 'Fenda Speakers',
      'tuning': 'Drop-C',
      'price': 199
   }],
   'stores': ['Hyderabad', 'Bangloer],
   'date': Sat Sep 13 2017 17:05:32 GMT+0530 (IST),
   'employee': {'name': 'Raghav}
}];
Here, we have different values such as an array of objects (the products), numerical values (the price), an array of strings (stores), a date object and an object (name).
On another note, when you place Google Tag Manager Container Code in your website, the data layer is automatically created.
In itself, data layer is a pretty complex concept to understand in the first go. This chapter will provide more insights on how to interact with the data layer.
Data Layer Events
A quick example of data layer event can be, a newsletter signup form, which cant be easily tracked with automatic GTM listeners. A website developer can support you to push a data layer event once a new subscriber has entered his/her email on your website. The code of this event should look like this −
push({event: new_subscriber});
If you require, you can ask your developer for some more information, such as the form location. This is required if there are more than one form on your website. It can be achieved using the following code.
window.dataLayer = window.dataLayer || [];
window.dataLayer.push({
   'formLocation': footer,
   'event': new_subscriber
});
Also, Google Tag Manager pushes a certain set of values to the data layer of web applications by default. These values are −
gtm.js − Pushed to the data layer as soon as Google Tag Manager is ready to run
gtm.dom − Pushed to the data layer when the DOM is ready
gtm.load − Pushed to the data layer when the window is fully loaded
Inspecting the Data Layer
As we already know by now, there are certain events that are created as a result of any interaction on the screen.
For instance, let us consider this simple page load event. To look at the events, you need to have the debugger running. Once you have the debugger running (in preview mode), visit the blog. If you look at the summary window at the bottom left corner, this is what you will see −
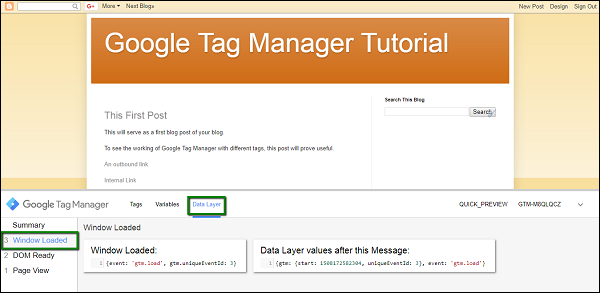
Step 1 − Click Window Loaded and then Data Layer.
The information shown in the Data Layer tab is about the Window Loaded event.
It is shown as {event: gtm.load, gtm.uniqueEventId: 3}
Further, if you want to take a closer look, you need to take support from Chromes console tab. Inspecting a data layer becomes easy when you know how to use Chrome debugger in the correct way.
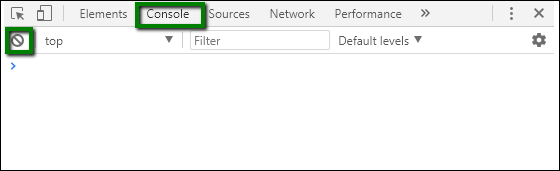
Step 2 − When you are on your blog, right-click at any part in the page. In the context menu displayed, click Inspect. The panel will be displayed at the right side of the screen, with Elements tab activated.
Step 3 − Click Console. When in the console mode, click the top left corner icon to clear all the messages shown. See the following screenshot for reference.
Step 4 − Once the window is cleared for any previous messages, type in dataLayer, make sure the capitalization for L is done. This name is provided by Google Tag Manager to its data layer. However, your developers may assign it a different name as and when required.
Step 5 − Press enter after dataLayer. It will show the following details.
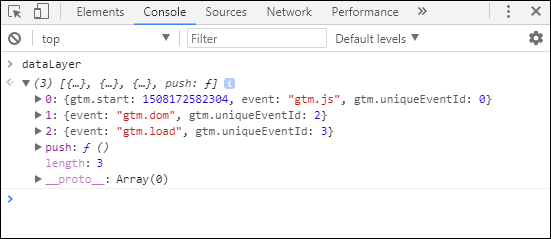
There are three objects, and each object contains some information. Now, these objects might not be the same for you, as they are shown in the above screenshot. The dataLayer is configurable and it is very much in the developers control to configure it as per the requirement.
The values that are present, are due to the Blogger gadget that is in use at that particular position/space. This is the reason why there is certain information there.
If you look at object 1, you will notice that the event that is fired, is gtm.dom. It is fired by GTM while loading the page.
In this way, you can inspect the data layer and add information in it as and when needed.
Variables in the Data Layer
Now that we are acquainted with the data layer, let us try and read one of the variables using Google Tag Manager Interface.
Here, we are going to try and read the event using a data layer variable.
If we see the above figure, the variable event holds the gtm.dom. We are going to create a variable from GTM interface and see how it reflects in the Variables tab under Google Tag Manager.
Step 1 − In Google Tag Manager Interface, go to Variables. Scroll down to the user-defined variables. Click NEW.
Step 2 − Provide a name to this new variable, let us call it as varEvent.
Step 3 − Click Choose a variable type to begin setup
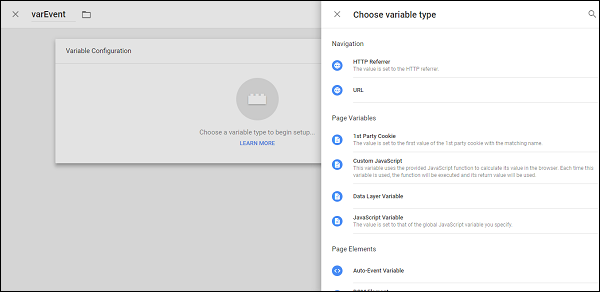
Step 4 − Select Data Layer Variable from the list.
Step 5 − When you select Data Layer Variable, you will be required to provide the name and version.
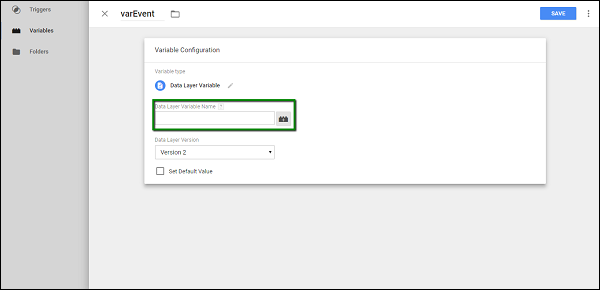
This name will be from the actual Data Layer of Google Tag Manager. As mentioned previously, the variable that we will track is event.
Step 6 − Enter event in Data Layer Variable Name.
Step 7 − Click SAVE.
Step 8 − Click Preview to see the changes reflected in the debugger.
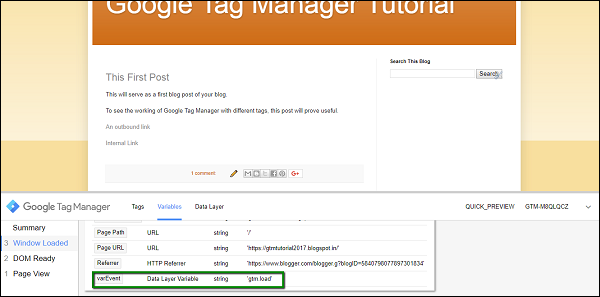
Step 9 − Once the page is loaded, click Window Loaded and then Variables. Scroll to the very bottom of Variables section, you will see varEvent, as highlighted in the above screenshot.
As seen in the above screenshot, the value will be gtm.load.
In this way, one can inspect the data layer and capture the values in the data layer as required.