- Silverlight - Home
- Silverlight - Overview
- Silverlight - Environment Setup
- Silverlight - Getting Started
- Silverlight - XAML Overview
- Silverlight - Project Types
- Silverlight - Fixed Layouts
- Silverlight - Dynamic Layout
- Constrained vs. Unconstrained
- Silverlight - CSS
- Silverlight - Controls
- Silverlight - Buttons
- Silverlight - Content Model
- Silverlight - ListBox
- Silverlight - Templates
- Silverlight - Visual State
- Silverlight - Data Binding
- Silverlight - Browser Integration
- Silverlight - Out-of-Browser
- Silverlight - Applications, Resources
- Silverlight - File Access
- Silverlight - View Model
- Silverlight - Input Handling
- Silverlight - Isolated Storage
- Silverlight - Text
- Silverlight - Animation
- Silverlight - Video and Audio
- Silverlight - Printing
Silverlight - View Model
In this chapter, we will be looking at an important technique in Silverlight's software development, the use of View Models.
The view model is a key piece, which introduces a technique called separated presentation by keeping the view separate from the model.
View Models offer one-way of achieving separated presentation, and we will see how they exploit Silverlight's data binding to reduce the amount of code needed in your user interface.
UI Development Challenges
View Models are designed to solve certain problems that crop up frequently when developing user interface software. Perhaps the most important one is that user interface code is often difficult to inextricably test, especially with automated unit tests. There are also code quality problems that can affect the ongoing flexibility and maintainability of your code.
If you follow the path of least resistance that Visual Studio's design tools lead you down, you can end up putting far too much code into the code behind.
It is very common to see large amounts of application functionality are added into the code behind.
Few developers would actually plan to put business logic into a user interface class, but because that is where Visual Studio puts your event handlers, it becomes an all too convenient place to get the things done.
It is widely accepted that software is easier to develop and maintain if classes have well-defined, and reasonably narrow responsibilities.
The code behind's job is to interact directly with the objects that make up the user interface where it is necessary.
As soon as you start putting code that makes decisions about how your application behaves in there which tends to lead to problems.
Not only can application logic flow into code that's supposed to be concerned with the user interface, some developers start to rely on controls, and other user interface objects to hold important application state.
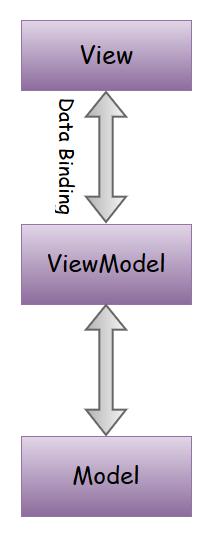
The model simply holds the data, the view simply holds the formatted date, and the controller (ViewModel) acts as the liaison between the two. The controller might take input from the view and place it on the model and vice versa.
Separated Presentation
To avoid the problems caused by putting application logic in the code behind or XAML, it is best to use a technique known as separated presentation. Having XAML and code behind with the minimum required for working with user interface objects directly, a user interface classes also contain code for complex interaction behaviors, application logic, and everything else as shown below on left side.
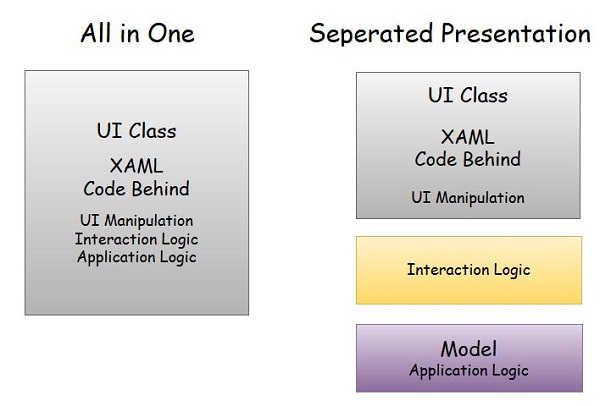
Important features of Seperated Presentation −
With separated presentation, the user interface class is much simpler. It has XAML of course, but the code behind does as little as is practical.
The application logic belongs in a separate class, which is often referred to as the model.
Many developers attempt to use data binding to connect elements in the XAML directly to properties in the model.
The problem is the model is entirely concerned with matters of what the application does, and not with how the user interacts with the application.
Most user interfaces have some state that does not belong in the application model. For example, if your user interface uses a drag and drop, something needs to keep track of things like where the item being dragged is right now, how its appearance should change as it moves over possible drop targets, and how those drop targets might also change as the item is dragged over them.
This sort of state can get surprisingly complex, and needs to be thoroughly tested.
In practice, you normally want some other class sitting between the user interface and the model. This has two important roles.
First, it adapts your application model for a particular user interface view.
Second, it is where any nontrivial interaction logic lives, and by that, I mean code required to get your user interface to behave in the way you want.
Model / View / ViewModel
View Model is an example of the separated presentation approach, but let us be clear about exactly what sort of thing we have in each layer. There are three layers −
- Model
- View
- ViewModel
Model
This is a classic object model comprising of ordinary C# classes that has no direct relationship with the user interface.
You would typically expect your Model codes to be able to compile without references to any user interface libraries. In fact, you would probably be able to take the exact same source code and compile it into a Silverlight application, an ordinary .NET Console application, or even server-side web code.
The types in the Model should represent the concepts your application works with.
View
A View is normally a UserControl, it might be your MainPage, or it might just be some part of your page.
In most Silverlight applications, it is a good idea to split your user interface up into small pieces defining a UserControl, or View for each piece.
Silverlight applications are not unique in this respect. Something that is obviously Silverlight specific is the View. The more fine-grained your user interface is, the better things tend to be. Not only are you less likely to trip over other developers working on the same files, keeping things small and simple naturally discourages the shortcuts that lead to spaghetti-like code.
For example, it is very common to define a View to represent an individual item in a List.
ViewModel
Finally, for each View, you write a ViewModel. So, this is one of the important features of a ViewModel class.
It exists to serve a particular View. The ViewModel is specialized for a particular way of presenting things, such as a particular data item as it appears in Lists.
This is why it is called a ViewModel; it adapts the underlying Model especially for a particular View. Like the Model, the ViewModel is also an ordinary C# class. It does not need to derive from any particular type.
As it happens, some developers find it convenient to put some common functionality into a base ViewModel class, but the pattern does not demand that. In particular, your ViewModel does not derive from any Silverlight specific type. However, unlike the model, it can use Silverlight types in its properties.
For example, your ViewModel might choose to make certain parts of your user interface visible only under certain conditions, and so you might provide a property of type System.Windows.Visibility, which is the type Silverlight elements use for their Visibility property. This makes it possible to bind the visibility of an element, such as a panel, directly to the ViewModel.
Example
Let us look at a simple example in which we will be using Model-View-ViewModel (MVVM) approach.
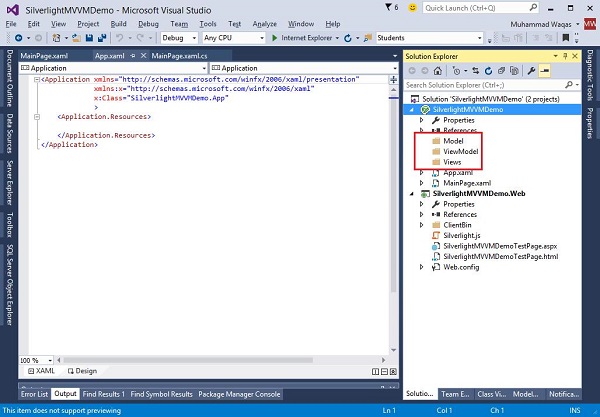
Step 1 − Create a new Silverlight Application project SilverlightMVVMDemo.
Step 2 − Add the three folders (Model, ViewModel, and Views) into your project as shown below.
Step 3 − Add a StudentModel class in the Model folder and paste the below code in that class.
using System.ComponentModel;

namespace SilverlightMVVMDemo.Model {

   public class StudentModel {}

   public class Student : INotifyPropertyChanged {
      private string firstName;
      private string lastName;

      public string FirstName {
         get { return firstName; }

         set {
            if (firstName != value) {
               firstName = value;
               RaisePropertyChanged("FirstName");
               RaisePropertyChanged("FullName");
            }
         }
      }

      public string LastName {
         get { return lastName; }

         set {
            if (lastName != value) {
               lastName = value;
               RaisePropertyChanged("LastName");
               RaisePropertyChanged("FullName");
            }
         }
      }

      public string FullName {
         get {
            return firstName + " " + lastName;
         }
      }

      public event PropertyChangedEventHandler PropertyChanged;

      private void RaisePropertyChanged(string property) {
         if (PropertyChanged != null) {
            PropertyChanged(this, new PropertyChangedEventArgs(property));
         }
      }
   }
}
Step 4 − Add another StudentViewModel class into ViewModel folder and paste the following code.
using SilverlightMVVMDemo.Model;
using System.Collections.ObjectModel;

namespace SilverlightMVVMDemo.ViewModel {

   public class StudentViewModel {

      public ObservableCollection<Student> Students {
         get;
         set;
      }

      public void LoadStudents() {
         ObservableCollection<Student> students = new ObservableCollection<Student>();

         students.Add(new Student { FirstName = "Mark", LastName = "Allain" });
         students.Add(new Student { FirstName = "Allen", LastName = "Brown" });
         students.Add(new Student { FirstName = "Linda", LastName = "Hamerski" });

         Students = students;
      }
   }
}
Step 5 − Add Silverlight User Control by right-clicking on Views folder and Select Add New Item.
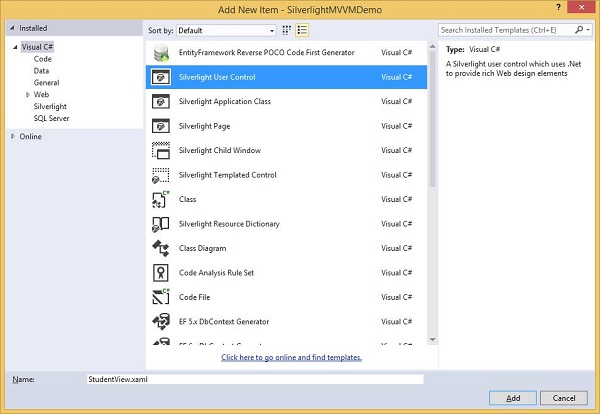
Step 6 − Click Add. Now you will see the XAML file. Add the following code into StudentView.xaml file, which contains different UI elements.
<UserControl x:Class = "SilverlightMVVMDemo.Views.StudentView"
   xmlns = "http://schemas.microsoft.com/winfx/2006/xaml/presentation"
   xmlns:x = "http://schemas.microsoft.com/winfx/2006/xaml"
   xmlns:d = "http://schemas.microsoft.com/expression/blend/2008"
   xmlns:mc = "http://schemas.openxmlformats.org/markup-compatibility/2006"
   mc:Ignorable = "d"
   d:DesignHeight = "300" d:DesignWidth = "400">

   <Grid x:Name = "LayoutRoot" Background = "White">

      <StackPanel HorizontalAlignment = "Left">

         <ItemsControl ItemsSource = "{Binding Path=Students}">

            <ItemsControl.ItemTemplate>

               <DataTemplate>

                  <StackPanel Orientation = "Horizontal">
                     <TextBox Text = "{Binding Path = FirstName, Mode = TwoWay}"
                        Width = "100" Margin = "3 5 3 5"/>

                     <TextBox Text = "{Binding Path = LastName, Mode = TwoWay}"
                        Width = "100" Margin = "0 5 3 5"/>

                     <TextBlock  Text = "{Binding Path = FullName, Mode=OneWay}"
                        Margin = "0 5 3 5"/>

                  </StackPanel>

               </DataTemplate>

            </ItemsControl.ItemTemplate>

         </ItemsControl>

      </StackPanel>

   </Grid>

</UserControl>
Step 7 − Now add the StudentView into your MainPage.xaml file as shown below.
<UserControl x:Class = "SilverlightMVVMDemo.MainPage"
   xmlns = "http://schemas.microsoft.com/winfx/2006/xaml/presentation"
   xmlns:x = "http://schemas.microsoft.com/winfx/2006/xaml"
   xmlns:d = "http://schemas.microsoft.com/expression/blend/2008"
   xmlns:mc = "http://schemas.openxmlformats.org/markup-compatibility/2006"
   xmlns:views = "clr-namespace:SilverlightMVVMDemo.Views"
   mc:Ignorable = "d"
   d:DesignHeight = "576.316" d:DesignWidth = "863.158">

   <Grid x:Name = "LayoutRoot" Background = "White">
      <views:StudentView x:Name = "StudentViewControl" Loaded = "StudentViewControl_Loaded"/>
   </Grid>

</UserControl>
Step 8 − Here is the implementation of Loaded event in the MainPage.xaml.cs file, which will update the View from the ViewModel.
using System.Windows;
using System.Windows.Controls;

namespace SilverlightMVVMDemo {

   public partial class MainPage : UserControl {

      public MainPage() {
         InitializeComponent();
      }
   }

   private void StudentViewControl_Loaded(object sender, RoutedEventArgs e) {
      SilverlightMVVMDemo.ViewModel.StudentViewModel
      studentViewModelObject = new SilverlightMVVMDemo.ViewModel.
      StudentViewModel();
      studentViewModelObject.LoadStudents();
      StudentViewControl.DataContext = studentViewModelObject;
   }
}
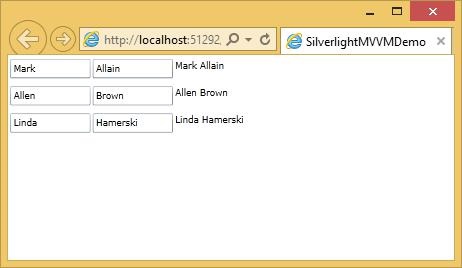
Step 9 − When the above code is compiled and executed, you will see the following output on you webpage.
UI vs ViewModel
One of the hardest parts of the MVVM approach is working out where the dividing line should come. It is not always obvious which things belong where.
In particular, some user interface elements provide functionality, which, according to a strict View, should arguably belong in the ViewModel.
In general, not all behaviors implemented in the View are so ViewModel friendly.
Part of the reason for this is that there is not any standard way to package ViewModel behavior for reuse, particularly not if you want to use a design environment, such as Visual Studio, or Blend.
Advantages of MVVM
MVVM offers the following advantages −
Separation of Presentation Concerns (View, ViewModel, Model)
Clean testable and manageable code. Can include presentation tier logic in unit testing.
No code behind code, so the presentation layer and the logic is loosely coupled.
Better way of databinding.
Disadvantages of MVVM
For simple UIs, MVVM can be an overkill. Debugging would be a bit difficult when we have complex data bindings.