- Python Data Persistence - Home
- Python Data Persistence - Introduction
- Python Data Persistence - File API
- File Handling with os Module
- Python Data Persistence - Object Serialization
- Python Data Persistence - Pickle Module
- Python Data Persistence - Marshal Module
- Python Data Persistence - Shelve Module
- Python Data Persistence - dbm Package
- Python Data Persistence - CSV Module
- Python Data Persistence - JSON Module
- Python Data Persistence - XML Parsers
- Python Data Persistence - Plistlib Module
- Python Data Persistence - Sqlite3 Module
- Python Data Persistence - SQLAlchemy
- Python Data Persistence - PyMongo module
- Python Data Persistence - Cassandra Driver
- Data Persistence - ZODB
- Data Persistence - Openpyxl Module
Python Data Persistence Resources
Python Data Persistence - Quick Guide
Python Data Persistence - Introduction
Overview of Python - Data Persistence
During the course of using any software application, user provides some data to be processed. The data may be input, using a standard input device (keyboard) or other devices such as disk file, scanner, camera, network cable, WiFi connection, etc.
Data so received, is stored in computers main memory (RAM) in the form of various data structures such as, variables and objects until the application is running. Thereafter, memory contents from RAM are erased.
However, more often than not, it is desired that the values of variables and/or objects be stored in such a manner, that it can be retrieved whenever required, instead of again inputting the same data.
The word persistence means "the continuance of an effect after its cause is removed". The term data persistence means it continues to exist even after the application has ended. Thus, data stored in a non-volatile storage medium such as, a disk file is a persistent data storage.
In this tutorial, we will explore various built-in and third party Python modules to store and retrieve data to/from various formats such as text file, CSV, JSON and XML files as well as relational and non-relational databases.
Using Pythons built-in File object, it is possible to write string data to a disk file and read from it. Pythons standard library, provides modules to store and retrieve serialized data in various data structures such as JSON and XML.
Pythons DB-API provides a standard way of interacting with relational databases. Other third party Python packages, present interfacing functionality with NOSQL databases such as MongoDB and Cassandra.
This tutorial also introduces, ZODB database which is a persistence API for Python objects. Microsoft Excel format is a very popular data file format. In this tutorial, we will learn how to handle .xlsx file through Python.
Python Data Persistence - File API
Python uses built-in input() and print() functions to perform standard input/output operations. The input() function reads bytes from a standard input stream device, i.e. keyboard.
The print() function on the other hand, sends the data towards standard output stream device i.e. the display monitor. Python program interacts with these IO devices through standard stream objects stdin and stdout defined in sys module.
The input() function is actually a wrapper around readline() method of sys.stdin object. All keystrokes from the input stream are received till Enter key is pressed.
>>> import sys
>>> x=sys.stdin.readline()
Welcome to TutorialsPoint
>>> x
'Welcome to TutorialsPoint\n'
Note that, readline() function leave a trailing \n character. There is also a read() method which reads data from standard input stream till it is terminated by Ctrl+D character.
>>> x=sys.stdin.read()
Hello
Welcome to TutorialsPoint
>>> x
'Hello\nWelcome to TutorialsPoint\n'
Similarly, print() is a convenience function emulating write() method of stdout object.
>>> x='Welcome to TutorialsPoint\n'
>>> sys.stdout.write(x)
Welcome to TutorialsPoint
26
Just as stdin and stdout predefined stream objects, a Python program can read data from and send data to a disk file or a network socket. They are also streams. Any object that has read() method is an input stream. Any object that has write() method is an output stream. The communication with the stream is established by obtaining reference to the stream object with built-in open() function.
open() function
This built-in function uses following arguments −
f=open(name, mode, buffering)
The name parameter, is name of disk file or byte string, mode is optional one-character string to specify the type of operation to be performed (read, write, append etc.) and buffering parameter is either 0, 1 or -1 indicating buffering is off, on or system default.
File opening mode is enumerated as per table below. Default mode is r
| Sr.No | Parameters & Description |
|---|---|
| 1 |
R Open for reading (default) |
| 2 |
W Open for writing, truncating the file first |
| 3 |
X Create a new file and open it for writing |
| 4 |
A Open for writing, appending to the end of the file if it exists |
| 5 |
B Binary mode |
| 6 |
T Text mode (default) |
| 7 |
+ Open a disk file for updating (reading and writing) |
In order to save data to file it must be opened with w mode.
f=open('test.txt','w')
This file object acts as an output stream, and has access to write() method. The write() method sends a string to this object, and is stored in the file underlying it.
string="Hello TutorialsPoint\n"
f.write(string)
It is important to close the stream, to ensure that any data remaining in buffer is completely transferred to it.
file.close()
Try and open test.txt using any test editor (such as notepad) to confirm successful creation of file.
To read contents of test.txt programmatically, it must be opened in r mode.
f=open('test.txt','r')
This object behaves as an input stream. Python can fetch data from the stream using read() method.
string=f.read()
print (string)
Contents of the file are displayed on Python console. The File object also supports readline() method which is able to read string till it encounters EOF character.
However, if same file is opened in w mode to store additional text in it, earlier contents are erased. Whenever, a file is opened with write permission, it is treated as if it is a new file. To add data to an existing file, use a for append mode.
f=open('test.txt','a')
f.write('Python Tutorials\n')
The file now, has earlier as well as newly added string. The file object also supports writelines() method to write each string in a list object to the file.
f=open('test.txt','a')
lines=['Java Tutorials\n', 'DBMS tutorials\n', 'Mobile development tutorials\n']
f.writelines(lines)
f.close()
Example - Reading data from a File
The readlines() method returns a list of strings, each representing a line in the file. It is also possible to read the file line by line until end of file is reached.
f=open('test.txt','r')
while True:
   line=f.readline()
   if line=='' : break
   print (line, end='')
f.close()
Output
Hello TutorialsPoint
Python Tutorials
Java Tutorials
DBMS tutorials
Mobile development tutorials
Example - Binary mode
By default, read/write operation on a file object are performed on text string data. If we want to handle files of different other types such as media (mp3), executables (exe), pictures (jpg) etc., we need to add b prefix to read/write mode.
Following statement will convert a string to bytes and write in a file.
main.py
f=open('test.bin', 'wb')
data=b"Hello World"
f.write(data)
f.close()
Conversion of text string to bytes is also possible using encode() function.
data="Hello World".encode('utf-8')
We need to use rb mode to read binary file. Returned value of read() method is first decoded before printing.
f=open('test.bin', 'rb')
data=f.read()
print (data.decode(encoding='utf-8'))
In order to write integer data in a binary file, the integer object should be converted to bytes by to_bytes() method.
n=25
n.to_bytes(8,'big')
f=open('test.bin', 'wb')
data=n.to_bytes(8,'big')
f.write(data)
To read back from a binary file, convert output of read() function to integer by from_bytes() function.
f=open('test.bin', 'rb')
data=f.read()
n=int.from_bytes(data, 'big')
print (n)
For floating point data, we need to use struct module from Pythons standard library.
import struct
x=23.50
data=struct.pack('f',x)
f=open('test.bin', 'wb')
f.write(data)
Unpacking the string from read() function, to retrieve the float data from binary file.
f=open('test.bin', 'rb')
data=f.read()
x=struct.unpack('f', data)
print (x)
Simultaneous read/write
When a file is opened for writing (with w or a), it is not possible, to read from it and vice versa. Doing so throws UnSupportedOperation error. We need to close the file before doing other operation.
In order to perform both operations simultaneously, we have to add + character in the mode parameter. Hence, w+ or r+ mode enables using write() as well as read() methods without closing a file. The File object also supports seek() function to rewind the stream to any desired byte position.
f=open('test.txt','w+')
f.write('Hello world')
f.seek(0,0)
data=f.read()
print (data)
f.close()
Following table summarizes all the methods available to a file like object.
| Sr.No | Method & Description |
|---|---|
| 1 |
close() Closes the file. A closed file cannot be read or written any more. |
| 2 |
flush() Flush the internal buffer. |
| 3 |
fileno() Returns the integer file descriptor. |
| 4 |
next() Returns the next line from the file each time it is being called. Use next() iterator in Python 3. |
| 5 |
read([size]) Reads at most size bytes from the file (less if the read hits EOF before obtaining size bytes). |
| 6 |
readline([size]) Reads one entire line from the file. A trailing newline character is kept in the string. |
| 7 |
readlines([sizehint]) Reads until EOF using readline() and returns a list containing the lines. |
| 8 |
seek(offset[, whence]) Sets the file's current position. 0-begin 1-current 2-end. |
| 9 |
seek(offset[, whence]) Sets the file's current position. 0-begin 1-current 2-end. |
| 10 |
tell() Returns the file's current position |
| 11 |
truncate([size]) Truncates the file's size. |
| 12 |
write(str) Writes a string to the file. There is no return value. |
File Handling with os Module
In addition to File object returned by open() function, file IO operations can also be performed using Python's built-in library has os module that provides useful operating system dependent functions. These functions perform low level read/write operations on file.
The open() function from os module is similar to the built-in open(). However, it doesn't return a file object but a file descriptor, a unique integer corresponding to file opened. File descriptor's values 0, 1 and 2 represent stdin, stdout, and stderr streams. Other files will be given incremental file descriptor from 2 onwards.
As in case of open() built-in function, os.open() function also needs to specify file access mode. Following table lists various modes as defined in os module.
| Sr.No. | Os Module & Description |
|---|---|
| 1 |
os.O_RDONLY Open for reading only |
| 2 |
os.O_WRONLY Open for writing only |
| 3 |
os.O_RDWR Open for reading and writing |
| 4 |
os.O_NONBLOCK Do not block on open |
| 5 |
os.O_APPEND Append on each write |
| 6 |
os.O_CREAT Create file if it does not exist |
| 7 |
os.O_TRUNC Truncate size to 0 |
| 8 |
os.O_EXCL Error if create and file exists |
To open a new file for writing data in it, specify O_WRONLY as well as O_CREAT modes by inserting pipe (|) operator. The os.open() function returns a file descriptor.
f=os.open("test.dat", os.O_WRONLY|os.O_CREAT)
Note that, data is written to disk file in the form of byte string. Hence, a normal string is converted to byte string by using encode() function as earlier.
data="Hello World".encode('utf-8')
The write() function in os module accepts this byte string and file descriptor.
os.write(f,data)
Dont forget to close the file using close() function.
os.close(f)
To read contents of a file using os.read() function, use following statements:
f=os.open("test.dat", os.O_RDONLY)
data=os.read(f,20)
print (data.decode('utf-8'))
Note that, the os.read() function needs file descriptor and number of bytes to be read (length of byte string).
If you want to open a file for simultaneous read/write operations, use O_RDWR mode. Following table shows important file operation related functions in os module.
| Sr.No | Functions & Description |
|---|---|
| 1 |
os.close(fd) Close the file descriptor. |
| 2 |
os.open(file, flags[, mode]) Open the file and set various flags according to flags and possibly its mode according to mode. |
| 3 |
os.read(fd, n) Read at most n bytes from file descriptor fd. Return a string containing the bytes read. If the end of the file referred to by fd has been reached, an empty string is returned. |
| 4 |
os.write(fd, str) Write the string str to file descriptor fd. Return the number of bytes actually written. |
Python Data Persistence - Object Serialization
Python's built-in file object returned by Python's built-in open() function has one important shortcoming. When opened with 'w' mode, the write() method accepts only the string object.
That means, if you have data represented in any non-string form, the object of either in built-in classes (numbers, dictionary, lists or tuples) or other user-defined classes, it cannot be written to file directly. Before writing, you need to convert it in its string representation.
numbers=[10,20,30,40]
   file=open('numbers.txt','w')
   file.write(str(numbers))
   file.close()
For a binary file, argument to write() method must be a byte object. For example, the list of integers is converted to bytes by bytearray() function and then written to file.
numbers=[10,20,30,40]
   data=bytearray(numbers)
   file.write(data)
   file.close()
To read back data from the file in the respective data type, reverse conversion needs to be done.
file=open('numbers.txt','rb')
   data=file.read()
   print (list(data))
This type of manual conversion, of an object to string or byte format (and vice versa) is very cumbersome and tedious. It is possible to store the state of a Python object in the form of byte stream directly to a file, or memory stream and retrieve to its original state. This process is called serialization and de-serialization.
Pythons built in library contains various modules for serialization and deserialization process.
| Sr.No. | Name & Description |
|---|---|
| 1 |
pickle Python specific serialization library |
| 2 |
marshal Library used internally for serialization |
| 3 |
shelve Pythonic object persistence |
| 4 |
dbm library offering interface to Unix database |
| 5 |
csv library for storage and retrieval of Python data to CSV format |
| 6 |
json Library for serialization to universal JSON format |
Python Data Persistence - Pickle Module
Pythons terminology for serialization and deserialization is pickling and unpickling respectively. The pickle module in Python library, uses very Python specific data format. Hence, non-Python applications may not be able to deserialize pickled data properly. It is also advised not to unpickle data from un-authenticated source.
The serialized (pickled) data can be stored in a byte string or a binary file. This module defines dumps() and loads() functions to pickle and unpickle data using byte string. For file based process, the module has dump() and load() function.
Pythons pickle protocols are the conventions used in constructing and deconstructing Python objects to/from binary data. Currently, pickle module defines 5 different protocols as listed below −
| Sr.No. | Names & Description |
|---|---|
| 1 |
Protocol version 0 Original human-readable protocol backwards compatible with earlier versions. |
| 2 |
Protocol version 1 Old binary format also compatible with earlier versions of Python. |
| 3 |
Protocol version 2 Introduced in Python 2.3 provides efficient pickling of new-style classes. |
| 4 |
Protocol version 3 Added in Python 3.0. recommended when compatibility with other Python 3 versions is required. |
| 5 |
Protocol version 4 was added in Python 3.4. It adds support for very large objects |
Example - Object representation
The pickle module consists of dumps() function that returns a string representation of pickled data.
main.py
from pickle import dumps
dct={"name":"Ravi", "age":23, "Gender":"M","marks":75}
dctstring=dumps(dct)
print (dctstring)
Output
b'\x80\x03}q\x00(X\x04\x00\x00\x00nameq\x01X\x04\x00\x00\x00Raviq\x02X\x03\x00\x00\x00ageq\x03K\x17X\x06\x00\x00\x00Genderq\x04X\x01\x00\x00\x00Mq\x05X\x05\x00\x00\x00marksq\x06KKu
Example - Loading String in dictionary
Use loads() function, to unpickle the string and obtain original dictionary object.
main.py
from pickle import dumps, loads

dct={"name":"Ravi", "age":23, "Gender":"M","marks":75}
dctstring=dumps(dct)

dct=loads(dctstring)
print (dct)
Output
{'name': 'Ravi', 'age': 23, 'Gender': 'M', 'marks': 75}
Example - Persisting Objects on Disk
Pickled objects can also be persistently stored in a disk file, using dump() function and retrieved using load() function.
main.py
import pickle
f=open("data.txt","wb")
dct={"name":"Ravi", "age":23, "Gender":"M","marks":75}
pickle.dump(dct,f)
f.close()

#to read
import pickle
f=open("data.txt","rb")
d=pickle.load(f)
print (d)
f.close()
Output
{'name': 'Ravi', 'age': 23, 'Gender': 'M', 'marks': 75}
The pickle module also provides, object oriented API for serialization mechanism in the form of Pickler and Unpickler classes.
As mentioned above, just as built-in objects in Python, objects of user defined classes can also be persistently serialized in disk file. In following program, we define a User class with name and mobile number as its instance attributes. In addition to the __init__() constructor, the class overrides __str__() method that returns a string representation of its object.
class User:
   def __init__(self,name, mob):
      self.name=name
      self.mobile=mob
   def __str__(self):
return ('Name: {} mobile: {} '. format(self.name, self.mobile))
Example - Serializing Object
To pickle object of above class in a file we use pickler class and its dump() method.
main.py
from pickle import Pickler

class User:
   def __init__(self, name, email, mob):
      self.name=name
      self.email=email
      self.mobile=mob
   def __str__(self):
      return ('Name: {} Email: {} mobile: {} '. format(self.name, self.email, self.mobile))

user1=User('Rajani', 'raj@gmail.com', '1234567890')
file=open('userdata','wb')
Pickler(file).dump(user1)
file.close()
Example - Deserializing Object
Conversely, Unpickler class has load() method to retrieve serialized object as follows −
main.py
from pickle import Unpickler

class User:
   def __init__(self, name, email, mob):
      self.name=name
      self.email=email
      self.mobile=mob
   def __str__(self):
      return ('Name: {} Email: {} mobile: {} '. format(self.name, self.email, self.mobile))

file=open('userdata','rb')
user1=Unpickler(file).load()
print (user1)
Output
Name: Rajani Email: raj@gmail.com mobile: 1234567890
Python Data Persistence - Marshal Module
Object serialization features of marshal module in Pythons standard library are similar to pickle module. However, this module is not used for general purpose data. On the other hand, it is used by Python itself for Pythons internal object serialization to support read/write operations on compiled versions of Python modules (.pyc files).
The data format used by marshal module is not compatible across Python versions. Therefore, a compiled Python script (.pyc file) of one version most probably wont execute on another.
Just as pickle module, marshal module also defined load() and dump() functions for reading and writing marshalled objects from / to file.
dump()
This function writes byte representation of supported Python object to a file. The file itself be a binary file with write permission
load()
This function reads the byte data from a binary file and converts it to Python object.
Following example demonstrates use of dump() and load() functions to handle code objects of Python, which are used to store precompiled Python modules.
The code uses built-in compile() function to build a code object out of a source string which embeds Python instructions.
compile(source, file, mode)
Example - Writing/Reading a Binary File
The file parameter should be the file from which the code was read. If it wasnt read from a file pass any arbitrary string.
The mode parameter is exec if the source contains sequence of statements, eval if there is a single expression or single if it contains a single interactive statement.
The compile code object is then stored in a .pyc file using dump() function.
main.py
import marshal
script = """
a=10
b=20
print ('addition=',a+b)
"""
code = compile(script, "script", "exec")
f=open("a.pyc","wb")
marshal.dump(code, f)
f.close()
To deserialize, the object from .pyc file use load() function. Since, it returns a code object, it can be run using exec(), another built-in function.
main.py
import marshal
f=open("a.pyc","rb")
data=marshal.load(f)
exec (data)
Output
addition= 30
Python Data Persistence - Shelve Module
The shelve module in Pythons standard library provides simple yet effective object persistence mechanism. The shelf object defined in this module is dictionary-like object which is persistently stored in a disk file. This creates a file similar to dbm database on UNIX like systems.
The shelf dictionary has certain restrictions. Only string data type can be used as key in this special dictionary object, whereas any picklable Python object can be used as value.
The shelve module defines three classes as follows −
| Sr.No | Shelve Module & Description |
|---|---|
| 1 |
Shelf This is the base class for shelf implementations. It is initialized with dict-like object. |
| 2 |
BsdDbShelf This is a subclass of Shelf class. The dict object passed to its constructor must support first(), next(), previous(), last() and set_location() methods. |
| 3 |
DbfilenameShelf This is also a subclass of Shelf but accepts a filename as parameter to its constructor rather than dict object. |
The open() function defined in shelve module which return a DbfilenameShelf object.
open(filename, flag='c', protocol=None, writeback=False)
The filename parameter is assigned to the database created. Default value for flag parameter is c for read/write access. Other flags are w (write only) r (read only) and n (new with read/write).
The serialization itself is governed by pickle protocol, default is none. Last parameter writeback parameter by default is false. If set to true, the accessed entries are cached. Every access calls sync() and close() operations, hence process may be slow.
Example - Creating a Database
Following code creates a database and stores dictionary entries in it.
main.py
import shelve
s=shelve.open("test")
s['name']="Ajay"
s['age']=23
s['marks']=75
s.close()
This will create test.dir file in current directory and store key-value data in hashed form. The Shelf object has following methods available −
| Sr.No. | Methods & Description |
|---|---|
| 1 |
close() synchronise and close persistent dict object. |
| 2 |
sync() Write back all entries in the cache if shelf was opened with writeback set to True. |
| 3 |
get() returns value associated with key |
| 4 |
items() list of tuples each tuple is key value pair |
| 5 |
keys() list of shelf keys |
| 6 |
pop() remove specified key and return the corresponding value. |
| 7 |
update() Update shelf from another dict/iterable |
| 8 |
values() list of shelf values |
Example - Accessing Values
To access value of a particular key in shelf −
main.py
import shelve
s=shelve.open('test')
print (s['age']) #this will print 23
s['age']=25
print (s.get('age')) #this will print 25
s.pop('marks') #this will remove corresponding k-v pair
Output
23
25
Example - Accessing Objects
As in a built-in dictionary object, the items(), keys() and values() methods return view objects.
main.py
import shelve
s=shelve.open('test')
print (list(s.items()))
print (list(s.keys()))
print (list(s.values()))
Output
[('name', 'Ajay'), ('age', 25), ('marks', 75)]
['name', 'age', 'marks']
['Ajay', 25, 75]
Example - Merge dictionary objects
To merge items of another dictionary with shelf use update() method.
main.py
import shelve
s=shelve.open('test')
d={'salary':10000, 'designation':'manager'}
s.update(d)
print (list(s.items()))
Output
[('age', 25), ('designation', 'manager'), ('name', 'Ajay'), ('salary', 10000)]
Python Data Persistence - DBM Package
The dbm package presents a dictionary like interface DBM style databases. DBM stands for DataBase Manager. This is used by UNIX (and UNIX like) operating system. The dbbm library is a simple database engine written by Ken Thompson. These databases use binary encoded string objects as key, as well as value.
The database stores data by use of a single key (a primary key) in fixed-size buckets and uses hashing techniques to enable fast retrieval of the data by key.
The dbm package contains following modules −
dbm.gnu module is an interface to the DBM library version as implemented by the GNU project.
dbm.ndbm module provides an interface to UNIX nbdm implementation.
dbm.dumb is used as a fallback option in the event, other dbm implementations are not found. This requires no external dependencies but is slower than others.
>>> import dbm
>>> dbm.whichdb('mydbm.db')
>>> db=dbm.open('mydbm.db','n')
>>> db['name']='Raj Deshmane'
>>> db['address']='Kirtinagar Pune'
>>> db['PIN']='431101'
>>> db.close()
The open() function allows mode these flags −
| Sr.No. | Value & Meaning |
|---|---|
| 1 |
'r' Open existing database for reading only (default) |
| 2 |
'w' Open existing database for reading and writing |
| 3 |
'c' Open database for reading and writing, creating it if it doesnt exist |
| 4 |
'n' Always create a new, empty database, open for reading and writing |
The dbm object is a dictionary like object, just as shelf object. Hence, all dictionary operations can be performed. The dbm object can invoke get(), pop(), append() and update() methods. Following code opens 'mydbm.db' with 'r' flag and iterates over collection of key-value pairs.
>>> db=dbm.open('mydbm.db','r')
>>> for k,v in db.items():
   print (k,v)
b'name' : b'Raj Deshmane'
b'address' : b'Kirtinagar Pune'
b'PIN' : b'431101'
Python Data Persistence - CSV Module
CSV stands for comma separated values. This file format is a commonly used data format while exporting/importing data to/from spreadsheets and data tables in databases. The csv module was incorporated in Pythons standard library as a result of PEP 305. It presents classes and methods to perform read/write operations on CSV file as per recommendations of PEP 305.
CSV is a preferred export data format by Microsofts Excel spreadsheet software. However, csv module can handle data represented by other dialects also.
The CSV API interface consists of following writer and reader classes −
writer()
This function in csv module returns a writer object that converts data into a delimited string and stores in a file object. The function needs a file object with write permission as a parameter. Every row written in the file issues a newline character. To prevent additional space between lines, newline parameter is set to ''.
The writer class has following methods −
writerow()
This method writes items in an iterable (list, tuple or string), separating them by comma character.
writerows()
This method takes a list of iterables, as parameter and writes each item as a comma separated line of items in the file.
Example - Writing to CSV File
Following example shows use of writer() function. First a file is opened in w mode. This file is used to obtain writer object. Each tuple in list of tuples is then written to file using writerow() method.
main.py
import csv
persons=[('Lata',22,45),('Anil',21,56),('John',20,60)]
csvfile=open('persons.csv','w', newline='')
obj=csv.writer(csvfile)
for person in persons:
   obj.writerow(person)
csvfile.close()
Output
This will create persons.csv file in current directory. It will show following data.
Lata,22,45
Anil,21,56
John,20,60
Instead of iterating over the list to write each row individually, we can use writerows() method.
import csv
csvfile=open('persons.csv','w', newline='')
persons=[('Lata',22,45),('Anil',21,56),('John',20,60)]
obj=csv.writer(csvfile)
obj.writerows(persons)
obj.close()
Example - Reading CSV File
This function returns a reader object which returns an iterator of lines in the csv file. Using the regular for loop, all lines in the file are displayed in following example −
main.py
import csv
csvfile=open('persons.csv','r', newline='')
obj=csv.reader(csvfile)
for row in obj:
   print (row)
Output
['Lata', '22', '45']
['Anil', '21', '56']
['John', '20', '60']
The reader object is an iterator. Hence, it supports next() function which can also be used to display all lines in csv file instead of a for loop.
main.py
import csv

csvfile=open('persons.csv','r', newline='')
obj=csv.reader(csvfile)

while True:
   try:
      row=next(obj)
      print (row)
   except StopIteration:
      break
Output
['Lata', '22', '45']
['Anil', '21', '56']
['John', '20', '60']
As mentioned earlier, csv module uses Excel as its default dialect. The csv module also defines a dialect class. Dialect is set of standards used to implement CSV protocol. The list of dialects available can be obtained by list_dialects() function.
>>> import csv
>>> csv.list_dialects()
['excel', 'excel-tab', 'unix']
In addition to iterables, csv module can export a dictionary object to CSV file and read it to populate Python dictionary object. For this purpose, this module defines following classes −
DictWriter()
This function returns a DictWriter object. It is similar to writer object, but the rows are mapped to dictionary object. The function needs a file object with write permission and a list of keys used in dictionary as fieldnames parameter. This is used to write first line in the file as header.
writeheader()
This method writes list of keys in dictionary as a comma separated line as first line in the file.
In following example, a list of dictionary items is defined. Each item in the list is a dictionary. Using writrows() method, they are written to file in comma separated manner.
Example - Writing Objects
main.py
import csv

persons=[
   {'name':'Lata', 'age':22, 'marks':45},
   {'name':'Anil', 'age':21, 'marks':56},
   {'name':'John', 'age':20, 'marks':60}
]
csvfile=open('persons.csv','w', newline='')
fields=list(persons[0].keys())
obj=csv.DictWriter(csvfile, fieldnames=fields)
obj.writeheader()
obj.writerows(persons)
csvfile.close()
Output
The persons.csv file shows following contents −
name,age,marks
Lata,22,45
Anil,21,56
John,20,60
DictReader()
This function returns a DictReader object from the underlying CSV file. As, in case of, reader object, this one is also an iterator, using which contents of the file are retrieved.
csvfile=open('persons.csv','r', newline='')
obj=csv.DictReader(csvfile)
The class provides fieldnames attribute, returning the dictionary keys used as header of file.
print (obj.fieldnames)
['name', 'age', 'marks']
Use loop over the DictReader object to fetch individual dictionary objects.
main.csv
import csv

csvfile=open('persons.csv','r', newline='')
obj=csv.DictReader(csvfile)

print (obj.fieldnames)

for row in obj:
   print (row)
Output
This results in following output −
['name', 'age', 'marks']
{'name': 'Lata', 'age': '22', 'marks': '45'}
{'name': 'Anil', 'age': '21', 'marks': '56'}
{'name': 'John', 'age': '20', 'marks': '60'}
Example - Converting OrderedDict Object
To convert OrderedDict object to normal dictionary, we have to first import OrderedDict from collections module.
main.csv
from collections import OrderedDict
r=OrderedDict([('name', 'Lata'), ('age', '22'), ('marks', '45')])
dict(r)
Output
This results in following output −
{'name': 'Lata', 'age': '22', 'marks': '45'}
Python Data Persistence - JSON Module
JSON stands for JavaScript Object Notation. It is a lightweight data interchange format. It is a language-independent and cross platform text format, supported by many programming languages. This format is used for data exchange between the web server and clients.
JSON format is similar to pickle. However, pickle serialization is Python specific whereas JSON format is implemented by many languages hence has become universal standard. Functionality and interface of json module in Pythons standard library is similar to pickle and marshal modules.
Just as in pickle module, the json module also provides dumps() and loads() function for serialization of Python object into JSON encoded string, and dump() and load() functions write and read serialized Python objects to/from file.
dumps() − This function converts the object into JSON format.
loads() − This function converts a JSON string back to Python object.
Following example demonstrates basic usage of these functions −
import json
data=['Rakesh',{'marks':(50,60,70)}]
s=json.dumps(data)
json.loads(s)
The dumps() function can take optional sort_keys argument. By default, it is False. If set to True, the dictionary keys appear in sorted order in the JSON string.
The dumps() function has another optional parameter called indent which takes a number as value. It decides length of each segment of formatted representation of json string, similar to print output.
The json module also has object oriented API corresponding to above functions. There are two classes defined in the module JSONEncoder and JSONDecoder.
JSONEncoder class
Object of this class is encoder for Python data structures. Each Python data type is converted in corresponding JSON type as shown in following table −
| Python | JSON |
|---|---|
| Dict | object |
| list, tuple | array |
| Str | string |
| int, float, int- & float-derived Enums | number |
| True | true |
| False | false |
| None | null |
The JSONEncoder class is instantiated by JSONEncoder() constructor. Following important methods are defined in encoder class −
| Sr.No. | Methods & Description |
|---|---|
| 1 |
encode() serializes Python object into JSON format |
| 2 |
iterencode() Encodes the object and returns an iterator yielding encoded form of each item in the object. |
| 3 |
indent Determines indent level of encoded string |
| 4 |
sort_keys is either true or false to make keys appear in sorted order or not. |
| 5 |
Check_circular if True, check for circular reference in container type object |
Following example encodes Python list object.
e=json.JSONEncoder()
e.encode(data)
JSONDecoder class
Object of this class helps in decoded in json string back to Python data structure. Main method in this class is decode(). Following example code retrieves Python list object from encoded string in earlier step.
d=json.JSONDecoder()
d.decode(s)
The json module defines load() and dump() functions to write JSON data to a file like object which may be a disk file or a byte stream and read data back from them.
Example - dump() function
This function writes JSONed Python object data to a file. The file must be opened with w mode.
main.py
import json
data=['Rakesh', {'marks': (50, 60, 70)}]

fp=open('json.txt','w')
json.dump(data,fp)
fp.close()
Output
This code will create json.txt in current directory. It shows the contents as follows −
["Rakesh", {"marks": [50, 60, 70]}]
Example - load() function
This function loads JSON data from the file and returns Python object from it. The file must be opened with read permission (should have r mode).
main.py
import json
fp=open('json.txt','r')
ret=json.load(fp)
print (ret)
fp.close()
Output
['Rakesh', {'marks': [50, 60, 70]}]
The json.tool module also has a command-line interface that validates data in file and prints JSON object in a pretty formatted manner.
(myenv) D:\Projects\python\myenv>py -m json.tool json.txt
[
   "Rakesh",
   {
      "marks": [
         50,
         60,
         70
      ]
   }
]
Python Data Persistence - XML Parsers
XML is acronym for eXtensible Markup Language. It is a portable, open source and cross platform language very much like HTML or SGML and recommended by the World Wide Web Consortium.
It is a well-known data interchange format, used by a large number of applications such as web services, office tools, and Service Oriented Architectures (SOA). XML format is both machine readable and human readable.
Standard Python library's xml package consists of following modules for XML processing −
| Sr.No. | Modules & Description |
|---|---|
| 1 |
xml.etree.ElementTree the ElementTree API, a simple and lightweight XML processor |
| 2 |
xml.dom the DOM API definition |
| 3 |
xml.dom.minidom a minimal DOM implementation |
| 4 |
xml.sax SAX2 interface implementation |
| 5 |
xml.parsers.expat the Expat parser binding |
Data in the XML document is arranged in a tree-like hierarchical format, starting with root and elements. Each element is a single node in the tree and has an attribute enclosed in <> and </> tags. One or more sub-elements may be assigned to each element.
Following is a typical example of a XML document −
<?xml version = "1.0" encoding = "iso-8859-1"?>
<studentlist>
<student>
<name>Ratna</name>
<subject>Physics</subject>
<marks>85</marks>
</student>
<student>
<name>Kiran</name>
<subject>Maths</subject>
<marks>100</marks>
</student>
<student>
<name>Mohit</name>
<subject>Biology</subject>
<marks>92</marks>
</student>
</studentlist>
While using ElementTree module, first step is to set up root element of the tree. Each Element has a tag and attrib which is a dict object. For the root element, an attrib is an empty dictionary.
import xml.etree.ElementTree as xmlobj
root=xmlobj.Element('studentList')
Now, we can add one or more elements under root element. Each element object may have SubElements. Each subelement has an attribute and text property.
student=xmlobj.Element('student')
nm=xmlobj.SubElement(student, 'name')
nm.text='name'
subject=xmlobj.SubElement(student, 'subject')
nm.text='Ratna'
subject.text='Physics'
marks=xmlobj.SubElement(student, 'marks')
marks.text='85'
This new element is appended to the root using append() method.
root.append(student)
Append as many elements as desired using above method. Finally, the root element object is written to a file.
tree = xmlobj.ElementTree(root)
file = open('studentlist.xml','wb')
tree.write(file)
file.close()
Now, we see how to parse the XML file. For that, construct document tree giving its name as file parameter in ElementTree constructor.
tree = xmlobj.ElementTree(file='studentlist.xml')
The tree object has getroot() method to obtain root element and getchildren() returns a list of elements below it.
root = tree.getroot()
children = root.getchildren()
A dictionary object corresponding to each sub element is constructed by iterating over sub-element collection of each child node.
for child in children:
   student={}
   pairs = child.getchildren()
   for pair in pairs:
      product[pair.tag]=pair.text
Each dictionary is then appended to a list returning original list of dictionary objects.
SAX is a standard interface for event-driven XML parsing. Parsing XML with SAX requires ContentHandler by subclassing xml.sax.ContentHandler. You register callbacks for events of interest and then, let the parser proceed through the document.
SAX is useful when your documents are large or you have memory limitations as it parses the file as it reads it from disk as a result entire file is never stored in the memory.
Document Object Model
(DOM) API is a World Wide Web Consortium recommendation. In this case, entire file is read into the memory and stored in a hierarchical (tree-based) form to represent all the features of an XML document.
SAX, not as fast as DOM, with large files. On the other hand, DOM can kill resources, if used on many small files. SAX is read-only, while DOM allows changes to the XML file.
Python Data Persistence - Plistlib Module
The plist format is mainly used by MAC OS X. These files are basically XML documents. They store and retrieve properties of an object. Python library contains plist module, that is used to read and write 'property list' files (they usually have .plist' extension).
The plistlib module is more or less similar to other serialization libraries in the sense, it also provides dumps() and loads() functions for string representation of Python objects and load() and dump() functions for disk operation.
Following dictionary object maintains property (key) and corresponding value −
proplist = {
   "name" : "Ganesh",
   "designation":"manager",
   "dept":"accts",
   "salary" : {"basic":12000, "da":4000, "hra":800}
}
Example - Writing to plist file
In order to write these properties in a disk file, we call dump() function in plist module.
main.py
import plistlib
fileName=open('salary.plist','wb')
proplist = {
   "name" : "Ganesh",
   "designation":"manager",
   "dept":"accts",
   "salary" : {"basic":12000, "da":4000, "hra":800}
}
plistlib.dump(proplist, fileName)
fileName.close()
Example - Reading a plist file
Conversely, to read back the property values, use load() function as follows −
main.py
import plistlib
fp= open('salary.plist', 'rb')
pl = plistlib.load(fp)
print(pl)
Output
{'dept': 'accts', 'designation': 'manager', 'name': 'Ganesh', 'salary': {'basic': 12000, 'da': 4000, 'hra': 800}}
Python Data Persistence - Sqlite3 Module
One major disadvantage of CSV, JSON, XML, etc., files is that they are not very useful for random access and transaction processing because they are largely unstructured in nature. Hence, it becomes very difficult to modify the contents.
These flat files are not suitable for client-server environment as they lack asynchronous processing capability. Using unstructured data files leads to data redundancy and inconsistency.
These problems can be overcome by using a relational database. A database is an organized collection of data to remove redundancy and inconsistency, and maintain data integrity. The relational database model is vastly popular.
Its basic concept is to arrange data in entity table (called relation). The entity table structure provides one attribute whose value is unique for each row. Such an attribute is called 'primary key'.
When primary key of one table appears in the structure of other tables, it is called 'Foreign key' and this forms the basis of the relationship between the two. Based on this model, there are many popular RDBMS products currently available −
- GadFly
- mSQL
- MySQL
- PostgreSQL
- Microsoft SQL Server 2000
- Informix
- Interbase
- Oracle
- Sybase
- SQLite
SQLite is a lightweight relational database used in a wide variety of applications. It is a self-contained, serverless, zero-configuration, transactional SQL database engine. The entire database is a single file, that can be placed anywhere in the file system. It's an open-source software, with very small footprint, and zero configuration. It is popularly used in embedded devices, IOT and mobile apps.
All relational databases use SQL for handling data in tables. However, earlier, each of these databases used to be connected with Python application with the help of Python module specific to the type of database.
Hence, there was a lack of compatibility among them. If a user wanted to change to different database product, it would prove to be difficult. This incompatibility issue was addresses by raising 'Python Enhancement Proposal (PEP 248)' to recommend consistent interface to relational databases known as DB-API. Latest recommendations are called DB-API Version 2.0. (PEP 249)
Python's standard library consists of the sqlite3 module which is a DB-API compliant module for handling the SQLite database through Python program. This chapter explains Python's connectivity with SQLite database.
As mentioned earlier, Python has inbuilt support for SQLite database in the form of sqlite3 module. For other databases, respective DB-API compliant Python module will have to be installed with the help of pip utility. For example, to use MySQL database we need to install PyMySQL module.
pip install pymysql
Following steps are recommended in DB-API −
Establish connection with the database using connect() function and obtain connection object.
Call cursor() method of connection object to get cursor object.
Form a query string made up of a SQL statement to be executed.
Execute the desired query by invoking execute() method.
Close the connection.
import sqlite3
db=sqlite3.connect('test.db')
Here, db is the connection object representing test.db. Note, that database will be created if it doesnt exist already. The connection object db has following methods −
| Sr.No. | Methods & Description |
|---|---|
| 1 |
cursor(): Returns a Cursor object which uses this Connection. |
| 2 |
commit(): Explicitly commits any pending transactions to the database. |
| 3 |
rollback(): This optional method causes a transaction to be rolled back to the starting point. |
| 4 |
close(): Closes the connection to the database permanently. |
A cursor acts as a handle for a given SQL query allowing the retrieval of one or more rows of the result. Cursor object is obtained from the connection to execute SQL queries using the following statement −
cur=db.cursor()
The cursor object has following methods defined −
| Sr.No | Methods & Description |
|---|---|
| 1 |
execute() Executes the SQL query in a string parameter. |
| 2 |
executemany() Executes the SQL query using a set of parameters in the list of tuples. |
| 3 |
fetchone() Fetches the next row from the query result set. |
| 4 |
fetchall() Fetches all remaining rows from the query result set. |
| 5 |
callproc() Calls a stored procedure. |
| 6 |
close() Closes the cursor object. |
Example - Creating Table
Following code creates a table in test.db
main.py
import sqlite3
db=sqlite3.connect('test.db')
cur =db.cursor()
cur.execute('''CREATE TABLE student (
StudentID INTEGER PRIMARY KEY AUTOINCREMENT,
name TEXT (20) NOT NULL,
age INTEGER,
marks REAL);''')
print ('table created successfully')
db.close()
Output
table created successfully
Data integrity desired in a database is achieved by commit() and rollback() methods of the connection object. The SQL query string may be having an incorrect SQL query that can raise an exception, which should be properly handled. For that, the execute() statement is placed within the try block If it is successful, the result is persistently saved using the commit() method. If the query fails, the transaction is undone using the rollback() method.
Example - Inserting Data
Following code executes INSERT query on the student table in test.db.
main.py
import sqlite3
db=sqlite3.connect('test.db')
qry="insert into student (name, age, marks) values('Abbas', 20, 80);"
try:
   cur=db.cursor()
   cur.execute(qry)
   db.commit()
print ("record added successfully")
except:
   print ("error in query")
   db.rollback()
db.close()
Output
record added successfully
Example - Inserting Data dynamically
If you want data in values clause of INSERT query to by dynamically provided by user input, use parameter substitution as recommended in Python DB-API. The ? character is used as a placeholder in the query string and provides the values in the form of a tuple in the execute() method. The following example inserts a record using the parameter substitution method. Name, age and marks are taken as input.
main.py
import sqlite3
db=sqlite3.connect('test.db')
nm=input('enter name: ')
a=int(input('enter age: '))
m=int(input('enter marks: '))
qry="insert into student (name, age, marks) values(?,?,?);"
try:
   cur=db.cursor()
   cur.execute(qry, (nm,a,m))
   db.commit()
   print ("one record added successfully")
except:
   print("error in operation")
   db.rollback()
db.close()
Output
enter name: mahesh
enter age: 12
enter marks: 34
one record added successfully
The sqlite3 module defines The executemany() method which is able to add multiple records at once. Data to be added should be given in a list of tuples, with each tuple containing one record. The list object is the parameter of the executemany() method, along with the query string. However, executemany() method is not supported by some of the other modules.
The UPDATE query usually contains a logical expression specified by WHERE clause The query string in the execute() method should contain an UPDATE query syntax. To update the value of 'age' to 23 for name='Anil', define the string as below:
qry="update student set age=23 where name='Anil';"
Example - Updating Records
To make the update process more dynamic, we use the parameter substitution method as described above.
import sqlite3
db=sqlite3.connect('test.db')
nm=input('enter name: ')
a=int(input('enter age: '))
qry="update student set age=? where name=?;"
try:
   cur=db.cursor()
   cur.execute(qry, (a, nm))
   db.commit()
   print("record updated successfully")
except:
   print("error in query")
   db.rollback()
db.close()
Output
enter name: mahesh
enter age: 34
record updated successfully
Example - Deleting Records
Similarly, DELETE operation is performed by calling execute() method with a string having SQLs DELETE query syntax. Incidentally, DELETE query also usually contains a WHERE clause.
main.py
import sqlite3
db=sqlite3.connect('test.db')
nm=input('enter name: ')
qry="DELETE from student where name=?;"
try:
   cur=db.cursor()
   cur.execute(qry, (nm,))
   db.commit()
   print("record deleted successfully")
except:
   print("error in operation")
   db.rollback()
db.close()
Output
enter name: mahesh
record deleted successfully
One of the important operations on a database table is retrieval of records from it. SQL provides SELECT query for the purpose. When a string containing SELECT query syntax is given to execute() method, a result set object is returned. There are two important methods with a cursor object using which one or many records from the result set can be retrieved.
fetchone()
Fetches the next available record from the result set. It is a tuple consisting of values of each column of the fetched record.
fetchall()
Fetches all remaining records in the form of a list of tuples. Each tuple corresponds to one record and contains values of each column in the table.
Example - Listing all records
Following example lists all records in student table
main.py
import sqlite3
db=sqlite3.connect('test.db')
37
sql="SELECT * from student;"
cur=db.cursor()
cur.execute(sql)
while True:
   record=cur.fetchone()
   if record==None:
      break
   print (record)
db.close()
Output
(1, 'Abbas', 20, 80.0)
If you plan to use a MySQL database instead of SQLite database, you need to install PyMySQL module as described above. All the steps in database connectivity process being same, since MySQL database is installed on a server, the connect() function needs the URL and login credentials.
import pymysql
con=pymysql.connect('localhost', 'root', '***')
Only thing that may differ with SQLite is MySQL specific data types. Similarly, any ODBC compatible database can be used with Python by installing pyodbc module.
Python Data Persistence - SQLAlchemy Module
Any relational database holds data in tables. The table structure defines data type of attributes which are basically of primary data types only which are mapped to corresponding built-in data types of Python. However, Python's user-defined objects can't be persistently stored and retrieved to/from SQL tables.
This is a disparity between SQL types and object oriented programming languages such as Python. SQL doesn't have equivalent data type for others such as dict, tuple, list, or any user defined class.
If you have to store an object in a relational database, it's instance attributes should be deconstructed into SQL data types first, before executing INSERT query. On the other hand, data retrieved from a SQL table is in primary types. A Python object of desired type will have to be constructed by using for use in Python script. This is where Object Relational Mappers are useful.
Object Relation Mapper (ORM)
An Object Relation Mapper (ORM) is an interface between a class and a SQL table. A Python class is mapped to a certain table in database, so that conversion between object and SQL types is automatically performed.
The Students class written in Python code is mapped to Students table in the database. As a result, all CRUD operations are done by calling respective methods of the class. This eliminates need to execute hard coded SQL queries in Python script.
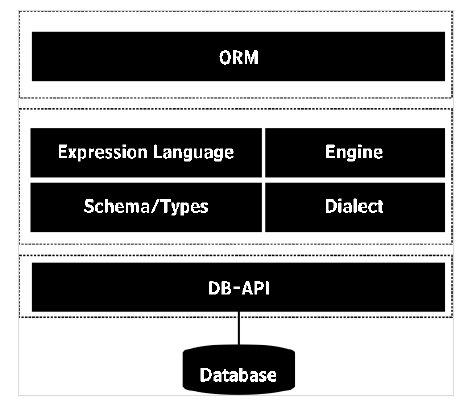
ORM library thus acts as an abstraction layer over the raw SQL queries and can be of help in rapid application development. SQLAlchemy is a popular object relational mapper for Python. Any manipulation of state of model object is synchronized with its related row in the database table.
SQLALchemy library includes ORM API and SQL Expression Language (SQLAlchemy Core). Expression language executes primitive constructs of the relational database directly.
ORM is a high level and abstracted pattern of usage constructed on top of the SQL Expression Language. It can be said that ORM is an applied usage of the Expression Language. We shall discuss SQLAlchemy ORM API and use SQLite database in this topic.
SQLAlchemy communicates with various types of databases through their respective DBAPI implementations using a dialect system. All dialects require that an appropriate DBAPI driver is installed. Dialects for following type of databases are included −
- Firebird
- Microsoft SQL Server
- MySQL
- Oracle
- PostgreSQL
- SQLite
- Sybase
Installation of SQLAlchemy is easy and straightforward, using pip utility.
pip3 install sqlalchemy
To check if SQLalchemy is properly installed and its version, enter following on Python prompt −
>>> import sqlalchemy
>>>sqlalchemy.__version__
'2.0.45'
Interactions with database are done through Engine object obtained as a return value of create_engine() function.
engine =create_engine('sqlite:///mydb.sqlite')
SQLite allows creation of in-memory database. SQLAlchemy engine for in-memory database is created as follows −
from sqlalchemy import create_engine
engine=create_engine('sqlite:///:memory:')
If you intend to use MySQL database instead, use its DB-API module pymysql and respective dialect driver.
engine = create_engine('mysql+pymydsql://root@localhost/mydb')
The create_engine has an optional echo argument. If set to true, the SQL queries generated by engine will be echoed on the terminal.
SQLAlchemy contains declarative base class. It acts as a catalog of model classes and mapped tables.
from sqlalchemy.ext.declarative import declarative_base
base=declarative_base()
Next step is to define a model class. It must be derived from base object of declarative_base class as above.
Set __tablename__ property to name of the table you want to be created in the database. Other attributes correspond to the fields. Each one is a Column object in SQLAlchemy and its data type is from one of the list below −
- BigInteger
- Boolean
- Date
- DateTime
- Float
- Integer
- Numeric
- SmallInteger
- String
- Text
- Time
Following code is the model class named as Student that is mapped to Students table.
from sqlalchemy.ext.declarative import declarative_base
from sqlalchemy import Column, Integer, String, Numeric
base=declarative_base()
class Student(base):
   __tablename__='Students'
   StudentID=Column(Integer, primary_key=True)
   name=Column(String)
   age=Column(Integer)
   marks=Column(Numeric)
To create a Students table that has a corresponding structure, execute create_all() method defined for base class.
base.metadata.create_all(engine)
We now have to declare an object of our Student class. All database transactions such as add, delete or retrieve data from database, etc., are handled by a Session object.
from sqlalchemy.orm import sessionmaker
Session = sessionmaker(bind=engine)
sessionobj = Session()
Data stored in Student object is physically added in underlying table by sessions add() method.
s1 = Student(name='Juhi', age=25, marks=200)
sessionobj.add(s1)
sessionobj.commit()
Example - Adding Record
Here, is the entire code for adding record in students table. As it is executed, corresponding SQL statement log is displayed on console.
main.py
from sqlalchemy import Column, Integer, String, Numeric
from sqlalchemy import create_engine
from sqlalchemy.ext.declarative import declarative_base

base=declarative_base()
class Student(base):
   __tablename__='Students'
   StudentID=Column(Integer, primary_key=True)
   name=Column(String)
   age=Column(Integer)
   marks=Column(Numeric)

engine = create_engine('sqlite:///college.db', echo=True)
base.metadata.create_all(engine)

from sqlalchemy.orm import sessionmaker
Session = sessionmaker(bind=engine)
sessionobj = Session()
s1 = Student(name='Juhi', age=25, marks=200)
sessionobj.add(s1)
sessionobj.commit()
Console output
CREATE TABLE "Students" (
   "StudentID" INTEGER NOT NULL,
   name VARCHAR,
   age INTEGER,
   marks NUMERIC,
   PRIMARY KEY ("StudentID")
)
INFO sqlalchemy.engine.base.Engine ()
INFO sqlalchemy.engine.base.Engine COMMIT
INFO sqlalchemy.engine.base.Engine BEGIN (implicit)
INFO sqlalchemy.engine.base.Engine INSERT INTO "Students" (name, age, marks) VALUES (?, ?, ?)
INFO sqlalchemy.engine.base.Engine ('Juhi', 25, 200.0)
INFO sqlalchemy.engine.base.Engine COMMIT
The session object also provides add_all() method to insert more than one objects in a single transaction.
sessionobj.add_all([s2,s3,s4,s5])
sessionobj.commit()
Now that, records are added in the table, we would like to fetch from it just as SELECT query does. The session object has query() method to perform the task. Query object is returned by query() method on our Student model.
qry=seesionobj.query(Student)
Use the get() method of this Query object fetches object corresponding to given primary key.
S1=qry.get(1)
While this statement is executed, its corresponding SQL statement echoed on the console will be as follows −
BEGIN (implicit)
SELECT "Students"."StudentID" AS "Students_StudentID", "Students".name AS
   "Students_name", "Students".age AS "Students_age",
   "Students".marks AS "Students_marks"
FROM "Students"
WHERE "Products"."Students" = ?
sqlalchemy.engine.base.Engine (1,)
The query.all() method returns a list of all objects which can be traversed using a loop.
main.py
from sqlalchemy import Column, Integer, String, Numeric
from sqlalchemy import create_engine
from sqlalchemy.ext.declarative import declarative_base

base=declarative_base()
class Student(base):
   __tablename__='Students'
   StudentID=Column(Integer, primary_key=True)
   name=Column(String)
   age=Column(Integer)
   marks=Column(Numeric)

engine = create_engine('sqlite:///college.db', echo=True)
base.metadata.create_all(engine)
from sqlalchemy.orm import sessionmaker
Session = sessionmaker(bind=engine)
sessionobj = Session()
qry=sessionobj.query(Students)
rows=qry.all()
for row in rows:
   print (row)
Updating a record in the mapped table is very easy. All you have to do is fetch a record using get() method, assign a new value to desired attribute and then commit the changes using session object. Below we change marks of Juhi student to 100.
S1=qry.get(1)
S1.marks=100
sessionobj.commit()
Deleting a record is just as easy, by deleting desired object from the session.
S1=qry.get(1)
Sessionobj.delete(S1)
sessionobj.commit()
Python Data Persistence - PyMongo Module
MongoDB is a document oriented NoSQL database. It is a cross platform database distributed under server side public license. It uses JSON like documents as schema.
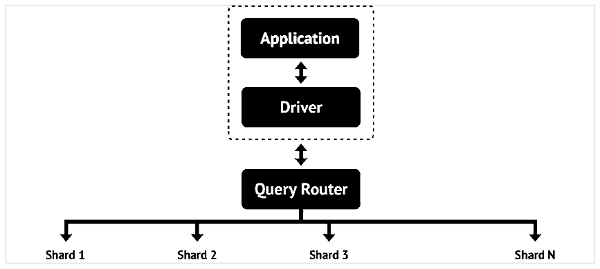
In order to provide capability to store huge data, more than one physical servers (called shards) are interconnected, so that a horizontal scalability is achieved. MongoDB database consists of documents.
A document is analogous to a row in a table of relational database. However, it doesn't have a particular schema. Document is a collection of key-value pairs - similar to dictionary. However, number of k-v pairs in each document may vary. Just as a table in relational database has a primary key, document in MongoDB database has a special key called "_id".
Before we see how MongoDB database is used with Python, let us briefly understand how to install and start MongoDB. Community and commercial version of MongoDB is available. Community version can be downloaded from www.mongodb.com/download-center/community.
Assuming that MongoDB is installed in c:\mongodb, the server can be invoked using following command.
c:\mongodb\bin>mongod
The MongoDB server is active at port number 22017 by default. Databases are stored in data/bin folder by default, although the location can be changed by dbpath option.
MongoDB has its own set of commands to be used in a MongoDB shell. To invoke shell, use Mongo command.
x:\mongodb\bin>mongo
A shell prompt similar to MySQL or SQLite shell prompt, appears before which native NoSQL commands can be executed. However, we are interested in connecting MongoDB database to Python.
PyMongo module has been developed by MongoDB Inc itself to provide Python programming interface. Use well known pip utility to install PyMongo.
pip3 install pymongo
Assuming that MongoDB server is up and running (with mongod command) and is listening at port 22017, we first need to declare a MongoClient object. It controls all transactions between Python session and the database.
from pymongo import MongoClient
client=MongoClient()
Use this client object to establish connection with MongoDB server.
client = MongoClient('localhost', 27017)
A new database is created with following command.
db=client.newdb
MongoDB database can have many collections, similar to tables in a relational database. A Collection object is created by Create_collection() function.
db.create_collection('students')
Example - Adding Document
Now, we can add one or more documents in the collection as follows −
main.py
from pymongo import MongoClient
client=MongoClient()
db=client.newdb
db.create_collection("students")
student=db['students']
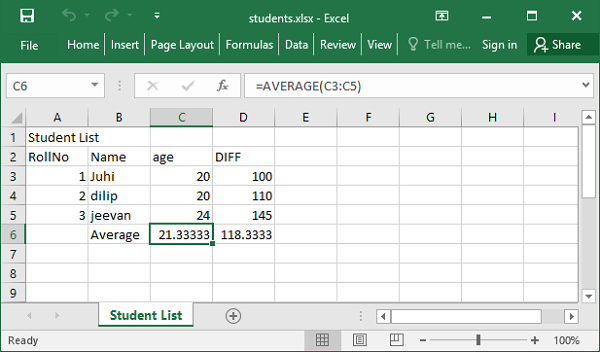
studentlist=[{'studentID':1,'Name':'Juhi','age':20, 'marks'=100},
{'studentID':2,'Name':'dilip','age':20, 'marks'=110},
{'studentID':3,'Name':'jeevan','age':24, 'marks'=145}]
student.insert_many(studentlist)
client.close()
Example - Retrieving Documents
To retrieve the documents (similar to SELECT query), we should use find() method. It returns a cursor with the help of which all documents can be obtained.
main.py
from pymongo import MongoClient
client=MongoClient()
db=client.newdb
students=db['students']
docs=students.find()
for doc in docs:
   print (doc['Name'], doc['age'], doc['marks'] )
To find a particular document instead of all of them in a collection, we need to apply filter to find() method. The filter uses logical operators. MongoDB has its own set of logical operators as below −
| Sr.No | MongoDB operator & Traditional logical operator |
|---|---|
| 1 |
$eq equal to (==) |
| 2 |
$gt greater than (>) |
| 3 |
$gte greater than or equal to (>=) |
| 4 |
$in if equal to any value in array |
| 5 |
$lt less than (<) |
| 6 |
$lte less than or equal to (<=) |
| 7 |
$ne not equal to (!=) |
| 8 |
$nin if not equal to any value in array |
Example - Filtering Documents
For example, we are interested in obtaining list of students older than 21 years. Using $gt operator in the filter for find() method as follows −
main.py
from pymongo import MongoClient
client=MongoClient()
db=client.newdb

students=db['students']
docs=students.find({'age':{'$gt':21}})
for doc in docs:
   print (doc.get('Name'), doc.get('age'), doc.get('marks'))
Example - Updating Documents
PyMongo module provides update_one() and update_many() methods for modifying one document or more than one documents satisfying a specific filter expression.
Let us update marks attribute of a document in which name is Juhi.
main.py
from pymongo import MongoClient
client=MongoClient()
db=client.newdb
doc=db.students.find_one({'Name': 'Juhi'})
db['students'].update_one({'Name': 'Juhi'},{"$set":{'marks':150}})
client.close()
Python Data Persistence - Cassandra Driver
Cassandra is another popular NoSQL database. High scalability, consistency, and fault-tolerance - these are some of the important features of Cassandra. This is Column store database. The data is stored across many commodity servers. As a result, data highly available.
Cassandra is a product from Apache Software foundation. Data is stored in distributed manner across multiple nodes. Each node is a single server consisting of keyspaces. Fundamental building block of Cassandra database is keyspace which can be considered analogous to a database.
Data in one node of Cassandra, is replicated in other nodes over a peer-to-peer network of nodes. That makes Cassandra a foolproof database. The network is called a data center. Multiple data centers may be interconnected to form a cluster. Nature of replication is configured by setting Replication strategy and replication factor at the time of the creation of a keyspace.
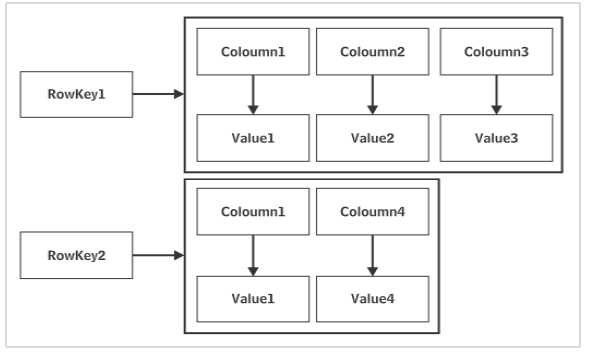
One keyspace may have more than one Column families just as one database may contain multiple tables. Cassandras keyspace doesnt have a predefined schema. It is possible that each row in a Cassandra table may have columns with different names and in variable numbers.
Cassandra software is also available in two versions: community and enterprise. The latest enterprise version of Cassandra is available for download at https://cassandra.apache.org/download/.
Cassandra has its own query language called Cassandra Query Language (CQL). CQL queries can be executed from inside a CQLASH shell similar to MySQL or SQLite shell. The CQL syntax appears similar to standard SQL.
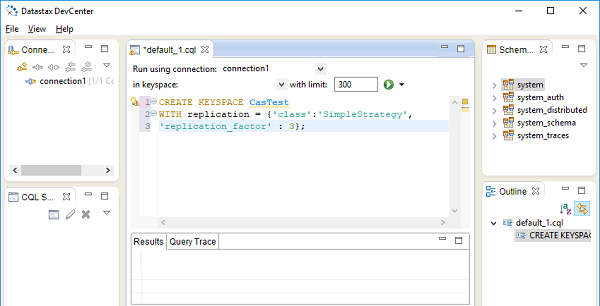
The Datastax community edition, also comes with a Develcenter IDE shown in following figure −
Python module for working with Cassandra database is called Cassandra Driver. It is also developed by Apache foundation. This module contains an ORM API, as well as a core API similar in nature to DB-API for relational databases.
Installation of Cassandra driver is easily done using pip3 utility.
pip3 install cassandra-driver
Interaction with Cassandra database, is done through Cluster object. Cassandra.cluster module defines Cluster class. We first need to declare Cluster object.
from cassandra.cluster import Cluster
clstr=Cluster()
All transactions such as insert/update, etc., are performed by starting a session with a keyspace.
session=clstr.connect()
To create a new keyspace, use execute() method of session object. The execute() method takes a string argument which must be a query string. The CQL has CREATE KEYSPACE statement as follows. The complete code is as below −
from cassandra.cluster import Cluster
clstr=Cluster()
session=clstr.connect()
session.execute(create keyspace mykeyspace with replication={
   'class': 'SimpleStrategy', 'replication_factor' : 3
};
Here, SimpleStrategy is a value for replication strategy and replication factor is set to 3. As mentioned earlier, a keyspace contains one or more tables. Each table is characterized by it data type. Python data types are automatically parsed with corresponding CQL data types according to following table −
| Python Type | CQL Type |
|---|---|
| None | NULL |
| Bool | Boolean |
| Float | float, double |
| int, long | int, bigint, varint, smallint, tinyint, counter |
| decimal.Decimal | Decimal |
| str, Unicode | ascii, varchar, text |
| buffer, bytearray | Blob |
| Date | Date |
| Datetime | Timestamp |
| Time | Time |
| list, tuple, generator | List |
| set, frozenset | Set |
| dict, OrderedDict | Map |
| uuid.UUID | timeuuid, uuid |
To create a table, use session object to execute CQL query for creating a table.
from cassandra.cluster import Cluster
clstr=Cluster()
session=clstr.connect('mykeyspace')
qry= '''
create table students (
   studentID int,
   name text,
   age int,
   marks int,
   primary key(studentID)
);'''
session.execute(qry)
The keyspace so created can be further used to insert rows. The CQL version of INSERT query is similar to SQL Insert statement. Following code inserts a row in students table.
from cassandra.cluster import Cluster
clstr=Cluster()
session=clstr.connect('mykeyspace')
session.execute("insert into students (studentID, name, age, marks) values
   (1, 'Juhi',20, 200);"
As you would expect, SELECT statement is also used with Cassandra. In case of execute() method containing SELECT query string, it returns a result set object which can be traversed using a loop.
from cassandra.cluster import Cluster
clstr=Cluster()
session=clstr.connect('mykeyspace')
rows=session.execute("select * from students;")
for row in rows:
print (StudentID: {} Name:{} Age:{} price:{} Marks:{}'
   .format(row[0],row[1], row[2], row[3]))
Cassandras SELECT query supports use of WHERE clause to apply filter on result set to be fetched. Traditional logical operators like <, > == etc. are recognized. To retrieve, only those rows from students table for names with age>20, the query string in execute() method should be as follows −
rows=session.execute("select * from students WHERE age>20 allow filtering;")
Note, the use of ALLOW FILTERING. The ALLOW FILTERING part of this statement allows to explicitly allow (some) queries that require filtering.
Cassandra driver API defines following classes of Statement type in its cassendra.query module.
SimpleStatement
A simple, unprepared CQL query contained in a query string. All examples above are examples of SimpleStatement.
BatchStatement
Multiple queries (such as INSERT, UPDATE, and DELETE) are put in a batch and executed at once. Each row is first converted as a SimpleStatement and then added in a batch.
Let us put rows to be added in Students table in the form of list of tuples as follows −
studentlist=[(1,'Juhi',20,100), ('2,'dilip',20, 110),(3,'jeevan',24,145)]
To add above rows using BathStatement, run following script −
from cassandra.query import SimpleStatement, BatchStatement
batch=BatchStatement()
for student in studentlist:
   batch.add(SimpleStatement("INSERT INTO students
      (studentID, name, age, marks) VALUES
      (%s, %s, %s %s)"), (student[0], student[1],student[2], student[3]))
session.execute(batch)
PreparedStatement
Prepared statement is like a parameterized query in DB-API. Its query string is saved by Cassandra for later use. The Session.prepare() method returns a PreparedStatement instance.
For our students table, a PreparedStatement for INSERT query is as follows −
stmt=session.prepare("INSERT INTO students (studentID, name, age, marks) VALUES (?,?,?)")
Subsequently, it only needs to send the values of parameters to bind. For example −
qry=stmt.bind([1,'Ram', 23,175])
Finally, execute the bound statement above.
session.execute(qry)
This reduces network traffic and CPU utilization because Cassandra does not have to re-parse the query each time.
Python Data Persistence - ZODB
ZODB (Zope object Database) is database for storing Python objects. It is ACID compliant - feature not found in NOSQL databases. The ZODB is also open source, horizontally scalable and schema-free, like many NoSQL databases. However, it is not distributed and does not offer easy replication. It provides persistence mechanism for Python objects. It is a part of Zope Application server, but can also be independently used.
ZODB was created by Jim Fulton of Zope Corporation. It started as simple Persistent Object System. Its current version is 5.5.0 and is written completely in Python. using an extended version of Python's built-in object persistence (pickle).
Some of the main features of ZODB are −
- transactions
- history/undo
- transparently pluggable storage
- built-in caching
- multiversion concurrency control (MVCC)
- scalability across a network
The ZODB is a hierarchical database. There is a root object, initialized when a database is created. The root object is used like a Python dictionary and it can contain other objects (which can be dictionary-like themselves). To store an object in the database, its enough to assign it to a new key inside its container.
ZODB is useful for applications where data is hierarchical and there are likely to be more reads than writes. ZODB is an extension of pickle object. That's why it can be processed through Python script only.
To install latest version of ZODB let use pip utility −
pip3 install zodb
Collecting zodb
...
Installing collected packages: zope.interface, zodbpickle, ZConfig, zc.lockfile, zope.proxy, transaction, zope.deferredimport, persistent, BTrees, zodb
Successfully installed BTrees-6.3 ZConfig-4.3 persistent-6.5 transaction-5.0 zc.lockfile-4.0 zodb-6.2 zodbpickle-4.3 zope.deferredimport-6.0 zope.interface-8.2 zope.proxy-7.1
ZODB provides following storage options −
FileStorage
This is the default. Everything stored in one big Data.fs file, which is essentially a transaction log.
DirectoryStorage
This stores one file per object revision. In this case, it does not require the Data.fs.index to be rebuilt on an unclean shutdown.
RelStorage
This stores pickles in a relational database. PostgreSQL, MySQL and Oracle are supported.
To create ZODB database we need a storage, a database and finally a connection.
First step is to have storage object.
import ZODB, ZODB.FileStorage
storage = ZODB.FileStorage.FileStorage('mydata.fs')
DB class uses this storage object to obtain database object.
db = ZODB.DB(storage)
Pass None to DB constructor to create in-memory database.
Db=ZODB.DB(None)
Finally, we establish connection with the database.
conn=db.open()
The connection object then gives you access to the root of the database with the root() method. The root object is the dictionary that holds all of your persistent objects.
root = conn.root()
For example, we add a list of students to the root object as follows −
root['students'] = ['Mary', 'Maya', 'Meet']
This change is not permanently saved in the database till we commit the transaction.
import transaction
transaction.commit()
To store object of a user defined class, the class must be inherited from persistent.Persistent parent class.
Advantages of Subclassing
Subclassing Persistent class has its advantages as follows −
The database will automatically track object changes made by setting attributes.
Data will be saved in its own database record.
You can save data that doesnt subclass Persistent, but it will be stored in the database record of whatever persistent object references it. Non-persistent objects are owned by their containing persistent object and if multiple persistent objects refer to the same non-persistent subobject, theyll get their own copies.
Let use define a student class subclassing Persistent class as under −
import persistent
   class student(persistent.Persistent):
   def __init__(self, name):
      self.name = name
   def __repr__(self):
      return str(self.name)
To add object of this class, let us first set up the connection as described above.
import ZODB, ZODB.FileStorage
storage = ZODB.FileStorage.FileStorage('studentdata.fs')
db = ZODB.DB(storage)
conn=db.open()
root = conn.root()
Declare object an add to root and then commit the transaction
s1=student("Akash")
root['s1']=s1
import transaction
transaction.commit()
conn.close()
List of all objects added to root can be retrieved as a view object with the help of items() method since root object is similar to built in dictionary.
print (root.items())
ItemsView({'s1': Akash})
To fetch attribute of specific object from root,
print (root['s1'].name)
Akash
The object can be easily updated. Since the ZODB API is a pure Python package, it doesnt require any external SQL type language to be used.
root['s1'].name='Abhishek'
import transaction
transaction.commit()
The database will be updated instantly. Note that transaction class also defines abort() function which is similar to rollback() transaction control in SQL.
Python Data Persistence - Openpyxl Module
Microsofts Excel is the most popular spreadsheet application. It has been in use since last more than 25 years. Later versions of Excel use Office Open XML (OOXML) file format. Hence, it has been possible to access spreadsheet files through other programming environments.
OOXML is an ECMA standard file format. Pythons openpyxl package provides functionality to read/write Excel files with .xlsx extension.
The openpyxl package uses class nomenclature that is similar to Microsoft Excel terminology. An Excel document is called as workbook and is saved with .xlsx extension in the file system. A workbook may have multiple worksheets. A worksheet presents a large grid of cells, each one of them can store either value or formula. Rows and columns that form the grid are numbered. Columns are identified by alphabets, A, B, C, ., Z, AA, AB, and so on. Rows are numbered starting from 1.
A typical Excel worksheet appears as follows −
The pip utility is good enough to install openpyxl package.
pip install openpyxl
The Workbook class represents an empty workbook with one blank worksheet. We need to activate it so that some data can be added to the worksheet.
from openpyxl import Workbook
wb=Workbook()
sheet1=wb.active
sheet1.title='StudentList'
As we know, a cell in worksheet is named as ColumnNameRownumber format. Accordingly, top left cell is A1. We assign a string to this cell as −
sheet1['A1']= 'Student List'
Alternately, use worksheets cell() method which uses row and column number to identify a cell. Call value property to cell object to assign a value.
cell1=sheet1.cell(row=1, column=1)
cell1.value='Student List'
After populating worksheet with data, the workbook is saved by calling save() method of workbook object.
wb.save('Student.xlsx')
This workbook file is created in current working directory.
Following Python script writes a list of tuples into a workbook document. Each tuple stores roll number, age and marks of student.
from openpyxl import Workbook
wb = Workbook()
sheet1 = wb.active
sheet1.title='Student List'
sheet1.cell(column=1, row=1).value='Student List'
studentlist=[('RollNo','Name', 'age', 'marks'),(1,'Juhi',20,100),
   (2,'dilip',20, 110) , (3,'jeevan',24,145)]
for col in range(1,5):
   for row in range(1,5):
      sheet1.cell(column=col, row=1+row).value=studentlist[row-1][col-1]
wb.save('students.xlsx')
The workbook students.xlsx is saved in current working directory. If opened using Excel application, it appears as below −
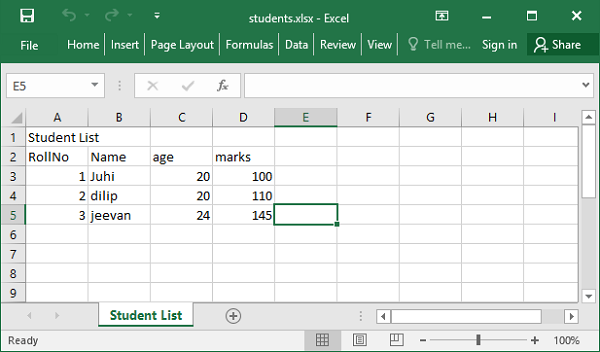
The openpyxl module offers load_workbook() function that helps in reading back data in the workbook document.
from openpyxl import load_workbook
wb=load_workbook('students.xlsx')
You can now access value of any cell specified by row and column number.
cell1=sheet1.cell(row=1, column=1)
print (cell1.value)
Student List
Example - Populating work sheet
Following code populates a list with work sheet data.
main.py
from openpyxl import load_workbook
wb=load_workbook('students.xlsx')
sheet1 = wb['Student List']
studentlist=[]
for row in range(1,5):
   stud=[]
for col in range(1,5):
   val=sheet1.cell(column=col, row=1+row).value
stud.append(val)
studentlist.append(tuple(stud))
print (studentlist)
Output
[('RollNo', 'Name', 'age', 'marks'), (1, 'Juhi', 20, 100), (2, 'dilip', 20, 110), (3, 'jeevan', 24, 145)]
One very important feature of Excel application is the formula. To assign formula to a cell, assign it to a string containing Excels formula syntax. Assign AVERAGE function to c6 cell having age.
sheet1['C6']= 'AVERAGE(C3:C5)'
Openpyxl module has Translate_formula() function to copy the formula across a range. Following program defines AVERAGE function in C6 and copies it to C7 that calculates average of marks.
main.py
from openpyxl import load_workbook
wb=load_workbook('students.xlsx')

sheet1 = wb['Student List']
from openpyxl.formula.translate import Translator#copy formula
sheet1['B6']='Average'
sheet1['C6']='=AVERAGE(C3:C5)'
sheet1['D6'] = Translator('=AVERAGE(C3:C5)', origin="C6").translate_formula("D6")
wb.save('students.xlsx')
Output
The changed worksheet now appears as follows −