- GitLab - Introduction
- GitLab - Installation
- GitLab - Git Commands
- GitLab - SSH Key Setup
- GitLab - Create Project
- GitLab - Fork a Project
- GitLab - Create a Branch
- GitLab - Add a File
- GitLab - Rebase Operation
- GitLab - Squashing Commits
- GitLab Users and Groups
- GitLab - Adding Users
- GitLab - Create Groups
- GitLab - Remove Users
- GitLab - User Permissions
- GitLab Issue Tracker
- GitLab - Create Issue
- GitLab - Merge Requests
- GitLab - Referencing Issues
- GitLab - Milestones
- GitLab - Wiki Pages
- GitLab Instance Management
- GitLab - Create Backup
- GitLab - Restore Backup
- GitLab - Import Repository
GitLab CI - Advanced usage of CI
Environments and Deployments
Environments are used for testing, building and deploying the CI (Continuous Integration) jobs and control the Continuous Deployment of software with the GitLab. GitLab CI is capable of tracking your project deployments and also you will come to know what is being deployed on your server.
The name of an environment could be defined by using environment:name string and contain the following −
- letters
- digits
- spaces
- -
- _
- /
- $
- {
- }
Using SSH keys with GitLab CI/CD
You can set the SSH (Secure Shell or Secure Socket Shell) keys to provide a reliable connection between the computer and GitLab. The SSH keys can be used with GitLab CI/CD when −
- You need to checkout internal sub modules.
- You need to download private packages using package manager.
- You need to install an application to your own server.
- You execute the SSH commands to remote server from build environment.
- You need to rsync files to a remote server from the build environment.
The SSH key setup is explained in the GitLab SSH Key Setup chapter.
Artifacts
Artifacts are used to attach the list of files and directories to the job after success. The artifacts contain following types −
- artifacts:name − This directive is used to specify the name of created artifacts archive. It provides unique name for created artifacts archive which is helpful when you are downloading the archive from GitLab.
- artifacts:when − This directive is used to upload artifacts when there is a job failure. It contains the following values:
- on_success − It is used to upload the artifacts when there is a job success.
- on_failure − It is used to upload the artifacts when the job fails.
- always − It is used to upload the artifacts regardless of job status.
- artifacts:expire_in − It defines that how long artifacts should live before they expire and therefore deleted, since they are uploaded and stored on GitLab
Triggering Pipelines
Triggers can force a specific branch or tag to get rebuilt with an API call and triggers with the legacy label will have access to the current project.
The new trigger can be added as shown in the below steps −
Step 1 − Login to your GitLab account and go to your project −
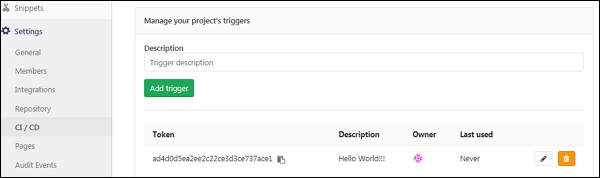
Step 2 − Click on the CI/CD option under Settings tab and expand the Pipeline triggers option −
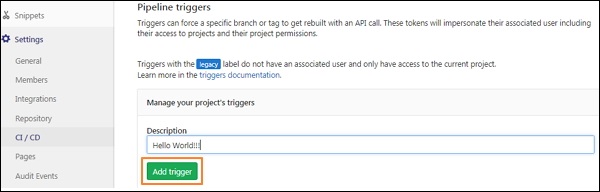
Enter the description for the trigger and click on the Add Trigger button.
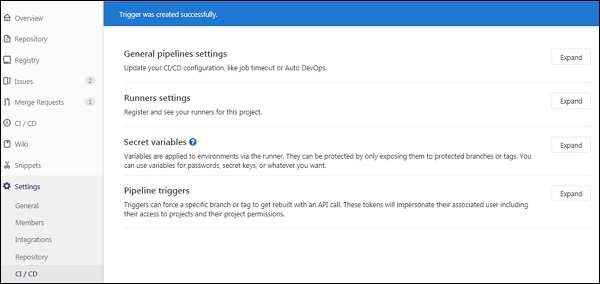
Step 3 − Next, it will display the success message after creating the trigger −
Step 4 − Now go to CI/CD option under Settings tab and expand the Pipeline triggers option. You will see the newly created trigger along with the token as shown in the image below −
Pipeline Schedules
You can run the pipeline by using the pipeline schedules at specific intervals. To create pipeline schedule, use the below steps −
Step 1 − Login to your GitLab account and go to your project −
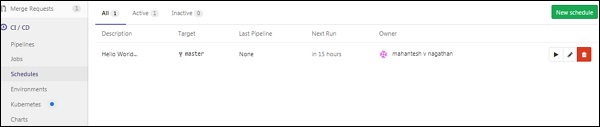
Step 2 − Click on the Schedules option under CI/CD tab and click on the New schedule button −

Step 3 − Next, it will open the Scheduling new pipeline screen, fill up the fields and click on the Save pipeline schedule button −

Step 4 − Now, you will see the pipeline which is scheduled to run −
Connecting GitLab with a Kubernetes Cluster
The Kubernetes cluster can be used to review and deploy the applications, running the pipeline etc in an easy method. You can create a new cluster to your project by associating your GitLab account with the Google Kubernetes Engine (GKE).
The new Kubernetes cluster can be created as shown in the below steps −
Step 1 − Login to your GitLab account and go to your project −
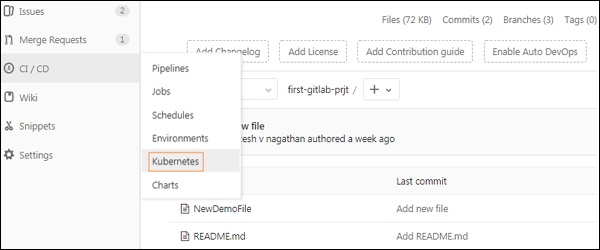
Step 2 − Click on the Kubernetes option under CI/CD tab −
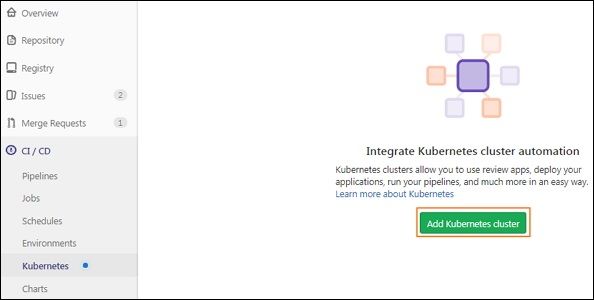
Step 3 − Next, click on Add Kubernetes cluster button −
Step 4 − Click on Create on GKE button to create a new Kubernetes cluster on Google Kubernetes Engine −

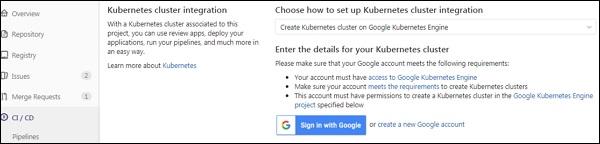
Step 5 − If you have a Google account, then sign with that account to enter the details for Kubernetes cluster or else create a new Google account −
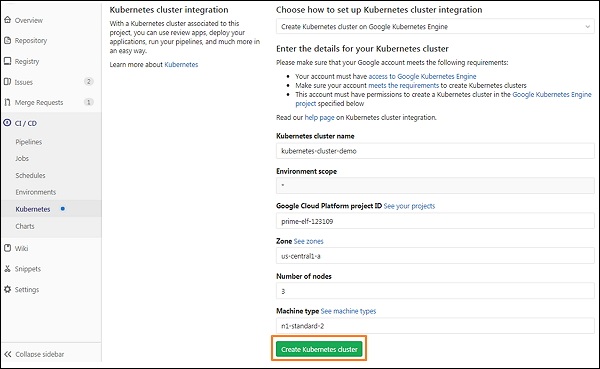
Step 6 − Now enter the values in the fields for your Kubernetes cluster −
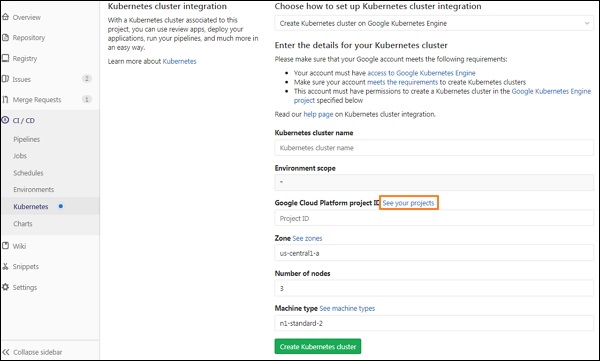
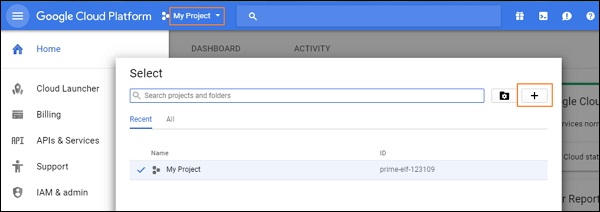
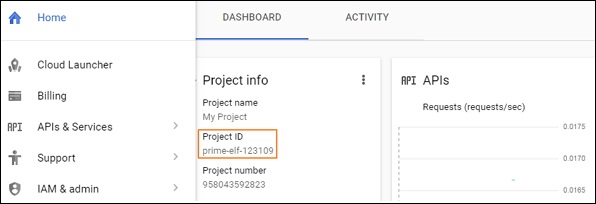
Step 7 − Before adding values in the fields, you need ID of the project which is created in the Google Cloud Platform console to host the Kubernetes cluster. To create ID, click on the See your projects link which is highlighted in the previous image. It will open the below screen, then click on My Project menu and click on the plus (+) icon to create a new project −
Step 8 − Now enter the project name and click on the Create button −
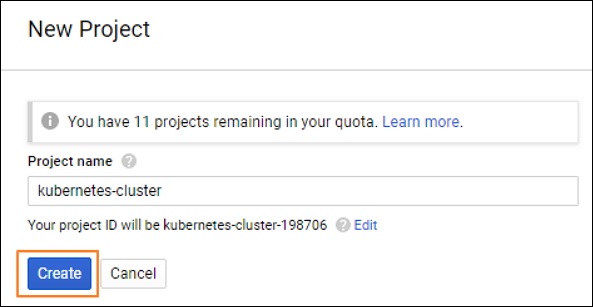
Step 9 − You will get the ID of the project which will host the Kubernetes cluster −
Step 10 − Enter the values in the fields for your Kubernetes cluster along with the Google Cloud Platform project ID and click on the Create Kubernetes cluster button −