- Home
- Brief Overview of IoT
- Introduction to ESP32
- Installing the ESP32 Board in Arduino IDE
- Setting up RTOS for dual-core and multi-threaded operation
- Interfacing ESP32 with MPU6050
- Interfacing ESP32 with Analog sensors
- ESP32 Preferences
- ESP32 SPIFFS storage (A mini-SD Card in the chip itself)
- Interfacing OLED Display with ESP32
- WiFi on ESP32
- Transmitting data over WiFi using HTTP
- Transmitting data over WiFi using HTTPS
- Transmitting data over WiFi using MQTT
- Transmitting data over Bluetooth
- Getting current time using NTP Client
- Performing the (OTA) update of ESP32 firmware
- Applications of ESP32
- Next steps for you as a developer
- ESP32 for IoT Useful Resources
- Quick Guide
- Useful Resources
- Discussion
Interfacing OLED Display with ESP32
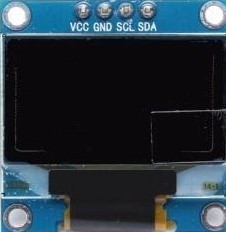
The combination of OLED with ESP32 is so popular that there are some boards of ESP32 with the OLED integrated. We'll, however, assume that you will be using a separate OLED module with your ESP32 board. If you have an OLED module, it perhaps looks like the image below.
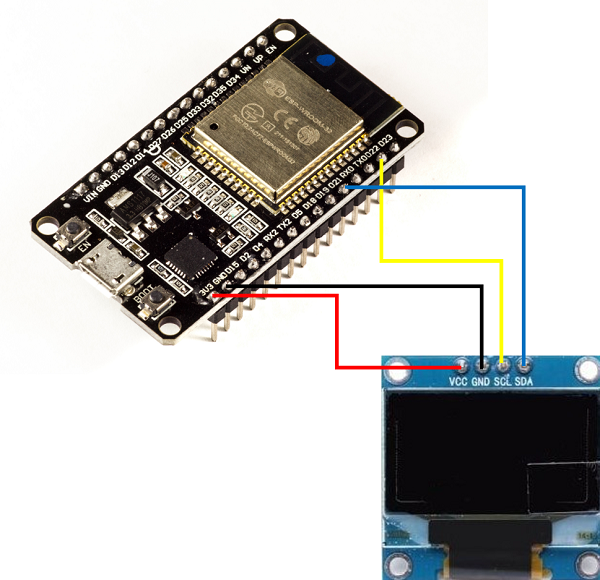
Connecting the OLED Display Module to ESP32
Like the MPU6050 module that we discussed in a previous chapter, the OLED module also generally uses I2C for communication. Therefore, the connection will be similar to the MPU6050 module. You need to connect the SDA line to pin 21 on ESP32, SCL line to pin 22, GND to GND, and VCC to 3V3 pin
Library for OLED Display
There are a number of libraries available for interfacing the OLED display with ESP32. You are free to use anyone you are comfortable with. For this example, we will use the 'ESP8266 and ESP32 OLED driver for SSD1306 displays, by ThingPulse, Fabrice Weinberg'. You can install this library from Tools −> Manage Libraries. It can also be found on GitHub

Code Walkthrough
The code becomes very simple thanks to the library we just installed. We will run a counter code, which will just count the seconds since the last reset and print them on the OLED module. The code can be found on GitHub
We begin with the inclusion of the SSD1306 library.
#include "SSD1306Wire.h"
Next, we define the OLED pins and its I2C address. Note that some OLED modules contain an additional Reset pin. A good example is the ESP32 TTGO board, which comes with an inbuilt OLED display. For that board, pin 16 is the reset pin. If you are connecting an external OLED module to your ESP32, you will most likely not use the Reset pin. The I2C address of 0x3c is generally common for all OLED modules.
//OLED related variables
#define OLED_ADDR   0x3c
#define OLED_SDA    21//4     //TTGO board without SD Card has OLED SDA connected to pin 4 of ESP32
#define OLED_SCL    22//15    //TTGO board without SD Card has OLED SCL connected to pin 15 of ESP32
#define OLED_RST    16        //Optional, TTGO board contains OLED_RST connected to pin 16 of ESP32
Next, we create the OLED display object and the counter variable.
SSD1306Wire  display(OLED_ADDR, OLED_SDA, OLED_SCL);
int counter = 0;
After that, we define two functions. One for initializing the OLED display (this function is redundant if your OLED module doesn't contain a reset pin), and the other for printing text messages on the OLED Display. The showOLEDMessage() function breaks down the OLED display area into 3 lines and asks for 3 strings, one for each line.
void initOLED() {
   pinMode(OLED_RST, OUTPUT);
   //Give a low to high pulse to the OLED display to reset it
   //This is optional and not required for OLED modules not containing a reset pin
   digitalWrite(OLED_RST, LOW);
   delay(20);
   digitalWrite(OLED_RST, HIGH);
}
void showOLEDMessage(String line1, String line2, String line3) {
   display.init();                        // clears screen
   display.setFont(ArialMT_Plain_16);
   display.drawString(0, 0, line1);       //  adds to buffer
   display.drawString(0, 20, line2);
   display.drawString(0, 40, line3);
   display.display();                     // displays content in buffer
}
Finally, in the setup, we just initialize the OLED display, and in the loop, we just utilize the first two lines of the display to show the counter.
void setup() {
   // put your setup code here, to run once:
   initOLED();
}
void loop() {
   // put your main code here, to run repeatedly
   showOLEDMessage("Num seconds is: ", String(counter), "");
   delay(1000);
   counter = counter+1;
}
That's it. Congratulations on displaying your first text statements on the OLED display.