- Home
- Brief Overview of IoT
- Introduction to ESP32
- Installing the ESP32 Board in Arduino IDE
- Setting up RTOS for dual-core and multi-threaded operation
- Interfacing ESP32 with MPU6050
- Interfacing ESP32 with Analog sensors
- ESP32 Preferences
- ESP32 SPIFFS storage (A mini-SD Card in the chip itself)
- Interfacing OLED Display with ESP32
- WiFi on ESP32
- Transmitting data over WiFi using HTTP
- Transmitting data over WiFi using HTTPS
- Transmitting data over WiFi using MQTT
- Transmitting data over Bluetooth
- Getting current time using NTP Client
- Performing the (OTA) update of ESP32 firmware
- Applications of ESP32
- Next steps for you as a developer
- ESP32 for IoT Useful Resources
- Quick Guide
- Useful Resources
- Discussion
SPIFFS in ESP32
In the previous chapter, we looked at preferences as one way of storing data in non−volatile storage and understood how they are used to store key-value pairs. In this one, we look at SPIFFS (SPI Flash File Storage), which is used for storing larger data in the form of files. Think of SPIFFS as a very small SD Card onboard the ESP32 chip itself. By default, about 1.5 MB of the onboard flash is allocated to SPIFFS. You can see that for yourself by going through Tools −> Partition Scheme.
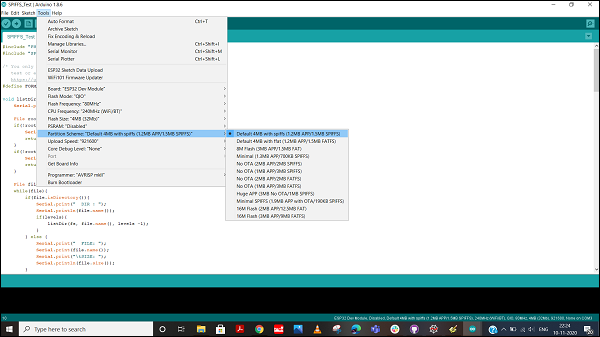
You can see that there are several other partition options available. However, let's not get there right now. Changing the partition scheme will anyway not be required for most of your applications. All the chapters in this tutorial will work well with the default partition scheme.
Now let's see the process of creating, modifying, reading, and deleting a file from SPIFFS, using an example.
Code Walkthrough
We will again use the example code provided. Go to File −> Examples −> SPIFFS −> SPIFFS_Test. This code is ideal for understanding all the file operations possible with SPIFFS. It can also be found on GitHub
We begin with the inclusion of two libraries: FS.h and SPIFFS.h. FS stands for File System.
#include "FS.h"
#include "SPIFFS.h"
Next, you see a macro definition, FORMAT_SPIFFS_IF_FAILED. There is an associated comment which suggests that you need to format the SPIFFS only the first time you run a test. What this means is that you can set the value of this macro to false after your first run. Formatting the SPIFFS takes time, and need not be done every time you run your code. Therefore, a practice that people follow is to have a separate code for formatting the SPIFFS, which they flash before flashing the main code. The main code doesn't include the format command. In this example though, for the sake of completeness, this macro has been kept as true.
/* You only need to format SPIFFS the first time you run a
   test or else use the SPIFFS plugin to create a partition
   https://github.com/me−no−dev/arduino−esp32fs−plugin */
#define FORMAT_SPIFFS_IF_FAILED true
Next, you can see that a number of functions have been defined for different file system operations. They are −
listDir − To list all directories
readFile − To read a specific file
writeFile − To write to a file (this overwrites the content already present in the file)
appendFile − To append content to a file (use this when you want to add to the existing content, not overwrite it
renameFile − To change the name of a file
deleteFile − To delete a file
void listDir(fs::FS &fs, const char * dirname, uint8_t levels){
   Serial.printf("Listing directory: %s\r\n", dirname);

   File root = fs.open(dirname);
   if(!root){
      Serial.println("− failed to open directory");
      return;
   }
   if(!root.isDirectory()){
      Serial.println(" − not a directory");
      return;
   }

   File file = root.openNextFile();
   while(file){
      if(file.isDirectory()){
         Serial.print("  DIR : ");
         Serial.println(file.name());
         if(levels){
            listDir(fs, file.name(), levels -1);
         }
      } else {
         Serial.print("  FILE: ");
         Serial.print(file.name());
         Serial.print("\tSIZE: ");
         Serial.println(file.size());
      }
      file = root.openNextFile();
   }
}

void readFile(fs::FS &fs, const char * path){
   Serial.printf("Reading file: %s\r\n", path);

   File file = fs.open(path);
   if(!file || file.isDirectory()){
       Serial.println("− failed to open file for reading");
       return;
   }

   Serial.println("− read from file:");
   while(file.available()){
      Serial.write(file.read());
   }
}

void writeFile(fs::FS &fs, const char * path, const char * message){
   Serial.printf("Writing file: %s\r\n", path);

   File file = fs.open(path, FILE_WRITE);
   if(!file){
      Serial.println("− failed to open file for writing");
      return;
   }
   if(file.print(message)){
      Serial.println("− file written");
   }else {
      Serial.println("− frite failed");
   }
}

void appendFile(fs::FS &fs, const char * path, const char * message){
   Serial.printf("Appending to file: %s\r\n", path);

   File file = fs.open(path, FILE_APPEND);
   if(!file){
      Serial.println("− failed to open file for appending");
      return;
   }
   if(file.print(message)){
      Serial.println("− message appended");
   } else {
      Serial.println("− append failed");
   }
}

void renameFile(fs::FS &fs, const char * path1, const char * path2){
   Serial.printf("Renaming file %s to %s\r\n", path1, path2);
   if (fs.rename(path1, path2)) {
      Serial.println("− file renamed");
   } else {
      Serial.println("− rename failed");
   }
}

void deleteFile(fs::FS &fs, const char * path){
   Serial.printf("Deleting file: %s\r\n", path);
   if(fs.remove(path)){
      Serial.println("− file deleted");
   } else {
      Serial.println("− delete failed");
   }
}
Note that all of the above functions aren't asking for a file name. They are asking for the full file path. Because this is a file system. You could have directories, subdirectories, and files within those subdirectories. Therefore, ESP32 needs to know the full path of the file you want to operate on.
Next comes a function that isn't exactly a file operation function − testFileIO. This is more of a time benchmarking function. It does the following −
Writes about 1 MB (2048 * 512 bytes) of data to the file path that you provide and measures the write time
Reads the same file and measures the read time
void testFileIO(fs::FS &fs, const char * path){
   Serial.printf("Testing file I/O with %s\r\n", path);

   static uint8_t buf[512];
   size_t len = 0;
   File file = fs.open(path, FILE_WRITE);
   if(!file){
      Serial.println("− failed to open file for writing");
      return;
   }

   size_t i;
   Serial.print("− writing" );
   uint32_t start = millis();
   for(i=0; i<2048; i++){
      if ((i & 0x001F) == 0x001F){
         Serial.print(".");
      }
      file.write(buf, 512);
   }
   Serial.println("");
   uint32_t end = millis() − start;
   Serial.printf(" − %u bytes written in %u ms\r\n", 2048 * 512, end);
   file.close();

   file = fs.open(path);
   start = millis();
   end = start;
   i = 0;
   if(file && !file.isDirectory()){
      len = file.size();
         size_t flen = len;
         start = millis();
         Serial.print("− reading" );
         while(len){
            size_t toRead = len;
            if(toRead > 512){
                toRead = 512;
            }
            file.read(buf, toRead);
            if ((i++ & 0x001F) == 0x001F){
              Serial.print(".");
            }
            len −= toRead;
         }
      Serial.println("");
      end = millis() - start;
      Serial.printf("- %u bytes read in %u ms\r\n", flen, end);
      file.close();
   } else {
      Serial.println("- failed to open file for reading");
   }
}
Note that the buf array is never initialized with any value. We may very well be writing garbage bytes to the file. That doesn't matter because the purpose of the function is to measure the write time and the read time.
Once our functions have been defined, we move on to the setup, where the invocation of each of these functions is shown.
void setup(){
   Serial.begin(115200);
   if(!SPIFFS.begin(FORMAT_SPIFFS_IF_FAILED)){
      Serial.println("SPIFFS Mount Failed");
      return;
   }
   listDir(SPIFFS, "/", 0);
   writeFile(SPIFFS, "/hello.txt", "Hello ");
   appendFile(SPIFFS, "/hello.txt", "World!\r\n");
   readFile(SPIFFS, "/hello.txt");
   renameFile(SPIFFS, "/hello.txt", "/foo.txt");
   readFile(SPIFFS, "/foo.txt");
   deleteFile(SPIFFS, "/foo.txt");
   testFileIO(SPIFFS, "/test.txt");
   deleteFile(SPIFFS, "/test.txt");
   Serial.println( "Test complete" );
}
The setup does essentially the following −
It first initializes the SPIFFS using SPIFFS.begin(). The macro defined at the beginning is used here. When true, it formats the SPIFFS (time−consuming); when false, it initializes the SPIFFS without formatting.
It then lists all the directories at the root level. Note that we have specified levels as 0. Therefore, we are not listing the subdirectories within the directories. You can increase the nesting by incrementing the levels argument.
It then writes "Hello" to a file hello.txt in the root. (the file will get created if it doesn't exist)
It then reads back hello.txt
It then renames hello.txt to foo.txt
It then reads foo.txt to see if the rename worked. You should see "Hello" printed because that's what is stored in the file.
It then deletes foo.txt
It then performs the testFileIO routine on a new file test.txt
Once the routine is performed, it deletes test.txt
That's it. This example code very nicely lists down and tests all the functions you may want to use with SPIFFS. You can go ahead and modify this code, and play around with the different functions.
Since we don't want to perform any recurring activity here, the loop is blank.
void loop(){
}
The output shown in the Serial Monitor will perhaps look like the image below −
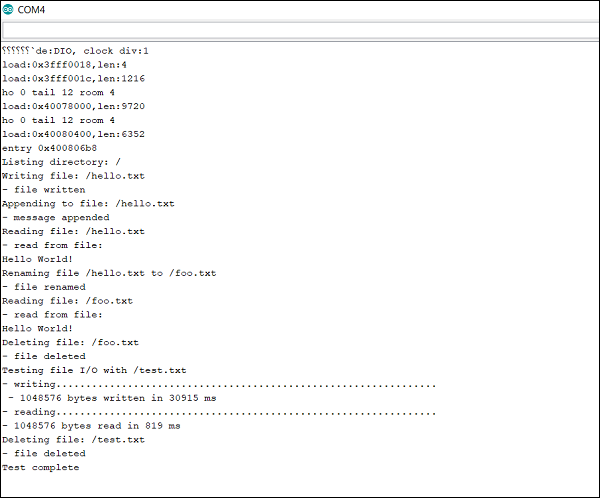
Note − If in case you get "SPIFFS Mount Failed" on running the sketch, set the value of FORMAT_SPIFFS_IF_FAILED to false and try again.