- Julia - Home
- Julia - Overview
- Julia - Environment Setup
- Julia - Basic Syntax
- Julia - Arrays
- Julia - Tuples
- Integers & Floating-Point Numbers
- Julia - Rational & Complex Numbers
- Julia - Basic Operators
- Basic Mathematical Functions
- Julia - Strings
- Julia - Functions
- Julia - Flow Control
- Julia - Dictionaries & Sets
- Julia - Date & Time
- Julia - Files I/O
- Julia - Metaprogramming
- Julia - Plotting
- Julia - Data Frames
- Working with Datasets
- Julia - Modules and Packages
- Working with Graphics
- Julia - Networking
- Julia - Databases
- Julia Useful Resources
- Julia - Quick Guide
- Julia - Useful Resources
- Julia - Cheatsheet
- Julia - Discussion
Julia Programming - Environment Setup
To install Julia, we need to download binary Julia platform in executable form which you can download from the link https://julialang.org/downloads/. On the webpage, you will find Julia in 32-bit and 64-bit format for all three major platforms, i.e. Linux, Windows, and Macintosh (OS X). The current stable release which we are going to use is v1.5.1.
Installing Julia
Let us see how we can install Julia on various platforms −
Linux and FreeBSD installation
The command set given below can be used to download the latest version of Julia programming language into a directory, lets say Julia-1.5.1 −
wget https://julialang-s3.julialang.org/bin/linux/x64/1.5/julia-1.5.1-linux-x86_64.tar.gztar zxvf julia-1.5.1-linux-x86_64.tar.gz
Once installed, we can do any of the following to run Julia −
Use Julias full path, <Julia directory>/bin/Julia to invoke Julia executable. Here <Julia directory> refers to the directory where Julia is installed on your computer.
You can also create a symbolic link to Julia programming language. The link should be inside a folder which is on your system PATH.
You can add Julias bin folder with full path to system PATH environment variable by editing the ~/.bashrc or ~/.bash_profile file. It can be done by opening the file in any of the editors and adding the line given below:
export PATH="$PATH:/path/to/<Julia directory>/bin"
Windows installation
Once you downloaded the installer as per your windows specifications, run the installer. It is recommended to note down the installation directory which looks like C:\Users\Ga\AppData\Local\Programs\Julia1.5.1.
To invoke Julia programming language by simply typing Julia in cmd, we must add Julia executable directory to system PATH. You need to follow the following steps according to your windows specifications −
On Windows 10
First open Run by using the shortcut Windows key + R.
Now, type rundll32 sysdm.cpl, EditEnvironmentVariables and press enter.
We will now find the row with Path under User Variable or System Variable.
Now click on edit button to get the Edit environment variable UI.
Now, click on New and paste in the directory address we have noted while installation (C:\Users\Ga\AppData\Local\Programs\Julia1.5.1\bin).
Finally click OK and Julia is ready to be run from command line by typing Julia.
On Windows 7 or 8
First open Run by using the shortcut Windows key + R.
Now, type rundll32 sysdm.cpl, EditEnvironmentVariables and press enter.
We will now find the row with Path under User Variable or System Variable.
Click on edit button and we will get the Edit environment variable UI.
Now move the cursor to the end of this field and check if there is semicolon at the end or not. If not found, then add a semicolon.
Once added, we need to paste in the directory address we have noted while installation (C:\Users\Ga\AppData\Local\Programs\Julia1.5.1\bin).
Finally click OK and Julia is ready to be run from command line by typing Julia.
macOS installation
On macOS, a file named Julia-<version>.dmg will be given. This file contains Julia-<version>.app and you need to drag this file to Applications Folder Shortcut. One other way to run Julia is from the disk image by opening the app.
If you want to run Julia from terminal, type the below given command −
ln -s /Applications/Julia-1.5.app/Contents/Resources/julia/bin/julia /usr/local/bin/julia
This command will create a symlink to the Julia version we have chosen. Now close the shell profile page and quit terminal as well. Now once again open the Terminal and type julia in it and you will be with your version of Julia programming language.
Building Julia from source
To build Julia from source rather than binaries, we need to follow the below given steps. Here we will be outlining the procedure for Ubuntu OS.
Download the source code from GitHub at https://github.com/JuliaLang/julia.
Compile it and you will get the latest version. It will not give us the stable version.
If you do not have git installed, use the following command to install the same −
sudo apt-get -f install git
Using the following command, clone the Julia sources −
git clone git://github.com/JuliaLang/julia.git
The above command will download the source code into a julia directory and that is in current folder.
Now, by using the command given below, install GNU compilation tools g++, gfortran, and m4 −
sudo apt-get install gfortran g++ m4
Once installation done, start the compilation process as follows −
cd Juliamake
After this, successful build Julia programming language will start up with the ./julia command.
Julias working environment
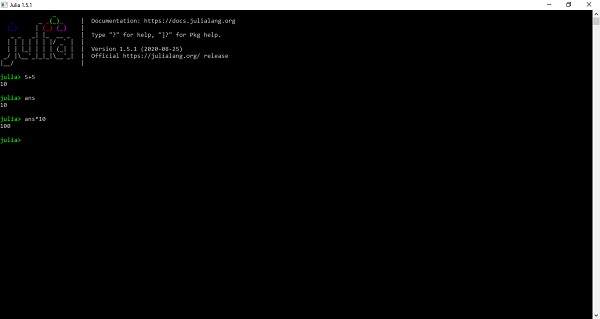
REPL (read-eval-print loop) is the working environment of Julia. With the help of this shell we can interact with Julias JIT (Just in Time) compiler to test and run our code. We can also copy and paste our code into .jl extension, for example, first.jl. Another option is to use a text editor or IDE. Let us have a look at REPL below −

After clicking on Julia logo, we will get a prompt with julia> for writing our piece of code or program. Use exit() or CTRL + D to end the session. If you want to evaluate the expression, press enter after input.
Packages
Almost all the standard libraries in Julia are written in Julia itself but the rest of the Julias code ecosystem can be found in Packages which are Git repositories. Some important points about Julia packages are given below −
Packages provide reusable functionality that can be easily used by other Julia projects.
Julia has built-in package manager named pkg.jl for package installation.
The package manager handles installation, removal, and updates of packages.
The package manager works only if the packages are in REPL.
Installing packages
Step 1 − First open the Julia command line.

Step 2 − Now open the Julia package management environment by pressing, ]. You will get the following console −

You can check https://discourse.julialang.org/t/shutting-down-julia-observer-posted-4-1-20/36870 to see which packages we can install on Julia.
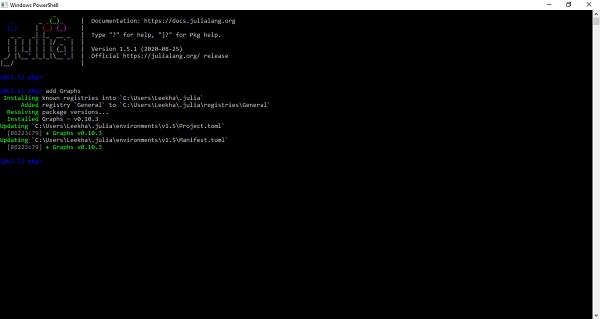
Adding a package
For adding a package in Julia environment, we need to use addcommand with the name of the package. For example, we will be adding the package named Graphs which is uses for working with graphs in Julia.
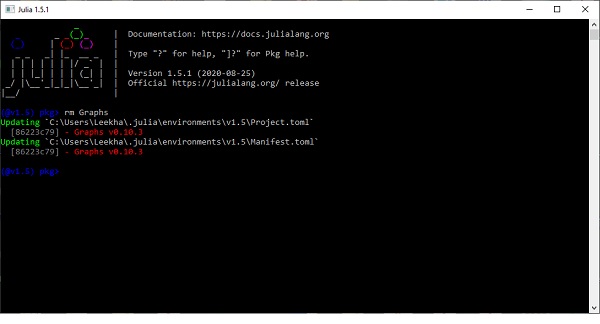
Removing a package
For removing a package from Julia, we need to use rm command with the name of the of the package. For example, we will be removing the package named Graphs as follows −
Updating a package
To update a Julia package, either you can use update command, which will update all the Julia packages, or you can use up command along with the name of the package, which will update specific package.
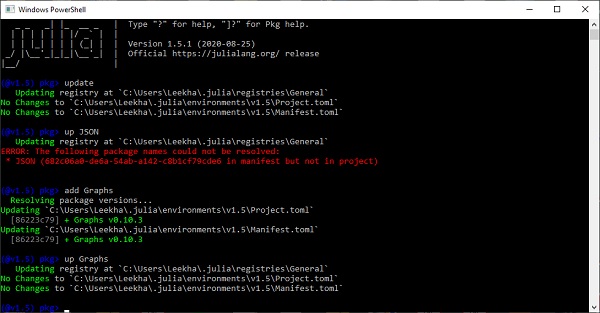
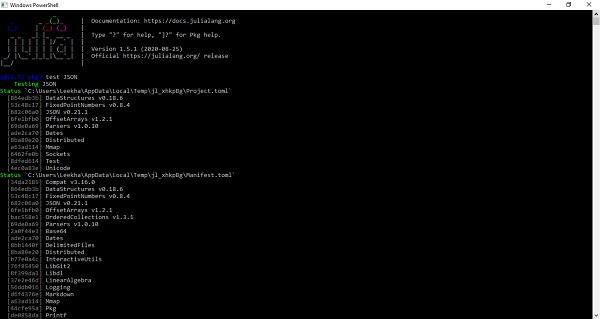
Testing a package
Use test command to test a Julia package. For example, below we have tested JSON package −
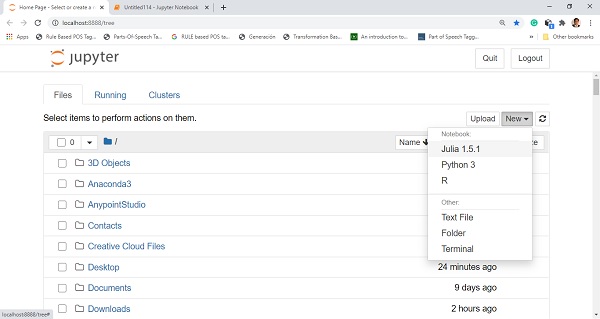
Installing IJulia
To install IJulia, use add IJulia command in Julia package environment. We need to make sure that you have preinstalled Anaconda on your machine. Once it gets installed, open Jupyter notebook and choose Julia1.5.1 as follows −
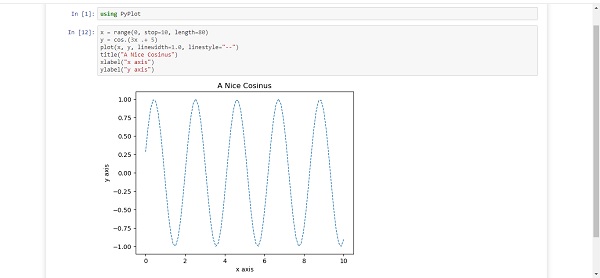
Now you will be able to write Julia programs using IJulia as follows −
Installing Juno
Juno is a powerful IDE for Julia programming language. It is free, and to install follow the steps given below −
Step 1 − First we need to install Julia on our system.
Step 2 − Now you need to install Atom from here. It must be updated(version 1.41+).
Step 3 − In Atom, go to settings and then install panel. It will install Juno for you.
Step 4 − Start working in Juno by opening REPL with Juno > open REPL command.