- Home
- Overview
- Environment
- Interfaces
- Launching Cluster
- Viewing Cluster Details
- Cluster Endpoints
- Accessing Cluster
- Modifying Cluster
- Rebooting Cluster
- Adding Nodes
- Removing Nodes
- Scaling the Clusters
- Delete Cluster
- Redis Shards
- Parameter Group
- Listing Parameters
- Deleting Parameters
- Engine Parameters
- Backup and Restore
- Monitoring Node - Metrics
- Memcached & Redis
- Accessing Memcached Cluster
- Lazy Loading
- Write Through
- Add TTL
- Memcached VPC
- Creating Memcached Cluster
- Connecting to Cluster in VPC
- Delete Memcached Cluster
- IAM policies
- SNS Notifications
- Events
- Managing Tags
- Managing Costs
- AWS ElastiCache - Resources
- Quick Guide
- Useful Resources
- Discussion
AWS ElastiCache - Adding Nodes
When we want to expand a cluster, we do so either by adding more nodes or changing the existing nodes to a higher configuration. Depending on many factors like the cost involved, the memory requirement etc, we may choose one of these approaches. In this chapter we will see how to expand a cluster by adding nodes to the clusters.
To add a node to a single-node Redis cluster (one without replication enabled), we need to go through a two-step process. The first step is to add replication, and the second step is to add a replica node.
Below are the details of all the steps to add a node to an existing cluster.
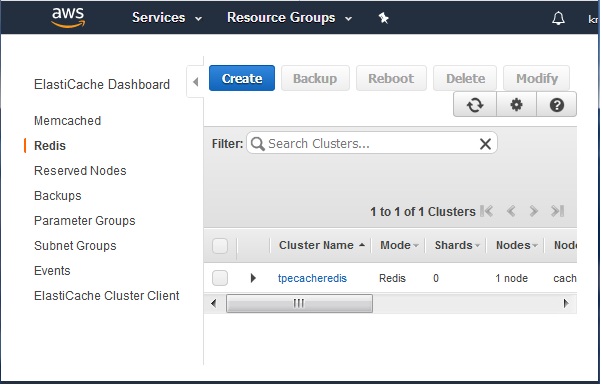
Identify the Cluster
We login to the AWS console and go to the ElastiCache dashboard. From the dashboard we choose the name of the cluster whose details we need. In the below diagram we see the name of the cluster details after clicking the name of the cluster as a hyperlink in the ElastiCache dashboard.
Add Replication
To a single-node Redis that does not have replication enabled, we first add replication. Then the existing node becomes the primary node in the replication-enabled cluster. After replication is added, you can add up to 5 replica nodes to the cluster. Under the Nodes tab we choose Add Replication button. Then fill up the description for the cluster replication and click create.

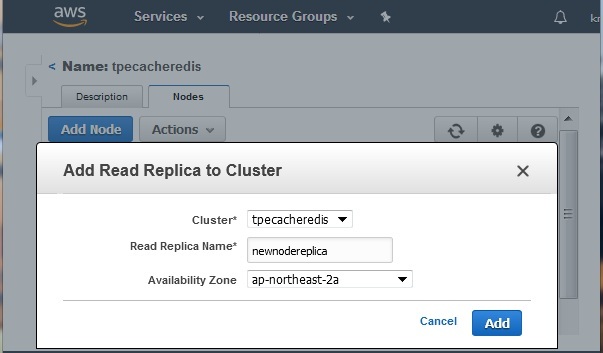
Add Read Replica
In this step we assign a name to the node we are adding to the cluster. Click on Add Node and mention the name of the read replica.
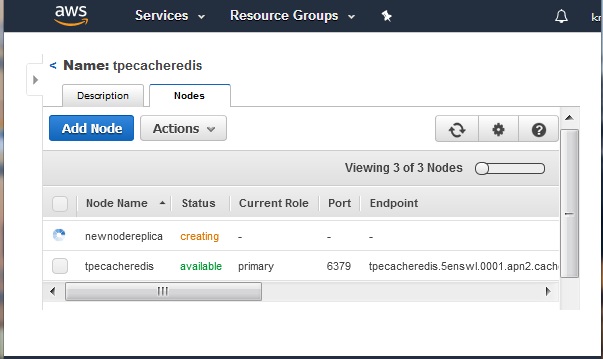
On clicking the button labelled Add we get the following screen shot. It shows the new node being added to the cluster. It takes a while to complete. The status shows as creating
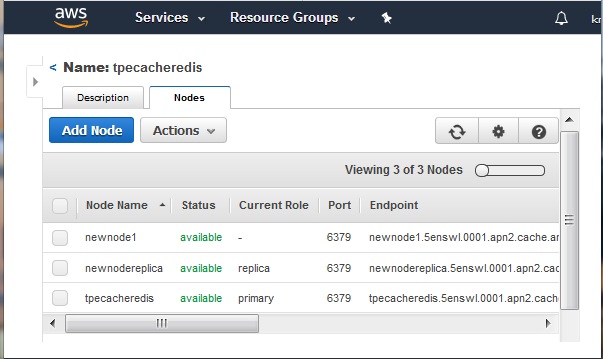
After a while on refreshing the web page we can see that the actual node has been added to the cluster. Its port number and Endpoint becomes available along with the change in its status.