- Tesults - Home
- Tesults - Overview
- Tesults - Sign Up & Project Creation
- Tesults - Integrating Your Automated Tests
- Tesults - View Test Results
- Tesults - Team Members
- Tesults - Project Configuration
- Tesults - Actioning Tasks Based on Test Results
- Tesults - Notifications
- Tesults - Integrations with Other Services
- Tesults - Test Case Management with Lists
- Tesults - Test Runs for Manual Testing
- Tesults Useful Resources
- Tesults - Quick Guide
- Tesults - Useful Resources
- Tesults - Discussion
Tesults - Quick Guide
Tesults - Overview
Software development teams have to understand the failures that have been identified from testing. They need to understand what test cases were run and what the reasons for the failures were and whether any regression or decline in quality has occurred.
Test reporting for both automated and manual testing, as well as managing of test cases is an important part of the development and testing tools stack. Ideally, test cases and test results should be easily accessible for all test runs.
Tesults is a web-based test results and test case management application. The objective of this tutorial is to demonstrate how to setup your tests to report results using Tesults and explain how to use the analysis and reporting features that are available.
Features of Tesults
Key features of Tesults are as follows −
- Test results reporting
- Test case management
- Consolidation of test results from parallel test jobs into a single run
- Consolidation of test results from across an application or project
- Notifications of results by email and other services such as Slack
- Storage of test generated data such as logs and screenshots.
- Assignment of test cases to team members
- Bug linking
- Flaky test indicator
- Test case comments
- Testing collaboration
- Performance data charting
Free and Paid Pricing
Tesults is commercial service with paid plans that teams can subscribe to. It provides a free project plan to use for evaluation. The free project has no time limit and can be used for as long as you want.
However, the free project is limited in a number of ways compared to the paid projects, most notably only one target (targets are explained in the next section) is provided and the number of test cases is limited to 100 for each test run.
For some open source projects, individuals and educators, and small teams getting started, Tesults provides discounted or even free offerings if requested by email as mentioned on their pricing page so even for teams that have no budget Tesults can be used.
Tesults - Sign Up and Project Creation
This chapter deals with topics such as how to sign up, how to create a project and what exactly are targets in tesults.
Sign up
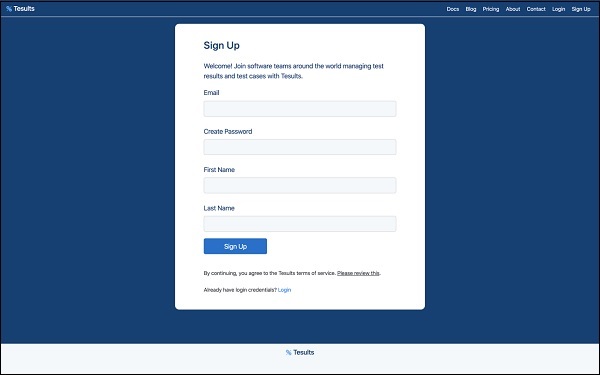
The first thing to do is sign up. Visit www.tesults.com and click Sign Up from the header.
To sign up, you must enter your email address, create a password and enter your name.
Creating a project
After signing up, you are automatically logged in and can create a project. Click config from the header and then click Create New Project. You need to enter a name for your project.
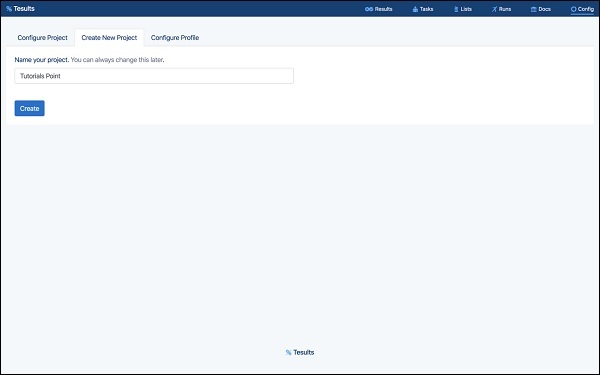
Next you must choose your plan. For this tutorial, we will create a free project.
After the project is created, a token will be displayed. This token is needed to submit test results to Tesults and should be copied. At any time, these token can be recreated from the configuration menu.
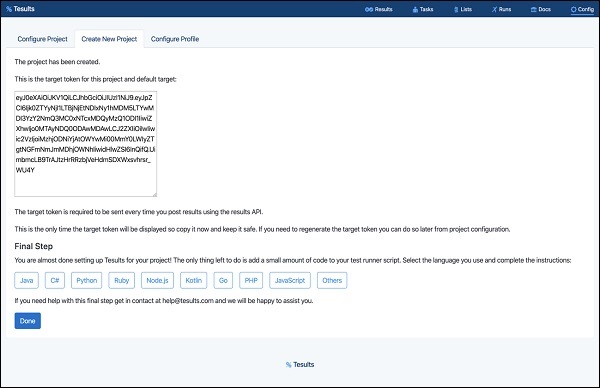
At this point the project is created. Next thing to do is integrate automated tests to push results data to Tesults.
Targets
Tesults uses the term target to refer to a source of test results data, like a specific test job. The recommendation is to consider each target a bucket to upload test results to. Usually software development teams do not only run a single test run. They may run tests in different environments, on different devices, in different branches and for different modules of an application.
For example, if there is a back-end and a front-end, there may be API tests for the back-end and UI automated tests for the front-end. If these sets of tests are run in a development environment and in a staging environment, then there are four test jobs −
- Back-end development
- Front-end development
- Back-end staging
- Front-end staging
Tesults would consider each one a target. The reason for this concept of target has to do with making each test run comparable to the last and as a way to organise results data from various sources.
Tesults - Integrating Your Automated Tests
Tesults makes libraries available to integrate for various languages which includes −
- Python
- Node.js / JS
- Java
- C#
- Ruby
- Go
There is also a REST API available. To upload test generated data and files, one of the libraries must be used.
No code integration
For some test frameworks, it is possible to integrate without any code using test framework specific libraries that are available.
Test frameworks requiring no code to integrate include −
- pytest
- Robot
- Jest
- Mocha
- JUnit5
- NUnit 3
The integration process is similar for all of these libraries.
Install Plugin
Within your test project, install the relevant Tesults plugin. For example, if you are using pytest, this is done using pip install tesults followed by pip install pytest-tesults. If you are using Mocha, you use npm install mocha-tesults-reporter save. See the appropriate command for your test framework on the Tesults website.
Configure Plugin
Some plugins require no configuration and are ready to use immediately, some require a small amount of configuration. In the case of pytest, for example, no additional configuration is required and it is ready to use.
In the case of Mocha, a small change is needed to the mocha call, specifically the reporter needs to be specified, mocha --reporter mocha-tesults-reporter. See the Tesults website for specific configuration for the framework you are using but, in general, the configuration is a one-line change or no change.
Pass Args
There is a required argument to pass to the plugin and other optional arguments. The required arg is to provide the Tesults target token. This token was generated on project creation for the default target in the previous tutorial page. You can get a new token if you do not have this token from the configuration menu in Tesults. Click Regenerate Target Token in the configuration menu.
How to pass the argument depends on your test framework and plugin. For example, in pytest it can be provided in the pytest call pytest --tesults-target token_value or by using a configuration file. For Mocha, it is similar, it can be passed through in the mocha called mocha * --reporter mocha-tesults-reporter -- tesults-target=token or it can be passed in a configuration file.
The target token is the only required arg, there are optional args for passing in build information and for files upload. See the Tesults website for specific information on args for your test framework.
Run Tests
Run your tests and results will now be submitted to Tesults.
Code integration
If you are using a custom test framework or a test framework for which Tesults does not have a specific library or plugin you need to make use of one of the language frameworks.
Here, we will take a look at what is involved in integrating for Python. Other languages have very similar integration processes, see the Tesults website for specific details for your programming language but follow this tutorial first to get an idea of the process −
Install Library
For Python, the following is the command −
pip install tesults
For other languages, the process is similar, for JS test frameworks, you install the library from npm, for Java you can use Gradle or Maven, for C# the packages are hosted on NuGet, and Ruby has it available as a gem.
Configure Library
For Python, configuration involves just a require tesults in any module you want to use the library. Again, similar configuration is needed in other languages. See the Tesults website for the specific configuration for your programming language.
Map Test Data
This step is something that the no code plugins allow you to avoid. For the code based integration you must map your test data to Tesults test data.
For Python, this means turning each test case result into a Python dictionary −
{
   'name': 'Tutorial 1',
   'desc':'Tutorial 1 .',
   'suite': 'Tutorials Point',
   'result': 'fail',
   'reason': 'Assert fail in line 102, tutorialspoint.py',
   'files': ['full-path/log.txt', 'full-path/screencapture.png'],
   '_CustomField': 'Custom field value'
}
The name and result are required. Everything else is optional. The result must be one of pass, fail, or unknown.
The suite is useful to provide because it helps groups test cases when viewing results and helps avoid name conflicts. The reason should be provided for failing test cases.
Files are useful for ensuring logs and other test files are stored and can be viewed alongside the test case for which they are for.
You can also have any number of custom fields; they must begin with the underscore (_) character. For each test case, build up a dictionary in this way, and store them in an array.
Upload Results
To upload results, each library provides a results upload function. In the case of Python, you need to call the following −
tesults.results(data)
where the data parameter is follows −
data = {
   target: token,
   results: {
      cases: [<your test cases>]
   }
}
The cases array is the array created in the section above.
For other programming languages, the process is exactly the same with just syntax changes.
Help
The Tesults website has a way to request help for integration if you need it.
Next Steps
At this point, integration is complete and we can look at how to view, analyse and take action from test results.
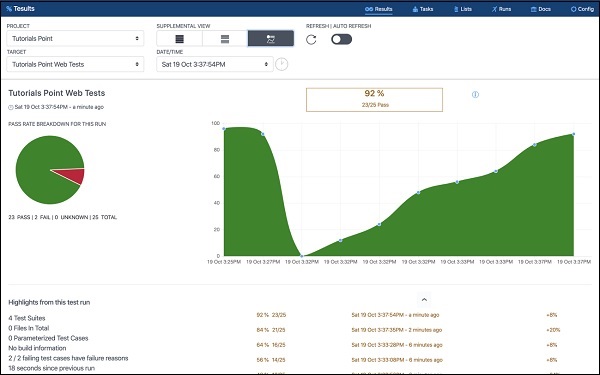
Tesults - View Test Results
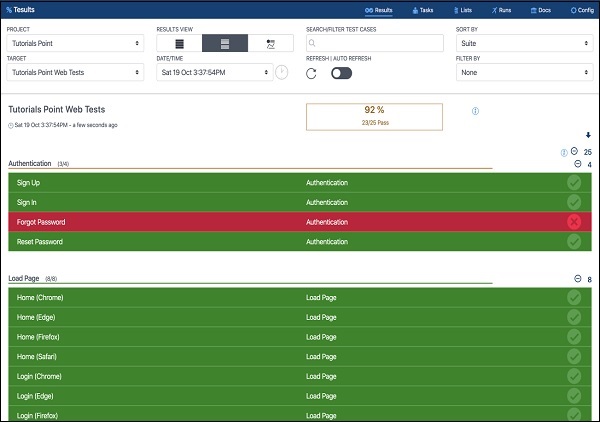
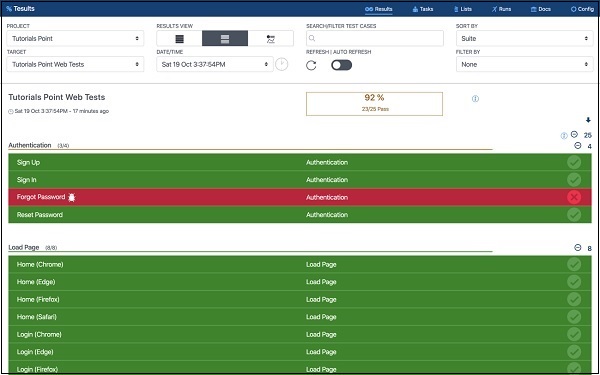
Tesults provides three views into overall test results and one detailed test case view.
Results View
The results view is the primary way to view test results for a test run. All of the test cases for a test run are displayed and grouped by test suite.
If you have hundreds or thousands of test results, you can use the test suite collapse and expand buttons on the side to make navigating easier.
There are controls available to change the view. You can use these to −
Change view type − results, summary, supplemental
Change project − if you have multiple projects
Change target − if you have multiple targets
Change test run − you can select older test runs
Search − useful if you have hundreds or thousands of test cases to search for a specific test case
Sort by − you can choose to sort results by suite, result (pass/fail) and test name
Refresh results − you can either click the refresh icon to manually refresh or enable auto refresh which will frequently refresh the view
The results view lists the total number of passes, fails, the total number of test cases and number of test cases by test suite.
Supplemental View
The supplemental view is most useful for quickly finding out which test cases are new fails, old or continuing fails and new passes. Rather than having to figure this out in the results view, the supplemental view makes this information easily available by automatically comparing the latest results with previous test runs.
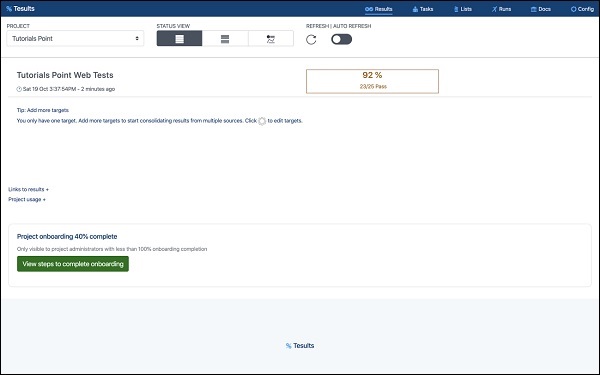
Summary View
The summary view is useful if you have many targets (test jobs). You can see the latest results from your whole project in this one view to find out whether there are specific areas that need attention.
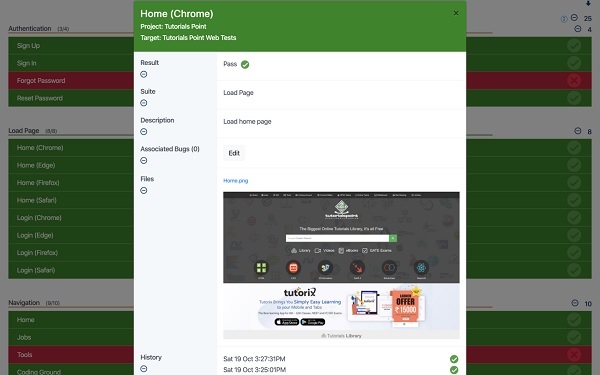
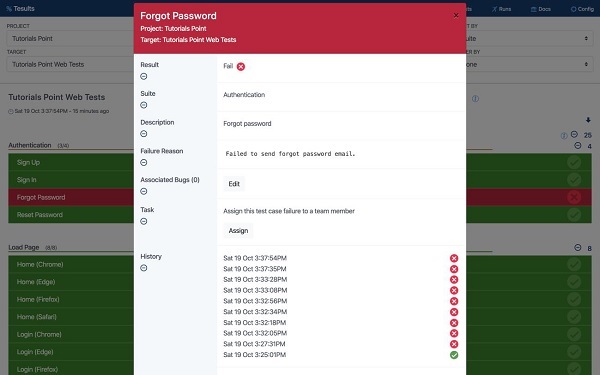
Test Case Detail
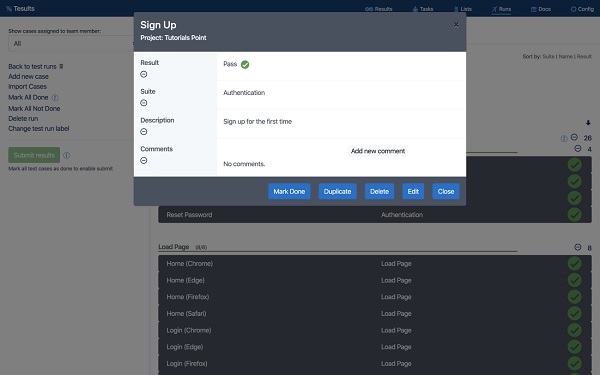
In the results view, you can click on any test case to see detailed information about it. A test case specific view appears with fields including −
Name
Description
Result
Suite − This is the test suite the test case belongs to
Failure reason − If the test case has failed
Files − Files can be viewed here. Logs, screen captures and some csv files can be viewed inline within the window, other files can be downloaded
Link − A direct link to this test case
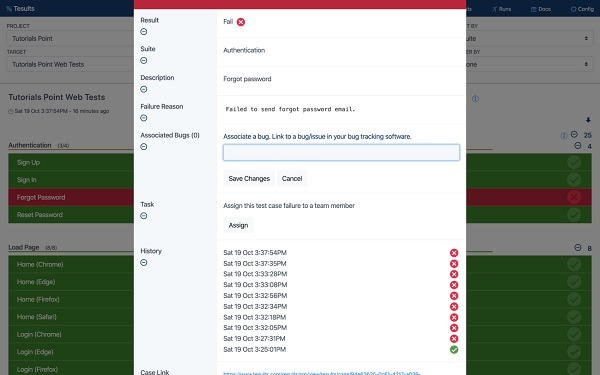
Associated bugs − Bugs from JIRA or other bug management systems that are linked to the test case
Task − Used to assign the test case to a colleague, useful for, if a test case has failed and someone should be looking into it
History − Displays the previous results of the same test case
Comments − Comments specific to a test case can be added
By using the three high level views and the test case detail view, it is possible to get a complete understanding of test results.
Tesults - Team Members
You can add team members to your project so that others can login and view results. Also, you need to add team members if you want to assign test case failures to specific people to investigate, review results and add bug links and to comment on test cases.
Adding team members
Click Config from the menu bar and then click Team Members.
Add team members individually by providing their email address and click Add. Or add in bulk using a CSV file.
An invitation is sent to the email address you have added.
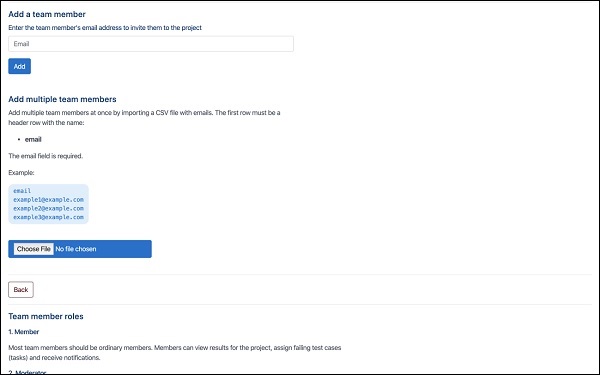
You can also remove team members here and change their role.
Team member roles
There are five team member roles. When a new team member is added they are automatically level 1 − Member. This role can view results.
If you want a team member to be able to manage test cases they must be changed to level 2 − Moderator.
The next role, level 3 − Administrator can also manage the project such as adding targets.
The next role, level 4 − Officer can also edit the project plan details and payment information.
Level 5 is the project owner; this will be you if you created the project. This role is the only one that can delete the project.
Tesults - Project Configuration
You can use the configuration menu to apply changes that can affect your project.
Click Config from the menu to open the configuration menu.
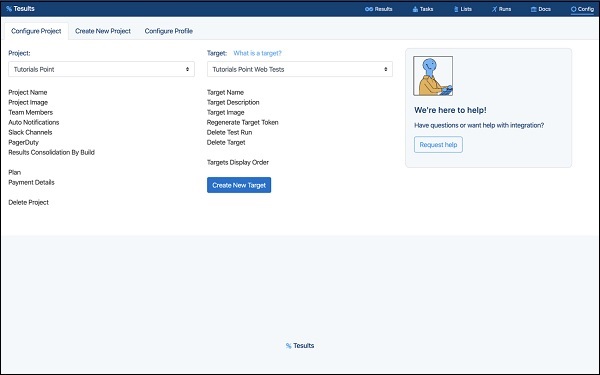
Targets
One of the most important things you can do from this menu is create and edit targets. Targets correspond to test jobs, so for every test run you want to report results with Tesults you need to create a corresponding target.
Click Create Target to create a target.
You can also edit the target name here and also regenerate the target token here.
If you have many targets you can also modify the order they appear in the Summary view and also in dropdown selection lists from here.
You can delete targets here too.
Team Members
Add and edit team members by clicking Team Members. The previous section talked about adding team members in detail.
Notifications
You can choose to enable and disable notifications by clicking Auto Notifications. You can choose whether to send notifications after every test run or only if the results have changed. The second way helps reduce spamming of results data when nothing has changed.
Integration with other Services
The configuration menu is also where you can integrate your projects with external services like Slack. For Slack, you can setup notifications to be sent to specific Slack channels for the whole project or for different Tesults targets.
Click Slack Channels to configure which Slack channels should receive notifications.
Plan
You can change your plan type by clicking Plan. For this tutorial we created a free project.
Results Consolidation by Build
If you run parallel test runs but the results should be consolidated as a single test run, you can enable consolidation by clicking the Results Consolidation by Build link from the configuration menu. Then, if the build name for a test run matches the build name for another test run, all the results are consolidated so that you see everything in one test run.
Delete Project
To delete your project, click Delete Project from the configuration menu.
Actioning Tasks Based on Test Results
Every test case can be treated as a task. This can be useful for processing failing test cases.
Assign failing test cases
Here, you will understand how to assign failing test cases to team members.
If you open the test case for a failing test case, you will see a field named Task. There is an assign button. If you click that you will see a dropdown list of all of your project team members.
Choose the team member you want to look into the test failure. They will then receive an email notifying them that they have been assigned the task.
Resolving test cases
If a task is assigned to you, you can set the task to resolved if you believe a fix has been implemented.
Resolution notifications
If a test case passes in the next test run, the task is automatically resolved and an email is sent to whoever the task is assigned to letting them know the test has passed and the task will be removed.
Monitor flaky test cases
Tesults adds a flaky icon next to the name of any test case that looks like it has changed results between pass and fail a few times. The intention is for the test case to be investigated to find out if −
- There is a problem with the test case itself that makes it pass sometimes and fail at other times.
- There is a bug in the system under test that shows up sporadically.
Link bugs to test cases
If a failing test case is due to a known bug or if you create a new bug because of a test fail, you can link the bug you create in your bug tracking software, e.g. JIRA, to the test case. Just paste the link from the bug tracker. Then, Tesults adds a bug icon next to the name of the test case to show a bug is linked.
Viewing tasks
Click Tasks from the menu bar to view tasks for yourself and for the rest of your team.
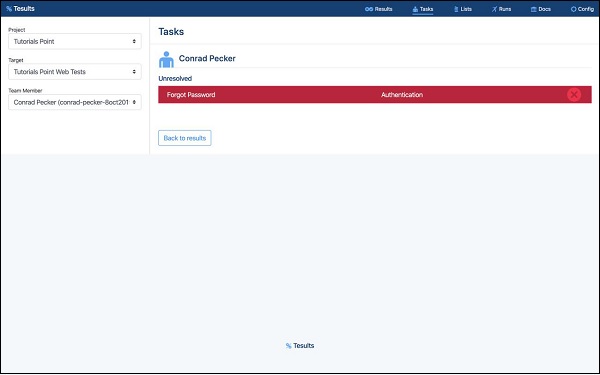
You can see what tasks are assigned to yourself and to others and tasks can be display by resolved (if you set them to resolved) and unresolved. You can also reassign as task to someone else by clicking on a test case.
Tesults - Notifications
You can setup notifications to be sent by email and with external services such as Slack.
Results
Click config from the menu to open the configuration menu, then click Automatic Notifications.
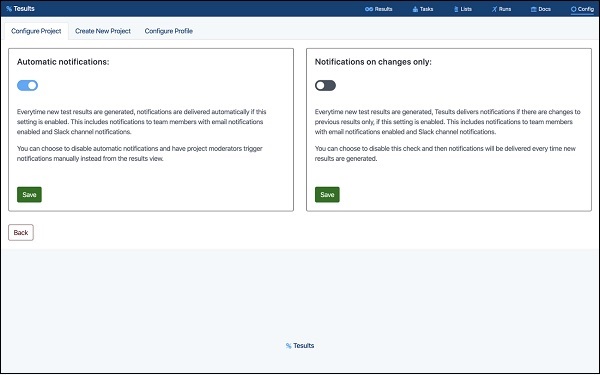
From here, you can choose to enable or disable test results notifications.
You can also choose to send notifications only when test results change or on every test run. If you submit test results with high frequency, such as part of a continuous integration system, it may be better to only send notifications on changes to avoid getting overrun with emails.
Integration with other services is covered in the next section.
Tasks
Tesults also sends notifications related to task management. If someone assigns you a test case, you receive a notification email about it. You are also notified when a test case assigned to you passes and is removed from your list.
Administrative
When team members are added or removed from a project notification messages are sent out about this.
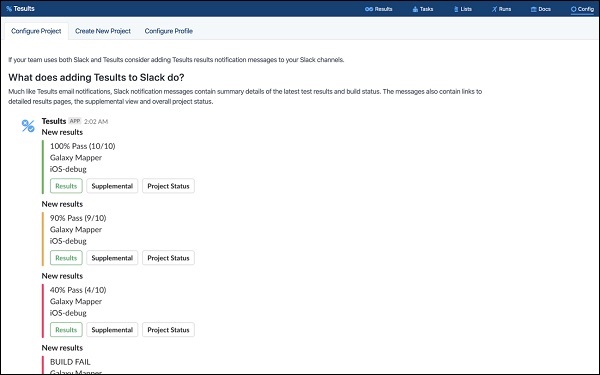
Tesults - Integrations with Other Services
Tesults can integrate with Slack to deliver notifications based on test results. The roadmap page also mentions integration with PagerDuty coming and there may be others in the future but for this tutorial we focus on the Slack integration specifically.
Click config from the menu bar to access the configuration menu and then click Slack.
The first step is to authorize Tesults to be able to send messages to your Slack channels. To do this, you must be logged in to Slack and Tesults. Then click the Add button as sown below −
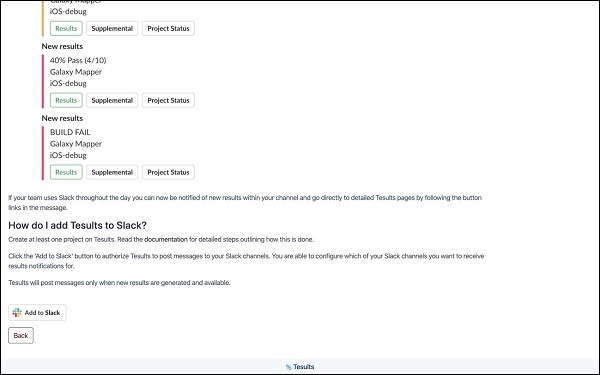
You are sent to Slack to authorise.
After confirmation you return to Tesults and then can choose to enable notifications by project scope or target scope.
Project Scope
Project scope allows you to choose which Slack channel or channels should receive your test results notifications. All notifications from any target will be sent to the channels you select.
Target Scope
If you want more fine grain control, select target scope.
Now, you can choose the target from your Tesults project and assign the Slack channel or channels you want to receive notifications for from a specific target. You can do this for every target.
This can be useful if you have Slack channels for different environments or project areas that should get more targeted notifications.
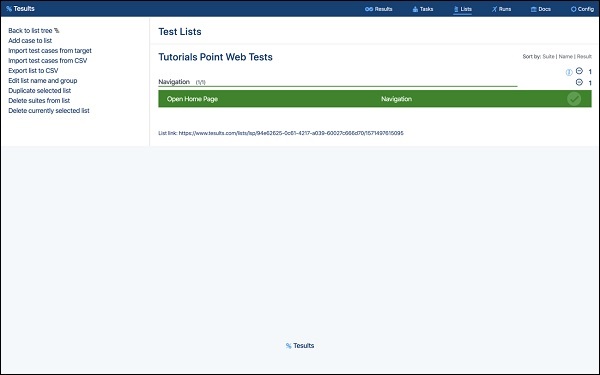
Tesults - Test Case Management with Lists
Test lists are used to manage test cases. Store test cases here are to reuse for each of your manual test runs or even for documenting automated tests.
Click lists from the menu to enter the Test Lists view.
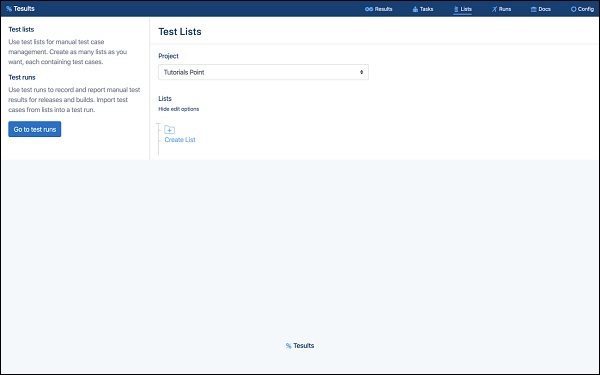
Creating a test list
Click Create List. Note that you also create a group to begin, groups allow you to organise your test lists. If you are going to create a lot of test lists create groups.
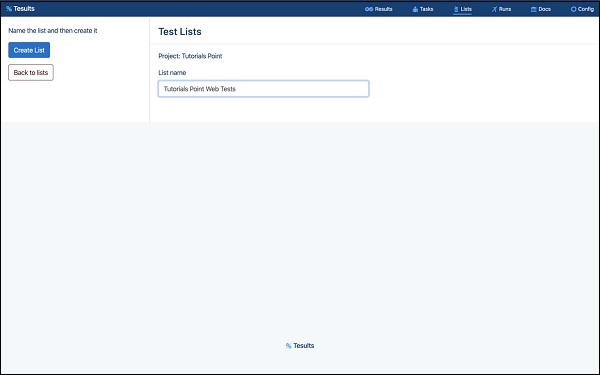
Now, name your test list and confirm. Your list will appear and you can immediately start adding test cases to it.
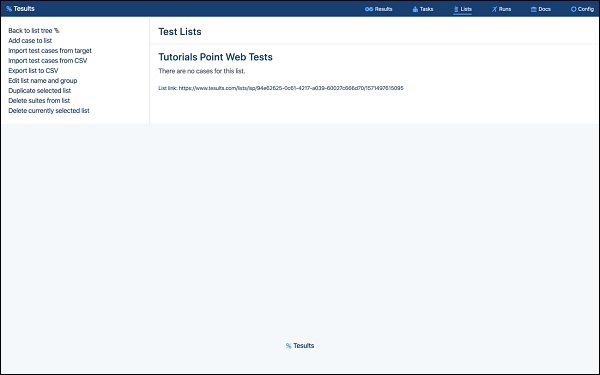
Adding test cases
Adding test cases include three types which are manual, import from CSV and import from target. Let us begin with understanding about Manual.
Manual
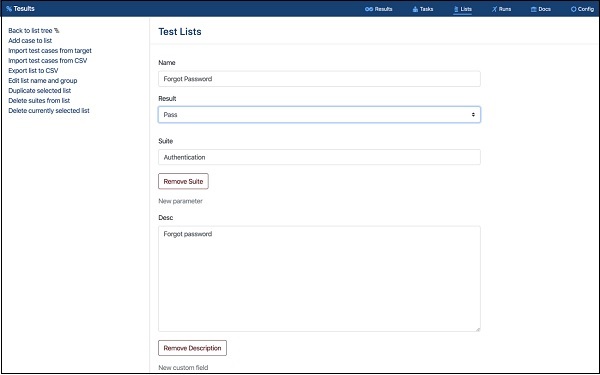
Click Add case to list to add a test case manually.
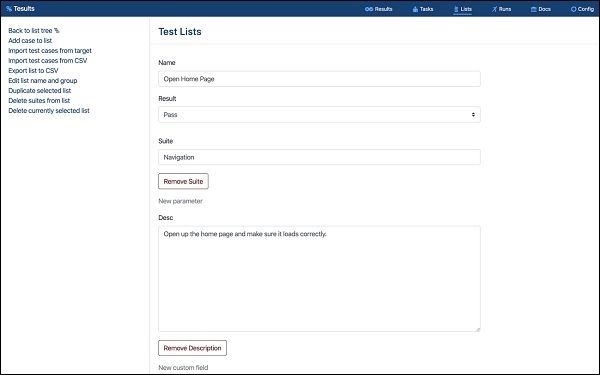
Enter test case details such as −
- Name
- Result
- Description
- Suite
- Parameters
- Custom fields
Click Save Case and you will see that the case has appeared in the list.
Import from CSV
You can also import cases from a csv file.
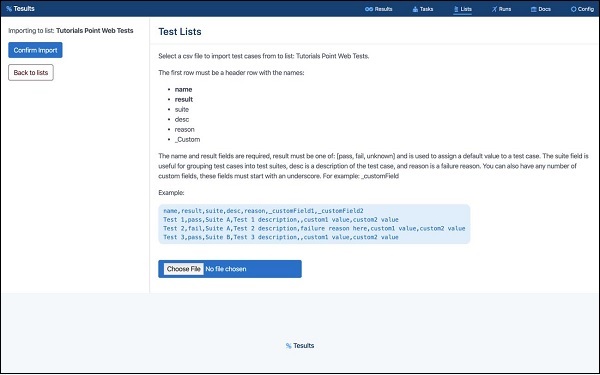
You need to ensure your csv file has the data laid out such the first row of the columns is the field names.
Import from Target
A third way to import test cases is from a target (existing test results).
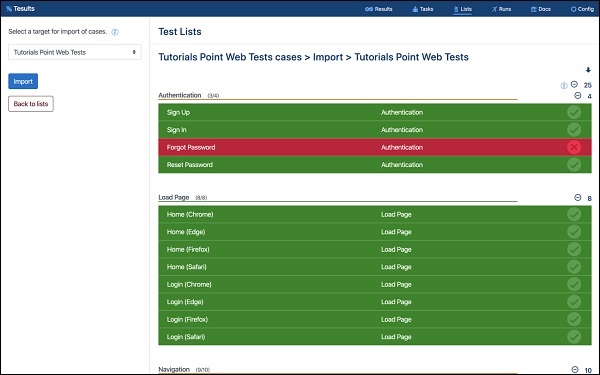
Select the target you want to import test cases from.
Updating test cases
Once your test list has been created and test cases added, you can edit or update test cases by clicking on a specific test case.
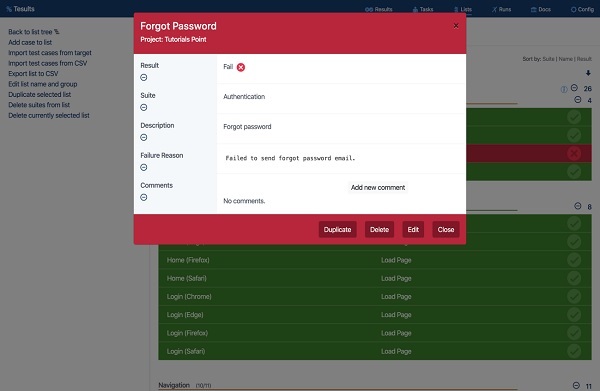
Click Edit from the footer of the test case.
You can change any field; in this case we change the result from fail to pass.
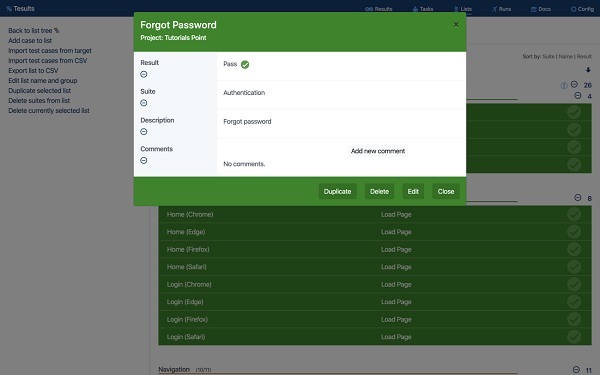
Deleting test cases
In the same way, you can delete a test case by clicking Delete from the footer of a selected test case.
Use with Test Runs
You can use test lists with manual test runs, how to do this is explained in the next section.
Tesults - Test Runs for Manual Testing
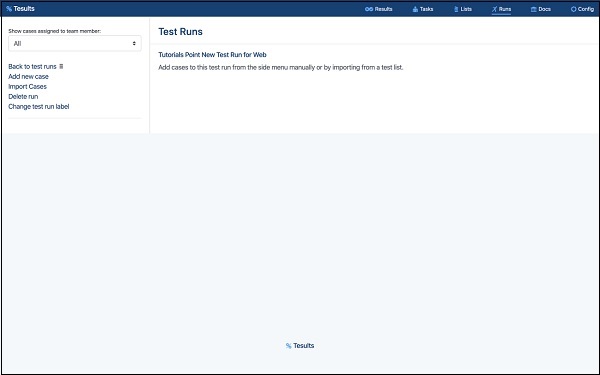
Test runs are used to conduct manual testing. Click runs from the menu to access test runs.
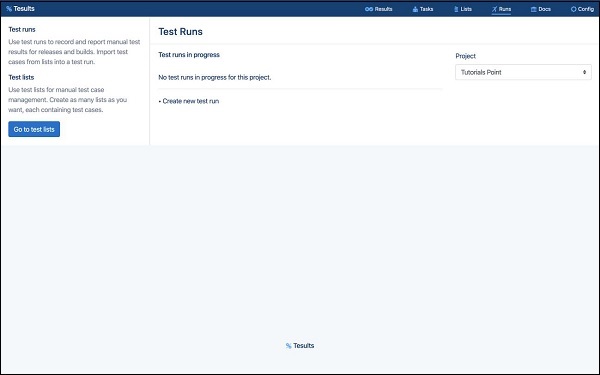
Create a test run
First thing to do is create a test run. Click Create new test run and then enter a name for your test run and confirm to create.
The name here is a temporary name. By default, Tesults sets it to the current date and time. The name is used to come back to a test run later on or share a test run with other team members to work on at the same time.
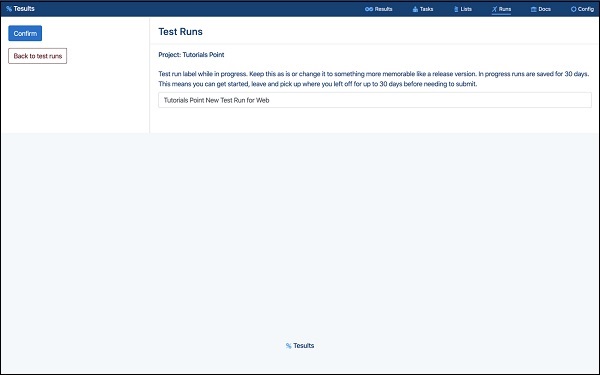
After confirming the new test run is created and it will be empty.
Adding test cases
To add a test case manually click add new case. Now, you can add test case details including −
- Name
- Result
- Suite
- Parameters
- Description
- Files (upload test case related files)
- Custom Fields
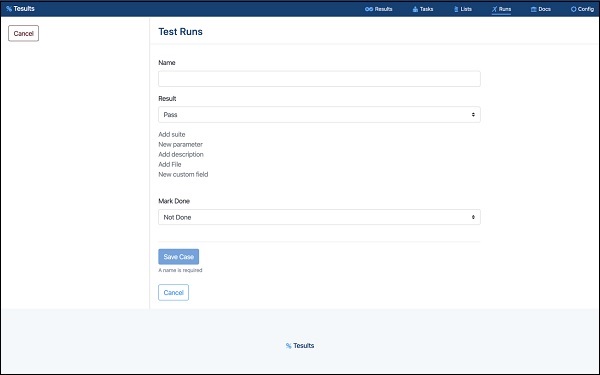
Save the case and you will see that it is added to the test run.
Importing test cases from a List
You can also add test cases from a test list (see previous section for creating test lists). This is the most efficient way to add test cases because for each new test run you can use your existing test cases.
Click Import Cases and then select a test list from the dropdown list and click Import.

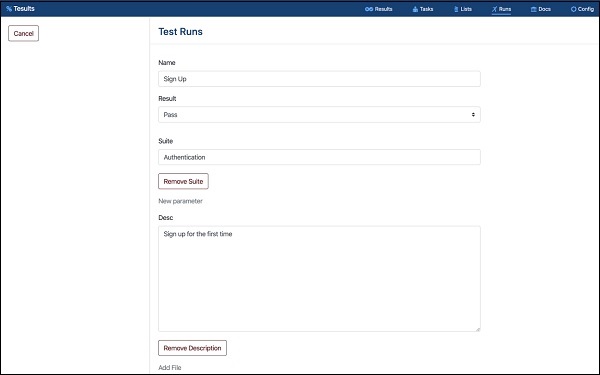
Editing test cases
To edit a test case, click it to open up test case details.
Click edit from the footer.
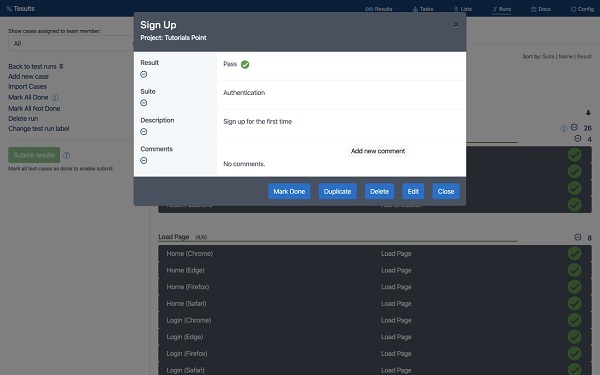
Deleting test cases
You can delete a test case in the same way. Select it and click delete from the footer.
Assigning test cases to team members
By default, test cases are unassigned and all test cases are shown from the list. Change test cases shown to a specific team member by changing the dropdown list from All to a team members name.
Once a team member is selected, including yourself, you can assign test cases to specific people. A new Assign button appears. Click it and the test run will change to display all test cases with indicators showing whether the test case is assigned to the currently selected person, or is unassigned or is assigned to someone else.
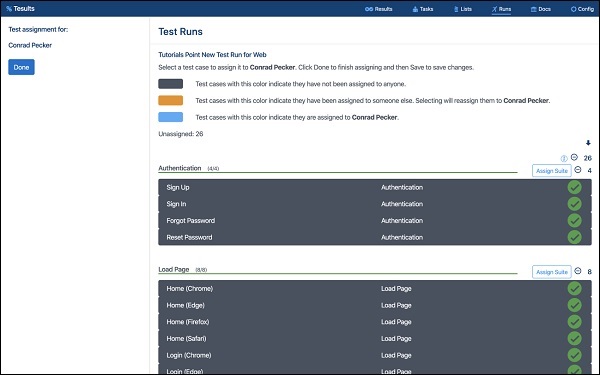
Now, you can click a test case to assign it to the currently selected team member, and click again to unassign. Click Done once you are finished.
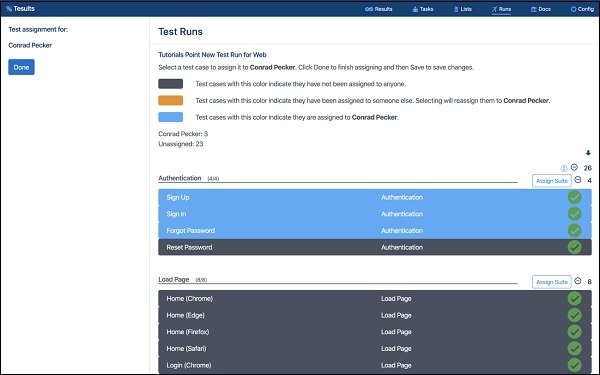
Having All selected will continue to display all test cases, and selecting a team member will display what test cases are assigned to that individual.
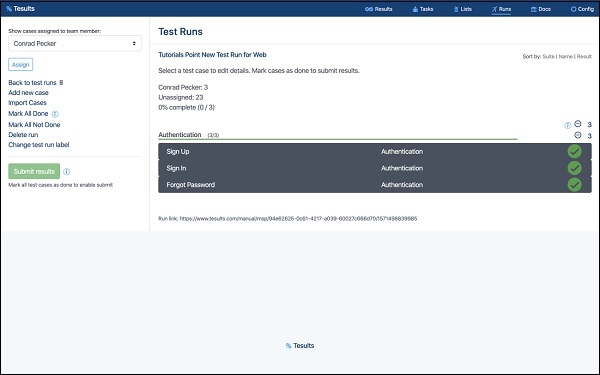
Marking test cases as done
By default, all test cases in the test run are marked as incomplete. This means that they need to be worked on. To indicate that test case has been completed, select the test case and from the footer click Mark Done.
At the top of the test, run the percentage of completed test cases is displayed along with the number that are assigned to team members.
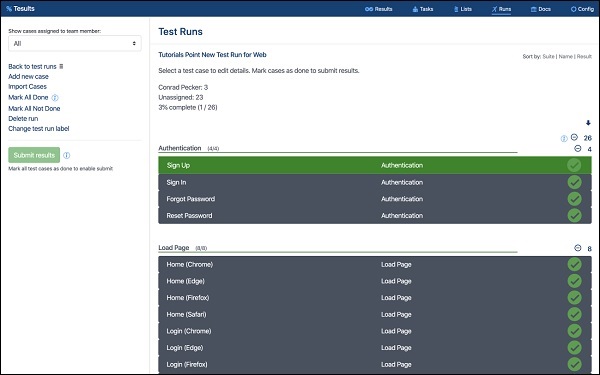
Marking test cases as done makes it easy to keep track of which test cases have been looked at and understand the progress of the run.
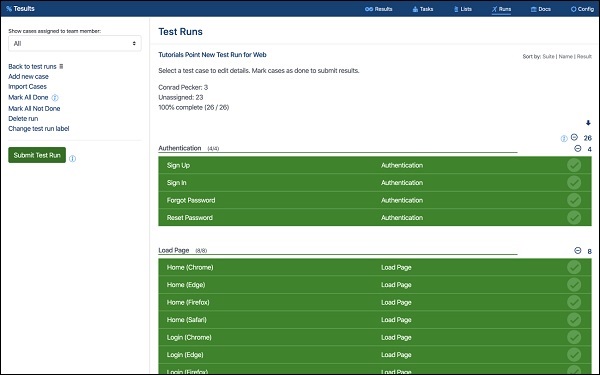
Submitting manual results
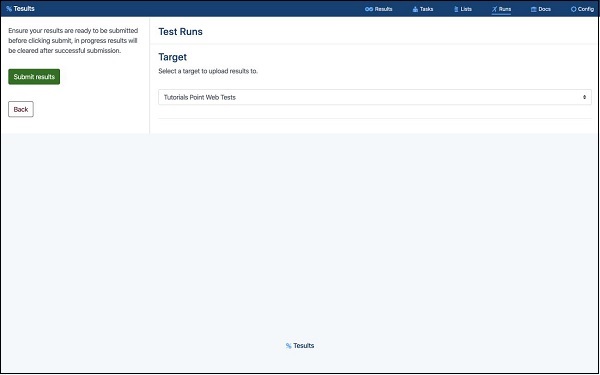
After all test cases in the run have been marked as complete, the Submit Test Run button is enabled and you can click it to submit results to one of your project targets.
Choose the appropriate target from the dropdown list and click Submit Results.
Since automated test runs may be by submitting results to particular targets, you may want to create separate targets for manual test runs, otherwise, historical data and comparisons will break and cause confusion.
It may be better in some cases not to submit results if the test run is for internal use with a test team and not for wider use. Simply view the test run within the team and then create a new test run to start a new one.
If you have created targets specifically for manual test runs, then submitting results is a good idea. After submitting you can click results from the menu bar to view results.