- Serverless - Home
- Serverless - Introduction
- Serverless - Installation
- Serverless - Deploying Function
- Serverless - Regions, Memory-Size, Timeouts
- Serverless - Service
- Serverless - Scheduled Lambdas
- Serverless - API Gateway Triggered Lambdas
- Serverless - Include/Exclude
- Serverless - Plugins
- Serverless - Packaging Dependencies
- Serverless - Layer Creation
- Serverless - REST API with DynamoDB
- Serverless - Telegram Echo Bot
- Serverless Useful Resources
- Serverless - Quick Guide
- Serverless - Useful Resources
- Serverless - Discussion
Serverless - Plugins
As serverless grew in popularity, it was but natural that the demand for a lot more features for niche user-cases would rise. These demands are met by plugins. As the name suggests, plugins are optional and you only need to install the ones that you need. In this chapter, we will see how to access the several plugins available for serverless, how to install these plugins,and how to reference them within serverless.yml.
Browsing the list of plugins
All the plugins available for serverless can be found at www.serverless.com/plugins/
You can search for a plugin here. For example, if you search for 'Python', you will see several plugins specifically developed for the python runtime. They are arranged in the order of popularity.
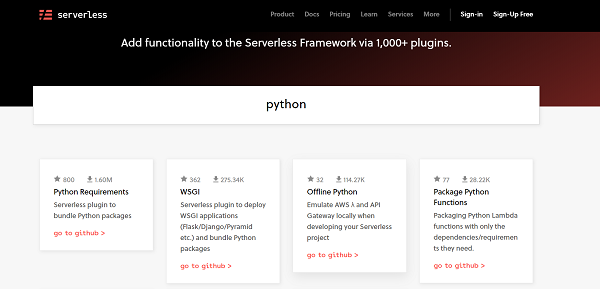
Let's look at the most popular python plugin (at the time of writing this post): Python Requirements. Click on that plugin. This opens up the detailed documentation related to this plugin.
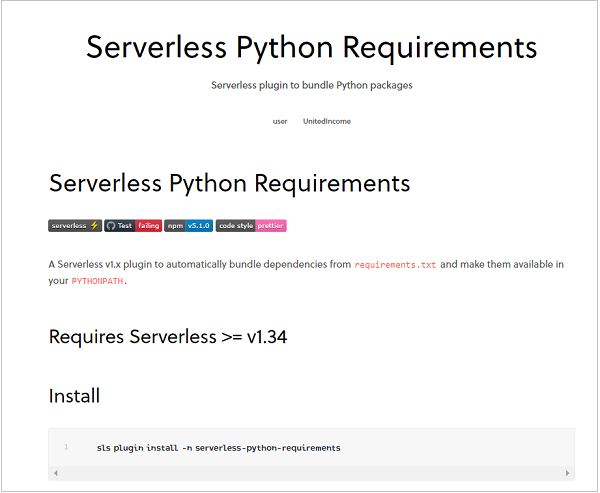
This documentation covers two of the most important aspects − installing the plugin and referencing it within serverless.yml. This is true for any plugin. You only need to open its documentation to know the installation and usage of that plugin. Coming back to the Python Requirements plugin, the documentation states that this plugin automatically bundles dependencies from requirements.txt and makes them available in your PYTHONPATH.
In other words, if your lambda function requires additional dependencies like pandas, numpy, matplotlib, etc., you need to just specify these dependencies in a requirements.txt file, that sits in the same folder as your serverless.yml file. Then this plugin will do the rest. You can even specify the version number of the libraries in requirements.txt.For instance, this is how a sample requirements.txt file looks like −
aws-psycopg2==1.2.1
boto
boto3==1.7.62
botocore==1.10.62
numpy==1.14.5
pandas==0.25.0
scipy==1.5.2
sqlalchemy==1.2.15
As you can see, you can either mention just the dependency name, or add the version number along with it (separated by the == sign). Of course, the dependencies, along with the application code, should not exceed 250 MB in size. Therefore, it is essential that you include only those dependencies that you actually need.
Now, let's come back to our plugin. We have the requirements.txt file ready. The next step would be to install the plugin. Open your Command Prompt and navigate to the project folder containing the serverless.yml file. Then, following the documentation, run the following command to install the plugin −
sls plugin install -n serverless-python-requirements
In fact, if you replace serverless-python-requirements with any other plugin name, the above command should still work for most plugins. However, it is recommended to follow the installation command given in the documentation whenever you install a new plugin. When you run the above command, you should see messages similar to those in the image below −

As you can see, a packages.json file got created in the project folder. If you had a packages.json file existing in your project folder, it would get edited to include the above plugin. Also,the serverless.yml file would automatically get edited to include the installed plugin. If you now open the serverless.yml file, you should see the following lines added −
plugins:
   - serverless-python-requirements
This means that the referencing of the plugin in serverless.yml is automatically done. There are several settings related to this plugin which can be found in the documentation. We will take up the setting related to 'Cross Compiling' in the next chapter. But for now, let us just see the effect of using this plugin. I've added numpy in my requirements.txt. This is how my handler.py file looks like −
import time
import numpy

def hello(event, context):
   print("second update!")
   time.sleep(4)
   print(numpy.random.randint(100))
   return("hello")
Let me now deploy this to lambda. You should see messages similar to those in the image below. Focus on the size of the package. It is now > 14 MB (this is the size of the zipped package) instead of ~10 kB before the plugin addition, because the numpy dependency is also getting bundled together.

This proves that the dependencies are now getting bundled along with the application code. You can test it locally using sls invoke local -f function_name.If you are a Windows or Mac user, chances are that testing out the deployed lambda function on the AWS Lambda Console will throw up an error, similar to the one given below −
Unable to import module 'handler':

IMPORTANT: PLEASE READ THIS FOR ADVICE ON HOW TO SOLVE THIS ISSUE!

Importing the numpy C-extensions failed. This error can happen for
many reasons, often due to issues with your setup or how NumPy was
installed.

We have compiled some common reasons and troubleshooting tips at:

   https://numpy.org/devdocs/user/troubleshooting-importerror.html

Please note and check the following:

  * The Python version is: Python3.8 from "/var/lang/bin/python3.8"
  * The NumPy version is: "1.19.4"

and make sure that they are the versions you expect.
Please carefully study the documentation linked above for further help.

Original error was: No module named 'numpy.core._multiarray_umath'
Head on to the next chapter to learn more about why this error is occurring and how to deal with it.