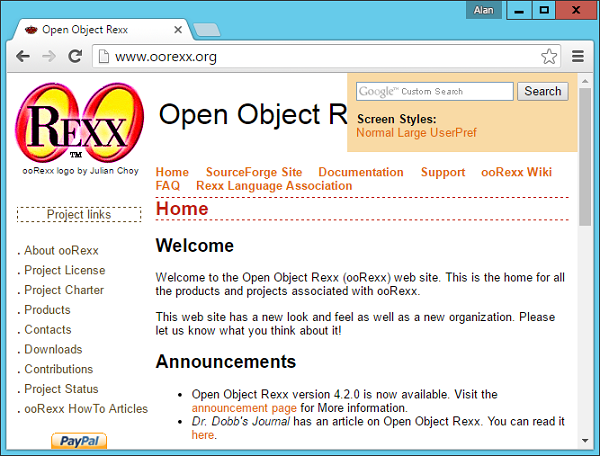
- Rexx - Home
- Rexx - Overview
- Rexx - Environment
- Rexx - Installation
- Rexx - Installation of Plugin-Ins
- Rexx - Basic Syntax
- Rexx - Datatypes
- Rexx - Variables
- Rexx - Operators
- Rexx - Arrays
- Rexx - Loops
- Rexx - Decision Making
- Rexx - Numbers
- Rexx - Strings
- Rexx - Functions
- Rexx - Stacks
- Rexx - File I/O
- Rexx - Functions For Files
- Rexx - Subroutines
- Rexx - Built-In Functions
- Rexx - System Commands
- Rexx - XML
- Rexx - Regina
- Rexx - Parsing
- Rexx - Signals
- Rexx - Debugging
- Rexx - Error Handling
- Rexx - Object Oriented
- Rexx - Portability
- Rexx - Extended Functions
- Rexx - Instructions
- Rexx - Implementations
- Rexx - Netrexx
- Rexx - Brexx
- Rexx - Databases
- Handheld & Embedded
- Rexx - Performance
- Rexx - Best Programming Practices
- Rexx - Graphical User Interface
- Rexx - Reginald
- Rexx - Web Programming
Rexx - Quick Guide
Rexx - Overview
Rexx (Restructured Extended Executor) is designed to be a scripting language. Its goal is to make scripting as easy, fast, reliable, and error-free as possible. Many programming languages are designed for compatibility with older languages, and are written for specific audiences or platforms. Rexx ignores extraneous objectives. It was designed from day one to be powerful, yet easy to use.
Rexx was designed and first implemented, in assembly language, as an 'own-time' project between 20th March 1979 and the middle of 1982 by Mike Cowlishaw of IBM, originally as a scripting programming language to replace the languages EXEC and EXEC 2. It was designed to be a macro or scripting language for any system. As such, Rexx is considered a precursor to Tcl and Python. Rexx was also intended by its creator to be a simplified and easier to learn version of the PL/I programming language.
Features of Rexx
Rexx as a programming language has the following key features −
Simple syntax
The ability to route commands to multiple environments
The ability to support functions, procedures and commands associated with a specific invoking environment.
A built-in stack, with the ability to interoperate with the host stack if there is one.
Small instruction set containing just two dozen instructions
Freeform syntax
Case-insensitive tokens, including variable names
Character string basis
Dynamic data typing, no declarations
No reserved keywords, except in local context
No include file facilities
Arbitrary numerical precision
Decimal arithmetic, floating-point
A rich selection of built-in functions, especially string and word processing
Automatic storage management
Crash protection
Content addressable data structures
Associative arrays
Straightforward access to system commands and facilities
Simple error-handling, and built-in tracing and debugger
Few artificial limitations
Simplified I/O facilities
The official website for Rexx is www.oorexx.org
Rexx - Environment
Before you can start working on Rexx, you need to ensure that you have a fully functional version of Rexx running on your system. This chapter will explain the installation of Rexx and its subsequent configuration on a Windows machine to get started with Rexx.
Ensure the following System requirements are met before proceeding with the installation.
System Requirements
| Memory | 2 GB RAM (recommended) |
| Disk Space | No minimum requirement. Preferably to have enough storage to store the programs which will be created using Rexx. |
| Operating System Version | Rexx can be installed on Windows, Ubuntu/Debian, Mac OS X. |
Downloading Rexx
To download Rexx, you should use the following URL − https://www.oorexx.org/downloads.rsp
This page has a variety of downloads for various versions of Rexx as shown in the following screenshot.
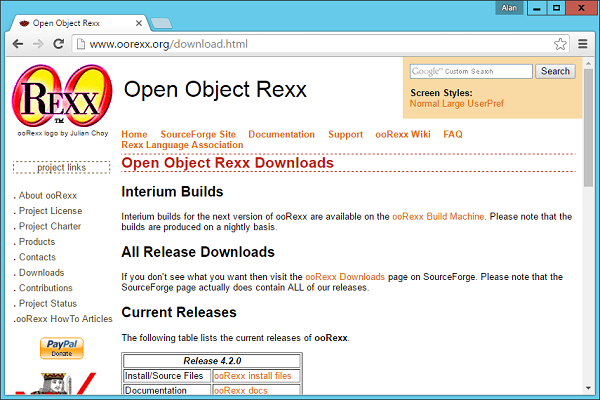
Click on the ooRexx install files in the table with the header of Release 4.2.0.
After this, you will be re-directed to the following page.

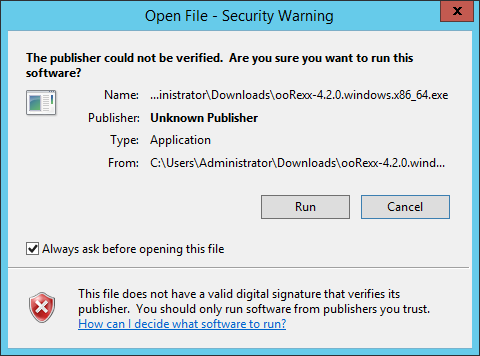
Click on the ooRexx-4.2.0.windows.x86_64.exe to download the 64-bit version of the software. We will discuss regarding the installation of the software in the following chapter.
Rexx - Installation
The following steps will explain in detail how Rexx can be installed on a Windows system.
Step 1 − Launch the Installer downloaded in the earlier section. After the installer starts, click on the Run button.
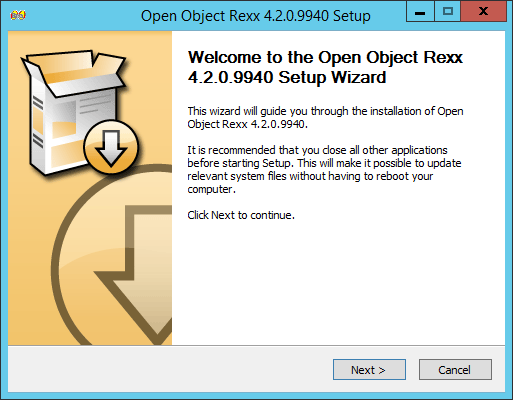
Step 2 − Click the next button on the following screen to proceed with the installation.
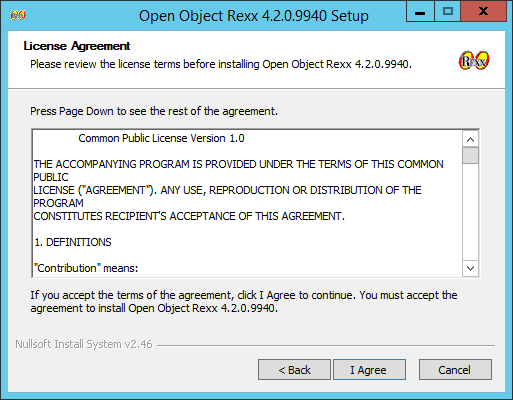
Step 3 − Click on the I Agree button to proceed.
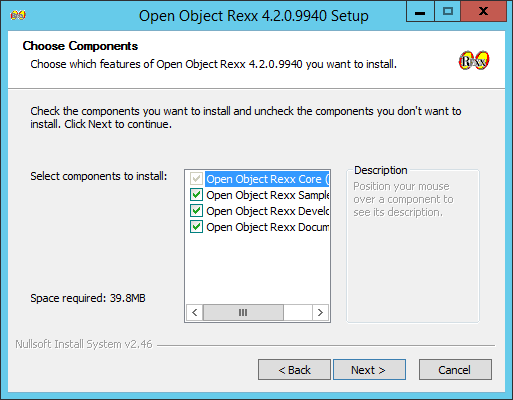
Step 4 − Accept the default components and then click on the next button.
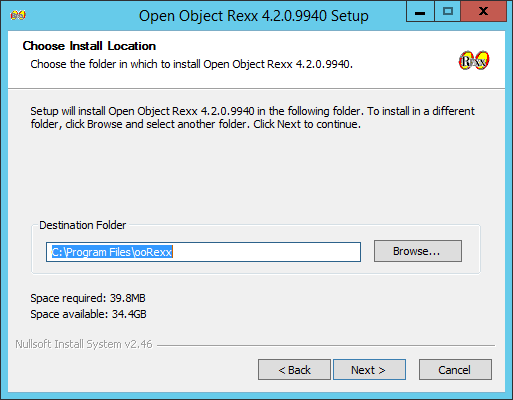
Step 5 − Choose the installation location and click on the Next button.
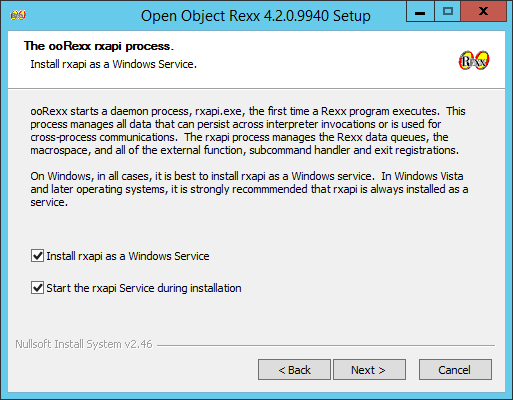
Step 6 − Accept the default processes which will be installed and click on the Next button.
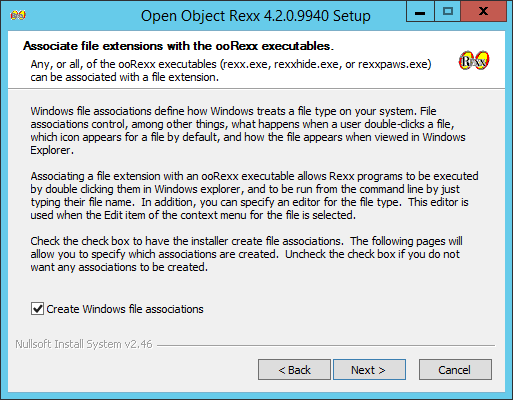
Step 7 − Choose the default file associations and click on the Next button.
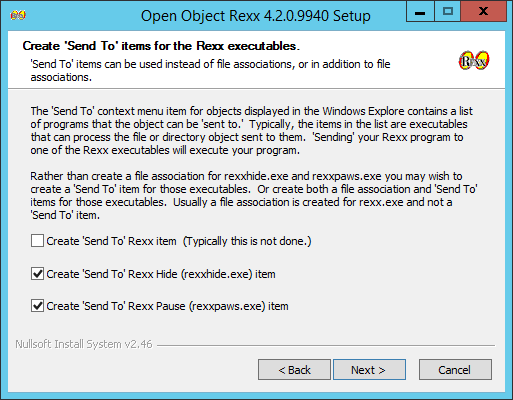
Step 8 − Click on the check boxes of send Rexx items to the executables and then click on the Next button as shown in the following screenshot.
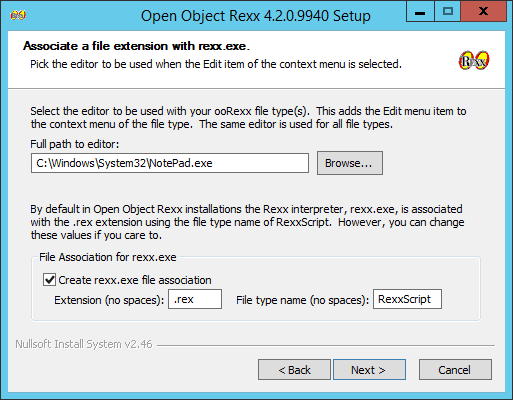
Step 9 − In the next screen, choose the editor for working with Rexx files. Keep the notepad as the default option. Also accept the default extension for each Rexx file.
Step 10 − Accept the default settings on the following screen that comes up and click on the Next button to proceed further with the installation.
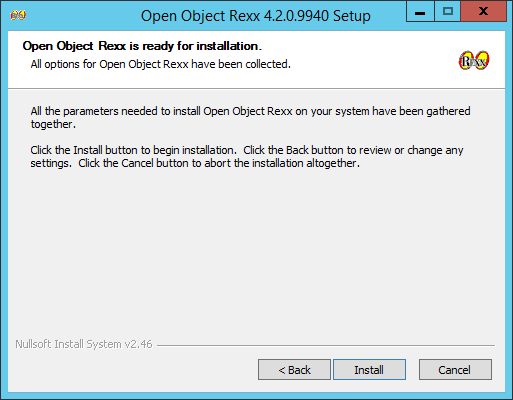
Step 11 − Finally click on the Install button to proceed with the installation.
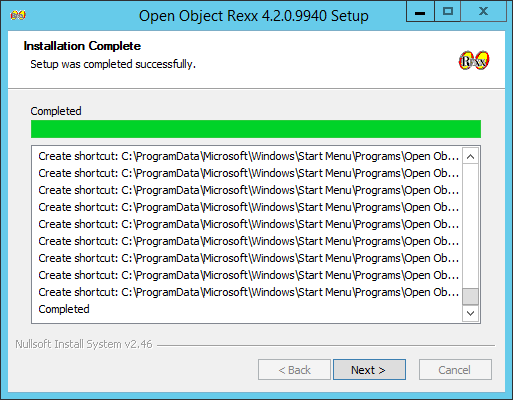
Step 12 − Once the installation is complete, you need to click on the Next button to proceed further.
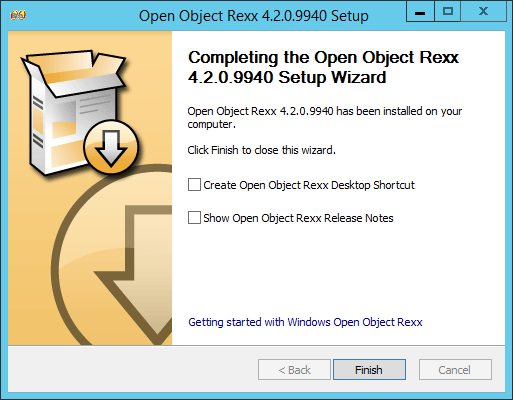
Step 13 − Click on the Finish button to complete the installation.
Rexx - Installation of Plugin-Ins
In this chapter, we will discuss on how to install plug-ins on popular IDEs (Integrated Development Environment). Rexx as a programming language is also available in popular IDEs such as Eclipse. Lets look at how we can get the required plugins in these IDEs, so that you have more choices in working with Rexx.
Installation in Eclipse
To make a trouble-free installation of Rexx in Eclipse, you will need to adhere to the following steps.
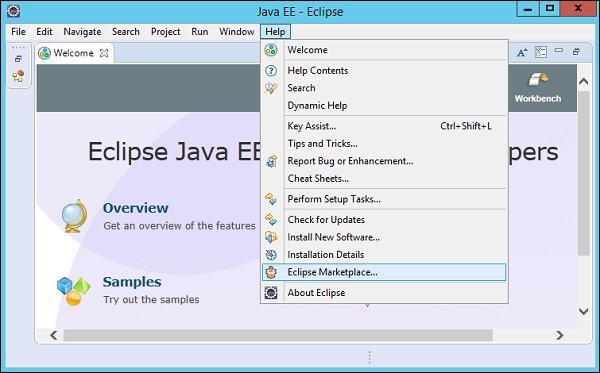
Step 1 − Open Eclipse and click on the Menu item, Help → Eclipse Marketplace as shown in the following screenshot.
Step 2 − In the next dialog box, enter Rexx in the search criteria and click on the search button.
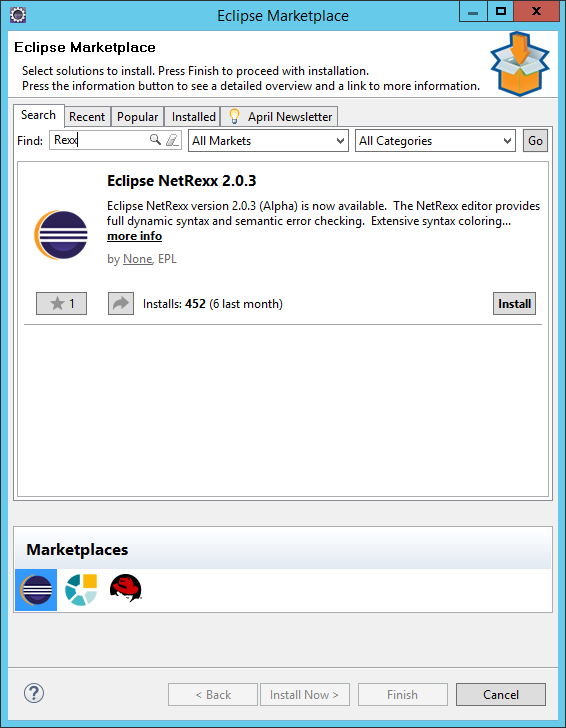
Once done, click the Install button.
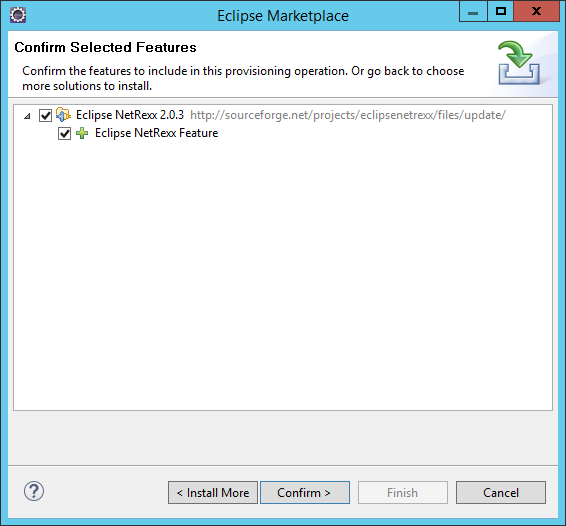
Step 3 − Click on the Confirm button to further continue with the features installation.
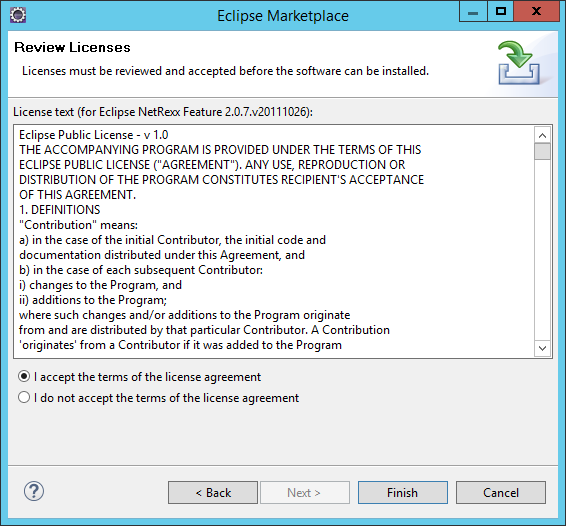
Step 4 − Eclipse will then download the necessary files to start off with the installation. Once done, Eclipse will ask for accepting the license agreements. Click on accepting the license agreements and then click on the Finish button as shown in the following screenshot.
Eclipse will then start installing the software in the background.
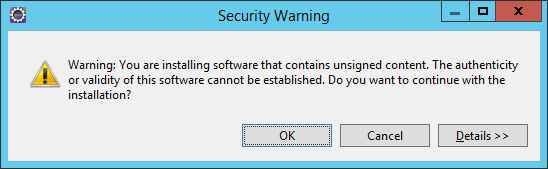
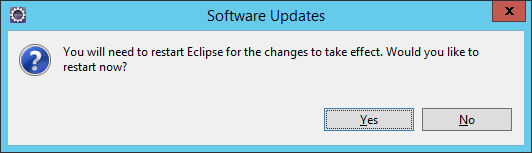
Step 5 − You will probably get a security warning (as shown in the following screenshot). Click on the OK button to proceed.
Step 6 − You will be prompted to restart Eclipse once the updates are installed. Click Yes to restart Eclipse.
Rexx - Basic Syntax
In order to understand the basic syntax of Rexx, let us first look at a simple Hello World program.
Example
/* Main program */
say "Hello World"
One can see how simple the hello world program is. It is a simple script line which is used to execute the Hello World program.
The following things need to be noted about the above program −
The say command is used to output a value to the console.
The /* */ is used for comments in Rexx.
The output of the above program will be −
Hello World
General Form of a Statement
In Rexx, lets see a general form of a program. Take a look at the following example.
/* Main program */
say add(5,6)
exit
add:
parse arg a,b
return a + b
The output of the above program will be −
11
Lets go through what we have understood from the above program −
Add is a function defined to add 2 numbers.
In the main program, the values of 5 and 6 is used as parameters to the add function.
The exit keyword is used to exit from the main program. This is used to differentiate the main program from the add function.
The add function is differentiated with the : symbol.
The parse statement is used to parse the incoming arguments.
Finally, the return statement is used to return the sum of the numeric values.
Subroutines and Functions
In Rexx, the code is normally divided into subroutines and functions. Subroutines and functions are used to differentiate the code into different logical units. The key difference between subroutines and functions is that functions return a value whereas subroutines dont.
Below is a key difference example between a subroutine and a function for an addition implementation −
Function Implementation
/* Main program */
say add(5,6)
exit
add:
parse arg a,b
return a + b
Subroutine Implementation
/* Main program */
add(5,6)
exit
add:
parse arg a,b
say a + b
The output of both the programs will be the value 11.
Executing Commands
Rexx can be used as a control language for a variety of command-based systems. The way that Rexx executes commands in these systems is as follows. When Rexx encounters a program line which is neither an instruction nor an assignment, it treats that line as a string expression which is to be evaluated and then passed to the environment.
An example is as follows −
Example
/* Main program */
parse arg command
command "file1"
command "file2"
command "file3"
exit
Each of the three similar lines in this program is a string expression which adds the name of a file (contained in the string constants) to the name of a command (given as a parameter). The resulting string is passed to the environment to be executed as a command. When the command has finished, the variable "rc" is set to the exit code of the command.
The output of the above program is as follows −
sh: file1: command not found
     3 *-* command "file1"
       >>>   " file1"
       +++   "RC(127)"
sh: file2: command not found
     4 *-* command "file2"
       >>>   " file2"
       +++   "RC(127)"
sh: file3: command not found
     5 *-* command "file3"
       >>>   " file3"
       +++   "RC(127)"
Keywords in Rexx
The free syntax of REXX implies that some symbols are reserved for the language processor's use in certain contexts.
Within particular instructions, some symbols may be reserved to separate the parts of the instruction. These symbols are referred to as keywords. Examples of REXX keywords are the WHILE in a DO instruction, and the THEN (which acts as a clause terminator in this case) following an IF or WHEN clause.
Apart from these cases, only simple symbols that are the first token in a clause and that are not followed by an "=" or ":" are checked to see if they are instruction keywords. You can use the symbols freely elsewhere in clauses without their being taken to be keywords.
Comments in Rexx
Comments are used to document your code. Single line comments are identified by using the /* */ at any position in the line.
An example is as follows −
/* Main program */
/* Call the add function */
add(5,6)

/* Exit the main program */
exit add:

/* Parse the arguments passed to the add function */ parse arg a,b
/* Display the added numeric values */
say a + b
Comments can also be written in between a code line as shown in the following program −
/* Main program */
/* Call the add function */
add(5,6)

/* Exit the main program */
exit
add:
parse    /* Parse the arguments passed to the add function */
arg a,b

/* Display the added numeric values */
say a + b
The output of the above program will be −
11
You can also have multiple lines in a comment as shown in the following program −
/* Main program
The below program is used to add numbers
Call the add function */
add(5,6)
exit
add:
parse arg a,b
say a + b
The output of the above program will be −
11
Rexx - DataTypes
In any programming language, you need to use various variables to store various types of information. Variables are nothing but reserved memory locations to store values. This means that when you create a variable you reserve some space in the memory to store the value associated with that variable.
You may like to store information of various data types like String, Character, Wide Character, Integer, Floating Point, Boolean, etc. Based on the data type of a variable, the operating system allocates memory and decides what can be stored in the reserved memory.
Built-in Data Types
Rexx offers a wide variety of built-in data types. Following is a list of data types which are defined in Rexx.
Integer − A string of numerics that does not contain a decimal point or exponent identifier. The first character can be a plus (+) or minus (-) sign. The number that is represented must be between -2147483648 and 2147483647, inclusive.
Big Integer − A string of numbers that does not contain a decimal point or an exponent identifier. The first character can be a plus (+) or minus (-) sign. The number that is represented must be between -9223372036854775808 and 2147483648, inclusive, or between 2147483648 and 9223372036854775807.
Decimal − It will be from one of the following formats −
A string of numerics that contains a decimal point but no exponent identifier. The p represents the precision and s represents the scale of the decimal number that the string represents. The first character can be a plus (+) or minus (-) sign.
A string of numerics that does not contain a decimal point or an exponent identifier. The first character can be a plus (+) or minus (-) sign. The number that is represented is less than -9223372036854775808 or greater than 9223372036854775807.
Float − A string that represents a number in scientific notation. The string consists of a series of numerics followed by an exponent identifier (an E or e followed by an optional plus (+) or minus (-) sign and a series of numerics). The string can begin with a plus (+) or minus (-) sign.
String − A normal string of characters.
Following are some examples of how each data type can be used. Again each data type will be discussed in detail in the subsequent chapters. This is just to get you up to speed with a brief description of the above mentioned data types.
Integer
An example of how the number data type can be used is shown in the following program. This program shows the addition of 2 Integers.
Example
/* Main program
The below program is used to add numbers
Call the add function */
add(5,6)

exit
add:

parse arg a,b
say a + b
The output of the above program will be −
11
Big Integer
The following program shows the capability of Rexx to handle big integers. This program shows how to add 2 big integers.
Example
/* Main program
The below program is used to add numbers
Call the add function */
add(500000000000,6000000000000000000000)

exit
add:

parse arg a,b
say a + b
The output of the above program will be −
6.00000000E+21
Decimal
The following program shows the capability of Rexx to handle decimal numbers. This program shows how to add 2 decimal numbers.
Example
/* Main program
The below program is used to add numbers
Call the add function */
add(5.5,6.6)

exit
add:

parse arg a,b
say a + b
The output of the above program will be −
12.1
Float
The following example show cases how a number can work as a float.
Example
/* Main program
The below program is used to add numbers
Call the add function */
add(12E2,14E4)

exit
add:

parse arg a,b
say a + b
The output of the above program will be −
141200
String
An example of how the Tuple data type can be used is shown in the following program.
Here we are defining a Tuple P which has 3 terms. The tuple_size is an inbuilt function defined in Rexx which can be used to determine the size of the tuple.
Example
/* Main program */
display("hello")

exit
display:

parse arg a
say a
The output of the above program will be −
hello
Rexx - Variables
In Rexx, all variables are bound with the = statement. Variable names are sometimes referred to as symbols. They may be composed of Letters, Digits, and Characters such as . ! ? _. A variable name you create must not begin with a digit or a period. A simple variable name does not include a period. A variable name that includes a period is called a compound variable and represents an array or table.
The following are the basic types of variables in Rexx which were also explained in the previous chapter −
Integers − This is used to represent an integer or a float. An example for this is 10.
Big integers − This represents a large integer value.
Decimal − A decimal value is a string of numerics that contains a decimal point but no exponent identifier.
Float − A float value is a string that represents a number in the scientific notation.
String − A series of characters defines a string in Rexx.
Different Types of Variable Functions
In this section, we will discuss regarding the various functions a variable can perform.
Variable Declarations
The general syntax of defining a variable is shown as follows −
var-name = var-value
where
var-name − This is the name of the variable.
var-value − This is the value bound to the variable.
The following program is an example of the variable declaration −
Example
/* Main program */
X = 40
Y = 50
Result = X + Y
say Result
In the above example, we have 2 variables, one is X which is bound to the value 40 and the next is Y which is bound to the value of 50. Another variable called Result is bound to the addition of X and Y.
The output of the above program will be as follows −
90
Naming Variables
Variable names are sometimes referred to as symbols. They may be composed of Letters, Digits, and Characters such as . ! ? _ . A variable name you create must not begin with a digit or period.
If a variable has not yet been assigned a value, it is referred to as uninitialized. The value of an uninitialized variable is the name of the variable itself in uppercase letters.
An example of an unassigned variable is as follows −
Example
/* Main program */
unassignedvalue
say unassignedvalue
If you run the above program you will get the following output −
UNASSIGNEDVALUE
sh: UNASSIGNEDVALUE: command not found
     2 *-* unassignedvalue
       >>>   "UNASSIGNEDVALUE"
       +++   "RC(127)"
Variables can be assigned values more than once. The below program shows how the value of X can be assigned a value multiple times.
Example
/* Main program */
X = 40
X = 50
say X
The output of the above program will be as follows −
50
Printing Variables
The values of variables are printed using the say command. Following is an example of printing a variety number of variables.
Example
/* Main program */
X = 40

/* Display an Integer */
say X
Y = 50.5

/* Display a Float */
say Y
Z = "hello"

/* Display a string */
say Z
The output of the above program will be as follows −
40
50.5
hello
Rexx - Operators
An operator is a symbol that tells the compiler to perform specific mathematical or logical manipulations.
Rexx has various types of operators which are also explained in detail as follows −
- Arithmetic operators
- Relational operators
- Logical operators
- Bitwise operators
Arithmetic Operators
The Rexx language supports the normal Arithmetic Operators as any the language. Following are the Arithmetic Operators available in Rexx.
| Operator | Description | Example |
|---|---|---|
| + | Addition of two operands | 1 + 2 will give 3 |
| Subtracts second operand from the first | 1 - 2 will give -1 | |
| ∗ | Multiplication of both operands | 2 ∗ 2 will give 4 |
| / | Division of numerator by denominator | 2 / 2 will give 1 |
| // | Remainder of dividing the first number by the second | 3 // 2 will give 1 |
| % | The div component will perform the division and return the integer component. | 3 % 2 will give 1 |
Relational Operators
Relational Operators allow of the comparison of objects. Following are the relational operators available in Rexx. In Rexx the true value is denoted by 1 and the false value is denoted by 0.
| Operator | Description | Example |
|---|---|---|
| == | Tests the equality between two objects | 2 = 2 will give 1 |
| < | Checks to see if the left object is less than the right operand. | 2 < 3 will give 1 |
| =< | Checks to see if the left object is less than or equal to the right operand. | 2 =< 3 will give 1 |
| > | Checks to see if the left object is greater than the right operand. | 3 > 2 will give 1 |
| >= | Checks to see if the left object is greater than or equal to the right operand. | 3 > 2 will give 1 |
Logical Operators
Logical Operators are used to evaluate Boolean expressions. Following are the logical operators available in Rexx.
| Operator | Description | Example |
|---|---|---|
| & | This is the logical and operator | 1 or 1 will give 1 |
| | | This is the logical or operator | 1 or 0 will give 1 |
| \ | This is the logical not operator | \0 will give 1 |
| && | This is the logical exclusive or operator | 1 && 0 will give 1 |
Bitwise Operators
Groovy provides four bitwise operators. Below are the bitwise operators available in Groovy.
| Sr.No. | Operator & Description |
|---|---|
| 1 | bitand This is the bitwise and operator |
| 2 | bitor This is the bitwise or operator |
| 3 | bitxor This is the bitwise xor or Exclusive or operator |
Operator Precedence
The following table shows the Operator Precedence for the Rexx operators in order of descending priority of their precedence.
| Operators | Precedence |
|---|---|
| Prefix operators | + - \ |
| Addition and subtraction | + - |
| Comparison operators | = == > < >= <= |
| Logical AND | & |
| Logical OR | | |
| EXCLUSIVE OR | && |
Rexx - Arrays
Arrays in any programming language allow you to group a list of values of the same type. The use of arrays is that it allows you to build a list of similar type of values which are sortable, searchable and can be easily manipulated. Rexx also allows one to define arrays. These arrays can be one dimensional or multidimensional.
Rexx arrays may be sparse. That is, not every array position must have a value or even be initialized. There can be empty array positions, or slots, between those that do contain data elements. Or arrays can be dense, in which consecutive array slots all contain data elements.
In many programming languages, you must be concerned with what the subscript of the first entry in a table is. Is the first numeric subscript 0 or 1? In Rexx, the first subscript is whatever you use! So, input the first array element into position 0 or 1 as you prefer.
array_name.0 = first element
or
array_name.1 = first element
Lets look at the different operations available for arrays.
Creating Arrays
Arrays are created with the same naming convention which is used for variables in Rexx.
The general syntax for creating arrays is as follows −
Arrayname.index = value
where
Arrayname − This is the name provided to the array.
Index − This is the index position in the array to refer to a specific element.
Value − This is the value assigned to the index element in the array.
An example of an array declaration is as follows −
Example
/* Main program */
list.1 = 0
list.2 = 0
list.3 = 0
The following points needs to be noted about the above program −
- The name of the array is given as list
- There are 3 elements of the array which are initialized to the value of 0.
Assigning Values to an Array Element
Values can be re-assigned to array elements in the same way as array elements are initialized.
The following program is an example of values which can be assigned to various index values of an existing array.
/* Main program */
list.1 = 0
list.2 = 0
list.3 = 0

/* Assigning new values to the array*/
list.1 = 10
list.3 = 30
Displaying Values of an Array
The values of an array can be displayed by referring to the index position of the array element. The following example shows to access various elements of the array.
Example
/* Main program */
list.1 = 0
list.2 = 0
list.3 = 0

/* Assigning new values to the array*/
list.1 = 10
list.3 = 30
say list.1
say list.2
say list.3
The output of the above program will be as follows −
10
0
30
Copying Arrays
All of the elements of an array can be copied onto another array. The general syntax of this is as follows −
Newarray. = sourcearray.
where
Newarray − This is the new array in which the elements need to be copied onto.
Sourcearray − This is the source array from which the elements need to be copied.
An example on how the copy operations for arrays can be carried out is shown in the following program −
Example
/* Main program */
list.1 = 0
list.2 = 0
list.3 = 0

/* Assigning new values to the array*/
list.1 = 10
list.3 = 30
listnew. = list.

say listnew.1
say listnew.2
say listnew.3
The output of the above program will be −
10
0
30
Iterating through array elements
Elements of an array can also be iterated by using the iterative statements available in Rexx. An example on how this can be done is as follows −
Example
/* Main program */
list.1 = 10
list.2 = 20
list.3 = 30

number_of_elements = 3
do j = 1 to number_of_elements
say list.j
end
The following pointers need to be noted about the above program −
The do loop is used to iterate through the array elements.
The variable number_of_elements is used to store the number of elements in the array.
The variable j is used to iterate through each element of the array.
The output of the above program will be −
10
20
30
Two-dimensional Arrays
It was also mentioned that we can construct multi-dimensional arrays in Rexx. Lets look at an example of how we can implement a 2-dimensional array.
Example
/* Main program */
list.1 = 10
list.1.1 = 11
list.1.2 = 12

say list.1
say list.1.1
say list.1.2
The output of the above program will be shown as follows −
10
11
12
The following point needs to be noted about the above program −
To create a multidimensional array, we can use another layer of indexing. So in our example, we used list.1.1 to create another inner array for the index value 1 of the list array.
Rexx - Loops
So far we have seen statements which have been executed one after the other in a sequential manner. Additionally, statements are provided in Rexx to alter the flow of control in a programs logic. They are then classified into a flow of control statements which we will study in detail.
A loop statement allows us to execute a statement or group of statements multiple times. The following illustration is the general form of a loop statement in most of the programming languages.
Let us discuss various loops supported by Rexx.
| Sr.No. | Loop Type & Description |
|---|---|
| 1 | do loop
The do loop is used to execute a number of statements for a certain number of times. The number of times that the statement needs to be executed is determined by the value passed to the do loop. |
| 2 | do-while loop
The do-while statement is used to simulate the simple while loop which is present in other programming languages. |
| 3 | do-until loop
The do-until loop is a slight variation of the do while loop. This loop varies in the fact that is exits when the condition being evaluated is false. |
Controlled Repetition
The do loops can be catered to carry out a controlled repetition of statements.
Syntax
The general syntax of this sort of statement is as follows.
do index = start [to limit] [by increment] [for count]
statement #1
statement #2
end
The difference in this statement is that there is an index which is used to control the number of times the loop is executed. Secondly, there are parameters which state the value which the index should start with, where it should end and what is the increment value.
Flow Diagram
Lets check out the flow diagram of this loop −
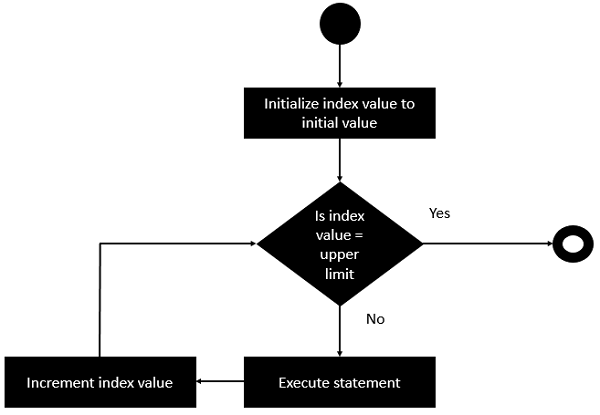
From the above diagram you can clearly see that the loop is executed based on the index value and how the index value is incremented.
The following program is an example of the controlled repetition statement.
Example
/* Main program */
do i = 0 to 5 by 2
   say "hello"
end
In the above program, the value of the count i is set to 0 first. Then it is incremented in counts of 2 till the value is not greater than 5.
The output of the above code will be −
hello
hello
hello
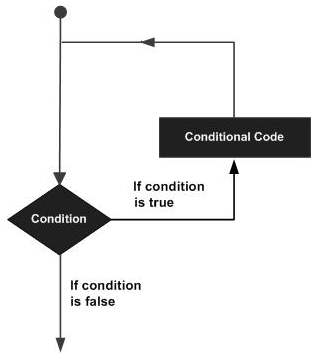
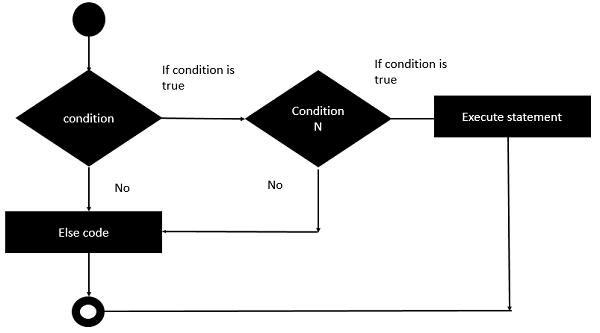
Rexx - Decision Making
Decision making structures require that the programmer specify one or more conditions to be evaluated or tested by the program.
The following diagram shows the general form of a typical decision-making structure found in most of the programming languages.
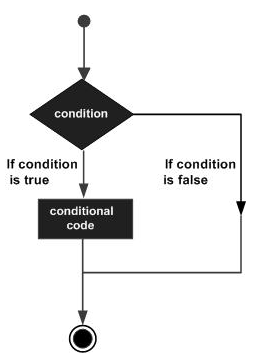
There is a statement or statements to be executed if the condition is determined to be true, and optionally, other statements to be executed if the condition is determined to be false.
Lets look at the various decision-making statements available in Rexx.
| Sr.No. | Statement & Description |
|---|---|
| 1 | If statement
The first decision-making statement is the if statement. An if statement consists of a Boolean expression followed by one or more statements. |
| 2 | If-else statement
The next decision-making statement is the if-else statement. An if statement can be followed by an optional else statement, which executes when the Boolean expression is false. |
Nested If Statements
Sometimes there is a requirement to have multiple if statements embedded inside each other, as is possible in other programming languages. In Rexx also this is possible.
Syntax
if (condition1) then
   do
      #statement1
   end
else
   if (condition2) then
      do
      #statement2
   end
Flow Diagram
The flow diagram of nested if statements is as follows −
Lets take an example of nested if statement −
Example
/* Main program */
i = 50
if (i < 10) then
   do
      say "i is less than 10"
   end
else
if (i < 7) then
   do
      say "i is less than 7"
   end
else
   do
      say "i is greater than 10"
   end
The output of the above program will be −
i is greater than 10
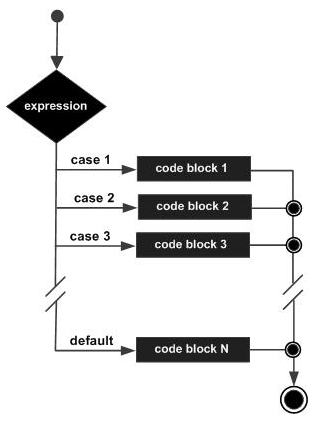
Select Statements
Rexx offers the select statement which can be used to execute expressions based on the output of the select statement.
Syntax
The general form of this statement is −
select
when (condition#1) then
statement#1

when (condition#2) then
statement#2
otherwise

defaultstatement
end
The general working of this statement is as follows −
The select statement has a range of when statements to evaluate different conditions.
Each when clause has a different condition which needs to be evaluated and the subsequent statement is executed.
The otherwise statement is used to run any default statement if the previous when conditions do not evaluate to true.
Flow Diagram
The flow diagram of the select statement is as follows
The following program is an example of the case statement in Rexx.
Example
/* Main program */
i = 50
select
when(i <= 5) then
say "i is less than 5"

when(i <= 10) then
say "i is less than 10"

otherwise
say "i is greater than 10"
end
The output of the above program would be −
i is greater than 10
Rexx - Numbers
Rexx has the following data types when it comes to numbers.
Integer − A string of numerics that does not contain a decimal point or exponent identifier. The first character can be a plus (+) or minus (-) sign. The number that is represented must be between -2147483648 and 2147483647, inclusive.
Big Integer − A string of numbers that does not contain a decimal point or an exponent identifier. The first character can be a plus (+) or minus (-) sign. The number that is represented must be between -9223372036854775808 and 2147483648, inclusive, or between 2147483648 and 9223372036854775807.
Decimal − One of the following formats −
A string of numerics that contains a decimal point but no exponent identifier, where p represents the precision and s represents the scale of the decimal number that the string represents. The first character can be a plus (+) or minus (-) sign.
A string of numerics that does not contain a decimal point or an exponent identifier. The first character can be a plus (+) or minus (-) sign. The number that is represented is less than -9223372036854775808 or greater than 9223372036854775807.
Float − A string that represents a number in scientific notation. The string consists of a series of numerics followed by an exponent identifier (an E or e followed by an optional plus (+) or minus (-) sign and a series of numerics). The string can begin with a plus (+) or minus (-) sign.
Lets now look at the different methods available for numbers.
| Sr.No. | Methods available for Numbers |
|---|---|
| 1 | ABS
This method returns the absolute value of an input number. |
| 2 | MAX
This method returns the maximum value from a list of numbers. |
| 3 | MIN
This method returns the minimum value from a list of numbers. |
| 4 | RANDOM
This method returns a random generated number. |
| 5 | SIGN
Returns 1 if number is greater than 0, or 0 if the number is 0, or -1 if the number is less than 0. |
| 6 | TRUNC
This method truncates a number. |
Rexx - Strings
Strings in Rexx are denoted by a sequence of characters. The following program is an example of strings −
/* Main program */
a = "This is a string"
say a
The output of the above program is as follows −
This is a string
Lets discuss some methods which are available in Rexx for strings.
| Sr.No. | Methods available in Rexx for Strings |
|---|---|
| 1 | left
This method returns a certain number of characters from the left of the string. |
| 2 | right
This method returns a certain number of characters from the right of the string. |
| 3 | length
This method returns the number of characters in the string. |
| 4 | reverse
This method returns the characters in a reverse format. |
| 5 | compare
This method compares 2 strings. Returns "0" if "string1" and "string2" are identical. Otherwise, it returns the position of the first character that does not match. |
| 6 | copies
This method copies a string n number of times. |
| 7 | substr
This method gets a substring from a particular string. |
| 8 | pos
This method returns the position of one string within another. |
| 9 | delstr
This method deletes a substring from within a string. |
Rexx - Functions
The code in Rexx is normally divided into Functions and Subroutines. Using functions helps in segregating the code into many more logical units. Lets look at these functions in detail.
Defining a Function
The syntax of a function declaration is as follows −
FunctionName:
PARSE ARG arguement1, arguement2 arguementN
Return value
Where,
FunctionName − This is the name assigned to the function.
PARSE ARG − These are keywords in Rexx which are used to mention that parameters are being passed onto the function.
arguement1, arguement2 arguementN − These are the arguments passed to the function.
Return value − This is the value returned by the function.
The following program is a simple example of how functions are used in Rexx.
/* Main program */
say add(5,6)
exit
add:
PARSE ARG a,b
return a + b
The following things should be noted about the above program −
We are defining a function called add which accepts 2 parameters a and b.
The function uses the return statement to return the sum of a and b.
The exit statement has to be used to signify the end of the main program.
The output of the above program would be as follows −
11
Working with Arguments
In Rexx, there are specific functions which can be made to work with arguments. Lets look at a couple of such arguments.
arg
This method is used to return the number of arguments defined for the function.
Syntax −
arg()
Parameters − None
Return Value − This method returns the number of arguments defined for the function.
Example −
/* Main program */
say add(5,6)
exit
add:
PARSE ARG a,b

say arg()
return a + b
Output − When we run the above program we will get the following result.
2
11
arg(index)
This method is used to return the value of the argument at the specific position.
Syntax −
arg(index)
Parameter −
Index − Index position of the argument to be returned.
Return Value − This method returns the value of the argument at the specific position.
Example −
/* Main program */
say add(5,6)
exit
add:
PARSE ARG a,b

say arg(1)
return a + b
Output − When we run the above program we will get the following result.
5
11
Recursive Functions
A recursive function or routine is one that calls itself. Any recursive function could be coded in a traditional non-recursive fashion (or iteratively), but sometimes recursion offers a better problem solution. Not all programming languages support recursion; Rexx does.
Lets see an example of the famous factorial program using recursive functions in Rexx.
/* Main program */
do n = 1 to 5
say 'The factorial of' n 'is:' factorial( n )
end
return

/* Function to get factorial */
factorial : procedure
n = arg(1)
if n = 1 then
return 1
return n * factorial( n - 1 )
The output of the above program is as follows −
The factorial of 1 is: 1
The factorial of 2 is: 2
The factorial of 3 is: 6
The factorial of 3 is: 24
The factorial of 3 is: 120
Rexx - Stacks
The stack is sometimes called the external data queue, but we follow common usage and refer to it as the stack. It is a block of memory that is logically external to Rexx. Instructions like push and queue place data into the stack, and instructions like pull and parse pull extract data from it. The queued built-in function reports how many items are in the stack.
Lets take a look at an example of a stack.
/* STACK: */
/* */
/* This program shows how to use the Rexx Stack as either a */

/* stack or a queue. */
do j = 1 to 3
push Stack: line # || j

/* push 3 lines onto the stack */
end
do j = 1 to queued()

/* retrieve and display LIFO */
pull line
say line
end
do j = 1 to 3 queue Queue: line # || j

/* queue 3 lines onto the stack */
end
do queued()

/* retrieve and display FIFO */
pull line
say line
end
exit 0
The first do loop in the program places three lines of data onto the stack. It uses the push instruction to do this. We number the lines so that when they are retrieved in the LIFO order their order is apparent.
The items placed into the stack by the push instruction are retrieved in the LIFO order −
do j = 1 to 3
push Stack: line # || j     /* push 3 lines onto the stack */
end
The next code block shows the use of the queued built-in function to discover the number of lines on the stack, as well as a loop to retrieve all the lines from the stack −
do j = 1 to queued()    /* retrieve and display LIFO */
pull line
say line
end
Since the three items were placed on the stack via push, they are retrieved in the LIFO order.
The output of the above program will be as follows.
STACK: LINE #3
STACK: LINE #2
STACK: LINE #1
Rexx - File I/O
Rexx provides a number of methods when working with I/O. Rexx provides easier classes to provide the following functionalities for files.
- Reading files
- Writing to files
- Seeing whether a file is a file or directory
The functions available in Rexx for File I/O are based on both line input and character input and we will be looking at the functions available for both in detail.
Lets explore some of the file operations Rexx has to offer. For the purposes of these examples, we are going to assume that there is a file called NewFile.txt which contains the following lines of text −
Example1
Example2
Example3
This file will be used for the read and write operations in the following examples. Here we will discuss regarding how to read the contents on a file in different ways.
Reading the Contents of a File a Line at a Time
The general operations on files are carried out by using the methods available in the Rexx library itself. The reading of files is the simplest of all operations in Rexx.
Lets look at the function used to accomplish this.
linein
This method returns a line from the text file. The text file is the filename provided as the input parameter to the function.
Syntax −
linein(filename)
Parameter −
filename − This is the name of the file from where the line needs to be read.
Return Value − This method returns one line of the file at a time.
Example −
/* Main program */
line_str = linein(Example.txt)
say line_str
The above code is pretty simple in the fact that the Example.txt file name is provided to the linein function. This function then reads a line of text and provides the result to the variable line_str.
Output − When we run the above program we will get the following result.
Example1
Reading the Contents of a File at One Time
In Rexx, reading all the contents of a file can be achieved with the help of the while statement. The while statement will read each line, one by one till the end of the file is reached.
An example on how this can be achieved is shown below.
/* Main program */
do while lines(Example.txt) > 0
line_str = linein(Example.txt)
say line_str
end
In the above program, the following things need to be noted −
The lines function reads the Example.txt file.
The while function is used to check if further lines exist in the Example.txt file.
For each line read from the file, the line_str variable holds the value of the current line. This is then sent to the console as output.
Output − When we run the above program we will get the following result.
Example1
Example2
Example3
Writing Contents to a File
Just like reading of files, Rexx also has the ability to write to files. Lets look at the function which is used to accomplish this.
lineout
This method writes a line to a file. The file to which the line needs to be written to is provided as the parameter to the lineout statement.
Syntax −
lineout(filename)
Parameter −
filename − This is the name of the file from where the line needs to be written to.
Return Value − This method returns the status of the lineout function. The value returned is 0 if the line was successfully written else the value of 1 will be returned.
Example −
/* Main program */
out = lineout(Example.txt,"Example4")
Output − Whenever the above code is run, the line Example4 will be written to the file Example.txt.
Rexx - Functions For Files
In this chapter, we will discuss regarding some of the other functions that are available for files.
| Sr.No. | Functions for Files |
|---|---|
| 1 | Lines
This function returns either the value 1 or the number of lines left to read in an input stream. The filename is given as the input to the function. |
| 2 | stream
This function is used to check the status of a file. Sometimes it is required to check the status of a file before it is used. If the file is corrupt or not available, then no further operations can be performed on the file. So it makes more sense to first check the status of the file. |
| 3 | charin
This function is used to read one character at a time from a file. Sometimes programs require to read files character wise and hence this function can be used for this purpose. |
| 4 | chars
This function returns either 1 or the number of characters left to read in the file itself. The filename is mentioned as a parameter to the function. |
| 5 | charout
This function is used to write one character at a time to a file. The filename is entered as a parameter to the function. |
Rexx - Subroutines
In any programming language, the entire program is broken into logical modules. This makes it easier to write code that can be maintained easily. This is a basic requirement for any programming language.
In Rexx, modules can be written using Subroutines and functions. Lets look at the subroutines in detail.
Defining a Subroutine
The syntax of a function declaration is as follows −
FunctionName:
   Statement#1
   Statement#2
   .
   Statement#N
Where,
FunctionName − This is the name assigned to the subroutine.
Statement#1 .. Statement#N − These are the list of statements that make up the subroutine.
The following program is a simple example showing the use of subroutines.
/* Main program */
call add
exit
add:
a = 5
b = 10
c = a + b
say c
The following things should be noted about the above program −
We are defining a subroutine called add.
The subroutine does a simple add functionality.
The exit statement has to be used to signify the end of the main program.
The output of the above program would be as follows −
15
Working with Arguments
It is also possible to work with arguments in Rexx. The following example shows how this can be achieved.
/* Main program */
call add 1,2
exit
add:
PARSE ARG a,b
c = a + b
say c
The following things should be noted about the above program −
We are defining a subroutine called add which takes on 2 parameters.
In the subroutines, the 2 parameters are parsed using the PARSE and ARG keyword.
The output of the above program would be as follows −
3
Different Methods for Arguments
Lets look at some other methods available for arguments.
arg
This method is used to return the number of arguments defined for the subroutine.
Syntax −
arg()
Parameters − None
Return Value − This method returns the number of arguments defined for the subroutine.
Example −
/* Main program */
call add 1,2
exit
add:
PARSE ARG a,b

say arg()
c = a + b
say c
When we run the above program we will get the following result.
2
3
arg(index)
This method is used to return the value of the argument at the specific position.
Syntax −
arg(index)
Parameters
Index − Index position of the argument to be returned.
Return Value − This method returns the value of the argument at the specific position.
Example −
/* Main program */
call add 1,2
exit
add:
PARSE ARG a,b

say arg(1)
c = a + b
say c
When we run the above program we will get the following result.
1
3
Rexx - Built-In Functions
Every programming language has some built-in functions that help the programmer do some routine tasks. Rexx also has a lot of built in functions.
Lets look at all of these functions available in Rexx.
| Sr.No. | Functions available in Rexx |
|---|---|
| 1 | ADDRESS
This method returns the name of the environment in the which the Rexx commands are currently running in. |
| 2 | BEEP
This method produces a sound in the system at a particular frequency and duration. |
| 3 | DataType
This method returns the value of NUM if the input is a valid number else it will return the value of CHAR. You can also specify if you want to compare the input value to a NUM or CHAR value. In each case, the value returned will be either 1 or 0 depending on the result. |
| 4 | DATE
This method returns the local date in the following format. |
| 5 | DIGITS
This method returns the current setting of NUMERIC DIGITS as defined in the current system. |
| 6 | ERRORTEXT
This method returns the Rexx error message associated with error number errorno. Please note that the error number needs to be a value from 0 to 99. This is useful in cases wherein your program returned an error code and you want to know what the error code means. |
| 7 | FORM
This method returns the current setting of NUMERIC FORM which is used to do mathematic calculations on the system. |
| 8 | TIME
This method returns the local time in the 24-hour clock format as shown in the following program. |
| 9 | USERID
This method returns the current user id logged into the system. |
| 10 | XRANGE
This method returns the characters in the range specified by the start and end character. |
| 11 | X2D
This method returns the decimal conversion of a hexstring value. |
| 12 | X2C
This method returns the character conversion of a hexstring value. |
Rexx - System Commands
One of the biggest advantages in Rexx is the ability to create re-usable scripts. Often in organizations nowadays, having re-usable scripts is a big value add in saving time to do common repetitive tasks.
For example, technology teams in an IT organization can have the need to have scripts which do common everyday tasks. These tasks can include interacting with the operating systems. These scripts can then be programmed to handle bad return codes or errors.
Rexx offers a lot of system commands that can be used to perform such repetitive tasks. Lets look at some of the system commands available in Rexx.
dir
This is the normal directory listing command which is used in Windows.
Syntax
dir
Parameters
None
Return Value
This method returns the current directory listing on the system.
Example
/* Main program */
dir
The output depends on the directory in the system.
The following program is just an example.
Output
Volume in drive D is LENOVO
Volume Serial Number is BAC9-9E3F
Directory of D:\
04/06/2016  12:52 AM           268,205 100008676689.pdf
10/20/2015  08:51 PM    <DIR>          data
06/01/2016  10:23 AM                31 Example.txt
10/28/2014  06:55 PM    <DIR>          Intel
06/02/2016  11:15 AM                23 main.rexx
12/22/2014  08:49 AM    <DIR>          PerfLogs
12/13/2015  11:45 PM    <DIR>          Program Files
12/24/2015  10:26 AM    <DIR>          Program Files (x86)
07/17/2015  01:21 AM    <DIR>          Users
12/23/2015  10:01 AM    <DIR>          Windows
               3 File(s)        268,259 bytes
               7 Dir(s)     202,567,680 bytes free
Another example of the dir command is shown in the following program. Only this time we are making use of the special rc variable. This variable is special in Rexx and gives you the status of the execution of system commands. If the value returned is 0, then that means the command is executed successfully. Else the error number will be given in the rc variable name.
Example
/* Main program */
dir
if rc = 0 then
   say 'The command executed successfully'
else
   say 'The command failed, The error code is =' rc
When we run the above program we will get the following result.
Output
The command failed, The error code is = 127
Redirection Commands
Rexx also has the facility of using redirection commands. The following redirection commands are available in Rexx.
< − This command is used to take in the input which comes from a file.
> − This command is used to output the content to a file. If the file does exist, it will be over-written.
>> − This is also used to output the content to a file. But the output is added to the end of the file to preserve the existing content of the file.
Lets look at an example of how we can use redirection commands. In the following example, we are using the sort command to sort a file called sortin.txt. The data from the file is sent to the sort command. The output of the sort command is then sent to the sortout.txt file.
Example
/* Main program */
'sort <sortin.txt> sortout.txt'
Assume that the file sortin.txt has the following data.
Output
b
c
a
The file sortout.txt will then have the following data.
a
b
c
The ADDRESS Function
This method is used to find out what is the default environment used for the Input, Error and Output streams.
Syntax
ADDRESS(options)
Parameters
Options for what is the address of a particular system.
Return Value
This method returns the name of the environment for the Input, Error and Output streams.
Example
/* Main program */
say ADDRESS('I')
say ADDRESS('O')
say ADDRESS('E')
When we run the above program we will get the following result.
Output
INPUT NORMAL
REPLACE NORMAL
REPLACE NORMAL
Rexx - XML
XML is a portable, open source language that allows programmers to develop applications that can be read by other applications, regardless of the operating system and/or developmental language. This is one of the most common languages used for exchanging data between applications.
What is XML?
The Extensible Markup Language XML is a markup language much like HTML or SGML. This is recommended by the World Wide Web Consortium and available as an open standard. XML is extremely useful for keeping track of small to medium amounts of data without requiring a SQL-based backbone.
For all our XML code examples, let's use the following simple XML file movies.xml for construction of the XML file and reading the file subsequently.
<collection shelf = "New Arrivals">
   <movie title = "Enemy Behind">
      <type>War, Thriller</type>
      <format>DVD</format>
      <year>2003</year>
      <rating>PG</rating>
      <stars>10</stars>
      <description>Talk about a US-Japan war</description>
   </movie>

   <movie title = "Transformers">
      <type>Anime, Science Fiction</type>
      <format>DVD</format>
      <year>1989</year>
      <rating>R</rating>
      <stars>8</stars>
      <description>A schientific fiction</description>
   </movie>

   <movie title = "Trigun">
      <type>Anime, Action</type>
      <format>DVD</format>
      <year>1986</year>
      <rating>PG</rating>
      <stars>10</stars>
      <description>Vash the Stam pede!</description>
   </movie>

   <movie title = "Ishtar">
      <type>Comedy</type>
      <format>VHS</format>
      <year>1987</year>
      <rating>PG</rating>
      <stars>2</stars>
      <description>Viewable boredom </description>
   </movie>
</collection>
Getting Started
By default, the xml functionality is not included in the Rexx interpreter. In order to work with XML in Rexx, the following steps need to be followed.
Download the following files −
Rexxxml − www.interlog.com/~ptjm/
Libxml2 − www.ctindustries.net/libxml/
iconv-1.9.2.win32 − www.xmlsoft.org/sources/win32/oldreleases/
libxslt-1.1.26.win32 − www.xmlsoft.org/sources/win32/oldreleases/
Extract all of the files and ensure they are included in the system path.
Loading XML Functions
Once all the files in the above section have been downloaded and successfully registered, the next step is to write the code to load the Rexx XML functions. This is done with the following code.
rcc = rxfuncadd('XMLLoadFuncs', 'rexxxml', 'xmlloadfuncs')

if rcc then do
   say rxfuncerrmsg()
   exit 1
end
call xmlloadfuncs
The following things can be noted about the above program −
The function rxfuncadd is used to load external libraries. The xmlloadfuncs function is used to load all the libraries in the rexxxml file into memory.
If the value of rcc<>0, then it would result in an error. For this , we can call the rxfuncerrmsg to give us more details on the error message.
We finally make a call to xmlloadfuncs, so that all xml related functionality can now be enabled in the Rexx program.
Lets look at the various methods available for XML in Rexx.
xmlVersion
This method returns the version of the XML and XSLT libraries used on the system.
Syntax
xmlVersion()
Parameters
None
Return Value
This method returns the version of the XML and XSLT libraries used on the system.
Example
rcc = rxfuncadd('XMLLoadFuncs', 'rexxxml', 'xmlloadfuncs')

if rcc then do
   say rxfuncerrmsg()
   exit 1
end
call xmlloadfuncs
say xmlVersion()
When we run above program we will get the following result. This again depends on the version of the XML libraries being used on the system.
Output
1.0.0 20631 10126
xmlParseXML
This function is used to parse the XML data sent to the function. The document tree is returned by the function.
Syntax
xmlParseXML(filename)
Parameters
Filename − This is the name of the XML file which needs to be parsed.
Return Value
The document tree is returned by the function. Else returns 0, if there is an error.
Example
rcc = rxfuncadd('XMLLoadFuncs', 'rexxxml', 'xmlloadfuncs')

if rcc then do
   say rxfuncerrmsg()
   exit 1
end
call xmlloadfuncs

say xmlVersion()
sw = xmlParseXML('test.xml')
Output
No general output.
xmlFindNode
This method evaluates the XPath expression passed to it. This is used for parsing the document tree to result a nodeset which can be processed further.
Syntax
xmlParseXML(XPath,document)
Parameters
XPath − This is the path of the node in the xml file.
document − This the XML document
Return Value
Evaluates XPath expression and returns result as a nodeset which can be used later on.
Example
rcc = rxfuncadd('XMLLoadFuncs', 'rexxxml', 'xmlloadfuncs')

if rcc then do
   say rxfuncerrmsg()
   exit 1
end
call xmlloadfuncs

say xmlVersion()
document = xmlParseXML('test.xml')
nodeset = xmlFindNode('//movie', document)
say xmlNodesetCount(nodeset)
When we run above program we will get the following result.
Output
4
The output shows the number of movie nodes in our xml list
xmlEvalExpression
The below method is used to Evaluate an XPath expression and return a string as a result.
Syntax
xmlParseXML(XPath,Node)
Parameters
XPath − This is the path of the node in the xml file.
document − The specific node element.
Return Value
A string is returned based on the XPath expression sent to it.
Example
rcc = rxfuncadd('XMLLoadFuncs', 'rexxxml', 'xmlloadfuncs')

if rcc then do
   say rxfuncerrmsg()
   exit 1
end
call xmlloadfuncs

document = xmlParseXML('test.xml')
nodeset = xmlFindNode('//movie', document)
do j = 1 to xmlNodesetCount(nodeset)
value = xmlEvalExpression('type', xmlNodesetItem(nodeset, j))
say value
end
When we run above program we will get the following result.
Output
War, Thriller
Anime, Science Fiction
Anime, Action
Comedy
Rexx - Regina
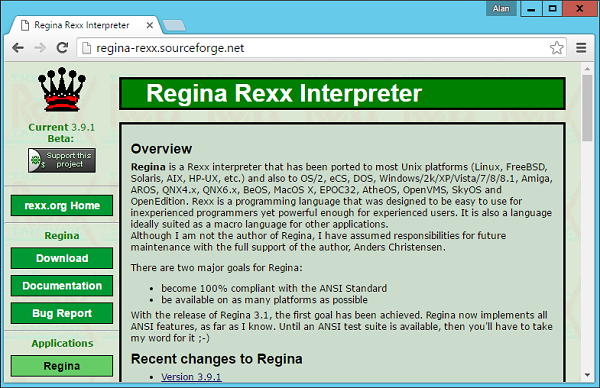
Regina is another Rexx interpreter available to compile and run Rexx programs. The official site for Regina is − www.regina-rexx.sourceforge.net/
Some of the advantages of using Regina are as follows −
Regina can run on any platform whether it be Windows, Linux or the Mac OS.
Regina works as per all available standards.
Regina has a big community following and hence there are a lot of forums and learning material available for Regina.
Regina has a lot of tools available for writing and testing Rexx programs.
In Regina, you can run commands which are not possible in the default Rexx Interpreter. For example, if you include certain configuration settings, you can actually run basic system level commands, which is not possible in Rexx.
When you install Rexx via the installation documented in Chapter 2 Rexx Environment, the Regina interpreter gets installed along with it.
Now lets see some of the common methods available when using Regina. These functions are the extended functions which are not available via normal use.
To make use of the extended functions, you need to include the following line of code. This enables the use of Regina extended functions.
options arexx_bifs
Secondly while running all Rexx programs, use the following command.
regina main.rexx
Where,
regina − This is the interpreter used for Rexx programs.
main.rexx − Your Rexx program.
We will now discuss in detail the various functions of Regina Rexx Interpreter.
| Sr.No. | Functions of Regina Rexx Interpreter |
|---|---|
| 1 | b2c
This method is used to convert a binary value to a string value. |
| 2 | bitcomp
The method is used to compare 2 bit strings, bit by bit. |
| 3 | bittst
This method is used to indicate the state of the specified bit in the bit string. |
| 4 | find
This method is used to search for the first occurrence of a string in another string. |
| 5 | getenv
This method returns the value of an environment variable on the system. |
| 6 | getpid
This method is used to get the value of the current running process id. |
| 7 | hash
This method returns the hash attribute of a string as a decimal number. It also updates the internal hash value of the string. |
| 8 | justify
This method is used to add justify or trim the value of a string based on the length value. |
| 9 | putenv
This method is used to set the value of an environment variable. |
| 10 | directory
This method gets the value of the current directory on the system. |
| 11 | chdir
This method changes the value of the current working directory on the system. |
| 12 | randu
This method returns a pseudo-random number between 0 and 1. |
Rexx - Parsing
One of the most powerful features of Rexx is its ability to parse text values. You probably will not see this in any other programming languages.
The general format of the parse statement is as follows −
Syntax
PARSE {UPPER|LOWER|CASELESS} source {template}
Where,
UPPER − The source is converted to upper case before parsing.
LOWER − The source is converted to lower case before parsing.
CASELESS − When this parameter is passed, the casing is ignored.
source − This is the source which needs to be parsed. There are many options available for this and can be any one of the following −
ARG − The arguments for the program or procedure can be used as the source.
LINEIN − The next line input can be used as the source.
SOURCE − The source information of the program can be used as the source.
VAR name − The value of a variable name can be used as the source.
template − This parameter specifies how to parse the source. There are many options available for this. Some of them are mentioned below.
variable name − This is the value assigned to the variable.
literal string − A literal string which can be used a pattern to split the strung.
# − An absolute character position within the source itself. So if you specify a value of 5, the 5th character will be used.
+# − A relative character position within the source itself. So if you specify a value of 5, the 5th character will be used relatively.
Lets look at a simple example of how parsing can be accomplished in Rexx.
Example
/* Main program */
parse value 'This is a Tutorial' with word1 word2 word3 word4
say "'"word1"'"
say "'"word2"'"
say "'"word3"'"
say "'"word4"'"
The above program parses the words in the phrase. When a value consists of words that are separated by only one space, and there are no leading or trailing spaces, the value is easy to parse into a known number of words as follows.
The parse function is used in Rexx to take a string value and then break them down into words. In the above example, the words are then split and then stored in the word variables.
The output of the above program would be as follows −
'This'
'is'
'a'
'Tutorial'
Another example of parsing is shown in the following program. This time we are using a while clause to do the parsing.
Example
/* Main program */
phrase = 'This is a Tutorial'

do while phrase <> ''
   parse var phrase word phrase
   say "'"word"'"
   end
The above program will give the following output −
'This'
'is'
'a'
'Tutorial'
Positional Parsing
Rexx also allows one to work with positional parsing. Lets see an example of how we can achieve positional parsing with the parse statement.
Example
/* Main program */
testString = "Doe       John M.   03/03/78  Mumbai              India";
parse var testString name1 11 name2 21 birthday 31 town 51 country
say name1
say name2
say birthday
say town
say country
From the above example, you can note that along with the variable name, we are also specifying where the string should end. So for name1, we should end by the 11th character and then starting parsing name2.
The output of the above program will be as follows −
Doe
John M.
03/03/78
Mumbai
India
You can also use relative positional parsing in this case.
Example
/* Main program */
testString = "Doe       John M.   03/03/78  Mumbai              India";
parse var testString name1 +10 name2 +10 birthday +10 town +20 country
say name1
say name2
say birthday
say town
say country
The output of the above program will be as shown below.
Doe
John M.
03/03/78
Mumbai
India
Rexx - Signals
In Rexx, the signal instruction is used generally for two purposes, which are −
One is to transfer control to another part of the program. This is normally like the go-to label which is used in other programming languages.
The other is to go to a specific trap label.
If the signal command is used in any of the following instruction commands, the pending control structures will automatically be deactivated.
if ... then ... else ...
do ... end
do i = 1 to n ... end [and similar do loops]
select when ... then ... ...etc. otherwise ... end
The general syntax of the signal statement is shown as follows −
Syntax
signal labelName

signal [ VALUE ] labelExpression
Lets look at an example of how to use the signal statement.
Example
/* Main program */
n = 100.45

if \ datatype( n, wholenumber ) then
   signal msg
   say 'This is a whole number'
   return 0
msg :
   say 'This is an incorrect number'
The output of the above program will be as shown below.
Output
This is an incorrect number.
If you change the value of the variable n to a whole number as shown in the following program −
/* Main program */
n = 100

if \ datatype( n, wholenumber ) then
   signal msg
   say ' This is a whole number '
   return 0
msg :
   say ' This is an incorrect number '
You will get the following output −
This is a whole number
One can also transfer to the value of the label as shown in the following program −
/* Main program */
n = 1

if \ datatype( n, wholenumber ) then
   signal msg

if n < 1 | n > 3 then
   signal msg
   signal value n
   3 : say 'This is the number 3'
   2 : say ' This is the number 2'
   1 : say ' This is the number 1'
   return n
msg :
   say ' This is an incorrect number '
   exit 99
The output of the above program will be shown as follows −
This is the number 1
Trap Label Transfer Activation / Deactivation
As we have mentioned earlier, the signal instruction can also be used to transfer control to a trap label.
The general syntax of the Trap label transfer is given as follows −
Syntax
signal ON conditionName [ NAME Label ]

signal OFF conditionName
Where,
conditionName − This is the condition for which the signal should be either be turned on or off.
Label − The optional label to which the program should be diverted to.
Lets see an example of using a trap label transfer.
Example
/* Main program */
signal on error
signal on failure
signal on syntax
signal on novalue
beep(1)
signal off error
signal off failure
signal off syntax
signal off novalue
exit 0
error: failure: syntax: novalue:
say 'An error has occured'
In the above example, we first turn the error signals on. We then add a statement which will result in an error. We then have the error trap label to display a custom error message.
The output of the above program will be as shown follows −
An error has occurred.
Rexx - Debugging
Debugging is an important feature in any programming language. It helps the developer to diagnose errors, find the root cause and then resolve them accordingly. In Rexx, the trace utility is used for debugging. The trace instruction can be implemented in 2 ways, one is the batch mode and the other is the interactive mode. Lets look at how to implement both options.
Trace in Batch Mode
The trace command is used to give a detailed level of each Rexx command which is executed.
The general syntax of the trace statement is shown as follows −
Syntax
trace [setting]
Where the setting can be anyone of the following options −
A − Traces all the commands.
C − Only traces the host commands which are sent to the operating system.
E − Only traces the host commands which are sent to the operating system which have resulted in an error.
F − Only traces the host commands which are sent to the operating system which have resulted in a failure.
I − This provides an intermediate level tracing of Rexx commands.
L − This option is if you want to label the tracing as it happens.
N − This is the default option in which no tracing happens.
Lets take a look at an example of the trace command.
Example
/* Main program */
trace A

/* Main program */
n = 100.45 if datatype( n, wholenumber ) then signal msg

say 'This is a whole number'
return 0

msg :
   say ' This is an incorrect number '
The output of the above program will be as follows −
5 *-* n = 100.45 if datatype( n, wholenumber ) then signal msg
   7 *-* say 'This is a whole number
This is a whole number
   8 *-* return 0
From the output, you can see that an additional trace was added to the output of the program. The following things can be noted about the output −
The line number along with the statement executed is added to the trace output.
Each line that gets executed is shown in the trace output.
Trace Function
Trace can also be enabled with the help of the trace function. The general syntax and example are shown below.
Syntax
trace()
The above function returns the current trace level.
Parameters
None
Return Value
The above function gives the current trace level.
Example
/* Main program */
say trace()

/* Main program */
n = 100.45 if datatype( n, wholenumber ) then signal msg

say 'This is a whole number'
return 0
msg :

say 'This is an incorrect number '
The output of the above program will be as follows.
N
This is an incorrect number
The first line of N denotes that the trace is set to Normal.
Setting Trace Value
The trace level can be set with the trace function. The general syntax and example are shown below.
Syntax
trace(travel_level)
Parameters
trace_level − This is similar to the options available for setting the trace level.
Return Value
The above function gives the current trace level.
Example
/* Main program */
say trace()
current_trace = trace('A')
say current_trace

/* Main program */
n = 100.45 if datatype( n, wholenumber ) then
signal msg say 'This is a whole number'
return 0
msg :
say ' This is an incorrect number '
The output of the above program will be as follows −
N
   4 *-* say current_trace
N
   6 *-* n = 100.45
   7 *-* if \ datatype( n, wholenumber ) then
   8 *-* signal msg
   12 *-* say 'This is an incorrect number'
'This is an incorrect number'
Interactive Tracing
Interactive tracing is wherein, tracing is carried out as the program runs. Just like in an IDE such as Visual Studio for .Net, in which you can add breakpoints and see how each statement executes, similarly here also you can see the program as each code line runs.
The general syntax is as follows −
Syntax
trace ?options
Where, options are the same for the trace command as shown below.
A − Traces all the commands
C − Only traces the host commands which are sent to the operating system.
E − Only traces the host commands which are sent to the operating system which have resulted in an error.
F − Only traces the host commands which are sent to the operating system which have resulted in a failure.
I − This provides an intermediate level tracing of Rexx commands.
L − This option is if you want to label the tracing as it happens.
N − This is the default option in which no tracing happens.
Lets take a look at an example of implementing active tracing.
Example
/* Main program */
trace ?A

/* Main program */
n = 100.45 if datatype( n, wholenumber ) then
signal msg

say 'This is a whole number'
return 0
msg : say 'This is an incorrect number'
The output of the above program will be as shown in the following program. The trace will stop at each line of code; then you need to press the Enter button to move onto the next line of code.
This is an incorrect number
       +++ "LINUX COMMAND /home/cg/root/5798511/main.rex"
     5 *-* n = 100.45 if datatype( n, wholenumber ) then
+++ Interactive trace. "Trace Off" to end debug, ENTER to Continue. +++
     6 *-* signal msg
    10 *-* msg :
    10 *-* say 'This is an incorrect number'
Rexx - Error Handling
Rexx has the ability to also work on Error handling as in other programming languages.
The following are some of the various error conditions that are seen in Rexx.
ERROR − This even is raised whenever a command which is sent to the operating system results in an error.
FAILURE − This even is raised whenever a command which is sent to the operating system results in a failure.
HALT − This is normally raised whenever an operation is dependent on another operation. An example is if an I/O operation is being halted for any reason.
NOVALUE − This event is raised when a value has not been assigned to a variable.
NOTREADY − This is raised by any I/O device which is not ready to accept any operation.
SYNTAX − This event is raised if there is any syntax error in the code.
LOSTDIGITS − This event is raised when an arithmetic operation results in a loss of digits during the operation.
Trapping Errors
Errors are trapped with the help of the signal command. Lets take a look at the syntax and an example of this.
Syntax
signal on [Errorcondition]
Where,
Errorcondition − This is the error condition which is given above.
Example
Lets take a look at an example on this.
/* Main program */
signal on error
signal on failure
signal on syntax
signal on novalue beep(1)
signal off error
signal off failure
signal off syntax
signal off novalue
exit 0
error: failure: syntax: novalue:
say 'An error has occured'
In the above example, we first turn the error signals on. We then add a statement which will result in an error. We then have the error trap label to display a custom error message.
The output of the above program will be as shown below.
An error has occurred.
An example of error codes is shown in the following program.
/* Main program */
signal on error
signal on failure
signal on syntax
signal on novalue beep(1)
exit 0
error: failure: syntax: novalue:

say 'An error has occured'
say rc
say sigl
The output of the above program will be as shown below.
An error has occured
40
6
Rexx - Object Oriented
When you install ooRexx as per the environment chapter, you will also have the ability to work with classes and objects. Please note that all of the following code needs to be run in the ooRexx interpreter. The normal Rexx interpreter will not be able to run this object oriented code.
Class and Method Declarations
A class is defined with the following Syntax declaration.
Syntax
::class classname
where classname is the name given to the class.
A method in a class is defined with the following Syntax declaration.
Syntax
::method methodname
Where methodname is the name given to the method.
A property in a class is defined with the below Syntax declaration.
Syntax
::attribute propertyname
Where propertyname is the name given to the property.
Example
The following is an example of a class in Rexx.
::class student
::attribute StudentID
::attribute StudentName
The following points need to be noted about the above program.
- The name of the class is student.
- The class has 2 properties, StudentID and StudentName.
Getter and Setter Methods
The Getter and Setter methods are used to automatically set and get the values of the properties. In Rexx, when you declare a property with the attribute keyword, the getter and setter methods are already put in place.
Example
::class student
::attribute StudentID
::attribute StudentName
In the above example, there would be Getter and Setter methods for StudentId and StudentName.
An example of how they can be used is shown in the following program.
/* Main program */
value = .student~new
value~StudentID = 1
value~StudentName = 'Joe'
say value~StudentID
say value~StudentName

exit 0
::class student
::attribute StudentID
::attribute StudentName
The output of the above program will be as shown below.
1
Joe
Instance Methods
Objects can be created from the class via the ~new operator. A method from the class can be called in the following way.
Object~methodname
Where methodname is the method which needs to be invoked from the class.
Example
The following example shows how an object can be created from a class and the respective method invoked.
/* Main program */
value = .student~new
value~StudentID = 1
value~StudentName = 'Joe'
value~Marks1 = 10
value~Marks2 = 20
value~Marks3 = 30
total = value~Total(value~Marks1,value~Marks2,value~Marks3)
say total

exit 0
::class student
::attribute StudentID
::attribute StudentName
::attribute Marks1
::attribute Marks2
::attribute Marks3
::method 'Total'
use arg a,b,c
return (ABS(a) + ABS(b) + ABS(c))
The output of the above program will be as shown below.
60
Creating Multiple Objects
One can also create multiple objects of a class. The following example will show how this can be achieved.
In here we are creating 3 objects (st, st1 and st2) and calling their instance members and instance methods accordingly.
Lets take a look at an example of how multiple objects can be created.
Example
/* Main program */
st = .student~new
st~StudentID = 1
st~StudentName = 'Joe'
st~Marks1 = 10
st~Marks2 = 20
st~Marks3 = 30
total = st~Total(st~Marks1,st~Marks2,st~Marks3)
say total

st1  =  .student~new
st1~StudentID = 2
st1~StudentName = 'John'
st1~Marks1 = 10
st1~Marks2 = 20
st1~Marks3 = 40
total = st1~Total(st1~Marks1,st1~Marks2,st1~Marks3)
say total

st2  =  .student~new
st2~StudentID = 3
st2~StudentName = 'Mark'
st2~Marks1 = 10
st2~Marks2 = 20
st2~Marks3 = 30
total = st2~Total(st2~Marks1,st2~Marks2,st2~Marks3)
say total

exit 0
::class student
::attribute StudentID
::attribute StudentName
::attribute Marks1
::attribute Marks2
::attribute Marks3
::method 'Total'
use arg a,b,c
return (ABS(a) + ABS(b) + ABS(c))
The output of the above program will be as shown below.
60
70
60
Inheritance
Inheritance can be defined as the process where one class acquires the properties (methods and fields) of another. With the use of inheritance, the information is made manageable in a hierarchical order.
The class which inherits the properties of other is known as subclass (derived class, child class) and the class whose properties are inherited is known as superclass (base class, parent class).
Lets see an example of inheritance in Rexx. In the following example we are creating a class called Person. From there we use the subclass keyword to create the Student class as a sub-class of Person.
Example
/* Main program */
st = .student~new
st~StudentID = 1
st~StudentName = 'Joe'
st~Marks1 = 10
st~Marks2 = 20
st~Marks3 = 30
say st~Total(st~Marks1,st~Marks2,st~Marks3)

exit 0
::class Person
::class student subclass Person
::attribute StudentID
::attribute StudentName
::attribute Marks1
::attribute Marks2
::attribute Marks3
::method 'Total'
use arg a,b,c
return (ABS(a) + ABS(b) + ABS(c))
The output of the above program will be as shown below.
60
Rexx - Portability
Portability is an important aspect in any programming language. As one knows, Rexx is available in a variety of operating systems such as Windows and Linux. So it need to be ensured that when one develops a program on the Windows platform, that it has the necessary precautions taken if the same programs runs on a Linux platform.
Rexx has the ability to run system level commands. There are commands which can be used to understand what is the operating system on which it is running on. Based on the output it can then take the appropriate actions to see what are the commands that can be run on this operating system.
Example
The following example shows how the parse functions are used to get the details of the operating system on which the program is running.
/* Main program */
parse version language level date month year.
parse source system invocation filename.
language = translate(language)

if pos('REGINA',language) = 0 then
   say 'Error , the default interpreter is not Regina' language
   say 'The Interpreter version/release date is:' date month year
   say 'The Language level is: ' level say 'The Operating System is'

   select
when system = 'WIN32' then
   'ver'
when system = 'UNIX' | system = 'LINUX' then
   'uname -a'
   otherwise
   say 'Unknown System:' system
end
if rc <> 0 then
   say 'Error :' rc
The output will vary depending on operating system. A sample output is given below.
The Interpreter version/release date: 5 Apr 2015
The Language level is:  5.00
The Operating System is
Unknown System: WIN64
Bad return code: RC
Rexx - Extended Functions
Rexx provides a number of extended functions that gives a wide variety of functionality, most of them which allow you to interact with the Operating System. Lets look at some of them in detail as explained below.
| Sr.No. | Extended Functions |
|---|---|
| 1 | b2c
This function converts a binary value to a string value. |
| 2 | bitclr
This function is used to toggle the specified bit in the binary string to 0. |
| 3 | bitcomp
This function is used to compare 2 binary strings starting with bit 0. |
| 4 | buftype
This function is used to display the contents of the stack which is normally used in debugging purposes. |
| 5 | crypt
This function is used to encrypt a string. |
| 6 | fork
This function is used to spawn a new child process on the system. |
| 7 | getpid
This function gets the id of the current running process. |
| 8 | hash
This function returns the hash value of a string. |
Rexx - Instructions
Rexx provides a number of instructions that gives a wide variety of functionality, most of them which allow you to interact with the Operating System. Lets look at some of them in detail.
| Sr.No. | Rexx Instructions |
|---|---|
| 1 | address
This function is used to display the current command environment. |
| 2 | drop
This function is used to unassign a variable. |
| 3 | interpret
Interprets or executes the defined instruction. |
| 4 | nop
This function means to perform no operation. This command is normally used in if statements. |
| 5 | Pull
This is used to pull input from the stack or from the default stream. |
| 6 | push
This is used to push a value onto the Rexx stack. |
Rexx - Implementations
The Rexx language has a lot of various implementations as we have already seen in the previous chapters. Each implementation has its own functionality. Lets look at the various implementations available for Rexx.
OoRexx
This is the object oriented version of Rexx. By default, the Rexx basic implementation is all based on procedures. But with ooRexx you can offer greater flexibility by having an Object oriented approach to Rexx. By using ooRexx you can have better re-use through creating re-usable classes and objects.
The following program is an example of a simple Rexx program which can be run with the ooRexx implementer.
Example
/* Main program */
say hello
To run this program, run the following command.
rexx main.rexx
When you run the above command, you will get the following output.
hello
Netrexx
This is for all Java based developers as it provides a Java based alternative for the Rexx language. So all of the objects are based on the Java Object Model. The advantage of this framework is that since Java is a widely popular language it becomes easier for developers to use this framework. So in this implementation, the Rexx code is converted to a Java program which can then be run on any Java virtual machine.
The following code is an example of a NetRexx program.
Create a file called main.nrx and place the following code in the file.
/* Main program */
say hello
To compile the code run the following command −
NetRexxC main.nrx
You will then get the following output. NetRexxC is the compiler which converts the Rexx program to its java equivalent.
java -cp ";;G:\NetRexx-3.04GA\lib\NetRexxF.jar;."
-Dnrx.compiler = ecj org.netrexx.process.NetRexxC  main.nrx
NetRexx portable processor 3.04 GA build 4-20150630-1657
Copyright (c) RexxLA, 2011,2015.   All rights reserved.
Parts Copyright (c) IBM Corporation, 1995,2008.
Program main.nrx
Compilation of 'main.nrx' successful
You can now run your java program using the following java command.
java main
When you run the above command, you will get the following output.
Hello
Brexx
This is a lightweight implementation of Rexx. This is a lighter package than the standard Rexx implementer. But it still has the full functionality of Rexx.
The following code is an example of a BRexx program.
/* Main program */
say hello
To run the program, run the following command.
rexx32 main.rexx
When you run the above command, you will get the following output.
hello
Rexx - Netrexx
NetRexx is the java implementation of Rexx. In NetRexx, the implementer is used to convert the Rexx program to a java program which can then be run on any Java virtual machine.
Setting up NetRexx
The first step in NetRexx is to set it up on the local machine. To do this, one needs to perform the following steps −
Step 1 − Go to the NetRexx download site − http://www.netrexx.org/downloads.nsp
Download the NetRexx.3.04.GA file.
Step 2 − Ensure that java is installed and running on your system. You can verify that java is running by using the javaversion command.
An example of the output is shown below.
H:\>java -version
java version "1.7.0_79"
Java(TM) SE Runtime Environment (build 1.7.0_79-b15)
Java HotSpot(TM) Client VM (build 24.79-b02, mixed mode, sharing)
Step 3 − Unzip the contents of the Netrexx zipped file. Copy the files from the NetRexx3.04GA\lib folder to your java installation/lib/etc folder.
Step 4 − Add the NetRexx-3.04GA\bin path to the path variable on the system.
Running the First NetRexx Program
Create a file called main.nrx and place the following code in the file.
/* Main program */
say hello
To compile the code run the following command.
NetRexxC main.nrx
You will then get the following output. NetRexxC is the compiler which converts the rexx program to its java equivalent.
java -cp ";;G:\NetRexx-3.04GA\lib\NetRexxF.jar;."
-Dnrx.compiler = ecj org.netrexx.process.NetRexxC  main.nrx
NetRexx portable processor 3.04 GA build 4-20150630-1657
Copyright (c) RexxLA, 2011,2015.   All rights reserved.
Parts Copyright (c) IBM Corporation, 1995,2008.
Program main.nrx
Compilation of 'main.nrx' successful
You can now run your java program using the following java command.
java main
When you run the above command, you will get the following output.
Hello
Let us now discuss some of the special aspects of the Netrexx library.
Indexed Strings
In NetRexx, strings can become the indexes to arrays. An example is shown below.
Example
/* Main program */
value = 'unknown'
value['a'] = 'b'
c = 'a'
say value[c]
When we run the above program, we will get the following result.
Output
b
Multiple Indexes
In NetRexx, you can have multiple indexes for arrays. An example is shown below.
Example
/* Main program */
value = 'null'
value['a', 'b'] = 1
say value['a', 'b']
When we run the above program we will get the following result.
Output
1
| Sr.No. | Command & Description |
|---|---|
| 1 | ask Command
This command is used to read a line from the default input stream. |
| 2 | digits Command
This command is used to display the current value of the digits value. |
| 3 | form Command
This command is used to display the current value of the form value. |
| 4 | length Command
This command is used to display the length of a string value. |
| 5 | version Command
This command is used to return the current version of NetRexx being used. |
| 6 | trace Command
This command is used to return the current trace setting being used by NetRexx. |
Rexx - Brexx
BRexx is a lighter weight implementation of Rexx. It still has a lot of functionality to offer as part of the Rexx implementation.
Setting up BRexx
The first step in BRexx is to set it up on the local machine. To do this, one needs to perform the following steps −
Step 1 − Go to the BRexx download site − https://ftp.gwdg.de/pub/languages/rexx/brexx/html/rx.html
Go to the downloads section and download the product.
Step 2 − Unzip the contents of the Brexx zipped file.
Step 3 − Add the BRexx\bin path to the path variable on the system.
Step 4 − Create a new variable called RXLIB and point it to the lib folder in the Brexx folder.
Running the First BRexx Program
Create a file called main.rexx and place the following code in the file.
/* Main program */
say hello
To run the program, run the following command.
rexx32 main.rexx
When you run the above command, you will get the following output.
hello
Let us now discuss some of the most commonly used functions available in the BRexx library.
| Sr.No. | Functions available in the BRexx Library |
|---|---|
| 1 | acos Command
This command is used to get the arc-cosine conversion of a number. |
| 2 | cos Command
This command is used to get the cosine conversion of a number. |
| 3 | sin Command
This command is used to get the sine conversion of a number. |
| 4 | asin Command
This command is used to get the arc-sine conversion of a number. |
| 5 | tan Command
This command is used to get the tangent conversion of a number. |
| 6 | atan Command
This command is used to get the arc-tangent conversion of a number. |
| 7 | mkdir Command
This command is used to create a directory in the current working directory. |
| 8 | rmdir Command
This command is used to remove a directory in the current working directory. |
| 9 | dir Command
This command is used to return the entire directory listing. |
Rexx - Databases
Rexx has the ability to work with a variety of databases which are listed below.
- HSQLDB
- Oracle
- SQL Server
- MySQL
- MongoDB
All the information for Rexx databases can be found once you click on the following link − https://rexxsql.sourceforge.net/
In our example, we are going to use MySQL DB as a sample. So the first step is to ensure to download the required drivers from the Rexx SQL site so that Rexx programs can work with SQL accordingly. So follow the subsequent steps to ensure that Rexx programs can work with MySQL databases.
Step 1 − Go to the following drivers download page from the Rexx site − https://sourceforge.net/projects/rexxsql/files/rexxsql/2.6/
Step 2 − Download the MYSQL drivers - rxsql26B3_my_w32_ooRexx
Step 3 − Unzip the contents to the local machine.
Step 4 − Add the path of the unzipped folder to the path variable on your machine.
For all the subsequent examples, make sure of the following pointers are in place −
You have created a database TESTDB.
You have created a table EMPLOYEE in TESTDB.
This table has fields FIRST_NAME, LAST_NAME, AGE, SEX and INCOME.
User ID "testuser" and password "test123" are set to access TESTDB.
Ensure you have downloaded the mysql jar file and added the file to your classpath.
You have gone through MySQL tutorial
Database Connection
To establish a database connection, you first need to the Rexxsql DLL and then use the SQLConnect function to establish a connection to the database. The syntax and example of how this can be achieved is given below.
Syntax
SQLConnect(cname,username,password,dbname)
Parameters
cname − This is the name to give to the connection.
username − The user name to connect to the database.
password − The password to connect to the database.
dbname − The database schema to connect to.
Return Value
A value equal to 0 will mean that the database connection is successful.
Example
/* Main program */
Call RxFuncAdd 'SQLLoadFuncs', 'rexxsql', 'SQLLoadFuncs'
Call SQLLoadFuncs
say SQLConnect(c1,' testuser ',' test123','testdb')
The output of the above program would be as shown below.
0
Creating a Database Table
The next step after connecting to the database is to create the tables in our database. The following example shows how to create a table in the database using Rexx. All of the commands in Rexx SQL are executed by using the SQLCommand function.
Syntax
SQLConnect(sname,statement)
Parameters
sname − This is the name to give to the statement to execute.
statement − This is the statement which needs to be executed against the database.
Return Value
A value equal to 0 will mean that the command was successful.
Example
/* Main program */
Call RxFuncAdd 'SQLLoadFuncs', 'rexxsql', 'SQLLoadFuncs'
Call SQLLoadFuncs

if SQLConnect(c1,'testuser','test123','testdb') == 0 then say 'Connect Succedded'
if SQLCommand(u1,"use testdb") == 0 then say 'Changed database to testdb'
   sqlstr = 'create table employee (first_name char(20) not null, last_name
   char(20),age int, sex
   char(1), income float)'

if SQLCommand(c2,sqlstr) == 0 then say 'Employee table created'
The output of the above program would be as shown below.
Connect Succedded
Changed database to testdb
Employee table created
Operations on a Database Table
The following types of operations are most commonly performed on a database table.
| Sr.No. | Operation & Description |
|---|---|
| 1 | Insert Operation
It is required when you want to create your records into a database table. |
| 2 | Read Operation
A READ Operation on any database means to fetch some useful information from the database. |
| 3 | Update Operation
The UPDATE Operation on any database means to update one or more records, which are already available in the database. |
| 4 | Delete Operation
The DELETE operation is required when you want to delete some records from your database. |
| 5 | Closing a Connection
The following command can be used to close a connection to the database. |
Performing Transaction
Transactions are a mechanism that ensures data consistency. Transactions have the following four properties −
Atomicity − Either a transaction completes or nothing happens at all.
Consistency − A transaction must start in a consistent state and leave the system in a consistent state.
Isolation − Intermediate results of a transaction are not visible outside the current transaction.
Durability − Once a transaction was committed, the effects are persistent, even after a system failure.
Here is a simple example of how to implement transactions.
Example
/* Main program */
Call RxFuncAdd 'SQLLoadFuncs', 'rexxsql', 'SQLLoadFuncs'
Call SQLLoadFuncs

if SQLConnect(c1,'testuser','test123','testdb') == 0 then say 'Connect Succedded'
if SQLCommand(u1,"use testdb") == 0 then say 'Changed database to testdb'
   sqlstr = "DELETE FROM EMPLOYEE WHERE AGE > 20"

if SQLCommand(c2,sqlstr) == 0 then
if sqlcommit() == 0 then say committed
The output of the above program would be as shown below.
Connect Succedded
Changed database to testdb
COMMITTED
Commit Operation
The commit operation is what tells the database to proceed ahead with the operation and finalize all changes to the database. In our above example, this is achieved by the following command.
Sqlcommit()
Rollback Operation
If you are not satisfied with one or more of the changes and you want to revert back those changes completely, then use rollback method. In our above example, this is achieved by the following command.
SqlRollback()
Rexx - Handheld & Embedded Programming
Handheld devices have come a long way and Rexx has a lot of ways in which it can run on these devices. Rexx has support for Pocket PCs, Palm devices, PDAs and other smart phone devices. The advantage of Rexx to work on these platforms is that Rexx is really a small weight programming system which just runs in the span of a few kilobytes. Hence it becomes easier to run Rexx programs on these devices.
Rexx on handheld devices can run in the following modes −
The first mode is the native node where it runs directly on the operating system itself. The advantage on running in this mode is that it is faster since it runs directly off the operating system.
The next mode is on top of the DOS or emulator program on top of the hand held device. The advantage of this mode is that is can run on any type of operating system as long as the emulator runs on that operating system.
The Rexx Interpreters for the various hand held devices categories are shown below.
- Windows CE − Brexx
- Palm OS − Rexx for Palm OS
- Symbian OS − Regina
For the DOS emulator, the following steps need to be carried out −
Step 1 − First is to download PocketDOS which is a popular DOS emulator. It is designed to run on many operating systems and has support for common VGA screens and serial and parallel ports.
Step 2 − The next step is to download the BRexx files for 16-bit DOS to a Windows PC.
Step 3 − The final step is to use ActiveSync to sync the Rexx program to the handheld device.
There are some other commercial DOS based products available. XTM is a product which falls under this category. The features of this product are as follows −
Support for the 80186 CPU and instruction set.
It kind of works off the BIOS code for better performance.
It can provide emulation for the Math co-processor, version 8087 MPU
It provides access to the serial ports.
It supports a variety of languages such as English, French and German.
Rexx - Performance
One of the key aspects of any programming language is the performance of the application. Special practices need to be taken care of to ensure that the applications performance is not hampered. Lets look at some of the considerations described in steps for better understanding −
Step 1 − Try to reduce the number of instructions In Rexx each instruction carries an overhead. So try to reduce the number of instructions in your program. An example of instructions that can be redesigned is shown below.
Instead of using multiple if else statements one can use the parse statement. So like in the following program, instead of having an if condition for each value, and getting the value of word1, word2, word3 and word4, use the parse statement.
/* Main program */

parse value 'This is a Tutorial' with word1 word2 word3 word4
say "'"word1"'"
say "'"word2"'"
say "'"word3"'"
say "'"word4"'"
Step 2 − Try to combine multiple statements into one statement. An example is shown below.
Suppose if you had the following code which did the assignment for a and b and passed it to a method called proc.
do i = 1 to 100
   a = 0
   b = 1
   call proc a,b
end
You can easily replace the above given code with the following code using the parse statement.
do i = 1 for 100
   parse value 0 1 with
   a,
   b,
   call proc a,b
end
Step 3 − Try to replace the do..to loop with the do..for loop wherever possible. This is normally recommended when the control variable is being iterated through a loop.
/* Main program */
do i = 1 to 10
   say i
end
The above program should be replaced by the following program.
/* Main program */
do i = 1 for 10
   say i
end
Step 4 − If possible, remove the for condition from a do loop as shown in the following program. If the control variable is not required, then just put the end value in the do loop as shown below.
/* Main program */
do 10
   say hello
end
Step 5 − In a select clause, whatever u feel is the best condition which will be evaluated needs to put first in the when clause. So in the following example, if we know that 1 is the most frequent option, we put the when 1 clause as the first clause in the select statement.
/* Main program */
select
   when 1 then say'1'
   when 2 then say'2'
   otherwise say '3'
end
Rexx - Best Programming Practices
Every programmer wants their program to be the best when it comes to quality and efficiency. The following are some of the best programing practices or hints when writing Rexx programs which can help one achieve these goals.
Hint 1
Use the address command before you issue any command to the operating system or command prompt. This will help you get the address space beforehand in memory and cause your program to run more efficiently.
An example of the address command is shown below.
Example
/* Main program */
address system dir
The output of the command is as follows, but it could vary from system to system.
Volume in drive H is Apps
Volume Serial Number is 8E66-AC3D
Directory of H:\
06/30/2016  01:28 AM    <DIR>          Apps
07/05/2016  03:40 AM               463 main.class
07/07/2016  01:30 AM                46 main.nrx
07/07/2016  01:42 AM                38 main.rexx
3 File(s)            547 bytes
Dir(s)  313,085,173,760 bytes free
Hint 2
Ensure all commands to the operating system are in upper case and in quotes wherever possible.
An example for the same is shown below.
Example
/* Main program */
options arexx_bifs
say chdir('\REXXML100')
say directory()
When we run the above program, we will get the following result.
0
D:\rexxxml100
Hint 3
Avoid creating big comment blocks as shown in the following program.
Example
/******/
/* */
/* */
/* */
/******/
/* Main program */
address system dir
Hint 4
Use the Parse statement to assign default values. An example for the same is shown below.
Example
parse value 0 1 with
a,
b
Hint 5
Use the "Left(var1,2)" statement wherever possible instead of the substr(var1,1,2)" statement.
Hint 6
Use the "Right(var1,2)" statement wherever possible instead of the substr(var1,length(var1),2)" statement.
Rexx - Graphical User Interface
In order to use the graphic user interfaces available in Rexx, one needs to use 2 packages, one is called ActiveTcl and the other is the Rexxtk package. Along with these 2 packages, one can design normal forms which can have buttons and other controls on the forms.
Environment Setup
The first thing to do is the environment setup. Lets go through the following steps to have the environment in place.
Step 1 − Download the Activetcl package from the following website − https://www.activestate.com/activetcl

Step 2 − The next step is to start the installation of ActiveTCl. Click on the Next button on the screen to proceed.
Step 3 − Accept the license Agreement and click on the Next button.
Step 4 − Choose a location for the installation and click on the next button.
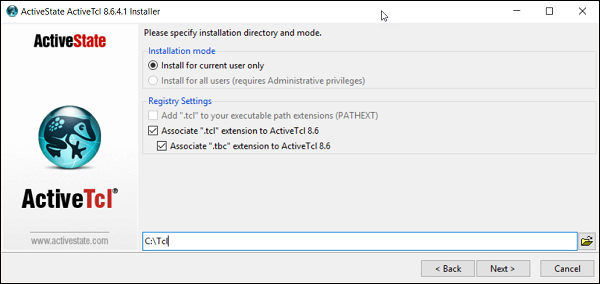
Step 5 − Choose a location for the installation of the demos and click on the Next button.
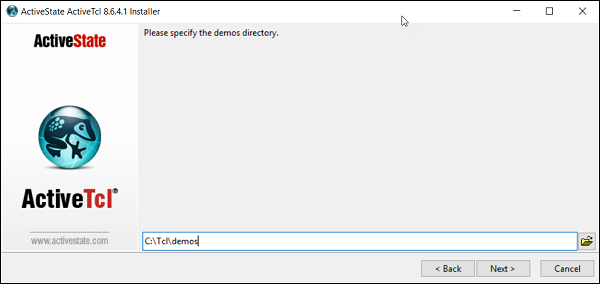
Step 6 − Click on the Next button to proceed with the installation.

Step 7 − Click on the Finish button to complete the installation.
Step 8 − The next step is to download the Rexxtk software from the following link − https://sourceforge.net/projects/rexxtk/
Step 9 − Double click the installer file from the link in the previous step to start the installation. Click on the next button to proceed.
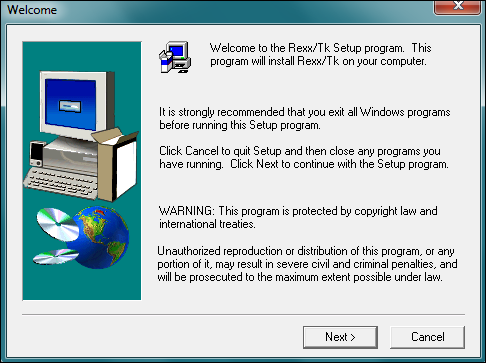
Step 10 − In the next screen, click on the Yes button to agree to the License Agreement.
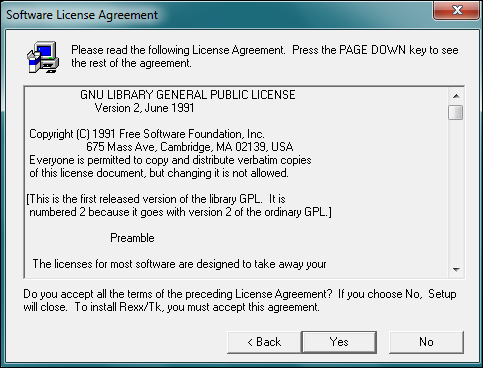
Step 11 − In the next screen, choose the location for the installation and click on the Next button.
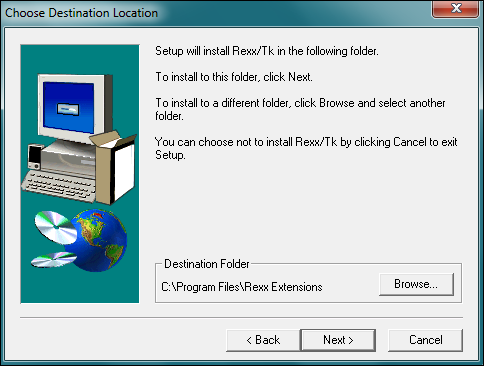
Step 12 − Choose the Program folder location and click on the next button.
Once the installation is complete, we can now start with programming the GUIs in Rexx.
Basic Program
Lets see how we can design a simple basic program with Rexx in a graphical user interface format.
Example
/* Main program */
call RxFuncAdd 'TkLoadFuncs','rexxtk','TkLoadFuncs'
call TkLoadFuncs
do forever
   interpret 'Call' TkWait()
end
call TkDropFuncs
exit 0
The following things need to be noted about the above program −
The Rexxtk library and all of its functions are loaded using the RxFuncAdd command.
The do forever loop will keep the window open and will wait for the user input.
Once the user input is detected, the program will exit.
When the above program is executed, you will get the following output.
Creating Menus
Menus are created with the help of the TkMenu and TkAdd functions. The syntax of these functions are given below.
Syntax
TkMenu(widgetname,options,0)
Parameters
Widgetname − A name to give to the menu.
Options can be anyone of the following −
selectcolor − if checkboxes or radio buttons are used as menu options, then this option specifies the color to choose when any menu option is selected.
tearoff − This option is used for adding sub menus to the main menu.
title − The string that needs to be used to give the window a title.
Return Value
A handle to the menu created.
Example
/* Main program */
call RxFuncAdd 'TkLoadFuncs','rexxtk','TkLoadFuncs'
call TkLoadFuncs

menubar = TkMenu('.m1')
filemenu = TkMenu('.m1.file','-tearoff', 0)
call TkAdd menubar, 'cascade', '-label', 'File', '-menu', filemenu
call TkAdd filemenu, 'command', '-label', 'Open...', '-rexx', 'getfile'
call TkConfig '.', '-menu', menubar

do forever
   interpret 'Call' TkWait()
end
call TkDropFuncs
exit 0
The following things need to be noted about the above program −
The menubar is created using the TkMenu function. The tearoff parameter means that we need to create submenus which is going to be attached to the main menu.
We then add 2 menu options called File and Open using the TkAdd function.
When the above program is executed, you will get the following output.
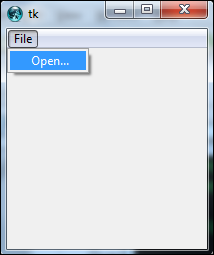
Rexx - Reginald
Reginald is another Rexx interpreter which was developed by Jeff Glantt and has some customizations on how Rexx programs can be run. In this section, we will see how to get Reginald setup and run a few Rexx programs in it.
Environment Setup
The first step is the environment setup which is to download the Reginald files. This can be done from the following website link − http://www.manmrk.net/tutorials/rexx/Reginald/win32/rxusrw32.htm
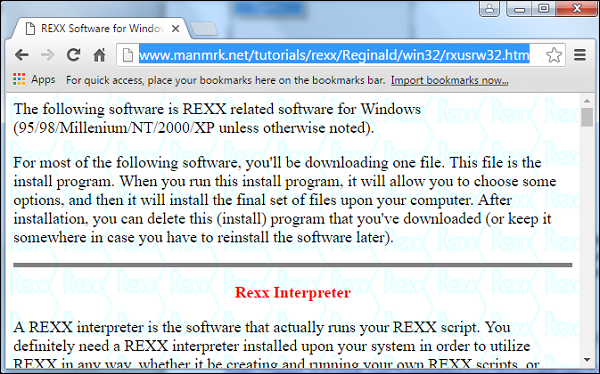
Once the download is complete and you launch the installer, the next screen will allow you to choose the install location.
Click the Install button to proceed.
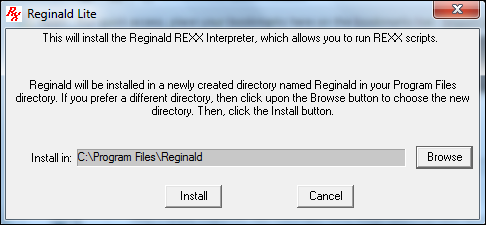
Once complete, we can now start to run one sample program in the Reginald interpreter. Create a simple program as shown below.
/* Main program */
say 'Hello'
Then run the following command −
RxLaunch.exe main.rexx
You will then get the following output. This program will now be running in the Reginald interpreter.
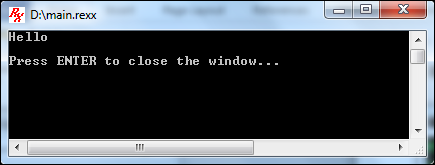
Other Functions Available
Apart from the normal Rexx commands, Reginald had some specific commands that are tailor-made for the Windows operating system. DriveMap is one such command −
DriveMap
This function gives information on the drive.
Syntax −
Drivemap(,options)
Parameters −
Options − These are a list of keywords which can be used to get various information on the drives of the local computer.
Return Value
A string value which has information on the drive.
Example −
/* Main program */
say 'Drives on system : ' DriveMap(,'FIXED')
If the above program is run, you will get the following output. This output depends from system to system.
List of disk drives : C:\ D:\
Rexx - Web Programming
Rexx has the facility to work with web servers as well. The most common being the apache web server. In order to use Rexxw with the Apache web server, you need to first download the Rexx modules from the following link − https://sourceforge.net/projects/modrexx/?source=typ_redirect
Once done, make sure to add the mod Rexx modules to the class path.
The following lines need to be added and modified to the Apache configuration file.
The following lines need to be added to the end of the appropriate −
- httpd.conf LoadModule list.
- LoadModule rexx_module modules/mod_rexx.dll
The following lines should be added at the end of the http.conf file.
AddType application/x-httpd-rexx-script .rex .rexx
AddType application/x-httpd-rexx-rsp .rsp
Add these for REXX Server Page support
RexxRspCompiler c:/Program Files/Apache Group/Apache2/bin/rspcomp.rex
Once the above changes have been made, you need to shut down and restart your apache web server.
The above lines also allow you to have Rexx based server pages just like Java server pages. You can add the Rexx code directly to the html pages.
An example is shown below −
<p>The current date and time is
   <?rexx
      /* Inserting the rexx statement */
      say date() time()
   ?>
</p>
When a Rexx based server page is run, the following things are carried out −
First a temporary file is created.
Then the Rexx Server compiler compiles the file into a Rexx program and places it in the temporary file.
The next step is to actually run the Rexx program.
Finally, the temporary file is removed.