- OpenShift - Home
- OpenShift - Overview
- OpenShift - Types
- OpenShift - Architecture
- OpenShift - Environment Setup
- OpenShift - Basic Concept
- OpenShift - Getting Started
- OpenShift - Build Automation
- OpenShift - CLI
- OpenShift - CLI Operations
- OpenShift - Clusters
- OpenShift - Application Scaling
- OpenShift - Administration
- OpenShift - Docker and Kubernetes
- OpenShift - Security
OpenShift - Quick Guide
OpenShift - Overview
OpenShift is a cloud development Platform as a Service (PaaS) hosted by Red Hat. Its an open source cloud-based user-friendly platform used to create, test, and run applications, and finally deploy them on cloud.
OpenShift is capable of managing applications written in different languages, such as Node.js, Ruby, Python, Perl, and Java. One of the key features of OpenShift is it is extensible, which helps the users support the application written in other languages.
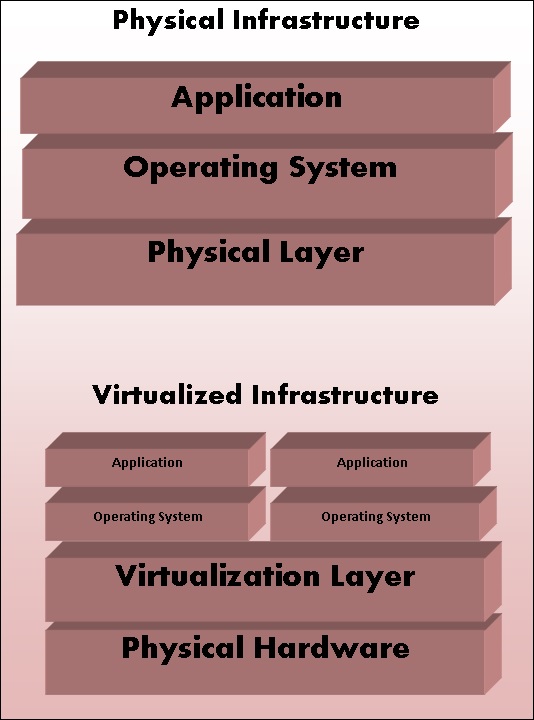
OpenShift comes with various concepts of virtualization as its abstraction layer. The underlying concept behind OpenShift is based on virtualization.
Virtualization
In general, virtualization can be defined as the creation of a virtual system rather than physical or actual version of anything starting from system, storage, or an operating system. The main goal of virtualization is to make the IT infrastructure more scalable and reliable. The concept of virtualization has been in existence from decades and with the evolution of IT industry today, it can be applied to a wide range of layers starting from System level, Hardware level, to Server level virtualization.
How It Works
It can be described as a technology in which any application or operating system is abstracted from its actual physical layer. One key use of the virtualization technology is server virtualization, which uses a software called hypervisor to abstract the layer from the underlying hardware. The performance of an operating system running on virtualization is as good as when it is running on the physical hardware. However, the concept of virtualization is popular as most of the system and application running do not require the use of the underlying hardware.
Physical vs Virtual Architecture
Types of Virtualization
Application Virtualization − In this method, the application is abstracted from the underlying operating system. This method is very useful in which the application can be run in isolation without being dependent on the operating system underneath.
Desktop Virtualization − This method is used to reduce the workstation load in which one can access the desktop remotely, using a thin client at the desk. In this method, the desktops are mostly run in a datacenter. A classic example can be a Virtual Desktop Image (VDI) which is used in most of the organizations.
Data Virtualization − It is a method of abstracting and getting away from traditional method of data and data management.
Server Virtualization − In this method, server-related resources are virtualized which includes the physical server, process, and operating system. The software which enables this abstraction is often referred to as the hypervisor.
Storage Virtualization − It is the process of pooling in multiple storage devices into a single storage device that is managed from a single central console.
Network Virtualization − It is the method in which all available network resources are combined by splitting up the available bandwidth and channels, each of which is independent of each other.
OpenShift
OpenShift is a cloud-enabled application Platform as a Service (PaaS). Its an open source technology which helps organizations move their traditional application infrastructure and platform from physical, virtual mediums to the cloud.
OpenShift supports a very large variety of applications, which can be easily developed and deployed on OpenShift cloud platform. OpenShift basically supports three kinds of platforms for the developers and users.
Infrastructure as a Service (IaaS)
In this format, the service provider provides hardware level virtual machines with some pre-defined virtual hardware configuration. There are multiple competitors in this space starting from AWS Google cloud, Rackspace, and many more.
The main drawback of having IaaS after a long procedure of setup and investment is that, one is still responsible for installing and maintaining the operating system and server packages, managing the network of infrastructure, and taking care of the basic system administration.
Software as a Service (SaaS)
With SaaS, one has the least worry about the underlying infrastructure. It is as simple as plug and play, wherein the user just has to sign up for the services and start using it. The main drawback with this setup is, one can only perform minimal amount of customization, which is allowed by the service provider. One of the most common example of SaaS is Gmail, where the user just needs to login and start using it. The user can also make some minor modifications to his account. However, it is not very useful from the developers point of view.
Platform as a Service (PaaS)
It can be considered as a middle layer between SaaS and IaaS. The primary target of PaaS evaluation is for developers in which the development environment can be spin up with a few commands. These environments are designed in such a way that they can satisfy all the development needs, right from having a web application server with a database. To do this, you just require a single command and the service provider does the stuff for you.
Why Use OpenShift?
OpenShift provides a common platform for enterprise units to host their applications on cloud without worrying about the underlying operating system. This makes it very easy to use, develop, and deploy applications on cloud. One of the key features is, it provides managed hardware and network resources for all kinds of development and testing. With OpenShift, PaaS developer has the freedom to design their required environment with specifications.
OpenShift provides different kind of service level agreement when it comes to service plans.
Free − This plan is limited to three years with 1GB space for each.
Bronze − This plan includes 3 years and expands up to 16 years with 1GB space per year.
Sliver − This is 16-year plan of bronze, however, has a storage capacity of 6GB with no additional cost.
Other than the above features, OpenShift also offers on-premises version known as OpenShift Enterprise. In OpenShift, developers have the leverage to design scalable and non-scalable applications and these designs are implemented using HAproxy servers.
Features
There are multiple features supported by OpenShift. Few of them are −
- Multiple Language Support
- Multiple Database Support
- Extensible Cartridge System
- Source Code Version Management
- One-Click Deployment
- Multi Environment Support
- Standardized Developers workflow
- Dependency and Build Management
- Automatic Application Scaling
- Responsive Web Console
- Rich Command-line Toolset
- Remote SSH Login to Applications
- Rest API Support
- Self-service On Demand Application Stack
- Built-in Database Services
- Continuous Integration and Release Management
- IDE Integration
- Remote Debugging of Applications
OpenShift - Types
OpenShift came into existence from its base named OpenShift V2, which was mainly based on the concept of year and cartridges, where each component has its specifications starting from machine creation till application deployment, right from building to deploying the application.
Cartridges − They were the focal point of building a new application starting from the type of application the environment requires to run them and all the dependencies satisfied in this section.
year − It can be defined as the bear metal machine or server with certain specifications regarding the resources, memory, and CPU. They were considered as a fundamental unit for running an application.
Application − These simply refer to the application or any integration application that will get deployed and run on OpenShift environment.
As we go deeper in the section, we will discuss on different formats and offerings of OpenShift. In the earlier days, OpenShift had three major versions.
OpenShift Origin − This was the community addition or open source version of OpenShift. It was also known as upstream project for other two versions.
OpenShift Online − It is a pubic PaaS as a service hosted on AWS.
OpenShift Enterprise − is the hardened version of OpenShift with ISV and vendor licenses.
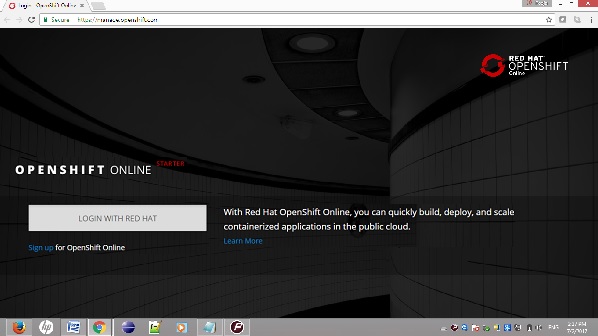
OpenShift Online
OpenShift online is an offering of OpenShift community using which one can quickly build, deploy, and scale containerized applications on the public cloud. It is Red Hats public cloud application development and hosting platform, which enables automated provisioning, management and scaling of application which helps the developer focus on writing application logic.
Setting Up Account on Red Hat OpenShift Online
Step 1 − Go to browser and visit the site openshift
Step 2 − If you have a Red Hat account, login to OpenShift account using the Red Hat login ID and password using the following URL. https://developers.redhat.com
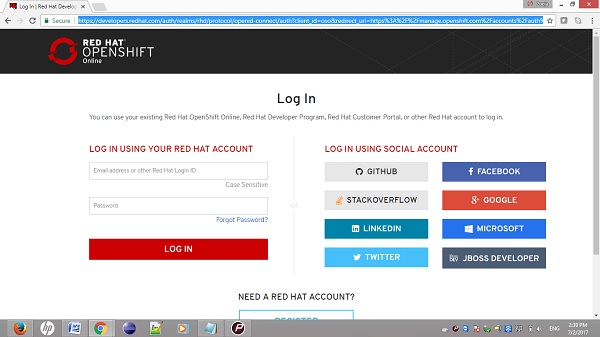
Step 3 − If you do not have a Red Hat account login, then sign up for OpenShift online service using the following link.
https://www.redhat.com/en/engage/openshift-application-transformation-ebook

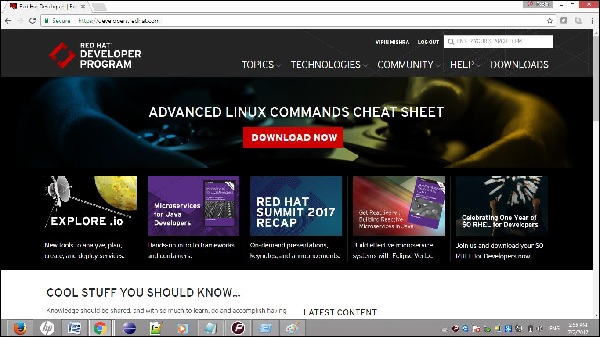
After login, you will see the following page.
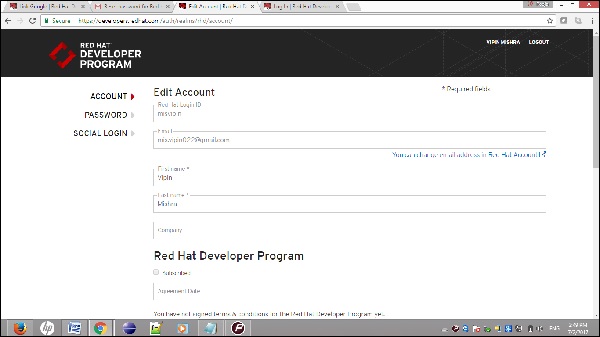
Once you have all the things in place, Red Hat will show some basic account details as shown in the following screenshot.
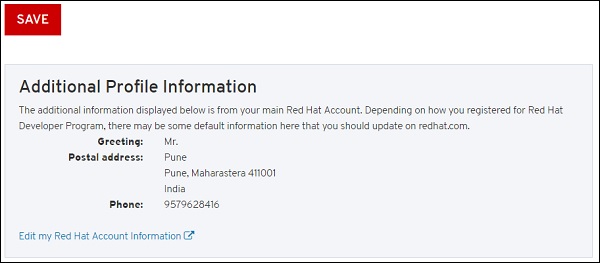
Finally, when you are logged in, you will see the following page.
OpenShift Container Platform
OpenShift container platform is an enterprise platform which helps multiple teams such as development and IT operations team to build and deploy containerized infrastructure. All the containers built in OpenShift uses a very reliable Docker containerization technology, which can be deployed on any data center of publically hosted cloud platforms.
OpenShift container platform was formally known as OpenShift Enterprises. It is a Red Hat on-premise private platform as service, built on the core concept of application containers powered by Docker, where orchestration and administration is managed by Kubernetes.
In other words, OpenShift brings Docker and Kubernetes together to the enterprise level. It is a container platform software for enterprise units to deploy and manage applicants in an infrastructure of own choice. For example, hosting OpenShift instances on AWS instances.
OpenShift container platform is available in two package levels.
OpenShift Container Local − This is for those developers who wish to deploy and test applications on the local machine. This package is mainly used by development teams for developing and testing applications.
OpenShift Container Lab − This is designed for extended evaluation of application starting from development till deployment to pre-prod environment.
OpenShift Dedicated
This is another offering added to the portfolio of OpenShift, wherein there is a customer choice of hosting a containerized platform on any of the public cloud of their choice. This gives the end user a true sense of multi-cloud offering, where they can use OpenShift on any cloud which satisfies their needs.
This is one of the newest offering of Red Hat where the end user can use OpenShift to build test deploy and run their application on OpenShift which is hosted on cloud.
Features of OpenShift Dedicated
OpenShift dedicated offers customized solution application platform on public cloud and it is inherited from OpenShift 3 technology.
Extensible and Open − This is built on the open concept of Docker and deployed on cloud because of which it is can expend itself as and when required.
Portability − As it is built using Docker, the applications running on Docker can easily be shipped from one place to the other, where Docker is supported.
Orchestration − With OpenShift 3, one of the key features of container orchestration and cluster management is supported using Kubernetes which came into offering with OpenShift version 3.
Automation − This version of OpenShift is enabled with the feature of source code management, build automation, and deployment automation which makes it very popular in the market as a Platform as a Service provider.
Competitors of OpenShift
Google App Engine − This is Googles free platform for developing and hosting web applications. Googles app engine offers fast development and deployment platform.
Microsoft Azure − Azure cloud is hosted by Microsoft on their data centers.
Amazon Elastic Cloud Compute − They are built-in services provided by Amazon, which help in developing and hosting scalable web applications on cloud.
Cloud Foundry − is an open source PaaS platform for Java, Ruby, Python, and Node.js applications.
CloudStack − Apaches CloudStack is a project developed by Citrix and is designed to become a direct competitor of OpenShift and OpenStack.
OpenStack − Another cloud technology provided by Red Hat for cloud computing.
Kubernetes − It is a direct orchestration and cluster management technology built to manage Docker container.
OpenShift - Architecture
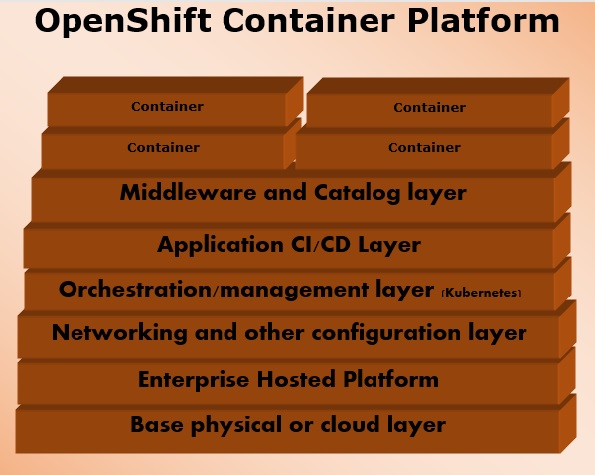
OpenShift is a layered system wherein each layer is tightly bound with the other layer using Kubernetes and Docker cluster. The architecture of OpenShift is designed in such a way that it can support and manage Docker containers, which are hosted on top of all the layers using Kubernetes. Unlike the earlier version of OpenShift V2, the new version of OpenShift V3 supports containerized infrastructure. In this model, Docker helps in creation of lightweight Linux-based containers and Kubernetes supports the task of orchestrating and managing containers on multiple hosts.
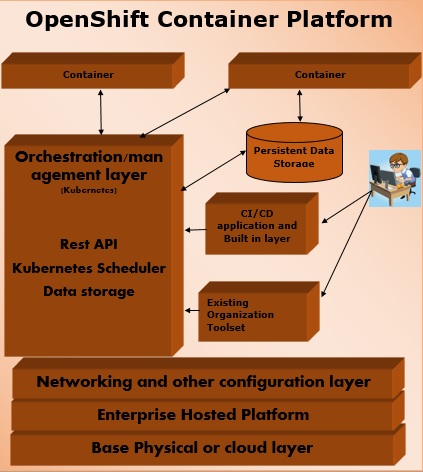
Components of OpenShift
One of the key components of OpenShift architecture is to manage containerized infrastructure in Kubernetes. Kubernetes is responsible for Deployment and Management of infrastructure. In any Kubernetes cluster, we can have more than one master and multiple nodes, which ensures there is no point of failure in the setup.
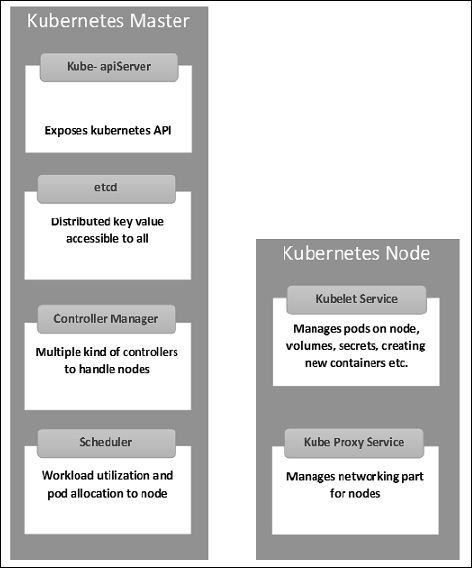
Kubernetes Master Machine Components
Etcd − It stores the configuration information, which can be used by each of the nodes in the cluster. It is a high availability key value store that can be distributed among multiple nodes. It should only be accessible by Kubernetes API server as it may have sensitive information. It is a distributed key value Store which is accessible to all.
API Server − Kubernetes is an API server which provides all the operation on cluster using the API. API server implements an interface which means different tools and libraries can readily communicate with it. A kubeconfig is a package along with the server side tools that can be used for communication. It exposes Kubernetes API.
Controller Manager − This component is responsible for most of the collectors that regulate the state of the cluster and perform a task. It can be considered as a daemon which runs in a non-terminating loop and is responsible for collecting and sending information to API server. It works towards getting the shared state of the cluster and then make changes to bring the current status of the server to a desired state. The key controllers are replication controller, endpoint controller, namespace controller, and service account controller. The controller manager runs different kind of controllers to handle nodes, endpoint, etc.
Scheduler − It is a key component of Kubernetes master. It is a service in master which is responsible for distributing the workload. It is responsible for tracking the utilization of working load on cluster nodes and then placing the workload on which resources are available and accepting the workload. In other words, this is the mechanism responsible for allocating pods to available nodes. The scheduler is responsible for workload utilization and allocating a pod to a new node.
Kubernetes Node Components
Following are the key components of the Node server, which are necessary to communicate with the Kubernetes master.
Docker − The first requirement of each node is Docker which helps in running the encapsulated application containers in a relatively isolated but lightweight operating environment.
Kubelet Service − This is a small service in each node, which is responsible for relaying information to and from the control plane service. It interacts with etcd store to read the configuration details and Wright values. This communicates with the master component to receive commands and work. The kubelet process then assumes responsibility for maintaining the state of work and the node server. It manages network rules, port forwarding, etc.
Kubernetes Proxy Service − This is a proxy service which runs on each node and helps in making the services available to the external host. It helps in forwarding the request to correct containers. Kubernetes Proxy Service is capable of carrying out primitive load balancing. It makes sure that the networking environment is predictable and accessible but at the same time it is isolated as well. It manages pods on node, volumes, secrets, creating new containers health checkup, etc.
Integrated OpenShift Container Registry
OpenShift container registry is an inbuilt storage unit of Red Hat, which is used for storing Docker images. With the latest integrated version of OpenShift, it has come up with a user interface to view images in OpenShift internal storage. These registries are capable of holding images with specified tags, which are later used to build containers out of it.
Frequently Used Terms
Image − Kubernetes (Docker) images are the key building blocks of Containerized Infrastructure. As of now, Kubernetes only supports Docker images. Each container in a pod has its Docker image running inside it. When configuring a pod, the image property in the configuration file has the same syntax as the Docker command.
Project − They can be defined as the renamed version of the domain which was present in the earlier version of OpenShift V2.
Container − They are the ones which are created after the image is deployed on a Kubernetes cluster node.
Node − A node is a working machine in Kubernetes cluster, which is also known as minion for master. They are working units which can a physical, VM, or a cloud instance.
Pod − A pod is a collection of containers and its storage inside a node of a Kubernetes cluster. It is possible to create a pod with multiple containers inside it. For example, keeping the database container and web server container inside the pod.
OpenShift - Environment Setup
In this chapter, we will learn about the environment setup of OpenShift.
System Requirement
In order to set up enterprise OpenShift, one needs to have an active Red Hat account. As OpenShift works on Kubernetes master and node architecture, we need to set up both of them on separate machines, wherein one machine acts as a master and other works on the node. In order to set up both, there are minimum system requirements.
Master Machine Configuration
Following are the minimum system requirements for master machine configuration.
A base machine hosted either on physical, virtual, or on any of the cloud environment.
At least Linux 7 with the required packages on that instance.
2 CPU core.
At least 8 GB RAM.
30 GB of internal hard disk memory.
Node Machine Configuration
- Physical or virtual base image as given for the master machine.
- At least Linux 7 on the machine.
- Docker installed with not below than 1.6 version.
- 1 CPU core.
- 8 GB RAM.
- 15 GB hard disk for hosting images and 15 GB for storing images.
Step by Step Guide to OpenShift Setup
In the following description, we are going to set up OpenShift lab environment, which can be later extended to a bigger cluster. As OpenShift requires master and node setup, we would need at least two machines hosted on either cloud, physical, or virtual machines.
Step 1 − First install Linux on both the machines, where the Linux 7 should be the least version. This can be done using the following commands if one has an active Red Hat subscription.
# subscription-manager repos --disable = "*"
# subscription-manager repos --enable = "rhel-7-server-rpms"
# subscription-manager repos --enable = "rhel-7-server-extras-rpms"
# subscription-manager repos --enable = "rhel-7-server-optional-rpms"
# subscription-manager repos --enable = "rhel-7-server-ose-3.0-rpms"
# yum install wget git net-tools bind-utils iptables-services bridge-utils
# yum install wget git net-tools bind-utils iptables-services bridge-utils
# yum install python-virtualenv
# yum install gcc
# yum install httpd-tools
# yum install docker
# yum update
Once we have all the above base packages installed in both of the machines, the next step would be to set up Docker on the respective machines.
Step 2 − Configure Docker so that it should allow insecure communication on the local network only. For this, edit the Docker file inside /etc/sysconfig. If the file is not present then you need to create it manually.
# vi /etc/sysconfig/docker
OPTIONS = --selinux-enabled --insecure-registry 192.168.122.0/24
After configuring the Docker on the master machine, we need to set up a password-less communication between both the machines. For this, we will use public and private key authentication.
Step 3 − Generate keys on the master machine and then copy the id_rsa.pub key to the authorized key file of the node machine, which can be done using the following command.
# ssh-keygen
# ssh-copy-id -i .ssh/id_rsa.pub root@ose3-node.test.com
Once you have all of the above setup in place, next is to set up OpenShift version 3 on the master machine.
Step 4 − From the master machine, run the following curl command.
# sh https://install.openshift.com/ose)
The above command will put the setup in place for OSV3. The next step would be to configure OpenShift V3 on the machine.
If you cannot download from the Internet directly, then it could be downloaded from https://okd.io/ as a tar package from which the installer can run on the local master machine.
Once we have the setup ready, then we need to start with the actual configuration of OSV3 on the machines. This setup is very specific to test the environment for actual production, we have LDAP and other things in place.
Step 5 − On the master machine, configure the following code located under /etc/openshift/master/master-config.yaml
# vi /etc/openshift/master/master-config.yaml
identityProviders:
- name: my_htpasswd_provider
challenge: true
login: true
provider:
apiVersion: v1
kind: HTPasswdPasswordIdentityProvider
file: /root/users.htpasswd
routingConfig:
subdomain: testing.com
Next, create a standard user for default administration.
# htpasswd -c /root/users.htpasswd admin
Step 6 − As OpenShift uses Docker registry for configuring images, we need to configure Docker registry. This is used for creating and storing the Docker images after build.
Create a directory on the OpenShift node machine using the following command.
# mkdir /images
Next, login to the master machine using the default admin credentials, which gets created while setting up the registry.
# oc login
Username: system:admin
Switch to the default created project.
# oc project default
Step 7 − Create a Docker Registry.
#echo '{"kind":"ServiceAccount","apiVersion":"v1","metadata":{"name":"registry"}}' | oc create -f -
Edit the user privileges.
#oc edit scc privileged
users:
- system:serviceaccount:openshift-infra:build-controller
- system:serviceaccount:default:registry
Create and edit the image registry.
#oadm registry --service-account = registry --
config = /etc/openshift/master/admin.kubeconfig --
credentials = /etc/openshift/master/openshift-registry.kubeconfig --
images = 'registry.access.redhat.com/openshift3/ose-${component}:${version}' --
mount-host = /images
Step 8 − Create a default routing.
By default, OpenShift uses OpenVswitch as software network. Use the following command to create a default routing. This is used for load balancing and proxy routing. The router is similar to the Docker registry and also runs in a registry.
# echo '{"kind":"ServiceAccount","apiVersion":"v1","metadata":{"name":"router"}}' | oc create -f -
Next, edit the privileges of the user.
#oc edit scc privileged
users:
   - system:serviceaccount:openshift-infra:build-controller
   - system:serviceaccount:default:registry
   - system:serviceaccount:default:router

#oadm router router-1 --replicas = 1 --
credentials = '/etc/openshift/master/openshift-router.kubeconfig' --
images = 'registry.access.redhat.com/openshift3/ose-${component}:${version}'
Step 9 − Configure the DNS.
In order to handle URL request, OpenShift needs a working DNS environment. This DNS configuration is required to create a wild card, which is required to create DNS wild card that points to a router.
# yum install bind-utils bind
# systemctl start named
# systemctl enable named
vi /etc/named.conf
options {listen-on port 53 { 10.123.55.111; };
forwarders {
   10.38.55.13;
   ;
};

zone "lab.com" IN {
   type master;
   file "/var/named/dynamic/test.com.zone";
   allow-update { none; };
};
Step 10 − The final step would be to set up github server on OpenShift V3 master machine, which is optional. This can be done easily using the following sequence of commands.
#yum install curl openssh-server
#systemctl enable sshd
# systemctl start sshd
# firewall-cmd --permanent --add-service = http
# systemctl reload firewalld
#curl https://packages.gitlab.com/install/repositories/gitlab/gitlab-
#yum install gitlab-ce
# gitlab-ctl reconfigure
Once the above setup is complete, you can verify by test and deploy applications, which we will know more about in the subsequent chapters.
OpenShift - Basic Concept
Before beginning with the actual setup and deployment of applications, we need to understand some basic terms and concepts used in OpenShift V3.
Containers and Images
Images
These are the basic building blocks of OpenShift, which are formed out of Docker images. In each pod on OpenShift, the cluster has its own images running inside it. When we configure a pod, we have a field which will get pooled from the registry. This configuration file will pull the image and deploy it on the cluster node.
apiVersion: v1
kind: pod
metadata:
   name: Tesing_for_Image_pull -----------> Name of Pod
      spec:
containers:
- name: neo4j-server ------------------------> Name of the image
image: <Name of the Docker image>----------> Image to be pulled
imagePullPolicy: Always ------------->Image pull policy
command: [echo, SUCCESS] -------------------> Massage after image pull
In order to pull and create an image out of it, run the following command. OC is the client to communicate with OpenShift environment after login.
$ oc create f Tesing_for_Image_pull
Container
This gets created when the Docker image gets deployed on the OpenShift cluster. While defining any configuration, we define the container section in the configuration file. One container can have multiple images running inside and all the containers running on cluster node are managed by OpenShift Kubernetes.
spec:
   containers:
   - name: py ------------------------> Name of the container
   image: python----------> Image going to get deployed on container
   command: [python, SUCCESS]
   restartPocliy: Never --------> Restart policy of container
Following are the specifications for defining a container having multiple images running inside it.
apiVersion: v1
kind: Pod
metadata:
   name: Tomcat
spec:
   containers:
   - name: Tomcat
   image: tomcat: 8.0
   ports:
   - containerPort: 7500
      imagePullPolicy: Always
      -name: Database
      Image: mongoDB
      Ports:
      - containerPort: 7501
imagePullPolicy: Always
In the above configuration, we have defined a multi-container pod with two images of Tomcat and MongoDB inside it.
Pods and Services
Pods
Pod can be defined as a collection of container and its storage inside a node of OpenShift (Kubernetes) cluster. In general, we have two types of pod starting from a single container pod to multi-container pod.
Single Container Pod − These can be easily created with OC command or by a basic configuration yml file.
$ oc run <name of pod> --image = <name of the image from registry>
Create it with a simple yaml file as follows.
apiVersion: v1
kind: Pod
metadata:
   name: apache
spec:
   containers:
   - name: apache
   image: apache: 8.0
   ports:
      - containerPort: 7500
imagePullPolicy: Always
Once the above file is created, it will generate a pod with the following command.
$ oc create f apache.yml
Multi-Container Pod − Multi-container pods are those in which we have more than one container running inside it. They are created using yaml files as follows.
apiVersion: v1
kind: Pod
metadata:
   name: Tomcat
spec:
   containers:
   - name: Tomcat
   image: tomcat: 8.0
   ports:
      - containerPort: 7500
imagePullPolicy: Always
   -name: Database
   Image: mongoDB
   Ports:
      - containerPort: 7501
imagePullPolicy: Always
After creating these files, we can simply use the same method as above to create a container.
Service − As we have a set of containers running inside a pod, in the same way we have a service that can be defined as a logical set of pods. Its an abstracted layer on top of the pod, which provides a single IP and DNS name through which pods can be accessed. Service helps in managing the load balancing configuration and to scale the pod very easily. In OpenShift, a service is a REST object whose deification can be posted to apiService on OpenShift master to create a new instance.
apiVersion: v1
kind: Service
metadata:
   name: Tutorial_point_service
spec:
   ports:
      - port: 8080
         targetPort: 31999
Builds and Streams
Builds
In OpenShift, build is a process of transforming images into containers. It is the processing which converts the source code to an image. This build process works on pre-defined strategy of building source code to image.
The build processes multiple strategies and sources.
Build Strategies
Source to Image − This is basically a tool, which helps in building reproducible images. These images are always in a ready stage to run using the Docker run command.
Docker Build − This is the process in which the images are built using Docker file by running simple Docker build command.
Custom Build − These are the builds which are used for creating base Docker images.
Build Sources
Git − This source is used when the git repository is used for building images. The Dockerfile is optional. The configurations from the source code looks like the following.
source:
type: "Git"
git:
   uri: "https://github.com/vipin/testing.git"
   ref: "master"
contextDir: "app/dir"
dockerfile: "FROM openshift/ruby-22-centos7\nUSER example"
Dockerfile − The Dockerfile is used as an input in the configuration file.
source:
   type: "Dockerfile"
   dockerfile: "FROM ubuntu: latest
   RUN yum install -y httpd"
Image Streams − Image streams are created after pulling the images. The advantage of an image stream is that it looks for updates on the new version of an image. This is used to compare any number of Docker formatted container images identified by tags.
Image streams can automatically perform an action when a new image is created. All the builds and deployments can watch for image action and perform an action accordingly. Following is how we define a build a stream.
apiVersion: v1
kind: ImageStream
metadata:
   annotations:
      openshift.io/generated-by: OpenShiftNewApp
   generation: 1
   labels:
      app: ruby-sample-build
   selflink: /oapi/v1/namespaces/test/imagestreams/origin-ruby-sample
   uid: ee2b9405-c68c-11e5-8a99-525400f25e34
spec: {}
status:
   dockerImageRepository: 172.30.56.218:5000/test/origin-ruby-sample
   tags:
   - items:
      - created: 2016-01-29T13:40:11Z
      dockerImageReference: 172.30.56.218:5000/test/origin-apache-sample
      generation: 1
      image: vklnld908.int.clsa.com/vipin/test
   tag: latest
Routes and Templates
Routes
In OpenShift, routing is a method of exposing the service to the external world by creating and configuring externally reachable hostname. Routes and endpoints are used to expose the service to the external world, from where the user can use the name connectivity (DNS) to access defined application.
In OpenShift, routes are created by using routers which are deployed by OpenShift admin on the cluster. Routers are used to bind HTTP (80) and https (443) ports to external applications.
Following are the different kinds of protocol supported by routes −
- HTTP
- HTTPS
- TSL and web socket
When configuring the service, selectors are used to configure the service and find the endpoint using that service. Following is an example of how we create a service and the routing for that service by using an appropriate protocol.
{
   "kind": "Service",
   "apiVersion": "v1",
   "metadata": {"name": "Openshift-Rservice"},
   "spec": {
      "selector": {"name":"RService-openshift"},
      "ports": [
         {
            "protocol": "TCP",
            "port": 8888,
            "targetPort": 8080
         }
      ]
   }
}
Next, run the following command and the service is created.
$ oc create -f ~/training/content/Openshift-Rservice.json
This is how the service looks like after creation.
$ oc describe service Openshift-Rservice

Name:              Openshift-Rservice
Labels:            <none>
Selector:          name = RService-openshift
Type:              ClusterIP
IP:                172.30.42.80
Port:              <unnamed> 8080/TCP
Endpoints:         <none>
Session Affinity:  None
No events.
Create a routing for service using the following code.
{
   "kind": "Route",
   "apiVersion": "v1",
   "metadata": {"name": "Openshift-service-route"},
   "spec": {
      "host": "hello-openshift.cloudapps.example.com",
      "to": {
         "kind": "Service",
         "name": "OpenShift-route-service"
      },
      "tls": {"termination": "edge"}
   }
}
When OC command is used to create a route, a new instance of route resource is created.
Templates
Templates are defined as a standard object in OpenShift which can be used multiple times. It is parameterized with a list of placeholders which are used to create multiple objects. This can be used to create anything, starting from a pod to networking, for which users have authorization to create. A list of objects can be created, if the template from CLI or GUI interface in the image is uploaded to the project directory.
apiVersion: v1
kind: Template
metadata:
   name: <Name of template>
   annotations:
      description: <Description of Tag>
      iconClass: "icon-redis"
      tags: <Tages of image>
objects:
   - apiVersion: v1
   kind: Pod
   metadata:
      name: <Object Specification>
spec:
   containers:
      image: <Image Name>
      name: master
      ports:
      - containerPort: <Container port number>
         protocol: <Protocol>
labels:
   redis: <Communication Type>
Authentication and Authorization
Authentication
In OpenShift, while configuring master and client structure, master comes up with an inbuilt feature of OAuth server. OAuth server is used for generating tokens, which is used for authentication to the API. Since, OAuth comes as a default setup for master, we have the Allow All identity provider used by default. Different identity providers are present which can be configured at /etc/openshift/master/master-config.yaml.
There are different types of identity providers present in OAuth.
- Allow All
- Deny All
- HTPasswd
- LDAP
- Basic Authentication
Allow All
apiVersion: v1
   kind: Pod
   metadata:
      name: redis-master
   spec:
      containers:
         image: dockerfile/redis
         name: master
      ports:
      - containerPort: 6379
         protocol: TCP
      oauthConfig:
      identityProviders:
      - name: my_allow_provider
         challenge: true
         login: true
      provider:
         apiVersion: v1
         kind: AllowAllPasswordIdentityProvider
Deny All
apiVersion: v1
kind: Pod
metadata:
   name: redis-master
spec:
   containers:
      image: dockerfile/redis
   name: master
   ports:
   - containerPort: 6379
      protocol: TCP
   oauthConfig:
   identityProviders:
   - name: my_allow_provider
      challenge: true
      login: true
   provider:
      apiVersion: v1
      kind: DenyAllPasswordIdentityProvider
HTPasswd
In order to use HTPasswd, we need to first set up Httpd-tools on the master machine and then configure it in the same way as we did for others.
identityProviders:
   - name: my_htpasswd_provider
      challenge: true
      login: true
      provider:
         apiVersion: v1
         kind: HTPasswdPasswordIdentityProvider
Authorization
Authorization is a feature of OpenShift master, which is used to validate for validating a user. This means that it checks the user who is trying to perform an action to see if the user is authorized to perform that action on a given project. This helps the administrator to control access on the projects.
Authorization policies are controlled using −
- Rules
- Roles
- Bindings
Evaluation of authorization is done using −
- Identity
- Action
- Bindings
Using Policies −
- Cluster policy
- Local policy
OpenShift - Getting Started
OpenShift consists of two types of medians to create and deploy applications, either by GUI or by CLI. In this chapter, we would be using CLI to create a new application. We would be using OC client to communicate with the OpenShift environment.
Creating a New Application
In OpenShift, there are three methods of creating a new application.
- From a source code
- From an image
- From a template
From a Source Code
When we try to create an application from the source code, OpenShift looks for a Docker file that should be present inside the repo, which defines the application build flow. We will use oc new-app to create an application.
First thing to keep in mind while using a repo is that , it should point to a origin in the repo from where OpenShift will pull the code and build it.
If the repo is cloned on the Docker machine where OC client is installed and the user is inside the same directory, then it can be created using the following command.
$ oc new-app . <Hear. Denotes current working directory>
Following is an example of trying to build from remote repo for a specific branch.
$ oc new-app https://github.com/openshift/Testing-deployment.git#test1
Here, test1 is the branch from where we are trying to create a new application in OpenShift.
When specifying a Docker file in the repository, we need to define the build strategy as shown below.
$ oc new-app OpenShift/OpenShift-test~https://github.com/openshift/Testingdeployment.git
From an Image
While building an application using images, the images are present in the local Docker server, in the in-house hosted Docker repository, or on the Docker hub. The only thing that a user needs to make sure is, he has the access to pull images from the hub without any issue.
OpenShift has the capability to determine the source used, whether it is a Docker image or a source stream. However, if the user wishes he can explicitly define whether it is an image stream or a Docker image.
$ oc new-app - - docker-image tomcat
Using an image stream −
$ oc new-app tomcat:v1
From a Template
Templates can be used for the creation of a new application. It can be an already existing template or creating a new template.
Following yaml file is basically a template that can be used for deployment.
apiVersion: v1
kind: Template
metadata:
   name: <Name of template>
   annotations:
      description: <Description of Tag>
      iconClass: "icon-redis"
      tags: <Tages of image>
objects:
   - apiVersion: v1
   kind: Pod
   metadata:
      name: <Object Specification>
spec:
   containers:
      image: <Image Name>
      name: master
      ports:
      - containerPort: <Container port number>
         protocol: <Protocol>
labels:
   redis: <Communication Type>
Develop and Deploy a Web Application
Developing a New Application in OpenShift
In order to create a new application in OpenShift, we have to write a new application code and build it using OpenShift OC build commands. As discussed, we have multiple ways of creating a new image. Here, we will be using a template to build the application. This template will build a new application when run with oc new-app command.
The following template will create − Two front-end applications and one database. Along with that, it will create two new services and those applications will get deployed to OpenShift cluster. While building and deploying an application, initially we need to create a namespace in OpenShift and deploy the application under that namespace.
Create a new namespace
$ oc new-project openshift-test --display-name = "OpenShift 3 Sample" --
description = "This is an example project to demonstrate OpenShift v3"
Template
{
   "kind": "Template",
   "apiVersion": "v1",
   "metadata": {
      "name": "openshift-helloworld-sample",
      "creationTimestamp": null,
         "annotations": {
         "description": "This example shows how to create a simple openshift
         application in openshift origin v3",
         "iconClass": "icon-openshift",
         "tags": "instant-app,openshift,mysql"
      }
   }
},
Object Definitions
Secret definition in a template
"objects": [
{
   "kind": "Secret",
   "apiVersion": "v1",
   "metadata": {"name": "dbsecret"},
   "stringData" : {
      "mysql-user" : "${MYSQL_USER}",
      "mysql-password" : "${MYSQL_PASSWORD}"
   }
},
Service definition in a template
{
   "kind": "Service",
   "apiVersion": "v1",
   "metadata": {
      "name": "frontend",
      "creationTimestamp": null
   },
   "spec": {
      "ports": [
         {
            "name": "web",
            "protocol": "TCP",
            "port": 5432,
            "targetPort": 8080,
            "nodePort": 0
         }
      ],
      "selector": {"name": "frontend"},
      "type": "ClusterIP",
      "sessionAffinity": "None"
   },
   "status": {
      "loadBalancer": {}
   }
},
Route definition in a template
{
   "kind": "Route",
   "apiVersion": "v1",
   "metadata": {
      "name": "route-edge",
      "creationTimestamp": null,
      "annotations": {
         "template.openshift.io/expose-uri": "http://{.spec.host}{.spec.path}"
      }
   },
   "spec": {
      "host": "www.example.com",
      "to": {
         "kind": "Service",
         "name": "frontend"
      },
      "tls": {
         "termination": "edge"
      }
   },
   "status": {}
},
{
   "kind": "ImageStream",
   "apiVersion": "v1",
   "metadata": {
      "name": "origin-openshift-sample",
      "creationTimestamp": null
   },
   "spec": {},
   "status": {
      "dockerImageRepository": ""
   }
},
{
   "kind": "ImageStream",
   "apiVersion": "v1",
   "metadata": {
      "name": "openshift-22-ubuntu7",
      "creationTimestamp": null
   },
   "spec": {
      "dockerImageRepository": "ubuntu/openshift-22-ubuntu7"
   },
   "status": {
      "dockerImageRepository": ""
   }
},
Build config definition in a template
{
   "kind": "BuildConfig",
   "apiVersion": "v1",
   "metadata": {
      "name": "openshift-sample-build",
      "creationTimestamp": null,
      "labels": {name": "openshift-sample-build"}
   },
   "spec": {
      "triggers": [
         { "type": "GitHub",
            "github": {
            "secret": "secret101" }
         },
         {
            "type": "Generic",
            "generic": {
               "secret": "secret101",
               "allowEnv": true }
         },
         {
            "type": "ImageChange",
            "imageChange": {}
         },
         { "type": "ConfigChange}
      ],
      "source": {
         "type": "Git",
         "git": {
            "uri": https://github.com/openshift/openshift-hello-world.git }
      },
      "strategy": {
         "type": "Docker",
         "dockerStrategy": {
            "from": {
               "kind": "ImageStreamTag",
               "name": "openshift-22-ubuntu7:latest
            },
            "env": [
               {
                  "name": "EXAMPLE",
                  "value": "sample-app"
               }
            ]
         }
      },
      "output": {
         "to": {
            "kind": "ImageStreamTag",
            "name": "origin-openshift-sample:latest"
         }
      },
      "postCommit": {
         "args": ["bundle", "exec", "rake", "test"]
      },
      "status": {
         "lastVersion": 0
      }
   }
},
Deployment config in a template
"status": {
   "lastVersion": 0
}
{
   "kind": "DeploymentConfig",
   "apiVersion": "v1",
   "metadata": {
      "name": "frontend",
      "creationTimestamp": null
   }
},
"spec": {
   "strategy": {
      "type": "Rolling",
      "rollingParams": {
         "updatePeriodSeconds": 1,
         "intervalSeconds": 1,
         "timeoutSeconds": 120,
         "pre": {
            "failurePolicy": "Abort",
            "execNewPod": {
               "command": [
                  "/bin/true"
               ],
               "env": [
                  {
                     "name": "CUSTOM_VAR1",
                     "value": "custom_value1"
                  }
               ]
            }
         }
      }
   }
}
"triggers": [
   {
      "type": "ImageChange",
      "imageChangeParams": {
         "automatic": true,
         "containerNames": [
            "openshift-helloworld"
         ],
         "from": {
            "kind": "ImageStreamTag",
            "name": "origin-openshift-sample:latest"
         }
      }
   },
   {
      "type": "ConfigChange"
   }
],
"replicas": 2,
"selector": {
   "name": "frontend"
},
"template": {
   "metadata": {
      "creationTimestamp": null,
      "labels": {
         "name": "frontend"
      }
   },
   "spec": {
      "containers": [
         {
            "name": "openshift-helloworld",
            "image": "origin-openshift-sample",
            "ports": [
               {
                  "containerPort": 8080,
                  "protocol": "TCP
               }
            ],
            "env": [
               {
                  "name": "MYSQL_USER",
                  "valueFrom": {
                     "secretKeyRef" : {
                        "name" : "dbsecret",
                        "key" : "mysql-user"
                     }
                  }
               },
               {
                  "name": "MYSQL_PASSWORD",
                  "valueFrom": {
                     "secretKeyRef" : {
                        "name" : "dbsecret",
                        "key" : "mysql-password"
                     }
                  }
               },
               {
                  "name": "MYSQL_DATABASE",
                  "value": "${MYSQL_DATABASE}"
               }
            ],
            "resources": {},
            "terminationMessagePath": "/dev/termination-log",
            "imagePullPolicy": "IfNotPresent",
            "securityContext": {
               "capabilities": {},
               "privileged": false
            }
         }
      ],
      "restartPolicy": "Always",
      "dnsPolicy": "ClusterFirst"
   },
   "status": {}
},
Service definition in a template
{
   "kind": "Service",
   "apiVersion": "v1",
   "metadata": {
      "name": "database",
      "creationTimestamp": null
   },
   "spec": {
   "ports": [
      {
         "name": "db",
         "protocol": "TCP",
         "port": 5434,
         "targetPort": 3306,
         "nodePort": 0
      }
   ],
   "selector": {
      "name": "database
   },
   "type": "ClusterIP",
   "sessionAffinity": "None" },
   "status": {
      "loadBalancer": {}
   }
},
Deployment config definition in a template
{
   "kind": "DeploymentConfig",
   "apiVersion": "v1",
   "metadata": {
      "name": "database",
      "creationTimestamp": null
   },
   "spec": {
      "strategy": {
         "type": "Recreate",
         "resources": {}
      },
      "triggers": [
         {
            "type": "ConfigChange"
         }
      ],
      "replicas": 1,
      "selector": {"name": "database"},
      "template": {
         "metadata": {
            "creationTimestamp": null,
            "labels": {"name": "database"}
         },
         "template": {
            "metadata": {
               "creationTimestamp": null,
               "labels": {
                  "name": "database"
               }
            },
            "spec": {
               "containers": [
                  {
                     "name": "openshift-helloworld-database",
                     "image": "ubuntu/mysql-57-ubuntu7:latest",
                     "ports": [
                        {
                           "containerPort": 3306,
                           "protocol": "TCP"
                        }
                     ],
                     "env": [
                        {
                           "name": "MYSQL_USER",
                           "valueFrom": {
                              "secretKeyRef" : {
                                 "name" : "dbsecret",
                                 "key" : "mysql-user"
                              }
                           }
                        },
                        {
                           "name": "MYSQL_PASSWORD",
                           "valueFrom": {
                              "secretKeyRef" : {
                                 "name" : "dbsecret",
                                 "key" : "mysql-password"
                              }
                           }
                        },
                        {
                           "name": "MYSQL_DATABASE",
                           "value": "${MYSQL_DATABASE}"
                        }
                     ],
                     "resources": {},
                     "volumeMounts": [
                        {
                           "name": "openshift-helloworld-data",
                           "mountPath": "/var/lib/mysql/data"
                        }
                     ],
                     "terminationMessagePath": "/dev/termination-log",
                     "imagePullPolicy": "Always",
                     "securityContext": {
                        "capabilities": {},
                        "privileged": false
                     }
                  }
               ],
               "volumes": [
                  {
                     "name": "openshift-helloworld-data",
                     "emptyDir": {"medium": ""}
                  }
               ],
               "restartPolicy": "Always",
               "dnsPolicy": "ClusterFirst
            }
         }
      },
      "status": {}
   },
   "parameters": [
      {
         "name": "MYSQL_USER",
         "description": "database username",
         "generate": "expression",
         "from": "user[A-Z0-9]{3}",
         "required": true
      },
      {
         "name": "MYSQL_PASSWORD",
         "description": "database password",
         "generate": "expression",
         "from": "[a-zA-Z0-9]{8}",
         "required": true
      },
      {
         "name": "MYSQL_DATABASE",
         "description": "database name",
         "value": "root",
         "required": true
      }
   ],
   "labels": {
      "template": "application-template-dockerbuild"
   }
}
The above template file needs to be compiled at once. We need to first copy all the content into a single file and name it as a yaml file once done.
We need to run the following command to create the application.
$ oc new-app application-template-stibuild.json
--> Deploying template openshift-helloworld-sample for "application-template-stibuild.json"

   openshift-helloworld-sample
   ---------
   This example shows how to create a simple ruby application in openshift origin v3
   * With parameters:
      * MYSQL_USER = userPJJ # generated
      * MYSQL_PASSWORD = cJHNK3se # generated
      * MYSQL_DATABASE = root

--> Creating resources with label app = ruby-helloworld-sample ...
   service "frontend" created
   route "route-edge" created
   imagestream "origin-ruby-sample" created
   imagestream "ruby-22-centos7" created
   buildconfig "ruby-sample-build" created
   deploymentconfig "frontend" created
   service "database" created
   deploymentconfig "database" created

--> Success
   Build scheduled, use 'oc logs -f bc/ruby-sample-build' to track its progress.
   Run 'oc status' to view your app.
If we wish to monitor the build, it can be done using −
$ oc get builds

NAME                        TYPE      FROM          STATUS     STARTED         DURATION
openshift-sample-build-1    Source   Git@bd94cbb    Running    7 seconds ago   7s
We can check the deployed applications on OpenShift using −
$ oc get pods
NAME                            READY   STATUS      RESTARTS   AGE
database-1-le4wx                1/1     Running     0          1m
frontend-1-e572n                1/1     Running     0          27s
frontend-1-votq4                1/1     Running     0          31s
opeshift-sample-build-1-build   0/1     Completed   0          1m
We can check if the application services are created as per the service definition using
$ oc get services
NAME        CLUSTER-IP      EXTERNAL-IP     PORT(S)      SELECTOR          AGE
database    172.30.80.39    <none>         5434/TCP     name=database      1m
frontend    172.30.17.4     <none>         5432/TCP     name=frontend      1m
OpenShift - Build Automation
In OpenShift, we have multiple methods of automating the build pipeline. In order to do that we need to create a BuildConfig resource to describe the build flow. The flow in BuildConfig can be compared with the job definition in Jenkins job definition. While creating the build flow, we have to choose the build strategy.
BuildConfig File
In OpenShift, BuildConfig is a rest object used to connect to API and then create a new instance.
kind: "BuildConfig"
apiVersion: "v1"
metadata:
   name: "<Name of build config file>"
spec:
   runPolicy: "Serial"
   triggers:
   -
      type: "GitHub"
      github:
         secret: "<Secrete file name>"
   - type: "Generic"
   generic:
      secret: "secret101"
   -
   type: "ImageChange"
   source:
      type: "<Source of code>"
      git:
   uri: "https://github.com/openshift/openshift-hello-world"
   dockerfile: "FROM openshift/openshift-22-centos7\nUSER example"
   strategy:
      type: "Source"

sourceStrategy:
   from:
      kind: "ImageStreamTag"
      name: "openshift-20-centos7:latest"
   output:
      to:
         kind: "ImageStreamTag"
         name: "origin-openshift-sample:latest"
   postCommit:
      script: "bundle exec rake test"
In OpenShift, there are four types of build strategies.
- Source-to-image strategy
- Docker strategy
- Custom strategy
- Pipeline strategy
Source-to-image Strategy
Allows creating container images starting from the source code. In this flow, the actual code gets downloaded first in the container and then gets compiled inside it. The compiled code gets deployed inside the same container and the image is built from that code.
strategy:
   type: "Source"
   sourceStrategy:
      from:
         kind: "ImageStreamTag"
         name: "builder-image:latest"
      forcePull: true
There are multiple strategy policies.
- Forcepull
- Incremental Builds
- External Builds
Docker Strategy
In this flow, OpenShift uses Dockerfile to build the image and then upload the created images to the Docker registry.
strategy:
   type: Docker
   dockerStrategy:
      from:
         kind: "ImageStreamTag"
         name: "ubuntu:latest"
Docker file option can be used in multiple locations starting from file path, no cache, and force pull.
- From Image
- Dockerfile path
- No cache
- Force pull
Custom Strategy
This is one of the different kinds of build strategy, wherein there is no such compulsion that the output of the build is going to be an image. It can be compared to a free style job of Jenkins. With this, we can create Jar, rpm, and other packages.
strategy:
   type: "Custom"
   customStrategy:
      from:
         kind: "DockerImage"
         name: "openshift/sti-image-builder"
It consists of multiple build strategies.
- Expose Docker socket
- Secrets
- Force pull
Pipeline Strategy
Pipeline strategy is used to create custom build pipelines. This is basically used to implement the workflow in the pipeline. This build flow uses custom build pipeline flow using Groovy DSL language. OpenShift will create a pipeline job in Jenkins and execute it. This pipeline flow can also be used in Jenkins. In this strategy, we use Jenkinsfile and append that in the buildconfig definition.
Strategy:
   type: "JenkinsPipeline"
   jenkinsPipelineStrategy:
   jenkinsfile: "node('agent') {\nstage 'build'\nopenshiftBuild(buildConfig: 'OpenShift-build', showBuildLogs: 'true')\nstage 'deploy'\nopenshiftDeploy(deploymentConfig: 'backend')\n}"
Using build pipeline
kind: "BuildConfig"
apiVersion: "v1"
metadata:
   name: "test-pipeline"
spec:
   source:
      type: "Git"
      git:
         uri: "https://github.com/openshift/openshift-hello-world"
   strategy:
      type: "JenkinsPipeline"
      jenkinsPipelineStrategy:
         jenkinsfilePath: <file path repository>
OpenShift - CLI
OpenShift CLI is used for managing OpenShift applications from the command line. OpenShift CLI has the capability to manage end-to-end application life cycle. In general, we would be using OC which is an OpenShift client to communicate with OpenShift.
OpenShift CLI Setup
In order to set up the OC client on a different operating system, we need to go through different sequence of steps.
OC Client for Windows
Step 1 − Download the oc cli from the following link https://github.com/openshift/origin/releases/tag/v3.6.0-alpha.2
Step 2 − Unzip the package on a target path on the machine.
Step 3 − Edit the path environment variable of the system.
C:\Users\xxxxxxxx\xxxxxxxx>echo %PATH%

C:\oraclexe\app\oracle\product\10.2.0\server\bin;C:\Program Files
(x86)\Intel\iCLS Client\;C:\Program Files\Intel\iCLS Client\;C:\Program Files
(x86)\AMD APP\bin\x86_64;C:\Program Files (x86)\AMD APP\bin\x86;

C:\Windows\system32;C:\Windows;C:\Windows\System32\Wbem;C:\Windows\System32\WindowsPowerShell\
v1.0\;C:\Program Files (x86)\Windows Live\Shared;C:\Program Files
(x86)\ATI Technologies\ATI.ACE\C

ore-Static;C:\Program Files\Intel\Intel(R) Management Engine
Components\DAL;C:\Program Files\Intel\Intel(R) Management Engine
Components\IPT;C:\Program Files (x86)\Intel\Intel(R) Management Engine Components\DAL;
Step 4 − Validate the OC setup on Windows.
C:\openshift-origin-client-tools-v3.6.0-alpha.2-3c221d5-windows>oc version
oc v3.6.0-alpha.2+3c221d5
kubernetes v1.6.1+5115d708d7
features: Basic-Auth
OC Client for Mac OS X
We can download the Mac OS setup binaries for the same location as for Windows and later unzip it at a location and set a path of executable under the environment PATH variable.
Alternatively
We can use Home brew and set it up using the following command.
$ brew install openshift-cli
OC Client for Linux
Under the same page, we have the tar file for Linux installation that can be used for installation. Later, a path variable can be set pointing to that particular executable location.
https://github.com/openshift/origin/releases/tag/v3.6.0-alpha.2
Unpack the tar file using the following command.
$ tar xf < path to the OC setup tar file >
Run the following command to check the authentication.
C:\openshift-origin-client-tools-v3.6.0-alpha.2-3c221d5-windows>oc login
Server [https://localhost:8443]:
CLI Configuration Files
OC CLI configuration file is used for managing multiple OpenShift server connection and authentication mechanism. This configuration file is also used for storing and managing multiple profiles and for switching between them. A normal configuration file looks like the following.
$ oc config view
apiVersion: v1
clusters:
   - cluster:
      server: https://vklnld908.int.example.com
   name: openshift

contexts:
- context:
   cluster: openshift
   namespace: testproject
   user: alice
   name: alice
current-context: alice
kind: Config
preferences: {}
users:
- name: vipin
   user:
      token: ZCJKML2365jhdfafsdj797GkjgjGKJKJGjkg232
Setting Up CLI Client
For setting user credential
$ oc config set-credentials <user_nickname>
[--client-certificate = <path/to/certfile>] [--client-key=<path/to/keyfile>]
[--token = <bearer_token>] [--username = <basic_user>] [--password = <basic_password>]
For setting cluster
$ oc config set-cluster <cluster_nickname> [--server = <master_ip_or_fqdn>]
[--certificate-authority = <path/to/certificate/authority>]
[--api-version = <apiversion>] [--insecure-skip-tls-verify = true]
Example
$ oc config set-credentials vipin --token = ZCJKML2365jhdfafsdj797GkjgjGKJKJGjkg232
For setting context
$ oc config set-context <context_nickname> [--cluster = <cluster_nickname>]
[--user = <user_nickname>] [--namespace = <namespace>]
CLI Profiles
In a single CLI configuration file, we can have multiple profiles wherein each profile has a different OpenShift server configuration, which later can be used for switching between different CLI profiles.
apiVersion: v1
clusters: --→ 1
- cluster:
   insecure-skip-tls-verify: true
   server: https://vklnld908.int.example.com:8443
   name: vklnld908.int.example.com:8443
- cluster:
   insecure-skip-tls-verify: true
   server: https://vklnld1446.int.example.com:8443
   name: vklnld1446.int.example.com:8443
contexts: ---→ 2
- context:
   cluster: vklnld908.int.example.com:8443
   namespace: openshift-project
   user: vipin/vklnld908.int.example.com:8443
   name: openshift-project/vklnld908.int.example.com:8443/vipin
- context:
   cluster: vklnld908.int.example.com:8443
   namespace: testing-project
   user: alim/vklnld908.int.example.com:8443
   name: testproject-project/openshift1/alim
current-context: testing-project/vklnld908.int.example.com:8443/vipin - 3
kind: Config
preferences: {}

users:
- name: vipin/vklnld908.int.example.com:8443
user: ---→ 4
   token: ZCJKML2365jhdfafsdj797GkjgjGKJKJGjkg232
In the above configuration, we can see it is divided into four main sections starting from cluster which defines two instances of OpenShift master machines. Second context section defines two contexts named vipin and alim. The current context defines which context is currently in use. It can be changed to other context or profile, if we change the definition here. Finally, the user definition and its authentication token is defined which in our case is vipin.
If we want to check the current profile in use, it can be done using −
$ oc status
oc status
In project testing Project (testing-project)
$ oc project
Using project "testing-project" from context named "testing-
project/vklnld908.int.example.com:8443/vipin" on server "https://vklnld908.int.example.com:8443".
If we want to switch to other CLI, it can be done from the command line using the following command.
$ oc project openshift-project
Now using project "Openshift-project" on server "
https://vklnld908.int.example.com:8443".
Using the above command, we can switch between profiles. At any point of time, if we wish to view the configuration, we can use $ oc config view command.
OpenShift - CLI Operations
OpenShift CLI is capable of performing all basic and advance configuration, management, addition, and deployment of applications.
We can perform different kinds of operations using OC commands. This client helps you develop, build, deploy, and run your applications on any OpenShift or Kubernetes compatible platform. It also includes the administrative commands for managing a cluster under the 'adm' subcommand.
Basic Commands
Following table lists the basic OC commands.
| Sr.No. | Commands & Description |
|---|---|
| 1 | Types An introduction to concepts and type |
| 2 | Login Log in to a server |
| 3 | new-project Request a new project |
| 4 | new-app Create a new application |
| 5 | Status Show an overview of the current project |
| 6 | Project Switch to another project |
| 7 | Projects Display existing projects |
| 8 | Explain Documentation of resources |
| 9 | Cluster Start and stop OpenShift cluster |
Login
Log in to your server and save the login for subsequent use. First-time users of the client should run this command to connect to a server, establish an authenticated session, and save a connection to the configuration file. The default configuration will be saved to your home directory under ".kube/config".
The information required to login -- like username and password, a session token, or the server details can be provided through flags. If not provided, the command will prompt for user input as needed.
Usage
oc login [URL] [options]
Example
# Log in interactively
oc login

# Log in to the given server with the given certificate authority file
oc login localhost:8443 --certificate-authority = /path/to/cert.crt

# Log in to the given server with the given credentials (will not prompt interactively)
oc login localhost:8443 --username = myuser --password=mypass
Options −
-p, --password = " − Password, will prompt if not provided
-u, --username = " − Username, will prompt if not provided
--certificate-authority = " − Path to a cert. file for the certificate authority
--insecure-skip-tls-verify = false − If true, the server's certificate will not be checked for validity. This will make your HTTPS connections insecure
--token = " − Bearer token for authentication to the API server
To get the complete details regarding any command, use the oc <Command Name> --help command.
Build and Deploy Commands
Following table lists the build and deploy commands.
| Sr.No. | Commands & Description |
|---|---|
| 1 | Rollout Manage a Kubernetes deployment or OpenShift deploy |
| 2 | Deploy View, start, cancel, or retry a deployment |
| 3 | Rollback Revert part of an application back to the previous state |
| 4 | new-build Create a new build configuration |
| 5 | start-build Start a new build |
| 6 | cancel-build Cancel running, pending, or new builds |
| 7 | import-image Imports images from a Docker registry |
| 8 | Tag Tag the existing images into image streams |
Application Management Commands
Following table lists the application management commands.
| Sr.No. | Commands & Description |
|---|---|
| 1 | Get Display one or many resources |
| 2 | Describe Show details of a specific resource or a group of resources |
| 3 | Edit Edit a resource on the server |
| 4 | Set Commands that help set specific features on objects |
| 5 | Label Update the labels on a resource |
| 6 | Annotate Update the annotations on a resource |
| 7 | Expose Expose a replicated application as a service or route |
| 8 | Delete Delete one or more resources |
| 9 | Scale Change the number of pods in a deployment |
| 10 | Autoscale Autoscale a deployment config, deployment, replication, Controller or replica set |
| 11 | Secrets Manage secrets |
| 12 | Serviceaccounts Manage service accounts in your project |
Troubleshooting and Debugging Commands
Following table lists the troubleshooting and debugging commands.
| Sr.No. | Commands & Description |
|---|---|
| 1 | logs Print the logs for a resource |
| 2 | Rsh Start a shell session in a pod |
| 3 | Rsync Copy files between the local filesystem and a pod |
| 4 | port-forward Forward one or more local ports to a pod |
| 5 | Debug Launch a new instance of a pod for debugging |
| 6 | Exec Execute a command in a container |
| 7 | Procy Run a proxy to the Kubernetes API server |
| 9 | Attach Attach to a running container |
| 10 | Run Run a particular image on the cluster |
| 11 | Cp Copy files and directories to and from containers |
Advanced Commands
Following table lists the advanced commands.
| Sr.No. | Commands & Description |
|---|---|
| 1 | adm Tools for managing a cluster |
| 2 | create Create a resource by filename or stdin |
| 3 | replace Replace a resource by filename or stdin |
| 4 | apply Apply a configuration to a resource by filename or stdin |
| 5 | patch Update field(s) of a resource using strategic merge patch |
| 6 | process Process a template into list of resources |
| 7 | export Export resources so they can be used elsewhere |
| 8 | extract Extract secrets or config maps to disk |
| 9 | idle Idle scalable resources |
| 10 | observe Observe changes to the resources and react to them (experimental) |
| 11 | policy Manage authorization policy |
| 12 | auth Inspect authorization |
| 13 | convert Convert config files between different API versions |
| 14 | import Commands that import applications |
Setting Commands
Following table lists the setting commands.
| Sr.No. | Commands & Description |
|---|---|
| 1 | Logout End the current server session |
| 2 | Config Change the configuration files for the client |
| 3 | Whoami Return information about the current session |
| 4 | Completion Output shell completion code for the specified shell (bash or zsh) |
OpenShift - Clusters
OpenShift uses two installation methods of setting up OpenShift cluster.
- Quick installation method
- Advanced configuration method
Setting Up Cluster
Quick Installation Method
This method is used for running a quick unattained cluster setup configuration. In order to use this method, we need to first install the installer. This can be done by running the following command.
Interactive method
$ atomic-openshift-installer install
This is useful when one wishes to run an interactive setup.
Unattended installation method
This method is used when one wishes to set up an unattended way of installation method, wherein the user can define a configuration yaml file and place it under ~/.config/openshift/ with the name of installer.cfg.yml. Then, the following command can be run to install the u tag.
$ atomic-openshift-installer u install
By default it uses the config file located under ~/.config/openshift/. Ansible on the other hand is used as a backup of installation.
version: v2
variant: openshift-enterprise
variant_version: 3.1
ansible_log_path: /tmp/ansible.log

deployment:
   ansible_ssh_user: root
   hosts:
   - ip: 172.10.10.1
   hostname: vklnld908.int.example.com
   public_ip: 24.222.0.1
   public_hostname: master.example.com
   roles:
      - master
      - node
   containerized: true
   connect_to: 24.222.0.1

   - ip: 172.10.10.2
   hostname: vklnld1446.int.example.com
   public_ip: 24.222.0.2
   public_hostname: node1.example.com
   roles:
      - node
   connect_to: 10.0.0.2

   - ip: 172.10.10.3
   hostname: vklnld1447.int.example.com
   public_ip: 10..22.2.3
   public_hostname: node2.example.com
   roles:
      - node
   connect_to: 10.0.0.3

roles:
   master:
      <variable_name1>: "<value1>"
      <variable_name2>: "<value2>"
   node:
      <variable_name1>: "<value1>"
Here, we have role-specific variable, which can be defined if one wishes to set up some specific variable.
Once done, we can verify the installation using the following command.
$ oc get nodes
NAME                    STATUS    AGE
master.example.com      Ready     10d
node1.example.com       Ready     10d
node2.example.com       Ready     10d
Advanced Installation
Advanced installation is completely based on Ansible configuration wherein the complete host configuration and variables definition regarding master and node configuration is present. This contains all the details regarding the configuration.
Once we have the setup and the playbook is ready, we can simply run the following command to setup the cluster.
$ ansible-playbook -i inventry/hosts ~/openshift-ansible/playbooks/byo/config.yml
Adding Hosts to a Cluster
We can add a host to the cluster using −
- Quick installer tool
- Advanced configuration method
Quick installation tool works in both interactive and non-interactive mode. Use the following command.
$ atomic-openshift-installer -u -c </path/to/file> scaleup
Format of scaling the application configuration file looks can be used for adding both master as well as node.
Advanced Configuration Method
In this method, we update the host file of Ansible and then add a new node or server details in this file. Configuration file looks like the following.
[OSEv3:children]
masters
nodes
new_nodes
new_master
In the same Ansible hosts file, add variable details regarding the new node as shown below.
[new_nodes]
vklnld1448.int.example.com openshift_node_labels = "{'region': 'primary', 'zone': 'east'}"
Finally, using the updated host file, run the new configuration and invoke the configuration file to get the setup done using the following command.
$ ansible-playbook -i /inventory/hosts /usr/share/ansible/openshift-ansible/playbooks/test/openshift-node/scaleup.yml
Managing Cluster Logs
OpenShift cluster log is nothing but the logs which are getting generated from the master and the node machines of cluster. These can manage any kind of log, starting from server log, master log, container log, pod log, etc. There are multiple technologies and applications present for container log management.
Few of the tools are as listed, which can be implemented for log management.
- Fluentd
- ELK
- Kabna
- Nagios
- Splunk
ELK stack − This stack is useful while trying to collect the logs from all the nodes and present them in a systematic format. ELK stack is mainly divided in three major categories.
ElasticSearch − Mainly resposible for collecting information from all the containers and putting it into a central location.
Fluentd − Used for feeding collected logs to elasticsearch container engine.
Kibana − A graphical interface used for presenting the collected data as a useful information in a graphical interface.
One key point to note is, when this system is deployed on the cluster it starts collecting logs from all the nodes.
Log Diagnostics
OpenShift has an inbuilt oc adm dignostics command with OC that can be used for analyzing multiple error situations. This tool can be used from the master as a cluster administrator. This utility is very helpful is troubleshooting and dignosing known problems. This runs on the master client and nodes.
If run without any agruments or flags, it will look for configuration files of the client, server, and node machnies, and use them for diagnostics. One can run the diagnostics individually by passing the following arguments −
- AggregatedLogging
- AnalyzeLogs
- ClusterRegistry
- ClusterRoleBindings
- ClusterRoles
- ClusterRouter
- ConfigContexts
- DiagnosticPod
- MasterConfigCheck
- MasterNode
- MetricsApiProxy
- NetworkCheck
- NodeConfigCheck
- NodeDefinitions
- ServiceExternalIPs
- UnitStatus
One can simply run them with the following command.
$ oc adm diagnostics <DiagnosticName>
Upgrading a Cluster
Upgradation of the cluster involves upgrading multiple things within the cluster and getiing the cluster updated with new components and upgrdes. This involves −
- Upgradation of master components
- Upgradation of node components
- Upgradation of policies
- Upgradation of routes
- Upgradation of image stream
In order to perform all these upgrades, we need to first get quick installers or utils in place. For that we need to update the following utilities −
- atomic-openshift-utils
- atomic-openshift-excluder
- atomic-openshift-docker-excluder
- etcd package
Before starting the upgrade, we need to backup etcd on the master machine, which can be done using the following commands.
$ ETCD_DATA_DIR = /var/lib/origin/openshift.local.etcd
$ etcdctl backup \
   --data-dir $ETCD_DATA_DIR \
   --backup-dir $ETCD_DATA_DIR.bak.<date>
Upgradation of Master Components
In OpenShift master, we start the upgrade by updating the etcd file and then moving on to Docker. Finally, we run the automated executer to get the cluster into the required position. However, before starting the upgrade we need to first activate the atomic openshift packages on each of the masters. This can be done using the following commands.
Step 1 − Remove atomic-openshift packages
$ atomic-openshift-excluder unexclude
Step 2 − Upgrade etcd on all the masters.
$ yum update etcd
Step 3 − Restart the service of etcd and check if it has started successfully.
$ systemctl restart etcd
$ journalctl -r -u etcd
Step 4 − Upgrade the Docker package.
$ yum update docker
Step 5 − Restart the Docker service and check if it is correctly up.
$ systemctl restart docker
$ journalctl -r -u docker
Step 6 − Once done, reboot the system with the following commands.
$ systemctl reboot
$ journalctl -r -u docker
Step 7 − Finally, run the atomic-executer to get the packages back to the list of yum excludes.
$ atomic-openshift-excluder exclude
There is no such compulsion for upgrading the policy, it only needs to be upgraded if recommended, which can be checked with the following command.
$ oadm policy reconcile-cluster-roles
In most of the cases, we dont need to update the policy definition.
Upgradation of Node Components
Once the master update is complete, we can start upgrading the nodes. One thing to keep in mind is, the period of upgrade should be short in order to avoid any kind of issue in the cluster.
Step 1 − Remove all atomic OpenShift packages from all the nodes where you wish to perform the upgrade.
$ atomic-openshift-excluder unexclude
Step 2 − Next, disable node scheduling before upgrade.
$ oadm manage-node <node name> --schedulable = false
Step 3 − Replicate all the node from the current host to the other host.
$ oadm drain <node name> --force --delete-local-data --ignore-daemonsets
Step 4 − Upgrade Docker setup on host.
$ yum update docker
Step 5 − Restart Docker service and then start the Docker service node.
$systemctl restart docker
$ systemctl restart atomic-openshift-node
Step 6 − Check if both of them started correctly.
$ journalctl -r -u atomic-openshift-node
Step 7 − After upgrade is complete, reboot the node machine.
$ systemctl reboot
$ journalctl -r -u docker
Step 8 − Re-enable scheduling on nodes.
$ oadm manage-node <node> --schedulable.
Step 9 − Run the atomic-openshift executer to get the OpenShift package back on node.
$ atomic-openshift-excluder exclude
Step 10 − Finally, check if all the nodes are available.
$ oc get nodes

NAME                 STATUS   AGE
master.example.com   Ready    12d
node1.example.com    Ready    12d
node2.example.com    Ready    12d
OpenShift - Application Scaling
Autoscaling is a feature in OpenShift where the applications deployned can scale and sink as and when requierd as per certain specifications. In OpenShift application, autoscaling is also known as pod autoscaling. There are two types of application scaling as follows.
Vertical Scaling
Vertical scaling is all about adding more and more power to a single machine which means adding more CPU and hard disk. The is an old method of OpenShift which is now not supported by OpenShift releases.
Horizontal Scaling
This type of scaling is useful when there is a need of handling more request by increasing the number of machines.
In OpenShift, there are two methods to enable the scaling feature.
- Using the deployment configuration file
- While running the image
Using Deployment Configuration File
In this method, the scaling feature is enabled via a deploymant configuration yaml file. For this, OC autoscale command is used with minimum and maximum number of replicas, which needs to run at any given point of time in the cluster. We need an object definition for the creation of autoscaler. Following is an example of pod autoscaler definition file.
apiVersion: extensions/v1beta1
kind: HorizontalPodAutoscaler
metadata:
   name: database
spec:
   scaleRef:
      kind: DeploymentConfig
      name: database
      apiVersion: v1
      subresource: scale
   minReplicas: 1
   maxReplicas: 10
   cpuUtilization:
      targetPercentage: 80
Once we have the file in place, we need to save it with yaml format and run the following command for deployment.
$ oc create f <file name>.yaml
While Running the Image
One can also autoscale without the yaml file, by using the following oc autoscale command in oc command line.
$ oc autoscale dc/database --min 1 --max 5 --cpu-percent = 75
deploymentconfig "database" autoscaled
This command will also generate a similar kind of file that can later be used for reference.
Deployment Strategies in OpenShift
Deployment strategy in OpenShift defines a flow of deployment with different available methods. In OpenShift, following are the important types of deployment strategies.
- Rolling strategy
- Recreate strategy
- Custom strategy
Following is an example of deployment configuration file, which is used mainly for deployment on OpenShift nodes.
kind: "DeploymentConfig"
apiVersion: "v1"
metadata:
   name: "database"
spec:
   template:
      metadata:
         labels:
            name: "Database1"
spec:
   containers:
      - name: "vipinopenshifttest"
         image: "openshift/mongoDB"
         ports:
            - containerPort: 8080
               protocol: "TCP"
replicas: 5
selector:
   name: "database"
triggers:
- type: "ConfigChange"
- type: "ImageChange"
   imageChangeParams:
      automatic: true
      containerNames:
         - "vipinopenshifttest"
      from:
         kind: "ImageStreamTag"
         name: "mongoDB:latest"
   strategy:
      type: "Rolling"
In the above Deploymentconfig file, we have the strategy as Rolling.
We can use the following OC command for deployment.
$ oc deploy <deployment_config> --latest
Rolling Strategy
Rolling strategy is used for rolling updates or deployment. This process also supports life-cycle hooks, which are used for injecting code into any deployment process.
strategy:
   type: Rolling
   rollingParams:
      timeoutSeconds: <time in seconds>
      maxSurge: "<definition in %>"
      maxUnavailable: "<Defintion in %>"
      pre: {}
      post: {}
Recreate Strategy
This deployment strategy has some of the basic features of rolling deployment strategy and it also supports life-cycle hook.
strategy:
   type: Recreate
   recreateParams:
      pre: {}
      mid: {}
      post: {}
Custom Strategy
This is very helpful when one wishes to provide his own deployment process or flow. All the customizations can be done as per the requirement.
strategy:
   type: Custom
   customParams:
      image: organization/mongoDB
      command: [ "ls -l", "$HOME" ]
      environment:
         - name: VipinOpenshiftteat
         value: Dev1
OpenShift - Administration
In this chapter, we will cover topics such as how to manage a node, configure a service account, etc.
Master and Node Configuration
In OpenShift, we need to use the start command along with OC to boot up a new server. While launching a new master, we need to use the master along with the start command, whereas while starting the new node we need to use the node along with the start command. In order to do this, we need to create configuration files for the master as well as for the nodes. We can create a basic configuration file for the master and the node using the following command.
For master configuration file
$ openshift start master --write-config = /openshift.local.config/master
For node configuration file
$ oadm create-node-config --node-dir = /openshift.local.config/node-<node_hostname> --node = <node_hostname> --hostnames = <hostname>,<ip_address>
Once we run the following commands, we will get the base configuration files that can be used as the starting point for configuration. Later, we can have the same file to boot the new servers.
apiLevels:
- v1beta3
- v1
apiVersion: v1
assetConfig:
   logoutURL: ""
   masterPublicURL: https://172.10.12.1:7449
   publicURL: https://172.10.2.2:7449/console/
      servingInfo:
         bindAddress: 0.0.0.0:7449
         certFile: master.server.crt
         clientCA: ""
keyFile: master.server.key
   maxRequestsInFlight: 0
   requestTimeoutSeconds: 0
controllers: '*'
corsAllowedOrigins:
- 172.10.2.2:7449
- 127.0.0.1
- localhost
dnsConfig:
   bindAddress: 0.0.0.0:53
etcdClientInfo:
   ca: ca.crt
   certFile: master.etcd-client.crt
   keyFile: master.etcd-client.key
   urls:
   - https://10.0.2.15:4001
etcdConfig:
   address: 10.0.2.15:4001
   peerAddress: 10.0.2.15:7001
   peerServingInfo:
      bindAddress: 0.0.0.0:7001
      certFile: etcd.server.crt
      clientCA: ca.crt
      keyFile: etcd.server.key
   servingInfo:
      bindAddress: 0.0.0.0:4001
      certFile: etcd.server.crt
      clientCA: ca.crt
      keyFile: etcd.server.key
   storageDirectory: /root/openshift.local.etcd
etcdStorageConfig:
   kubernetesStoragePrefix: kubernetes.io
   kubernetesStorageVersion: v1
   openShiftStoragePrefix: openshift.io
   openShiftStorageVersion: v1
imageConfig:
   format: openshift/origin-${component}:${version}
   latest: false
kind: MasterConfig
kubeletClientInfo:
   ca: ca.crt
   certFile: master.kubelet-client.crt
   keyFile: master.kubelet-client.key
   port: 10250
kubernetesMasterConfig:
   apiLevels:
   - v1beta3
   - v1
   apiServerArguments: null
   controllerArguments: null
   masterCount: 1
   masterIP: 10.0.2.15
   podEvictionTimeout: 5m
   schedulerConfigFile: ""
   servicesNodePortRange: 30000-32767
   servicesSubnet: 172.30.0.0/16
   staticNodeNames: []
masterClients:
   externalKubernetesKubeConfig: ""
   openshiftLoopbackKubeConfig: openshift-master.kubeconfig
masterPublicURL: https://172.10.2.2:7449
networkConfig:
   clusterNetworkCIDR: 10.1.0.0/16
   hostSubnetLength: 8
   networkPluginName: ""
   serviceNetworkCIDR: 172.30.0.0/16
oauthConfig:
   assetPublicURL: https://172.10.2.2:7449/console/
   grantConfig:
      method: auto
   identityProviders:
   - challenge: true
   login: true
   name: anypassword
   provider:
      apiVersion: v1
      kind: AllowAllPasswordIdentityProvider
   masterPublicURL: https://172.10.2.2:7449/
   masterURL: https://172.10.2.2:7449/
   sessionConfig:
      sessionMaxAgeSeconds: 300
      sessionName: ssn
      sessionSecretsFile: ""
   tokenConfig:
      accessTokenMaxAgeSeconds: 86400
      authorizeTokenMaxAgeSeconds: 300
policyConfig:
   bootstrapPolicyFile: policy.json
   openshiftInfrastructureNamespace: openshift-infra
   openshiftSharedResourcesNamespace: openshift
projectConfig:
   defaultNodeSelector: ""
   projectRequestMessage: ""
   projectRequestTemplate: ""
   securityAllocator:
      mcsAllocatorRange: s0:/2
      mcsLabelsPerProject: 5
      uidAllocatorRange: 1000000000-1999999999/10000
routingConfig:
   subdomain: router.default.svc.cluster.local
serviceAccountConfig:
   managedNames:
   - default
   - builder
   - deployer

masterCA: ca.crt
   privateKeyFile: serviceaccounts.private.key
   privateKeyFile: serviceaccounts.private.key
   publicKeyFiles:
   - serviceaccounts.public.key
servingInfo:
   bindAddress: 0.0.0.0:8443
   certFile: master.server.crt
   clientCA: ca.crt
   keyFile: master.server.key
   maxRequestsInFlight: 0
   requestTimeoutSeconds: 3600
Node configuration files
allowDisabledDocker: true
apiVersion: v1
dnsDomain: cluster.local
dnsIP: 172.10.2.2
dockerConfig:
   execHandlerName: native
imageConfig:
   format: openshift/origin-${component}:${version}
   latest: false
kind: NodeConfig
masterKubeConfig: node.kubeconfig
networkConfig:
   mtu: 1450
   networkPluginName: ""
nodeIP: ""
nodeName: node1.example.com

podManifestConfig:
   path: "/path/to/pod-manifest-file"
   fileCheckIntervalSeconds: 30
servingInfo:
   bindAddress: 0.0.0.0:10250
   certFile: server.crt
   clientCA: node-client-ca.crt
   keyFile: server.key
volumeDirectory: /root/openshift.local.volumes
This is how the node configuration files look like. Once we have these configuration files in place, we can run the following command to create master and node server.
$ openshift start --master-config = /openshift.local.config/master/master-
config.yaml --node-config = /openshift.local.config/node-<node_hostname>/node-
config.yaml
Managing Nodes
In OpenShift, we have OC command line utility which is mostly used for carrying out all the operations in OpenShift. We can use the following commands to manage the nodes.
For listing a node
$ oc get nodes
NAME                             LABELS
node1.example.com     kubernetes.io/hostname = vklnld1446.int.example.com
node2.example.com     kubernetes.io/hostname = vklnld1447.int.example.com
Describing details about a node
$ oc describe node <node name>
Deleting a node
$ oc delete node <node name>
Listing pods on a node
$ oadm manage-node <node1> <node2> --list-pods [--pod-selector=<pod_selector>] [-o json|yaml]
Evaluating pods on a node
$ oadm manage-node <node1> <node2> --evacuate --dry-run [--pod-selector=<pod_selector>]
Configuration Authentication
In OpenShift master, there is a built-in OAuth server, which can be used for managing authentication. All OpenShift users get the token from this server, which helps them communicate to OpenShift API.
There are different kinds of authentication level in OpenShift, which can be configured along with the main configuration file.
- Allow all
- Deny all
- HTPasswd
- LDAP
- Basic authentication
- Request header
While defining the master configuration, we can define the identification policy where we can define the type of policy that we wish to use.
Allow All
Allow All
oauthConfig:
   ...
   identityProviders:
   - name: Allow_Authontication
      challenge: true
      login: true
      provider:
         apiVersion: v1
         kind: AllowAllPasswordIdentityProvider
Deny All
This will deny access to all usernames and passwords.
oauthConfig:
   ...
   identityProviders:
   - name: deny_Authontication
      challenge: true
      login: true
      provider:
         apiVersion: v1
         kind: DenyAllPasswordIdentityProvider
HTPasswd
HTPasswd is used to validate the username and password against an encrypted file password.
For generating an encrypted file, following is the command.
$ htpasswd </path/to/users.htpasswd> <user_name>
Using the encrypted file.
oauthConfig:
   ...
   identityProviders:
   - name: htpasswd_authontication
      challenge: true
      login: true
      provider:
         apiVersion: v1
         kind: HTPasswdPasswordIdentityProvider
         file: /path/to/users.htpasswd
LDAP Identity Provider
This is used for LDAP authentication wherein LDAP server plays a key role in authentication.
oauthConfig:
   ...
   identityProviders:
   - name: "ldap_authontication"
      challenge: true
      login: true
      provider:
         apiVersion: v1
         kind: LDAPPasswordIdentityProvider
         attributes:
            id:
            - dn
            email:
            - mail
            name:
            - cn
            preferredUsername:
            - uid
         bindDN: ""
         bindPassword: ""
         ca: my-ldap-ca-bundle.crt
         insecure: false
         url: "ldap://ldap.example.com/ou=users,dc=acme,dc=com?uid"
Basic Authentication
This is used when the validation of username and password is done against a server-to-server authentication. The authentication is protected in the base URL and is presented in JSON format.
oauthConfig:
   ...
   identityProviders:
   - name: my_remote_basic_auth_provider
      challenge: true
      login: true
      provider:
         apiVersion: v1
         kind: BasicAuthPasswordIdentityProvider
         url: https://www.vklnld908.int.example.com/remote-idp
         ca: /path/to/ca.file
         certFile: /path/to/client.crt
         keyFile: /path/to/client.key
Configuring a Service Account
Service accounts provide a flexible way of accessing OpenShift API exposing the username and password for authentication.
Enabling a Service Account
Service account uses a key pair of public and private key for authentication. Authentication to API is done using a private key and validating it against a public key.
ServiceAccountConfig:
   ...
   masterCA: ca.crt
   privateKeyFile: serviceaccounts.private.key
   publicKeyFiles:
   - serviceaccounts.public.key
   - ...
Creating a Service Account
Use the following command to create a service account
$ Openshift cli create service account <name of server account>
Working with HTTP Proxy
In most of the production environment, direct access to Internet is restricted. They are either not exposed to Internet or they are exposed via a HTTP or HTTPS proxy. In an OpenShift environment, this proxy machine definition is set as an environment variable.
This can be done by adding a proxy definition on the master and node files located under /etc/sysconfig. This is similar as we do for any other application.
Master Machine
/etc/sysconfig/openshift-master
HTTP_PROXY=http://USERNAME:PASSWORD@172.10.10.1:8080/
HTTPS_PROXY=https://USERNAME:PASSWORD@172.10.10.1:8080/
NO_PROXY=master.vklnld908.int.example.com
Node Machine
/etc/sysconfig/openshift-node
HTTP_PROXY=http://USERNAME:PASSWORD@172.10.10.1:8080/
HTTPS_PROXY=https://USERNAME:PASSWORD@172.10.10.1:8080/
NO_PROXY=master.vklnld908.int.example.com
Once done, we need to restart the master and node machines.
For Docker Pull
/etc/sysconfig/docker
HTTP_PROXY = http://USERNAME:PASSWORD@172.10.10.1:8080/
HTTPS_PROXY = https://USERNAME:PASSWORD@172.10.10.1:8080/
NO_PROXY = master.vklnld1446.int.example.com
In order to make a pod run in a proxy environment, it can be done using −
containers:
- env:
   - name: "HTTP_PROXY"
      value: "http://USER:PASSWORD@:10.0.1.1:8080"
OC environment command can be used to update the existing env.
OpenShift Storage with NFS
In OpenShift, the concept of persistent volume and persistent volume claims forms persistent storage. This is one of the key concepts in which first persistent volume is created and later that same volume is claimed. For this, we need to have enough capacity and disk space on the underlying hardware.
apiVersion: v1
kind: PersistentVolume
metadata:
   name: storage-unit1
spec:
   capacity:
      storage: 10Gi
   accessModes:
   - ReadWriteOnce
   nfs:
      path: /opt
      server: 10.12.2.2
   persistentVolumeReclaimPolicy: Recycle
Next, using OC create command create Persistent Volume.
$ oc create -f storage-unit1.yaml

persistentvolume " storage-unit1 " created
Claiming the created volume.
apiVersion: v1
kind: PersistentVolumeClaim
metadata:
   name: Storage-clame1
spec:
   accessModes:
      - ReadWriteOnce
   resources:
      requests:
         storage: 5Gi
Create the claim.
$ oc create -f Storage-claim1.yaml
persistentvolume " Storage-clame1 " created
User and Role Management
User and role administration is used to manage users, their access and controls on different projects.
Creating a User
Predefined templates can be used to create new users in OpenShift.
kind: "Template"
apiVersion: "v1"
parameters:
   - name: vipin
   required: true
objects:
   - kind: "User"
   apiVersion: "v1"
   metadata:
   name: "${email}"

- kind: "Identity"
   apiVersion: "v1"
   metadata:
      name: "vipin:${email}"
   providerName: "SAML"
   providerUserName: "${email}"
- kind: "UserIdentityMapping"
apiVersion: "v1"
identity:
   name: "vipin:${email}"
user:
   name: "${email}"
Use oc create f <file name> to create users.
$ oc create f vipin.yaml
Use the following command to delete a user in OpenShift.
$ oc delete user <user name>
Limiting User Access
ResourceQuotas and LimitRanges are used for limiting user access levels. They are used for limiting the pods and containers on the cluster.
apiVersion: v1
kind: ResourceQuota
metadata:
   name: resources-utilization
spec:
   hard:
      pods: "10"
Creating the quote using the above configuration
$ oc create -f resource-quota.yaml n Openshift-sample
Describing the resource quote
$ oc describe quota resource-quota  -n  Openshift-sample
Name:              resource-quota
Namespace:                              Openshift-sample
Resource           Used                  Hard
--------           ----                  ----
pods                3                    10
Defining the container limits can be used for limiting the resources which are going to be used by deployed containers. They are used to define the maximum and minimum limitations of certain objects.
User project limitations
This is basically used for the number of projects a user can have at any point of time. They are basically done by defining the user levels in categories of bronze, silver, and gold.
We need to first define an object which holds the value of how many projects a bronze, silver, and gold category can have. These need to be done in the master-confif.yaml file.
admissionConfig:
   pluginConfig:
      ProjectRequestLimit:
         configuration:
            apiVersion: v1
            kind: ProjectRequestLimitConfig
            limits:
            - selector:
               level: platinum
            - selector:
               level: gold
            maxProjects: 15
            - selector:
               level: silver
            maxProjects: 10
            - selector:
               level: bronze
            maxProjects: 5
Restart the master server.
Assigning a user to a particular level.
$ oc label user vipin level = gold
Moving the user out of the label, if required.
$ oc label user <user_name> level-
Adding roles to a user.
$ oadm policy add-role-to-user<user_name>
Removing the role from a user.
$ oadm policy remove-role-from-user<user_name>
Adding a cluster role to a user.
$ oadm policy add-cluster-role-to-user<user_name>
Removing a cluster role from a user.
$ oadm policy remove-cluster-role-from-user<user_name>
Adding a role to a group.
$ oadm policy add-role-to-user<user_name>
Removing a role from a group.
$ oadm policy remove-cluster-role-from-user<user_name>
Adding a cluster role to a group.
$ oadm policy add-cluster-role-to-group<groupname>
Removing a cluster role from a group.
$ oadm policy remove-cluster-role-from-group <role> <groupname>
User for cluster administration
This is one of the most powerful roles where the user has the capability to manage a complete cluster starting from creation till deletion of a cluster.
$ oadm policy add-role-to-user admin <user_name> -n <project_name>
User with ultimate power
$ oadm policy add-cluster-role-to-user cluster-admin <user_name>
OpenShift - Docker and Kubernetes
OpenShift is built on top of Docker and Kubernetes. All the containers are built on top of Docker cluster, which is basically Kubernetes service on top of Linux machines, using Kubernetes orchestrations feature.
In this process, we build Kubernetes master which controls all the nodes and deploys the containers to all the nodes. The main function of Kubernetes is to control OpenShift cluster and deployment flow using a different kind of configuration file. As in Kubernetes, we use kubctl in the same way we use OC command line utility to build and deploy containers on cluster nodes.
Following are the different kinds of config files used for creation of different kind of objects in the cluster.
- Images
- POD
- Service
- Replication Controller
- Replica set
- Deployment
Images
Kubernetes (Docker) images are the key building blocks of Containerized Infrastructure. As of now, Kubernetes only support Docker images. Each container in a pod has its Docker image running inside it.
apiVersion: v1
kind: pod
metadata:
   name: Tesing_for_Image_pull -----------> 1
   spec:
   containers:
- name: neo4j-server ------------------------> 2
image: <Name of the Docker image>----------> 3
imagePullPolicy: Always ------------->4
command: [echo, SUCCESS] -------------------> 5
POD
A pod is collection of containers and its storage inside a node of a Kubernetes cluster. It is possible to create a pod with multiple containers inside it. Following is an example of keeping a database container and web interface container in the same pod.
apiVersion: v1
kind: Pod
metadata:
   name: Tomcat
spec:
   containers:
   - name: Tomcat
      image: tomcat: 8.0
      ports:
- containerPort: 7500
imagePullPolicy: Always
Service
A service can be defined as a logical set of pods. It can be defined as an abstraction on top of the pod that provides a single IP address and DNS name by which pods can be accessed. With Service, it is very easy to manage load balancing configuration. It helps PODs to scale very easily.
apiVersion: v1
kind: Service
metadata:
   name: Tutorial_point_service
spec:
   ports:
   - port: 8080
      targetPort: 31999
Replication Controller
Replication Controller is one of the key features of Kubernetes, which is responsible for managing the pod lifecycle. It is responsible for making sure that specified numbers of pod replicas are running at any point of time.
apiVersion: v1
kind: ReplicationController
metadata:
   name: Tomcat-ReplicationController
spec:
   replicas: 3
   template:
   metadata:
      name: Tomcat-ReplicationController
   labels:
      app: App
      component: neo4j
   spec:
      containers:
      - name: Tomcat
      image: tomcat: 8.0
      ports:
      - containerPort: 7474
Replica Set
The replica set ensures how many replica of pod should be running. It can be considered as a replacement of the replication controller.
apiVersion: extensions/v1beta1
kind: ReplicaSet
metadata:
   name: Tomcat-ReplicaSet
spec:
   replicas: 3
   selector:
      matchLables:
      tier: Backend
   matchExpression:
      - { key: tier, operation: In, values: [Backend]}

   app: App
   component: neo4j
spec:
   containers:
   - name: Tomcat-
image: tomcat: 8.0
   ports:
containerPort: 7474
Deployment
Deployments are upgraded and higher versions of the replication controller. They manage the deployment of replica sets, which is also an upgraded version of the replication controller. They have the capability to update the replica set and they are also capable of rolling back to the previous version.
apiVersion: extensions/v1beta1 --------------------->1
kind: Deployment --------------------------> 2
metadata:
   name: Tomcat-ReplicaSet
spec:
   replicas: 3
   template:
      metadata:
lables:
   app: Tomcat-ReplicaSet
   tier: Backend
spec:
   containers:
name: Tomcat-
   image: tomcat: 8.0
   ports:
   - containerPort: 7474
All config files can be used to create their respective Kubernetes objects.
$ Kubectl create f <file name>.yaml
Following commands can be used to know the details and description of the Kubernetes objects.
For POD
$ Kubectl get pod <pod name>
$ kubectl delete pod <pod name>
$ kubectl describe pod <pod name>
For Replication Controller
$ Kubectl get rc <rc name>
$ kubectl delete rc <rc name>
$ kubectl describe rc <rc name>
For Service
$ Kubectl get svc <svc name>
$ kubectl delete svc <svc name>
$ kubectl describe svc <svc name>
For more details on how to work with Docker and Kubernetes, please visit our Kubernetes tutorial using the following link kubernetes.
OpenShift - Security
OpenShift security is mainly a combination of two components that mainly handles security constraints.
- Security Context Constraints (SCC)
- Service Account
Security Context Constraints (SCC)
It is basically used for pod restriction, which means it defines the limitations for a pod, as in what actions it can perform and what all things it can access in the cluster.
OpenShift provides a set of predefined SCC that can be used, modified, and extended by the administrator.
$ oc get scc
NAME              PRIV   CAPS  HOSTDIR  SELINUX    RUNASUSER         FSGROUP   SUPGROUP  PRIORITY
anyuid            false   []   false    MustRunAs  RunAsAny          RunAsAny  RunAsAny  10
hostaccess        false   []   true     MustRunAs  MustRunAsRange    RunAsAny  RunAsAny  <none>
hostmount-anyuid  false   []   true     MustRunAs  RunAsAny          RunAsAny  RunAsAny  <none>
nonroot           false   []   false    MustRunAs  MustRunAsNonRoot  RunAsAny  RunAsAny  <none>
privileged        true    []   true     RunAsAny   RunAsAny          RunAsAny  RunAsAny  <none>
restricted        false   []   false    MustRunAs  MustRunAsRange    RunAsAny  RunAsAny  <none>
If one wishes to use any pre-defined scc, that can be done by simply adding the user or the group to the scc group.
$ oadm policy add-user-to-scc <scc_name> <user_name>
$ oadm policy add-group-to-scc <scc_name> <group_name>
Service Account
Service accounts are basically used to control access to OpenShift master API, which gets called when a command or a request is fired from any of the master or node machine.
Any time an application or a process requires a capability that is not granted by the restricted SCC, you will have to create a specific service account and add the account to the respective SCC. However, if a SCC does not suit your requirement, then it is better to create a new SCC specific to your requirement rather than using the one that is a best fit. In the end, set it for the deployment configuration.
$ oc create serviceaccount Cadmin
$ oc adm policy add-scc-to-user vipin -z Cadmin
Container Security
In OpenShift, security of containers is based on the concept of how secure the container platform is and where are the containers running. There are multiple things that come into picture when we talk about container security and what needs to be taken care of.
Image Provenance − A secure labeling system is in place that identifies exactly and incontrovertibly where the containers running in the production environment came from.
Security Scanning − An image scanner automatically checks all the images for known vulnerabilities.
Auditing − The production environment is regularly audited to ensure all containers are based on up-to-date containers, and both hosts and containers are securely configured.
Isolation and Least Privilege − Containers run with the minimum resources and privileges needed to function effectively. They are not able to unduly interfere with the host or other containers.
Runtime Threat Detection − A capability that detects active threats against containerized application in runtime and automatically responds to it.
Access Controls − Linux security modules, such as AppArmor or SELinux, are used to enforce access controls.
There are few key methods by which container security is archived.
- Controlling access via oAuth
- Via self-service web console
- By Certificates of platform
Controlling Access via OAuth
In this method, authentication to API control access is archived getting a secured token for authentication via OAuth servers, which comes inbuilt in OpenShift master machine. As an administrator, you have the capability to modify the configuration of OAuth server configuration.
For more details on OAuth server configuration, refer to Chapter 5 of this tutorial.
Via Self-Service Web Console
This web console security feature is inbuilt in OpenShift web console. This console ensures that all the teams working together do not have access to other environments without authentication. The multi-telnet master in OpenShift has the following security features −
- TCL layer is enabled
- Uses x.509 certificate for authentication
- Secures the etcd configuration on the master machine
By Certificates of Platform
In this method, certificates for each host is configured during installation via Ansible. As it uses HTTPS communication protocol via Rest API, we need TCL secured connection to different components and objects. These are pre-defined certificates, however, one can even have a custom certificate installed on the cluster of master for access. During the initial setup of the master, custom certificates can be configured by overriding the existing certificates using openshift_master_overwrite_named_certificates parameter.
Example
openshift_master_named_certificates = [{"certfile": "/path/on/host/to/master.crt",
"keyfile": "/path/on/host/to/master.key",
"cafile": "/path/on/host/to/mastercert.crt"}]
For more detail on how to generate custom certificates, visit the following link −
https://www.linux.com/training-tutorials/creating-self-signed-ssl-certificates-apache-linux/
Network Security
In OpenShift, Software Defined Networking (SDN) is used for communication. Network namespace is used for each pod in the cluster, wherein each pod gets its own IP and a range of ports to get network traffic on it. By this method, one can isolate pods because of which it cannot communicate with pods in the other project.
Isolating a Project
This can be done by the cluster admin using the following oadm command from CLI.
$ oadm pod-network isolate-projects <project name 1> <project name 2>
This means that the projects defined above cannot communicate with other projects in the cluster.
Volume Security
Volume security clearly means securing the PV and PVC of projects in OpenShift cluster. There are mainly four sections to control access to volumes in OpenShift.
- Supplemental Groups
- fsGroup
- runAsUser
- seLinuxOptions
Supplemental Groups − Supplemental groups are regular Linux groups. When a process runs in the system, it runs with a user ID and group ID. These groups are used for controlling access to shared storage.
Check the NFS mount using the following command.
# showmount -e <nfs-server-ip-or-hostname>
Export list for f21-nfs.vm:
/opt/nfs *
Check NFS details on the mount server using the following command.
# cat /etc/exports
/opt/nfs *(rw,sync,no_root_squash)
...
# ls -lZ /opt/nfs -d
drwxrws---. nfsnobody 2325 unconfined_u:object_r:usr_t:s0 /opt/nfs
# id nfsnobody
uid = 65534(nfsnobody) gid = 454265(nfsnobody) groups = 454265(nfsnobody)
The /opt/nfs/ export is accessible by UID 454265 and the group 2325.
apiVersion: v1
kind: Pod
...
spec:
   containers:
   - name: ...
      volumeMounts:
      - name: nfs
         mountPath: /usr/share/...
   securityContext:
      supplementalGroups: [2325]
   volumes:
   - name: nfs
      nfs:
      server: <nfs_server_ip_or_host>
      path: /opt/nfs
fsGroup
fsGroup stands for the file system group which is used for adding container supplemental groups. Supplement group ID is used for shared storage and fsGroup is used for block storage.
kind: Pod
spec:
   containers:
   - name: ...
   securityContext:
      fsGroup: 2325
runAsUser
runAsUser uses the user ID for communication. This is used in defining the container image in pod definition. A single ID user can be used in all containers, if required.
While running the container, the defined ID is matched with the owner ID on the export. If the specified ID is defined outside, then it becomes global to all the containers in the pod. If it is defined with a specific pod, then it becomes specific to a single container.
spec:
   containers:
   - name: ...
      securityContext:
         runAsUser: 454265