- Mantis - Home
- Mantis - Introduction
- Mantis - Features
- Mantis - Installation
- Mantis - Trial Setup
- Mantis - Login
- Mantis - My View
- Mantis - Project Management
- Mantis - Manage Categories
- Mantis - Versions
- Mantis - Issue Lifecycle
- Mantis - Report an Issue
- Mantis - Import Issues
- Mantis - View Issues
- Mantis - Edit Issues
- Mantis - Clone an Issue
- Mantis - Advanced Features
- Mantis - Change Status
- Mantis - Issues Relationships
- Mantis - Move an Issue
- Mantis - Issue History
- Miscellaneous Functionalities
- Mantis - Search Issues
- Mantis - Change Log
- Mantis - Roadmap
- Mantis - Summary
- Mantis - Add Custom Fields
Mantis - Import Issues
The user can create multiple issues at a time using CSV files. CSV files are comma separated file.
Rules for CSV File
While creating a CSV file, following points must be considered −
CSV file should be separate for each project.
CSV file should be saved as CSV (Comma Delimited).
The user should switch to the project before starting the CSV import steps.
All entries should be made in a Notebook application. Each entry should be separated by a comma ,.
Files should be saved as filename.csv and the file type as All files.
Dont map ID field with any field in CSV. The system will automatically generate an Issue ID.
For multiple lines \n can be used.
For timestamp fields such as issue submission and last update timestamps, it is recommended using ISO 8601. However, PHP accepts any method strtotime (). If an integer is provided as the value, then it will be treated as the number of seconds, since Unix Epoch (January 1 1970 00:00:00 GMT).
Sample file will look like the following −
| login | wires | General | login functionality should be available | Assigned to | administrator | 1.0 |
| error | wires | General | error message on wrong credential | new | 1.0 | |
| on successful | wires | General | welcome page on successful login | Assigned to | administrator | 1.0 |
Import CSV
To import a CSV file, the user should perform the following steps −
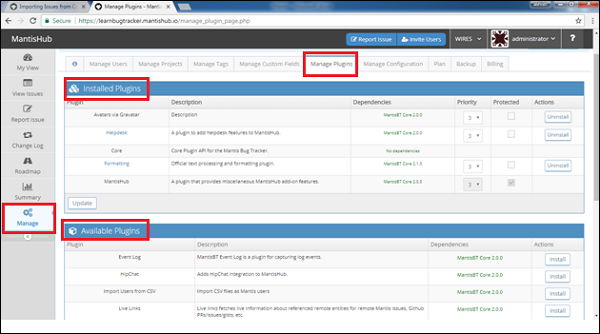
Step 1 − Go to Manage → Manage Plug-in.
Step 2 − Check whether the CSV Importer plug-in is installed or not.
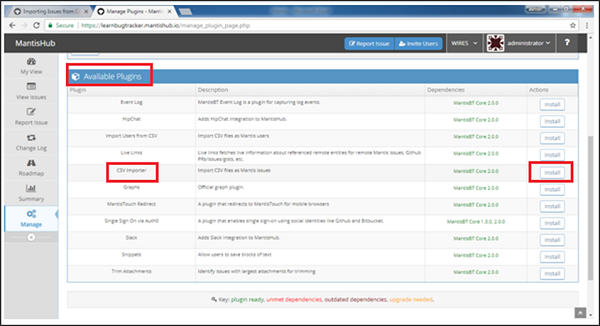
Step 3 − If it is not installed, click Install as shown in the following screenshot.
Step 4 − Since CSV Importer is not present in the Installed Plugins, go to Available Plugins section and find CSV Importer. Click Install as shown in the following screenshot.
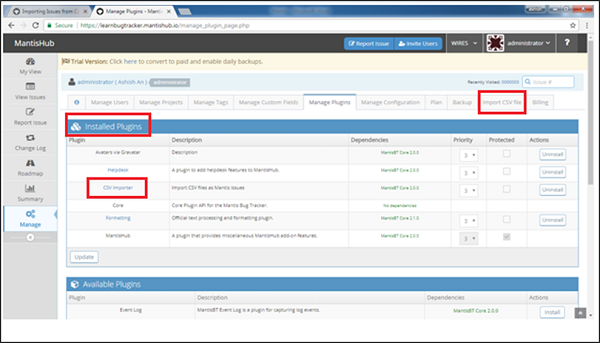
Step 5 − After installation, the user can see CSV Importer in the Installed Plug-in section. The Import CSV File section is also present. Click Import CSV File as shown in the following screenshot.
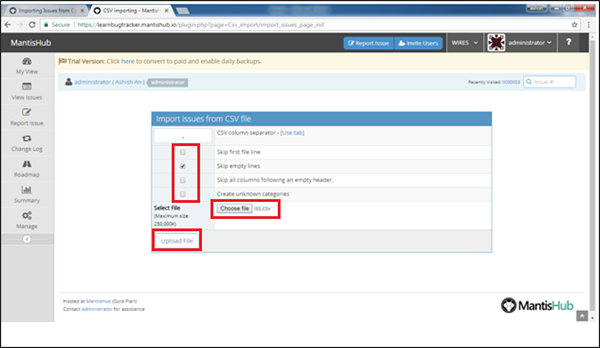
Step 6 − After clicking Import CSV file, import issues from the CSV file opens. Select various options based on the file and requirements as shown in the following screenshot. Later, click Choose File to browse the file and then click Upload file.
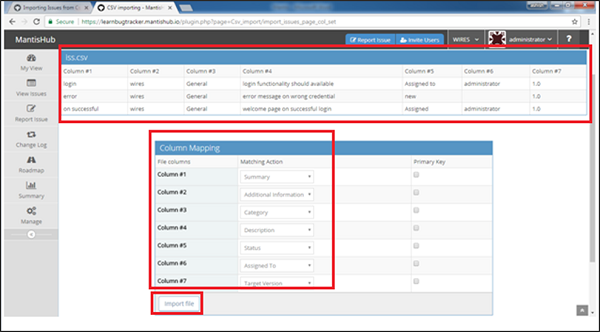
Step 7 − After successful upload, the user can see the data column wise. Below that, the user needs to map those columns with different fields of Issue form as shown in the following screenshot.
Step 8 − After mapping, click the Import File button.
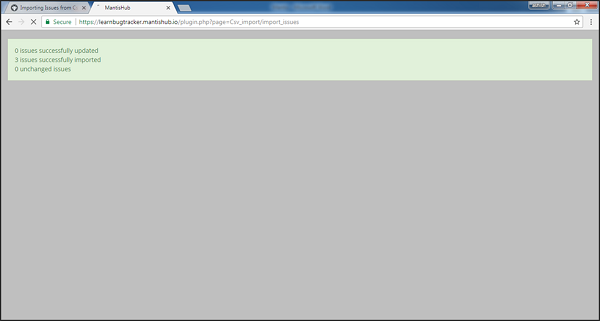
After completion of import, the user can see counts of successful and unsuccessful entries.
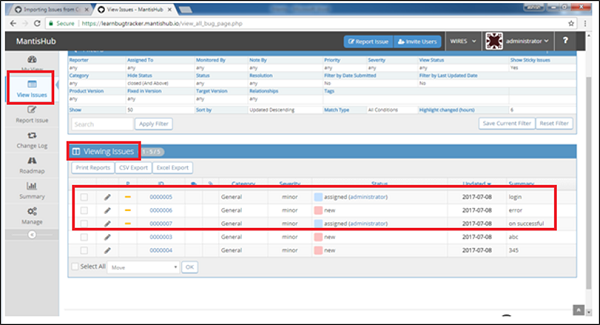
Automatically, the user navigates to View Issues tab at Viewing Issues section as shown in the following screenshot.