- Dart Programming - Home
- Dart Programming - Overview
- Dart Programming - Environment
- Dart Programming - Syntax
- Dart Programming - Data Types
- Dart Programming - Variables
- Dart Programming - Operators
- Dart Programming - Loops
- Dart Programming - Decision Making
- Dart Programming - Numbers
- Dart Programming - String
- Dart Programming - Boolean
- Dart Programming - Lists
- Dart Programming - Lists
- Dart Programming - Map
- Dart Programming - Symbol
- Dart Programming - Runes
- Dart Programming - Enumeration
- Dart Programming - Functions
- Dart Programming - Interfaces
- Dart Programming - Classes
- Dart Programming - Object
- Dart Programming - Collection
- Dart Programming - Generics
- Dart Programming - Packages
- Dart Programming - Exceptions
- Dart Programming - Debugging
- Dart Programming - Typedef
- Dart Programming - Libraries
- Dart Programming - Async
- Dart Programming - Concurrency
- Dart Programming - Unit Testing
- Dart Programming - HTML DOM
Dart Programming - Quick Guide
Dart Programming - Overview
Dart is an object-oriented language with C-style syntax which can optionally trans compile into JavaScript. It supports a varied range of programming aids like interfaces, classes, collections, generics, and optional typing.
Dart can be extensively used to create single-page applications. Single-page applications apply only to websites and web applications. Single-page applications enable navigation between different screens of the website without loading a different webpage in the browser. A classic example is GMail when you click on a message in your inbox, browser stays on the same webpage, but JavaScript code hides the inbox and brings the message body on screen.
Google has released a special build of Chromium the Dart VM. Using Dartium means you dont have to compile your code to JavaScript until youre ready to test on other browsers.
The following table compares the features of Dart and JavaScript.
| Feature | Dart | JavaScript |
|---|---|---|
| Type system | Optional, dynamic | Weak, dynamic |
| Classes | Yes, single inheritance | Prototypical |
| Interfaces | Yes, multiple interfaces | No |
| Concurrency | Yes, with isolates | Yes, with HTML5 web workers |
This tutorial provides a basic level understanding of the Dart programming language.
Dart Programming - Environment
This chapter discusses setting up the execution environment for Dart on the Windows platform.
Executing Script Online with DartPad
You may test your scripts online by using the online editor at https://dartpad.dev/. The Dart Editor executes the script and displays both HTML as well as console output. The online editor is shipped with a set of preset code samples.
A screenshot of the Dartpad editor is given below −
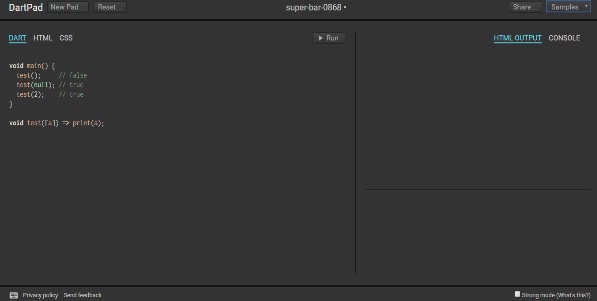
Dartpad also enables to code in a more restrictive fashion. This can be achieved by checking the Strong mode option on the bottom right of the editor. Strong mode helps with −
- Stronger static and dynamic checking
- Idiomatic JavaScript code generation for better interoperability.
You may try the following example using Dartpad
void main() {
   print('hello world');
}
The code will display the following output
hello world
Setting Up the Local Environment
In this section, let us see how to set up the local environment.
Using the Text Editor
Examples of a few editors include Windows Notepad, Notepad++, Emacs, vim or vi, etc. Editors may vary from one Operating System to another. The source files are typically named with the extension ".dart".
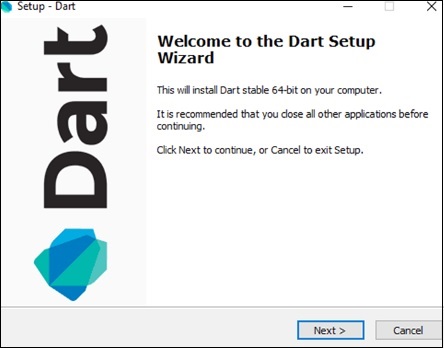
Installing the Dart SDK
The current stable version of Dart is 1.21.0. The dart sdk can be downloaded from −
A screenshot of the Dart SDK installation is given below −
On completion of the SDK installation, set the PATH environment variable to −
<dart-sdk-path>\bin
Verifying the Installation
To verify if Dart has been successfully installed, open the command prompt and enter the following command −
Dart
If installation is successful, it will show the dart runtime.
IDE Support
A plethora of IDEs support scripting in Dart. Examples include Eclipse, IntelliJ, and WebStorm from Jet brains.
Given below are the steps for configuring the Dart environment using WebStrom IDE.
Installing WebStorm
The installation file for WebStorm can be downloaded from https://www.jetbrains.com/webstorm/download/#section=windows-version.
The WebStorm installation file is available for Mac OS, Windows and Linux.
After downloading the installation files, follow the steps given below −
Install the Dart SDK: Refer to the steps listed above
Create a new Dart project and configure Dart support
To create a new Dart project,
Click Create New Project from the Welcome Screen
In the next dialog box, click Dart
If there is no value specified for the Dart SDK path, then provide the SDK path. For example, the SDK path may be <dart installation directory>/dart/dartsdk.
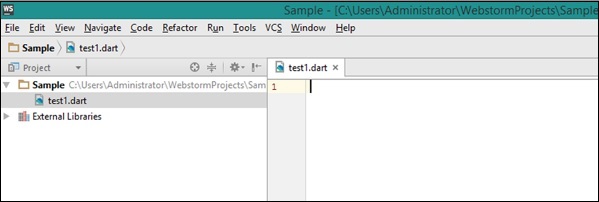
Add a Dart File to the Project
To add a Dart file to the Project −
- Right-click on the Project
- New → Dart File
- Enter the name of the Dart Script
A screenshot of the WebStorm Editor is given below −
The dart2js Tool
The dart2js tool compiles Dart code to JavaScript. Compiling Dart code to JS enables running the Dart script on browsers that do not support the Dart VM.
The dart2js tool is shipped as a part of the Dart SDK and can be found in the /dartsdk/bin folder.
To compile Dart to JavaScript, type the following command in the terminal
dart2js - - out = <output_file>.js <dart_script>.dart
This command produces a file that contains the JavaScript equivalent of your Dart code. A complete tutorial on using this utility can be found on the official Dart website.
Dart Programming - Syntax
Syntax defines a set of rules for writing programs. Every language specification defines its own syntax. A Dart program is composed of −
- Variables and Operators
- Classes
- Functions
- Expressions and Programming Constructs
- Decision Making and Looping Constructs
- Comments
- Libraries and Packages
- Typedefs
- Data structures represented as Collections / Generics
Your First Dart Code
Let us start with the traditional Hello World example −
main() {
   print("Hello World!");
}
The main() function is a predefined method in Dart. This method acts as the entry point to the application. A Dart script needs the main() method for execution. print() is a predefined function that prints the specified string or value to the standard output i.e. the terminal.
The output of the above code will be −
Hello World!
Execute a Dart Program
You can execute a Dart program in two ways −
- Via the terminal
- Via the WebStorm IDE
Via the Terminal
To execute a Dart program via the terminal −
- Navigate to the path of the current project
- Type the following command in the Terminal window
dart file_name.dart
Via the WebStorm IDE
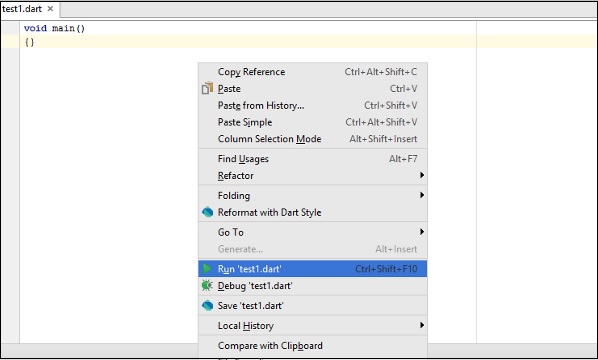
To execute a Dart program via the WebStorm IDE −
Right-click the Dart script file on the IDE. (The file should contain the main() function to enable execution)
Click on the Run <file_name> option. A screenshot of the same is given below −
One can alternatively click the  button or use the shortcut Ctrl+Shift+F10 to execute the Dart Script.
Dart Command-Line Options
Dart command-line options are used to modify Dart Script execution. Common commandline options for Dart include the following −
| Sr.No | Command-Line Option & Description |
|---|---|
| 1 | -c or --c
Enables both assertions and type checks (checked mode). |
| 2 | --version
Displays VM version information. |
| 3 | --packages <path>
Specifies the path to the package resolution configuration file. |
| 4 | -p <path>
Specifies where to find imported libraries. This option cannot be used with --packages. |
| 5 | -h or --help
Displays help. |
Enabling Checked Mode
Dart programs run in two modes namely −
- Checked Mode
- Production Mode (Default)
It is recommended to run the Dart VM in checked mode during development and testing, since it adds warnings and errors to aid development and debugging process. The checked mode enforces various checks like type-checking etc. To turn on the checked mode, add the -c or -checked option before the script-file name while running the script.
However, to ensure performance benefit while running the script, it is recommended to run the script in the production mode.
Consider the following Test.dart script file −
void main() {
   int n = "hello";
   print(n);
}
Run the script by entering −
dart Test.dart
Though there is a type-mismatch the script executes successfully as the checked mode is turned off. The script will result in the following output −
hello
Now try executing the script with the "- - checked" or the "-c" option −
dart -c Test.dart
Or,
dart - - checked Test.dart
The Dart VM will throw an error stating that there is a type mismatch.
Unhandled exception:
type 'String' is not a subtype of type 'int' of 'n' where
   String is from dart:core
   int is from dart:core
#0  main (file:///C:/Users/Administrator/Desktop/test.dart:3:9)
#1  _startIsolate.<anonymous closure> (dart:isolate-patch/isolate_patch.dart :261)
#2  _RawReceivePortImpl._handleMessage (dart:isolate-patch/isolate_patch.dart:148)
Identifiers in Dart
Identifiers are names given to elements in a program like variables, functions etc. The rules for identifiers are −
Identifiers can include both, characters and digits. However, the identifier cannot begin with a digit.
Identifiers cannot include special symbols except for underscore (_) or a dollar sign ($).
Identifiers cannot be keywords.
They must be unique.
Identifiers are case-sensitive.
Identifiers cannot contain spaces.
The following tables lists a few examples of valid and invalid identifiers −
| Valid identifiers | Invalid identifiers |
|---|---|
| firstName | Var |
| first_name | first name |
| num1 | first-name |
| $result | 1number |
Keywords in Dart
Keywords have a special meaning in the context of a language. The following table lists some keywords in Dart.
| abstract 1 | continue | false | new | this |
| as 1 | default | final | null | throw |
| assert | deferred 1 | finally | operator 1 | true |
| async 2 | do | for | part 1 | try |
| async* 2 | dynamic 1 | get 1 | rethrow | typedef 1 |
| await 2 | else | if | return | var |
| break | enum | implements 1 | set 1 | void |
| case | export 1 | import 1 | static 1 | while |
| catch | external 1 | in | super | with |
| class | extends | is | switch | yield 2 |
| const | factory 1 | library 1 | sync* 2 | yield* 2 |
Whitespace and Line Breaks
Dart ignores spaces, tabs, and newlines that appear in programs. You can use spaces, tabs, and newlines freely in your program and you are free to format and indent your programs in a neat and consistent way that makes the code easy to read and understand.
Dart is Case-sensitive
Dart is case-sensitive. This means that Dart differentiates between uppercase and lowercase characters.
Statements end with a Semicolon
Each line of instruction is called a statement. Each dart statement must end with a semicolon (;). A single line can contain multiple statements. However, these statements must be separated by a semicolon.
Comments in Dart
Comments are a way to improve the readability of a program. Comments can be used to include additional information about a program like author of the code, hints about a function/ construct etc. Comments are ignored by the compiler.
Dart supports the following types of comments −
Single-line comments ( // ) − Any text between a "//" and the end of a line is treated as a comment
Multi-line comments (/* */) − These comments may span multiple lines.
Example
// this is single line comment

/* This is a
   Multi-line comment
*/
Object-Oriented Programming in Dart
Dart is an Object-Oriented language. Object Orientation is a software development paradigm that follows real-world modelling. Object Orientation considers a program as a collection of objects that communicate with each other via mechanism called methods.
Object − An object is a real-time representation of any entity. As per Grady Brooch, every object must have three features −
State − described by the attributes of an object.
Behavior − describes how the object will act.
Identity − a unique value that distinguishes an object from a set of similar such objects.
Class − A class in terms of OOP is a blueprint for creating objects. A class encapsulates data for the object.
Method − Methods facilitate communication between objects.
Example: Dart and Object Orientation
class TestClass {
   void disp() {
      print("Hello World");
   }
}
void main() {
   TestClass c = new TestClass();
   c.disp();
}
The above example defines a class TestClass. The class has a method disp(). The method prints the string Hello World on the terminal. The new keyword creates an object of the class. The object invokes the method disp().
The code should produce the following output −
Hello World
Dart Programming - Data Types
One of the most fundamental characteristics of a programming language is the set of data types it supports. These are the type of values that can be represented and manipulated in a programming language.
The Dart language supports the following types−
- Numbers
- Strings
- Booleans
- Lists
- Maps
Numbers
Numbers in Dart are used to represent numeric literals. The Number Dart come in two flavours −
Integer − Integer values represent non-fractional values, i.e., numeric values without a decimal point. For example, the value "10" is an integer. Integer literals are represented using the int keyword.
Double − Dart also supports fractional numeric values i.e. values with decimal points. The Double data type in Dart represents a 64-bit (double-precision) floating-point number. For example, the value "10.10". The keyword double is used to represent floating point literals.
Strings
Strings represent a sequence of characters. For instance, if you were to store some data like name, address etc. the string data type should be used. A Dart string is a sequence of UTF-16 code units. Runes are used to represent a sequence of UTF-32 code units.
The keyword String is used to represent string literals. String values are embedded in either single or double quotes.
Boolean
The Boolean data type represents Boolean values true and false. Dart uses the bool keyword to represent a Boolean value.
List and Map
The data types list and map are used to represent a collection of objects. A List is an ordered group of objects. The List data type in Dart is synonymous to the concept of an array in other programming languages. The Map data type represents a set of values as key-value pairs. The dart: core library enables creation and manipulation of these collections through the predefined List and Map classes respectively.
The Dynamic Type
Dart is an optionally typed language. If the type of a variable is not explicitly specified, the variables type is dynamic. The dynamic keyword can also be used as a type annotation explicitly.
Dart Programming - Variables
A variable is a named space in the memory that stores values. In other words, it acts a container for values in a program. Variable names are called identifiers. Following are the naming rules for an identifier −
Identifiers cannot be keywords.
Identifiers can contain alphabets and numbers.
Identifiers cannot contain spaces and special characters, except the underscore (_) and the dollar ($) sign.
Variable names cannot begin with a number.
Type Syntax
A variable must be declared before it is used. Dart uses the var keyword to achieve the same. The syntax for declaring a variable is as given below −
var name = 'Smith';
All variables in dart store a reference to the value rather than containing the value. The variable called name contains a reference to a String object with a value of Smith.

Dart supports type-checking by prefixing the variable name with the data type. Type-checking ensures that a variable holds only data specific to a data type. The syntax for the same is given below −
String name = 'Smith';
int num = 10;
Consider the following example −
void main() {
   String name = 1;
}
The above snippet will result in a warning since the value assigned to the variable doesnt match the variables data type.
Output
Warning: A value of type 'String' cannot be assigned to a variable of type 'int'
All uninitialized variables have an initial value of null. This is because Dart considers all values as objects. The following example illustrates the same −
void main() {
   int num;
   print(num);
}
Output
Null
The dynamic keyword
Variables declared without a static type are implicitly declared as dynamic. Variables can be also declared using the dynamic keyword in place of the var keyword.
The following example illustrates the same.
void main() {
   dynamic x = "tom";
   print(x);
}
Output
tom
Final and Const
The final and const keyword are used to declare constants. Dart prevents modifying the values of a variable declared using the final or const keyword. These keywords can be used in conjunction with the variables data type or instead of the var keyword.
The const keyword is used to represent a compile-time constant. Variables declared using the const keyword are implicitly final.
Syntax: final Keyword
final variable_name
OR
final data_type variable_name
Syntax: const Keyword
const variable_name
OR
const data_type variable_name
Example final Keyword
void main() {
   final val1 = 12;
   print(val1);
}
Output
12
Example const Keyword
void main() {
   const pi = 3.14;
   const area = pi*12*12;
   print("The output is ${area}");
}
The above example declares two constants, pi and area, using the const keyword. The area variables value is a compile-time constant.
Output
The output is 452.15999999999997
Note − Only const variables can be used to compute a compile time constant. Compile-time constants are constants whose values will be determined at compile time
Example
Dart throws an exception if an attempt is made to modify variables declared with the final or const keyword. The example given below illustrates the same −
void main() {
   final v1 = 12;
   const v2 = 13;
   v2 = 12;
}
The code given above will throw the following error as output −
Unhandled exception:
cannot assign to final variable 'v2='.
NoSuchMethodError: cannot assign to final variable 'v2='
#0  NoSuchMethodError._throwNew (dart:core-patch/errors_patch.dart:178)
#1      main (file: Test.dart:5:3)
#2    _startIsolate.<anonymous closure> (dart:isolate-patch/isolate_patch.dart:261)
#3    _RawReceivePortImpl._handleMessage (dart:isolate-patch/isolate_patch.dart:148)
Dart Programming - Operators
An expression is a special kind of statement that evaluates to a value. Every expression is composed of −
Operands − Represents the data
Operator − Defines how the operands will be processed to produce a value.
Consider the following expression "2 + 3". In this expression, 2 and 3 are operands and the symbol "+" (plus) is the operator.
In this chapter, we will discuss the operators that are available in Dart.
- Arithmetic Operators
- Equality and Relational Operators
- Type test Operators
- Bitwise Operators
- Assignment Operators
- Logical Operators
Arithmetic Operators
The following table shows the arithmetic operators supported by Dart.
| Sr.No | Operators & Meaning |
|---|---|
| 1 | +
Add |
| 2 | −
Subtract |
| 3 | -expr
Unary minus, also known as negation (reverse the sign of the expression) |
| 4 | *
Multiply |
| 5 | /
Divide |
| 6 | ~/
Divide, returning an integer result |
| 7 | %
Get the remainder of an integer division (modulo) |
| 8 | ++
Increment |
| 9 | --
Decrement |
Equality and Relational Operators
Relational Operators tests or defines the kind of relationship between two entities. Relational operators return a Boolean value i.e. true/ false.
Assume the value of A is 10 and B is 20.
| Operator | Description | Example |
|---|---|---|
| > | Greater than | (A > B) is False |
| < | Lesser than | (A < B) is True |
| >= | Greater than or equal to | (A >= B) is False |
| <= | Lesser than or equal to | (A <= B) is True |
| == | Equality | (A==B) is False |
| != | Not equal | (A!=B) is True |
Type test Operators
These operators are handy for checking types at runtime.
| Operator | Meaning |
|---|---|
| is | True if the object has the specified type |
| is! | False if the object has the specified type |
Bitwise Operators
The following table lists the bitwise operators available in Dart and their role −
| Operator | Description | Example |
|---|---|---|
| Bitwise AND | a & b | Returns a one in each bit position for which the corresponding bits of both operands are ones. |
| Bitwise OR | a | b | Returns a one in each bit position for which the corresponding bits of either or both operands are ones. |
| Bitwise XOR | a ^ b | Returns a one in each bit position for which the corresponding bits of either but not both operands are ones. |
| Bitwise NOT | ~ a | Inverts the bits of its operand. |
| Left shift | a ≪ b | Shifts a in binary representation b (< 32) bits to the left, shifting in zeroes from the right. |
| Signpropagating right shift | a ≫ b | Shifts a in binary representation b (< 32) bits to the right, discarding bits shifted off. |
Assignment Operators
The following table lists the assignment operators available in Dart.
| Sr.No | Operator & Description |
|---|---|
| 1 | =(Simple Assignment )
Assigns values from the right side operand to the left side operand Ex:C = A + B will assign the value of A + B into C |
| 2 | ??=
Assign the value only if the variable is null |
| 3 | +=(Add and Assignment)
It adds the right operand to the left operand and assigns the result to the left operand. Ex: C += A is equivalent to C = C + A |
| 4 | =(Subtract and Assignment)
It subtracts the right operand from the left operand and assigns the result to the left operand. Ex: C -= A is equivalent to C = C A |
| 5 | *=(Multiply and Assignment)
It multiplies the right operand with the left operand and assigns the result to the left operand. Ex: C *= A is equivalent to C = C * A |
| 6 | /=(Divide and Assignment)
It divides the left operand with the right operand and assigns the result to the left operand. |
Note − Same logic applies to Bitwise operators, so they will become ≪=, ≫=, ≫=, ≫=, |= and ^=.
Logical Operators
Logical operators are used to combine two or more conditions. Logical operators return a Boolean value. Assume the value of variable A is 10 and B is 20.
| Operator | Description | Example |
|---|---|---|
| && | And − The operator returns true only if all the expressions specified return true |
(A > 10 && B > 10) is False. |
| || | OR − The operator returns true if at least one of the expressions specified return true |
(A > 10 || B > 10) is True. |
| ! | NOT − The operator returns the inverse of the expressions result. For E.g.: !(7>5) returns false |
!(A > 10) is True. |
Conditional Expressions
Dart has two operators that let you evaluate expressions that might otherwise require ifelse statements −
condition ? expr1 : expr2
If condition is true, then the expression evaluates expr1 (and returns its value); otherwise, it evaluates and returns the value of expr2.
expr1 ?? expr2
If expr1 is non-null, returns its value; otherwise, evaluates and returns the value of expr2
Example
The following example shows how you can use conditional expression in Dart −
void main() {
   var a = 10;
   var res = a > 12 ? "value greater than 10":"value lesser than or equal to 10";
   print(res);
}
It will produce the following output −
value lesser than or equal to 10
Example
Lets take another example −
void main() {
   var a = null;
   var b = 12;
   var res = a ?? b;
   print(res);
}
It will produce the following output −
12
Dart Programming - Loops
At times, certain instructions require repeated execution. Loops are an ideal way to do the same. A loop represents a set of instructions that must be repeated. In a loops context, a repetition is termed as an iteration.
The following figure illustrates the classification of loops −
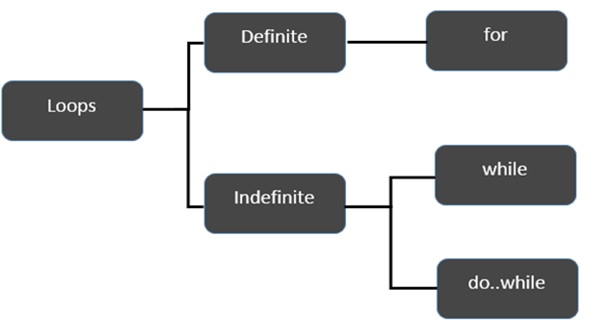
Lets start the discussion with Definite Loops. A loop whose number of iterations are definite/fixed is termed as a definite loop.
| Sr.No | Loop & Description |
|---|---|
| 1 | for loop
The for loop is an implementation of a definite loop. The for loop executes the code block for a specified number of times. It can be used to iterate over a fixed set of values, such as an array |
| 2 | forin Loop
The for...in loop is used to loop through an object's properties. |
Moving on, lets now discuss the indefinite loops. An indefinite loop is used when the number of iterations in a loop is indeterminate or unknown. Indefinite loops can be implemented using −
| Sr.No | Loop & Description |
|---|---|
| 1 | while Loop
The while loop executes the instructions each time the condition specified evaluates to true. In other words, the loop evaluates the condition before the block of code is executed. |
| 2 | dowhile Loop
The dowhile loop is similar to the while loop except that the do...while loop doesnt evaluate the condition for the first time the loop executes. |
Let us now move on and discuss the Loop Control Statements of Dart.
| Sr.No | Control Statement & Description |
|---|---|
| 1 | break Statement
The break statement is used to take the control out of a construct. Using break in a loop causes the program to exit the loop. Following is an example of the break statement. |
| 2 | continue Statement
The continue statement skips the subsequent statements in the current iteration and takes the control back to the beginning of the loop. |
Using Labels to Control the Flow
A label is simply an identifier followed by a colon (:) that is applied to a statement or a block of code. A label can be used with break and continue to control the flow more precisely.
Line breaks are not allowed between the continue or break statement and its label name. Also, there should not be any other statement in between a label name and an associated loop.
Example: Label with Break
void main() {
   outerloop: // This is the label name

   for (var i = 0; i < 5; i++) {
      print("Innerloop: ${i}");
      innerloop:

      for (var j = 0; j < 5; j++) {
         if (j > 3 ) break ;

         // Quit the innermost loop
         if (i == 2) break innerloop;

         // Do the same thing
         if (i == 4) break outerloop;

         // Quit the outer loop
         print("Innerloop: ${j}");
      }
   }
}
The following output is displayed on successful execution of the above code.
Innerloop: 0
Innerloop: 0
Innerloop: 1
Innerloop: 2
Innerloop: 3
Innerloop: 1
Innerloop: 0
Innerloop: 1
Innerloop: 2
Innerloop: 3
Innerloop: 2
Innerloop: 3
Innerloop: 0
Innerloop: 1
Innerloop: 2
Innerloop: 3
Innerloop: 4
Example: Label with continue
void main() {
   outerloop: // This is the label name

   for (var i = 0; i < 3; i++) {
      print("Outerloop:${i}");

      for (var j = 0; j < 5; j++) {
         if (j == 3){
            continue outerloop;
         }
         print("Innerloop:${j}");
      }
   }
}
The following output is displayed on successful execution of the above code.
Outerloop: 0
Innerloop: 0
Innerloop: 1
Innerloop: 2

Outerloop: 1
Innerloop: 0
Innerloop: 1
Innerloop: 2

Outerloop: 2
Innerloop: 0
Innerloop: 1
Innerloop: 2
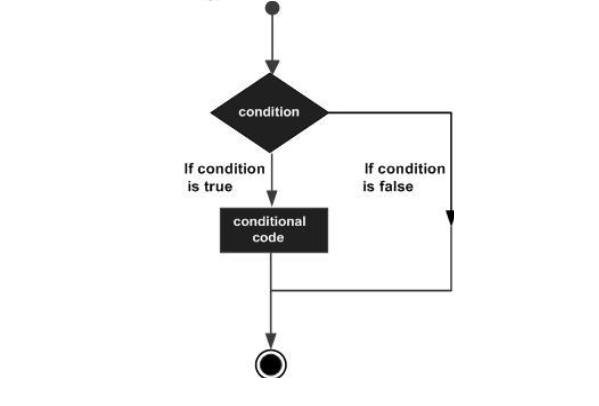
Dart Programming - Decision Making
A conditional/decision-making construct evaluates a condition before the instructions are executed.
Conditional constructs in Dart are classified in the following table.
| Sr.No | Statement & Description |
|---|---|
| 1 | if statement
An if statement consists of a Boolean expression followed by one or more statements. |
| 2 | If...Else Statement
An if can be followed by an optional else block. The else block will execute if the Boolean expression tested by the if block evaluates to false. |
| 3 | elseif Ladder
The elseif ladder is useful to test multiple conditions. Following is the syntax of the same. |
| 4 | switchcase Statement
The switch statement evaluates an expression, matches the expressions value to a case clause and executes the statements associated with that case. |
Dart Programming - Numbers
Dart numbers can be classified as −
int − Integer of arbitrary size. The int data type is used to represent whole numbers.
double − 64-bit (double-precision) floating-point numbers, as specified by the IEEE 754 standard. The double data type is used to represent fractional numbers
The num type is inherited by the int and double types. The dart core library allows numerous operations on numeric values.
The syntax for declaring a number is as given below −
int var_name;      // declares an integer variable
double var_name;   // declares a double variable
Example
void main() {
   // declare an integer
   int num1 = 10;

   // declare a double value
   double num2 = 10.50;

   // print the values
   print(num1);
   print(num2);
}
It will produce the following output −
10
10.5
Note − The Dart VM will throw an exception if fractional values are assigned to integer variables.
Parsing
The parse() static function allows parsing a string containing numeric literal into a number. The following illustration demonstrates the same −
void main() {
   print(num.parse('12'));
   print(num.parse('10.91'));
}
The above code will result in the following output −
12
10.91
The parse function throws a FormatException if it is passed any value other than numerals. The following code shows how to pass an alpha-numeric value to the parse() function.
Example
void main() {
   print(num.parse('12A'));
   print(num.parse('AAAA'));
}
The above code will result in the following output −
Unhandled exception:
FormatException: 12A
#0 num.parse (dart:core/num.dart:446)
#1 main (file:///D:/Demos/numbers.dart:4:13)
#2 _startIsolate.<anonymous closure> (dart:isolatepatch/isolate_patch.dart:261)
#3 _RawReceivePortImpl._handleMessage (dart:isolatepatch/isolate_patch.dart:148)
Number Properties
The following table lists the properties supported by Dart numbers.
| Sr.No | Property & Description |
|---|---|
| 1 | hashcode
Returns a hash code for a numerical value. |
| 2 | isFinite
True if the number is finite; otherwise, false. |
| 3 | isInfinite
True if the number is positive infinity or negative infinity; otherwise, false. |
| 4 | isNan
True if the number is the double Not-a-Number value; otherwise, false. |
| 5 | isNegative
True if the number is negative; otherwise, false. |
| 6 | sign
Returns minus one, zero or plus one depending on the sign and numerical value of the number. |
| 7 | isEven
Returns true if the number is an even number. |
| 8 | isOdd
Returns true if the number is an odd number. |
Number Methods
Given below are a list of commonly used methods supported by numbers −
| Sr.No | Method & Description |
|---|---|
| 1 | abs
Returns the absolute value of the number. |
| 2 | ceil
Returns the least integer no smaller than the number. |
| 3 | compareTo
Compares this to other number. |
| 4 | Floor
Returns the greatest integer not greater than the current number. |
| 5 | remainder
Returns the truncated remainder after dividing the two numbers. |
| 6 | Round
Returns the integer closest to the current numbers. |
| 7 | toDouble
Returns the double equivalent of the number. |
| 8 | toInt
Returns the integer equivalent of the number. |
| 9 | toString
Returns the string equivalent representation of the number. |
| 10 | truncate
Returns an integer after discarding any fractional digits. |
Dart Programming - String
The String data type represents a sequence of characters. A Dart string is a sequence of UTF 16 code units.
String values in Dart can be represented using either single or double or triple quotes. Single line strings are represented using single or double quotes. Triple quotes are used to represent multi-line strings.
The syntax of representing string values in Dart is as given below −
Syntax
String  variable_name = 'value'

OR

String  variable_name = ''value''

OR

String  variable_name = '''line1
line2'''

OR

String  variable_name= ''''''line1
line2''''''
The following example illustrates the use of String data type in Dart.
void main() {
   String str1 = 'this is a single line string';
   String str2 = "this is a single line string";
   String str3 = '''this is a multiline line string''';
   String str4 = """this is a multiline line string""";

   print(str1);
   print(str2);
   print(str3);
   print(str4);
}
It will produce the following Output −
this is a single line string
this is a single line string
this is a multiline line string
this is a multiline line string
Strings are immutable. However, strings can be subjected to various operations and the resultant string can be a stored as a new value.
String Interpolation
The process of creating a new string by appending a value to a static string is termed as concatenation or interpolation. In other words, it is the process of adding a string to another string.
The operator plus (+) is a commonly used mechanism to concatenate / interpolate strings.
Example 1
void main() {
   String str1 = "hello";
   String str2 = "world";
   String res = str1+str2;

   print("The concatenated string : ${res}");
}
It will produce the following output −
The concatenated string : Helloworld
Example 2
You can use "${}" can be used to interpolate the value of a Dart expression within strings. The following example illustrates the same.
void main() {
   int n=1+1;

   String str1 = "The sum of 1 and 1 is ${n}";
   print(str1);

   String str2 = "The sum of 2 and 2 is ${2+2}";
   print(str2);
}
It will produce the following output −
The sum of 1 and 1 is 2
The sum of 2 and 2 is 4
String Properties
The properties listed in the following table are all read-only.
| Sr.No | Property & Description |
|---|---|
| 1 | codeUnits
Returns an unmodifiable list of the UTF-16 code units of this string. |
| 2 | isEmpty
Returns true if this string is empty. |
| 3 | Length
Returns the length of the string including space, tab and newline characters. |
Methods to Manipulate Strings
The String class in the dart: core library also provides methods to manipulate strings. Some of these methods are given below −
| Sr.No | Methods & Description |
|---|---|
| 1 | toLowerCase()
Converts all characters in this string to lower case. |
| 2 | toUpperCase()
Converts all characters in this string to upper case. |
| 3 | trim()
Returns the string without any leading and trailing whitespace. |
| 4 | compareTo()
Compares this object to another. |
| 5 | replaceAll()
Replaces all substrings that match the specified pattern with a given value. |
| 6 | split()
Splits the string at matches of the specified delimiter and returns a list of substrings. |
| 7 | substring()
Returns the substring of this string that extends from startIndex, inclusive, to endIndex, exclusive. |
| 8 | toString()
Returns a string representation of this object. |
| 9 | codeUnitAt()
Returns the 16-bit UTF-16 code unit at the given index. |
Dart Programming - Boolean
Dart provides an inbuilt support for the Boolean data type. The Boolean data type in DART supports only two values true and false. The keyword bool is used to represent a Boolean literal in DART.
The syntax for declaring a Boolean variable in DART is as given below −
bool var_name = true;
OR
bool var_name = false
Example
void main() {
   bool test;
   test = 12 > 5;
   print(test);
}
It will produce the following output −
true
Example
Unlike JavaScript, the Boolean data type recognizes only the literal true as true. Any other value is considered as false. Consider the following example −
var str = 'abc';
if(str) {
   print('String is not empty');
} else {
   print('Empty String');
}
The above snippet, if run in JavaScript, will print the message String is not empty as the if construct will return true if the string is not empty.
However, in Dart, str is converted to false as str != true. Hence the snippet will print the message Empty String (when run in unchecked mode).
Example
The above snippet if run in checked mode will throw an exception. The same is illustrated below −
void main() {
   var str = 'abc';
   if(str) {
      print('String is not empty');
   } else {
      print('Empty String');
   }
}
It will produce the following output, in Checked Mode −
Unhandled exception:
type 'String' is not a subtype of type 'bool' of 'boolean expression' where
   String is from dart:core
   bool is from dart:core
#0 main (file:///D:/Demos/Boolean.dart:5:6)
#1 _startIsolate.<anonymous closure> (dart:isolate-patch/isolate_patch.dart:261)
#2 _RawReceivePortImpl._handleMessage (dart:isolate-patch/isolate_patch.dart:148)
It will produce the following output, in Unchecked Mode −
Empty String
Note − The WebStorm IDE runs in checked mode, by default.
Dart Programming - Lists
A very commonly used collection in programming is an array. Dart represents arrays in the form of List objects. A List is simply an ordered group of objects. The dart:core library provides the List class that enables creation and manipulation of lists.
The logical representation of a list in Dart is given below −

test_list − is the identifier that references the collection.
The list contains in it the values 12, 13, and 14. The memory blocks holding these values are known as elements.
Each element in the List is identified by a unique number called the index. The index starts from zero and extends up to n-1 where n is the total number of elements in the List. The index is also referred to as the subscript.
Lists can be classified as −
- Fixed Length List
- Growable List
Let us now discuss these two types of lists in detail.
Fixed Length List
A fixed length lists length cannot change at runtime. The syntax for creating a fixed length list is as given below −
Step 1 − Declaring a list
The syntax for declaring a fixed length list is given below −
var list_name = new List(initial_size)
The above syntax creates a list of the specified size. The list cannot grow or shrink at runtime. Any attempt to resize the list will result in an exception.
Step 2 − Initializing a list
The syntax for initializing a list is as given below −
lst_name[index] = value;
Example
void main() {
   var lst = new List(3);
   lst[0] = 12;
   lst[1] = 13;
   lst[2] = 11;
   print(lst);
}
It will produce the following output −
[12, 13, 11]
Growable List
A growable lists length can change at run-time. The syntax for declaring and initializing a growable list is as given below −
Step 1 − Declaring a List
var list_name = [val1,val2,val3]
--- creates a list containing the specified values
OR
var list_name = new List()
--- creates a list of size zero
Step 2 − Initializing a List
The index / subscript is used to reference the element that should be populated with a value. The syntax for initializing a list is as given below −
list_name[index] = value;
Example
The following example shows how to create a list of 3 elements.
void main() {
   var num_list = [1,2,3];
   print(num_list);
}
It will produce the following output −
[1, 2, 3]
Example
The following example creates a zero-length list using the empty List() constructor. The add() function in the List class is used to dynamically add elements to the list.
void main() {
   var lst = new List();
   lst.add(12);
   lst.add(13);
   print(lst);
}
It will produce the following output −
[12, 13]
List Properties
The following table lists some commonly used properties of the List class in the dart:core library.
| Sr.No | Methods & Description |
|---|---|
| 1 | first
Returns the first element in the list. |
| 2 | isEmpty
Returns true if the collection has no elements. |
| 3 | isNotEmpty
Returns true if the collection has at least one element. |
| 4 | length
Returns the size of the list. |
| 5 | last
Returns the last element in the list. |
| 6 | reversed
Returns an iterable object containing the lists values in the reverse order. |
| 7 | Single
Checks if the list has only one element and returns it. |
Dart Programming - Lists (Basic Operations)
In this chapter, we will discuss how to carry out some basic operations on Lists, such as −
| Sr.No | Basic Operation & Description |
|---|---|
| 1 | Inserting Elements into a List
Mutable Lists can grow dynamically at runtime. The List.add() function appends the specified value to the end of the List and returns a modified List object. |
| 2 | Updating a list
Lists in Dart can be updated by − |
| 3 | Removing List items
The following functions supported by the List class in the dart:core library can be used to remove the item(s) in a List. |
Dart Programming - Map
The Map object is a simple key/value pair. Keys and values in a map may be of any type. A Map is a dynamic collection. In other words, Maps can grow and shrink at runtime.
Maps can be declared in two ways −
- Using Map Literals
- Using a Map constructor
Declaring a Map using Map Literals
To declare a map using map literals, you need to enclose the key-value pairs within a pair of curly brackets "{ }".
Here is its syntax −
var identifier = { key1:value1, key2:value2 [,..,key_n:value_n] }
Declaring a Map using a Map Constructor
To declare a Map using a Map constructor, we have two steps. First, declare the map and second, initialize the map.
The syntax to declare a map is as follows −
var identifier = new Map()
Now, use the following syntax to initialize the map −
map_name[key] = value
Example: Map Literal
void main() {
   var details = {'Usrname':'tom','Password':'pass@123'};
   print(details);
}
It will produce the following output −
{Usrname: tom, Password: pass@123}
Example: Adding Values to Map Literals at Runtime
void main() {
   var details = {'Usrname':'tom','Password':'pass@123'};
   details['Uid'] = 'U1oo1';
   print(details);
}
It will produce the following output −
{Usrname: tom, Password: pass@123, Uid: U1oo1}
Example: Map Constructor
void main() {
   var details = new Map();
   details['Usrname'] = 'admin';
   details['Password'] = 'admin@123';
   print(details);
}
It will produce the following output −
{Usrname: admin, Password: admin@123}
Note − A map value can be any object including NULL.
Map Properties
The Map class in the dart:core package defines the following properties −
| Sr.No | Property & Description |
|---|---|
| 1 | Keys
Returns an iterable object representing keys |
| 2 | Values
Returns an iterable object representing values |
| 3 | Length
Returns the size of the Map |
| 4 | isEmpty
Returns true if the Map is an empty Map |
| 5 | isNotEmpty
Returns true if the Map is an empty Map |
Map - Functions
Following are the commonly used functions for manipulating Maps in Dart.
| Sr.No | Function Name & Description |
|---|---|
| 1 |
addAll()
Adds all key-value pairs of other to this map. |
| 2 |
clear()
Removes all pairs from the map. |
| 3 |
remove()
Removes key and its associated value, if present, from the map. |
| 4 |
forEach()
Applies f to each key-value pair of the map. |
Dart Programming - Symbol
Symbols in Dart are opaque, dynamic string name used in reflecting out metadata from a library. Simply put, symbols are a way to store the relationship between a human readable string and a string that is optimized to be used by computers.
Reflection is a mechanism to get metadata of a type at runtime like the number of methods in a class, the number of constructors it has or the number of parameters in a function. You can even invoke a method of the type which is loaded at runtime.
In Dart reflection specific classes are available in the dart:mirrors package. This library works in both web applications and command line applications.
Syntax
Symbol obj = new Symbol('name');
// expects a name of class or function or library to reflect
The name must be a valid public Dart member name, public constructor name, or library name.
Example
Consider the following example. The code declares a class Foo in a library foo_lib. The class defines the methods m1, m2, and m3.
Foo.dart
library foo_lib;
// libarary name can be a symbol

class Foo {
   // class name can be a symbol
   m1() {
      // method name can be a symbol
      print("Inside m1");
   }
   m2() {
      print("Inside m2");
   }
   m3() {
      print("Inside m3");
   }
}
The following code loads Foo.dart library and searches for Foo class, with help of Symbol type. Since we are reflecting the metadata from the above library the code imports dart:mirrors library.
FooSymbol.dart
import 'dart:core';
import 'dart:mirrors';
import 'Foo.dart';

main() {
   Symbol lib = new Symbol("foo_lib");
   //library name stored as Symbol

   Symbol clsToSearch = new Symbol("Foo");
   // class name stored as Symbol

   if(checkIf_classAvailableInlibrary(lib, clsToSearch))
   // searches Foo class in foo_lib library
      print("class found..");
}

bool checkIf_classAvailableInlibrary(Symbol libraryName, Symbol className) {
   MirrorSystem mirrorSystem = currentMirrorSystem();
   LibraryMirror libMirror = mirrorSystem.findLibrary(libraryName);

   if (libMirror != null) {
      print("Found Library");
      print("checkng...class details..");
      print("No of classes found is : ${libMirror.declarations.length}");
      libMirror.declarations.forEach((s, d) => print(s));

      if (libMirror.declarations.containsKey(className)) return true;
      return false;
   }
}
Note that the line libMirror.declarations.forEach((s, d) => print(s)); will iterate across every declaration in the library at runtime and prints the declarations as type of Symbol.
This code should produce the following output −
Found Library
checkng...class details..
No of classes found is : 1
Symbol("Foo") // class name displayed as symbol
class found.
Example: Display the number of instance methods of a class
Let us now consider displaying the number of instance methods in a class. The predefined class ClassMirror helps us to achieve the same.
import 'dart:core';
import 'dart:mirrors';
import 'Foo.dart';

main() {
   Symbol lib = new Symbol("foo_lib");
   Symbol clsToSearch = new Symbol("Foo");
   reflect_InstanceMethods(lib, clsToSearch);
}
void reflect_InstanceMethods(Symbol libraryName, Symbol className) {
   MirrorSystem mirrorSystem = currentMirrorSystem();
   LibraryMirror libMirror = mirrorSystem.findLibrary(libraryName);

   if (libMirror != null) {
      print("Found Library");
      print("checkng...class details..");
      print("No of classes found is : ${libMirror.declarations.length}");
      libMirror.declarations.forEach((s, d) => print(s));

      if (libMirror.declarations.containsKey(className)) print("found class");
      ClassMirror classMirror = libMirror.declarations[className];

      print("No of instance methods found is ${classMirror.instanceMembers.length}");
      classMirror.instanceMembers.forEach((s, v) => print(s));
   }
}
This code should produce the following output −
Found Library
checkng...class details..
No of classes found is : 1
Symbol("Foo")
found class
No of instance methods found is 8
Symbol("==")
Symbol("hashCode")
Symbol("toString")
Symbol("noSuchMethod")
Symbol("runtimeType")
Symbol("m1")
Symbol("m2")
Symbol("m3")
Convert Symbol to String
You can convert the name of a type like class or library stored in a symbol back to string using MirrorSystem class. The following code shows how you can convert a symbol to a string.
import 'dart:mirrors';
void main(){
   Symbol lib = new Symbol("foo_lib");
   String name_of_lib = MirrorSystem.getName(lib);

   print(lib);
   print(name_of_lib);
}
It should produce the following output −
Symbol("foo_lib")

foo_lib
Dart Programming - Runes
Strings are a sequence of characters. Dart represents strings as a sequence of Unicode UTF-16 code units. Unicode is a format that defines a unique numeric value for each letter, digit, and symbol.
Since a Dart string is a sequence of UTF-16 code units, 32-bit Unicode values within a string are represented using a special syntax. A rune is an integer representing a Unicode code point.
The String class in the dart:core library provides mechanisms to access runes. String code units / runes can be accessed in three ways −
- Using String.codeUnitAt() function
- Using String.codeUnits property
- Using String.runes property
String.codeUnitAt() Function
Code units in a string can be accessed through their indexes. Returns the 16-bit UTF-16 code unit at the given index.
Syntax
String.codeUnitAt(int index);
Example
import 'dart:core';
void main(){
   f1();
}
f1() {
   String x = 'Runes';
   print(x.codeUnitAt(0));
}
It will produce the following output −
82
String.codeUnits Property
This property returns an unmodifiable list of the UTF-16 code units of the specified string.
Syntax
String. codeUnits;
Example
import 'dart:core';
void main(){
   f1();
}
f1() {
   String x = 'Runes';
   print(x.codeUnits);
}
It will produce the following output −
[82, 117, 110, 101, 115]
String.runes Property
This property returns an iterable of Unicode code-points of this string.Runes extends iterable.
Syntax
String.runes
Example
void main(){
   "A string".runes.forEach((int rune) {
      var character=new String.fromCharCode(rune);
      print(character);
   });
}
It will produce the following output −
A
s
t
r
i
n
g
Unicode code points are usually expressed as \uXXXX, where XXXX is a 4-digit hexadecimal value. To specify more or less than 4 hex digits, place the value in curly brackets. One can use the constructor of the Runes class in the dart:core library for the same.
Example
main() {
   Runes input = new Runes(' \u{1f605} ');
   print(new String.fromCharCodes(input));
}
It will produce the following output −

Dart Programming - Enumeration
An enumeration is used for defining named constant values. An enumerated type is declared using the enum keyword.
Syntax
enum enum_name {
   enumeration list
}
Where,
- The enum_name specifies the enumeration type name
- The enumeration list is a comma-separated list of identifiers
Each of the symbols in the enumeration list stands for an integer value, one greater than the symbol that precedes it. By default, the value of the first enumeration symbol is 0.
For example
enum Status {
   none,
   running,
   stopped,
   paused
}
Example
enum Status {
   none,
   running,
   stopped,
   paused
}
void main() {
   print(Status.values);
   Status.values.forEach((v) => print('value: $v, index: ${v.index}'));
   print('running: ${Status.running}, ${Status.running.index}');
   print('running index: ${Status.values[1]}');
}
It will produce the following output −
[Status.none, Status.running, Status.stopped, Status.paused]
value: Status.none, index: 0
value: Status.running, index: 1
value: Status.stopped, index: 2
value: Status.paused, index: 3
running: Status.running, 1
running index: Status.running
Dart Programming - Functions
Functions are the building blocks of readable, maintainable, and reusable code. A function is a set of statements to perform a specific task. Functions organize the program into logical blocks of code. Once defined, functions may be called to access code. This makes the code reusable. Moreover, functions make it easy to read and maintain the programs code.
A function declaration tells the compiler about a function's name, return type, and parameters. A function definition provides the actual body of the function.
| Sr.No | Functions & Description |
|---|---|
| 1 | Defining a Function
A function definition specifies what and how a specific task would be done. |
| 2 | Calling a Function
A function must be called so as to execute it. |
| 3 | Returning Functions
Functions may also return value along with control, back to the caller. |
| 4 | Parameterized Function
Parameters are a mechanism to pass values to functions. |
Optional Parameters
Optional parameters can be used when arguments need not be compulsorily passed for a functions execution. A parameter can be marked optional by appending a question mark to its name. The optional parameter should be set as the last argument in a function.
We have three types of optional parameters in Dart −
| Sr.No | Parameter & Description |
|---|---|
| 1 |
Optional Positional Parameter
To specify optional positional parameters, use square [] brackets. |
| 2 |
Optional named parameter
Unlike positional parameters, the parameter's name must be specified while the value is being passed. Curly brace {} can be used to specify optional named parameters. |
| 3 |
Optional Parameters with Default Values
Function parameters can also be assigned values by default. However, such parameters can also be explicitly passed values. |
Recursive Dart Functions
Recursion is a technique for iterating over an operation by having a function call to itself repeatedly until it arrives at a result. Recursion is best applied when you need to call the same function repeatedly with different parameters from within a loop.
Example
void main() {
   print(factorial(6));
}
factorial(number) {
   if (number <= 0) {
      // termination case
      return 1;
   } else {
      return (number * factorial(number - 1));
      // function invokes itself
   }
}
It should produce the following output −
720
Lambda Functions
Lambda functions are a concise mechanism to represent functions. These functions are also called as Arrow functions.
Syntax
[return_type]function_name(parameters)=>expression;
Example
void main() {
   printMsg();
   print(test());
}
printMsg()=>
print("hello");

int test()=>123;
// returning function
It should produce the following output −
hello 123
Dart Programming - Interfaces
An interface defines the syntax that any entity must adhere to. Interfaces define a set of methods available on an object. Dart does not have a syntax for declaring interfaces. Class declarations are themselves interfaces in Dart.
Classes should use the implements keyword to be able to use an interface. It is mandatory for the implementing class to provide a concrete implementation of all the functions of the implemented interface. In other words, a class must redefine every function in the interface it wishes to implement.
Syntax: Implementing an Interface
class identifier implements interface_name
Example
In the following program, we are declaring a class Printer. The ConsolePrinter class implements the implicit interface declaration for the Printer class. The main function creates an object of the ConsolePrinter class using the new keyword. This object is used to invoke the function print_data defined in the ConsolePrinter class.
void main() {
   ConsolePrinter cp= new ConsolePrinter();
   cp.print_data();
}
class Printer {
   void print_data() {
      print("__________Printing Data__________");
   }
}
class ConsolePrinter implements Printer {
   void print_data() {
      print("__________Printing to Console__________");
   }
}
It should produce the following output −
__________Printing to Console__________
Implementing Multiple Interfaces
A class can implement multiple interfaces. The interfaces are separated by a comma. The syntax for the same is given below −
class identifier implements interface-1,interface_2,interface_4.
The following example shows how you can implement multiple interfaces in Dart −
void main() {
   Calculator c = new Calculator();
   print("The gross total : ${c.ret_tot()}");
   print("Discount :${c.ret_dis()}");
}
class Calculate_Total {
   int ret_tot() {}
}
class Calculate_Discount {
   int ret_dis() {}
}
class Calculator  implements Calculate_Total,Calculate_Discount {
   int ret_tot() {
      return 1000;
   }
   int ret_dis() {
      return 50;
   }
}
It should produce the following output −
The gross total: 1000
Discount:50
Dart Programming - Classes
Dart is an object-oriented language. It supports object-oriented programming features like classes, interfaces, etc. A class in terms of OOP is a blueprint for creating objects. A class encapsulates data for the object. Dart gives built-in support for this concept called class.
Declaring a Class
Use the class keyword to declare a class in Dart. A class definition starts with the keyword class followed by the class name; and the class body enclosed by a pair of curly braces. The syntax for the same is given below −
Syntax
class class_name {
   <fields>
   <getters/setters>
   <constructors>
   <functions>
}
The class keyword is followed by the class name. The rules for identifiers must be considered while naming a class.
A class definition can include the following −
Fields − A field is any variable declared in a class. Fields represent data pertaining to objects.
Setters and Getters − Allows the program to initialize and retrieve the values of the fields of a class. A default getter/ setter is associated with every class. However, the default ones can be overridden by explicitly defining a setter/ getter.
Constructors − responsible for allocating memory for the objects of the class.
Functions − Functions represent actions an object can take. They are also at times referred to as methods.
These components put together are termed as the data members of the class.
Example: Declaring a class
class Car {
   // field
   String engine = "E1001";

   // function
   void disp() {
      print(engine);
   }
}
The example declares a class Car. The class has a field named engine. The disp() is a simple function that prints the value of the field engine.
Creating Instance of the class
To create an instance of the class, use the new keyword followed by the class name. The syntax for the same is given below −
Syntax
var object_name = new class_name([ arguments ])
The new keyword is responsible for instantiation.
The right-hand side of the expression invokes the constructor. The constructor should be passed values if it is parameterized.
Example: Instantiating a class
var obj = new Car("Engine 1")
Accessing Attributes and Functions
A classs attributes and functions can be accessed through the object. Use the . dot notation (called as the period) to access the data members of a class.
//accessing an attribute
obj.field_name

//accessing a function
obj.function_name()
Example
Take a look at the following example to understand how to access attributes and functions in Dart −
void main() {
   Car c= new Car();
   c.disp();
}
class Car {
   // field
   String engine = "E1001";

   // function
   void disp() {
      print(engine);
   }
}
The output of the above code is as follows −
E1001
Dart Constructors
A constructor is a special function of the class that is responsible for initializing the variables of the class. Dart defines a constructor with the same name as that of the class. A constructor is a function and hence can be parameterized. However, unlike a function, constructors cannot have a return type. If you dont declare a constructor, a default no-argument constructor is provided for you.
Syntax
Class_name(parameter_list) {
   //constructor body
}
Example
The following example shows how to use constructors in Dart −
void main() {
   Car c = new Car('E1001');
}
class Car {
   Car(String engine) {
      print(engine);
   }
}
It should produce the following output −
E1001
Named Constructors
Dart provides named constructors to enable a class define multiple constructors. The syntax of named constructors is as given below −
Syntax : Defining the constructor
Class_name.constructor_name(param_list)
Example
The following example shows how you can use named constructors in Dart −
void main() {
   Car c1 = new Car.namedConst('E1001');
   Car c2 = new Car();
}
class Car {
   Car() {
      print("Non-parameterized constructor invoked");
   }
   Car.namedConst(String engine) {
      print("The engine is : ${engine}");
   }
}
It should produce the following output −
The engine is : E1001
Non-parameterized constructor invoked
The this Keyword
The this keyword refers to the current instance of the class. Here, the parameter name and the name of the classs field are the same. Hence to avoid ambiguity, the classs field is prefixed with the this keyword. The following example explains the same −
Example
The following example explains how to use the this keyword in Dart −
void main() {
   Car c1 = new Car('E1001');
}
class Car {
   String engine;
   Car(String engine) {
      this.engine = engine;
      print("The engine is : ${engine}");
   }
}
It should produce the following output −
The engine is : E1001
Dart Class Getters and Setters
Getters and Setters, also called as accessors and mutators, allow the program to initialize and retrieve the values of class fields respectively. Getters or accessors are defined using the get keyword. Setters or mutators are defined using the set keyword.
A default getter/setter is associated with every class. However, the default ones can be overridden by explicitly defining a setter/ getter. A getter has no parameters and returns a value, and the setter has one parameter and does not return a value.
Syntax: Defining a getter
Return_type  get identifier
{
}
Syntax: Defining a setter
set identifier
{
}
Example
The following example shows how you can use getters and setters in a Dart class −
class Student {
   String name;
   int age;

   String get stud_name {
      return name;
   }

   void set stud_name(String name) {
      this.name = name;
   }

   void set stud_age(int age) {
      if(age<= 0) {
        print("Age should be greater than 5");
      }  else {
         this.age = age;
      }
   }

   int get stud_age {
      return age;
   }
}
void main() {
   Student s1 = new Student();
   s1.stud_name = 'MARK';
   s1.stud_age = 0;
   print(s1.stud_name);
   print(s1.stud_age);
}
This program code should produce the following output −
Age should be greater than 5
MARK
Null
Class Inheritance
Dart supports the concept of Inheritance which is the ability of a program to create new classes from an existing class. The class that is extended to create newer classes is called the parent class/super class. The newly created classes are called the child/sub classes.
A class inherits from another class using the extends keyword. Child classes inherit all properties and methods except constructors from the parent class.
Syntax
class child_class_name extends parent_class_name
Note − Dart doesnt support multiple inheritance.
Example: Class Inheritance
In the following example, we are declaring a class Shape. The class is extended by the Circle class. Since there is an inheritance relationship between the classes, the child class, i.e., the class Car gets an implicit access to its parent class data member.
void main() {
   var obj = new Circle();
   obj.cal_area();
}
class Shape {
   void cal_area() {
      print("calling calc area defined in the Shape class");
   }
}
class Circle extends Shape {}
It should produce the following output −
calling calc area defined in the Shape class
Types of Inheritance
Inheritance can be of the following three types −
Single − Every class can at the most extend from one parent class.
Multiple − A class can inherit from multiple classes. Dart doesnt support multiple inheritance.
Multi-level − A class can inherit from another child class.
Example
The following example shows how multi-level inheritance works −
void main() {
   var obj = new Leaf();
   obj.str = "hello";
   print(obj.str);
}
class Root {
   String str;
}
class Child extends Root {}
class Leaf extends Child {}
//indirectly inherits from Root by virtue of inheritance
The class Leaf derives the attributes from Root and Child classes by virtue of multi-level inheritance. Its output is as follows −
hello
Dart Class Inheritance and Method Overriding
Method Overriding is a mechanism by which the child class redefines a method in its parent class. The following example illustrates the same −
Example
void main() {
   Child c = new Child();
   c.m1(12);
}
class Parent {
   void m1(int a){ print("value of a ${a}");}
}
class Child extends Parent {
   @override
   void m1(int b) {
      print("value of b ${b}");
   }
}
It should produce the following output −
value of b 12
The number and type of the function parameters must match while overriding the method. In case of a mismatch in the number of parameters or their data type, the Dart compiler throws an error. The following illustration explains the same −
import 'dart:io';
void main() {
   Child c = new Child();
   c.m1(12);
}
class Parent {
   void m1(int a){ print("value of a ${a}");}
}
class Child extends Parent {
   @override
   void m1(String b) {
      print("value of b ${b}");
   }
}
It should produce the following output −
value of b 12
The static Keyword
The static keyword can be applied to the data members of a class, i.e., fields and methods. A static variable retains its values till the program finishes execution. Static members are referenced by the class name.
Example
class StaticMem {
   static int num;
   static disp() {
      print("The value of num is ${StaticMem.num}")  ;
   }
}
void main() {
   StaticMem.num = 12;
   // initialize the static variable }
   StaticMem.disp();
   // invoke the static method
}
It should produce the following output −
The value of num is 12
The super Keyword
The super keyword is used to refer to the immediate parent of a class. The keyword can be used to refer to the super class version of a variable, property, or method. The following example illustrates the same −
Example
void main() {
   Child c = new Child();
   c.m1(12);
}
class Parent {
   String msg = "message variable from the parent class";
   void m1(int a){ print("value of a ${a}");}
}
class Child extends Parent {
   @override
   void m1(int b) {
      print("value of b ${b}");
      super.m1(13);
      print("${super.msg}")   ;
   }
}
It should produce the following output −
value of b 12
value of a 13
message variable from the parent class
Dart Programming - Object
Object-Oriented Programming defines an object as any entity that has a defined boundary. An object has the following −
State − Describes the object. The fields of a class represent the objects state.
Behavior − Describes what an object can do.
Identity − A unique value that distinguishes an object from a set of similar other objects. Two or more objects can share the state and behavior but not the identity.
The period operator (.) is used in conjunction with the object to access a class data members.
Example
Dart represents data in the form of objects. Every class in Dart extends the Object class. Given below is a simple example of creating and using an object.
class Student {
   void test_method() {
      print("This is a  test method");
   }

   void test_method1() {
      print("This is a  test method1");
   }
}
void main()    {
   Student s1 = new Student();
   s1.test_method();
   s1.test_method1();
}
It should produce the following output −
This is a test method
This is a test method1
The Cascade operator (..)
The above example invokes the methods in the class. However, every time a function is called, a reference to the object is required. The cascade operator can be used as a shorthand in cases where there is a sequence of invocations.
The cascade ( .. ) operator can be used to issue a sequence of calls via an object. The above example can be rewritten in the following manner.
class Student {
   void test_method() {
      print("This is a  test method");
   }

   void test_method1() {
      print("This is a  test method1");
   }
}
void main() {
   new Student()
   ..test_method()
   ..test_method1();
}
It should produce the following output −
This is a test method
This is a test method1
The toString() method
This function returns a string representation of an object. Take a look at the following example to understand how to use the toString method.
void main() {
   int n = 12;
   print(n.toString());
}
It should produce the following output −
12
Dart Programming - Collection
Dart, unlike other programming languages, doesnt support arrays. Dart collections can be used to replicate data structures like an array. The dart:core library and other classes enable Collection support in Dart scripts.
Dart collections can be basically classified as −
| Sr.No | Dart collection & Description |
|---|---|
| 1 | List
A List is simply an ordered group of objects. The dart:core library provides the List class that enables creation and manipulation of lists.
|
| 2 | Set
Set represents a collection of objects in which each object can occur only once. The dart:core library provides the Set class to implement the same. |
| 3 | Maps
The Map object is a simple key/value pair. Keys and values in a map may be of any type. A Map is a dynamic collection. In other words, Maps can grow and shrink at runtime. The Map class in the dart:core library provides support for the same. |
| 4 | Queue
A Queue is a collection that can be manipulated at both ends. Queues are useful when you want to build a first-in, first-out collection. Simply put, a queue inserts data from one end and deletes from another end. The values are removed / read in the order of their insertion. |
Iterating Collections
The Iterator class from the dart:core library enables easy collection traversal. Every collection has an iterator property. This property returns an iterator that points to the objects in the collection.
Example
The following example illustrates traversing a collection using an iterator object.
void main() {
   List <String> logTypes = new List <String>();
   logTypes.add(1);
   logTypes.add("ERROR");
   logTypes.add("INFO");

   //iterating across list
   for (String type in logTypes) {
      print(type);
   }
}
It should produce the following output −
1
ERROR
INFO
Example: Generic Set
void main() {
   Set <int>numberSet = new  Set<int>();
   numberSet.add(100);
   numberSet.add(20);
   numberSet.add(5);
   numberSet.add(60);
   numberSet.add(70);

   // numberSet.add("Tom");
   compilation error;
   print("Default implementation  :${numberSet.runtimeType}");

   for(var no in numberSet) {
      print(no);
   }
}
It should produce the following output −
Default implementation :_CompactLinkedHashSet<int>
100
20
5
60
70
Example: Generic Queue
main() {
   int x = 12;
   int y = 0;
   int res;

   try {
      res = x ~/ y;
   }
   on IntegerDivisionByZeroException {
      print('Cannot divide by zero');
   }
}
It should produce the following output −
Cannot divide by zero
Example: Using the catch Block
In the following example, we have used the same code as above. The only difference is that the catch block (instead of the ON block) here contains the code to handle the exception. The parameter of catch contains the exception object thrown at runtime.
main() {
   int x = 12;
   int y = 0;
   int res;

   try {
      res = x ~/ y;
   }
   catch(e) {
      print(e);
   }
}
It should produce the following output −
IntegerDivisionByZeroException
Example: oncatch
The following example shows how to use the on...catch block.
main() {
   int x = 12;
   int y = 0;
   int res;

   try {
      res = x ~/ y;
   }
   on IntegerDivisionByZeroException catch(e) {
      print(e);
   }
}
It should produce the following output −
IntegerDivisionByZeroException
The Finally Block
The finally block includes code that should be executed irrespective of an exceptions occurrence. The optional finally block executes unconditionally after try/on/catch.
The syntax for using the finally block is as follows −
try {
   // code that might throw an exception
}
on Exception1 {
   // exception handling code
}
catch Exception2 {
   //  exception handling
}
finally {
   // code that should always execute; irrespective of the exception
}
The following example illustrates the use of finally block.
main() {
   int x = 12;
   int y = 0;
   int res;

   try {
      res = x ~/ y;
   }
   on IntegerDivisionByZeroException {
      print('Cannot divide by zero');
   }
   finally {
      print('Finally block executed');
   }
}
It should produce the following output −
Cannot divide by zero
Finally block executed
Throwing an Exception
The throw keyword is used to explicitly raise an exception. A raised exception should be handled to prevent the program from exiting abruptly.
The syntax for raising an exception explicitly is −
throw new Exception_name()
Example
The following example shows how to use the throw keyword to throw an exception −
main() {
   try {
      test_age(-2);
   }
   catch(e) {
      print('Age cannot be negative');
   }
}
void test_age(int age) {
   if(age<0) {
      throw new FormatException();
   }
}
It should produce the following output −
Age cannot be negative
Custom Exceptions
As specified above, every exception type in Dart is a subtype of the built-in class Exception. Dart enables creating custom exceptions by extending the existing ones. The syntax for defining a custom exception is as given below −
Syntax: Defining the Exception
class Custom_exception_Name implements Exception {
   // can contain constructors, variables and methods
}
Custom Exceptions should be raised explicitly and the same should be handled in the code.
Example
The following example shows how to define and handle a custom exception.
class AmtException implements Exception {
   String errMsg() => 'Amount should be greater than zero';
}
void main() {
   try {
      withdraw_amt(-1);
   }
   catch(e) {
      print(e.errMsg());
   }
finally {
      print('Ending requested operation.....');
   }
}
void withdraw_amt(int amt) {
   if (amt <= 0) {
      throw new AmtException();
   }
}
In the above code, we are defining a custom exception, AmtException. The code raises the exception if the amount passed is not within the excepted range. The main function encloses the function invocation in the try...catch block.
The code should produce the following output −
Amount should be greater than zero
Ending requested operation....
Dart Programming - Debugging
Every now and then, developers commit mistakes while coding. A mistake in a program is referred to as a bug. The process of finding and fixing bugs is called debugging and is a normal part of the development process. This section covers tools and techniques that can help you with debugging tasks.
The WebStorm editor enables breakpoints and step-by-step debugging. The program will break at the point where the breakpoint is attached. This functionality is like what you might expect from Java or C# application development. You can watch variables, browse the stack, step over and step into method and function calls, all from the WebStorm Editor.
Adding a Breakpoint
Consider the following code snippet. (TestString.dart)
void main() {
   int a = 10, b = 20, c = 5;
   c = c * c * c;

   print("$a + $b = ${a+b}");
   print("$a%$b = ${a%b}");  // Add a break point here
   print("$a*$b = ${a*b}");
   print("$a/$b = ${a/b}");
   print(c);
}
To add a breakpoint, click on the left margin to. In the figure given below, line number 7 has a break point.
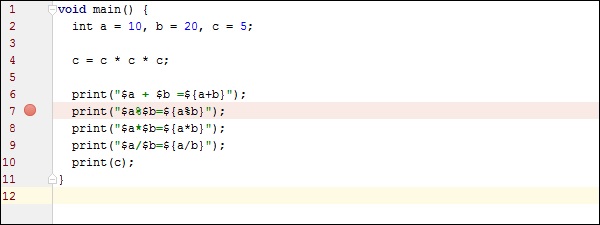
Run the program in debug mode. In the project explorer right click on the dart program in our case TestString.dart.
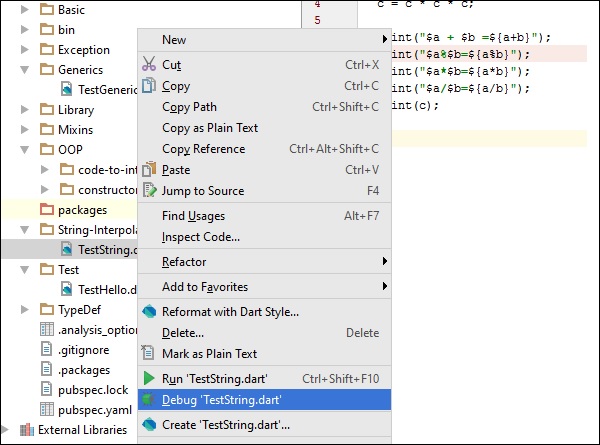
Once the program runs in debug mode, you will get the Debugger window as shown in the following screenshot. The variables tab shows the values of variables in the current context. You can add watchers for specific variables and listen to that values changes using watches window.
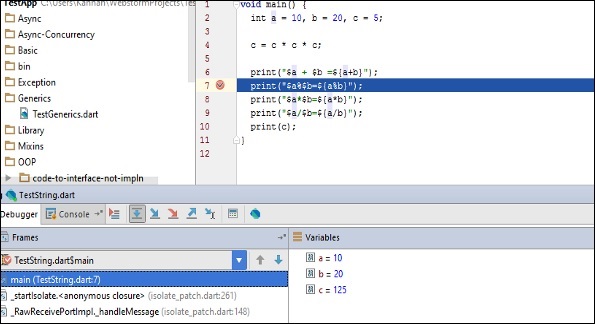
Step Into (F7) arrow icon on debug menu helps to Executes code one statement at a time. If main methods call a subroutine, then this will go into the subroutine code also.
Step over (F8): It is similar to Step Into. The difference in use occurs when the current statement contains a call to a subroutine. If the main method calls a subroutine, step over will not drill into the subroutine. it will skip the subroutine.
Step Out (Shift+F8): Executes the remaining lines of a function in which the current execution point lies. The next statement displayed is the statement following the subroutine call.
After running in debug mode, the program gives the following output −
10 + 20 = 30
10 % 20 = 10
10 * 20 = 200
10 / 20 = 0.5
125
Dart Programming - Typedef
A typedef, or a function-type alias, helps to define pointers to executable code within memory. Simply put, a typedef can be used as a pointer that references a function.
Given below are the steps to implement typedefs in a Dart program.
Step 1: Defining a typedef
A typedef can be used to specify a function signature that we want specific functions to match. A function signature is defined by a functions parameters (including their types). The return type is not a part of the function signature. Its syntax is as follows.
typedef function_name(parameters)
Step 2: Assigning a Function to a typedef Variable
A variable of typedef can point to any function having the same signature as typedef. You can use the following signature to assign a function to a typedef variable.
type_def var_name = function_name
Step 3: Invoking a Function
The typedef variable can be used to invoke functions. Here is how you can invoke a function −
var_name(parameters)
Example
Lets now take an example to understand more on typedef in Dart.
At first, let us define a typedef. Here we are defining a function signature. The function will take two input parameters of the type integer. Return type is not a part of the function signature.
typedef ManyOperation(int firstNo , int secondNo); //function signature
Next, let us define the functions. Define some functions with the same function signature as that of the ManyOperation typedef.
Add(int firstNo,int second){
   print("Add result is ${firstNo+second}");
}
Subtract(int firstNo,int second){
   print("Subtract result is ${firstNo-second}");
}
Divide(int firstNo,int second){
   print("Add result is ${firstNo/second}");
}
Finally, we will invoke the function via typedef. Declare a variable of the ManyOperations type. Assign the function name to the declared variable.
ManyOperation oper ;

//can point to any method of same signature
oper = Add;
oper(10,20);
oper = Subtract;
oper(30,20);
oper = Divide;
oper(50,5);
The oper variable can point to any method which takes two integer parameters. The Add function's reference is assigned to the variable. Typedefs can switch function references at runtime
Let us now put all the parts together and see the complete program.
typedef ManyOperation(int firstNo , int secondNo);
//function signature

Add(int firstNo,int second){
   print("Add result is ${firstNo+second}");
}
Subtract(int firstNo,int second){
   print("Subtract result is ${firstNo-second}");
}
Divide(int firstNo,int second){
   print("Divide result is ${firstNo/second}");
}
Calculator(int a, int b, ManyOperation oper){
   print("Inside calculator");
   oper(a,b);
}
void main(){
   ManyOperation oper = Add;
   oper(10,20);
   oper = Subtract;
   oper(30,20);
   oper = Divide;
   oper(50,5);
}
The program should produce the following output −
Add result is 30
Subtract result is 10
Divide result is 10.0
Note − The above code will result in an error if the typedef variable tries to point to a function with a different function signature.
Example
Typedefs can also be passed as a parameter to a function. Consider the following example −
typedef ManyOperation(int firstNo , int secondNo);   //function signature
Add(int firstNo,int second){
   print("Add result is ${firstNo+second}");
}
Subtract(int firstNo,int second){
   print("Subtract result is ${firstNo-second}");
}
Divide(int firstNo,int second){
   print("Divide result is ${firstNo/second}");
}
Calculator(int a,int b ,ManyOperation oper){
   print("Inside calculator");
   oper(a,b);
}
main(){
   Calculator(5,5,Add);
   Calculator(5,5,Subtract);
   Calculator(5,5,Divide);
}
It will produce the following output −
Inside calculator
Add result is 10
Inside calculator
Subtract result is 0
Inside calculator
Divide result is 1.0
Dart Programming - Libraries
A library in a programming language represents a collection of routines (set of programming instructions). Dart has a set of built-in libraries that are useful to store routines that are frequently used. A Dart library comprises of a set of classes, constants, functions, typedefs, properties, and exceptions.
Importing a library
Importing makes the components in a library available to the caller code. The import keyword is used to achieve the same. A dart file can have multiple import statements.
Built in Dart library URIs use the dart: scheme to refer to a library. Other libraries can use a file system path or the package: scheme to specify its URI. Libraries provided by a package manager such as the pub tool uses the package: scheme.
The syntax for importing a library in Dart is given below −
import 'URI'
Consider the following code snippet −
import 'dart:io'
import 'package:lib1/libfile.dart'
If you want to use only part of a library, you can selectively import the library. The syntax for the same is given below −
import 'package: lib1/lib1.dart' show foo, bar;
// Import only foo and bar.

import 'package: mylib/mylib.dart' hide foo;
// Import all names except foo
Some commonly used libraries are given below −
| Sr.No | Library & Description |
|---|---|
| 1 | dart:io File, socket, HTTP, and other I/O support for server applications. This library does not work in browser-based applications. This library is imported by default. |
| 2 | dart:core Built-in types, collections, and other core functionality for every Dart program. This library is automatically imported. |
| 3 | dart: math Mathematical constants and functions, plus a random number generator. |
| 4 | dart: convert Encoders and decoders for converting between different data representations, including JSON and UTF-8. |
| 5 | dart: typed_data Lists that efficiently handle fixed sized data (for example, unsigned 8 byte integers). |
Example : Importing and using a Library
The following example imports the built-in library dart: math. The snippet calls the sqrt() function from the math library. This function returns the square root of a number passed to it.
import 'dart:math';
void main() {
   print("Square root of 36 is: ${sqrt(36)}");
}
Output
Square root of 36 is: 6.0
Encapsulation in Libraries
Dart scripts can prefix identifiers with an underscore ( _ ) to mark its components private. Simply put, Dart libraries can restrict access to its content by external scripts. This is termed as encapsulation. The syntax for the same is given below −
Syntax
_identifier
Example
At first, define a library with a private function.
library loggerlib;
void _log(msg) {
   print("Log method called in loggerlib msg:$msg");
}
Next, import the library
import 'test.dart' as web;
void main() {
   web._log("hello from webloggerlib");
}
The above code will result in an error.
Unhandled exception:
No top-level method 'web._log' declared.
NoSuchMethodError: method not found: 'web._log'
Receiver: top-level
Arguments: [...]
#0 NoSuchMethodError._throwNew (dart:core-patch/errors_patch.dart:184)
#1 main (file:///C:/Users/Administrator/WebstormProjects/untitled/Assertion.dart:6:3)
#2 _startIsolate.<anonymous closure> (dart:isolate-patch/isolate_patch.dart:261)
#3 _RawReceivePortImpl._handleMessage (dart:isolate-patch/isolate_patch.dart:148)
Creating Custom Libraries
Dart also allows you to use your own code as a library. Creating a custom library involves the following steps −
Step 1: Declaring a Library
To explicitly declare a library, use the library statement. The syntax for declaring a library is as given below −
library library_name
// library contents go here
Step 2: Associating a Library
You can associate a library in two ways −
- Within the same directory
import 'library_name'
- From a different directory
import 'dir/library_name'
Example: Custom Library
First, let us define a custom library, calculator.dart.
library calculator_lib;
import 'dart:math';

//import statement after the libaray statement
int add(int firstNumber,int secondNumber){
   print("inside add method of Calculator Library ") ;
   return firstNumber+secondNumber;
}
int modulus(int firstNumber,int secondNumber){
   print("inside modulus method of Calculator Library ") ;
   return firstNumber%secondNumber;
}
int random(int no){
   return new Random().nextInt(no);
}
Next, we will import the library −
import 'calculator.dart';
void main() {
   var num1 = 10;
   var num2 = 20;
   var sum = add(num1,num2);
   var mod = modulus(num1,num2);
   var r = random(10);

   print("$num1 + $num2 = $sum");
   print("$num1 % $num2= $mod");
   print("random no $r");
}
The program should produce the following output −
inside add method of Calculator Library
inside modulus method of Calculator Library
10 + 20 = 30
10 % 20= 10
random no 0
Library Prefix
If you import two libraries with conflicting identifiers, then you can specify a prefix for one or both libraries. Use the 'as' keyword for specifying the prefix. The syntax for the same is given below −
Syntax
import 'library_uri' as prefix
Example
First, let us define a library: loggerlib.dart.
library loggerlib;
void log(msg){
   print("Log method called in loggerlib msg:$msg");
}
Next, we will define another library: webloggerlib.dart.
library webloggerlib;
void log(msg){
   print("Log method called in webloggerlib msg:$msg");
}
Finally, we will import the library with a prefix.
import 'loggerlib.dart';
import 'webloggerlib.dart' as web;

// prefix avoids function name clashes
void main(){
   log("hello from loggerlib");
   web.log("hello from webloggerlib");
}
It will produce the following output −
Log method called in loggerlib msg:hello from loggerlib
Log method called in webloggerlib msg:hello from webloggerlib
Dart Programming - Async
An asynchronous operation executes in a thread, separate from the main application thread. When an application calls a method to perform an operation asynchronously, the application can continue executing while the asynchronous method performs its task.
Example
Lets take an example to understand this concept. Here, the program accepts user input using the IO library.
import 'dart:io';
void main() {
   print("Enter your name :");

   // prompt for user input
   String name = stdin.readLineSync();

   // this is a synchronous method that reads user input
   print("Hello Mr. ${name}");
   print("End of main");
}
The readLineSync() is a synchronous method. This means that the execution of all instructions that follow the readLineSync() function call will be blocked till the readLineSync() method finishes execution.
The stdin.readLineSync waits for input. It stops in its tracks and does not execute any further until it receives the users input.
The above example will result in the following output −
Enter your name :
Tom

// reads user input
Hello Mr. Tom
End of main
In computing, we say something is synchronous when it waits for an event to happen before continuing. A disadvantage in this approach is that if a part of the code takes too long to execute, the subsequent blocks, though unrelated, will be blocked from executing. Consider a webserver that must respond to multiple requests for a resource.
A synchronous execution model will block every other users request till it finishes processing the current request. In such a case, like that of a web server, every request must be independent of the others. This means, the webserver should not wait for the current request to finish executing before it responds to request from other users.
Simply put, it should accept requests from new users before necessarily completing the requests of previous users. This is termed as asynchronous. Asynchronous programming basically means no waiting or non-blocking programming model. The dart:async package facilitates implementing asynchronous programming blocks in a Dart script.
Example
The following example better illustrates the functioning of an asynchronous block.
Step 1 − Create a contact.txt file as given below and save it in the data folder in the current project.
1, Tom
2, John
3, Tim
4, Jane
Step 2 − Write a program which will read the file without blocking other parts of the application.
import "dart:async";
import "dart:io";

void main(){
   File file = new File( Directory.current.path+"\\data\\contact.txt");
   Future<String> f = file.readAsString();

   // returns a futrue, this is Async method
   f.then((data)=>print(data));

   // once file is read , call back method is invoked
   print("End of main");
   // this get printed first, showing fileReading is non blocking or async
}
The output of this program will be as follows −
End of main
1, Tom
2, John
3, Tim
4, Jan
The "end of main" executes first while the script continues reading the file. The Future class, part of dart:async, is used for getting the result of a computation after an asynchronous task has completed. This Future value is then used to do something after the computation finishes.
Once the read operation is completed, the execution control is transferred within "then()". This is because the reading operation can take more time and so it doesnt want to block other part of program.
Dart Future
The Dart community defines a Future as "a means for getting a value sometime in the future." Simply put, Future objects are a mechanism to represent values returned by an expression whose execution will complete at a later point in time. Several of Darts built-in classes return a Future when an asynchronous method is called.
Dart is a single-threaded programming language. If any code blocks the thread of execution (for example, by waiting for a time-consuming operation or blocking on I/O), the program effectively freezes.
Asynchronous operations let your program run without getting blocked. Dart uses Future objects to represent asynchronous operations.
Dart Programming - Concurrency
Concurrency is the execution of several instruction sequences at the same time. It involves performing more than one task simultaneously.
Dart uses Isolates as a tool for doing works in parallel. The dart:isolate package is Darts solution to taking single-threaded Dart code and allowing the application to make greater use of the hard-ware available.
Isolates, as the name suggests, are isolated units of running code. The only way to send data between them is by passing messages, like the way you pass messages between the client and the server. An isolate helps the program to take advantage of multicore microprocessors out of the box.
Example
Lets take an example to understand this concept better.
import 'dart:isolate';
void foo(var message){
   print('execution from foo ... the message is :${message}');
}
void main(){
   Isolate.spawn(foo,'Hello!!');
   Isolate.spawn(foo,'Greetings!!');
   Isolate.spawn(foo,'Welcome!!');

   print('execution from main1');
   print('execution from main2');
   print('execution from main3');
}
Here, the spawn method of the Isolate class facilitates running a function, foo, in parallel with the rest of our code. The spawn function takes two parameters −
- the function to be spawned, and
- an object that will be passed to the spawned function.
In case there is no object to pass to the spawned function, it can be passed a NULL value.
The two functions (foo and main) might not necessarily run in the same order each time. There is no guarantee as to when foo will be executing and when main() will be executing. The output will be different each time you run.
Output 1
execution from main1
execution from main2
execution from main3
execution from foo ... the message is :Hello!!
Output 2
execution from main1
execution from main2
execution from main3
execution from foo ... the message is :Welcome!!
execution from foo ... the message is :Hello!!
execution from foo ... the message is :Greetings!!
From the outputs, we can conclude that the Dart code can spawn a new isolate from running code like the way Java or C# code can start a new thread.
Isolates differ from threads in that an isolate has its own memory. Theres no way to share a variable between isolatesthe only way to communicate between isolates is via message passing.
Note − The above output will be different for different hardware and operating system configurations.
Isolate v/s Future
Doing complex computational work asynchronously is important to ensure responsiveness of applications. Dart Future is a mechanism for retrieving the value of an asynchronous task after it has completed, while Dart Isolates are a tool for abstracting parallelism and implementing it on a practical high-level basis.
Dart Programming - Unit Testing
Unit Testing involves testing every individual unit of an application. It helps the developer to test small functionalities without running the entire complex application.
The Dart external library named "test" provides a standard way of writing and running unit tests.
Dart unit testing involves the following steps −
Step 1: Installing the "test" package
To installing third-party packages in the current project, you will require the pubspec.yaml file. To install test packages, first make the following entry in the pubspec.yaml file −
dependencies:
test:
After making the entry, right-click the pubspec.yaml file and get dependencies. It will install the "test" package. Given below is a screenshot for the same in the WebStorm Editor.
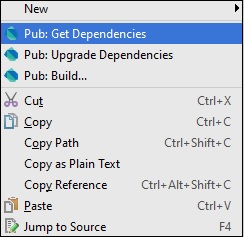
Packages can be installed from the command line too. Type the following in the terminal −
pub get
Step 2: Importing the "test" package
import "package:test/test.dart";
Step 3 Writing Tests
Tests are specified using the top-level function test(), while test assertions are made using the expect() function. For using these methods, they should be installed as a pub dependency.
Syntax
test("Description of the test ", () {
   expect(actualValue , matchingValue)
});
The group() function can be used to group tests. Each group's description is added to the beginning of its test's descriptions.
Syntax
group("some_Group_Name", () {
   test("test_name_1", () {
      expect(actual, equals(exptected));
   });
   test("test_name_2", () {
      expect(actual, equals(expected));
   });
})
Example 1: A Passing Test
The following example defines a method Add(). This method takes two integer values and returns an integer representing the sum. To test this add() method −
Step 1 − Import the test package as given below.
Step 2 − Define the test using the test() function. Here, the test() function uses the expect() function to enforce an assertion.
import 'package:test/test.dart';
// Import the test package

int Add(int x,int y)
// Function to be tested {
   return x+y;
}
void main() {
   // Define the test
   test("test to check add method",(){
      // Arrange
      var expected = 30;

      // Act
      var actual = Add(10,20);

      // Asset
      expect(actual,expected);
   });
}
It should produce the following output −
00:00 +0: test to check add method
00:00 +1: All tests passed!
Example 2: A Failing Test
The subtract() method defined below has a logical mistake. The following test verifies the same.
import 'package:test/test.dart';
int Add(int x,int y){
   return x+y;
}
int Sub(int x,int y){
   return x-y-1;
}
void main(){
   test('test to check sub',(){
      var expected = 10;
      // Arrange

      var actual = Sub(30,20);
      // Act

      expect(actual,expected);
      // Assert
   });
   test("test to check add method",(){
      var expected = 30;
      // Arrange

      var actual = Add(10,20);
      // Act

      expect(actual,expected);
      // Asset
   });
}
Output − The test case for the function add() passes but the test for subtract() fails as shown below.
00:00 +0: test to check sub
00:00 +0 -1: test to check sub
Expected: <10>
Actual: <9>
package:test  expect
bin\Test123.dart 18:5  main.<fn>

00:00 +0 -1: test to check add method
00:00 +1 -1: Some tests failed.
Unhandled exception:
Dummy exception to set exit code.
#0  _rootHandleUncaughtError.<anonymous closure> (dart:async/zone.dart:938)
#1  _microtaskLoop (dart:async/schedule_microtask.dart:41)
#2  _startMicrotaskLoop (dart:async/schedule_microtask.dart:50)
#3  _Timer._runTimers (dart:isolate-patch/timer_impl.dart:394)
#4  _Timer._handleMessage (dart:isolate-patch/timer_impl.dart:414)
#5  _RawReceivePortImpl._handleMessage (dart:isolate-patch/isolate_patch.dart:148)
Grouping Test Cases
You can group the test cases so that it adds more meaning to you test code. If you have many test cases this helps to write much cleaner code.
In the given code, we are writing a test case for the split() function and the trim function. Hence, we logically group these test cases and call it String.
Example
import "package:test/test.dart";
void main() {
   group("String", () {
      test("test on split() method of string class", () {
         var string = "foo,bar,baz";
         expect(string.split(","), equals(["foo", "bar", "baz"]));
      });
      test("test on trim() method of string class", () {
         var string = "  foo ";
         expect(string.trim(), equals("foo"));
      });
   });
}
Output − The output will append the group name for each test case as given below −
00:00 +0: String test on split() method of string class
00:00 +1: String test on trim() method of string class
00:00 +2: All tests passed
Dart Programming - HTML DOM
Every webpage resides inside a browser window which can be considered as an object.
A Document object represents the HTML document that is displayed in that window. The Document object has various properties that refer to other objects which allow access to and modification of document content.
The way a document content is accessed and modified is called the Document Object Model, or DOM. The Objects are organized in a hierarchy. This hierarchical structure applies to the organization of objects in a Web document.
Window − Top of the hierarchy. It is the outmost element of the object hierarchy.
Document − Each HTML document that gets loaded into a window becomes a document object. The document contains the contents of the page.
Elements − represent the content on a web page. Examples include the text boxes, page title etc.
Nodes − are often elements, but they can also be attributes, text, comments, and other DOM types.
Here is a simple hierarchy of a few important DOM objects −
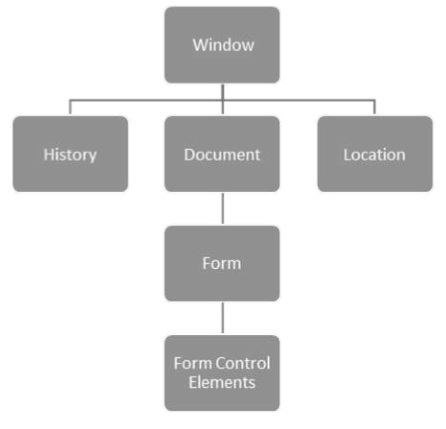
Dart provides the dart:html library to manipulate objects and elements in the DOM. Console-based applications cannot use the dart:html library. To use the HTML library in the web applications, import dart:html −
import 'dart:html';
Moving on, we will discuss some DOM Operations in the next section.
Finding DOM Elements
The dart:html library provides the querySelector function to search for elements in the DOM.
Element querySelector(String selectors);
The querySelector() function returns the first element that matches the specified group of selectors. "selectors should be string using CSS selector syntax as given below
var element1 = document.querySelector('.className');
var element2 = document.querySelector('#id');
Example: Manipulating DOM
Follow the steps given below, in the Webstorm IDE −
Step 1 − File NewProject → In the location, provide the project name as DemoWebApp.
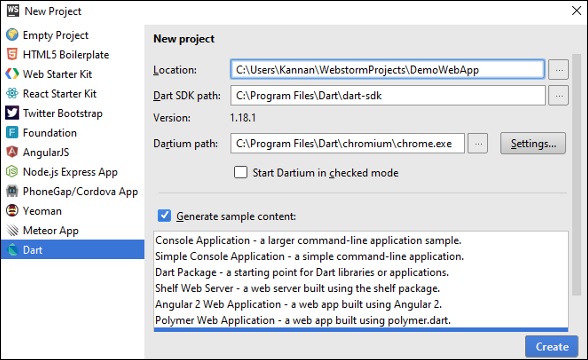
Step 1 − In the section "Generate sample content", select SimpleWebApplication.
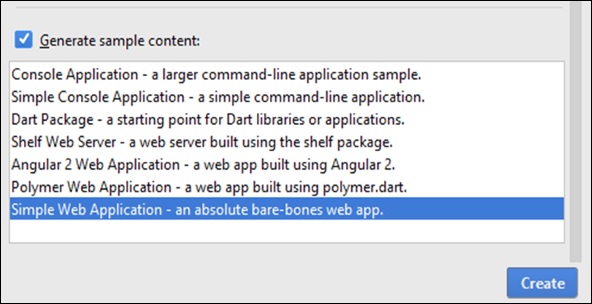
It will create a sample project, DemoWebApp. There is a pubspec.yaml file containing the dependencies which need to be downloaded.
name: 'DemoWebApp'
version: 0.0.1
description: An absolute bare-bones web app.

#author: Your Name <email@example.com>
#homepage: https://www.example.com
environment:
   sdk: '>=1.0.0 <2.0.0'
dependencies:
   browser: '>=0.10.0 <0.11.0'   dart_to_js_script_rewriter: '^1.0.1'
transformers:
- dart_to_js_script_rewriter
If you are connected to Web, then these will be downloaded automatically, else you can right-click on the pubspec.yaml and get dependencies.
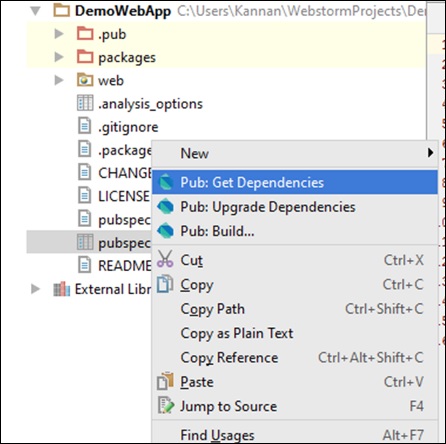
In the web folder, you will find three files: Index.html, main.dart, and style.css
Index.html
<!DOCTYPE html>
<html>
   <head>
      <meta charset = "utf-8">
      <meta http-equiv = "X-UA-Compatible" content = "IE = edge">
      <meta name = "viewport" content = "width = device-width, initial-scale = 1.0">
      <meta name = "scaffolded-by" content = "https://github.com/google/stagehand">
      <title>DemoWebApp</title>
      <link rel = "stylesheet" href = "styles.css">
      <script defer src = "main.dart" type = "application/dart"></script>
      <script defer src = "packages/browser/dart.js"></script>
   </head>

   <body>
      <h1>
         <div id = "output"></div>
      </h1>
   </body>
</html>
Main.dart
import 'dart:html';
void main() {
   querySelector('#output').text = 'Your Dart web dom app is running!!!.';
}
Run the index.html file; you will see the following output on your screen.
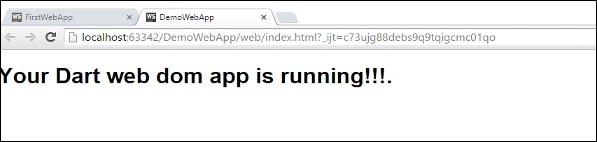
Event Handling
The dart:html library provides the onClick event for DOM Elements. The syntax shows how an element could handle a stream of click events.
querySelector('#Id').onClick.listen(eventHanlderFunction);
The querySelector() function returns the element from the given DOM and onClick.listen() will take an eventHandler method which will be invoked when a click event is raised. The syntax of eventHandler is given below −
void eventHanlderFunction (MouseEvent event){ }
Let us now take an example to understand the concept of Event Handling in Dart.
TestEvent.html
<!DOCTYPE html>
<html>
   <head>
      <meta charset = "utf-8">
      <meta http-equiv = "X-UA-Compatible" content = "IE = edge">
      <meta name = "viewport" content = "width = device-width, initial-scale = 1.0">
      <meta name = "scaffolded-by" content ="https://github.com/google/stagehand">
      <title>DemoWebApp</title>
      <link rel = "stylesheet" href = "styles.css">
      <script defer src = "TestEvent.dart" type="application/dart"></script>
      <script defer src = "packages/browser/dart.js"></script>
   </head>

   <body>
      <div id = "output"></div>
      <h1>
         <div>
            Enter you name : <input type = "text" id = "txtName">
            <input type = "button" id = "btnWish" value="Wish">
         </div>
      </h1>
      <h2 id = "display"></h2>
   </body>

</html>
TestEvent.dart
import 'dart:html';
void main() {
   querySelector('#btnWish').onClick.listen(wishHandler);
}
void wishHandler(MouseEvent event){
   String name = (querySelector('#txtName')  as InputElement).value;
   querySelector('#display').text = 'Hello Mr.'+ name;
}
Output
