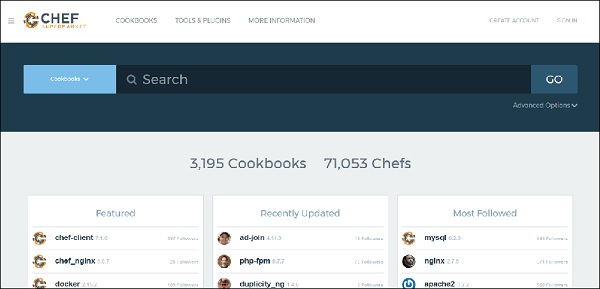
- Chef - Home
- Chef - Overview
- Chef - Architecture
- Chef - Version Control System Setup
- Chef - Workstation Setup
- Chef - Client Setup
- Chef - Test Kitchen Setup
- Chef - Knife Setup
- Chef - Solo Setup
- Chef - Cookbooks
- Chef - Cookbook Dependencies
- Chef - Roles
- Chef - Environment
- Chef - Chef-Client as Daemon
- Chef - Chef-Shell
- Chef - Testing Cookbooks
- Chef - Foodcritic
- Chef - ChefSpec
- Testing Cookbook with Test Kitchen
- Chef - Nodes
- Chef - Chef-Client Run
- Dynamically Configuring Recipes
- Chef - Templates
- Chef - Plain Ruby with Chef DSL
- Chef - Ruby Gems with Recipes
- Chef - Libraries
- Chef - Definition
- Chef - Environment Variable
- Chef - Data Bags
- Chef - Scripts for Data Bags
- Chef - Cross-Platform Cookbooks
- Chef - Resources
- Lightweight Resource Provider
- Chef - Blueprints
- Chef - Files & Packages
- Chef - Community Cookbooks
- Chef Useful Resources
- Chef - Quick Guide
- Chef - Useful Resources
- Chef - Discussion
Chef - Quick Guide
Chef - Overview
Chef is an open source technology developed by Opscode. Adam Jacob, co-founder of Opscode is known as the founder of Chef. This technology uses Ruby encoding to develop basic building blocks like recipe and cookbooks. Chef is used in infrastructure automation and helps in reducing manual and repetitive tasks for infrastructure management.
Chef have got its own convention for different building blocks, which are required to manage and automate infrastructure.
Why Chef?
Chef is a configuration management technology used to automate the infrastructure provisioning. It is developed on the basis of Ruby DSL language. It is used to streamline the task of configuration and managing the companys server. It has the capability to get integrated with any of the cloud technology.
In DevOps, we use Chef to deploy and manage servers and applications in-house and on the cloud.
Features of Chef
Following are the most prominent features of Chef −
Chef uses popular Ruby language to create a domain-specific language.
Chef does not make assumptions on the current status of a node. It uses its mechanisms to get the current status of machine.
Chef is ideal for deploying and managing the cloud server, storage, and software.
Advantages of Chef
Chef offers the following advantages −
Lower barrier for entry − As Chef uses native Ruby language for configuration, a standard configuration language it can be easily picked up by anyone having some development experience.
Excellent integration with cloud − Using the knife utility, it can be easily integrated with any of the cloud technologies. It is the best tool for an organization that wishes to distribute its infrastructure on multi-cloud environment.
Disadvantages of Chef
Some of the major drawbacks of Chef are as follows −
One of the huge disadvantages of Chef is the way cookbooks are controlled. It needs constant babying so that people who are working should not mess up with others cookbooks.
Only Chef solo is available.
In the current situation, it is only a good fit for AWS cloud.
It is not very easy to learn if the person is not familiar with Ruby.
Documentation is still lacking.
Key Building Blocks of Chef
Recipe
It can be defined as a collection of attributes which are used to manage the infrastructure. These attributes which are present in the recipe are used to change the existing state or setting a particular infrastructure node. They are loaded during Chef client run and comparted with the existing attribute of the node (machine). It then gets to the status which is defined in the node resource of the recipe. It is the main workhorse of the cookbook.
Cookbook
A cookbook is a collection of recipes. They are the basic building blocks which get uploaded to Chef server. When Chef run takes place, it ensures that the recipes present inside it gets a given infrastructure to the desired state as listed in the recipe.
Resource
It is the basic component of a recipe used to manage the infrastructure with different kind of states. There can be multiple resources in a recipe, which will help in configuring and managing the infrastructure. For example −
package − Manages the packages on a node
service − Manages the services on a node
user − Manages the users on the node
group − Manages groups
template − Manages the files with embedded Ruby template
cookbook_file − Transfers the files from the files subdirectory in the cookbook to a location on the node
file − Manages the contents of a file on the node
directory − Manages the directories on the node
execute − Executes a command on the node
cron − Edits an existing cron file on the node
Attribute
They are basically settings. They can be thought of as a key value pair of anything which one wants to use in the cookbook. There are several different kinds of attributes that can be applied, with a different level of precedence over the final settings that the node operates under.
File
Its a subdirectory within the cookbook that contains any static file which will be placed on the nodes that uses the cookbooks. A recipe then can be declared as a resource that moves the files from that directory to the final node.
Templates
They are similar to files, but they are not static. Template files end with the .ebr extension, which means they contain embedded Ruby. They are mainly used to substitute an attribute value into the files to create the final file version that will be placed on the node.
Metadata.rb
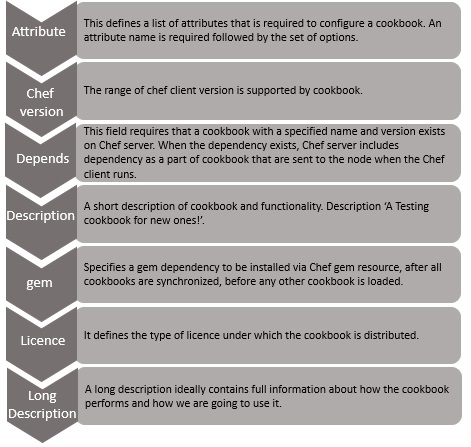
It is used to manage the metadata about the package. This includes details like the name and details of the package. It also includes things such as dependency information that tells which cookbooks this cookbook needs to operate. This allows the Chef server to build the run-list of the node correctly and ensures that all of the pieces are transferred correctly.
Default Cookbook Structure
C:\chef\cookbooks\nginx>tree
Folder PATH listing for volume Local Disk
Volume serial number is BE8B-6427
C: attributes
definitions
files
   default
libraries
providers
recipes
resources
templates
    default
Chef Related Technologies
Following is the list of Chef related technologies.
Puppet
Puppet provides a standard way of delivering and operating software, no matter where it runs. It is an automated administrative engine for Linux, Unix, and Windows system that performs administrative tasks based on centralized specification.
The primary features of Puppet are as follows −
- Implementing new systems with a uniform configuration.
- Updating the systems and upgrading the security and software packages.
- Incorporating new features and adding dexterous capabilities.
- Customizing configurations for ensuring the availability of data sources.
- Optimizing the available resources and minimizing the cost.
- Simplifying the roles and enabling the team to focus on core and productive issues.
- Getting a birds eye view of the available infrastructure.
Ansible
Ansible is a radically simple IT automation platform that makes your applications and systems easier to deploy. Avoid writing scripts or custom code to deploy and update your applications automate in a language that approaches plain English, using SSH, with no agents to install on remote systems.
The primary features of Ansible are as follows −
- Simple and easy to learn
- Written in Python
- Agentless
- YAML-based Playbooks
- Ansible galaxy
SaltStack
SaltStack is used for data-driven configuration. It is a new approach of infrastructure management built on dynamic communication bus. It is used for data-driven orchestration, remote execution for any infrastructure, and configuration management for any app stack.
Fabric
Fabric is a Python-based programming language, which is developed as an API of Python which needs to be imported in Python code in order to configure and manage an infrastructure.
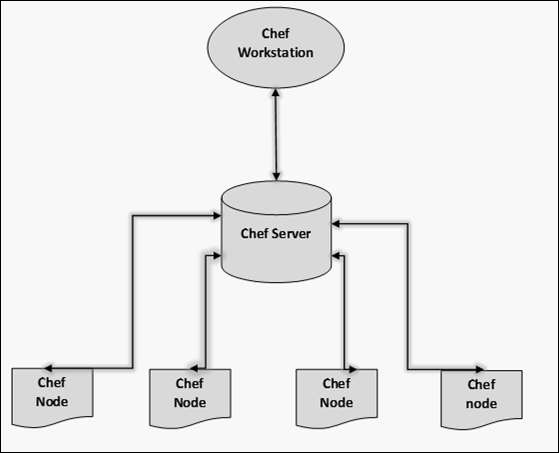
Chef - Architecture
Chef works on a three-tier client server model wherein the working units such as cookbooks are developed on the Chef workstation. From the command line utilities such as knife, they are uploaded to the Chef server and all the nodes which are present in the architecture are registered with the Chef server.
In order to get the working Chef infrastructure in place, we need to set up multiple things in sequence.
In the above setup, we have the following components.
Chef Workstation
This is the location where all the configurations are developed. Chef workstation is installed on the local machine. Detailed configuration structure is discussed in the later chapters of this tutorial.
Chef Server
This works as a centralized working unit of Chef setup, where all the configuration files are uploaded post development. There are different kinds of Chef server, some are hosted Chef server whereas some are built-in premise.
Chef Nodes
They are the actual machines which are going to be managed by the Chef server. All the nodes can have different kinds of setup as per requirement. Chef client is the key component of all the nodes, which helps in setting up the communication between the Chef server and Chef node. The other components of Chef node is Ohai, which helps in getting the current state of any node at a given point of time.
Chef - Version Control System Setup
Using Version Control system is a fundamental part of infrastructure automation. There are multiple kinds of version control system such as SVN, CVS, and GIT. Due to the popularity of GIT among the Chef community, we will use the GIT setup.
Note − Dont think of building an infrastructure as a code without a version control system.
On Windows
Step 1 − Download the Windows installer from www.git-scm.org and follow the installation steps.
Step 2 − Sign up for a central repository on GitHub.
Step 3 − Upload the ssh key to the GitHub account, so that one can interact with it easily. For details on ssh key visit the following link https://help.github.com/articles/generatingssh-keys.
Step 4 − Finally create a repo on the github account by visiting https://github.com/new with the name of chef-repo.
Before actually starting to write a cookbook, one can set up an initial GIT repository on the development box and clone the empty repository provided by Opscode.
Step 1 − Download Opscode Chef repository empty structure.
$ wget https://github.com/opscode/chef-repo/tarball/master
Step 2 − Extract the tar ball.
$ tar xvf master
Step 3 − Rename the directory.
$ mv opscode-chef-repo-2c42c6a/ chef-repo
Step 4 − Change the current working directory to chef repo.
$ cd chef-repo
Step 5 − Initialize a fresh get repo.
$ git init.
Step 6 − Connect to your repo on the git hub.
$ git remote add origin git@github.com:vipin022/chef-
Step 7 − Push the local repo to github.
$ git add.
$ git commit m empty repo structure added
$ git push u origin maste
By using the above procedure, you will get an empty chef repo in place. You can then start working on developing the recipes and cookbooks. Once done, you can push the changes to the GitHub.
Chef - Workstation Setup
Chef follows the concept of client-server architecture, hence in order to start working with Chef one needs to set up Chef on the workstation and develop the configuration locally. Later it can be uploaded to Chef server to make them working on the Chef nodes, which needs to be configured.
Opscode provides a fully packaged version, which does not have any external prerequisites. This fully packaged Chef is called the omnibus installer.
On Windows Machine
Step 1 − Download the setup .msi file of chefDK on the machine.
Step 2 − Follow the installation steps and install it on the target location.
The setup will look as shown in the following screenshot.
ChefDK Path Variable
$ echo $PATH
/c/opscode/chef/bin:/c/opscode/chefdk/bin:
On Linux Machine
In order to set up on the Linux machine, we need to first get curl on the machine.
Step 1 − Once curl is installed on the machine, we need to install Chef on the workstation using Opscodes omnibus Chef installer.
$ curl L https://www.opscode.com/chef/install.sh | sudo bash
Step 2 − Install Ruby on the machine.
Step 3 − Add Ruby to path variable.
$ echo export PATH = /opt/chef/embedded/bin:$PATH ≫ ~/.bash_profile &&
source ~/.bash_profile
The Omnibus Chef will install Ruby and all the required Ruby gems into /opt/chef/embedded by adding /opt/chef/embedded/bin directory to the .bash_profile file.
If Ruby is already installed, then install the Chef Ruby gem on the machine by running the following command.
$ gem install chef
Chef - Client Setup
In order to make Chef node communicate with Chef server, you need to set up Chef client on the node.
Chef Client
This is one of the key components of Chef node, which retrieves the cookbooks from the Chef server and executes them on the node. It is also known as the Chef provisioner.
Here, we will use Vagrant to manage VM. Vagrant can also be configured with the provisioner such as Shell script, Chef and Puppet to get VM into a desired state. In our case, we will use Vagrant to manage VMs using VirtualBox and Chef client as a provisioner.
Step 1 − Download and install VirtualBox from https://www.virtualbox.org/wiki/downlod
Step 2 − Download and install Vagrant at http://downloads.vagrantup.com
Step 3 − Install Vagrant Omnibus plugin to enable Vagrant to install Chef client on the VM.
$ vagrant plugin install vagrant-omnibus
Creating and Booting Virtual
Step 1 − We can download the required Vagrant box from the Opscode vagrant repo. Download the opscode-ubuntu-12.04 box from the following URL https://www.vagrantup.com/
Step 2 − Once you have the Vagrant file, download the path you need to edit the Vagrant file.
vipin@laptop:~/chef-repo $ subl Vagrantfile
Vagrant.configure("2") do |config|
   config.vm.box = "opscode-ubuntu-12.04"
   config.vm.box_url = https://opscode-vm-bento.s3.amazonaws.com/
   vagrant/opscode_ubuntu-12.04_provisionerless.box
   config.omnibus.chef_version = :latest
   config.vm.provision :chef_client do |chef|
      chef.provisioning_path = "/etc/chef"
      chef.chef_server_url = "https://api.opscode.com/
      organizations/<YOUR_ORG>"
      chef.validation_key_path = "/.chef/<YOUR_ORG>-validator.pem"
      chef.validation_client_name = "<YOUR_ORG>-validator"
      chef.node_name = "server"
   end
end
In the above program, you need to update the <YOUR_ORG> name with the correct or required organization name.
Step 3 − Next step after the configuration is, to get the vagrant box up. For this, you need to move to the location where Vagrant box is located and run the following command.
$ vagrant up
Step 4 − Once the machine is up, you can login to the machine using the following command.
$ vagrant ssh
In the above command, vagrantfile is written in a Ruby Domain Specific Language (DSL) for configuring the vagrant virtual machine.
In the vagrant file, we have the config object. Vagrant will use this config object to configure the VM.
Vagrant.configure("2") do |config|
.
End
Inside the config block, you will tell vagrant which VM image to use, in order to boot the node.
config.vm.box = "opscode-ubuntu-12.04"
config.vm.box_url = https://opscode-vm-bento.s3.amazonaws.com/
   vagrant/opscode_ubuntu-12.04_provisionerless.box
In the next step, you will tell Vagrant to download the omnibus plugin.
config.omnibus.chef_version = :latest
After selecting the VM box to boot, configure how to provision the box using Chef.
config.vm.provision :chef_client do |chef|
..
End
Inside this, you need to set up instruction on how to hook up the virtual node to the Chef server. You need to tell Vagrant where you need to store all the Chef stuff on the node.
chef.provisioning_path = "/etc/chef"
Chef - Test Kitchen Setup
Test Kitchen is Chefs integrated testing framework. It enables writing test recipes, which will run on the VMs once they are instantiated and converged using the cookbook. The test recipes run on that VM and can verify if everything works as expected.
ChefSpec is something which only simulates a Chef run. Test kitchen boots up real node and runs Chef on it.
Step 1 − Install test kitchen Ruby gem and test kitchen vagrant gem to enable test kitchen to use vagrant for spinning up test.
$ gem install kitchen
$ gem install kitchen-vagrant
Step 2 − Set up test kitchen. This can be done by creating .kitchen.yml in the cookbook directory.
driver_plugin: vagrant
driver_config:
   require_chef_omnibus: true
platforms:
   - name: ubuntu-12.04
   driver_config:
      box: opscode-ubuntu-12.04
      box_url: https://opscode-vm.s3.amazonaws.com/vagrant/opscode_
      ubuntu-12.04_provisionerless.box
suites:
   - name: default
run_list:
   - recipe[minitest-handler]
   - recipe[my_cookbook_test]
attributes: { my_cookbook: { greeting: 'Ohai, Minitest!'} }
In the above code, one part defines that vagrant needs to spin up the VMs and it defines that you want Omnibus to install Chef on the target node.
The second part defines which platform you want to test the cookbooks. Vagrant will always create and destroy new instances. You do not have to fear about the side effects with vagrant VMs you spin up using Vagrant file.
Test kitchen can be considered as a temporary environment that helps to run and test cookbooks in a temporary environment that is similar to production. With test kitchen on, one can make sure that the given piece of code is working, before it is actually getting deployed on to testing, preproduction, and production environment. This feature of test kitchen is followed by many organizations as a set before putting the cookbooks in an actual working environment.
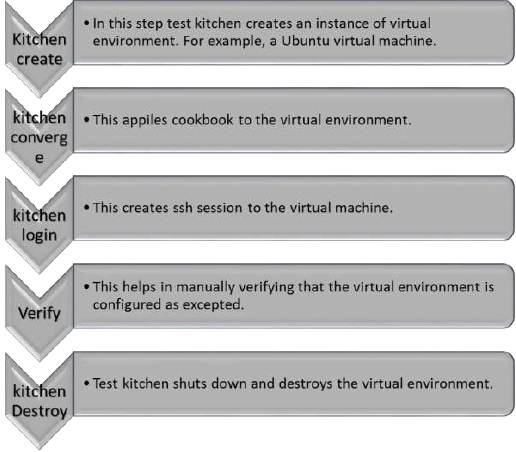
Test Kitchen Workflow
Following are the steps involved in Test Kitchen Workflow.
Creating a Cookbook Using Chef
Use the following code to create a cookbook.
$ chef generate cookbook motd_rhel
Installing Cookbook Gems:

Compiling Cookbooks...
Recipe: code_generator::cookbook
   * directory[C:/chef/cookbooks/motd_rhel] action create
      - create new directory C:/chef/cookbooks/motd_rhel

   * template[C:/chef/cookbooks/motd_rhel/metadata.rb] action create_if_missing
      - create new file C:/chef/cookbooks/motd_rhel/metadata.rb
      - update content in file C:/chef/cookbooks/motd_rhel/metadata.rb from none to
      d6fcc2 (diff output suppressed by config)

   * template[C:/chef/cookbooks/motd_rhel/README.md] action create_if_missing
      - create new file C:/chef/cookbooks/motd_rhel/README.md
      - update content in file C:/chef/cookbooks/motd_rhel/README.md from none to 50deab
         (diff output suppressed by config)

   * cookbook_file[C:/chef/cookbooks/motd_rhel/chefignore] action create
      - create new file C:/chef/cookbooks/motd_rhel/chefignore
      - update content in file C:/chef/cookbooks/motd_rhel/chefignore from none to 15fac5
         (diff output suppressed by config)

   * cookbook_file[C:/chef/cookbooks/motd_rhel/Berksfile] action create_if_missing
      - create new file C:/chef/cookbooks/motd_rhel/Berksfile
      - update content in file C:/chef/cookbooks/motd_rhel/Berksfile from none to 9f08dc
         (diff output suppressed by config)

   * template[C:/chef/cookbooks/motd_rhel/.kitchen.yml] action create_if_missing
      - create new file C:/chef/cookbooks/motd_rhel/.kitchen.yml
      - update content in file C:/chef/cookbooks/motd_rhel/.kitchen.yml
         from none to 49b92b (diff output suppressed by config)

   * directory[C:/chef/cookbooks/motd_rhel/test/integration/default/serverspec]
      action create
      - create new directory
         C:/chef/cookbooks/motd_rhel/test/integration/default/serverspec

   * directory[C:/chef/cookbooks/motd_rhel/test/integration/helpers/serverspec]
      action create
      - create new directory
         C:/chef/cookbooks/motd_rhel/test/integration/helpers/serverspec

   * cookbook_file
      [C:/chef/cookbooks/motd_rhel/test/integration/helpers/serverspec/spec_helper.rb]
      action create_if_missing
      - create new file
         C:/chef/cookbooks/motd_rhel/test/integration/helpers/serverspec/spec_helper.rb
      - update content in file
         C:/chef/cookbooks/motd_rhel/test/integration/helpers/serverspec/spec_helper.rb
            from none to d85df4 (diff output suppressed by config)

   * template
      [C:/chef/cookbooks/motd_rhel/test/integration/default/serverspec/defaul t_spec.rb]
      action create_if_missing
      - create new file
         C:/chef/cookbooks/motd_rhel/test/integration/default/serverspec/default_spec.rb
      - update content in file
         C:/chef/cookbooks/motd_rhel/test/integration/default/serverspec/default_spec.rb
            from none to 3fbdbd (diff output suppressed by config)

   * directory[C:/chef/cookbooks/motd_rhel/spec/unit/recipes] action create
      - create new directory C:/chef/cookbooks/motd_rhel/spec/unit/recipes

   * cookbook_file
      [C:/chef/cookbooks/motd_rhel/spec/spec_helper.rb] action create_if_missing
      - create new file C:/chef/cookbooks/motd_rhel/spec/spec_helper.rb
      - update content in file
         C:/chef/cookbooks/motd_rhel/spec/spec_helper.rb from none to 587075
            (diff output suppressed by config)

   * template
      [C:/chef/cookbooks/motd_rhel/spec/unit/recipes/default_spec.rb]
      action create_if_missing
      - create new file C:/chef/cookbooks/motd_rhel/spec/unit/recipes/default_spec.rb
      - update content in file
         C:/chef/cookbooks/motd_rhel/spec/unit/recipes/default_spec.rb
            from none to ff3b17 (diff output suppressed by config)

   * directory[C:/chef/cookbooks/motd_rhel/recipes] action create
      - create new directory C:/chef/cookbooks/motd_rhel/recipes

   * template[C:/chef/cookbooks/motd_rhel/recipes/default.rb] action create_if_missing
      - create new file C:/chef/cookbooks/motd_rhel/recipes/default.rb
      - update content in file
         C:/chef/cookbooks/motd_rhel/recipes/default.rb from none to c4b029
            (diff output suppressed by config)

   * execute[initialize-git] action run
      - execute git init .

   * cookbook_file[C:/chef/cookbooks/motd_rhel/.gitignore] action create
      - create new file C:/chef/cookbooks/motd_rhel/.gitignore
      - update content in file C:/chef/cookbooks/motd_rhel/.gitignore from none to 33d469
         (diff output suppressed by config)

   * execute[git-add-new-files] action run
      - execute git add .

   * execute[git-commit-new-files] action run
      - execute git commit -m "Add generated cookbook content"
Following is the Created Cookbook Structure as an output of the above code.

Test Kitchen Configuration File
.kitchen.yaml file
driver:
   name: vagrant
provisioner:
   name: chef_zero
# verifier:
# name: inspec
# format: doc
platforms:
   - name: ubuntu-14.04
suites:
   - name: default
   run_list:
      - recipe[motd_rhel::default]
   attributes:
Drivers − It specifies the software which manages the machine.
Provisioner − It provides specification on how Chef runs. We are using chef_zero because it enables to mimic a Chef server environment on the local machine. This allows to work with node attributes and Chef server specifications.
Platform − This specifies the target operating system.
Suites − It defines what one wants to apply on the virtual environment. Here, you define multiple definition. It is the location where you define the run list, which specifies which recipe to run and in which sequence we need to run.
Running the Commands in Sequence
Kitchen List
$ kitchen list
Instance  Driver  Provisioner Verifier   Transport Last Action
ubuntu-1404 Vagrant ChefZero   Busser       Ssh   <Not Created>
Kitchen Create
$ kitchen create
-----> Starting Kitchen (v1.4.2)
-----> Creating <default-centos-72>...
      Bringing machine 'default' up with 'virtualbox' provider...
      ==> default: Box 'opscode-centos-7.2' could not be found.
         Attempting to find and install...
      default: Box Provider: virtualbox
      default: Box Version: >= 0
      ==> default: Box file was not detected as metadata. Adding it directly...
         ==> default: Adding box 'opscode-centos-7.2' (v0) for provider: virtualbox
         default: Downloading:
            https://opscode-vmbento.s3.amazonaws.com/vagrant/virtualbox/
            opscode_centos-7.1_chefprovisionerless.box[...]
         Vagrant instance <default-centos-72> created.
         Finished creating <default-centos-72> (3m12.01s).
         -----> Kitchen is finished. (3m12.60s)
Kitchen Converge
$ kitchen converge
-----> Converging <default-centos-72>...
      Preparing files for transfer
      Preparing dna.json
      Resolving cookbook dependencies with Berkshelf 4.0.1...
      Removing non-cookbook files before transfer
      Preparing validation.pem
      Preparing client.rb
-----> Chef Omnibus   installation detected (install only if missing)
      Transferring files to <default-centos-72>
      Starting Chef Client, version 12.6.0
      resolving cookbooks for run list: ["motd_rhel::default"]
      Synchronizing Cookbooks: - motd_rhel (0.1.0)
      Compiling Cookbooks...       Converging 1 resources
      Recipe: motd_rhel::default        (up to date)
      Running handlers:       Running handlers complete
      Chef Client finished, 0/1 resources updated in 01 seconds
      Finished converging <default-centos-72> (0m3.57s).
      -----> Kitchen is finished. (0m4.55s)
Testing Setup
Kitchen login is used to test if the testing VM is provisioned correctly.
$ kitchen login
Last login: Thu Jan 30 19:02:14 2017 from 10.0.2.2
hostname:  default-centos-72
fqdn:      default-centos-72
memory:    244180kBcpu count: 1
Finally Exit
$ exit
Logout
Connection to 127.0.0.1 closed.
Destroying Setup
$ Kitchen destroy
-----> Starting Kitchen (v1.4.2)
-----> Destroying <default-centos-72>...
   ==> default: Forcing shutdown of VM...
   ==> default: Destroying VM and associated drives...
   Vagrant instance <default-centos-72> destroyed.
   Finished destroying <default-centos-72> (0m4.94s).
-----> Kitchen is finished. (0m5.93s)
Chef - Knife Setup
Knife is Chefs command-line tool to interact with the Chef server. One uses it for uploading cookbooks and managing other aspects of Chef. It provides an interface between the chefDK (Repo) on the local machine and the Chef server. It helps in managing −
- Chef nodes
- Cookbook
- Recipe
- Environments
- Cloud Resources
- Cloud Provisioning
- Installation on Chef client on Chef nodes
Knife provides a set of commands to manage Chef infrastructure.
Bootstrap Commands
- knife bootstrap [SSH_USER@]FQDN (options)
Client Commands
- knife client bulk delete REGEX (options)
- knife client create CLIENTNAME (options)
- knife client delete CLIENT (options)
- knife client edit CLIENT (options)
- Usage: C:/opscode/chef/bin/knife (options)
- knife client key delete CLIENT KEYNAME (options)
- knife client key edit CLIENT KEYNAME (options)
- knife client key list CLIENT (options)
- knife client key show CLIENT KEYNAME (options)
- knife client list (options)
- knife client reregister CLIENT (options)
- knife client show CLIENT (options)
Configure Commands
- knife configure (options)
- knife configure client DIRECTORY
Cookbook Commands
- knife cookbook bulk delete REGEX (options)
- knife cookbook create COOKBOOK (options)
- knife cookbook delete COOKBOOK VERSION (options)
- knife cookbook download COOKBOOK [VERSION] (options)
- knife cookbook list (options)
- knife cookbook metadata COOKBOOK (options)
- knife cookbook metadata from FILE (options)
- knife cookbook show COOKBOOK [VERSION] [PART] [FILENAME] (options)
- knife cookbook test [COOKBOOKS...] (options)
- knife cookbook upload [COOKBOOKS...] (options)
Cookbook Site Commands
- knife cookbook site download COOKBOOK [VERSION] (options)
- knife cookbook site install COOKBOOK [VERSION] (options)
- knife cookbook site list (options)
- knife cookbook site search QUERY (options)
- knife cookbook site share COOKBOOK [CATEGORY] (options)
- knife cookbook site show COOKBOOK [VERSION] (options)
- knife cookbook site unshare COOKBOOK
Data Bag Commands
- knife data bag create BAG [ITEM] (options)
- knife data bag delete BAG [ITEM] (options)
- knife data bag edit BAG ITEM (options)
- knife data bag from file BAG FILE|FOLDER [FILE|FOLDER..] (options)
- knife data bag list (options)
- knife data bag show BAG [ITEM] (options)
Environment Commands
- knife environment compare [ENVIRONMENT..] (options)
- knife environment create ENVIRONMENT (options)
- knife environment delete ENVIRONMENT (options)
- knife environment edit ENVIRONMENT (options)
- knife environment from file FILE [FILE..] (options)
- knife environment list (options)
- knife environment show ENVIRONMENT (options)
Exec Commands
- knife exec [SCRIPT] (options)
Help Commands
- knife help [list|TOPIC]
Index Commands
- knife index rebuild (options)
Node Commands
- knife node bulk delete REGEX (options)
- knife node create NODE (options)
- knife node delete NODE (options)
- knife node edit NODE (options)
- knife node environment set NODE ENVIRONMENT
- knife node from file FILE (options)
- knife node list (options)
- knife node run_list add [NODE] [ENTRY[,ENTRY]] (options)
- knife node run_list remove [NODE] [ENTRY[,ENTRY]] (options)
- knife node run_list set NODE ENTRIES (options)
- knife node show NODE (options)
OSC Commands
- knife osc_user create USER (options)
- knife osc_user delete USER (options)
- knife osc_user edit USER (options)
- knife osc_user list (options)
- knife osc_user reregister USER (options)
- knife osc_user show USER (options)
Path-Based Commands
- knife delete [PATTERN1 ... PATTERNn]
- knife deps PATTERN1 [PATTERNn]
- knife diff PATTERNS
- knife download PATTERNS
- knife edit [PATTERN1 ... PATTERNn]
- knife list [-dfR1p] [PATTERN1 ... PATTERNn]
- knife show [PATTERN1 ... PATTERNn]
- knife upload PATTERNS
- knife xargs [COMMAND]
Raw Commands
- knife raw REQUEST_PATH
Recipe Commands
- knife recipe list [PATTERN]
Role Commands
- knife role bulk delete REGEX (options)
- knife role create ROLE (options)
- knife role delete ROLE (options)
- knife role edit ROLE (options)
- knife role env_run_list add [ROLE] [ENVIRONMENT] [ENTRY[,ENTRY]] (options)
- knife role env_run_list clear [ROLE] [ENVIRONMENT]
- knife role env_run_list remove [ROLE] [ENVIRONMENT] [ENTRIES]
- knife role env_run_list replace [ROLE] [ENVIRONMENT] [OLD_ENTRY] [NEW_ENTRY]
- knife role env_run_list set [ROLE] [ENVIRONMENT] [ENTRIES]
- knife role from file FILE [FILE..] (options)
- knife role list (options)
- knife role run_list add [ROLE] [ENTRY[,ENTRY]] (options)
- knife role run_list clear [ROLE]
- knife role run_list remove [ROLE] [ENTRY]
- knife role run_list replace [ROLE] [OLD_ENTRY] [NEW_ENTRY]
- knife role run_list set [ROLE] [ENTRIES]
- knife role show ROLE (options)
Serve Commands
- knife serve (options)
SSH Commands
- knife ssh QUERY COMMAND (options)
SSL Commands
- knife ssl check [URL] (options)
- knife ssl fetch [URL] (options)
Status Commands
- knife status QUERY (options)
Tag Commands
- knife tag create NODE TAG ...
- knife tag delete NODE TAG ...
- knife tag list NODE
User Commands
- knife user create USERNAME DISPLAY_NAME FIRST_NAME LAST_NAME EMAIL PASSWORD (options)
- knife user delete USER (options)
- knife user edit USER (options)
- knife user key create USER (options)
- knife user key delete USER KEYNAME (options)
- knife user key edit USER KEYNAME (options)
- knife user key list USER (options)
- knife user key show USER KEYNAME (options)
- knife user list (options)
- knife user reregister USER (options)
- knife user show USER (options)
Knife Setup
In order to set up knife, one needs to move to .chef directory and create a knife.rb inside the chef repo, which tells knife about the configuration details. This will have a couple up details.
current_dir = File.dirname(__FILE__)
log_level                :info
log_location             STDOUT
node_name                'node_name'
client_key               "#{current_dir}/USER.pem"
validation_client_name   'ORG_NAME-validator'
validation_key           "#{current_dir}/ORGANIZATION-validator.pem"
chef_server_url          'https://api.chef.io/organizations/ORG_NAME'
cache_type               'BasicFile'
cache_options( :path =>  "#{ENV['HOME']}/.chef/checksums" )
cookbook_path            ["#{current_dir}/../cookbooks"]
In the above code, we are using the hosted Chef server which uses the following two keys.
validation_client_name   'ORG_NAME-validator'
validation_key           "#{current_dir}/ORGANIZATION-validator.pem"
Here, knife.rb tells knife which organization to use and where to find the private key. It tells knife where to find the users private key.
client_key "#{current_dir}/USER.pem"
The following line of code tells knife we are using the hosted server.
chef_server_url 'https://api.chef.io/organizations/ORG_NAME'
Using the knife.rb file, the validator knife can now connect to your organizations hosted Opscode.
Chef - Solo Setup
Chef-Solo is an open source tool that runs locally and allows to provision guest machines using Chef cookbooks without the complication of any Chef client and server configuration. It helps to execute cookbooks on a self-created server.
Before running Chef-Solo on the local machine, one needs to install the following two files on the local machine.
Solo.rb − This file tells Chef about where to find cookbooks, roles, and data bags.
Node.json − This file sets the run list and any node-specific attribute, if required.
solo.rb Configuration
Following are the steps to configure solo.rb.
Step 1 − Create a solo.rb file inside the chef repo.
current_dir       = File.expand_path(File.dirname(__FILE__))
file_cache_path   "#{current_dir}"
cookbook_path     "#{current_dir}/cookbooks"
role_path         "#{current_dir}/roles"
data_bag_path     "#{current_dir}/data_bags"
Step 2 − Add the file to git repo.
$ git add solo.rb
Step 3 − Create a node.json file inside the chef repo with the following content.
{
   "run_list": [ "recipe[ntp]" ]
}
Step 4 − Get the ntp cookbook inside the chef repo using knife.
vipin@laptop:~/chef-repo $ knife cookbook site install ntp
Installing ntp to /Users/mma/work/chef-repo/cookbooks
TRUNCATED OUTPUT
Cookbook ntp version 1.3.0 successfully installed
Step 5 − Add the node.json file to Git.
$ git add node.json
Step 6 − Commit and push the files to git repo.
vipin@laptop:~/chef-repo $ git commit -m "initial setup for Chef Solo"
vipin@laptop:~/chef-repo $ git push
Counting objects: 4, done.
Delta compression using up to 4 threads.
...TRUNCATED OUTPUT...
To git@github.com:mmarschall/chef-repo.git
b930647..5bcfab6 master -> master
Running the Cookbook on the Node
Step 1 − Login to the node where one wants to provision the Chef-Solo.
Step 2 − Clone the Chef repo on the machine.
$ git clone $URL_PATH
Step 3 − cd to the chef repo.
$ cd chef-repo
Finally, run the Chef-Solo to converge the node −
$ sudo chef-solo -c solo.rb -j node.json
[2017-20-08T22:54:13+01:00] INFO: *** Chef 11.0.0 ***
[2017-20-08T22:54:13+01:00] INFO: Setting the run_list to
["recipe[ntp]"] from JSON
...TRUNCATED OUTPUT...
[2012-12-08T22:54:16+01:00] INFO: Chef Run complete in 2.388374
seconds
[2012-12-08T22:54:16+01:00] INFO: Running report handlers
solo.rb configures Chef-Solo to look for its cookbooks, roles, and data bags inside the current directory: the Chef repository.
Chef-Solo takes its node configuration from a JSON file. In our example, we called it node.json. If you're going to manage multiple servers, you'll need a separate file for each node. Then, Chef-Solo just executes a Chef run based on the configuration data found in solo.rb and node.json.
Chef - Cookbooks
Cookbooks are fundamental working units of Chef, which consists of all the details related to working units, having the capability to modify configuration and the state of any system configured as a node on Chef infrastructure. Cookbooks can perform multiple tasks. Cookbooks contain values about the desired state of node. This is achieved in Chef by using the desired external libraries.
Key Components of a Cookbook
- Recipes
- Metadata
- Attributes
- Resources
- Templates
- Libraries
- Anything else that helps to create a system
Creating a Cookbook
There are two ways to dynamically create a cookbook.
- Using chef command
- Using knife utility
Using Chef Command
To create an empty cookbook using Chef command, run the following command.
C:\Users\vipinkumarm>chef generate cookbook <Cookbook Name>
C:\Users\vipinkumarm>chef generate cookbook VTest
Installing Cookbook Gems:

Compiling Cookbooks...
Recipe: code_generator::cookbook
   * directory[C:/Users/vipinkumarm/VTest] action create
      - create new directory C:/Users/vipinkumarm/VTest

   * template[C:/Users/vipinkumarm/VTest/metadata.rb] action create_if_missing
      - create new file C:/Users/vipinkumarm/VTest/metadata.rb
      - update content in file C:/Users/vipinkumarm/VTest/metadata.rb
         from none to 4b9435 (diff output suppressed by config)

   * template[C:/Users/vipinkumarm/VTest/README.md] action create_if_missing
      - create new file C:/Users/vipinkumarm/VTest/README.md
      - update content in file C:/Users/vipinkumarm/VTest/README.md
         from none to 482077 (diff output suppressed by config)

   * cookbook_file[C:/Users/vipinkumarm/VTest/chefignore] action create
      - create new file C:/Users/vipinkumarm/VTest/chefignore
      - update content in file C:/Users/vipinkumarm/VTest/chefignore
         from none to 15fac5 (diff output suppressed by config)

   * cookbook_file[C:/Users/vipinkumarm/VTest/Berksfile] action create_if_missing
      - create new file C:/Users/vipinkumarm/VTest/Berksfile
      - update content in file C:/Users/vipinkumarm/VTest/Berksfile
         from none to 9f08dc (diff output suppressed by config)

   * template[C:/Users/vipinkumarm/VTest/.kitchen.yml] action create_if_missing
      - create new file C:/Users/vipinkumarm/VTest/.kitchen.yml
      - update content in file C:/Users/vipinkumarm/VTest/.kitchen.yml
         from none to 93c5bd (diff output suppressed by config)

   * directory[C:/Users/vipinkumarm/VTest/test/integration/default/serverspec]
      action create
      - create new directory
         C:/Users/vipinkumarm/VTest/test/integration/default/serverspec

   * directory[C:/Users/vipinkumarm/VTest/test/integration/helpers/serverspec]
      action create
      - create new directory
         C:/Users/vipinkumarm/VTest/test/integration/helpers/serverspec

   * cookbook_file
      [C:/Users/vipinkumarm/VTest/test/integration/helpers/serverspec/sp ec_helper.rb]
      action create_if_missing
      - create new file
         C:/Users/vipinkumarm/VTest/test/integration/helpers/serverspec/spec_helper.rb
      - update content in file
         C:/Users/vipinkumarm/VTest/test/integration/helpers/serverspec/spec_helper.rb
         from none to d85df4 (diff output suppressed by config)

   * template
      [C:/Users/vipinkumarm/VTest/test/integration/default/serverspec/default _spec.rb]
      action create_if_missing
      - create new file
         C:/Users/vipinkumarm/VTest/test/integration/default/serverspec/default_spec.rb
      - update content in file
         C:/Users/vipinkumarm/VTest/test/integration/default/serverspec/default_spec.rb
         from none to 758b94 (diff output suppressed by config)

   * directory[C:/Users/vipinkumarm/VTest/spec/unit/recipes] action create
      - create new directory C:/Users/vipinkumarm/VTest/spec/unit/recipes

   * cookbook_file[C:/Users/vipinkumarm/VTest/spec/spec_helper.rb]
      action create_if_missing
      - create new file C:/Users/vipinkumarm/VTest/spec/spec_helper.rb
      - update content in file C:/Users/vipinkumarm/VTest/spec/spec_helper.rb
         from none to 587075 (diff output suppressed by config)

   * template[C:/Users/vipinkumarm/VTest/spec/unit/recipes/default_spec.rb]
      action create_if_missing
      - create new file C:/Users/vipinkumarm/VTest/spec/unit/recipes/default_spec.rb
      - update content in file
         C:/Users/vipinkumarm/VTest/spec/unit/recipes/default_spec.rb
         from none to 779503 (diff output suppressed by config)
      - create new file C:/Users/vipinkumarm/VTest/recipes/default.rb
      - update content in file C:/Users/vipinkumarm/VTest/recipes/default.rb
         from none to 8cc381 (diff output suppressed by config)

   * cookbook_file[C:/Users/vipinkumarm/VTest/.gitignore] action create
      - create new file C:/Users/vipinkumarm/VTest/.gitignore
      - update content in file C:/Users/vipinkumarm/VTest/.gitignore from none to 33d469
         (diff output suppressed by config)
The cookbook structure with the name VTest will be created in the directory and following will be the structure for the same.
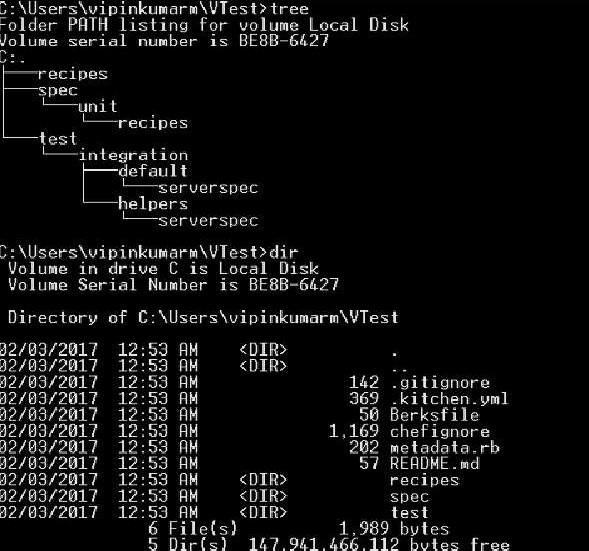
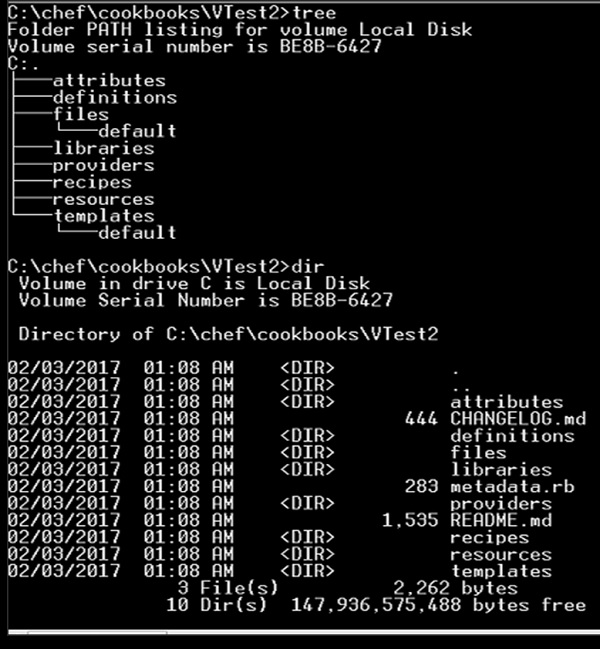
Using Knife Utility
Use the following command to create a cookbook using knife utility.
C:\Users\vipinkumarm\VTest>knife cookbook create VTest2
WARNING: No knife configuration file found
** Creating cookbook VTest2 in C:/chef/cookbooks
** Creating README for cookbook: VTest2
** Creating CHANGELOG for cookbook: VTest2
** Creating metadata for cookbook: VTest2
Following will be the structure of the cookbook.
Chef - Cookbook Dependencies
The features of defining cookbook dependencies help in managing cookbook. This feature is used when we want to use the functionality of one cookbook in other cookbooks.
For example, if one wants to compile C code then one needs to make sure that all the dependencies required to compile are installed. In order to do so, there might be separate cookbook which can perform such a function.
When we are using chef-server, we need to know such dependencies in cookbooks which should be decelerated in the cookbooks metadata file. This file is located at the top on the cookbook directory structure. It provides hints to the Chef server which helps in deploying cookbooks on the correct node.
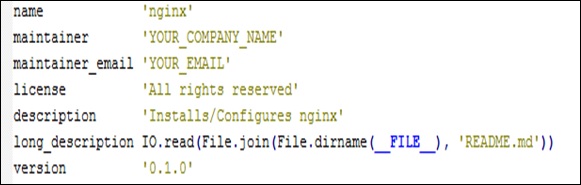
Features of metadata.rb File
Located at the top in the cookbook directory structure.
Compiled when the cookbook is uploaded to Chef server using knife command.
Compiled with knife cookbook metadata subcommand.
Created automatically when the knife cookbook create command is run.
Configuration of metadata.rb
Following is the default content of a metadata file.
Chef - Roles
Roles in Chef are a logical way of grouping nodes. Typical cases are to have roles for web servers, database servers, and so on. One can set custom run list for all the nodes and override attribute value within roles.
Create a Role
vipin@laptop:~/chef-repo $ subl roles/web_servers.rb
name "web_servers"
description "This role contains nodes, which act as web servers"
run_list "recipe[ntp]"
default_attributes 'ntp' => {
   'ntpdate' => {
      'disable' => true
   }
}
Once we have the role created, we need to upload to the Chef server.
Upload Role to Chef Server
vipin@laptop:~/chef-repo $ knife role from file web_servers.rb
Now, we need to assign a role to a node called server.
Assign a Role to Node
vipin@laptop:~/chef-repo $ knife node edit server
"run_list": [
   "role[web_servers]"
]
Saving updated run_list on node server
Run the Chef-Client
user@server:~$ sudo chef-client
...TRUNCATED OUTPUT...
[2013-07-25T13:28:24+00:00] INFO: Run List is [role[web_servers]]
[2013-07-25T13:28:24+00:00] INFO: Run List expands to [ntp]
...TRUNCATED OUTPUT...
How It Works
Define a role in a Ruby file inside the roles folder of Chef repository.
A role consists of a name and a description attribute.
A role consists of role-specific run list and role-specific attribute settings.
Every node that has a role in its run list will have the roles run list exacted into its own.
All the recipes in the roles run list will be executed on the node.
The role will be uploaded to Chef server using the knife role from file command.
The role will be added to the node run list.
Running Chef client on a node having the role in its run list will execute all the recipes listed in the role.
Chef - Environment
Chef helps in performing environment specific configuration. It is always a good idea to have a separate environment for development, testing, and production.
Chef enables grouping nodes into separate environments to support an ordered development flow.
Creating an Environment
Creation of environment on the fly can be done using the knife utility. Following command will open a Shells default editor, so that one can modify the environment definition.
vipin@laptop:~/chef-repo $ knife environment create book {
   "name": "book",
   "description": "",
   "cookbook_versions": {
   },
   "json_class": "Chef::Environment",
   "chef_type": "environment",
   "default_attributes": {
   },
   "override_attributes": {
   }
}
Created book
Testing a Created Environment
vipin@laptop:~/chef-repo $ knife environment list
_default
book
List Node for All Environments
vipin@laptop:~/chef-repo $ knife node list
my_server
_default Environment
Each organization will always start with at least a single environment called default environment, which is always available to the Chef server. A default environment cannot be modified in anyway. Any kind of changes can only be accommodated in the custom environment that we create.
Environment Attributes
An attribute can be defined in an environment and then used to override the default settings in the node. When the Chef client run takes place, then these attributes are compared with the default attributes that are already present in the node. When the environment attributes take precedence over the default attributes, Chef client will apply these settings and values when the Chef client run takes place on each node.
An environment attribute can only be either default_attribute or override_attribute. It cannot be a normal attribute. One can use default_attribute or override_attribute methods.
Attribute Type
Default − A default attribute is always reset at the start of every Chef client run and have the lowest attribute precedence.
Override − An override attribute is always reset at the start of every Chef client run and has a higher attribute precedence than default, force_default and normal. An override attribute is most often defined in the recipe but can also be specified in an attribute file for a role or for an environment.
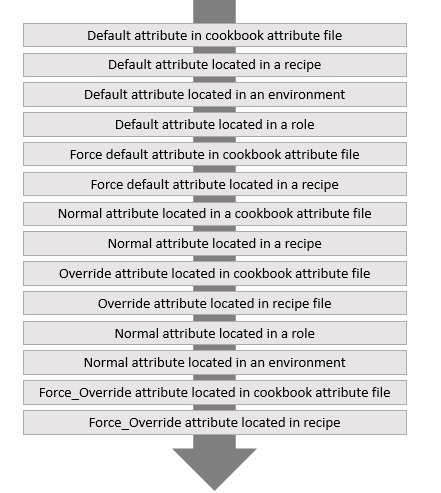
Order of Applying an Attribute
Chef - Chef-Client as Daemon
Running Chef-Client as daemon helps in knowing the state of all the nodes at any point of time. This help in running the Chef-Client at any point of time.
Pre-requisites
The node should be registered with Chef server and it should be running Chef-Client without any error.
Chef-Client in Daemon Mode
Start Chef-Client in daemon mode, running every 30 minutes.
user@server:~$ sudo chef-client -i 1800
In the above code, i enables to run the Chef-Client in daemon mode on the required node and 1800 seconds define that the Chef-Client daemon should run in every 30 minutes.
Validating Daemon Run
Validate that the Chef-Client is running as a daemon.
user@server:~$ ps auxw | grep chef-client
The above command will grep the running daemon process of Chef-Client.
Other Ways
Instead of running Chef-Client as a daemon, we can run the same as a cron job.
user@server:~$ subl /etc/cron.d/chef_client
PATH=/usr/local/bin:/usr/bin:/bin
# m h dom mon dow user command
*/15 * * * * root chef-client -l warn | grep -v 'retrying [1234]/5 in'
The above cron job will run after every 15 minutes.
Chef - Chef-Shell
Writing Chef cookbooks is always hard. It makes it even harder because of long feedback cycle of uploading them to the Chef server, provisioning a vagrant VM, checking how they failed there, rinsing and repeating. It would be easier if we could try to test some pieces or recipes before we do all this heavy lifting at once.
Chef comes with Chef-Shell, which is essentially an interactive Ruby session with Chef. In the Chef-Shell, we can create −
- Attributes
- Write Recipes
- Initializing Chef runs
It is used to evaluate parts of recipes on the fly, before uploading them to Chef server and execute complete cookbooks on the node.
Running Shell
Step 1 − Run Chef-Shell in a standalone mode.
mma@laptop:~/chef-repo $ chef-shell
loading configuration: none (standalone chef-shell session)
Session type: standalone
Loading...[2017-01-12T20:48:01+01:00] INFO: Run List is []
[2017-01-12T20:48:01+01:00] INFO: Run List expands to []
done.
This is chef-shell, the Chef Shell.
Chef Version: 11.0.0
http://www.opscode.com/chef
http://wiki.opscode.com/display/chef/Home
run `help' for help, `exit' or ^D to quit.
Ohai2u mma@laptop!
chef >
Step 2 − Switch to attribute mode in the Chef-Shell
chef > attributes_mode
Step 3 − Setting attribute value.
chef:attributes > set[:title] = "Chef Cookbook"
"Chef Cookbook"
chef:attributes > quit
:attributes
chef >
Step 4 − Switch to recipe mode.
chef > recipe_mode
Step 5 − Create a file resource.
chef:recipe > file "/tmp/book.txt" do
chef:recipe > content node.title
chef:recipe ?> end

=> <file[/tmp/book.txt] @name: "/tmp/book.txt" @noop: nil @
before: nil @params: {} @provider: Chef::Provider::File @allowed_
actions: [:nothing, :create, :delete, :touch, :create_if_missing]
@action: "create" @updated: false @updated_by_last_action: false
@supports: {} @ignore_failure: false @retries: 0 @retry_delay:
2 @source_line: "(irb#1):1:in `irb_binding'" @elapsed_time: 0 @
resource_name: :file @path: "/tmp/book.txt" @backup: 5 @diff: nil
@cookbook_name: nil @recipe_name: nil @content: "Chef Cookbook">

chef:recipe >
Step 6 − Commence Chef run to create the file with the given content.
chef:recipe > run_chef
[2017-01-12T21:07:49+01:00] INFO: Processing file[/tmp/book.txt]
action create ((irb#1) line 1)
--- /var/folders/1r/_35fx24d0y5g08qs131c33nw0000gn/T/cheftempfile20121212-
11348-dwp1zs 2012-12-12 21:07:49.000000000
+0100
+++ /var/folders/1r/_35fx24d0y5g08qs131c33nw0000gn/T/chefdiff20121212-
11348-hdzcp1 2012-12-12 21:07:49.000000000 +0100
@@ -0,0 +1 @@
+Chef Cookbook
\ No newline at end of file
[2017-01-12T21:07:49+01:00] INFO: entered create
[2017-01-12T21:07:49+01:00] INFO: file[/tmp/book.txt] created file
/tmp/book.txt
How it Works
Chef-Shell starts with an Interactive Ruby (IRB) session enhanced with some specific features.
It offers modes such as attributes_mode and interactive_mode.
It helps in writing commands, which are written inside a recipe or cookbook.
It runs everything in an interactive mode.
We can run Chef-Shell in three different modes: Standalone mode, Client mode, and Solo mode.
Standalone mode − It is the default mode. No cookbooks are loaded, and the run-list is empty.
Client mode − Here, the chef-shell acts as a chef-client.
Solo mode − Here, the chef-shell acts as a chef-solo client.
Chef - Testing Cookbooks
In case the cookbook is directly deployed and run on the production server, there are high chances that the cookbook can break up in production. The best way to prevent this from happening is, testing the cookbook in the setup environment.
Following are the steps for testing.
Step 1 − Install the cookbook using the following command.
vipin@laptop:~/chef-repo $ knife cookbook site install <cookbook name>
Step 2 − Run the knife cookbook test commands on the working cookbook.
vipin@laptop:~/chef-repo $ knife cookbook test VTest
checking ntp
Running syntax check on ntp
Validating ruby files
Validating templates
Step 3 − Break something in the cookbook and test again.
vipin@laptop:~/chef-repo $ subl cookbooks/VTest/recipes/default.rb
...
[ node['ntp']['varlibdir']
node['ntp']['statsdir'] ].each do |ntpdir|
   directory ntpdir do
      owner node['ntp']['var_owner']
      group node['ntp']['var_group']
      mode 0755
   end
end
Step 4 − Run the knife test command again.
vipin@laptop:~/chef-repo $ knife cookbook test ntp
checking ntp
Running syntax check on ntp
Validating ruby files
FATAL: Cookbook file recipes/default.rb has a ruby syntax error:
FATAL: cookbooks/ntp/recipes/default.rb:25: syntax error,
unexpected tIDENTIFIER, expecting ']'
FATAL: node['ntp']['statsdir'] ].each do |ntpdir|
FATAL: ^
FATAL: cookbooks/ntp/recipes/default.rb:25: syntax error,
unexpected ']', expecting $end
FATAL: node['ntp']['statsdir'] ].each do |ntpdir|
FATAL:
Working Method
Knife cookbook test executes a Ruby syntax check on all the Ruby files within the cookbook as well as all ERB templates. It loops through Ruby files and runs Ruby c against each of them. Ruby c checks the syntax of the script and quits without running it.
After going through all the Ruby files, knife cookbook test goes through all ERB templates and pipes, the redundant version created by x through Ruby c.
Limitations
Knife cookbook test does only a simple syntax check on the Ruby files and ERB templates. We can go ahead fully test driven by using ChefSpec and test kitchen.
Chef - Foodcritic
Writing good cookbooks without any issue is quite a difficult task. But there are ways which can help in identifying the pitfalls. Flagging in Chef Cookbook is possible. Foodcritic is one of the best way of archiving it, which tries to identify possible issues with the logic and style of cookbooks.
Foodcritic Setup
Step 1 − Add Foodcritic gem.
vipin@laptop:~/chef-repo $ subl Gemfile
source 'https://rubygems.org'
gem 'foodcritic', '~>2.2.0'
Step 2 − Install the gem.
vipin@laptop:~/chef-repo $ bundle install
Fetching gem metadata from https://rubygems.org/
...TRUNCATED OUTPUT...
Installing foodcritic (2.2.0)
Foodcritic Gem
Step 1 − Run Foodcritic on the cookbook.
vipin@laptop:~/chef-repo $ foodcritic ./cookbooks/<Cookbook Name>
FC002: Avoid string interpolation where not required: ./cookbooks/
mysql/attributes/server.rb:220
...TRUNCATED OUTPUT...
FC024: Consider adding platform equivalents: ./cookbooks/<Cookbook Name>/
recipes/server.rb:132
Step 2 − Generate a detailed report.
vipin@laptop:~/chef-repo $ foodcritic -C ./cookbooks/mysql
cookbooks/<cookbook Name>/attributes/server.rb
FC002: Avoid string interpolation where not required
[...]
85| default['<Cookbook Name>']['conf_dir'] = "#{mysql['basedir']}"
[...]
cookbooks/<Cookbook Name>/recipes/client.rb
FC007: Ensure recipe dependencies are reflected in cookbook
metadata
40| end
41|when "mac_os_x"
42| include_recipe 'homebrew'
43|end
44|
Working Method
Foodcritic defines a set of rules and checks recipe agents, each one of them. It comes with multiple rules concerning various areas: styles, connectedness, attributes, string, probability, search, services, files, metadata, and so on.
Chef - ChefSpec
Test Driven Development (TDD) is a way to write unit test before writing any actual recipe code. The test should be real and should validate what a recipe does. It should actually fail as there was no recipe developed. Once the recipe is developed, the test should pass.
ChefSpec is built on the popular RSpec framework and offers a tailored syntax for testing Chef recipe.
Creating ChefSpec
Step 1 − Create a gem file containing the chefSpec gem.
vipin@laptop:~/chef-repo $ subl Gemfile
source 'https://rubygems.org'
gem 'chefspec'
Step 2 − Install the gem.
vipin@laptop:~/chef-repo $ bundler install
Fetching gem metadata from https://rubygems.org/
...TRUNCATED OUTPUT...
Installing chefspec (1.3.1)
Using bundler (1.3.5)
Your bundle is complete!
Step 3 − Create a spec directory.
vipin@laptop:~/chef-repo $ mkdir cookbooks/<Cookbook Name>/spec
Step 4 − Create a Spec
vipin@laptop:~/chef-repo $ subl
cookbooks/my_cookbook/spec/default_spec.rb
require 'chefspec'
describe 'my_cookbook::default' do
   let(:chef_run) {
      ChefSpec::ChefRunner.new(
         platform:'ubuntu', version:'12.04'
      ).converge(described_recipe)
   }

   it 'creates a greetings file, containing the platform
   name' do
      expect(chef_run).to
      create_file_with_content('/tmp/greeting.txt','Hello! ubuntu!')
   end
end
Step 5 − Validate ChefSpec.
vipin@laptop:~/chef-repo $ rspec cookbooks/<Cookbook Name>/spec/default_spec.rb
F
Failures:
1) <CookBook Name> ::default creates a greetings file, containing the platform name
Failure/Error: expect(chef_run.converge(described_recipe)).to
create_file_with_content('/tmp/greeting.txt','Hello! ubuntu!')
File content:
does not match expected:
Hello! ubuntu!
# ./cookbooks/my_cookbook/spec/default_spec.rb:11:in `block
(2 levels) in <top (required)>'
Finished in 0.11152 seconds
1 example, 1 failure

Failed examples:
rspec ./cookbooks/my_cookbook/spec/default_spec.rb:10 # my_
cookbook::default creates a greetings file, containing the
platform name
Step 6 − Edit Cookbooks default recipe.
vipin@laptop:~/chef-repo $ subl cookbooks/<Cookbook Name>/recipes/default.rb
template '/tmp/greeting.txt' do
   variables greeting: 'Hello!'
end
Step 7 − Create a template file.
vipin@laptop:~/chef-repo $ subl cookbooks/< Cookbook Name>/recipes/default.rb
<%= @greeting %> <%= node['platform'] %>!
Step 8 − Run the rspec again.
vipin@laptop:~/chef-repo $ rspec cookbooks/<Cookbook Name>/spec/default_spec.rb
.
Finished in 0.10142 seconds
1 example, 0 failures
How It Works
In order to make it work, we need to first set up the base infrastructure for using RSpec with Chef. Then we need to ChefSpec Ruby gem and the cookbook needs a directory called spec where all the tests will be saved.
Chef - Testing Cookbook with Test Kitchen
Test kitchen is Chefs integration testing framework. It enables writing tests, which run after VM is instantiated and converged using the cookbook. The tests run on VM and can verify that everything works as expected.
This is node contract to ChefSpec, which only simulates a Chef run. Test Kitchen boots up a real node and runs Chef on it.
Setting Up
In order to do this, we need to have Vagrant installed on the machine which helps in managing a virtual machine. Then we need to have bookshelf installed and hooked with Vagrant in order to manage cookbook dependencies.
Step 1 − Edit default recipe in the cookbook.
vipin@laptop:~/chef-repo $ subl cookbooks/<Cookbook Name>/recipes/default.rb
file "/tmp/greeting.txt" do
   content node['my_cookbook']['greeting']
end
Step 2 − Edit cookbook attributes.
vipin@laptop:~/chef-repo $ subl cookbooks/<Cookbook Name>/attributes/default.rb
default['my_cookbook']['greeting'] = "Ohai, Chefs!"
Step 3 − Edit gem file to install the necessary Ruby gems.
vipin@laptop:~/chef-repo $ subl Gemfile
gem 'test-kitchen', '~> 2.0.0.alpha.7'
gem 'kitchen-vagrant'
Step 4 − Install the necessary Ruby gem.
vipin@laptop:~/chef-repo $ bundle install
...TRUNCATED OUTPUT...
Installing test-kitchen (1.0.0.alpha.7)
Installing kitchen-vagrant (0.10.0) ...TRUNCATED OUTPUT...
Step 5 − Create .kitchen.yml file in the cookbook.
vipin@laptop:~/chef-repo/cookbooks/my_cookbook $ subl .kitchen.yml
---
driver_plugin: vagrant
driver_config:
   require_chef_omnibus: true
platforms:
   - name: ubuntu-12.04
  driver_config:
      box: opscode-ubuntu-12.04
      box_url:
         https://opscode-vm.s3.amazonaws.com/vagrant/
            opscode_ubuntu12.04_provisionerless.box
suites:
   - name: default
   run_list:
      - recipe[minitest-handler]
      - recipe[my_cookbook_test]
attributes: { my_cookbook: { greeting: 'Ohai, Minitest!'} }
Step 6 − Create a test directory inside the cookbook.
vipin@laptop:~/chef-repo/cookbooks/<Cookbook Name>$ mkdir test
Step 7 − Create a test cookbook for integration testing.
vipin@laptop:~/chef-repo/cookbooks/<Cookbook Name>/test $ knife
cookbook create my_cookbook_test
** Creating cookbook my_cookbook_test
** Creating README for cookbook: my_cookbook_test
** Creating CHANGELOG for cookbook: my_cookbook_test
** Creating metadata for cookbook: my_cookbook_test
Step 8 − Edit test cookbooks default recipe.
vipin@laptop:~/chef-repo/cookbooks/my_cookbook $ subl
test/cookbooks/my_cookbook_test/recipes/default.rb
include_recipe 'my_cookbook::default'
Step 9 − Create Minitest Spec inside the cookbook.
vipin@laptop:~/chef-repo/cookbooks/my_cookbook $ mkdir -p
   test/cookbooks/my_cookbook_test/files/default/tests/minitest

vipin@laptop:~/chef-repo/cookbooks/my_cookbook $ subl
   test/cookbooks/my_cookbook_test/files/default/tests/minitest/default_test.rb

require 'minitest/spec'
describe_recipe 'my_cookbook::default' do
   describe "greeting file" do
      it "creates the greeting file" do
         file("/tmp/greeting.txt").must_exist
      end

      it "contains what's stored in the 'greeting' node
         attribute" do
         file('/tmp/greeting.txt').must_include 'Ohai, Minitest!'
      end
end
Step 10 − Edit your main cookbook's Berksfile.
vipin@laptop:~/chef-repo/cookbooks/my_cookbook $ subl Berksfile
site :opscode
metadata
cookbook "apt"
cookbook "minitest-handler"
cookbook "my_cookbook_test", path:
"./test/cookbooks/my_cookbook_test"
Testing the Setup
vipin@laptop:~/chef-repo/cookbooks/my_cookbook $ kitchen test
-----> Starting Kitchen (v1.0.0.alpha.7)
...TRUNCATED OUTPUT...
-----> Converging <default-ubuntu-1204>
-----> Installing Chef Omnibus (true)
...TRUNCATED OUTPUT...
Starting Chef Client, version 11.4.4
[2013-06-29T18:33:57+00:00] INFO: *** Chef 11.4.4 ***
[2013-06-29T18:33:58+00:00] INFO: Setting the run_list to
["recipe[minitest-handler]", "recipe[my_cookbook_test]"]
from JSON
...TRUNCATED OUTPUT...
# Running tests:
recipe::my_cookbook::default::greeting
file#test_0001_creates the greeting file = 0.00 s = .
recipe::my_cookbook::default::greeting
file#test_0002_contains what's stored in the 'greeting'
node attribute = 0.00 s = .
Finished tests in 0.011190s, 178.7277 tests/s, 178.7277
assertions/s.
2 tests, 2 assertions, 0 failures, 0 errors, 0 skips
...TRUNCATED OUTPUT...
-----> Kitchen is finished. (2m5.69s)
Chef - Nodes
Knife preflight shows details about all the nodes which uses a certain cookbook before uploading it to Chef server.
Getting Started
In order to get started, we need to have knife-preflight gem installed.
Step 1 − Define the path in the gem file.
vipin@laptop:~/chef-repo $ subl Gemfile
source 'https://rubygems.org'
gem 'knife-preflight'
Step 2 − Run bundler to install knife-preflight gem.
vipin@laptop:~/chef-repo $ bundle install
Fetching gem metadata from https://rubygems.org/
...TRUNCATED OUTPUT...
Installing knife-preflight (0.1.6)
Working Method
Run knife-preflight on the given cookbook.
We can run the preflight command to find out which nodes and roles have the given cookbook in their expanded run lists.
vipin@laptop:~/chef-repo $ knife preflight ntp
Searching for nodes containing ntp OR ntp::default in their
expanded run_list...
2 Nodes found
www-staging.example.com
cms-staging.example.com
Searching for roles containing ntp OR ntp::default in their
expanded run_list...
3 Roles found
your_cms_role
your_www_role
your_app_role
Found 6 nodes and 3 roles using the specified search
criteria
There are multiple ways for a cookbook to get executed on the node.
You can assign the cookbook directly to a node by adding it to the node's run list.
You can add a cookbook to the role and add the role to the node's run list.
You can add the role to the run list of another role and add that other role to the node's run list.
A cookbook can be a dependency of another used cookbook.
No matter how a cookbook ends up in a node's run list, the knife preflight command will catch it as Chef stores all expanded lists of roles and recipes in node attributes. The knife preflight command issues a search for exactly those node attributes.
Chef - Chef-Client Run
In order to test Chef-Client run, we need to have Chef-Client configured to use the hosted Chef or own hosted server.
Running Chef-Client in Debug Mode
vipin@server:~$ sudo chef-client -l debug
TRUNCATED OUTPUT
Hashed Path:A+WOcvvGu160cBO7IFKLYPhh9fI=
X-Ops-Content-Hash:2jmj7l5rSw0yVb/vlWAYkK/YBwk=
X-Ops-Timestamp:2012-12-27T11:14:07Z
X-Ops-UserId:vagrant'
Header hash: {"X-Ops-Sign"=>"algorithm=sha1;version=1.0;",
"X-Ops-Userid"=>"vagrant", "X-Ops-Timestamp"=>"2012-12-
27T11:14:07Z", "X-Ops-Content-
Hash"=>"2jmj7l5rSw0yVb/vlWAYkK/YBwk=", "X-Ops-
Authorization-
1"=>"HQmTt9U/
LJJVAJXWtyOu3GW8FbybxAIKp4rhiw9O9O3wtGYVHyVGuoilWDao",
"X-Ops-Authorization-
2"=>"2/uUBPWX+YAN0g1/
fD2854QAU2aUcnSaVM0cPNNrldoOocmA0U5HXkBJTKok",
"X-Ops-Authorization-
3"=>"6EXPrEJg5T+
ddWd5qHAN6zMqYc3untb41t+eBpigGHPhtn1LLInMkPeIYwBm",
"X-Ops-Authorization-
4"=>"B0Fwbwz2HVP3wEsYdBGu7yOatq7fZBXHfIpeOi0kn/
Vn0P7HrucnOpONmMgU", "X-Ops-Authorization-
5"=>"RBmmbetFSKCYsdg2v2mW/
ifLIVemhsHyOQjffPYPpNIB3U2n7vji37NxRnBY",
"X-Ops-Authorization-
6"=>"Pb3VM7FmY60xKvWfZyahM8y8WVV9xPWsD1vngihjFw=="}
[2012-12-27T11:14:07+00:00] DEBUG: Sending HTTP Request via
GET to api.opscode.com:443/organizations/agilewebops/
nodes/vagrant
[2012-12-27T11:14:09+00:00] DEBUG: ---- HTTP Status and
Header Data: ----
[2012-12-27T11:14:09+00:00] DEBUG: HTTP 1.1 200 OK
[2012-12-27T11:14:09+00:00] DEBUG: server: nginx/1.0.5
[2012-12-27T11:14:09+00:00] DEBUG: date: Thu, 27 Dec 2012
Inspecting the Result of the Last Chef-Client Run
In order to check the last Chef-Client run especially failure issues when we are developing a new cookbook, we need to know what exactly went wrong. Even though Chef prints everything in stdout, one might want to see the debug log again.
If we want to test, we need to have a broken cookbook which is failing on compilation.
user@server:~$ sudo chef-client
==================================================================
==============
Recipe Compile Error in /srv/chef/file_store/cookbooks/my_
cookbook/recipes/default.rb
==================================================================
==============
NoMethodError
-------------
undefined method `each' for nil:NilClass
Cookbook Trace:
---------------
/srv/chef/file_store/cookbooks/my_cookbook/recipes/default.
rb:9:in `from_file'
Relevant File Content:
----------------------
/srv/chef/file_store/cookbooks/my_cookbook/recipes/default.rb:
2: # Cookbook Name:: my_cookbook
3: # Recipe:: default
4: #
5: # Copyright 2013, YOUR_COMPANY_NAME
6: #
7: # All rights reserved - Do Not Redistribute
8: #
9≫ nil.each {}
10:
For more details, we can look into the stacktrace.
user@server:~$ less /srv/chef/file_store/chef-stacktrace.out
Generated at 2013-07-21 18:34:05 +0000
NoMethodError: undefined method `each' for nil:NilClass
/srv/chef/file_store/cookbooks/my_cookbook/recipes/default.rb:9:in
`from_file'
/opt/chef/embedded/lib/ruby/gems/1.9.1/gems/chef-11.4.4/lib/chef/
mixin/from_file.rb:30:in `instance_eval'
/opt/chef/embedded/lib/ruby/gems/1.9.1/gems/chef-11.4.4/lib/chef/
mixin/from_file.rb:30:in `from_file'
/opt/chef/embedded/lib/ruby/gems/1.9.1/gems/chef-11.4.4/lib/chef/
cookbook_version.rb:346:in `load_recipe'
Chef - Dynamically Configuring Recipes
Attributes are the key components for dynamically configuring cookbooks. Attributes enable the authors to make the cookbook configurable. By overriding default values set in cookbooks, the user can inject their own values.
Step 1 − Create a default file for cookbook attributes and add a default attribute to it.
vipin@laptop:~/chef-repo $ subl cookbooks/my_cookbook/attributes/default.rb
default['my_cookbook']['message'] = 'hello world!'
Step 2 − Define the attribute inside the recipe.
vipin@laptop:~/chef-repo $ subl cookbooks/<Cookbook Name>/recipes/default.rb
message = node['my_cookbook']['message']
Chef::Log.info("** Saying what I was told to say: #{message}")
Step 3 − Uploading the modified cookbook.
vipin@laptop:~/chef-repo $ knife cookbook upload my_cookbook
Uploading my_cookbook [0.1.0]
Step 4 − Running Chef-Client of the defined node.
user@server:~$ sudo chef-client
...TRUNCATED OUTPUT...
[2013-01-13T20:48:21+00:00] INFO: ** Saying what I was told to
say: hello world!
...TRUNCATED OUTPUT...
Working Method
Chef loads all attributes from the attribute file before it executes them. The attributes are stored with the node object. One can access all the attributes stored with the node object within recipes and retrieve their current values.
Chef has a restricted structure starting from the default being the lowest, then comes normal (which is aliased with the set) and then overrides. The attribute level set in the recipe has precedence over the same level set in an attribute file.
Overriding Attribute at the Node and Environment Level
Attribute defined in roles or environment have the highest precedence.
Step 1 − Create a role.
vipin@laptop:~/chef-repo $ subl roles/german_hosts.rb
name "german_hosts"
description "This Role contains hosts, which should print out
their messages in German"
run_list "recipe[my_cookbook]"
default_attributes "my_cookbook" => { "message" => "Hallo Welt!" }
Step 2 − Upload the role to Chef server.
vipin@laptop:~/chef-repo $ knife role from file german_hosts.rb
Updated Role german_hosts!
Step 3 − Assign the role to a node.
vipin@laptop:~/chef-repo $ knife node edit server
"run_list": [
   "role[german_hosts]"
]
Saving updated run_list on node server
Step 4 − Run the Chef-Client.
user@server:~$ sudo chef-client
...TRUNCATED OUTPUT...
[2013-01-13T20:49:49+00:00] INFO: ** Saying what I was told to
say: Hallo Welt!
...TRUNCATED OUTPUT...
Chef - Templates
In Infrastructure, configuration management is all about how well one configures the hosts. In general, all the configurations are done using the configuration files. Chef uses templates to be able to fill the configuration file with dynamic values.
Chef provides templates as a resource which can be used in the recipe. Configuration files dynamic values can be retrieved from data bags, attributes or even calculate them by passing them into the template.
How to Use It?
Step 1 − Add the template to the recipe.
vipin@laptop:~/chef-repo $ subl cookbooks/<Cookbook Name>/recipes/default.rb
template '/tmp/message' do
   source 'Test.erb'
   variables(
      hi: 'Tesing',
      world: 'Welt',
      from: node['fqdn']
   )
end
Step 2 − Add ERB Template file.
vipin@laptop:~/chef-repo $ subl cookbooks/<Cookbook Name>/templates/default/test.erb
<%- 4.times do %>
<%= @hi %>, <%= @world %> from <%= @from %>!
<%- end %>
Step 3 − Upload the modified cookbook to Chef server.
vipin@laptop:~/chef-repo $ knife cookbook upload <Cookbook Name>
Uploading my_cookbook [0.1.0]
Run Chef Client on your node:
user@server:~$ sudo chef-client
...TRUNCATED OUTPUT...
[2017-01-14T20:41:21+00:00] INFO: Processing template[/tmp/
message] action create (my_cookbook::default line 9)
[2017-01-14T20:41:22+00:00] INFO: template[/tmp/message] updated
content
Step 4 − Validate the content of the uploaded file.
user@server:~$ sudo cat /tmp/message
Hallo, Welt from vagrant.vm!
Hallo, Welt from vagrant.vm!
Hallo, Welt from vagrant.vm!
Hallo, Welt from vagrant.vm!
Workflow
Chef uses Erubis as its template language. It allows embedding pure Ruby code inside special symbols in the templates.
<%= %> is used if you want to print the value of a variable or Ruby expression into the generated file.
<%- %> is used if you want to embed Ruby logic into your template file. We use it to loop our expression four times.
Chef - Plain Ruby with Chef DSL
In Chef, if one needs to create simple recipes one can use resources available in Chef, such as templates, remote_file, and services. However as the recipes become elaborate, one needs advanced techniques, such as conditional statements to execute parts of the recipe on condition. This is the power of mixing plain Ruby with Chef Domain Specific Language (DSL).
How to Use It?
Start Chef Shell on any of the node in the client mode to be able to access the Chef server.
user@server:~$ sudo chef-shell --client
loading configuration: /etc/chef/client.rb
Session type: client
...TRUNCATED OUTPUT...
run `help' for help, `exit' or ^D to quit.
Ohai2u user@server!
Chef>
Basic Conditions with Chef DSL
Sort nodes by name using plain Ruby.
chef > nodes.sort! {|a,b| a.name <=> b.name }
=> [node[alice],node[server]]
Loop through the nodes, printing their operating system.
chef > nodes.each do |n|
   chef > puts n['os']
   chef ?>
end
linux
windows
=> [node[server], node[alice]]
Install multiple Ruby gems using an array, a loop, and string expansion to construct the gem names.
chef > %w{ec2 essentials}.each do |gem|
   chef > gem_package "knife-#{gem}"
   chef ?> end   => ["ec2", "essentials"]
Working Method
Chef recipes are Ruby files, which gets evaluated in the context of Chef run. They can contain plain Ruby code such as if statement and loops as well as Chef DSL elements such as resources.
Inside the recipe, one can simply declare Ruby variables and assign values to it.
Chef - Ruby Gems with Recipes
Recipes are the key building blocks of cookbook which is basically Ruby code. It is possible to use all of the Ruby language features inside the Chef recipe. Most of the time Ruby build in functionality is enough but sometimes one might need to use additional Ruby gems. For example, if one needs to access MySQL database from the recipe itself.
Chef recipe has the capability to get the required Ruby gems in order to use them inside the very same recipe.
Using iptable Gem in the Given Recipe
Step 1 − Edit the default recipe of the cookbook and install the gem to be used inside the recipe.
vipin@laptop:~/chef-repo $ subl
cookbooks/my_cookbook/recipes/default.rb
chef_gem 'ipaddress'
require 'ipaddress'
ip = IPAddress("192.168.0.1/24")
Chef::Log.info("Netmask of #{ip}: #{ip.netmask}")
Step 2 − Upload the modified cookbook to the Chef server.
vipin@laptop:~/chef-repo $ knife cookbook upload my_cookbook
Uploading my_cookbook [0.1.0]
Step 3 − Running Chef client to see the output.
user@server $ sudo chef-client
...TRUNCATED OUTPUT...
[2013-01-18T14:02:02+00:00] INFO: Netmask of 192.168.0.1:
255.255.255.0
...TRUNCATED OUTPUT...
Working Method
Chef run steps consist of the compilation phase, where it compiles all the resources and an execution phase where Chef runs the resource providers to converge the node to the desired state. If one needs any particular Ruby gem inside the cookbook, one needs to install the gem during the complication phase.
The chef_gem resource will exactly do the same, and in Chef, Omnibus is the only way to work. Its main function is to make gems available to Chef itself.
Chef - Libraries
Libraries in Chef provides a place to encapsulate compiled logic so that the cookbook recipes remain neat and clean.
Creating the Library
Step 1 − Create a helper method in cookbooks library.
vipin@laptop:~/chef-repo $ subl cookbooks/my_cookbook/libraries/ipaddress.rb
class Chef::Recipe
def netmask(ipaddress)
IPAddress(ipaddress).netmask
end
end
Step 2 − Use the helper method.
vipin@laptop:~/chef-repo $ subl cookbooks/my_cookbook/recipes/default.rb
ip = '10.10.0.0/24'
mask = netmask(ip) # here we use the library method
Chef::Log.info("Netmask of #{ip}: #{mask}")
Step 3 − Upload the modified cookbook to the Chef Server.
vipin@laptop:~/chef-repo $ knife cookbook upload my_cookbook
Uploading my_cookbook [0.1.0]
Testing the Library
user@server $ sudo chef-client
...TRUNCATED OUTPUT...
[2013-01-18T14:38:26+00:00] INFO: Netmask of 10.10.0.0/24:
255.255.255.0
...TRUNCATED OUTPUT...
Working Method
Chef library code can open the chef::Recipe class and add new methods as done in Step 1. This step is not the cleanest but the simplest way of doing it.
class Chef::Recipe
def netmask(ipaddress)
...
end
end
Best Practices
Once we open the chef::recipe class, there are changes that it gets polluted. As a best practice, it is always a better way to introduce a new sub class inside the library and define a method as class method. This avoids pulling the chef::recipe namespace.
vipin@laptop:~/chef-repo $ subl cookbooks/my_cookbook/libraries/ipaddress.rb
class Chef::Recipe::IPAddress
def self.netmask(ipaddress)
IPAddress(ipaddress).netmask
end
end
We can use the method inside the recipe like
IPAddress.netmask(ip)
Chef - Definition
Definition can be defined as a logical method of grouping resources, which are used again and again. In this flow, we group the resources and give them a name to regain readability of defined cookbooks.
In order to do this, we should have a recipe. In this case, we are using test_cookbook and a run list of nodes, which includes the cookbook.
Creating a Definition
Step 1 − Create a new definition file in the cookbooks definition folder.
vipin@laptop:~/chef-repo $ subl cookbooks/test_cookbook/definitions/
capistrano_deploy_dirs.rb
define :capistrano_deploy_dirs, :deploy_to => '' do
   directory "#{params[:deploy_to]}/releases"
   directory "#{params[:deploy_to]}/shared"
   directory "#{params[:deploy_to]}/shared/system"
end
Step 2 − Use a definition inside the cookbooks default recipe.
vipin@laptop:~/chef-repo $ subl cookbooks/test_cookbook/recipes/default.rb
capistrano_deploy_dirs do
   deploy_to "/srv"
end
Step 3 − Upload the cookbook to the chef server.
vipin@laptop:~/chef-repo $ knife cookbook upload test_cookbook
Uploading test_cookbook [0.1.0]
Step 4 − Run the Chef client on the desired node.
vipin@laptop:~/chef-repuser@server $ sudo chef-client
...TRUNCATED OUTPUT...
[2013-01-18T16:31:11+00:00] INFO: Processing directory[/srv/
releases] action create (my_cookbook::default line 2)
[2013-01-18T16:31:11+00:00] INFO: directory[/srv/releases] created
directory /srv/releases
[2013-01-18T16:31:11+00:00] INFO: Processing directory[/srv/
shared] action create (my_cookbook::default line 3)
[2013-01-18T16:31:11+00:00] INFO: directory[/srv/shared] created
directory /srv/shared
[2013-01-18T16:31:11+00:00] INFO: Processing directory[/srv/
shared/system] action create (my_cookbook::default line 4)
[2013-01-18T16:31:11+00:00] INFO: directory[/srv/shared/system]
Definition in cookbooks are like micros, which group the resources and give them a name. A definition has a name by which one can tell them from which can be called inside the recipe and it has a list of perimeters.
In the definition, we have parameters which in our code looks like the following.
..
directory "#{params[:deploy_to]}/releases"
directory "#{params[:deploy_to]}/shared"
directory "#{params[:deploy_to]}/shared/system
It can be used inside the default recipe as follows.
capistrano_deploy_dirs do
   deploy_to "/srv"`
end
Chef - Environment Variable
Environment variable is a key way to make Chef recipe run on any particular node successfully. There are multiple ways of doing it, either manually setting them up or by using a Shell script. Setting them via recipe is what we need to perform here.
To do this, we need to have a cookbook here we would use test_cookbook and a run list which contains test_cookbook.
Setting Environment Variable Using Chef Recipe
Step 1 − Update the default recipe of cookbook with an environment variable.
vipin@laptop:~/chef-repo $ subl cookbooks/test_cookbook/recipes/default.rb
ENV['MESSAGE'] = 'Testing environment variable update with chef !'
execute 'print value of environment variable $MESSAGE' do
   command 'echo $MESSAGE > /tmp/message'
end
Step 2 − Upload the updated cookbook to the server.
vipin@laptop:~/chef-repo $ knife cookbook upload test_cookbook
Uploading my_cookbook [0.1.0]
Step 3 − Running the Chef client to create a temp file.
user@server:~$ sudo chef-client
...TRUNCATED OUTPUT...
[2013-01-25T15:01:57+00:00] INFO: Processing execute[print
value of environment variable $MESSAGE] action run
(my_cookbook::default line 11)
[2013-01-25T15:01:57+00:00] INFO: execute[print value of
environment variable $MESSAGE] ran successfully
...TRUNCATED OUTPUT...
Validating Variable
user@server:~$ cat /tmp/message
Hello from Chef
Working Method
Ruby exposes the current environment variable via ENV a hash to read and modify the environment variable.
Execute Resource
We can use execute resource to do the same inside the Chef default recipe of cookbook.
mma@laptop:~/chef-repo $ subl cookbooks/test_cookbook/recipes/default.rb
execute 'print value of environment variable $MESSAGE' do
   command 'echo $MESSAGE > /tmp/message'
   environment 'MESSAGE' => 'Hello from the execute resource'
end
Note − Setting an environment variable using ENV will make that variable available during the whole Chef run. In contrast, passing it to the execute resource will only make it available for that one command executed by the resource.
Chef - Data Bugs
Chef data bags can be defined as an arbitrary collection of data which one can use with cookbooks. Using data bags is very helpful when one does not wish to hardcode attributes in recipes nor to store attributes in cookbooks.
Working Method
In the following setup, we are trying to communicate to http endpoint URL. For this, we need to create a data bag, which will hold the endpoint URL detail and use it in our recipe.
Step 1 − Create a directory for our data bag.
mma@laptop:~/chef-repo $ mkdir data_bags/hooks
Step 2 − Create a data bag item for request bin. One needs to make sure one is using a defined requestBin URL.
vipi@laptop:~/chef-repo $ subl data_bags/hooks/request_bin.json {
   "id": "request_bin",
   "url": "http://requestb.in/1abd0kf1"
}
Step 3 − Create a data bag on the Chef server
vipin@laptop:~/chef-repo $ knife data bag create hooks
Created data_bag[hooks]
Step 4 − Upload the data bag to the Chef server.
vipin@laptop:~/chef-repo $ knife data bag from file hooks requestbin.json
Updated data_bag_item[hooks::RequestBin]
Step 5 − Update the default recipe of the cookbook to receive the required cookbook from a data bag.
vipin@laptop:~/chef-repo $ subl cookbooks/my_cookbook/recipes/default.rb
hook = data_bag_item('hooks', 'request_bin')
http_request 'callback' do
   url hook['url']
end
Step 6 − Upload the modified cookbook to the Chef server.
vipin@laptop:~/chef-repo $ knife cookbook upload my_cookbook
Uploading my_cookbook [0.1.0]
Step 7 − Run the Chef client on the node to check if the http request bin gets executed.
user@server:~$ sudo chef-client
...TRUNCATED OUTPUT...
[2013-02-22T20:37:35+00:00] INFO: http_request[callback]
GET to http://requestb.in/1abd0kf1 successful
...TRUNCATED OUTPUT...
How it Works
Data bag is a named collection of structure data entries. One needs to define data entry and call the data bag item in JSON file. One can also search for data bag item from within the recipes to use the data stored in the data bags.
We created a data bag called hooks. A data bag is a directory within Chef repository. We used knife to create it on the server.
Chef - Scripts for Data Bugs
In certain conditions, it is not possible to put the server under the full control of Chef. In such cases, one might need to access values in Chef data bags from scripts. In order to do this, one needs to store data bag values in a JSON file and let the added script access those values.
For this, one needs to have a cookbook. In our case we would use test_cookbook as earlier and should have the run list of the node including test_cookbook definition in it.
Working Method
Step 1 − Create a data bag.
vipin@laptop:~/chef-repo $ mkdir data_bags/servers
vipin@laptop:~/chef-repo $ knife data bag create servers
Created data_bag[servers]
Step 2 − Create a data bag item.
vipin@laptop:~/chef-repo $ subl data_bags/servers/Storage.json {
   "id": "storage",
   "host": "10.0.0.12"
}
Step 3 − Update the data bag item.
vipin@laptop:~/chef-repo $ subl data_bags/servers/Storage.json {
   "id": "storage",
   "host": "10.0.0.12"
}
Using in Cookbook
Step 1 − Need to create a JSON file containing data bag values using the above cookbook so that external scripts can access those values.
vipin@laptop:~/chef-repo $ subl cookbooks/test_cookbook/recipes/default.rb
file "/etc/backup_config.json" do
   owner "root"
   group "root"
   mode 0644
   content data_bag_item('servers', 'backup')['host'].to_json
end
Step 2 − Upload test_cookbook to Chef server.
vipin@laptop:~/chef-repo $ knife cookbook upload test_cookbook
Uploading my_cookbook [0.1.0]
Step 3 − Run the Chef client on the node.
user@server:~$ sudo chef-client
...TRUNCATED OUTPUT...
[2013-03-14T20:30:33+00:00] INFO: Processing
file[/etc/backup_config.json] action create
(my_cookbook::default line 9)
[2013-03-14T20:30:34+00:00] INFO: entered create
[2013-03-14T20:30:34+00:00] INFO:
file[/etc/backup_config.json] owner changed to 0
[2013-03-14T20:30:34+00:00] INFO:
file[/etc/backup_config.json] group changed to 0
[2013-03-14T20:30:34+00:00] INFO:
file[/etc/backup_config.json] mode changed to 644
[2013-03-14T20:30:34+00:00] INFO:
file[/etc/backup_config.json] created file
/etc/backup_config.json
...TRUNCATED OUTPUT...
Step 4 − Validating the content of the generated JSON file.
user@server:~$ cat /etc/backup_config.json
"10.0.0.12"
Workflow of Scripts
In the above command, the file resource that we have used which creates JSON file inside the /etc directory is defined in the default cookbook. It gets the file content directly from the data bag using the data_bag_item method. We access the host values from the data bag item and convert it to JSON. The file resource uses the JSON-converted values as its content and writes it to the disk.
Chef - Cross-Platform for Cookbooks
Cross-Platform cookbooks are those cookbooks which adopt an underlying environment on which it is going to run. Chef provides a host of features, which helps in writing crossplatform cookbooks capable of running on any OS, on which it is going to get deployed. This helps a developer to write a completely operational cookbook.
In order to do this, we need to have a cookbook. In our case it will be test_cookbook and a run list which will have the cookbook definition in it.
Working Method
Retrieving the nodes platform detail and executing the conditional logic in our cookbook depends on the platform. In our case, we will test it for Ubuntu.
Step 1 − Log a message if the node is Ubuntu.
vipin@laptop:~/chef-repo $ subl cookbooks/test_cookbook/recipes/default.rb
Log.info("Running on ubuntu") if node.platform['ubuntu']
Step 2 − Upload the cookbook to Chef server.
vipin@laptop:~/chef-repo $ subl cookbooks/test_cookbook/recipes/default.rb
Uploading my_cookbook [0.1.0]
Uploaded 1 cookbook.
Step 3 − Run the Chef client on the node.
user@server:~$ sudo chef-client
...TRUNCATED OUTPUT...
[2013-03-03T20:07:39+00:00] INFO: Running on Ubuntu
...TRUNCATED OUTPUT...
Alternatively, if one is not interested in a specific platform but only needs to know which declarative one is using, the following statement can be used.
Log.info("Running on a debian derivative") if
platform_family?('debian')
Uploading the modified cookbook and running Chef client on Ubuntu node will show the following result.
[2013-03-03T20:16:14+00:00] INFO: Running on a debian
derivative
Workflow of Scripts
In the above command, Ohai will discover the current status of the nodes operating system and store it as a platform attribute with the node object.
node['platform']
Or, you can use method style syntax −
node.platform
Setting Platform Specific Values
In order to set platform specific values chef offers convenience methods value_for_platform and value_for_platform_family. They can be used to avoid complex case statement and use a simple hash instead.
Example cookbook
execute "start-runsvdir" do
   command value_for_platform(
      "debian" => { "default" => "runsvdir-start" },
      "ubuntu" => { "default" => "start runsvdir" },
      "gentoo" => { "default" => "/etc/init.d/runit-start start" }
   )
   action :nothing
end
In the above example, the command is OS specific as defined.
- For Debian, "runsvdir-start" will work
- For Ubuntu, "start runsvdir" will work
- For Gentoo, "/etc/init.d/runit-start" will work
Chef - Resources
Chef resource represents a piece of the operating system at its desired state. It is a statement of configuration policy that describes the desired state of a node to which one wants to take the current configuration to using resource providers. It helps in knowing the current status of the target machine using the Ohai mechanism of Chef. It also helps in defining the steps required to perform to get the target machine to that state. The resources are grouped in recipes which describes the working configuration.
In case of Chef, chef::Platform maps the providers and platform versions of each node. At the beginning of every Chef-client run, Chef server collects the details of any machines current state. Later, Chef server uses those values to identify the correct provider.
Resource Syntax
type 'name' do
   attribute 'value'
   action :type_of_action
end
In the above syntax, type is the resource type and name is the name that we are going to use. In the do and end block, we have the attribute of that resource and the action that we need to take for that particular resource.
Every resource that we use in the recipe has its own set of actions, which is defined inside the do and end block.
Example
type 'name' do
   attribute 'value'
   action :type_of_action
end
All resources share a common set of functionality, actions, properties, conditional execution, notification, and relevant path of action.
| Actions | The :nothing action can be used with any resource or custom resource. |
| Properties | The ignore_failure, provider, retries, retry_delay, and supports properties can be used with any resource or custom resources. |
| Guards | The not_if and only_if conditional executions can be used to put additional guards around certain resources, so that they are only run when the condition is met. |
| Guard Interpreters | Evaluates a string command using a script-based resource: bash, csh, perl, powershell_script, python, or ruby. |
| Notifications | The notifies and subscribes notifications can be used with any resource. |
| Relative Paths | The #{ENV['HOME']} relative path can be used with any resource. |
| Windows File Security | The template, file, remote_file, cookbook_file, directory, and remote_directory resources support the use of inheritance and access control lists (ACLs) within recipes. |
| Run in Compile Phase | Sometimes a resource needs to be run before every other resource or after all resources have been added to the resource collection. |
Available Resources
apt_package
Use the apt_package resource to manage packages for the Debian and Ubuntu platforms.
Bash
Use the bash resource to execute scripts using the Bash interpreter. This resource may also use any of the actions and properties that are available to the execute resource. Commands that are executed with this resource are (by their nature) not idempotent, as they are typically unique to the environment in which they are run. Use not_if and only_if to guard this resource for idempotence.
Batch
Use the batch resource to execute a batch script using the cmd.exe interpreter. The batch resource creates and executes a temporary file (similar to how the script resource behaves), rather than running the command inline.
This resource inherits actions (:run and :nothing) and properties (creates, cwd, environment, group, path, timeout, and user) from the execute resource. Commands that are executed with this resource are (by their nature) not idempotent, as they are typically unique to the environment in which they are run. Use not_if and only_if to guard this resource for idempotence.
bff_package
Use the bff_package resource to manage packages for the AIX platform using the installp utility. When a package is installed from a local file, it must be added to the node using the remote_file or cookbook_file resources.
chef_gem
Use the chef_gem resource to install a gem only for the instance of Ruby that is dedicated to the Chef-Client. When a gem is installed from a local file, it must be added to the node using the remote_file or cookbook_file resources.
The chef_gem resource works with all of the same properties and options as the gem_package resource, but does not accept the gem_binary property because it always uses the CurrentGemEnvironment under which the Chef-Client is running. In addition to performing actions similar to the gem_package resource, the chef_gem resource does the above.
cookbook_file
Use the cookbook_file resource to transfer files from a sub-directory of COOKBOOK_NAME/files/ to a specified path located on a host that is running the ChefClient.
The file is selected according to file specificity, which allows different source files to be used based on the hostname, host platform (operating system, distro, or as appropriate), or platform version. Files that are located in the COOKBOOK_NAME/files/default subdirectory may be used on any platform.
Cron
Use the cron resource to manage cron entries for time-based job scheduling. Properties for a schedule will default to * if not provided. The cron resource requires access to a crontab program, typically cron.
Csh
Use the csh resource to execute scripts using the csh interpreter. This resource may also use any of the actions and properties that are available to the execute resource.
Commands that are executed with this resource are (by their nature) not idempotent, as they are typically unique to the environment in which they are run. Use not_if and only_if to guard this resource for idempotence.
Deploy
Use the deploy resource to manage and control deployments. This is a popular resource, but is also complex, having the most properties, multiple providers, the added complexity of callbacks, plus four attributes that support layout modifications from within a recipe.
Directory
Use the directory resource to manage a directory, which is a hierarchy of folders that comprises all of the information stored on a computer. The root directory is the top-level, under which the rest of the directory is organized.
The directory resource uses the name property to specify the path to a location in a directory. Typically, permission to access that location in the directory is required.
dpkg_package
Use the dpkg_package resource to manage packages for the dpkg platform. When a package is installed from a local file, it must be added to the node using the remote_file or cookbook_file resources.
easy_install_package
Use the easy_install_package resource to manage packages for the Python platform.
Env
Use the env resource to manage environment keys in Microsoft Windows. After an environment key is set, Microsoft Windows must be restarted before the environment key is available to the Task Scheduler.
erl_call
Use the erl_call resource to connect to a node located within a distributed Erlang system. Commands that are executed with this resource are (by their nature) not idempotent, as they are typically unique to the environment in which they are run. Use not_if and only_if to guard this resource for idempotence.
Execute
Use the execute resource to execute a single command. Commands that are executed with this resource are (by their nature) not idempotent, as they are typically unique to the environment in which they are run. Use not_if and only_if to guard this resource for idempotence.
File
Use the file resource to manage the files directly on a node.
freebsd_package
Use the freebsd_package resource to manage packages for the FreeBSD platform.
gem_package
Use the gem_package resource to manage gem packages that are only included in recipes. When a package is installed from a local file, it must be added to the node using the remote_file or cookbook_file resources.
Git
Use the git resource to manage source control resources that exist in a git repository. git version 1.6.5 (or higher) is required to use all of the functionality in the git resource.
Group
Use the group resource to manage a local group.
homebrew_package
Use the homebrew_package resource to manage packages for the Mac OS X platform.
http_request
Use the http_request resource to send an HTTP request (GET, PUT, POST, DELETE, HEAD, or OPTIONS) with an arbitrary message. This resource is often useful when custom callbacks are necessary.
Ifconfig
Use the ifconfig resource to manage interfaces.
ips_package
Use the ips_package resource to manage packages (using Image Packaging System (IPS)) on the Solaris 11 platform.
Ksh
Use the ksh resource to execute scripts using the Korn shell (ksh) interpreter. This resource may also use any of the actions and properties that are available to the execute resource.
Commands that are executed with this resource are (by their nature) not idempotent, as they are typically unique to the environment in which they are run. Use not_if and only_if to guard this resource for idempotence.
Link
Use the link resource to create symbolic or hard links.
Log
Use the log resource to create log entries. The log resource behaves like any other resource: built into the resource collection during the compile phase, and then run during the execution phase. (To create a log entry that is not built into the resource collection, use Chef::Log instead of the log resource)
macports_package
Use the macports_package resource to manage packages for the Mac OS X platform.
Mdadm
Use the mdadm resource to manage RAID devices in a Linux environment using the mdadm utility. The mdadm provider will create and assemble an array, but it will not create the config file that is used to persist the array upon reboot.
If the config file is required, it must be done by specifying a template with the correct array layout, and then by using the mount provider to create a file systems table (fstab) entry.
Mount
Use the mount resource to manage a mounted file system.
Ohai
Use the ohai resource to reload the Ohai configuration on a node. This allows recipes that change system attributes (like a recipe that adds a user) to refer to those attributes later on during the chef-client run.
Package
Use the package resource to manage packages. When the package is installed from a local file (such as with RubyGems, dpkg, or RPM Package Manager), the file must be added to the node using the remote_file or cookbook_file resources.
pacman_package
Use the pacman_package resource to manage packages (using pacman) on the Arch Linux platform.
powershell_script
Use the powershell_script resource to execute a script using the Windows PowerShell interpreter, much like how the script and script-based resourcesbash, csh, perl, python, and rubyare used. The powershell_script is specific to the Microsoft Windows platform and the Windows PowerShell interpreter.
Python
Use the python resource to execute scripts using the Python interpreter. This resource may also use any of the actions and properties that are available to the execute resource.
Commands that are executed with this resource are (by their nature) not idempotent, as they are typically unique to the environment in which they are run. Use not_if and only_if to guard this resource for idempotence.
Reboot
Use the reboot resource to reboot a node, a necessary step with some installations on certain platforms. This resource is supported for use on the Microsoft Windows, Mac OS X, and Linux platforms.
registry_key
Use the registry_key resource to create and delete registry keys in Microsoft Windows.
remote_directory
Use the remote_directory resource to incrementally transfer a directory from a cookbook to a node. The directory that is copied from the cookbook should be located under COOKBOOK_NAME/files/default/REMOTE_DIRECTORY.
The remote_directory resource will obey file specificity.
remote_file
Use the remote_file resource to transfer a file from a remote location using file specificity. This resource is similar to the file resource.
Route
Use the route resource to manage the system routing table in a Linux environment.
rpm_package
Use the rpm_package resource to manage packages for the RPM Package Manager platform.
Ruby
Use the ruby resource to execute scripts using the Ruby interpreter. This resource may also use any of the actions and properties that are available to the execute resource.
Commands that are executed with this resource are (by their nature) not idempotent, as they are typically unique to the environment in which they are run. Use not_if and only_if to guard this resource for idempotence.
ruby_block
Use the ruby_block resource to execute Ruby code during a Chef-Client run. Ruby code in the ruby_block resource is evaluated with other resources during convergence, whereas Ruby code outside of a ruby_block resource is evaluated before other resources, as the recipe is compiled.
Script
Use the script resource to execute scripts using a specified interpreter, such as Bash, csh, Perl, Python, or Ruby. This resource may also use any of the actions and properties that are available to the execute resource.
Commands that are executed with this resource are (by their nature) not idempotent, as they are typically unique to the environment in which they are run. Use not_if and only_if to guard this resource for idempotence.
Service
Use the service resource to manage a service.
smart_os_package
Use the smartos_package resource to manage packages for the SmartOS platform.
solaris_package
The solaris_package resource is used to manage packages for the Solaris platform.
Subversion
Use the subversion resource to manage source control resources that exist in a Subversion repository.
Template
Use the template resource to manage the contents of a file using an Embedded Ruby (ERB) template by transferring files from a sub-directory of COOKBOOK_NAME/templates/ to a specified path located on a host that is running the Chef-Client. This resource includes actions and properties from the file resource. Template files managed by the template resource follow the same file specificity rules as the remote_file and file resources.
User
Use the user resource to add users, update existing users, remove users, and to lock/unlock user passwords.
windows_package
Use the windows_package resource to manage Microsoft Installer Package (MSI) packages for the Microsoft Windows platform.
windows_service
Use the windows_service resource to manage a service on the Microsoft Windows platform.
yum_package
Use the yum_package resource to install, upgrade, and remove packages with Yum for the Red Hat and CentOS platforms. The yum_package resource is able to resolve provides data for packages much like Yum can do when it is run from the command line. This allows a variety of options for installing packages, like minimum versions, virtual provides, and library names.
Chef - Lightweight Resource Provider
Lightweight resource provider (LWRP) provides an option of extending the list of available resources by extending it features and allows Chef user to create custom resources.
By creating custom resources one can simply write cookbooks because one can own enriched custom resources using Chef DSL which helps in making the recipe code more expressive.
In Chef community, many of the custom resources are implemented using LWRPs. There are many working examples of LWRP such as iptables_rules and apt_repository.
Working Method
Make sure one has cookbook name Testing_resource and a run_list of node which contains Testing_resource cookbook.
Building LWRP
Step 1 − Create a custom resource in Testing_resource cookbook.
vipin@laptop:~/chef-repo $ subl cookbooks/Testing_resource/resources/default.rb
actions :create, :remove
attribute :title, kind_of: String, default: "World"
attribute :path, kind_of: String, default: "/tmp/greeting.txt"
Step 2 − Create a provider for resources in Tesing_resource cookbook.
vipin@laptop:~/chef-repo $ subl cookbooks/Testing_resource/provider/default.rb
action :create do
   log "Adding '#{new_resource.name}' greeting as #{new_resource.
      path}"
   file new_resource.path do
      content "#{new_resource.name}, #{new_resource.title}!"
      action :create
end
action :remove do
   Chef::Log.info "Removing '#{new_resource.name}' greeting #{new_resource.path}"
   file new_resource.path do
      action :delete
   end
end
Step 3 − Use a new resource by editing Testing_resource default recipe.
vipin@laptop:~/chef-repo $ subl cookbooks/Tesing_resource/recipes/default.rb
greeting "Ohai" do
   title "Chef"
   action :create
end
Step 4 − Upload the modified cookbook to Chef server.
vipin@laptop:~/chef-repo $ knife cookbook upload greeting
Uploading greeting [0.1.0]
Step 5 − Run Chef-Client on the node.
vipin@server:~$ sudo chef-client
...TRUNCATED OUTPUT...
2013-06-28T21:32:54+00:00] INFO: Processing greeting[Ohai] action
create (greeting::default line 9)
[2013-06-28T21:32:54+00:00] INFO: Adding 'Ohai' greeting as /tmp/
greeting.txt
[2013-06-28T21:32:54+00:00] INFO: Processing file[/tmp/greeting.
txt] action create (/srv/chef/file_store/cookbooks/greeting/
providers/default.rb line 7)
[2013-06-28T21:32:54+00:00] INFO: entered create
[2013-06-28T21:32:54+00:00] INFO: file[/tmp/greeting.txt] created
file /tmp/greeting.txt
...TRUNCATED OUTPUT...
Step 6 − Validate the content of the generated file.
user@server:~$ cat /tmp/greeting.txt
Ohai, Chef!
Workflow Scripts
LWRPs live in cookbooks. A custom resource lives inside the cookbooks, and will be available under the cookbook name. In the workflow, first we define the definitions and then pass the attributes to the resources which is going to be used in the cookbook. Finally, we use those actions and attributes in our recipe.
Chef - Blueprints
In Chef, blueprints are the tools to find out and record exactly what is present on the server. Blueprints record all the things required such as directors, packages, configuration files, and so on. Blueprints have the capability to split server information in various formats. One of them is Chef recipe. This helps to configure unique server using Chef.
Woring Method
We need to have Python and Git installed on the node where we need to run the blueprint.
Step 1 − Install the blueprint.
vipin@server:~$ pip install blueprint
Step 2 − Create a blueprint.
user@server:~$ sudo blueprint create internal-cookbook
# [blueprint] using cached blueprintignore(5) rules
# [blueprint] searching for Python packages
# [blueprint] searching for PEAR/PECL packages
# [blueprint] searching for Yum packages
# [blueprint] searching for Ruby gems
# [blueprint] searching for npm packages
# [blueprint] searching for software built from source
# [blueprint] searching for configuration files
# [blueprint] /etc/ssl/certs/AC_Ra\xc3\xadz_Certic\xc3\
xa1mara_S.A..pem not UTF-8 - skipping it
# [blueprint] /etc/ssl/certs/NetLock_Arany_=Class_Gold=_F\xc5\
x91tan\xc3\xbas\xc3\xadtv\xc3\xa1ny.pem not UTF-8 - skipping it
# [blueprint] /etc/ssl/certs/EBG_Elektronik_Sertifika_Hizmet_Sa\
xc4\x9flay\xc4\xb1c\xc4\xb1s\xc4\xb1.pem not UTF-8 - skipping it
# [blueprint] /etc/ssl/certs/Certinomis_-_Autorit\xc3\xa9_Racine.
pem not UTF-8 - skipping it
# [blueprint] /etc/ssl/certs/T\xc3\x9cB\xc4\xb0TAK_UEKAE_K\xc3\
xb6k_Sertifika_Hizmet_Sa\xc4\x9flay\xc4\xb1c\xc4\xb1s\xc4\xb1_-_S\
xc3\xbcr\xc3\xbcm_3.pem not UTF-8 - skipping it
# [blueprint] searching for APT packages
# [blueprint] searching for service dependencies
Step 3 − Create a cookbook from the blueprint.
user@server:~$ blueprint show -C internal-cookbook my-server/recipes/default.rb
Step 4 − Validate the content of the generated file.
user@server:~$ cat internal-cookbook /recipes/default.rb
#
# Automatically generated by blueprint(7). Edit at your own risk.
#
cookbook_file('/tmp/96468fd1cc36927a027045b223c61065de6bc575.tar')
do
   backup false
   group 'root'
   mode '0644'
   owner 'root'
   source 'tmp/96468fd1cc36927a027045b223c61065de6bc575.tar'
end
execute('/tmp/96468fd1cc36927a027045b223c61065de6bc575.tar') do
   command 'tar xf "/tmp/96468fd1cc36927a027045b223c61065de6bc575.tar"'
   cwd '/usr/local'
end
directory('/etc/apt/apt.conf.d') do
...TRUNCATED OUTPUT...
service('ssh') do
   action [:enable, :start]
   subscribes :restart, resources('cookbook_file[/etc/default/
      keyboard]', 'cookbook_file[/etc/default/console-setup]',
      'cookbook_file[/etc/default/ntfs-3g]', 'package[openssh-server]',
      'execute[96468fd1cc36927a027045b223c61065de6bc575.tar]')
end
Workflow Script
Blueprint is a Python package that finds out all the relevant configuration data of the server and stores it in a Git repo. Each blueprint has its own name.
One can ask the blueprint to show the content of its Git repo in various formants.
user@server:~$ ls -l internal-cookbook /
total 8
drwxrwxr-x 3 vagrant vagrant 4096 Jun 28 06:01 files
-rw-rw-r-- 1 vagrant vagrant 0 Jun 28 06:01 metadata.rb
drwxrwxr-x 2 vagrant vagrant 4096 Jun 28 06:01 recipes
Blueprints Show Commands
user@server:~$ blueprint show-packages my-server
...TRUNCATED OUTPUT...
apt wireless-regdb 2011.04.28-1ubuntu3
apt zlib1g-dev 1:1.2.3.4.dfsg-3ubuntu4
python2.7 distribute 0.6.45
python2.7 pip 1.3.1
pip blueprint 3.4.2
pip virtualenv 1.9.1
The preceding command shows all kinds of installed packages. Other show commands are as follows −
- show-files
- show-services
- show-sources
Chef - Files & Packages
In Chef, creating configuration files and moving packages are the key components. There are multiple ways how Chef manages the same. There are multiple ways how Chef supports in dealing with the files and software packages.
Installing Packages from Third-Party Repo
Step 1 − Edit the default recipe of the cookbook.
vipin@laptop:~/chef-repo $ subl cookbooks/test_cookbook/recipes/default.rb
include_recipe "apt"
apt_repository "s3tools" do
   uri "http://s3tools.org/repo/deb-all"
   components ["stable/"]
   key "http://s3tools.org/repo/deb-all/stable/s3tools.key"
   action :add
end
package "s3cmd"
Step 2 − Edit the metadata to add dependency on the apt cookbook.
vipin@laptop:~/chef-repo $ subl cookbooks/my_cookbook/metadata.rb
...
depends "apt"
Step 3 − Upload the modified cookbook to the Chef server.
Step 4 − Validate that the package you are trying to install, is not yet installed.
Step 5 − Validate the default repo.
Step 6 − Run Chef-Client on the node.
Step 7 − Validate that the required package is installed.
Installing Software from Source
If one needs to install a piece of software that is not available as a package for a given platform, one needs to compile it oneself. In Chef, we can do this by using the script resource.
Step 1 − Edit the default recipe.
vipin@laptop:~/chef-repo $ subl cookbooks/my_cookbook/recipes/
default.rb
version = "1.3.9"
bash "install_nginx_from_source" do
   cwd Chef::Config['file_cache_path']
   code ≪-EOH
      wget http://nginx.org/download/nginx-#{version}.tar.gz
      tar zxf nginx-#{version}.tar.gz &&
      cd nginx-#{version} &&
      ./configure && make && make install
   EOH
Step 2 − Upload the modified cookbook to the Chef server.
Step 3 − Run the Chef-Client on the node.
Step 4 − Validate that the nginx is installed.
Chef - Community Cookbooks
Community cookbooks are similar to any other cookbook. The only reason it is called community cookbook is because anyone who knows to write cookbooks can join this community and upload their cookbooks to the centralized hub. These cookbooks are available for free and anyone can download and use it. In order to use these community cookbooks, one needs to download them, modify them as per the requirement, and upload them to their respective Chef server.
One needs to have knife configured on their system in order to update, upload, and download the cookbooks. Interact with cookbooks using the knife cookbook commands. With knife cookbook, you can create, delete, show, list, download, and upload cookbooks. Read the knife cookbook commands documentation for more information in Chapter 7.
Following is the link of community cookbooks: https://supermarket.chef.io/cookbooksdirectory