- YouTube Marketing - Home
- YouTube Marketing - Overview
- Creating an Account
- Create Creative Video
- Creating a Channel
- Channel Description Box
- Setup Channel Background
- Channel Branding
- Create Video Thumbnails
- Create Video Playlists
- Video Sharing
- Deleting a Video
- Hide a Video
- Sharing Unlisted and Private Videos
- White Hat SEO for Videos
- Choosing a Video Title
- Add Video Annotation
- Promoting a Video
- Fan Finder
- Handling Comments
- Manage Negative Comments
- Monetize Your Video
- Marketing Tricks
- Safety Settings
- Videos Admin
- Video Transcripts
- Video Call Button
- YouTube Partner Program
- YouTube Marketing - Analytics
Create Video Thumbnails
Video thumbnails let people see a quick snapshot of your video. After your video is finished uploading, you'll be able to choose a thumbnail from the default three options YouTube automatically generates. To select the one that you'd like to use, simply click the thumbnail and click save changes.
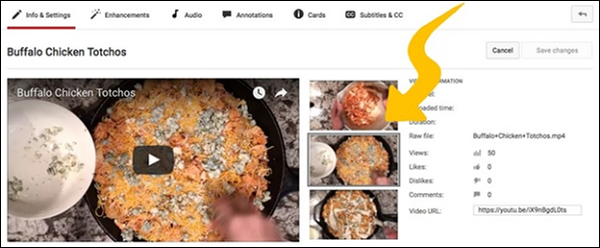
Here's how to change a thumbnail at any time −
- Go to your channel Video Manager.
- Click Edit for the corresponding video you'd like to change.
Custom video thumbnails
If your account is verified and in good standing, you may have the ability to upload custom thumbnails for your video uploads.
Uploading custom thumbnails
To upload a custom thumbnail when you upload a video, follow the following steps.
Record or upload your video.
At the end of the video processing stage in the upload interface, you will see an option to choose a Custom thumbnail under the "Video thumbnails" section.
To upload a custom thumbnail for an existing video −
- Go to your channel Video Manager.
- Locate a video and click the Edit button.
- Click the Custom thumbnail button and upload a thumbnail.
- Once the thumbnail is uploaded, don't forget to click the "Save Changes" button.
Your custom thumbnail image should be as large as possible, as the image will also be used as the preview image in the embedded player.
We recommend your custom thumbnails −
- Have a resolution of 1280×720 (with minimum width of 640 pixels).
- Be uploaded in image formats such as .JPG, .GIF, .BMP, or .PNG.
- Remain under the 2MB limit.
- Try to use a 16:9 aspect ratio as it's the most used in YouTube players and previews.