- Three.js - Home
- Three.js - Introduction
- Three.js - Installation
- Three.js - Hello Cube App
- Three.js - Renderer and Responsiveness
- Three.js - Responsive Design
- Three.js - Debug and Stats
- Three.js - Cameras
- Three.js - Controls
- Three.js - Lights & Shadows
- Three.js - Geometries
- Three.js - Materials
- Three.js - Textures
- Three.js - Drawing Lines
- Three.js - Animations
- Three.js - Creating Text
- Three.js - Loading 3D Models
- Three.js - Libraries and Plugins
- Three.js Useful Resources
- Three.js - Quick Guide
- Three.js - Useful Resources
- Three.js - Discussion
Three.js - Quick Guide
Three.js - Introduction
All modern browsers became more powerful and more accessible directly using JavaScript. They have adopted WebGL (Web Graphics Library), a JavaScript API, which allows you to render highperformance interactive 3D and 2D graphics within any compatible web browser using the capabilities of the GPU (Graphics Processing Unit).
But WebGL is a very low-level system that only draws basic objects like point, square, and line. However, programming WebGL directly from JavaScript is a very complex and verbose process. You need to know the inner details of WebGL and learn a complex shader language to get the most out of WebGL. Here comes Three.js to make your life easy.
What is Three.js?
Three.js is an open-source, lightweight, cross-browser, general-purpose JavaScript library. Three.js uses WebGL behind the scenes, so you can use it to render Graphics on an HTML <canvas> element in the browser. Since Three.js uses JavaScript, you can interact with other web page elements, add animations and interactions, and even create a game with some logic.
Why use Three.js?
The following features make Three.js an excellent library to use.
You can create complex 3D graphics by just using JavaScript.
You can create Virtual Reality (VR) and Augmented Reality (AR) scenes inside the browser.
Since it uses WebGL, it has cross-browser support. Many browsers support it.
You can add various materials, textures and animate 3D objects.
You can also load and work on objects from other 3D modeling software.
With a couple of lines of JavaScript and simple logic, you can create anything, from highperformance interactive 3D models to photorealistic real-time scenes.
These are some excellent websites created using Three.js−
You can find many other examples on the official website of three.js
Browser Support
All modern browsers on desktop, as well as on mobile, currently support WebGL. The only browser where you have to take care of is the mobile Opera Mini browser. For IE 10 and older,there is the IEWebGL plugin, which you can get from https://github.com/iewebgl/iewebgl./ You can find detailed information about the WebGL browser support here.
Once you understand what Three.js is, you can continue to the next chapter about setting up a project to start working with Three.js.
Three.js - Installation
There are many ways to include Three.js in your project. You can use any of these following methods to get started using Three.js. Then open your favorite code editor and get going.
Download the complete Three.js project
Download the complete Three.js project into your system. You can download it here or from GitHub. Extract the three.js-master.zip file and look inside the build folder. You can find two three.js, three.min.js, which is just a minified version. Add any of these two files into your project folder and link them to your HTML file. Now you are good to use Three.js in your project.
Note − We recommend using the minified version as it loads faster.
Insert the following <script> tag into the <head> element of your HTML with a path to the threejs.min.js file.
<script src='/path/to/threejs.min.js'></script>
Use CDN links
You can link the files from a CDN (Content Delivery Network), a remote site dedicated to hosting files so that you can use them online. You can use any of these websites −
Insert any of the following <script> tags into the <head> element of your HTML.
<script src="https://cdnjs.cloudflare.com/ajax/libs/three.js/r127/three.min.js"></script>
or
<script src="https://cdn.jsdelivr.net/npm/three@0.127.0/build/three.min.js"></script>
Install the package of Three.js
Three.js is also available as a package on NPM.If you have Node.js set up on your computer, you can install it using npm or yarn.
npm install three
or
yarn add three
Then, you can import Three.js from the three.module.js file into your JavaScript file
import * as THREE from 'three'
You can use Three.js along with any JavaScript framework like React, Angular, Vue.
Once you finish setting up your project, let's start creating.
Three.js - Hello Cube App
Like any other programming language, let's start learning Three.js by creating "Hello cube!" app.
The HTML
<!DOCTYPE html>
<html>
   <head>
      <meta name="viewport" content="width=device-width, initial-scale=1" />
      <meta charset="UTF-8" />
      <title>Three.js - Hello cube</title>
      <style>
         /* Our CSS goes here */
      </style>
      <script src="https://cdnjs.cloudflare.com/ajax/libs/three.js/r127/three.min.js"></script>
   </head>
   <body>
      <div id="threejs-container">
         <!-- Our output to be rendered here →
      </div>
      <script type="module">
         // our JavaScript code goes here
      </script>
   </body>
</html>
As you can see, it's just a simple HTML file with Three.js CDN.
The CSS
<style>
* {
   margin: 0;
   padding: 0;
   box-sizing: border-box;
   font-family: -apple-system, BlinkMacSystemFont, "Segoe UI", Roboto,
   Oxygen,
   Ubuntu, Cantarell, "Open Sans", "Helvetica Neue", sans-serif;
}
html,
body {
   height: 100vh;
   width: 100vw;
}
#threejs-container{
   position: block;
   width: 100%;
   height: 100%;
}
</style>
The above CSS is just the basic styling of the HTML page. The threejs-container takes up the whole screen.
The JavaScript
This is where our three.js app comes into life. The code below renders a single cube in the middle of the screen. All these codes will go into the empty <script> tag in the HTML.
const width = window.innerWidth
const height = window.innerHeight
// Scene
const scene = new THREE.Scene()
scene.background = new THREE.Color('#00b140')
// Camera
const fov = 45 // AKA Field of View
const aspect = window.innerWidth / window.innerHeight
const near = 0.1 // the near clipping plane
const far = 100 // the far clipping plane
const camera = new PerspectiveCamera(fov, aspect, near, far)
camera.position.set(0, 0, 10)
// Renderer
const renderer = new THREE.WebGLRenderer()
renderer.setSize(window.innerWidth, window.innerHeight)
renderer.setPixelRatio(Math.min(window.devicePixelRatio, 2))
// Creating a cube
const geometry = new THREE.BoxGeometry(2, 2, 2)
const material = new THREE.MeshBasicMaterial({ wireframe: true })
const cube = new THREE.Mesh(geometry, material)
scene.add(cube)
// Rendering the scene
const container = document.querySelector('#threejs-container')
container.append(renderer.domElement)
renderer.render(scene, camera)
Let's discuss the code one step at a time, and then you can get more information about each element in the upcoming chapters. The first thing we need to do is to create a scene, a camera, and a renderer. These are the essential components that make up every Three.js app.
The Scene
const scene = new THREE.Scene()
scene.background = new THREE.Color('#262626')
The scene serves as the container for everything we can see on the screen, without a THREE.Scene object, Three.js cannot render anything. The background color is dark gray so that we can see the cube.
The Camera
const camera = new PerspectiveCamera(fov, aspect, near, far)
camera.position.set(0, 0, 10)
The camera object defines what weâll see when we render a scene. There are not many but different types of cameras, but for this example, youâll use a PerspectiveCamera, which matches the way our eyes see the world.
The Renderer
const renderer = new THREE.WebGLRenderer()
renderer.setSize(window.innerWidth, window.innerHeight)
The renderer object is responsible for calculating what the scene looks like in the browser, based on the camera. There are different types of renderers, but we mainly use WebGLRenderer since most browsers support WebGL.
In addition to creating the renderer instance, we also need to set the size at which we want it to render our app. It's a good idea to use the width and height of the area we want to fill with our app The Cube- in this case, the width and height of the browser window.
The Cube
const geometry = new THREE.BoxGeometry(2, 2, 2)
const material = new THREE.MeshBasicMaterial({
   color: 0xffffff,
   wireframe: true,
})
const cube = new THREE.Mesh(geometry, material)
scene.add(cube)
The above code creates a simple cube at the center of the screen. We can make any object using THREE.Mesh. The Mesh takes two objects, geometry and material. The geometry of a mesh defines its shape, and materials determine the surface properties of objects.
To create a cube, we need BoxGeometry and a primary material (MeshBasicMaterial) with the color 0xffffff. If the wireframe property is set to true, it tells Three.js to show us a wireframe and not a solid object.
Rendering the Scene
const container = document.querySelector('#threejs-container')
container.append(renderer.domElement)
renderer.render(scene, camera)
Example
Last but not least, we add the renderer element to our HTML document. The renderer uses an <canvas> element to display the scene to us. In this case, the renderer appends the <canvas> element to the reference container in the HTML.
hello-cube-app.html
<!DOCTYPE html>
<html lang="en">
<head>
<meta charset="UTF-8" />
<meta http-equiv="X-UA-Compatible" content="ie=edge" />
<meta name="viewport" content="width=device-width, initial-scale=1.0" />
<title>Three.js â Hello cube</title>
<style>
* {
margin: 0;
padding: 0;
box-sizing: border-box;
font-family: -applesystem, BlinkMacSystemFont, 'Segoe UI', Roboto, Oxygen, Ubuntu,
Cantarell, 'Open Sans', 'Helvetica Neue', sans-serif;
}
html,
body {
height: 100vh;
overflow: hidden;
width: 100vw;
}
#threejs-container {
position: block;
width: 100%;
height: 100%;
}
</style>
<script src="https://cdnjs.cloudflare.com/ajax/libs/three.js/r128/three.min.js"></script>
</head>
<body>
<div id="threejs-container"></div>
<script type="module">
// Hello Cube App
// Your first Three.js application
// sizes
const width = window.innerWidth
const height = window.innerHeight
// scene
const scene = new THREE.Scene()
scene.background = new THREE.Color(0x262626)
// camera
const camera = new THREE.PerspectiveCamera(45, width / height, 0.1, 100)
camera.position.set(0, 0, 10)
// cube
const geometry = new THREE.BoxGeometry(2, 2, 2)
const material = new THREE.MeshBasicMaterial({
color: 0xffffff,
wireframe: true
})
const cube = new THREE.Mesh(geometry, material)
scene.add(cube)
// renderer
const renderer = new THREE.WebGL1Renderer()
renderer.setSize(width, height)
renderer.setPixelRatio(Math.min(window.devicePixelRatio, 2))
// rendering the scene
const container = document.querySelector('#threejs-container')
container.append(renderer.domElement)
renderer.render(scene, camera)
</script>
</body>
</html>
Output
The output looks like this if everything is working correctly. Play around with the code to get a better understanding of how it works.
You have now completed creating your first three.js application. Let's go ahead and add more beauty to the app.
Three.js - Renderer & Responsiveness
Basic Functionality of a Scene
You know that Scene is a container for the camera, lights, and objects we want to render on the screen. Let's look at some basic functionality of the Scene object −
Adding an Object
The function add(object) is used to an object to the scene.
const scene = THREE.Scene()
scene.add(cube) // adds the cube
scene.add(sphere) // adds a sphere
Removing an Object
The function remove(object) removes an object from the scene.
scene.remove(cube) // removes the last added cube
scene.remove(sphere) // removes a sphere
Children
In the scene.children return an array of all the objects in the scene, including the camera and lights.
console.log(scene.children) // outputs all the objects in the scene
console.log(scene.children.length) // outputs number of elements on the
scene
Note − We can give a name to any object using its name attribute. A name is handy for debugging purposes but can also directly access an object from your scene.
Check out the following example.
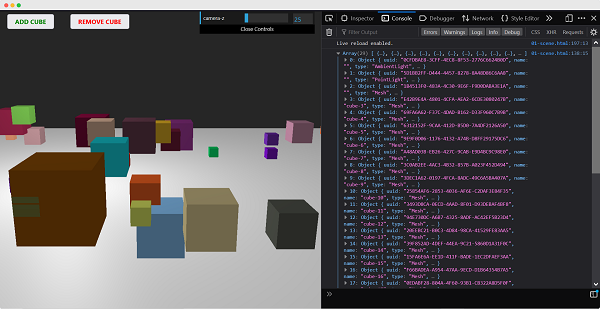
scene.html
<!DOCTYPE html>
<html lang="en">
<head>
<meta charset="UTF-8" />
<meta http-equiv="X-UA-Compatible" content="ie=edge" />
<meta name="viewport" content="width=device-width, initial-scale=1.0" />
<title>Three.js â The scene
<style>
* {
margin: 0;
padding: 0;
box-sizing: border-box;
font-family: -applesystem, BlinkMacSystemFont, 'Segoe UI', Roboto, Oxygen, Ubuntu,
Cantarell, 'Open Sans', 'Helvetica Neue', sans-serif;
}
html,
body {
height: 100vh;
width: 100vw;
background-color: #262626;
overflow: hidden;
}
#btn-conatiner {
position: absolute;
top: 0;
left: 0;
height: 10vh;
width: 100%;
}
@media screen and (max-width:600px){
#btn-container{
display: flex;
flex-direction: column;
}
}
.btn {
padding: 5px 15px;
margin: 5px 15px;
font-weight: bold;
text-transform: uppercase;
}
.add {
color: green;
}
.rem {
color: red;
}
#threejs-container {
position: block;
width: 100%;
height: 100%;
}
</style>
<script src="https://cdnjs.cloudflare.com/ajax/libs/three.js/r128/three.min.js"></script>
<script src="https://cdnjs.cloudflare.com/ajax/libs/dat-gui/0.7.7/dat.gui.js"></script>
</head>
<body>
<div id="btn-conatiner">
<button class="btn add">Add Cube</button>
<button class="btn rem">Remove Cube</button>
</div>
<div id="threejs-container"></div>
<script type="module">
// Experimenting with different methods of scene
// add, remove, children, getElementById
// sizes
let width = window.innerWidth
let height = window.innerHeight
const gui = new dat.GUI()
// scene
const scene = new THREE.Scene()
scene.background = new THREE.Color(0x262626)
// lights
const ambientLight = new THREE.AmbientLight(0xffffff, 0.5)
scene.add(ambientLight)
const light = new THREE.PointLight(0xffffff, 0.5)
light.position.set(-10, 10, -10)
// for shadow
light.castShadow = true
light.shadow.mapSize.width = 1024
light.shadow.mapSize.height = 1024
light.shadow.camera.near = 0.1
light.shadow.camera.far = 1000
scene.add(light)
// camera
const camera = new THREE.PerspectiveCamera(45, width / height, 0.1, 1000)
camera.position.set(0, 10, 40)
camera.lookAt(0, 0, 0)
gui.add(camera.position, 'z', 10, 200, 1).name('camera-z')
// plane
const planeGeometry = new THREE.PlaneGeometry(100, 100)
const plane = new THREE.Mesh(
planeGeometry,
new THREE.MeshPhongMaterial({ color: 0xffffff, side: THREE.DoubleSide })
)
plane.rotateX(Math.PI / 2)
plane.position.y = -1.75
plane.receiveShadow = true
scene.add(plane)
// scene.add
function addCube() {
const cubeSize = Math.ceil(Math.random() * 3)
const cubeGeometry = new THREE.BoxGeometry(cubeSize, cubeSize, cubeSize)const cubeMaterial = new THREE.MeshLambertMaterial({
color: Math.random() * 0xffffff
})
const cube = new THREE.Mesh(cubeGeometry, cubeMaterial)
cube.castShadow = true
cube.name = 'cube-' + scene.children.length
cube.position.x = -30 + Math.round(Math.random() * 50)
cube.position.y = Math.round(Math.random() * 5)
cube.position.z = -20 + Math.round(Math.random() * 50)
scene.add(cube)
}
const add = document.querySelector('.add')
add.addEventListener('click', () => {
addCube()
console.log('cube added')
})
// scene.remove
function removeCube() {
const allChildren = scene.children
const lastObject = allChildren[allChildren.length - 1]
if (lastObject.name) {
scene.remove(lastObject)
}
}
const remove = document.querySelector('.rem')
remove.addEventListener('click', () => {
removeCube()
console.log('cube removed')
})
// scene.children
console.log(scene.children)
// responsivenesswindow.addEventListener('resize', () => {
width = window.innerWidth
height = window.innerHeight
camera.aspect = width / height
camera.updateProjectionMatrix()
renderer.setSize(window.innerWidth, window.innerHeight)
renderer.render(scene, camera)
})
// renderer
const renderer = new THREE.WebGL1Renderer()
renderer.setSize(width, height)
renderer.setPixelRatio(Math.min(window.devicePixelRatio, 2))
// animation
function animate() {
requestAnimationFrame(animate)
renderer.render(scene, camera)
}
// rendering the scene
const container = document.querySelector('#threejs-container')
container.append(renderer.domElement)
renderer.render(scene, camera)
animate()
</script>
</body>
</html>
Open your console to see the elements on the scene.
Using name attribute
The function scene.getObjectByName(name) directly returns the object, by specific name, from the scene.
You can also add another argument - recursive.
scene.getObjectByName(name, recursive)
If you set the recursive argument to true, Three.js will search through the complete tree of objects to find the thing with the specified name.
Adding Fog to the scene
This property allows you to set the fog for the scene. The fog renders a haze that hides faraway objects.
scene.fog = new THREE.Fog(0xffffff, 0.015, 100)
This line of code defines a white fog (0xffffff). You can use the preceding two properties to tune how the mist appears. The 0.015 value sets the near property, and the 100 value sets the far property. With these properties, you can determine where the fog starts and how fast it gets denser.
With the THREE.Fog object, the fog increases linearly. There is also a different way to set the mist for the scene; for this, use the following definition −
scene.fog = new THREE.FogExp2(0xffffff, 0.01)
This time, we don't specify near and far, but just the color (0xffffff) and the mist's density(0.01). It's best to experiment a bit with these properties to get the effect you want.
Using the override material property
The overrideMaterial property forces all the objects in the scene to use the same material.
scene.overrideMaterial = new THREE.MeshLambertMaterial({ color: 0xffffff })
Here, all the objects on the scene of the same material, i.e., MeshLambertMaterial.
Note − THREE.Scene is a structure that is sometimes also called a Scenegraph. A scene graph is a structure that can hold all the necessary information of a graphical scene.In Three.js, this means that THREE.Scene contains all the objects, lights, and other objects needed for rendering.

Renderer
The renderer uses the camera and the information from the scene to draw the output on the screen, i.e., <canvas> element.
In the Hello cube app, we used the WebGLRenderer. Some other renderers are available, but the WebGLRenderer is by far the most powerful renderer available and usually the only one you need.
Note − There is a canvas-based renderer, a CSS-based renderer, and an SVG-based one. Even though they work and can render simple scenes, I wouldn't recommend using them. They are not being developed actively, very CPU-intensive, and lack features such as good material support and shadows.
Three.js - Responsive Design
On resizing the screen, you can observe that the scene is not responsive. Making a web page responsive generally refers to the page displaying well on different sized displays from desktops to tablets to phones. In this chapter, you can see how to solve some fundamental problems of your Three.js app.
Automatically resize the output when the browser size changes
When you resize the browser, we have to notify the Three.js to know how wide the <canvas> element should be. For the camera, we need to update the aspect property, which holds the aspect ratio of the screen, and for the renderer, we need to change its size.
window.addEventListener('resize', () => {
   // update display width and height
   width = window.innerWidth
   height = window.innerHeight
   // update camera aspect
   camera.aspect = width / height
   camera.updateProjectionMatrix()
   // update renderer
   renderer.setSize(width, height)
   renderer.setPixelRatio(Math.min(window.devicePixelRatio, 2))
   renderer.render(scene, camera)
})
Example
The above code gives responsiveness to your Three.js project.
resize-browser.html
<!DOCTYPE html>
<html lang="en">
<head>
<meta charset="UTF-8" />
<meta http-equiv="X-UA-Compatible" content="ie=edge" />
<meta name="viewport" content="width=device-width, initial-scale=1.0" />
<title>Three.js â Resizing browser</title>
<style>
* {
margin: 0;
padding: 0;
box-sizing: border-box;
font-family: -applesystem, BlinkMacSystemFont, 'Segoe UI', Roboto, Oxygen, Ubuntu,
Cantarell, 'Open Sans', 'Helvetica Neue', sans-serif;
}
html,
body {
height: 100vh;
width: 100vw;
}
#threejs-container {
position: block;
width: 100%;
height: 100%;
}
</style>
<script src="https://cdnjs.cloudflare.com/ajax/libs/three.js/r128/three.min.js"></script>
<script src="https://cdnjs.cloudflare.com/ajax/libs/dat-gui/0.7.7/dat.gui.js"></script>
</head>
<body>
<div id="threejs-container"></div>
<script type="module">
// Adding responsiveness for Three.js
// sizes
let width = window.innerWidth
let height = window.innerHeight
const gui = new dat.GUI()
// scene
const scene = new THREE.Scene()
scene.background = new THREE.Color(0x262626)
// camera
const camera = new THREE.PerspectiveCamera(45, width / height, 0.1, 100)
camera.position.set(0, 0, 10)
// cube
const geometry = new THREE.BoxGeometry(2, 2, 2)
const material = new THREE.MeshBasicMaterial({
color: 0xffffff,
wireframe: true
})
const cube = new THREE.Mesh(geometry, material)
scene.add(cube)
// responsiveness
window.addEventListener('resize', () => {
width = window.innerWidth
height = window.innerHeight
camera.aspect = width / height
camera.updateProjectionMatrix()
renderer.setSize(window.innerWidth, window.innerHeight)
renderer.render(scene, camera)
})
// renderer
const renderer = new THREE.WebGL1Renderer()
renderer.setSize(width, height)
renderer.setPixelRatio(Math.min(window.devicePixelRatio, 2))
// animation
function animate() {
requestAnimationFrame(animate)
cube.rotation.x += 0.005
cube.rotation.y += 0.01
renderer.render(scene, camera)
}
// rendering the scene
const container = document.querySelector('#threejs-container')
container.append(renderer.domElement)
renderer.render(scene, camera)
animate()
</script>
</body>
</html>
Output
When you execute the code, it will produce the following output −
Now, resize the browser. Due to the responsive design, the object will always reposition itself at the center of the browser.
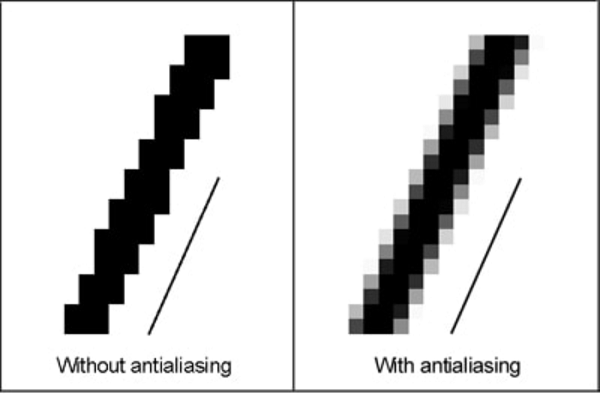
Anti-aliasing
The aliasing effect is the appearance of jagged edges or "jaggies" (also known as stair-stepped lines) on edges and objects (rendered using pixels).
Example
antialiasing.html
<!DOCTYPE html>
<html lang="en">
   <head>
      <meta charset="UTF-8" />
      <meta http-equiv="X-UA-Compatible" content="ie=edge" />
      <meta name="viewport" content="width=device-width, initial-scale=1.0" />
      <title>Three.js - Anti-aliasing</title>
      <style>
         * {
            margin: 0;
            padding: 0;
            box-sizing: border-box;
            font-family: -applesystem, BlinkMacSystemFont, 'Segoe UI', Roboto, Oxygen, Ubuntu,
            Cantarell, 'Open Sans', 'Helvetica Neue', sans-serif;
         }
         html,
         body {
            height: 100vh;
            width: 100vw;
         }
         #threejs-container {
            position: block;
            width: 100%;
            height: 100%;
         }
      </style>
      <script src="https://cdnjs.cloudflare.com/ajax/libs/three.js/r128/three.min.js"></script>
      <script src="https://cdnjs.cloudflare.com/ajax/libs/dat-gui/0.7.7/dat.gui.js"></script>
   </head>
   <body>
      <div id="threejs-container"></div>
      <script type="module">
         // Adding anti-aliasing to Three.js app for removing jaggies
         // sizes
         let width = window.innerWidth
         let height = window.innerHeight
         const gui = new dat.GUI()
         // scene
         const scene = new THREE.Scene()
         scene.background = new THREE.Color(0x262626)
         // camera
         const camera = new THREE.PerspectiveCamera(45, width / height, 0.1, 100)
         camera.position.set(0, 0, 10)
         // cube
         const geometry = new THREE.BoxGeometry(2, 2, 2)
         const material = new THREE.MeshBasicMaterial({
            color: 0xffffff,
            wireframe: true
         })
         const cube = new THREE.Mesh(geometry, material)
         scene.add(cube)
         // responsiveness
         window.addEventListener('resize', () => {
            width = window.innerWidth
            height = window.innerHeight
            camera.aspect = width / height
            camera.updateProjectionMatrix()
            renderer.setSize(window.innerWidth, window.innerHeight)
            renderer.render(scene, camera)
         })
         // renderer - anti-aliasing
         const renderer = new THREE.WebGLRenderer({ antialias: true })
         renderer.physicallyCorrectLights = true
         renderer.setSize(width, height)
         renderer.setPixelRatio(Math.min(window.devicePixelRatio, 2))
         // animation
         function animate() {
            requestAnimationFrame(animate)
            cube.rotation.x += 0.005
            cube.rotation.y += 0.01
            renderer.render(scene, camera)
         }
         // rendering the scene
         const container = document.querySelector('#threejs-container')
         container.append(renderer.domElement)
         renderer.render(scene, camera)
         animate()
      </script>
   </body>
</html>
Output
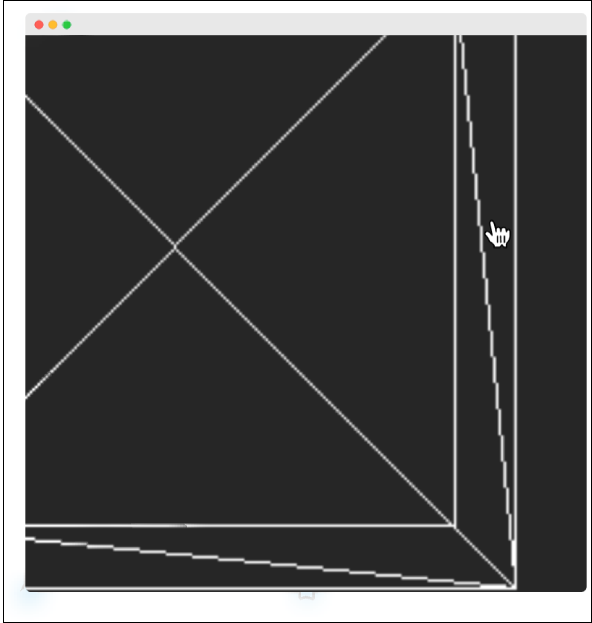
Aliasing in our Hello cube app looks like this.
We can turn on anti-aliasing by setting antialias property of the WebGLRenderer to true. By default, it is false. Here, we set the antialias parameter to true −
const renderer = new WebGLRenderer({ antialias: true })
renderer.physicallyCorrectLights = true
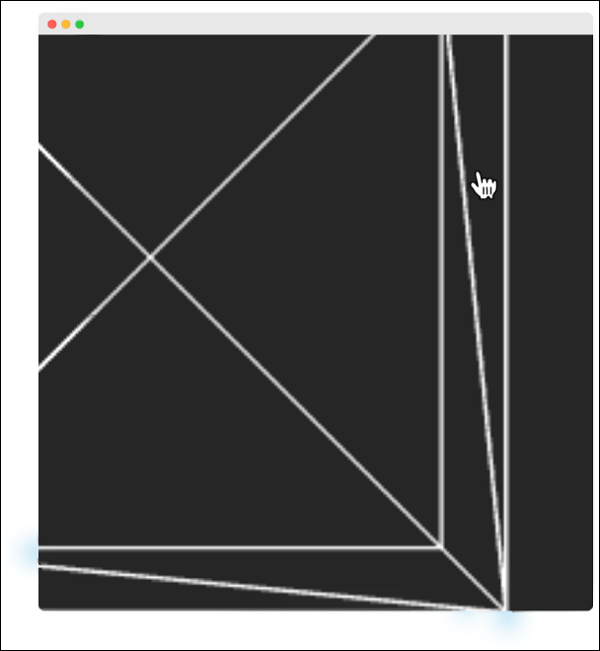
After antialiasing, it looks smooth without jaggies like the one below.
The property physicallyCorrectLights tells Three.js whether to use physically correct lighting mode. Default is false. Setting it to true helps increase the detail of the object.
Three.js - Debug & Stats
Using Dat.GUI
It is hard to keep experimenting with the values of variables, like the cubeâs position. In that case, suppose until you get something you like. It's a kind of slow and overwhelming process. Luckily, there is already a good solution available that integrates great with Three.js, dat.GUI. It allows you to create a fundamental user interface component that can change variables in your code.
Installation
To use dat.GUI in your project, download it here and add the <script> tag to the HTML file.
<script type='text/javascript' src='path/to/dat.gui.min.js'></script>
Or you can use CDN, add the following <script> tag inside your HTML.
<script src="https://cdnjs.cloudflare.com/ajax/libs/dat-gui/0.7.7/dat.gui.js"></script>
If you are using Three.js in a node app, install the npm package - dat.GUI and import it into your JavaScript file.
npm install dat.gui
OR
yarn add dat.gui
import * as dat from 'dat.gui'
Usage
First, you should initialize the object itself. It creates a widget and displays it on the screen top rightcorner.
const gui = new dat.GUI()
Then, you can add the parameter you want to control and the variable. For example, the following code is to control the y position of the cube.
gui.add(cube.position, 'y')
Example
Try adding other position variables. Refer to this working code example.
cube.html
<!DOCTYPE html>
<html lang="en">
   <head>
      <meta charset="UTF-8" />
      <meta http-equiv="X-UA-Compatible" content="ie=edge" />
      <meta name="viewport" content="width=device-width, initial-scale=1.0" />
      <title>Three.js - Position GUI</title>
      <style>
         * {
            margin: 0;
            padding: 0;
            box-sizing: border-box;
            font-family: -applesystem, BlinkMacSystemFont, 'Segoe UI', Roboto, Oxygen, Ubuntu,
            Cantarell, 'Open Sans', 'Helvetica Neue', sans-serif;
         }
         html,
         body {
            height: 100vh;
            width: 100vw;
         }
         #threejs-container {
            position: block;
            width: 100%;
            height: 100%;
         }
      </style>
      <script src="https://cdnjs.cloudflare.com/ajax/libs/three.js/r128/three.min.js"></script>
      <script src="https://cdnjs.cloudflare.com/ajax/libs/dat-gui/0.7.7/dat.gui.js"></script>
   </head>
   <body>
      <div id="threejs-container"></div>
      <script type="module">
         // Adding UI to debug and experimenting different values
         // UI
         const gui = new dat.GUI()
         // sizes
         let width = window.innerWidth
         let height = window.innerHeight
         // scene
         const scene = new THREE.Scene()
         scene.background = new THREE.Color(0x262626)
         // camera
         const camera = new THREE.PerspectiveCamera(45, width / height, 0.1, 100)
         camera.position.set(0, 0, 10)
         // cube
         const geometry = new THREE.BoxGeometry(2, 2, 2)
         const material = new THREE.MeshBasicMaterial({
            color: 0xffffff,
            wireframe: true
         })
         gui.add(material, 'wireframe')
         const cube = new THREE.Mesh(geometry, material)
         scene.add(cube)
         gui.add(cube.position, 'x')
         gui.add(cube.position, 'y')
         gui.add(cube.position, 'z')
         // responsiveness
         window.addEventListener('resize', () => {
            width = window.innerWidth
            height = window.innerHeight
            camera.aspect = width / height
            camera.updateProjectionMatrix()
            renderer.setSize(window.innerWidth, window.innerHeight)
            renderer.render(scene, camera)
         })
         // renderer
         const renderer = new THREE.WebGL1Renderer()
         renderer.setSize(width, height)
         renderer.setPixelRatio(Math.min(window.devicePixelRatio, 2))
         // animation
         function animate() {
            requestAnimationFrame(animate)
            cube.rotation.x += 0.005
            cube.rotation.y += 0.01
            renderer.render(scene, camera)
         }
         // rendering the scene
         const container = document.querySelector('#threejs-container')
         container.append(renderer.domElement)
         renderer.render(scene, camera)
         animate()
      </script>
   </body>
</html>
Output
You can customize the label displayed using the name attribute. To change the label on the variable line, use .name("your label").
gui.add(cube.position, 'y').name('cube-y')
You can set up min/max limits and steps for getting the slider. The following line allow values from 1 to 10, increasing the value by 1 at a time.
gui.add(cube.position, 'y').min(1).max(10).step(1)
// or
gui.add(cube.position, 'y', 1, 10, 1)
If there are many variables with the same name, you may find it difficult to differentiate among them. In that case, you can add folders for every object. All the variables related to an object be in one folder.
// creating a folder
const cube1 = gui.addFolder('Cube 1')
cube1.add(redCube.position, 'y').min(1).max(10).step(1)
cube1.add(redCube.position, 'x').min(1).max(10).step(1)
cube1.add(redCube.position, 'z').min(1).max(10).step(1)
// another folder
const cube2 = gui.addFolder('Cube 2')
cube2.add(greenCube.position, 'y').min(1).max(10).step(1)
cube2.add(greenCube.position, 'x').min(1).max(10).step(1)
cube2.add(greenCube.position, 'z').min(1).max(10).step(1)
Example
Now, check the following example.
gui-folders.html
<!DOCTYPE html>
<html lang="en">
   <head>
      <meta charset="UTF-8" />
      <meta http-equiv="X-UA-Compatible" content="ie=edge" />
      <meta name="viewport" content="width=device-width, initial-scale=1.0" />
      <title>Three.js - More variables</title>
      <style>
         * {
            margin: 0;
            padding: 0;
            box-sizing: border-box;
            font-family: -applesystem, BlinkMacSystemFont, 'Segoe UI', Roboto, Oxygen, Ubuntu,
               Cantarell, 'Open Sans', 'Helvetica Neue', sans-serif;
         }
         html,
         body {
            height: 100vh;
            width: 100vw;
         }
         #threejs-container {
            position: block;
            width: 100%;
            height: 100%;
         }
      </style>
      <script src="https://cdnjs.cloudflare.com/ajax/libs/three.js/r128/three.min.js"></script>
      <script src="https://cdnjs.cloudflare.com/ajax/libs/dat-gui/0.7.7/dat.gui.js"></script>
   </head>
   <body>
      <div id="threejs-container"></div>
      <script type="module">
         // Adding folders to distinguish between variables

         // controls
         const gui = new dat.GUI()
         // sizes
         let width = window.innerWidth
         let height = window.innerHeight
         // scene
         const scene = new THREE.Scene()
         scene.background = new THREE.Color(0x262626)
         // camera
         const camera = new THREE.PerspectiveCamera(45, width / height, 0.1, 100)
         camera.position.set(0, 0, 10)
         const camFolder = gui.addFolder('Camera')
         camFolder.add(camera.position, 'z').min(10).max(60).step(10)
         // cube
         const geometry = new THREE.BoxGeometry(2, 2, 2)
         const material = new THREE.MeshBasicMaterial({
            color: 0xffffff,
            wireframe: true
         })
         const cubeColor = {
            color: 0xffffff
         }
         const materialFolder = gui.addFolder('Material')
         materialFolder.add(material, 'wireframe')
         materialFolder.addColor(cubeColor, 'color').onChange(() => {
            // callback
            material.color.set(cubeColor.color)
         })
         materialFolder.open()
         const cube = new THREE.Mesh(geometry, material)
         scene.add(cube)
         const cubeFolder = gui.addFolder('Cube')
         // for position
         const posFolder = cubeFolder.addFolder('position')
         posFolder.add(cube.position, 'x', 0, 5, 0.1)
         posFolder.add(cube.position, 'y', 0, 5, 0.1)
         posFolder.add(cube.position, 'z', 0, 5, 0.1)
         posFolder.open()
         // for scale
         const scaleFolder = cubeFolder.addFolder('Scale')
         scaleFolder.add(cube.scale, 'x', 0, 5, 0.1).name('Width')
         scaleFolder.add(cube.scale, 'y', 0, 5, 0.1).name('Height')
         scaleFolder.add(cube.scale, 'z', 0, 5, 0.1).name('Depth')
         scaleFolder.open()
         cubeFolder.open()
         // responsiveness
         window.addEventListener('resize', () => {
            width = window.innerWidth
            height = window.innerHeight
            camera.aspect = width / height
            camera.updateProjectionMatrix()
            renderer.setSize(window.innerWidth, window.innerHeight)
            renderer.render(scene, camera)
         })
         // renderer
         const renderer = new THREE.WebGL1Renderer()
         renderer.setSize(width, height)
         renderer.setPixelRatio(Math.min(window.devicePixelRatio, 2))
         // animation
         function animate() {
         requestAnimationFrame(animate)
            cube.rotation.x += 0.005
            cube.rotation.y += 0.01
            renderer.render(scene, camera)
         }
         // rendering the scene
         const container = document.querySelector('#threejs-container')
         container.append(renderer.domElement)
         renderer.render(scene, camera)
         animate()
      </script>
   </body>
</html>
Output
You can also add some callback functions. onChange is triggered once the value is changed.
gui.add(cube.position, 'y').onChange(function () {
   // refresh based on the new value of y
   console.log(cube.position.y)
})
Let's see another example of changing color using dat.gui and callbacks.
// parameter
const cubeColor = {
   color: 0xff0000,
}
gui.addColor(cubeColor, 'color').onChange(() => {
   // callback
   cube.color.set(cubeColor.color)
})
The above callback onChange notifies Three.js to change the cube color when the color from cubeColor changes.
We are going to use this dat.gui a lot from now. Make sure you get used to it by experimenting with the "Hello Cube!" app.
Stats − Statistics play an important role in large-scale applications.
Three.js - Cameras
Types of Cameras
There are two types of cameras are in Three.js.
| Sr.No | Cameras & Description |
|---|---|
| 1 | There are different cameras in Three.js. The most common camera and the one we've been using is the PerspectiveCamera. |
| 2 | The 2nd most common camera is the OrthographicCamera. It specifies a box with the settings left, right top, bottom, near, and far. It represents three-dimensional objects in two dimensions. |
Making the Camera Follow an Object
In the animation function, we use the camera.lookAt function to point the camera to the position function of the object. We do this in every frame that we render. It looks like the camera is exactly following the object's position.
function animate() {
   const object = scene.getObjectByName('sphere')
   renderer.render(scene, camera)
   camera.lookAt(object.position)
   requestAnimationFrame(render)
}
Three.js - Controls
You can move the camera around the scene using camera controls. Three.js has many camera controls you can use to control the camera throughout a scene. You have to get the controls separately from GitHub. The Three.js library does not include these.
| Sr.No | Controls & Description |
|---|---|
| 1 |
Orbit controls allow the camera to orbit around the center of the scene. |
| 2 |
TrackballControls is similar to Orbit controls. However, it does not maintain a constant camera up vector. |
| 3 |
These are flight simulator-like controls. Move and steer with the keyboard and the mouse. |
| 4 |
The PointerLockControls implements the inbuilt browsers Pointer Lock API. |
In this chapter, we have seen the most useful controls. Some developers are creating more useful controls for Three.js. You can see some other controls here, well documented and easy to use.
Three.js - Lights & Shadows
Lights make the objects visible, similarly, in Three.js THREE.Light lights up the scene and makes some things visible. Not all materials are affected by lighting. The MeshBasicMaterial and MeshNormalMaterial are self-illuminating, so they don't need lighting to be visible within a scene. However, most of the other materials do, the MeshLambertMaterial, MeshPhongMaterial, MeshStandardMaterial, MeshPhysicalMaterial, and MeshToonMaterial. We'll discuss more materials in further chapters. In this chapter, we'll focus on different types of lights in Three.js.
Every light has color and intensity properties.
color − (optional) hexadecimal color of the light. Default is 0xffffff (white).
intensity − (optional) numeric value of the light's strength/intensity. Default is 1.
Casting Shadows
The light that is coming from a specific direction can cast shadows. First, we should make the scene ready for casting shadows.
Step − 1
We should first tell the renderer that we want to enable shadows. Casting shadows is an expensive operation. WebGLRenderer only supports this functionality. It uses Shadow mapping, a technique specific to WebGL, performed directly on the GPU.
renderer.shadowMapEnabled = true
The above line of code tells the renderer to cast shadows in the scene.
Note − Three.js, by default, uses shadow maps. Shadow map works for light that casts shadows.The scene renders all objects marked to cast shadows from the point of view of the light.
If your shadow looks a bit blocky around its edges, it means the shadow map is too small. To increase the shadow map size, you can define shadowMapHeight and shadowMapWidht properties for the light. Alternatively, you can also try to change the shadowMapType property of WebGLRenderer. You can set this to THREE.BasicShadowMap, THREE.PCFShadowMap, or THREE.PCFSoftShadowMap.
// to antialias the shadow
renderer.shadowMapType = THREE.PCFSoftShadowMap
// or
directionalLight.shadowMapWidth = 2048
directionalLight.shadowMapHeight = 2048
Step − 2
You should configure objects to cast shadows. You can inform Three.js which objects can cast shadows and which objects can receive shadows.
object.castShadow = true
object.recieveShadow = true
Step − 3
All the above steps are the same for every light. The next step is to set up the shadow-related properties.
light.castShadow = true
light.shadow.camera.near = 10
light.shadow.camera.far = 100
light.shadow.camera.left = -50
light.shadow.camera.right = 50
light.shadow.camera.top = 50
light.shadow.camera.bottom = -50
The first property, castShadow, tells Three.js that this light casts shadows. As casting shadows is an expensive operation, we need to define the area where shadows can appear. You can do it with the shadow.camera.near, shadow.camera.far, and shadow.camera.left, etc. properties. With the above properties, we create a box-like area where Three.js render shadows.
Example
Explore more in this example.
directional.html
<!DOCTYPE html>
<html lang="en">
   <head>
      <meta charset="UTF-8" />
      <meta http-equiv="X-UA-Compatible" content="ie=edge" />
      <meta name="viewport" content="width=device-width, initial-scale=1.0" />
      <title>Three.js - Directional Light</title>
      <style>
         * {
            margin: 0;
            padding: 0;
            box-sizing: border-box;
            font-family: -applesystem, BlinkMacSystemFont, 'Segoe UI', Roboto, Oxygen, Ubuntu,
            Cantarell, 'Open Sans', 'Helvetica Neue', sans-serif;
         }
         html,
         body {
            height: 100vh;
            width: 100vw;
         }
         #threejs-container {
            position: block;
            width: 100%;
            height: 100%;
         }
      </style>
      <script src="https://cdnjs.cloudflare.com/ajax/libs/three.js/r128/three.min.js"></script>
      <script src="https://cdnjs.cloudflare.com/ajax/libs/dat-gui/0.7.7/dat.gui.js"></script>
   </head>
   <body>
   <div id="container"></div>
      <script type="module">
         // Adding directional light to the scene
         // The lights falls from the light only in one direction.
         // You can see the position of light using helpers provided in Three.j
         s for debugging purposes

         // GUI
         const gui = new dat.GUI()
         // sizes
         let width = window.innerWidth
         let height = window.innerHeight
         // scene
         const scene = new THREE.Scene()
         scene.background = new THREE.Color(0x262626)
         // camera
         const camera = new THREE.PerspectiveCamera(45, width / height, 0.1, 1000)
         camera.position.set(0, 0, 10)
         const camFolder = gui.addFolder('Camera')
         camFolder.add(camera.position, 'z', 10, 80, 1)
         camFolder.open()
         // lights
         const ambientLight = new THREE.AmbientLight(0xffffff, 0.5)
         scene.add(ambientLight)
         const light = new THREE.DirectionalLight()
         light.position.set(2.5, 2, 2)
         light.castShadow = true
         light.shadow.mapSize.width = 512
         light.shadow.mapSize.height = 512
         light.shadow.camera.near = 0.5
         light.shadow.camera.far = 100
         scene.add(light)
         const helper = new THREE.DirectionalLightHelper(light)
         scene.add(helper)
         // light controls
         const lightColor = {
            color: light.color.getHex()
         }
         const lightFolder = gui.addFolder('Directional Light')
         lightFolder.addColor(lightColor, 'color').onChange(() => {
         light.color.set(lightColor.color)
         })
         lightFolder.add(light, 'intensity', 0, 1, 0.01)
         lightFolder.open()
         const directionalLightFolder = gui.addFolder('Position of Light')
         directionalLightFolder.add(light.position, 'x', -10, 10, 0.1)
         directionalLightFolder.add(light.position, 'y', -10, 10, 0.1)
         directionalLightFolder.add(light.position, 'z', -10, 10, 0.1)
         directionalLightFolder.open()
         // plane
         const planeGeometry = new THREE.PlaneGeometry(100, 20)
         const plane = new THREE.Mesh(planeGeometry, new THREE.MeshPhongMateria
         l({ color: 0xffffff }))
         plane.rotateX(-Math.PI / 2)
         plane.position.y = -1.75
         plane.receiveShadow = true
         scene.add(plane)
         // cube
         const geometry = new THREE.BoxGeometry(2, 2, 2)
         const material = new THREE.MeshStandardMaterial({
            color: 0x87ceeb
         })
         const materialFolder = gui.addFolder('Material')
         materialFolder.add(material, 'wireframe')
         materialFolder.open()
         const cube = new THREE.Mesh(geometry, material)
         cube.position.set(0, 0.5, 0)
         cube.castShadow = true
         cube.receiveShadow = true
         scene.add(cube)
         // responsiveness
         window.addEventListener('resize', () => {
            width = window.innerWidth
            height = window.innerHeight
            camera.aspect = width / height
            camera.updateProjectionMatrix()
            renderer.setSize(window.innerWidth, window.innerHeight)
            renderer.render(scene, camera)
         })
         // renderer
         const renderer = new THREE.WebGL1Renderer()
         renderer.setSize(window.innerWidth, window.innerHeight)
         renderer.shadowMap.enabled = true
         renderer.shadowMap.type = THREE.PCFSoftShadowMap
         renderer.setPixelRatio(Math.min(window.devicePixelRatio, 2))
         // animation
         function animate() {
            requestAnimationFrame(animate)
            cube.rotation.x += 0.005
            cube.rotation.y += 0.01
            renderer.render(scene, camera)
         }
         // rendering the scene
         const container = document.querySelector('#container')
         container.append(renderer.domElement)
         renderer.render(scene, camera)
         animate()
      </script>
   </body>
</html>
Output
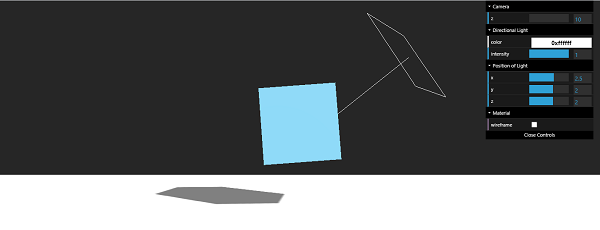
| Sr.No | Lights & Description |
|---|---|
| 1 |
It is the most basic light, which illuminates the whole scene equally. |
| 2 |
Directional light comes from a specific point and is emitted directly from far away to the target. |
| 3 |
It is another kind of light that comes from a specific direction in the shape of the cone. |
| 4 |
The point light is a light source that emits light in all directions from a single point. |
| 5 |
It is a special light for creating natural lighting. |
Three.js - Geometries
Geometries are used to create and define shapes in Three.js. Three.js has many types of built-in geometries, both 2D and 3D.
In this chapter, we'll discuss basic built-in geometries. Weâll first look at the 2D geometries, and after that, weâll explore all the basic 3D geometries that are available.
| Sr.No | Geometrys & Description |
|---|---|
| 1 |
The THREE.PlaneGeometry creates a simple 2D rectangle. |
| 2 |
The THREE.CircleGeometry creates a simple 2D circle. |
| 3 |
The THREE.RingGeometry creates a D disc with a hole in the center. |
| 4 |
The THREE.BoxGeometry creates a simple 3D box with specified dimensions. |
| 5 |
The THREE.SphereGeometry creates 3D sphere geometries. |
| 6 |
To create a cylinder in Three.js, you can use the Three.CylinderGeometry. |
| 7 |
You can use THREE.ConeGeometry to create a cone. It is very similar to CylinderGeometry, except it only allows you to set the radius instead of radiusTop and radiusBottom. |
| 8 |
Torus is a tube-like shape that looks like a donut. You can use THREE.TorusGeometry to create a torus in Three.js. |
| 9 |
A torus knot is a special kind of knot that looks like a tube that winds around itself a couple of times. |
| 10 |
A polyhedron is a geometry that has only flat faces and straight edges. |
Learn more about geometries here
Three.js - Materials
Material is like the skin of the object. It defines the outer appearance of the geometry. Three.js provides many materials to work. We should choose the type of material according to our needs. In this chapter, we'll discuss the most commonly used materials in Three.js.
| Sr.No | Materials & Description |
|---|---|
| 1 |
It is the very basic material in Three.js. |
| 2 |
It uses the distance from the camera to determine how to color your mesh in a greyscale. |
| 3 |
This material uses the magnitude of the x/y/z values of the facesâ normal vectors to calculate and set the red/green/blue values of the colors displayed on the face. |
| 4 |
You can use this material to create dull-looking, non-shiny surfaces. |
| 5 |
This material is similar to MeshLambertMaterial but can create more shiny surfaces. |
| 6 |
It is similar but gives a more accurate and realistic looking result than the MeshLambertMaterial or MeshPhongMaterial. Instead of shininess, it has two properties: roughness and metalness. |
| 7 |
It is pretty similar to MeshStandardMaterial. You can control the reflectivity of the material. |
| 8 |
Until now, while creating a Mesh, you added a single material to it. |
Three.js - Textures
The texture is an image or color added to the material to give more detail or beauty. The texture is an essential topic in Three.js. In this section, we'll see how to apply a basic texture to our material.
Basic Texture
First, you should create a loader. Three.js has a built-in function TextureLoader() to load textures into your Three.js project. Then you can load any texture or image by specifying its path in the load() function.
const loader = new THREE.TextureLoader()
texture.load('/path/to/the/image')
Then, set the map property of the material to this texture. That's it; you applied a texture to the plane geometry.
Textures have settings for repeating, offsetting, and rotating a texture. By default, textures in three.js do not repeat. There are two properties, wrapS for horizontal wrapping and wrapT for vertical wrapping to set whether a texture repeats. And set the repeating mode to THREE.ReaptWrapping.
texture.wrapS = THREE.RepeatWrapping
texture.wrapT = THREE.RepeatWrapping
texture.magFilter = THREE.NearestFilter
In Three.js, you can choose what happens both when the texture is drawn larger than its original size and what happens when it's drawn smaller than its original size.
For setting the filter, when the texture is larger than its original size, you set texture.magFilter property to either THREE.NearestFilter or THREE.LinearFilter.
NearestFilter − This filter uses the color of the nearest texel that it can find.
LinearFilter − This filter is more advanced and uses the color values of the four neighboring texels to determine the correct color.
And, you can add how many times to repeat the texture.
const timesToRepeatHorizontally = 4
const timesToRepeatVertically = 2
texture.repeat.set(timesToRepeatHorizontally, timesToRepeatVertically)
Example
Check out the following example.
texture.html
<!DOCTYPE html>
<html lang="en">
   <head>
      <meta charset="UTF-8" />
      <meta http-equiv="X-UA-Compatible" content="ie=edge" />
      <meta name="viewport" content="width=device-width, initial-scale=1.0" />
      <title>Three.js - Checker Board</title>
      <style>
         * {
            margin: 0;
            padding: 0;
            box-sizing: border-box;
            font-family: -applesystem, BlinkMacSystemFont, 'Segoe UI', Roboto, Oxygen, Ubuntu,
            Cantarell, 'Open Sans', 'Helvetica Neue', sans-serif;
         }
         html,
         body {
            height: 100vh;
            width: 100vw;
         }
         #threejs-container {
            position: block;
            width: 100%;
            height: 100%;
         }
      </style>
      <script src="https://cdnjs.cloudflare.com/ajax/libs/three.js/r128/three.min.js"></script>
      <script src="https://cdnjs.cloudflare.com/ajax/libs/dat-gui/0.7.7/dat.gui.js"></script>
   </head>
   <body>
      <div id="threejs-container"></div>
      <script type="module">
         // Creating a checker-board using Textures
         // applying the texture to 2d plane geometry
         // GUI
         const gui = new dat.GUI()
         // sizes
         let width = window.innerWidth
         let height = window.innerHeight
         // scene
         const scene = new THREE.Scene()
         scene.background = new THREE.Color(0x262626)
         // camera
         const camera = new THREE.PerspectiveCamera(75, width / height, 0.1, 100)
         camera.position.set(0, 0, 10)
         const camFolder = gui.addFolder('Camera')
         camFolder.add(camera.position, 'z').min(10).max(60).step(10)
         camFolder.open()
         // Light
         const ambientLight = new THREE.AmbientLight(0xffffff, 1)
         scene.add(ambientLight)
         // texture
         const planeSize = 10
         const loader = new THREE.TextureLoader()
         const texture = loader.load(' https://cloud-nfpbfxp6x-hack-clubbot.vercel.app/0height.png ')
         texture.wrapS = THREE.RepeatWrapping
         texture.wrapT = THREE.RepeatWrapping
         texture.magFilter = THREE.NearestFilter
         const repeats = planeSize / 2
         texture.repeat.set(repeats, repeats)
         class StringToNumberHelper {
            constructor(obj, prop) {
               this.obj = obj
               this.prop = prop
            }
            get value() {
               return this.obj[this.prop]
            }
            set value(v) {
               this.obj[this.prop] = parseFloat(v)
            }
         }
         const wrapModes = {
            ClampToEdgeWrapping: THREE.ClampToEdgeWrapping,
            RepeatWrapping: THREE.RepeatWrapping,
            MirroredRepeatWrapping: THREE.MirroredRepeatWrapping
         }
         function updateTexture() {
            texture.needsUpdate = true
         }
         gui
            .add(new StringToNumberHelper(texture, 'wrapS'), 'value', wrapModes)
            .name('texture.wrapS')
            .onChange(updateTexture)
         gui
            .add(new StringToNumberHelper(texture, 'wrapT'), 'value', wrapModes)
            .name('texture.wrapT')
            .onChange(updateTexture)
         gui.add(texture.repeat, 'x', 0, 5, 0.01).name('texture.repeat.x')
         gui.add(texture.repeat, 'y', 0, 5, 0.01).name('texture.repeat.y')
         // plane for board
         const geometry = new THREE.PlaneGeometry(planeSize, planeSize)
         const material = new THREE.MeshPhongMaterial({
            map: texture,
            side: THREE.DoubleSide
         })
         const board = new THREE.Mesh(geometry, material)
         board.position.set(0, 0, 0)
         scene.add(board)
         // responsiveness
         window.addEventListener('resize', () => {
            width = window.innerWidth
            height = window.innerHeight
            camera.aspect = width / height
            camera.updateProjectionMatrix()
            renderer.setSize(window.innerWidth, window.innerHeight)
            renderer.render(scene, camera)
         })
         // renderer
         const renderer = new THREE.WebGL1Renderer()
         renderer.setSize(width, height)
         renderer.setPixelRatio(Math.min(window.devicePixelRatio, 2))
         // animation
         function animate() {
            requestAnimationFrame(animate)
            renderer.render(scene, camera)
         }
         // rendering the scene
         const container = document.querySelector('#threejs-container')
         container.append(renderer.domElement)
         renderer.render(scene, camera)
         console.log(scene.children)
         animate()
      </script>
   </body>
</html>
Output
Texture Mapping
base color map
It is the basic colored image you add to the object to the texture. With a base color map we add colors to the surface.
const textureMap = new THREE.TextureLoader().load('/path/to/texture-map')
material.map = textureMap
You can add the effect of depth using a bump map or normal map or distance map.
bump map
A bump map is a grayscale image, where the intensity of each pixel determines the height. You can just set the material bumpMap property to the texture. It adds fine details to the texture.
const textureBumpMap = new THREE.TextureLoader().load('/path/to/bump-map')
material.bumpMap = textureBumpMap
Normal Maps
A normal map describes the normal vector for each pixel, which should be used to calculate how light affects the material used in the geometry. It creates an illusion of depthness to the flat surface.
const textureNormalMap = new THREE.TextureLoader().load('/path/to/normal-map')
material.normalMap = textureNormalMap
Displacement Map
While the normal map gives an illusion of depth, we change the model's shape, with a displacement map based on the information from the texture.
const textureDisplacementMap = new THREE.TextureLoader().load(
   '/path/to/displacement-map'
)
material.displacemetMap = textureDisplacementMap
Roughness Map
The roughness map defines which areas are rough and that affects the reflection sharpness from the surface.
const textureRoughnessMap = new THREE.TextureLoader().load(
   '/path/to/roughness-map'
)
material.roughnessMap = textureRoughnessMap
Ambient Occlusion Map
It highlights the shadow areas of the object. It requires a second set of UVs.
const textureAmbientOcclusionMap = new THREE.TextureLoader().load(
   '/path/to/AmbientOcclusion-map'
)
material.aoMap = textureAmbientOcclusionMap
// second UV
mesh.geometry.attributes.uv2 = mesh.geometry.attributes.uv
If you compare the objects with roughness map and ambient occlusion map, you can observe that The shadows are more highlighted after using aoMap.
Metalness Map
It defines how much the material is like a metal.
const textureMetalnessMap = new THREE.TextureLoader().load(
   '/path/to/metalness-map'
)
material.metalnessMap = textureMetalnessMap
Example
Now, check out the following example
texture-maps.html
<!DOCTYPE html>
<html lang="en">
   <head>
      <meta charset="UTF-8" />
      <meta http-equiv="X-UA-Compatible" content="ie=edge" />
      <meta name="viewport" content="width=device-width, initial-scale=1.0" />
      <title>Three.js - Texture Mapping</title>
      <style>
         * {
            margin: 0;
            padding: 0;
            box-sizing: border-box;
            font-family: -applesystem, BlinkMacSystemFont, 'Segoe UI', Roboto, Oxygen, Ubuntu,
            Cantarell, 'Open Sans', 'Helvetica Neue', sans-serif;
         }
         html,
         body {
            height: 100vh;
            width: 100vw;
         }
         #threejs-container {
            position: block;
            width: 100%;
            height: 100%;
         }
      </style>
      <script src="https://cdnjs.cloudflare.com/ajax/libs/three.js/r128/three.min.js"></script>
      <script src="https://cdnjs.cloudflare.com/ajax/libs/dat-gui/0.7.7/dat.gui.js"></script>
   </head>
   <body>
      <div id="threejs-container"></div>
      <script type="module">
         // Using different types of texture maps
         import { OrbitControls } from "https://threejs.org/examples/jsm/controls/OrbitControls.js"

         // sizes
         let width = window.innerWidth
         let height = window.innerHeight
         // scene
         const scene = new THREE.Scene()
         scene.background = new THREE.Color(0xffffff)
         // lights
         const ambientLight = new THREE.AmbientLight(0xffffff, 0.5)
         scene.add(ambientLight)
         const light = new THREE.DirectionalLight(0xffffff, 4.0)
         light.position.set(0, 10, 20)
         light.castShadow = true
         light.shadow.mapSize.width = 512
         light.shadow.mapSize.height = 512
         light.shadow.camera.near = 0.5
         light.shadow.camera.far = 100
         scene.add(light)
         // camera
         const camera = new THREE.PerspectiveCamera(45, width / height, 0.1, 100)
         camera.position.set(0, 0, 10)
         // textures
         const loader = new THREE.TextureLoader()
         const texture = loader.load('https://cloud-nfpbfxp6x-hack-clubbot.vercel.app/5basecolor.jpg')
         const normalmap = loader.load('https://cloud-nfpbfxp6x-hack-clubbot.vercel.app/2normal.jpg')
         const heightmap = loader.load('https://cloud-nfpbfxp6x-hack-clubbot.vercel.app/0height.png')
         const roughmap = loader.load('https://cloud-nfpbfxp6x-hack-clubbot.vercel.app/3roughness.jpg')
         const ambientOcclusionmap = loader.load('https://cloud-nfpbfxp6x-hackclub-bot.vercel.app/4ambientocclusion.jpg')
         const metallicmap = loader.load('https://cloud-nfpbfxp6x-hack-clubbot.vercel.app/1metallic.jpg')
         // plane
         const planeGeometry = new THREE.PlaneGeometry(100, 100)
         const plane = new THREE.Mesh(
            planeGeometry,
            new THREE.MeshPhongMaterial({ color: 0xffffff, side: THREE.DoubleSide })
         )
         plane.rotateX(-Math.PI / 2)
         plane.position.y = -2.75
         plane.receiveShadow = true
         scene.add(plane)
         // object
         const geometry = new THREE.SphereGeometry(1, 64, 64)
         const material1 = new THREE.MeshStandardMaterial({
            map: texture,
            side: THREE.DoubleSide
         })
         const object1 = new THREE.Mesh(geometry, material1)
         object1.position.set(-2.5, 1.5, 0)
         object1.castShadow = true
         scene.add(object1)
         // normal map
         const material2 = new THREE.MeshStandardMaterial({
            color: 0xffffff,
            map: texture,
            side: THREE.DoubleSide,
            normalMap: normalmap
         })
         const object2 = new THREE.Mesh(geometry, material2)
         object2.position.set(0, 1.5, 0)
         object2.castShadow = true
         scene.add(object2)
         // displacement map
         const material3 = new THREE.MeshStandardMaterial({
            color: 0xffffff,
            map: texture,
            side: THREE.DoubleSide,
            normalMap: normalmap,
            displacementMap: heightmap,
            displacementScale: 0.05
         })
         const object3 = new THREE.Mesh(geometry, material3)
         object3.position.set(2.5, 1.5, 0)
         object3.castShadow = true
         scene.add(object3)
         console.log(object3)
         // roughness map
         const material4 = new THREE.MeshStandardMaterial({
            color: 0xffffff,
            map: texture,
            side: THREE.DoubleSide,
            normalMap: normalmap,
            displacementMap: heightmap,
            displacementScale: 0.05,
            roughnessMap: roughmap,
            roughness: 0.5
         })
         const object4 = new THREE.Mesh(geometry, material4)
         object4.position.set(-2.5, -1.5, 0)
         object4.castShadow = true
         scene.add(object4)
         console.log(object4)
         // ambient occlusion map
         const material5 = new THREE.MeshStandardMaterial({
            color: 0xffffff,
            map: texture,
            side: THREE.DoubleSide,
            normalMap: normalmap,
            displacementMap: heightmap,
            displacementScale: 0.05,
            roughnessMap: roughmap,
            roughness: 0.1,
            aoMap: ambientOcclusionmap
         })
         const object5 = new THREE.Mesh(geometry, material5)
         object5.position.set(0, -1.5, 0)
         object5.geometry.attributes.uv2 = object5.geometry.attributes.uv
         object5.castShadow = true
         scene.add(object5)
         console.log(object5)
         // for env maps
         const cubeRenderTarget = new THREE.WebGLCubeRenderTarget(128, {
            format: THREE.RGBFormat,
            generateMipMaps: true,
            minFilter: THREE.LinearMipmapLinearFilter,
            encoding: THREE.sRGBEncoding
         })
         const cubeCamera = new THREE.CubeCamera(1, 10000, cubeRenderTarget)
         cubeCamera.position.set(0, 100, 0)
         scene.add(cubeCamera)
         // metallic map
         const material6 = new THREE.MeshStandardMaterial({
            color: 0xffffff,
            map: texture,
            side: THREE.DoubleSide,
            normalMap: normalmap,
            displacementMap: heightmap,
            displacementScale: 0.15,
            roughnessMap: roughmap,
            roughness: 0.1,
            aoMap: ambientOcclusionmap,
            metalnessMap: metallicmap,
            metalness: 1,
            envMap: cubeRenderTarget.texture
         })
         const object6 = new THREE.Mesh(geometry, material6)
         object6.position.set(2.5, -1.5, 0)
         object6.geometry.attributes.uv2 = object6.geometry.attributes.uv
         object6.castShadow = true
         scene.add(object6)
         console.log(object6)
         cubeCamera.position.copy(object6.position)
         // responsiveness
         window.addEventListener('resize', () => {
            width = window.innerWidth
            height = window.innerHeight
            camera.aspect = width / height
            camera.updateProjectionMatrix()
            renderer.setSize(window.innerWidth, window.innerHeight)
            renderer.render(scene, camera)
         })
         // renderer - anti-aliasing
         const renderer = new THREE.WebGLRenderer({ antialias: true })
         renderer.physicallyCorrectLights = true
         renderer.setSize(width, height)
         renderer.setPixelRatio(Math.min(window.devicePixelRatio, 2))
         const controls = new OrbitControls(camera, renderer.domElement)
         // animation
         function animate() {
            requestAnimationFrame(animate)
            let objects = [object1, object2, object3, object4, object5, object6]
            objects.forEach((i) => {
               //i.rotation.x += 0.005
               i.rotation.y += 0.01
            })
            controls.update()
            cubeCamera.update(renderer, scene)
            renderer.render(scene, camera)
         }
         // rendering the scene
         const container = document.querySelector('#threejs-container')
         container.append(renderer.domElement)
         renderer.render(scene, camera)
         animate()
      </script>
   </body>
</html>
Output
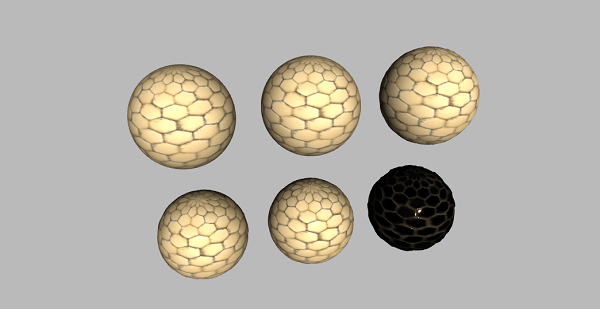
There are some other maps for creating a real-world model in computer graphics. You can learn more here.
Three.js - Drawing Lines
You have learned about quite a lot of materials in Three.js. Now let's see some unique materials used in drawing lines. We can draw various shapes and patterns using lines.
Using BufferGeometry
THREE.BufferGeometry is the base class of all the built-in geometries in Three.js. You can create your geometry by passing an array of vertices of the geometry.
Learn more about BufferGeometry here.
const points = []
points.push(new THREE.Vector3(-10, 0, 0))
points.push(new THREE.Vector3(0, -10, 0))
points.push(new THREE.Vector3(10, 0, 0))
These are some additional elements Three.js provides us to create our geometries. THREE.Vector3(x, y, z) - It makes a point in 3D space. In the above code, we are adding 3 points to the points array.
const geometry = new THREE.BufferGeometry().setFromPoints(points)
THREE.BufferGeometry(), as mentioned before it creates our geometry. We use the setFromPoints method to set the geometry using the array of points.
Note − Lines are drawn between each consecutive pair of vertices, but not between the first and last (the line is not closed.)
const material = new THREE.LineBasicMaterial({
   // for normal lines
   color: 0xffffff,
   linewidth: 1,
   linecap: 'round', //ignored by WebGLRenderer
   linejoin: 'round', //ignored by WebGLRenderer
})
// or
const material = new THREE.LineDashedMaterial({
   // for dashed lines
   color: 0xffffff,
   linewidth: 1,scale: 1,
   dashSize: 3,
   gapSize: 1,
})
These are the unique materials for lines. You can use any one of THREE.LineBasicMaterial or THREE.LineDashedMaterial.
const line = new THREE.Line(geometry, material)
Example
Now, instead of using THREE.Mesh, we use THREE.Line for drawing lines. Now, you see a "V" shape drawn using lines on the screen.
linebasic.html
<!DOCTYPE html>
<html lang="en">
   <head>
      <meta charset="UTF-8" />
      <meta http-equiv="X-UA-Compatible" content="ie=edge" />
      <meta name="viewport" content="width=device-width, initial-scale=1.0" />
      <title>Three.js - Line basic</title>
      <style>
         * {
            margin: 0;
            padding: 0;
            box-sizing: border-box;
            font-family: -applesystem, BlinkMacSystemFont, 'Segoe UI', Roboto, Oxygen, Ubuntu,
               Cantarell, 'Open Sans', 'Helvetica Neue', sans-serif;
         }
         html,
         body {
            height: 100vh;
            width: 100vw;
         }
         #threejs-container {
            position: block;
            width: 100%;
            height: 100%;
         }
      </style>
      <script src="https://cdnjs.cloudflare.com/ajax/libs/three.js/r128/three.min.js"></script>
      <script src="https://cdnjs.cloudflare.com/ajax/libs/dat-gui/0.7.7/dat.gui.js"></script>
   </head>
   <body>
      <div id="threejs-container"></div>
      <script type="module">
         // Creating a line using LineBasicMaterial

         // GUI
         const gui = new dat.GUI()
         // sizes
         let width = window.innerWidth
         let height = window.innerHeight
         // scene
         const scene = new THREE.Scene()
         scene.background = new THREE.Color(0x262626)
         // camera
         const camera = new THREE.PerspectiveCamera(45, width / height, 0.1, 100)
         camera.position.set(0, 0, 50)
         camera.lookAt(0, 0, 0)
         const camFolder = gui.addFolder('Camera')
         camFolder.add(camera.position, 'z', 10, 100)
         camFolder.open()
         // Line
         const points = []
         points.push(new THREE.Vector3(-10, 0, 0))
         points.push(new THREE.Vector3(0, -20, 0))
         points.push(new THREE.Vector3(10, 0, 0))
         const folders = [gui.addFolder('Poin 1'), gui.addFolder('Poin 2'), gui.addFolder('Poin 3')]
         folders.forEach((folder, i) => {
            folder.add(points[i], 'x', -30, 30, 1).onChange(redraw)
            folder.add(points[i], 'y', -30, 30, 1).onChange(redraw)
            folder.add(points[i], 'z', -30, 30, 1).onChange(redraw)
            folder.open()
         })
         const geometry = new THREE.BufferGeometry().setFromPoints(points)
         const material = new THREE.LineBasicMaterial({
            color: 0xffffff,
            linewidth: 2
         })
         const line = new THREE.Line(geometry, material)
         line.position.set(0, 10, 0)
         scene.add(line)
         function redraw() {
            let newGeometry = new THREE.BufferGeometry().setFromPoints(points)
            line.geometry.dispose()
            line.geometry = newGeometry
         }
         // responsiveness
         window.addEventListener('resize', () => {
            width = window.innerWidth
            height = window.innerHeight
            camera.aspect = width / height
            camera.updateProjectionMatrix()
            renderer.setSize(window.innerWidth, window.innerHeight)
            renderer.render(scene, camera)
         })
         // renderer
         const renderer = new THREE.WebGL1Renderer()
         renderer.setSize(width, height)
         renderer.setPixelRatio(Math.min(window.devicePixelRatio, 2))
         // animation
         function animate() {
            requestAnimationFrame(animate)
            renderer.render(scene, camera)
         }
         // rendering the scene
         const container = document.querySelector('#threejs-container')
         container.append(renderer.domElement)
         renderer.render(scene, camera)
         animate()
      </script>
   </body>
</html>
Output
Example
You can create any type of geometry wireframe using lines by specifying the vertices. Check out the following example where we are drawing dashed lines.
dashedline.html
<!DOCTYPE html>
<html lang="en">
   <head>
      <meta charset="UTF-8" />
      <meta http-equiv="X-UA-Compatible" content="ie=edge" />
      <meta name="viewport" content="width=device-width, initial-scale=1.0" />
      <title>Three.js - Dashed line</title>
      <style>
         * {
            margin: 0;
            padding: 0;
            box-sizing: border-box;
            font-family: -applesystem, BlinkMacSystemFont, 'Segoe UI', Roboto, Oxygen, Ubuntu,
               Cantarell, 'Open Sans', 'Helvetica Neue', sans-serif;
         }
         html,
         body {
            height: 100vh;
            width: 100vw;
         }
         #threejs-container {
            position: block;
            width: 100%;
            height: 100%;
         }
      </style>
      <script src="https://cdnjs.cloudflare.com/ajax/libs/three.js/r128/three.min.js"></script>
      <script src="https://cdnjs.cloudflare.com/ajax/libs/dat-gui/0.7.7/dat.gui.js"></script>
   </head>
   <body>
      <div id="threejs-container"></div>
      <script type="module">
         // Creating dashed line using LineDashedMaterial
         // GUI
         const gui = new dat.GUI()
         // sizes
         let width = window.innerWidth
         let height = window.innerHeight
         // scene
         const scene = new THREE.Scene()
         scene.background = new THREE.Color(0x262626)
         // camera
         const camera = new THREE.PerspectiveCamera(45, width / height, 0.1, 100)
         camera.position.set(0, 0, 50)
         camera.lookAt(0, 0, 0)
         const camFolder = gui.addFolder('Camera')
         camFolder.add(camera.position, 'z', 10, 100)
         camFolder.open()
         // Line
         const points = []
         points.push(new THREE.Vector3(-10, 0, 0))
         points.push(new THREE.Vector3(0, -20, 0))
         points.push(new THREE.Vector3(10, 0, 0))
         const folders = [gui.addFolder('Poin 1'), gui.addFolder('Poin 2'), gui.addFolder('Poin 3')]
         folders.forEach((folder, i) => {
            folder.add(points[i], 'x', -30, 30, 1).onChange(redraw)
            folder.add(points[i], 'y', -30, 30, 1).onChange(redraw)
            folder.add(points[i], 'z', -30, 30, 1).onChange(redraw)
            folder.open()
         })
         const geometry = new THREE.BufferGeometry().setFromPoints(points)
            const material = new THREE.LineDashedMaterial({
            color: 0xffffff,
            linewidth: 2,
            scale: 1,
            dashSize: 3,
            gapSize: 2
         })
         const line = new THREE.Line(geometry, material)
         line.computeLineDistances()
         line.position.set(0, 10, 0)
         scene.add(line)
         console.log(line)
         function redraw() {
            let newGeometry = new THREE.BufferGeometry().setFromPoints(points)
            line.geometry.dispose()
            line.geometry = newGeometry
         }
         // responsiveness
         window.addEventListener('resize', () => {
            width = window.innerWidth
            height = window.innerHeight
            camera.aspect = width / height
            camera.updateProjectionMatrix()
            renderer.setSize(window.innerWidth, window.innerHeight)
            renderer.render(scene, camera)
         })
         // renderer
         const renderer = new THREE.WebGL1Renderer()
         renderer.setSize(width, height)
         renderer.setPixelRatio(Math.min(window.devicePixelRatio, 2))
         // animation
         function animate() {
            requestAnimationFrame(animate)
            renderer.render(scene, camera)
         }
         // rendering the scene
         const container = document.querySelector('#threejs-container')
         container.append(renderer.domElement)
         renderer.render(scene, camera)
         animate()
      </script>
   </body>
</html>
Output
Three.js - Animations
Animations give life to our websites, as you can see that most of the examples use animations.Let's see how to add basic animations to our Three.js web application.
If you want to add animations to your Three.js scene, you'll need to render the scene multiple times. To do that, you should use the standard HTML5 requestAnimationFrame functionality.
function animate() {
   // schedule multiple rendering
   requestAnimationFrame(animate)
   renderer.render(scene, camera)
}
The above code executes the argument passes to requestAnimationFrame, animate function, at regular intervals, and also renders the scene multiple times (every 60ms).
You now have your animation loop, so any changes made to your model, camera, or other objects in the scene can now be done from within the animate function.
Let's create a simple rotating animation.
function animate() {
   requestAnimationFrame(animate)
   // rotating the cube
   cube.rotation.x += 0.005
   cube.rotation.y += 0.01
   renderer.render(scene, camera)
}
The above code creates a rotating cube. Every time the animate renders, the cube rotates by the specified values, which repeats as an infinite loop.
You can also add animation to any other element in the scene. Check out this example and play around the scene exploring different animations.
You can also use different animation libraries like Tween.js, Greensock, to create professional animations using Three.js.
In the following section, let's use tween.js to add animations to our 3D objects
Using Twee.js in the Three.js project
First things first, you should include the library in your project. Add a script tag or install from npm.
<script src="path/to/tween.js"></script>
To use this library, we need to first create an instance of a TWEEN.Tween object.
const initial = { x: 0, y: 1.25, z: 0, rot: 0 }
const final = { x: 5, y: 15, z: -10, rot: 2 * Math.PI }
const tween = new TWEEN.Tween(initial)
It creates a TWEEN.Tween instance. We can use this instance to move the provided properties from the initial value to the final value.
tween.to(final)
With to function, we tell the tween object that we want to change the initial values to final values slowly. So, we vary the x property from 0 to 5. The second parameter, which is 5000, defines how many milliseconds this change should take.
You can also choose how the value changes over time. For instance, you can use a linear easing function. It changes the values at a constant rate, which starts with small changes and quickly increases. Many more easing functions are predefined in TWEEN.
tween.easing(TWEEN.Easing.Elastic.InOut)
To make the 3D object animate, we need to be notified at every change. This is done with onUpdate(). If you want to be notified at the end of the tween, use onComplete().
tween.onUpdate(function () {
   cube.position.set(this.x, this.y, this.z)
   cube.rotation.set(this.rot, this.rot, this.rot)
})
There are several other settings you can use on the tween object to control how the animation behaves. In this case, we tell the tween object to repeat its animation indefinitely and use a yo-yo effect that reverses the animation.
tween.repeat(Infinity)
tween.yoyo(true)
Finally, we can start the tween object by calling the start function.
tween.start()
At this point, nothing happens. You have to update the tween so that it is updated whenever the text the scene renders. You can call it in the animate function.
function animate() {
   requestAminationFrame(animate)
   TWEEN.update()
}
Now, you can see the effect. Similarly, you can use any animation library with Three.js.
Three.js - Creating Text
Often you need to add text to your scene. In this chapter, let's see how to add 2D and 3D text to our scene.
Draw Text to Canvas and Use as a Texture
This is the easiest way to add 2D text to your scene. you can create canvas using JavaScript andd add it to the dom.
const canvas = document.createElement('canvas')
const context = canvas.getContext('2d')
The code above creates a canvas element, and we set the context to 2d. The canvas.getContext() method returns an object that provides methods and properties for drawing on the canvas, which it can use to draw text, lines, boxes, circles, and more.
context.fillStyle = 'green'
context.font = '60px sans-serif
context.fillText('Hello World!', 0, 60)
The fillText() is a method of a 2D drawing context. The fillText() method allows you to draw a text string at a coordinate with the fill (color) derived from the fillStyle you provided. You can set the font of the text using the font property.
The above code set the font to 60-pixel-tall san-serif and the fill style to green. The text 'Hello, World!' is drawn starting at the coordinates (0, 60).
// canvas contents are used for a texture
const texture = new THREE.Texture(canvas)
texture.needsUpdate = true
To create a texture from a canvas element, we need to create a new instance of THREE.Texture and pass in the canvas element we made. The code above creates a texture using the canvas (in this case, our text). The needsUpdate parameter of the texture is set to true. It informs Three.js that our canvas texture has changed and needs to be updated the next time the scene is rendered.
Now, create a plane geometry and add this as a texture to the material.
var material = new THREE.MeshBasicMaterial({
   map: texture,
   side: THREE.DoubleSide,
})
material.transparent = true
var mesh = new THREE.Mesh(new THREE.PlaneGeometry(50, 10), material)
Using Text Geometry
THREE.TextGeometry is another type of geometry that generates text as a single geometry. It takes two arguments, text - the text you want to render, and other parameters.
Parameters
font − This is the name of the font.
size − Size of the text. Default is 100.
height − The height property defines the depth of the text; in other words, how far the text extrudes to make it 3D. This defaults to 50.
curveSegments − Number of points on the curves. Default is 12.
bevelEnabled − A bevel provides a smooth transition from the front of the text to the side. If you set this value to true, it adds a bevel to the rendered text. By default, it is false.
bevelThickness − If you've set bevelEnabled to true, it defines how deep the bevel is. Default is 10.
bevelSize − It determines how high the bevel is. Default is equal to 8.
bevelOffset − How far from text outline bevel starts. Default is 0.
bevelSegments − The number of bevel segments. Default is 3.
You need to use THREE.FontLoader to load fonts from their typeface.json files.
const loader = new THREE.FontLoader()
loader.load('fonts/helvetiker_regular.typeface.json', function (font) {
   const geometry = new THREE.TextGeometry('Hello Three.js!', {
      font: font,
      size: 3,
      height: 0.2,
      curveSegments: 12,
      bevelEnabled: false,
      bevelThickness: 0.5,
      bevelSize: 0.3,
      bevelOffset: 0,
      bevelSegments: 5,
   })
})
Now, you should add some material to it and create a mesh.
const material = new THREE.MeshFaceMaterial([
   new THREE.MeshPhongMaterial({
      color: 0xff22cc,
      flatShading: true,
   }), // front
   new THREE.MeshPhongMaterial({
      color: 0xffcc22
   }), // side
])
const mesh = new THREE.Mesh(geometry, material)
mesh.name = 'text'
scene.add(mesh)
Note − There is one thing you need to take into account when working with THREE.TextGeometry and materials. It can take two materials as an array: one for the front of rendered text and another for the side of the text. If you just pass in one material, it gets applied to both the front and the side.
Example
Now, you can see the text rendered to the scene. Check out the following example.
2d-text.html
<!DOCTYPE html>
<html>
   <head>
      <meta charset="UTF-8" />
      <meta http-equiv="X-UA-Compatible" content="ie=edge" />
      <meta name="viewport" content="width=device-width, initial-scale=1.0" />
      <title>Three.js - 2d text</title>
      <style>
         * {
            margin: 0;
            padding: 0;
            box-sizing: border-box;
            font-family: -applesystem, BlinkMacSystemFont, 'Segoe UI', Roboto, Oxygen, Ubuntu,
               Cantarell, 'Open Sans', 'Helvetica Neue', sans-serif;
         }
         html,
         body {
            height: 100vh;
            width: 100vw;
         }
         #threejs-container {
            position: block;
            width: 100%;
            height: 100%;
         }
      </style>
      <script src="https://cdnjs.cloudflare.com/ajax/libs/three.js/r128/three.min.js"></script>
      <script src="https://cdnjs.cloudflare.com/ajax/libs/dat-gui/0.7.7/dat.gui.js"></script>
   </head>
   <body>
      <div id="threejs-container"></div>
      <script type="module">
         // Adding 2d text to Three.js scene
         // Writing on canvas and then adding the canvas as a texture to material
         // GUI
         const gui = new dat.GUI()

         // sizes
         let width = window.innerWidth
         let height = window.innerHeight
         const size = 256
         const container = document.querySelector('#threejs-container')
         const canvas = document.createElement('canvas'),
         ctx = canvas.getContext('2d')
         function changeCanvas() {
            ctx.font = '20pt Arial'
            ctx.fillStyle = 'white'
            ctx.fillRect(0, 0, canvas.width, canvas.height)
            ctx.fillStyle = 'black'
            ctx.textAlign = 'center'
            ctx.textBaseline = 'middle'
            ctx.fillText('Tutorialspoint!', canvas.width / 2, canvas.height / 2)
         }
         // scene
         const scene = new THREE.Scene()
         scene.background = new THREE.Color(0x262626)
         // lights
         const ambientLight = new THREE.AmbientLight(0xffffff, 1)
         scene.add(ambientLight)
         const pointLight = new THREE.PointLight(0xffffff, 0.5)
         pointLight.position.x = 20
         pointLight.position.y = 30
         pointLight.position.z = 40
         scene.add(pointLight)
         // camera
         const camera = new THREE.PerspectiveCamera(70, width / height, 1, 1000)
         camera.position.z = 500
         scene.add(camera)
         // renderer
         const renderer = new THREE.WebGL1Renderer({ antialias: true })
         renderer.setSize(width, height)
         renderer.setPixelRatio(Math.min(window.devicePixelRatio, 2))
         container.append(renderer.domElement)
         renderer.render(scene, camera)
         // cube
         const texture = new THREE.Texture(canvas)
         const material = new THREE.MeshStandardMaterial({ map: texture })
         const geometry = new THREE.BoxGeometry(200, 200, 200)
         const mesh = new THREE.Mesh(geometry, material)
         scene.add(mesh)
         canvas.width = canvas.height = size
         // responsiveness
         window.addEventListener('resize', () => {
            width = window.innerWidth
            height = window.innerHeight
            camera.aspect = width / height
            camera.updateProjectionMatrix()
            renderer.setSize(window.innerWidth, window.innerHeight)
            renderer.render(scene, camera)
         })
         // animation
         function animate() {
            requestAnimationFrame(animate)
            changeCanvas()
            texture.needsUpdate = true
            mesh.rotation.y += 0.01
            renderer.render(scene, camera)
         }
         animate()
      </script>
   </body>
</html>
Output
Example
Let us now take another example to see how to add 3D text in a scene.
3d-text.html
<!DOCTYPE html>
<html lang="en">
   <head>
      <meta charset="UTF-8" />
      <meta http-equiv="X-UA-Compatible" content="ie=edge" />
      <meta name="viewport" content="width=device-width, initial-scale=1.0" />
      <title>Three.js - 3d text</title>
      <style>
         * {
            margin: 0;
            padding: 0;
            box-sizing: border-box;
            font-family: -applesystem, BlinkMacSystemFont, 'Segoe UI', Roboto, Oxygen, Ubuntu,
               Cantarell, 'Open Sans', 'Helvetica Neue', sans-serif;
         }
         html,
         body {
            height: 100vh;
            width: 100vw;
         }
         #threejs-container {
            position: block;
            width: 100%;
            height: 100%;
         }
      </style>
      <script src="https://cdnjs.cloudflare.com/ajax/libs/three.js/r128/three.min.js"></script>
      <script src="https://cdnjs.cloudflare.com/ajax/libs/dat-gui/0.7.7/dat.gui.js"></script>
   <head>
   <body>
      <div id="threejs-container"></div>
      <script type="module">
         // Creating 3d text using Text Geometry in Three.js
         // GUI
         const gui = new dat.GUI()
         // sizes
         let width = window.innerWidth
         let height = window.innerHeight
         // scene
         const scene = new THREE.Scene()
         scene.background = new THREE.Color(0x262626)
         // lights
         const ambientLight = new THREE.AmbientLight(0xffffff, 1)
         scene.add(ambientLight)
         const pointLight = new THREE.PointLight(0xffffff, 0.5)
         pointLight.position.x = 20
         pointLight.position.y = 30
         pointLight.position.z = 40
         scene.add(pointLight)
         // camera
         const camera = new THREE.PerspectiveCamera(30, width / height, 0.1, 1000)
         camera.position.set(0, 0, 50)
         const camFolder = gui.addFolder('Camera')
         camFolder.add(camera.position, 'z').min(10).max(500).step(10)
         camFolder.open()
         function createMaterial() {}
         const loader = new THREE.FontLoader()
         // promisify font loading
         function loadFont(url) {
            return new Promise((resolve, reject) => {
               loader.load(url, resolve, undefined, reject)
            })
         }
         async function doit() {
            const font = await loadFont('https://threejs.org/examples/fonts/helvetiker_regular.typeface.json')
            let text = 'Hello World !'
            const geometry = new THREE.TextGeometry(text, {
               font: font,
               size: 3,
               height: 0.2,
               curveSegments: 12,
               bevelEnabled: true,
               bevelOffset: 0,
               bevelThickness: 0.5,
               bevelSize: 0.3,
               bevelSegments: 5
            })
            const material = [
               new THREE.MeshPhongMaterial({
                  color: 0xff22cc,
               flatShading: true
               }), // front
               new THREE.MeshPhongMaterial({
               color: 0xffcc22
               }) // side
            ]
            const mesh = new THREE.Mesh(geometry, material)
            geometry.computeBoundingBox()
            geometry.computeVertexNormals()
            geometry.boundingBox.getCenter(mesh.position).multiplyScalar(-1)
            mesh.position.x = -geometry.boundingBox.max.x / 2
            const parent = new THREE.Object3D()
            parent.add(mesh)
            scene.add(parent)
            const opts = geometry.parameters.options
            console.log(opts)
            const geoProps = {
               font: opts.font,
               size: opts.size,
               height: opts.height,
               curveSegments: opts.curveSegments,
               bevelEnabled: opts.bevelEnabled,
               bevelOffset: opts.bevelOffset,
               bevelThickness: opts.bevelThickness,
               bevelSize: opts.bevelSize,
               bevelSegments: opts.bevelSegments
            }
            console.log(geoProps)
            // GUI for exporimenting cube properties
            const props = gui.addFolder('Properties')
            props
               .add(geoProps, 'size', 1, 30)
               .step(1)
               .onChange(redraw)
               .onFinishChange(() => console.dir(mesh.geometry))
            props.add(geoProps, 'height', 0, 30).step(0.1).onChange(redraw)
            props.add(geoProps, 'curveSegments', 1, 30).step(1).onChange(redraw)
            props.add(geoProps, 'bevelEnabled').onChange(redraw)
            props.add(geoProps, 'bevelOffset', 0, 1).onChange(redraw)
            props.add(geoProps, 'bevelThickness', 0, 3).onChange(redraw)
            props.add(geoProps, 'bevelSize', 0, 3).onChange(redraw)
            props.add(geoProps, 'bevelSegments', 1, 8).step(1).onChange(redraw)
            props.open()
            function redraw() {
               camera.position.set(0, 0, 80)
               let newGeometry = new THREE.TextGeometry(text, {
                  font: geoProps.font,
                  size: geoProps.size,
                  height: geoProps.height,
                  curveSegments: geoProps.curveSegments,
                  bevelEnabled: geoProps.bevelEnabled,
                  bevelOffset: geoProps.bevelOffset,
                  bevelThickness: geoProps.bevelThickness,
                  bevelSize: geoProps.bevelSize,
                  bevelSegments: geoProps.bevelSegments
               })
               mesh.geometry.dispose()
               mesh.geometry = newGeometry
               mesh.geometry.parameters.options.depth = 0.2
               console.log(mesh.geometry.parameters.options)
            }
         }
         doit()
         // responsiveness
         window.addEventListener('resize', () => {
            width = window.innerWidth
            height = window.innerHeight
            camera.aspect = width / height
            camera.updateProjectionMatrix()
            renderer.setSize(window.innerWidth, window.innerHeight)
            renderer.render(scene, camera)
         })
         // renderer
         const renderer = new THREE.WebGL1Renderer({ antialias: true })
         renderer.setSize(width, height)
         renderer.setPixelRatio(Math.min(window.devicePixelRatio, 2))
         // animation
         function animate() {
            requestAnimationFrame(animate)
            renderer.render(scene, camera)
         }
         // rendering the scene
         const container = document.querySelector('#threejs-container')
         container.append(renderer.domElement)
         renderer.render(scene, camera)
         animate()
      </script>
   </body>
</html>
Output
Three.js - Loading 3D Models
3D models are available in many formats. You can import most of the models into Three.js and work with them quickly. Some formats are difficult to work with, inefficient for real-time experiences, or simply not fully supported by Three.js at this time. Let's discuss some of the standard formats and how to load them into the Three.js file.
Note − Only a few format loaders are built-in in Three.js. For loading other format models, you need to include their JavaScript files. You can find all the different loaders in the Three.js repo in the three/examples/jsm/loaders directory.
For loading any model, we use these simple three steps −
- Include [NameOfFormat]Loader.js in your web page.
- Use [NameOfFormat]Loader.load() to load a URL.
- Check what the response format for the callback function looks like and render the result.
OBJ Model Loader
The OBJ file defines the geometry of the material in the form of text. Many other 3D Model software can create models in OBJ format. In Threejs, when importing an OBJ, the default material is a white MeshPhongMaterial. You need at least one light in your scene. You can use OBJLoader to load the models in OBJ format.
To use OBJLoader in your Three.js project, you need to add the OBJLoader JavaScript file.
<script type="text/javascript" src="../scripts/OBJLoader.js"></script>
Then, you can load the model just like you loaded the texture using .load method.
const loader = new THREE.OBJLoader()
loader.load('path/to/your/.obj file', (object) => {
   scene.add(object)
})
In this code, we use OBJLoader to load the model from a URL. Once the model is loaded, the callback we provide is called, and we can customize the loaded mesh if you want.
MTL Model Loader
OBJ and MTL are companion formats and often used together. The MTL file defines the materials used for the geometry in OBJ files. The MTL is also in a text-based format.
<script type="text/javascript" src="../scripts/MTLLoader.js"></script>
We'll use MTLLoader and OBJLoader together in this code snippet.
const mtlLoader = new THREE.MTLLoader()
mtlLoader.load('/path/to/your/.mtl file', (materials) => {
   materials.preload()
   // loading geometry
   const objLoader = new THREE.OBJLoader()
   objLoader.setMaterials(materials)
   objLoader.load('path/to/your/.obj file', (object) => {
      mesh = object
      scene.add(mesh)
   })
})
It loads the materials first. Then we set the materials of the OBJ file to load as the loaded material and then load the OBJ file. It creates the mesh we needed to render an object to the scene, customizing the mesh or material just like those in the Three.js projects.
GLTF Model Loader
A glTF file may contain one or more scenes, meshes, materials, textures, skins, skeletons, morph targets, animations, lights, and cameras. It is the recommended format by official Three.js.Both.GLB and .GLTF versions of the format are well-supported by Three.js. Because glTF focuses on runtime asset delivery, it is compact to transmit and fast to load.
<script src="../scripts/GLTFLoader.js"></script>
Using the GLTFLoader object, you can import either JSON (.gltf) or binary (.glb) format.
const loader = new THREE.GLTFLoader()
// loading model
loader.load('path/to/model.glb', (gltf) => {
   scene.add(gltf.scene)
})
The scene of the imported glTF model is added to our Three.js project. The loaded model may contain two scenes; you can specify the scene you want to import.
DRACO Loader
The DRACOLoader is used to load geometry (.drc format files) compressed with the Draco library. Draco is an open-source library for compressing and decompressing 3D meshes and point clouds.
glTF files can also be compressed using the DRACO library, and they can also be loaded using the glTFLoader. We can configure the glTFLoader to use the DRACOLoader to decompress the file in such cases
<script src="../scripts/GLTFLoader.js"></script>
<script src="../scripts/DRACOLoader.js"></script>
Like any other model, you can easily load the .drc files using DRACOLoader. And then, you can add Material to the geometry loaded and render the Mesh to the scene.
const loader = new THREE.DRACOLoader()
loader.setDecoderPath('/scripts/draco/')
// Load a Draco geometry
loader.load('path/to/your/.drc file', (geometry) => {
   const material = new THREE.MeshStandardMaterial({ color: 0xffffff })
   const mesh = new THREE.Mesh(geometry, material)
   scene.add(mesh)
})
This code snippet is used when you want to import glTF file format that has geometry compressed using Draco library.
const dracoLoader = new THREE.DRACOLoader()
dracoLoader.setDecoderPath('/scripts/draco/')
dracoLoader.setDecoderConfig({ type: 'js' })
// loading glTF model that uses draco library
const loader = new THREE.GLTFLoader()
loader.setDRACOLoader(dracoLoader)
loader.load('models/monkey_compressed.glb', (gltf) => {
   scene.add(gltf.scene)
})
STL Model Loader
The STL model format is widely used for rapid prototyping, 3D printing, and computer-aided manufacturing.
STL files describe only the surface geometry of a 3D object without any representation of color, texture, or other common 3d modeling attributes. You can add them to the callback function.
<script src="../scripts/STLLoader.js"></script>
We use the geometry from the .stl file and add material to it before adding it to the scene.
const material = new THREE.MeshPhysicalMaterial({ color: 0xaaaaaa })
const loader = new THREE.STLLoader()
loader.load('path/to/your/.stl file', (geometry) => {
   const mesh = new THREE.Mesh(geometry, material)
   scene.add(mesh)
})
There are many other formats you can load into your Three.js project. The above mentioned are the standard formats. The Loader files are well-documented and easy to use.
Troubleshooting
If you cannot load your model correctly or it is distorted, discolored, or missing entirely. These are some troubleshooting steps mentioned in official Three.js site −
Check the JavaScript console for errors, and make sure you've used an onError callback when calling .load() to log the result.
View the model in another application. For glTF, drag-and-drop viewers are available for Three.js and Babylon.js. If the model appears correctly in one or more applications, file a bug against Three.js. If the model cannot be shown in any application, You should file a bug with the application used to create the model.
Try scaling the model up or down by a factor of 1000. Many models are scaled differently, and large models may not appear if the camera is inside the model.
Try to add and position a light source. The model may be hidden in the dark.
Look for failed texture requests in the network tab, like C:\\Path\To\Model\texture.jpg. Use paths relative to your model instead, such as images/texture.jpg - this may require editing the model file in a text editor.
Asking for Help
Suppose you've gone through the troubleshooting process above, and your model still isn't working. In that case, the right approach to asking for help gets you to a solution faster. Post a question on the Three.js forum and, whenever possible, include your model (or a simpler model with the same problem) in any formats you have available. Include enough information for someone else to reproduce the issue quickly - ideally, a live demo.
Three.js - Libraries and Plugins
Official three.js examples are maintained as part of the three.js repository and always use the latest version of three.js.
Listed here are externally developed compatible libraries and plugins for three.js
Physics
Postprocessing
In addition to the Official three.js postprocessing effects, support for some additional effects and frameworks are available through external libraries.
Intersection and Raycasting Performance
File Formats
In addition to the official three.js loaders, support for some additional formats is available through external libraries.
3D Text and Layout
Particle Systems
Inverse Kinematics
Game AI
Wrappers and Frameworks
It is the list maintained by the Three.js official community. Apart from these, there are many other libraries and plugins to add beautiful effects easier.