- spaCy - Home
- spaCy - Introduction
- spaCy - Getting Started
- spaCy - Models and Languages
- spaCy - Architecture
- spaCy - Command Line Helpers
- spaCy - Top-level Functions
- spaCy - Visualization Function
- spaCy - Utility Functions
- spaCy - Compatibility Functions
- spaCy - Containers
- Doc Class ContextManager and Property
- spaCy - Container Token Class
- spaCy - Token Properties
- spaCy - Container Span Class
- spaCy - Span Class Properties
- spaCy - Container Lexeme Class
- Training Neural Network Model
- Updating Neural Network Model
- spaCy Useful Resources
- spaCy - Quick Guide
- spaCy - Useful Resources
- spaCy - Discussion
spaCy - Quick Guide
spaCy - Introduction
In this chapter, we will understand the features, extensions and visualisers with regards to spaCy. Also, a features comparison is provided which will help the readers in analysis of the functionalities provided by spaCy as compared to Natural Language Toolkit (NLTK) and coreNLP. Here, NLP refers to Natural Language Processing.
What is spaCy?
spaCy, which is developed by the software developers Matthew Honnibal and Ines Montani, is an open-source software library for advanced NLP. It is written in Python and Cython (C extension of Python which is mainly designed to give C like performance to the Python language programs).
spaCy is a relatively a new framework but, one of the most powerful and advanced libraries which is used to implement the NLP.
Features
Some of the features of spaCy that make it popular are explained below −
Fast − spaCy is specially designed to be as fast as possible.
Accuracy − spaCy implementation of its labelled dependency parser makes it one of the most accurate frameworks (within 1% of the best available) of its kind.
Batteries included − The batteries included in spaCy are as follows −
Index preserving tokenization.
Alpha tokenization support more than 50 languages.
Part-of-speech tagging.
Pre-trained word vectors.
Built-in easy and beautiful visualizers for named entities and syntax.
Text classification.
Extensile − You can easily use spaCy with other existing tools like TensorFlow, Gensim, scikit-Learn, etc.
Deep learning integration − It has Thinc-a deep learning framework, which is designed for NLP tasks.
Extensions and visualisers
Some of the easy-to-use extensions and visualisers that comes with spaCy and are free, open-source libraries are listed below −
Thinc − It is Machine Learning (ML) library optimised for Central Processing Unit (CPU) usage. It is also designed for deep learning with text input and NLP tasks.
sense2vec − This library is for computing word similarities. It is based on Word2vec.
displaCy − It is an open-source dependency parse tree visualiser. It is built with JavaScript, CSS (Cascading Style Sheets), and SVG (Scalable Vector Graphics).
displaCy ENT − It is a built-in named entity visualiser that comes with spaCy. It is built with JavaScript and CSS. It lets the user check its models prediction in browser.
Feature Comparison
The following table shows the comparison of the functionalities provided by spaCy, NLTK, and CoreNLP −
| Features | spaCy | NLTK | CoreNLP |
|---|---|---|---|
| Python API | Yes | Yes | No |
| Easy installation | Yes | Yes | Yes |
| Multi-language Support | Yes | Yes | Yes |
| Integrated word vectors | Yes | No | No |
| Tokenization | Yes | Yes | Yes |
| Part-of-speech tagging | Yes | Yes | Yes |
| Sentence segmentation | Yes | Yes | Yes |
| Dependency parsing | Yes | No | Yes |
| Entity Recognition | Yes | Yes | Yes |
| Entity linking | Yes | No | No |
| Coreference Resolution | No | No | Yes |
Benchmarks
spaCy has the fastest syntactic parser in the world and has the highest accuracy (within 1% of the best available) as well.
Following table shows the benchmark of spaCy −
| System | Year | Language | Accuracy |
|---|---|---|---|
| spaCy v2.x | 2017 | Python and Cython | 92.6 |
| spaCy v1.x | 2015 | Python and Cython | 91.8 |
| ClearNLP | 2015 | Java | 91.7 |
| CoreNLP | 2015 | Java | 89.6 |
| MATE | 2015 | Java | 92.5 |
| Turbo | 2015 | C++ | 92.4 |
spaCy - Getting Started
This chapter will help the readers in understanding about the latest version of spaCy. Moreover, the readers can learn about the new features and improvements in the respective version, its compatibility and how to install spaCy.
Latest version
spaCy v3.0 is the latest version which is available as a nightly release. This is an experimental and alpha release of spaCy via a separate channel named spacy-nightly. It reflects future spaCy and cannot be use for production use.
To prevent potential conflicts, try to use a fresh virtual environment.
You can use the below given pip command to install it −
pip install spacy-nightly --pre
New Features and Improvements
The new features and improvements in the latest version of spaCy are explained below −
Transformer-based pipelines
It features all new transformer-based pipelines with support for multi-task learning. These new transformer-based pipelines make it the highest accurate framework (within 1% of the best available).
You can access thousands of pretrained models for your pipeline because, spaCys transformer support interoperates with other frameworks like PyTorch and HuggingFace transformers.
New training workflow and config system
The spaCy v3.0 provides a single configuration file of our training run.
There are no hidden defaults hence, makes it easy to return our experiments and track changes.
Custom models using any ML framework
New configuration system of spaCy v3.0 makes it easy for us to customise the Neural Network (NN) models and implement our own architecture via ML library Thinc.
Manage end-to-end workflows and projects
The spaCy project let us manage and share end-to-end workflow for various use cases and domains.
It also let us organise training, packaging, and serving our custom pipelines.
On the other hand, we can also integrate with other data science and ML tools like DVC (Data Vision Control), Prodigy, Streamlit, FastAPI, Ray, etc.
Parallel training and distributed computing with Ray
To speed up the training process, we can use Ray, a fast and simple framework for building and running distributed applications, to train spaCy on one or more remote machines.
New built-in pipeline components
This is the new version of spaCy following new trainable and rule-based components which we can add to our pipeline.
These components are as follows −
SentenceRecognizer
Morphologizer
Lemmatizer
AttributeRuler
Transformer
TrainablePipe
New pipeline component API
This SpaCy v3.0 provides us new and improved pipeline component API and decorators which makes defining, configuring, reusing, training, and analyzing easier and more convenient.
Dependency matching
SpaCy v3.0 provides us the new DependencyMatcher that let us match the patterns within the dependency parser. It uses Semgrex operators.
New and updated documentation
It has new and updated documentation including −
A new usage guide on embeddings, transformers, and transfer learning.
A guide on training pipelines and models.
Details about the new spaCy projects and updated usage documentation on custom pipeline components.
New illustrations and new API references pages documenting spaCys ML model architecture and projected data formats.
Compatibility
spaCy can run on all major operating systems such as Windows, macOS/OS X, and Unix/Linux. It is compatible with 64-bit CPython 2.7/3.5+ versions.
Installing spaCy
The different options to install spaCy are explained below −
Using package manager
The latest release versions of spaCy is available over both the package managers, pip and conda. Let us check out how we can use them to install spaCy −
pip − To install Spacy using pip, you can use the following command −
pip install -U spacy
In order to avoid modifying system state, it is suggested to install spacy packages in a virtual environment as follows −
python -m venv .env
source .env/bin/activate
pip install spacy
conda − To install spaCy via conda-forge, you can use the following command −
conda install -c conda-forge spacy
From source
You can also install spaCy by making its clone from GitHub repository and building it from source. It is the most common way to make changes to the code base.
But, for this, you need to have a python distribution including the following −
Header files
A compiler
pip
virtualenv
git
Use the following commands −
First, update pip as follows −
python -m pip install -U pip
Now, clone spaCy with the command given below:
git clone https://github.com/explosion/spaCy
Now, we need to navigate into directory by using the below mentioned command −
cd spaCy
Next, we need to create environment in .env, as shown below −
python -m venv .env
Now, activate the above created virtual environment.
source .env/bin/activate
Next, we need to set the Python path to spaCy directory as follows −
export PYTHONPATH=`pwd`
Now, install all requirements as follows −
pip install -r requirements.txt
At last, compile spaCy −
python setup.py build_ext --inplace
Ubuntu
Use the following command to install system-level dependencies in Ubuntu Operating System (OS) −
sudo apt-get install build-essential python-dev git
macOS/OS X
Actually, macOS and OS X have preinstalled Python and git. So, we need to only install a recent version of XCode including CLT (Command Line Tools).
Windows
In the table below, there are Visual C++ Build Tools or Visual Studio Express versions given for official distribution of Python interpreter. Choose on as per your requirements and install −
| Distribution | Version |
|---|---|
| Python 2.7 | Visual Studio 2008 |
| Python 3.4 | Visual Studio 2010 |
| Python 3.5+ | Visual Studio 2015 |
Upgrading spaCy
The following points should be kept in mind while upgrading spaCy −
Start with a clean virtual environment.
For upgrading spaCy to a new major version, you must have the latest compatible models installed.
There should be no old shortcut links or incompatible model package in your virtual environment.
In case if you have trained your own models, the train and runtime inputs must match i.e. you must retrain your models with the newer version as well.
The spaCy v2.0 and above provides a validate command, which allows the user to verify whether, all the installed models are compatible with installed spaCy version or not.
In case if there would be any incompatible models, validate command will print the tips and installation instructions. This command can also detect out-of-sync model links created in various virtual environments.
You can use the validate command as follows −
pip install -U spacy
python -m spacy validate
In the above command, python -m is used to make sure that we are executing the correct version of spaCy.
Running spaCy with GPU
spaCy v2.0 and above comes with neural network (NN) models that can be implemented in Thinc. If you want to run spaCy with Graphics Processing Unit (GPU) support, use the work of Chainers CuPy module. This module provides a numpy-compatible interface for GPU arrays.
You can install spaCy on GPU by specifying the following −
spaCy[cuda]
spaCy[cuda90]
spaCy[cuda91]
spaCy[cuda92]
spaCy[cuda100]
spaCy[cuda101]
spaCy[cuda102]
On the other hand, if you know your cuda version, the explicit specifier allows cupy to be installed. It will save the compilation time.
Use the following command for the installation −
pip install -U spacy[cuda92]
After a GPU-enabled installation, activate it by calling spacy.prefer_gpu or spacy.require_gpu as follows −
import spacy
spacy.prefer_gpu()
nlp_model = spacy.load("en_core_web_sm")
spaCy - Models and Languages
Let us learn about the languages supported by spaCy and its statistical models.
Language Support
Currently, spaCy supports the following languages −
| Language | Code |
|---|---|
| Chinese | zh |
| Danish | da |
| Dutch | nl |
| English | en |
| French | fr |
| German | de |
| Greek | el |
| Italian | it |
| Japanese | ja |
| Lithuanian | lt |
| Multi-language | xx |
| Norwegian Bokml | nb |
| Polish | pl |
| Portuguese | pt |
| Romanian | ro |
| Spanish | es |
| Afrikaans | af |
| Albanian | sq |
| Arabic | ar |
| Armenian | hy |
| Basque | eu |
| Bengali | bn |
| Bulgarian | bg |
| Catalan | ca |
| Croatian | hr |
| Czech | cs |
| Estonian | et |
| Finnish | fi |
| Gujarati | gu |
| Hebrew | he |
| Hindi | hi |
| Hungarian | hu |
| Icelandic | is |
| Indonesian | id |
| Irish | ga |
| Kannada | kn |
| Korean | ko |
| Latvian | lv |
| Ligurian | lij |
| Luxembourgish | lb |
| Macedonian | mk |
| Malayalam | ml |
| Marathi | mr |
| Nepali | ne |
| Persian | fa |
| Russian | ru |
| Serbian | sr |
| Sinhala | si |
| Slovak | sk |
| Slovenian | sl |
| Swedish | sv |
| Tagalog | tl |
| Tamil | ta |
| Tatar | tt |
| Telugu | te |
| Thai | th |
| Turkish | tr |
| Ukrainian | uk |
| Urdu | ur |
| Vietnamese | vi |
| Yoruba | yo |
spaCys statistical models
As we know that spaCys models can be installed as Python packages, which means like any other module, they are a component of our application. These modules can be versioned and defined in requirement.txt file.
Installing spaCys Statistical Models
The installation of spaCys statistical models is explained below −
Using Download command
Using spaCys download command is one of the easiest ways to download a model because, it will automatically find the best-matching model compatible with our spaCy version.
You can use the download command in the following ways −
The following command will download best-matching version of specific model for your spaCy version −
python -m spacy download en_core_web_sm
The following command will download best-matching default model and will also create a shortcut link −
python -m spacy download en
The following command will download the exact model version and does not create any shortcut link −
python -m spacy download en_core_web_sm-2.2.0 --direct
Via pip
We can also download and install a model directly via pip. For this, you need to use pip install with the URL or local path of the archive file. In case if you do not have the direct link of a model, go to model release, and copy from there.
For example,
The command for installing model using pip with external URL is as follows −
pip install https://github.com/explosion/spacy-models/releases/download/en_core_web_sm-2.2.0/en_core_web_sm-2.2.0.tar.gz
The command for installing model using pip with local file is as follows −
pip install /Users/you/en_core_web_sm-2.2.0.tar.gz
The above commands will install the particular model into your site-packages directory. Once done, we can use spacy.load() to load it via its package name.
Manually
You can also download the data manually and place in into a custom directory of your choice.
Use any of the following ways to download the data manually −
Download the model via your browser from the latest release.
You can configure your own download script by using the URL (Uniform Resource Locator) of the archive file.
Once done with downloading, we can place the model package directory anywhere on our local file system. Now to use it with spaCy, we can create a shortcut link for the data directory.
Using models with spaCy
Here, how to use models with spaCy is explained.
Using custom shortcut links
We can download all the spaCy models manually, as discussed above, and put them in our local directory. Now whenever the spaCy project needs any model, we can create a shortcut link so that spaCy can load the model from there. With this you will not end up with duplicate data.
For this purpose, spaCy provide us the link command which can be used as follows −
python -m spacy link [package name or path] [shortcut] [--force]
In the above command, the first argument is the package name or local path. If you have installed the model via pip, you can use the package name here. Or else, you have a local path to the model package.
The second argument is the internal name. This is the name you want to use for the model. The -force flag in the above command will overwrite any existing links.
The examples are given below for both the cases.
Example
Given below is an example for setting up shortcut link to load installed package as default_model −
python -m spacy link en_core_web_md en_default
An example for setting up shortcut link to load local model as my_default_model is as follows −
python -m spacy link /Users/Leekha/model my_default_en
Importing as module
We can also import an installed model, which can call its load() method with no arguments as shown below −
import spaCy
import en_core_web_sm
nlp_example = en_core_web_sm.load()
my_doc = nlp_example("This is my first example.")
my_doc
Output
This is my first example.
Using own models
You can also use your trained model. For this, you need to save the state of your trained model using Language.to_disk() method. For more convenience in deploying, you can also wrap it as a Python package.
Naming Conventions
Generally, the naming convention of [lang_[name]] is one such convention that spaCy expected all its model packages to be followed.
The name of spaCys model can be further divided into following three components −
Type − It reflects the capabilities of model. For example, core is used for general-purpose model with vocabulary, syntax, entities. Similarly, depent is used for only vocab, syntax, and entities.
Genre − It shows the type of text on which the model is trained. For example, web or news.
Size − As name implies, it is the model size indicator. For example, sm (for small), md (For medium), or lg (for large).
Model versioning
The model versioning reflects the following −
Compatibility with spaCy.
Major and minor model version.
For example, a model version r.s.t translates to the following −
r − spaCy major version. For example, 1 for spaCy v1.x.
s − Model major version. It restricts the users to load different major versions by the same code.
t − Model minor version. It shows the same model structure but, different parameter values. For example, trained on different data for different number of iterations.
spaCy - Architecture
This chapter tells us about the data structures in spaCy and explains the objects along with their role.
Data Structures
The central data structures in spaCy are as follows −
Doc − This is one of the most important objects in spaCys architecture and owns the sequence of tokens along with all their annotations.
Vocab − Another important object of central data structure of spaCy is Vocab. It owns a set of look-up tables that make common information available across documents.
The data structure of spaCy helps in centralising strings, word vectors, and lexical attributes, which saves memory by avoiding storing multiple copies of the data.
Objects and their role
The objects in spaCy along with their role and an example are explained below −
Span
It is a slice from Doc object, which we discussed above. We can create a Span object from the slice with the help of following command −
doc[start : end]
Example
An example of span is given below −
import spacy
import en_core_web_sm
nlp_example = en_core_web_sm.load()
my_doc = nlp_example("This is my first example.")
span = my_doc[1:6]
span
Output
is my first example.
Token
As the name suggests, it represents an individual token such as word, punctuation, whitespace, symbol, etc.
Example
An example of token is stated below −
import spacy
import en_core_web_sm
nlp_example = en_core_web_sm.load()
my_doc = nlp_example("This is my first example.")
token = my_doc[4]
token
Output
example
Tokenizer
As name suggests, tokenizer class segments the text into words, punctuations marks etc.
Example
This example will create a blank tokenizer with just the English vocab −
from spacy.tokenizer import Tokenizer
from spacy.lang.en import English
nlp_lang = English()
blank_tokenizer = Tokenizer(nlp_lang.vocab)
blank_tokenizer
Output
<spacy.tokenizer.Tokenizer at 0x26506efc480>
Language
It is a text-processing pipeline which, we need to load once per process and pass the instance around application. This class will be created, when we call the method spacy.load().
It contains the following −
Shared vocabulary
Language data
Optional model data loaded from a model package
Processing pipeline containing components such as tagger or parser.
Example
This example of language will initialise English Language object
from spacy.vocab import Vocab
from spacy.language import Language
nlp_lang = Language(Vocab())
from spacy.lang.en import English
nlp_lang = English()
nlp_lang
Output
When you run the code, you will see the following output −
<spacy.lang.en.English at 0x26503773cf8>
spaCy - Command Line Helpers
This chapter gives information about the command line helpers used in spaCy.
Why Command Line Interface?
spaCy v1.7.0 and above comes with new command line helpers. It is used to download as well as link the models. You can also use it to show the useful debugging information. In short, command line helpers are used to download, train, package models, and also to debug spaCy.
Checking Available Commands
You can check the available commands by using spacy - -help command.
The example to check the available commands in spaCy is given below −
Example
C:\Users\Leekha>python -m spacy --help
Output
The output shows the available commands.
Available commands
download, link, info, train, pretrain, debug-data, evaluate, convert, package, init-model, profile, validate
Available Commands
The commands available in spaCy are given below along with their respective descriptions.
| Sr.No. | Command & Description |
|---|---|
| 1 | Download To download models for spaCy. |
| 2 | Link To create shortcut links for models. |
| 3 | Info To print the information. |
| 4 | Validate To check compatibility of the installed models. |
| 5 | Convert To convert the files into spaCy's JSON format. |
| 6 | Pretrain To pre-train the token to vector (tok2vec) layer of pipeline components. |
| 7 | Init-model To create a new model directory from raw data. |
| 8 | Evaluate To evaluate a model's accuracy and speed. |
| 9 | Package To generate a model python package from an existing model data directory. |
| 10 | Debug-data To analyse, debug, and validate our training and development data. |
| 11 | Train To train a model. |
spaCy - Top-level Functions
Here, we will be discussing some of the top-level functions used in spaCy. The functions along with the descriptions are listed below −
| Sr.No. | Command & Description |
|---|---|
| 1 | spacy.load() To load a model. |
| 2 | spacy.blank() To create a blank model. |
| 3 | spacy.info() To provide information about the installation, models and local setup from within spaCy. |
| 4 | spacy.explain() To give a description. |
| 5 | spacy.prefer_gpu() To allocate data and perform operations on GPU. |
| 6 | spacy.require_gpu() To allocate data and perform operations on GPU. |
spacy.load()
As the name implies, this spacy function will load a model via following −
Its shortcut links.
The name of the installed model package.
A Unicode paths.
Path-like object.
spaCy will try to resolve the load argument in the below given order −
If a model is loaded from a shortcut link or package name, spaCy will assume it as a Python package and call the models own load() method.
On the other hand, if a model is loaded from a path, spacy will assume it is a data directory and hence initialize the Language class.
Upon using this function, the data will be loaded in via Language.from_disk.
Arguments
The table below explains its arguments −
| NAME | TYPE | DESCRIPTION |
|---|---|---|
| name | unicode / Path | It is the shortcut link, package name or path of the model to load. |
| disable | List | It represents the names of pipeline components to disable. |
Example
In the below examples, spacy.load() function loads a model by using shortcut link, package, unicode path and a pathlib path −
Following is the command for spacy.load() function for loading a model by using the shortcut link −
nlp_model = spacy.load("en")
Following is the command for spacy.load() function for loading a model by using package −
nlp_model = spacy.load("en_core_web_sm")
Following is the command for spacy.load() function for loading a model by using the Unicode path −
nlp_model = spacy.load("/path/to/en")
Following is the command for spacy.load() function for loading a model by using the pathlib path −
nlp_model = spacy.load(Path("/path/to/en"))
Following is the command for spacy.load() function for loading a model with all the arguments −
nlp_model = spacy.load("en_core_web_sm", disable=["parser", "tagger"])
spacy.blank()
It is the twin of spacy.blank() function, creates a blank model of a given language class.
Arguments
The table below explains its arguments −
| NAME | TYPE | DESCRIPTION |
|---|---|---|
| name | unicode | It represents the ISO code of the language class to be loaded. |
| disable | list | This argument represents the names of pipeline components to be disabled. |
Example
In the below examples, spacy.blank() function is used for creating a blank model of en language class.
nlp_model_en = spacy.blank("en")
spacy.info()
Like info command, spacy.info() function provides information about the installation, models, and local setup from within spaCy.
If you want to get the model meta data as a dictionary, you can use the meta-attribute on your nlp object with a loaded model. For example, nlp.meta.
Arguments
The table below explains its arguments −
| NAME | TYPE | DESCRIPTION |
|---|---|---|
| model | unicode | It is the shortcut link, package name or path of a model. |
| markdown | bool | This argument will print the information as Markdown. |
Example
An example is given below −
spacy.info()
spacy.info("en")
spacy.info("de", markdown=True)
spacy.explain()
This function will give us a description for the following −
POS tag
Dependency label
Entity type
Arguments
The table below explains its arguments −
| NAME | TYPE | DESCRIPTION |
|---|---|---|
| term | unicode | It is the term which we want to be explained. |
Example
An example for the use of spacy.explain() function is mentioned below −
import spacy
import en_core_web_sm
nlp= en_core_web_sm.load()
spacy.explain("NORP")
doc = nlp("Hello TutorialsPoint")
for word in doc:
   print(word.text, word.tag_, spacy.explain(word.tag_))
Output
Hello UH interjection
TutorialsPoint NNP noun, proper singular
spacy.prefer_gpu()
If you have GPU, this function will allocate data and perform operations on GPU. But the data and operations will not be moved to GPU, if they are already available on CPU. It will return a Boolean output whether the GPU was activated or not.
Example
An example for the use of spacy.prefer_gpu() is stated below −
import spacy
activated = spacy.prefer_gpu()
nlp = spacy.load("en_core_web_sm")
spacy.require_gpu()
This function is introduced in version 2.0.14 and it will also allocate data and perform operations on GPU. It will raise an error if there is no GPU available. The data and operations will not be moved to GPU, if they are already available on CPU.
It is recommended that this function should be called right after importing spacy and before loading any of the model. It will also return a Boolean type output.
Example
An example for the use of spacy.require_gpu() function is as follows −
import spacy
spacy.require_gpu()
nlp = spacy.load("en_core_web_sm")
spaCy - Visualization Function
Visualizer functions are mainly used to visualize the dependencies and also the named entities in browser or in a notebook. As of spacy version 2.0, there are two popular visualizers namely displaCy and displaCyENT.
They both are the part of spacys built-in visualization suite. By using this visualization suite namely displaCy, we can visualize a dependency parser or named entity in a text.
displaCy()
Here, we will learn about the displayCy dependency visualizer and displayCy entity visualizer.
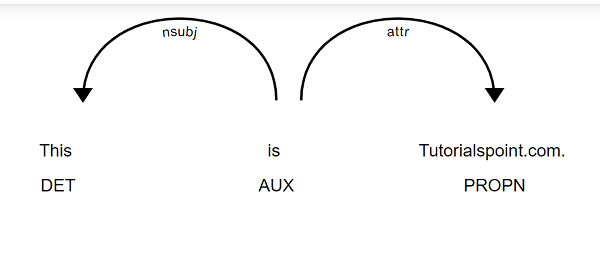
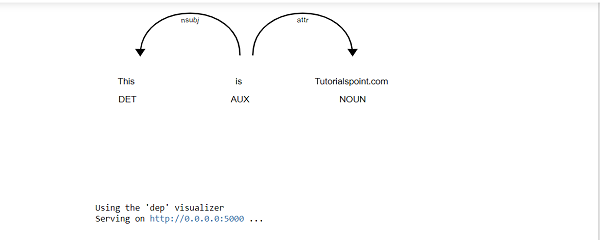
Visualizing the dependency parse
The displaCy dependency visualizer (dep) will show the POS(Part-of-Speech) tags and syntactic dependencies.
Example
An example for the use of displaCy() dependency visualizer for visualizing the dependency parse is given below −
import spacy
from spacy import displacy
nlp = spacy.load("en_core_web_sm")
doc = nlp("This is Tutorialspoint.com.")
displacy.serve(doc, style="dep")
Output
This gives the following output −
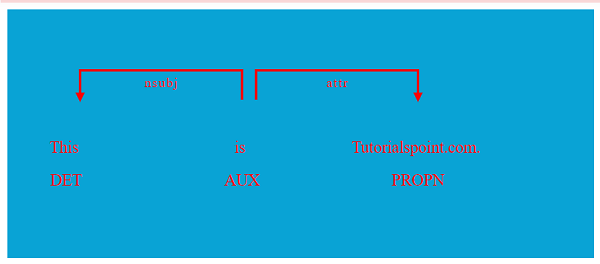
We can also specify a dictionary of settings to customize the layout. It will be under argument option (we will discuss in detail later).
The example with options is given below −
import spacy
from spacy import displacy
nlp = spacy.load("en_core_web_sm")
doc = nlp("This is Tutorialspoint.com.")
options = {"compact": True, "bg": "#09a3d5",
           "color": "red", "font": "Source Sans Pro"}
displacy.serve(doc, style="dep", options=options)
Output
Given below is the output −
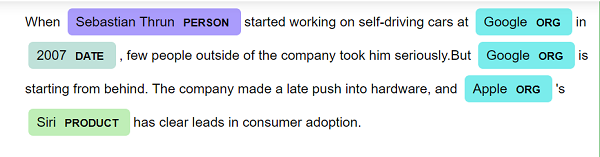
Visualizing named entities
The displaCy entity visualizer (ent) will highlight named entities and their labels in a text.
Example
An example for the use of displaCy entity visualizer for named entities is given below −
import spacy
from spacy import displacy

text = "When Sebastian Thrun started working on self-driving cars at Google in
2007, few people outside of the company took him seriously. But Google is
starting from behind. The company made a late push into hardware, and Apple's
Siri has clear leads in consumer adoption."

nlp = spacy.load("en_core_web_sm")
doc = nlp(text)
displacy.serve(doc, style="ent")
Output
The output is stated below −
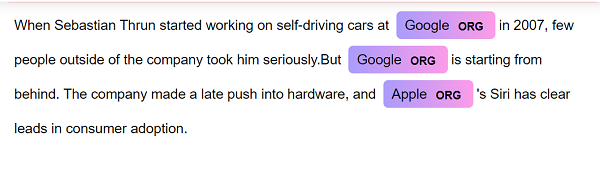
We can also specify a dictionary of settings to customize the layout. It will be under argument option (we will discuss in detail later).
The example with options is given below −
import spacy
from spacy import displacy

text = "When Sebastian Thrun started working on self-driving cars at Google in
2007, few people outside of the company took him seriously. But Google is
starting from behind. The company made a late push into hardware, and Apple's
Siri has clear leads in consumer adoption."

nlp = spacy.load("en_core_web_sm")
doc = nlp(text)
colors = {"ORG": "linear-gradient(90deg, #aa9cfc, #fc9ce7)"}
options = {"ents": ["ORG"], "colors": colors}
displacy.serve(doc, style="ent", options=options)
Output
The output is mentioned below −
displaCy() methods
As of version 2.0, displaCy () function has two methods namely serve and render. Lets discuss about them in detail. A table is given below of the methods along with their respective descriptions.
| Sr.No. | Method & Description |
|---|---|
| 1 | displayCy.serve It will serve the dependency parse tree. |
| 2 | displayCy.render It will render the dependency parse tree. |
displaCy.serve
It is the method that will serve a dependency parse tree/ named entity visualization to see in a web browser. It will run a simple web browser.
Arguments
The table below explains its arguments −
| NAME | TYPE | DESCRIPTION | DEFAULT |
|---|---|---|---|
| Docs | list, doc, Span | It represents the document to visualize. | |
| Style | Unicode | We have two visualization style namely dep, or ent. | The default value is dep. |
| Page | bool | It will render the markup as full HTML page. | The default value is true. |
| minify | bool | This argument will minify the HTML markup. | The default value is false. |
| options | dict | It represents the visualizers-specific options. For example, colors. | {} |
| manual | bool | This argument will not parse Doc and instead, expect a dict or list of dicts. | The default value is false. |
| Port | int | It is the port number to serve visualization. | 5000 |
| Host | unicode | It is the Host number to serve visualization. | '0.0.0.0' |
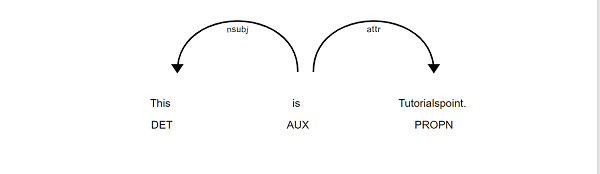
Example
An example for displayCy.serve method is given below −
import spacy
from spacy import displacy
nlp = spacy.load("en_core_web_sm")
doc1 = nlp("This is Tutorialspoint.com")
displacy.serve(doc1, style="dep")
Output
This gives the following output −
displaCy.render
This displaCy method will render a dependency parse tree or named entity visualization.
Arguments
The table below explains its arguments −
| NAME | TYPE | DESCRIPTION | DEFAULT |
|---|---|---|---|
| Docs | list, doc, Span | It represents the document to visualize. | |
| Style | Unicode | We have two visualization style namely dep, or ent. | The default value is dep. |
| Page | Bool | It will render the markup as full HTML page. | The default value is false. |
| minify | Bool | This argument will minify the HTML markup. | The default value is false. |
| options | Dict | It represents the visualizers-specific options. For example, colors. | {} |
| manual | Bool | This argument will not parse Doc and instead, expect a dict or list of dicts. | The default value is false. |
| jupyter | Bool | To return markup ready to be rendered in a notebook, this argument will explicitly enable or disable the Jupyter mode. If we will not provide this argument, it will automatically detect. | None |
Example
An example for the displaCy.render method is stated below −
import spacy
from spacy import displacy
nlp = spacy.load("en_core_web_sm")
doc = nlp("This is Tutorialspoint.")
html = displacy.render(doc, style="dep")
Output
Visualizer options
The option argument of dispaCy () function lets us specify additional settings for each visualizer, dependency as well as named entity visualizer.
Dependency Visualizer options
The table below explains the Dependency Visualizer options −
| NAME | TYPE | DESCRIPTION | DEFAULT |
|---|---|---|---|
| fine_grained | bool | Put the value of this argument True, if you want to use fine-grained part-of-speech tags (Token.tag_), instead of coarse-grained tags (Token.pos_). | The default value is False. |
| add_lemma | bool | Introduced in version 2.2.4, this argument prints the lemmas in a separate row below the token texts. | The default value is False. |
| collapse_punct | bool | It attaches punctuation to the tokens. | The default value is True. |
| collapse_phrases | bool | This argument merges the noun phrases into one token. | The default value is False. |
| compact | bool | If you will take this argument as true, you will get the Compact mode with square arrows that takes up less space. | The default value is False. |
| color | unicode | As name implies, this argument is for the text color (HEX, RGB or color names). | '#000000' |
| bg | unicode | As name implies, this argument is for the Background color (HEX, RGB or color names). | '#ffffff' |
| font | unicode | It is for the font name. | Default value is 'Arial'. |
| offset_x | int | This argument is used for spacing on left side of the SVG in px. | The default value of this argument is 50. |
| arrow_stroke | int | This argument is used for adjusting the width of arrow path in px. | The default value of this argument is 2. |
| arrow_width | int | This argument is used for adjusting the width of arrow head in px. | The default value of this argument is 10 / 8 (compact). |
| arrow_spacing | int | This argument is used for adjusting the spacing between arrows in px to avoid overlaps. | The default value of this argument is 20 / 12 (compact). |
| word_spacing | int | This argument is used for adjusting the vertical spacing between words and arcs in px. | The default value of this argument is 45. |
| distance | int | This argument is used for adjusting the distance between words in px. | The default value of this argument is 175 / 150 (compact). |
Named Entity Visualizer options
The table below explains the Named Entity Visualizer options −
| NAME | TYPE | DESCRIPTION | DEFAULT |
|---|---|---|---|
| ents | list | It represents the entity types to highlight. Put None for all types. | The default value is None. |
| colors | Dict | As name implies, it is use for color overrides. The entity types in uppercase must mapped to color name. | {} |
spaCy - Utility Functions
We can find some small collection of spaCys utility functions in spacy/util.py. Let us understand those functions and their usage.
The utility functions are listed below in a table with their descriptions.
| Sr.No. | Utility Function & Description |
|---|---|
| 1 | Util.get_data_path To get path to the data directory. |
| 2 | Util.set_data_path To set custom path to the data directory. |
| 3 | Util.get_lang_class To import and load a Language class. |
| 4 | Util.set_lang_class To set a custom Language class. |
| 5 | Util.lang_class_is_loaded To find whether a Language class is already loaded or not. |
| 6 | Util.load_model This function will load a model. |
| 7 | Util.load_model_from_path This function will load a model from a data directory path. |
| 8 | Util.load_model_from_init_py It is a helper function which is used in the load() method of a model package. |
| 9 | Util.get_model_meta To get a models meta.json from a directory path. |
| 10 | Util.update_exc This function will update, validate, and overwrite tokenizer expectations. |
| 11 | Util.is_in_jupyter To check whether we are running the spacy from a Jupyter notebook. |
| 12 | Util.get_package_path To get the path of an installed spacy package. |
| 13 | Util.is_package To validate model packages. |
| 14 | Util.compile_prefix_regex This function will compile a sequence of prefix rules into a regex object. |
| 15 | Util.compile_suffix_regex This function will compile a sequence of suffix rules into a regex object. |
| 16 | Util.compile_infix_regex This function will compile a sequence of infix rules into a regex object. |
| 17 | Util.compounding This function will yield an infinite series of compounding values. |
| 18 | Util.decaying This function will yield an infinite series of linearly decaying values. |
| 19 | Util.itershuffle To shuffle an iterator. |
| 20 | Util.filter_spans To filter a sequence of span objects and to remove the duplicates. |
spaCy - Compatibility Functions
As we know that all Python codes are written in an intersection of Python2 and Python3 which may be not that fine in Python. But, that is quite easy in Cython.
The compatibility functions in spaCy along with its description are listed below −
| Compatibility Function | Description |
|---|---|
| Spacy.compat() | Deals with Python or platform compatibility. |
| compat.is_config() | Checks whether a specific configuration of Python version and operating system (OS) matches the users setup. |
Spacy.compat()
It is the function that has all the logic dealing with Python or platform compatibility. It is distinguished from other built-in function by suffixed with an underscore. For example, unicode_.
Some examples are given in the table below −
| NAME | PYTHON 2 | PYTHON 3 |
|---|---|---|
| compat.bytes_ | str | bytes |
| compat.unicode_ | unicode | str |
| compat.basestring_ | basestring | str |
| compat.input_ | raw_input | input |
| compat.path2str | str(path) with .decode('utf8') | str(path) |
Example
An example of spacy.compat() function is as follows −
import spacy
from spacy.compat import unicode_
compat_unicode = unicode_("This is Tutorialspoint")
compat_unicode
Output
Upon execution, you will receive the following output −
'This is Tutorialspoint'
compat.is_config()
It is the function that checks whether a specific configuration of Python version and operating system (OS) matches the users setup. This function is mostly used for displaying the targeted error messages.
Arguments
The table below explains its arguments −
| NAME | TYPE | DESCRIPTION |
|---|---|---|
| python2 | Bool | Whether spaCy is executed with Python 2.x or not. |
| python3 | Bool | Whether spaCy is executed with Python 3.x or not. |
| windows | Bool | Whether spaCy is executed on Windows or not. |
| linux | Bool | Whether spaCy is executed on Linux or not. |
| OS X | Bool | Whether spaCy is executed on OS X or not. |
Example
An example of compat.is_config() function is as follows −
import spacy
from spacy.compat import is_config
if is_config(python3=True, windows=True):
   print("Spacy is executing on Python 3 on Windows.")
Output
Upon execution, you will receive the following output −
Spacy is executing on Python 3 on Windows.
spaCy - Containers
In this chapter, we will learn about the spaCys containers. Let us first understand the classes which have spaCys containers.
Classes
We have four classes which consist of spaCys containers −
Doc
Doc, a container for accessing linguistic annotations, is a sequence of token objects. With the help of Doc class, we can access sentences as well as named entities.
We can also export annotations to numpy arrays and serialize to compressed binary strings as well. The Doc object holds an array of TokenC structs while, Token and Span objects can only view this array and cant hold any data.
Token
As the name suggests, it represents an individual token such as word, punctuation, whitespace, symbol, etc.
Span
It is a slice from Doc object, which we discussed above.
Lexeme
It may be defined as an entry in the vocabulary. As opposed to a word token, a Lexeme has no string context. It is a word type hence, it does not have any PoS(Part-of-Speech) tag, dependency parse or lemma.
Now, let us discuss all four classes in detail −
Doc Class
The arguments, serialization fields, methods used in Doc class are explained below −
Arguments
The table below explains its arguments −
| NAME | TYPE | DESCRIPTION |
|---|---|---|
| text | unicode | This attribute represents the document text in Unicode. |
| mem | Pool | As name implies, this attribute is for the documents local memory heap, for all C data it owns. |
| vocab | Vocab | It stores all the lexical types. |
| tensor | ndarray | Introduced in version 2.0, it is a container for dense vector representations. |
| cats | dict | Introduced in version 2.0, this attribute maps a label to a score for categories applied to the document. Note that the label is a string, and the score should be a float value. |
| user_data | - | It represents a generic storage area mainly for user custom data. |
| lang | int | Introduced in version 2.1, it is representing the language of the documents vocabulary. |
| lang_ | unicode | Introduced in version 2.1, it is representing the language of the documents vocabulary. |
| is_tagged | bool | It is a flag that indicates whether the document has been part-of-speech tagged or not. It will return True, if the Doc is empty. |
| is_parsed | bool | It is a flag that indicates whether the document has been syntactically parsed or not. It will return True, if the Doc is empty. |
| is_sentenced | bool | It is a flag that indicates whether the sentence boundaries have been applied to the document or not. It will return True, if the Doc is empty. |
| is_nered | bool | This attribute was introduced in version 2.1. It is a flag that indicates whether the named entities have been set or not. It will return True, if the Doc is empty. It will also return True, if any of the tokens has an entity tag set. |
| sentiment | float | It will return the documents positivity/negativity score (if any available) in float. |
| user_hooks | dict | This attribute is a dictionary allowing customization of the Docs properties. |
| user_token_hooks | dict | This attribute is a dictionary allowing customization of properties of Token children. |
| user_span_hooks | dict | This attribute is a dictionary allowing customization of properties of Span children. |
| _ | Underscore | It represents the user space for adding custom attribute extensions. |
Serialization fields
During serialization process, to restore various aspects of the object, spacy will export several data fields. We can also exclude data fields from serialization by passing names via one of the arguments called exclude.
The table below explains the serialization fields −
| Sr.No. | Name & Description |
|---|---|
| 1 | Text It represents the value of the Doc.text attribute. |
| 2 | Sentiment It represents the value of the Doc.sentiment attribute. |
| 3 | Tensor It represents the value of the Doc.tensor attribute. |
| 4 | user_data It represents the value of the Doc.user_data dictionary. |
| 5 | user_data_keys It represents the keys of the Doc.user_data dictionary. |
| 6 | user_data_values It represents the values of the Doc.user_data dictionary. |
Methods
Following are the methods used in Doc class −
| Sr.No. | Method & Description |
|---|---|
| 1 | Doc._ _init_ _ To construct a Doc object. |
| 2 | Doc._ _getitem_ _ To get a token object at a particular position. |
| 3 | Doc._ _iter_ _ To iterate over those token objects from which the annotations can be easily accessed. |
| 4 | Doc._ _len_ _ To get the number of tokens in the document. |
ClassMethods
Following are the classmethods used in Doc class −
| Sr.No. | Classmethod & Description |
|---|---|
| 1 | Doc.set_extension It defines a custom attribute on the Doc. |
| 2 | Doc.get_extension It will look up a previously extension by name. |
| 3 | Doc.has_extension It will check whether an extension has been registered on the Doc class or not. |
| 4 | Doc.remove_extension It will remove a previously registered extension on the Doc class. |
Doc Class ContextManager and Property
In this chapter, let us learn about the context manager and the properties of Doc Class in spaCy.
Context Manager
It is a context manager, which is used to handle the retokenization of the Doc class. Let us now learn about the same in detail.
Doc.retokenize
When you use this context manager, it will first modify the Docs tokenization, store it, and then, make all at once, when the context manager exists.
The advantage of this context manager is that it is more efficient and less error prone.
Example 1
Refer the example for Doc.retokenize context manager given below −
import spacy
nlp_model = spacy.load("en_core_web_sm")
from spacy.tokens import Doc
doc = nlp_model("This is Tutorialspoint.com.")
with doc.retokenize() as retokenizer:
   retokenizer.merge(doc[0:0])
doc
Output
You will see the following output −
is Tutorialspoint.com.
Example 2
Here is another example of Doc.retokenize context manager −
import spacy
nlp_model = spacy.load("en_core_web_sm")
from spacy.tokens import Doc
doc = nlp_model("This is Tutorialspoint.com.")
with doc.retokenize() as retokenizer:
   retokenizer.merge(doc[0:2])
doc
Output
You will see the following output −
This is Tutorialspoint.com.
Retokenize Methods
Given below is the table, which provides information about the retokenize methods in a nutshell. The two retokenize methods are explained below the table in detail.
| Sr.No. | Method & Description |
|---|---|
| 1 | Retokenizer.merge It will mark a span for merging. |
| 2 | Retokenizer.split It will mark a token for splitting into the specified orths. |
Properties
The properties of Doc Class in spaCy are explained below −
| Sr.No. | Doc Property & Description |
|---|---|
| 1 | Doc.ents Used for the named entities in the document. |
| 2 | Doc.noun_chunks Used to iterate over the base noun phrases in a particular document. |
| 3 | Doc.sents Used to iterate over the sentences in a particular document. |
| 4 | Doc.has_vector Represents a Boolean value which indicates whether a word vector is associated with the object or not. |
| 5 | Doc.vector Represents a real-valued meaning. |
| 6 | Doc.vector_norm Represents the L2 norm of the documents vector representation. |
spaCy - Container Token Class
This chapter will help the readers in understanding about the Token Class in spaCy.
Token Class
As discussed previously, Token class represents an individual token such as word, punctuation, whitespace, symbol, etc.
Attributes
The table below explains its attributes −
| NAME | TYPE | DESCRIPTION |
|---|---|---|
| Doc | Doc | It represents the parent document. |
| sent | Span | Introduced in version 2.0.12, represents the sentence span that this token is a part of. |
| Text | unicode | It is Unicode verbatim text content. |
| text_with_ws | unicode | It represents the text content, with trailing space character (if present). |
| whitespace_ | unicode | As name implies it is the trailing space character (if present). |
| Orth | int | It is the ID of the Unicode verbatim text content. |
| orth_ | unicode | It is the Unicode Verbatim text content which is identical to Token.text. This text content exists mostly for consistency with the other attributes. |
| Vocab | Vocab | This attribute represents the vocab object of the parent Doc. |
| tensor | ndarray | Introduced in version 2.1.7, represents the tokens slice of the parent Docs tensor. |
| Head | Token | It is the syntactic parent of this token. |
| left_edge | Token | As name implies it is the leftmost token of this tokens syntactic descendants. |
| right_edge | Token | As name implies it is the rightmost token of this tokens syntactic descendants. |
| I | Int | Integer type attribute representing the index of the token within the parent document. |
| ent_type | int | It is the named entity type. |
| ent_type_ | unicode | It is the named entity type. |
| ent_iob | int | It is the IOB code of named entity tag. Here, 3 = the token begins an entity, 2 = it is outside an entity, 1 = it is inside an entity, and 0 = no entity tag is set. |
| ent_iob_ | unicode | It is the IOB code of named entity tag. B = the token begins an entity, I = it is inside an entity, O = it is outside an entity, and "" = no entity tag is set. |
| ent_kb_id | int | Introduced in version 2.2, represents the knowledge base ID that refers to the named entity this token is a part of. |
| ent_kb_id_ | unicode | Introduced in version 2.2, represents the knowledge base ID that refers to the named entity this token is a part of. |
| ent_id | int | It is the ID of the entity the token is an instance of (if any). This attribute is currently not used, but potentially for coreference resolution. |
| ent_id_ | unicode | It is the ID of the entity the token is an instance of (if any). This attribute is currently not used, but potentially for coreference resolution. |
| Lemma | int | Lemma is the base form of the token, having no inflectional suffixes. |
| lemma_ | unicode | It is the base form of the token, having no inflectional suffixes. |
| Norm | int | This attribute represents the tokens norm. |
| norm_ | unicode | This attribute represents the tokens norm. |
| Lower | int | As name implies, it is the lowercase form of the token. |
| lower_ | unicode | It is also the lowercase form of the token text which is equivalent to Token.text.lower(). |
| Shape | int | To show orthographic features, this attribute is for transform of the tokens string. |
| shape_ | unicode | To show orthographic features, this attribute is for transform of the tokens string. |
| Prefix | int | It is the hash value of a length-N substring from the start of the token. The defaults value is N=1. |
| prefix_ | unicode | It is a length-N substring from the start of the token. The default value is N=1. |
| Suffix | int | It is the hash value of a length-N substring from the end of the token. The default value is N=3. |
| suffix_ | unicode | It is the length-N substring from the end of the token. The default value is N=3. |
| is_alpha | bool | This attribute represents whether the token consist of alphabetic characters or not? It is equivalent to token.text.isalpha(). |
| is_ascii | bool | This attribute represents whether the token consist of ASCII characters or not? It is equivalent to all(ord(c) < 128 for c in token.text). |
| is_digit | Bool | This attribute represents whether the token consist of digits or not? It is equivalent to token.text.isdigit(). |
| is_lower | Bool | This attribute represents whether the token is in lowercase or not? It is equivalent to token.text.islower(). |
| is_upper | Bool | This attribute represents whether the token is in uppercase or not? It is equivalent to token.text.isupper(). |
| is_title | bool | This attribute represents whether the token is in titlecase or not? It is equivalent to token.text.istitle(). |
| is_punct | bool | This attribute represents whether the token a punctuation? |
| is_left_punct | bool | This attribute represents whether the token a left punctuation mark, e.g. '(' ? |
| is_right_punct | bool | This attribute represents whether the token a right punctuation mark, e.g. ')' ? |
| is_space | bool | This attribute represents whether the token consist of whitespace characters or not? It is equivalent to token.text.isspace(). |
| is_bracket | bool | This attribute represents whether the token is a bracket or not? |
| is_quote | bool | This attribute represents whether the token a quotation mark or not? |
| is_currency | bool | Introduced in version 2.0.8, this attribute represents whether the token is a currency symbol or not? |
| like_url | bool | This attribute represents whether the token resemble a URL or not? |
| like_num | bool | This attribute represents whether the token represent a number or not? |
| like_email | bool | This attribute represents whether the token resemble an email address or not? |
| is_oov | bool | This attribute represents whether the token have a word vector or not? |
| is_stop | bool | This attribute represents whether the token is part of a stop list or not? |
| Pos | int | It represents the coarse-grained part-of-speech from the Universal POS tag set. |
| pos_ | unicode | It represents the coarse-grained part-of-speech from the Universal POS tag set. |
| Tag | int | It represents the fine-grained part-of-speech. |
| tag_ | unicode | It represents the fine-grained part-of-speech. |
| Dep | int | This attribute represents the syntactic dependency relation. |
| dep_ | unicode | This attribute represents the syntactic dependency relation. |
| Lang | Int | This attribute represents the language of the parent documents vocabulary. |
| lang_ | unicode | This attribute represents the language of the parent documents vocabulary. |
| Prob | float | It is the smoothed log probability estimate of tokens word type. |
| Idx | int | It is the character offset of the token within the parent document. |
| Sentiment | float | It represents a scalar value that indicates the positivity or negativity of the token. |
| lex_id | int | It represents the sequential ID of the tokens lexical type which is used to index into tables. |
| Rank | int | It represents the sequential ID of the tokens lexical type which is used to index into tables. |
| Cluster | int | It is the Brown cluster ID. |
| _ | Underscore | It represents the user space for adding custom attribute extensions. |
Methods
Following are the methods used in Token class −
| Sr.No. | Method & Description |
|---|---|
| 1 | Token._ _init_ _ It is used to construct a Token object. |
| 2 | Token.similarity It is used to compute a semantic similarity estimate. |
| 3 | Token.check_flag It is used to check the value of a Boolean flag. |
| 4 | Token._ _len_ _ It is used to calculate the number of Unicode characters in the token. |
ClassMethods
Following are the classmethods used in Token class −
| Sr.No. | Classmethod & Description |
|---|---|
| 1 | Token.set_extension It defines a custom attribute on the Token. |
| 2 | Token.get_extension It will look up a previously extension by name. |
| 3 | Token.has_extension It will check whether an extension has been registered on the Token class or not. |
| 4 | Token.remove_extension It will remove a previously registered extension on the Token class. |
spaCy - Token Properties
In this chapter, we will learn about the properties with regards to the Token class in spaCy.
Properties
The token properties are listed below along with their respective descriptions.
| Sr.No. | Token Property & Description |
|---|---|
| 1 | Token.ancestors Used for the rightmost token of this tokens syntactic descendants. |
| 2 | Token.conjuncts Used to return a tuple of coordinated tokens. |
| 3 | Token.children Used to return a sequence of the tokens immediate syntactic children. |
| 4 | Token.lefts Used for the leftward immediate children of the word. |
| 5 | Token.rights Used for the rightward immediate children of the word. |
| 6 | Token.n_rights Used for the number of rightward immediate children of the word. |
| 7 | Token.n_lefts Used for the number of leftward immediate children of the word. |
| 8 | Token.subtree This yields a sequence that contains the token and all the tokens syntactic descendants. |
| 9 | Token.vector This represents a real-valued meaning. |
| 10 | Token.vector_norm This represents the L2 norm of the tokens vector representation. |
Token.ancestors
This token property is used for the rightmost token of this tokens syntactic descendants.
Example
An example of Token.ancestors property is given below −
import spacy
nlp_model = spacy.load("en_core_web_sm")
from spacy.tokens import Token
doc = nlp_model("Give it back! He pleaded.")

it_ancestors = doc[1].ancestors
[t.text for t in it_ancestors]
Output
['Give']
Token.conjuncts
This token property is used to return a tuple of co-ordinated tokens. Here, the token itself would not be included.
Example
An example of Token.conjuncts property is as follows −
import spacy
nlp_model = spacy.load("en_core_web_sm")
from spacy.tokens import Token
doc = nlp_model("I like cars and bikes")
cars_conjuncts = doc[2].conjuncts
[t.text for t in cars_conjuncts]
Output
The output is mentioned below −
['bikes']
Token.children
This token property is used to return a sequence of the tokens immediate syntactic children.
Example
An example of Token.children property is as follows −
import spacy
nlp_model = spacy.load("en_core_web_sm")
from spacy.tokens import Token
doc = nlp_model("This is Tutorialspoint.com.")
give_child = doc[1].children
[t.text for t in give_child]
Output
['This', 'Tutorialspoint.com', '.']
Token.lefts
This token property is used for the leftward immediate children of the word. It would be in the syntactic dependency parse.
Example
An example of Token.lefts property is as follows −
import spacy
nlp_model = spacy.load("en_core_web_sm")
from spacy.tokens import Token
doc = nlp_model("This is Tutorialspoint.com.")
left_child = [t.text for t in doc[1].lefts]
left_child
Output
You will get the following output −
['This']
Token.rights
This token property is used for the rightward immediate children of the word. It would be in the syntactic dependency parse.
Example
An example of Token.rights property is given below −
import spacy
nlp_model = spacy.load("en_core_web_sm")
from spacy.tokens import Token
doc = nlp_model("This is Tutorialspoint.com.")
right_child = [t.text for t in doc[1].rights]
right_child
Output
['Tutorialspoint.com', '.']
Token.n_rights
This token property is used for the number of rightward immediate children of the word. It would be in the syntactic dependency parse.
Example
An example of Token.n_rights property is given below −
import spacy
nlp_model = spacy.load("en_core_web_sm")
from spacy.tokens import Token
doc = nlp_model("This is Tutorialspoint.com.")
doc[1].n_rights
Output
2
Token.n_lefts
This token property is used for the number of leftward immediate children of the word. It would be in the syntactic dependency parse.
Example
An example of Token.n_lefts property is as follows −
import spacy
nlp_model = spacy.load("en_core_web_sm")
from spacy.tokens import Token
doc = nlp_model("This is Tutorialspoint.com.")
doc[1].n_lefts
Output
The output is stated below −
1
Token.subtree
This token property yields a sequence that contains the token and all the tokens syntactic descendants.
Example
An example of Token.subtree property is as follows −
import spacy
nlp_model = spacy.load("en_core_web_sm")
from spacy.tokens import Token
doc = nlp_model("This is Tutorialspoint.com.")
subtree_doc = doc[1].subtree
[t.text for t in subtree_doc]
Output
['This', 'is', 'Tutorialspoint.com', '.']
Token.vector
This token property represents a real-valued meaning. It will return a one-dimensional array representing the tokens semantics.
Example 1
An example of Token.vector property is as follows −
import spacy
nlp_model = spacy.load("en_core_web_sm")
doc = nlp_model("The website is Tutorialspoint.com.")
doc.vector.dtype
Output
The output is stated below −
dtype('float32')
Example 2
An another example of Token.vector property is given below −
doc.vector.shape
Output
The output is stated below −
(96,)
Token.vector_norm
This token property represents the L2 norm of the tokens vector representation.
Example
An example of Token.vector_norm property is given below −
import spacy
nlp_model = spacy.load("en_core_web_sm")
doc1 = nlp_model("The website is Tutorialspoint.com.")
doc2 = nlp_model("It is having best technical tutorials.")
doc1[2].vector_norm !=doc2[2].vector_norm
Output
True
spaCy - Container Span Class
This chapter will help you in understanding the Span Class in spaCy.
Span Class
It is a slice from Doc object, we discussed above.
Attributes
The table below explains its arguments −
| NAME | TYPE | DESCRIPTION |
|---|---|---|
| doc | Doc | It represents the parent document. |
| tensor V2.1.7 | Ndarray | Introduced in version 2.1.7 represents the spans slice of the parent Docs tensor. |
| sent | Span | It is actually the sentence span that this span is a part of. |
| start | Int | This attribute is the token offset for the start of the span. |
| end | Int | This attribute is the token offset for the end of the span. |
| start_char | Int | Integer type attribute representing the character offset for the start of the span. |
| end_char | Int | Integer type attribute representing the character offset for the end of the span. |
| text | Unicode | It is a Unicode that represents the span text. |
| text_with_ws | Unicode | It represents the text content of the span with a trailing whitespace character if the last token has one. |
| orth | Int | This attribute is the ID of the verbatim text content. |
| orth_ | Unicode | It is the Unicode Verbatim text content, which is identical to Token.text. This text content exists mostly for consistency with the other attributes. |
| label | Int | This integer attribute is the hash value of the spans label. |
| label_ | Unicode | It is the label of span. |
| lemma_ | Unicode | It is the lemma of span. |
| kb_id | Int | It represents the hash value of the knowledge base ID, which is referred to by the span. |
| kb_id_ | Unicode | It represents the knowledge base ID, which is referred to by the span. |
| ent_id | Int | This attribute represents the hash value of the named entity the token is an instance of. |
| ent_id_ | Unicode | This attribute represents the string ID of the named entity the token is an instance of. |
| sentiment | Float | A float kind scalar value that indicates the positivity or negativity of the span. |
| _ | Underscore | It is representing the user space for adding custom attribute extension. |
Methods
Following are the methods used in Span class −
| Sr.No. | Method & Description |
|---|---|
| 1 | Span._ _init_ _ To construct a Span object from the slice doc[start : end]. |
| 2 | Span._ _getitem_ _ To get a token object at a particular position say n, where n is an integer. |
| 3 | Span._ _iter_ _ To iterate over those token objects from which the annotations can be easily accessed. |
| 4 | Span._ _len_ _ To get the number of tokens in span. |
| 5 | Span.similarity To make a semantic similarity estimate. |
| 6 | Span.merge To retokenize the document in a way that the span is merged into a single token. |
ClassMethods
Following are the classmethods used in Span class −
| Sr.No. | Classmethod & Description |
|---|---|
| 1 | Span.set_extension It defines a custom attribute on the Span. |
| 2 | Span.get_extension To look up a previously extension by name. |
| 3 | Span.has_extension To check whether an extension has been registered on the Span class or not. |
| 4 | Span.remove_extension To remove a previously registered extension on the Span class. |
spaCy - Span Class Properties
In this chapter, let us learn the Span properties in spaCy.
Properties
Following are the properties with regards to Span Class in spaCy.
| Sr.No. | Span Properties & Description |
|---|---|
| 1 | Span.ents Used for the named entities in the span. |
| 2 | Span.as_doc Used to create a new Doc object corresponding to the Span. It will have a copy of data too. |
| 3 | Span.root To provide the token with the shortest path to the root of the sentence. |
| 4 | Span.lefts Used for the tokens that are to the left of the span whose heads are within the span. |
| 5 | Span.rights Used for the tokens that are to the right of the span whose heads are within the span. |
| 6 | Span.n_rights Used for the tokens that are to the right of the span whose heads are within the span. |
| 7 | Span.n_lefts Used for the tokens that are to the left of the span whose heads are within the span. |
| 8 | Span.subtree To yield the tokens that are within the span and the tokens which descend from them. |
| 9 | Span.vector Represents a real-valued meaning. |
| 10 | Span.vector_norm Represents the L2 norm of the documents vector representation. |
Span.ents
This Span property is used for the named entities in the span. If the entity recogniser has been applied, this property will return a tuple of named entity span objects.
Example 1
An example of Span.ents property is as follows −
import spacy
nlp_model = spacy.load("en_core_web_sm")
doc = nlp_model("This is Tutorialspoint.com.")
span = doc[0:5]
ents = list(span.ents)
ents[0].label
Output
You will receive the following output −
383
Example 2
An another example of Span.ents property is as follows −
ents[0].label_
Output
You will receive the following output −
ORG
Example 3
Given below is another example of Span.ents property −
ents[0].text
Output
You will receive the following output −
'Tutorialspoint.com'
Span.as_doc
As the name suggests, this Span property will create a new Doc object corresponding to the Span. It will have a copy of data too.
Example
An example of Span.as_doc property is given below −
import spacy
nlp_model = spacy.load("en_core_web_sm")
doc = nlp_model("I like India.")
span = doc[2:4]
doc2 = span.as_doc()
doc2.text
Output
You will receive the following output −
India
Span.root
This Span property will provide the token with the shortest path to the root of the sentence. It will take the first token, if there are multiple tokens which are equally high in the tree.
Example 1
An example of Span.root property is as follows −
import spacy
nlp_model = spacy.load("en_core_web_sm")
doc = nlp_model("I like New York in Autumn.")
i, like, new, york, in_, autumn, dot = range(len(doc))
doc[new].head.text
Output
You will receive the following output −
'York'
Example 2
An another example of Span.root property is as follows −
doc[york].head.text
Output
You will receive the following output −
'like'
Example 3
Given below is an example of Span.root property −
new_york = doc[new:york+1]
new_york.root.text
Output
You will receive the following output −
'York'
Span.lefts
This Span property is used for the tokens that are to the left of the span, whose heads are within the span.
Example
An example of Span.lefts property is mentioned below −
import spacy
nlp_model = spacy.load("en_core_web_sm")
doc = nlp_model("This is Tutorialspoint.com.")
lefts = [t.text for t in doc[1:4].lefts]
lefts
Output
You will receive the following output −
['This']
Span.rights
This Span property is used for the tokens that are to the right of the span whose heads are within the span.
Example
An example of Span.rights property is given below −
import spacy
nlp_model = spacy.load("en_core_web_sm")
doc = nlp_model("This is Tutorialspoint.com.")
rights = [t.text for t in doc[1:2].rights]
rights
Output
You will receive the following output −
['Tutorialspoint.com', '.']
Span.n_rights
This Span property is used for the tokens that are to the right of the span whose heads are within the span.
Example
An example of Span.n_rights property is as follows −
import spacy
nlp_model = spacy.load("en_core_web_sm")
doc = nlp_model("This is Tutorialspoint.com.")
doc[1:2].n_rights
Output
You will receive the following output −
2
Span.n_lefts
This Span property is used for the tokens that are to the left of the span whose heads are within the span.
Example
An example of Span.n_lefts property is as follows −
import spacy
nlp_model = spacy.load("en_core_web_sm")
doc = nlp_model("This is Tutorialspoint.com.")
doc[1:2].n_lefts
Output
You will receive the following output −
1
Span.subtree
This Span property yields the tokens that are within the span and the tokens which descend from them.
Example
An example of Span.subtree property is as follows −
import spacy
nlp_model = spacy.load("en_core_web_sm")
doc = nlp_model("This is Tutorialspoint.com.")
subtree = [t.text for t in doc[:1].subtree]
subtree
Output
You will receive the following output −
['This']
Span.vector
This Span property represents a real-valued meaning. The defaults value is an average of the token vectors.
Example 1
An example of Span.vector property is as follows −
import spacy
nlp_model = spacy.load("en_core_web_sm")
doc = nlp_model("The website is Tutorialspoint.com.")
doc[1:].vector.dtype
Output
You will receive the following output −
dtype('float32')
Example 2
An another example of Span.vector property is as follows −
Output
You will receive the following output −
(96,)
Span.vector_norm
This doc property represents the L2 norm of the documents vector representation.
Example
An example of Span.vector_norm property is as follows −
import spacy
nlp_model = spacy.load("en_core_web_sm")
doc = nlp_model("The website is Tutorialspoint.com.")
doc[1:].vector_norm
doc[2:].vector_norm
doc[1:].vector_norm != doc[2:].vector_norm
Output
You will receive the following output −
True
spaCy - Container Lexeme Class
In this chapter, Lexeme Class in spaCy is explained in detail.
Lexeme Class
Lexeme class is an entry in the vocabulary. It has no string context. As opposed to a word token, it is a word type. Thats the reason it has no POS(part-of-speech) tag, dependency parse or lemma.
Attributes
The table below explains its arguments −
| NAME | TYPE | DESCRIPTION |
|---|---|---|
| vocab | Vocab | It represents the vocabulary of the lexeme. |
| text | unicode | A Unicode attribute representing verbatim text content. |
| orth | int | It is an integer type attribute that represents ID of the verbatim text content. |
| orth_ | unicode | It is the Unicode Verbatim text content which is identical to Lexeme.text. This text content exists mostly for consistency with the other attributes. |
| rank | int | It represents the sequential ID of the lexemes lexical type which is used to index into tables. |
| flags | int | It represents the container of the lexemes binary flags. |
| norm | int | This attribute represents the lexemes norm. |
| norm_ | unicode | This attribute represents the lexemes norm. |
| lower | int | As name implies, it is the lowercase form of the word. |
| lower_ | unicode | It is also the lowercase form of the word. |
| shape | int | To show orthographic features, this attribute is for transform of the words string. |
| shape_ | unicode | To show orthographic features, this attribute is for transform of the words string. |
| prefix | int | It is the hash value of a length-N substring from the start of the word. The defaults value is N=1. |
| prefix_ | unicode | It is a length-N substring from the start of the word. The default value is N=1. |
| suffix | int | It is the hash value of a length-N substring from the end of the word. The default value is N=3. |
| suffix_ | unicode | It is the length-N substring from the end of the word. The default value is N=3. |
| is_alpha | bool | This attribute represents whether the lexeme consist of alphabetic characters or not? It is equivalent to lexeme.text.isalpha(). |
| is_ascii | bool | This attribute represents whether the lexeme consist of ASCII characters or not? It is equivalent to all(ord(c) |
| is_digit | Bool | This attribute represents whether the lexeme consist of digits or not? It is equivalent to lexeme.text.isdigit(). |
| is_lower | Bool | This attribute represents whether the lexeme is in lowercase or not? It is equivalent to lexeme.text.islower(). |
| is_upper | Bool | This attribute represents whether the lexeme is in uppercase or not? It is equivalent to lexeme.text.isupper(). |
| is_title | bool | This attribute represents whether the lexeme is in titlecase or not? It is equivalent to lexeme.text.istitle(). |
| is_punct | bool | This attribute represents whether the lexeme a punctuation? |
| is_left_punct | bool | This attribute represents whether the lexeme a left punctuation mark, e.g. '(' ? |
| is_right_punct | bool | This attribute represents whether the lexeme a right punctuation mark, e.g. ')' ? |
| is_space | bool | This attribute represents whether the lexeme consist of whitespace characters or not? It is equivalent to lexeme.text.isspace(). |
| is_bracket | bool | This attribute represents whether the lexeme is a bracket or not? |
| is_quote | bool | This attribute represents whether the lexeme a quotation mark or not? |
| is_currency | bool | Introduced in version 2.0.8, this attribute represents whether the lexeme is a currency symbol or not? |
| like_url | bool | This attribute represents whether the lexeme resemble a URL or not? |
| like_num | bool | This attribute represents whether the lexeme represent a number or not? |
| like_email | bool | This attribute represents whether the lexeme resemble an email address or not? |
| is_oov | bool | This attribute represents whether the lexeme have a word vector or not? |
| is_stop | bool | This attribute represents whether the lexeme is part of a stop list or not? |
| Lang | Int | This attribute represents the language of the parent documents vocabulary. |
| lang_ | unicode | This attribute represents the language of the parent documents vocabulary. |
| Prob | float | It is the smoothed log probability estimate of lexemes word type. |
| cluster | int | It represents the brown cluster ID. |
| Sentiment | float | It represents a scalar value that indicates the positivity or negativity of the lexeme. |
Methods
Following are the methods used in Lexeme class −
| Sr.No. | Methods & Description |
|---|---|
| 1 | Lexeme._ _init_ _ To construct a Lexeme object. |
| 2 | Lexeme.set_flag To change the value of a Boolean flag. |
| 3 | Lexeme.check_flag To check the value of a Boolean flag. |
| 4 | Lexeme.similarity To compute a semantic similarity estimate. |
Lexeme._ _init_ _
This is one of the most useful methods of Lexeme class. As name implies, it is used to construct a Lexeme object.
Arguments
The table below explains its arguments −
| NAME | TYPE | DESCRIPTION |
|---|---|---|
| Vocab | Vocab | This argument represents the parent vocabulary. |
| Orth | int | It is the orth id of the lexeme. |
Example
An example of Lexeme._ _init_ _ method is given below −
import spacy
nlp_model = spacy.load("en_core_web_sm")
doc = nlp_model("The website is Tutorialspoint.com.")
lexeme = doc[3]
lexeme.text
Output
When you run the code, you will see the following output −
'Tutorialspoint.com'
Lexeme.set_flag
This method is used to change the value of a Boolean flag.
Arguments
The table below explains its arguments −
| NAME | TYPE | DESCRIPTION |
|---|---|---|
| flag_id | Int | It represents the attribute ID of the flag, which is to be set. |
| value | bool | It is the new value of the flag. |
Example
An example of Lexeme.set_flag method is given below −
import spacy
nlp_model = spacy.load("en_core_web_sm")
New_FLAG = nlp_model.vocab.add_flag(lambda text: False)
nlp_model.vocab["Tutorialspoint.com"].set_flag(New_FLAG, True)
New_FLAG
Output
When you run the code, you will see the following output −
25
Lexeme.check_flag
This method is used to check the value of a Boolean flag.
Argument
The table below explains its argument −
| NAME | TYPE | DESCRIPTION |
|---|---|---|
| flag_id | Int | It represents the attribute ID of the flag which is to be checked. |
Example 1
An example of Lexeme.check_flag method is given below −
import spacy
nlp_model = spacy.load("en_core_web_sm")
library = lambda text: text in ["Website", "Tutorialspoint.com"]
my_library = nlp_model.vocab.add_flag(library)
nlp_model.vocab["Tutorialspoint.com"].check_flag(my_library)
Output
When you run the code, you will see the following output −
True
Example 2
Given below is another example of Lexeme.check_flag method −
nlp_model.vocab["Hello"].check_flag(my_library)
Output
When you run the code, you will see the following output −
False
Lexeme.similarity
This method is used to compute a semantic similarity estimate. The default is cosine over vectors.
Argument
The table below explains its argument −
| NAME | TYPE | DESCRIPTION |
|---|---|---|
| Other | - | It is the object with which the comparison will be done. By default, it will accept Doc, Span, Token, and Lexeme objects. |
Example
An example of Lexeme.similarity method is as follows −
import spacy
nlp_model = spacy.load("en_core_web_sm")
apple = nlp.vocab["apple"]
orange = nlp.vocab["orange"]
apple_orange = apple.similarity(orange)
orange_apple = orange.similarity(apple)
apple_orange == orange_apple
Output
When you run the code, you will see the following output −
True
Properties
Following are the properties of Lexeme Class.
| Sr.No. | Property & Description |
|---|---|
| 1 | Lexeme.vector It will return a 1-dimensional array representing the lexemes semantics. |
| 2 | Lexeme.vector_norm It represents the L2 norm of the lexemes vector representation. |
Lexeme.vector
This Lexeme property represents a real-valued meaning. It will return a one-dimensional array representing the lexemes semantics.
Example
An example of Lexeme.vector property is given below −
import spacy
nlp_model = spacy.load("en_core_web_sm")
apple = nlp_model.vocab["apple"]
apple.vector.dtype
Output
You will see the following output −
dtype('float32')
Lexeme.vector_norm
This token property represents the L2 norm of the lexemes vector representation.
Example
An example of Lexeme.vector_norm property is as follows −
import spacy
nlp_model = spacy.load("en_core_web_sm")
apple = nlp.vocab["apple"]
pasta = nlp.vocab["pasta"]
apple.vector_norm != pasta.vector_norm
Output
You will see the following output −
True
spaCy - Training Neural Network Model
In this chapter, let us learn how to train a neural network model in spaCy.
Here, we will understand how we can update spaCys statistical models to customize them for our use case. For Example, to predict a new entity type in online comments. To customize, we first need to train own model.
Steps for Training
Let us understand the steps for training a neural network model in spaCy.
Step1 − Initialization - If you are not taking pre-trained model, then first, we need to initialize the model weights randomly with nlp.begin_training.
Step2 − Prediction - Next, we need to predict some examples with the current weights. It can be done by calling nlp.updates.
Step3 − Compare - Now, the model will check the predictions against true labels.
Step4 − Calculate - After comparing, here, we will decide how to change weights for better prediction next time.
Step5 − Update - At last make a small change in the current weights and pick the next batch of examples. Continue calling nlp.updates for every batch of examples you take.
Let us now understand these steps with the help of below diagram −
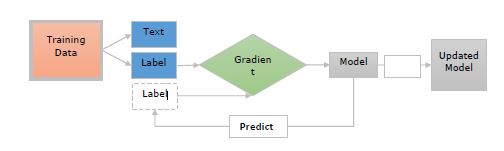
Here −
Training Data − The training data are the examples and their annotations. These are the examples, which we want to update the model with.
Text − It represents the input text, which the model should predict a label for. It should be a sentence, paragraph, or longer document.
Label − The label is actually, what we want from our model to predict. For example, it can be a text category.
Gradient − Gradient is how we should change the weights to reduce the error. It will be computed after comparing the predicted label with true label.
Training the Entity Recognizer
First, the entity recognizer will take a document and predict the phrases as well as their labels.
It means the training data needs to include the following −
Texts.
The entities they contain.
The entity labels.
Each token can only be a part of one entity. Hence, the entities cannot be overlapped.
We should also train it on entities and their surrounding context because, entity recognizer predicts entities in context.
It can be done by showing the model a text and a list of character offsets.
For example, In the code given below, phone is a gadget which starts at character 0 and ends at character 8.
("Phone is coming", {"entities": [(0, 8, "GADGET")]})
Here, the model should also learn the words other than entities.
Consider another example for training the entity recognizer, which is given below −
("I need a new phone! Any suggestions?", {"entities": []})
The main goal should be to teach our entity recognizer model, to recognize new entities in similar contexts even if, they were not in the training data.
spaCys Training Loop
Some libraries provide us the methods that takes care of model training but, on the other hand, spaCy provides us full control over the training loop.
Training loop may be defined as a series of steps which is performed to update as well as to train a model.
Steps for Training Loop
Let us see the steps for training loop, which are as follows −
Step 1 − Loop - The first step is to loop, which we usually need to perform several times, so that the model can learn from it. For example, if you want to train your model for 20 iterations, you need to loop 20 times.
Step 2 − Shuffle - Second step is to shuffle the training data. We need to shuffle the data randomly for each iteration. It helps us to prevent the model from getting stuck in a suboptimal solution.
Step 3 − Divide Later on divide the data into batches. Here, we will divide the training data into mini batches. It helps in increasing the readability of the gradient estimates.
Step 4 − Update - Next step is to update the model for each step. Now, we need to update the model and start the loop again, until we reach the last iteration.
Step 5 − Save - At last, we can save this trained model and use it in spaCy.
Example
Following is an example of spaCys Training loop −
DATA = [
   ("How to order the Phone X", {"entities": [(20, 28, "GADGET")]})
]
# Step1: Loop for 10 iterations
for i in range(10):
   # Step2: Shuffling the training data
   random.shuffle(DATA)
   # Step3: Creating batches and iterating over them
   for batch in spacy.util.minibatch(DATA):
      # Step4: Splitting the batch in texts and annotations
      texts = [text for text, annotation in batch]
      annotations = [annotation for text, annotation in batch]
      # Step5: Updating the model
      nlp.update(texts, annotations)
# Step6: Saving the model
nlp.to_disk(path_to_model)
spaCy - Updating Neural Network Model
In this chapter, we will learn how to update the neural network model in spaCy.
Reasons to update
Following are the reasons to update an existing model −
The updated model will provide better results on your specific domain.
While updating an existing model, you can learn classification schemes for your problem.
Updating an existing model is essential for text classification.
It is especially useful for named entity recognition.
It is less critical for POS tagging as well as dependency parsing.
Updating an existing model
With the help of spaCy, we can update an existing pre-trained model with more data. For example, we can update the model to improve its predictions on different texts.
Updating an existing pre-trained model is very useful, if you want to improve the categories which the model already knows. For example, "person" or "organization". We can also update an existing pre-trained model for adding new categories.
It is recommended to always update an existing pre-trained model with examples of the new category as well as examples of the other categories, which the model previously predicted correctly. If not done, improving the new category might hurt the other categories.
Setting up a new pipeline
From the below given example, let us understand how we can set up a new pipeline from scratch for updating an existing model −
First, we will start with blank English model by using spacy.blank method. It only has the language data and tokenization rules and does not have any pipeline component.
After that we will create a blank entity recognizer and will add it to the pipeline. Next, we will add the new string labels to the model by using add_label.
Now, we can initialize the model with random weights by calling nlp.begin_training.
Next, we need to randomly shuffle the data on each iteration. It is to get better accuracy.
Once shuffled, divide the example into batches by using spaCys minibatch function. At last, update the model with texts and annotations and then, continue to loop.
Examples
Given below is an example for starting with blank English model by using spacy.blank−
nlp = spacy.blank("en")
Following is an example for creating blank entity recognizer and adding it to the pipeline −
ner = nlp.create_pipe("ner")
nlp.add_pipe(ner)
Here is an example for adding a new label by using add_label −
ner.add_label("GADGET")
An example for starting the training by using nlp.begin_training is as follows −
nlp.begin_training()
This is an example for training for iterations and shuffling the data on each iteration.
for itn in range(10):
   random.shuffle(examples)
This is an example for dividing the examples into batches using minibatch utility function for batch in spacy.util.minibatch(examples, size=2).
texts = [text for text, annotation in batch]
annotations = [annotation for text, annotation in batch]
Given below is an example for updating the model with texts and annotations −
nlp.update(texts, annotations)