- ServiceNow - Home
- ServiceNow - Introduction
- ServiceNow - Fundamentals
- ServiceNow - ITIL
- ServiceNow - Cloud Services
- ServiceNow - Administration
- ServiceNow - Development
- Mastering and Certification
- ServiceNow Useful Resources
- ServiceNow - Quick Guide
- ServiceNow - Useful Resources
- ServiceNow - Discussion
ServiceNow - Administration
ServiceNow administration deals with general support, administration and maintenance of the ServiceNow platform for the organisation.
It also includes customising user interface, keeping versions up to date, configuration of applications and modules, managing security and user access, monitoring the system performance and doing regular health checks, managing workflows, UI policies, UI actions, etc.
ServiceNow administrators are also responsible for setting up the ServiceNow, loading ServiceNow with the initial data, setting up groups, roles, users, SLAs, etc.
ServiceNow Configuration
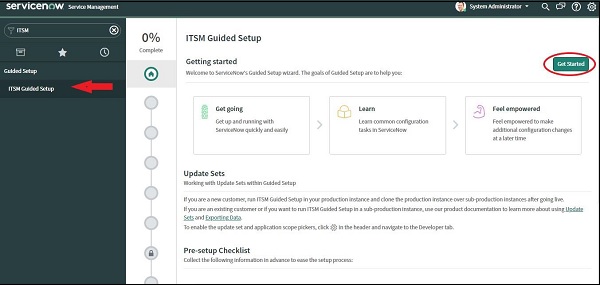
The best way for the initial configuration of the ServiceNow is to use the ITSM guided setup application. Generally, only system administrators have access to ITSM guided setup application.
ITSM guided setup provides a sequence of tasks that help you configure IT Service Management (ITSM) applications on your ServiceNow instance from scratch including company name, logo, colour combinations, fonts, banner, form layout, fields to be displayed in forms, lists, etc.
Moreover, the ITSM guided setup also assists in configuring the major applications like Incident, Change, Problem, etc. To open ITSM guided setup, search ITSM in the navigation bar and open the first search result ITSM guided setup and click on the Get started button, as shown below.
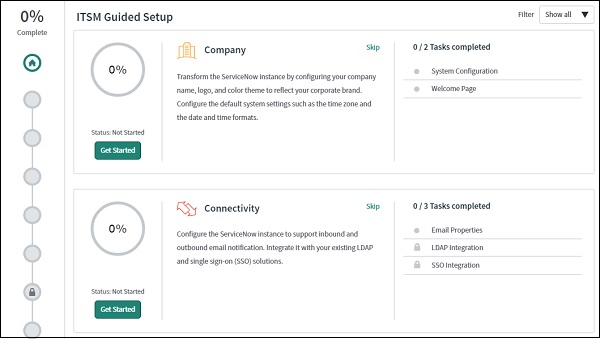
The entire setup is organised into categories like Company, Connectivity, Foundational data, CMDB, etc. We have to configure each category one by one using an interactive and guided menu. The completion progress for each category is displayed, beside the content frame and also, the overall completion status is displayed at the top of content frame.
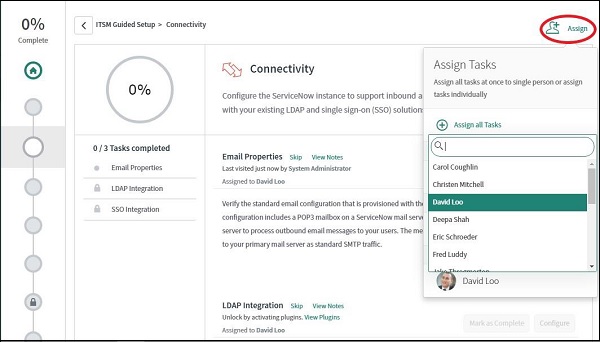
We can configure the category in any order and we can skip the configuration of any specific category as well. The task for the configuration of the ServiceNow from scratch is very big and, therefore, we can assign the task to configure each category to the individual admin user.
The steps in guided setup are very detailed and self-explanatory. You can play around with the guided setup and try to configure the various categories. There are instructions and help available in every category for the reference.
Import sets
The import sets are used to import the data in ServiceNow from external sources like excel, JDBC, etc. The data is imported in the ServiceNow and then, mapped in the relevant ServiceNow tables. The data can be imported manually one time, or we can schedule the periodic import to happen automatically. Lets discuss, both the imports one by one with the help of an example.
Manual Import
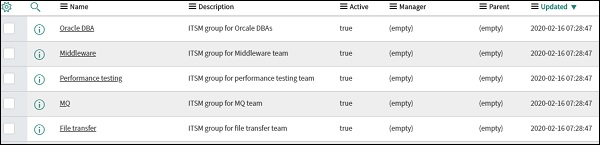
The data can be imported manually using the Load data module of System import set application. Lets take an example, we have to import 5 groups in ServiceNow. The table, which stores the group in the ServiceNow is sys_user_group. To browse the data in this table, simply type sys_user_group.list in the navigation bar.
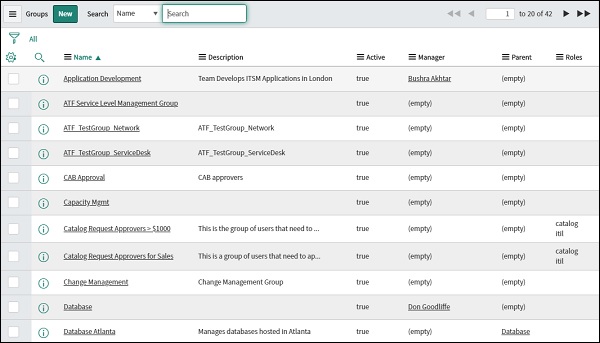
Suppose, we have data of five groups in the excel, which we want to upload in the ServiceNow.
| A | B | C | |
|---|---|---|---|
| 1 | Name | Description | Active |
| 2 | Oracle DBA | ITSM group for Oracle DBAs | True |
| 3 | Middleware | ITSM group for Middleware Team | True |
| 4 | File Transfer | ITSM group for File Transfer Team | True |
| 5 | MQ | ITSM group for MQ Team | True |
| 6 | Performance testing | ITSM group for performance testing team | True |
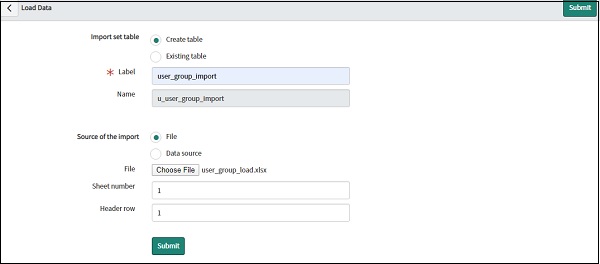
Open the Load data module for System import set application. In the import set table, click on the Create table, as we do not have any existing import table for importing user groups. The import tables are basically the intermediate tables or the staging table.
As we import the file, the data is first loaded in this table and then, we can load the data from this import table to the actual target table in the ServiceNow (sys_user_group in this case).
Then, give the name of the new table in the Label field. The important point to note here, is all the tables, which are created by the user, have the prefix of u_ in the name and all the system tables of ServiceNow have prefix sys_ in the name.
Select the file from the explorer. Additionally, you can give the sheet number, which corresponds to the tab in the excel and header row (column name) in the excel. Both of them are 1 in our case. Finally, click on submit.
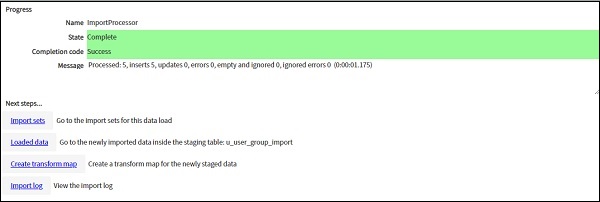
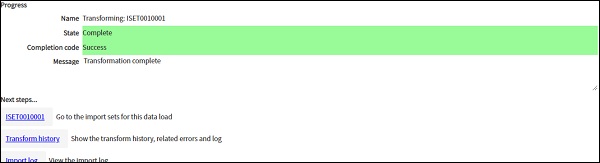
Once the process is complete, you will see the above screen with state as complete and the next steps which have to be followed. First, let us go to the Import Sets under Next steps.
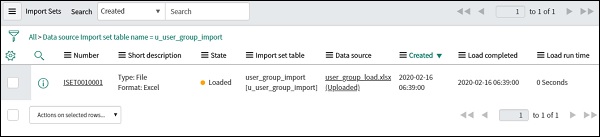
You can see that the import set has been created with the state as Loaded, which means that the data in our excel file, has been loaded in our intermediate table u_user_group_import. You can check the data in this intermediate table, by searching u_user_group_import.list in the navigation bar.
Now let's move ahead and create a transform map for this imported data. In the transform map, basically, we create the mapping between intermediate table and target table (sys_user_group system table), that means which column of intermediate table corresponds to which column of target table, so that data can be loaded in target table accordingly.
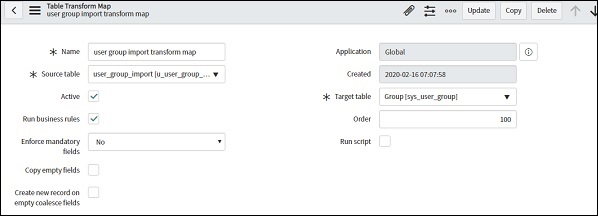
Go to the Create transform map module under the System import set application and give any name for the transform map. Select the source table, which is u_user_group_import in our case and the target table, which is sys_user_goup. Since, we have to keep this transform map active, check the active box and check Run business rule as well. The business rules are a set of rules, which runs when any insert or update is made on the table.
For example, if a user does not enter any data in a field, the default values are set automatically. You can even give your own script, if you want to process the data before inserting it to target table, for this check the Run script box.
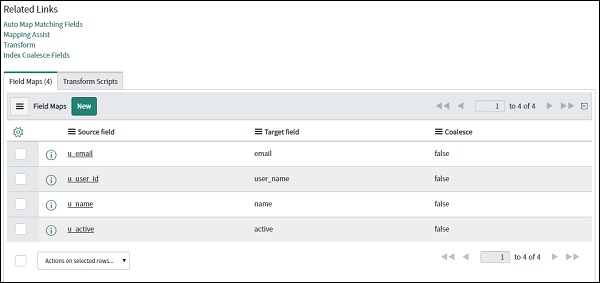
Now, that we have created a transform map, either we can map the column of source table to target table, or allow ServiceNow to do the auto mapping for us. Go to Transform maps module under System import sets → Administrations → Transform maps.
Select the transform map, which we have just created and check for the section Related links. There are two options, auto mapping and mapping assist. Click on Auto map matching fields and you will find all the mapping done automatically in the Field map tab.
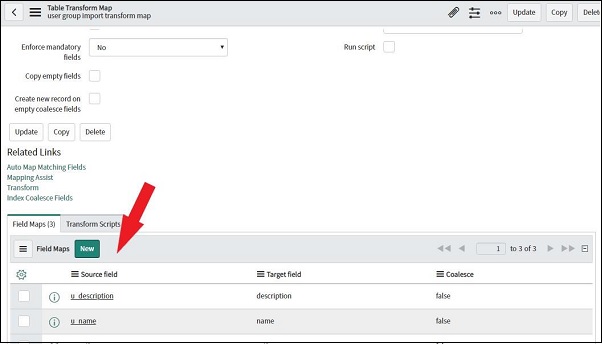
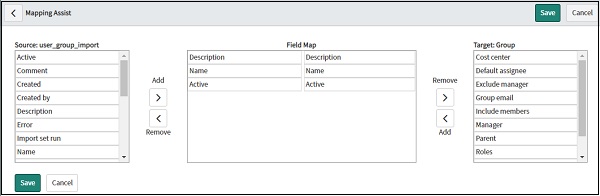
You can also try to do the mapping manually, by clicking on Mapping assist.
Let us run this transform map to load the data in our target table. This is our final step. Go to Run transform module inside System import set. Select the transform map, we have just created and click Transform.
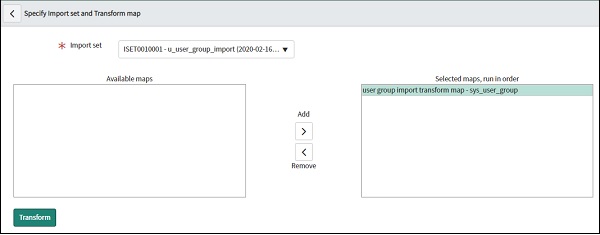
We will get the below screen showing the .
Now, we will go to sys_user_group table and check that our groups are imported successfully.
Since, we were importing the user groups for the first time, we were required to create an import table, transform map, etc. These efforts will be reduced in all the subsequent imports of the user groups, as we already have an import table and transform map.
Scheduled Data Import
Scheduled data import is very useful if, our ServiceNow is receiving data from some external system. ServiceNow can be connected to other systems via FTP, HTTP, SCP, etc. We can also upload the file periodically in ServiceNow, so that, it can be picked up by the scheduled import process.
Let us take an example, wherein, we have some external system based on UNIX, which will daily generate a file (in the fixed path), having details of the new employee joining the BookWorm ltd.
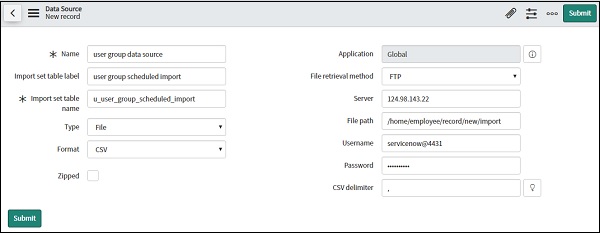
The ServiceNow is supposed to pull this file from the external system, process this file and finally, import the data in the sys_user table. Lets implement this step by step. First of all, we have to create a data source, navigate to the Data source module under System import set application.
Give the name of data source, import set table (new table will be created), format of the file which ServiceNow will pull (CSV, XML, Excel, Jason, Etc). Here, we are taking the example of csv, so we have to give csv delimiter as well, which would be , (comma) in our case. Now select the file retrieval method, here we are using FTP and we have to give the server, pathname where, file will be available for pull, FTP username and password.
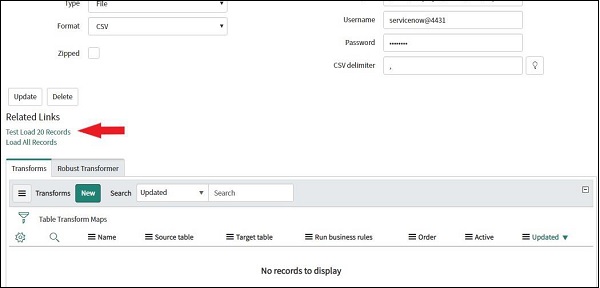
After clicking the submit button, open the Data source again and click on Test load 20 records in the Related link section. ServiceNow will now try to test load the records via FTP, so make sure that, the file is present in the mentioned location.
Now, after the test load, we have to create the transform map. Navigate to Transform map and click on new, to create a new transform map. Give the name of the source table, which we created during data source definition and target table as sys_user.

After submitting, open the newly created transformed map and go to Related links sections. Here, you can use auto mapping or use mapping assist (for manual mapping), if auto mapping is unable to detect the fields properly.
Click on the update to confirm the mapping.
Now, it's time to create the scheduled import. Navigate to Scheduled import module inside System import set application and click on new to create a new scheduled import. Select the data source, which we have created and select the frequency of running this scheduled import. It can be daily, weekly, monthly or periodically. Let us make it run daily at 08:00 hrs.
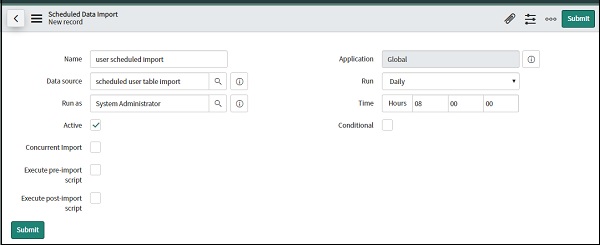
Click on submit and check the user table after the scheduled import run. The data should be imported into the sys_user table.

SLAs Configuration
SLA stands for Service Level Agreement, which is a commitment or contract between the service provider and the service consumer (customer), or it can also be commitment between various departments within an organisation. This contract clearly states the level of service that, the provider should give, the response time, the resolution time of incidents, penalties (if any), uptime, system performance, etc.
For example − BookWorm ltd. has implemented ITIL within its organisation, in such a way that, each incident reported within an organisation should be recorded in ServiceNow and categorised in any of the following four categories - Critical, High, Medium and Low.
A SLA is signed between the IT and business of BookWorm ltd., which clearly defines the time limit to resolve incidents in each category −
Critical - 6 hrs, High - 24 hrs, Medium - 48 hrs and Low - 72 hrs
This is called as resolution time. In a similar manner, there is a response time SLA, which defines time limit to acknowledge the incident (or assign the incident to respective group) in ServiceNow system.
Critical - 30 mins, High - 60 mins, Medium - 5 hrs and Low - 8 hrs.
For defining the SLA, we have a module called SLA definition inside SLA application. To define a new SLA, open SLA definition module and click on New button.
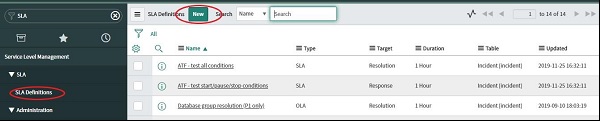
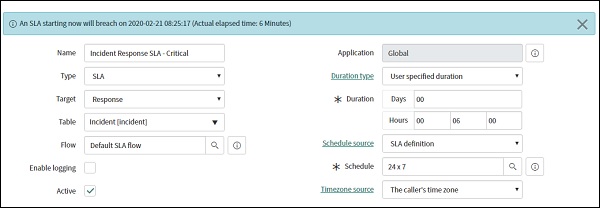
Lets create a SLA in the incident table. We can also choose to create SLA in any other table like change, problem, etc. First, start with Response time for critical incidents. Give the name of SLA, select type as SLA, select Target as Response and Table as Incident. Workflow is used for escalation purposes.
For example, if 50% of SLA time is over and the incident is not resolved/acknowledged, we can choose to send an alert email to the leader of that team. Then, if 75% of SLA time is over, we can choose to send email to manager of that team and so on. We will take a look at workflow in more detail in the next section.
Now, select duration as User defined and give duration as 30 minutes, as it is for Critical incident. Then select the schedule, which means, if we want to calculate the SLA time 24 X 7, exclude weekends, exclude only Sundays, etc.
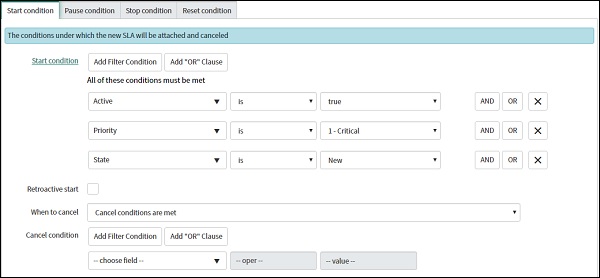
Now let's put the conditions, so that this SLA gets attached to every new critical incident. Scroll down to the next section and there, you can give the Start conditions, as given herewith,
Incident is active.
Incident is new.
Priority of incident is critical.
Further, for the Stop condition we choose to stop the SLA, once the incident is assigned and moved to in progress status.

Finally, click submit. Now, we will create one new critical incident and check if, this SLA gets attached to the incident.
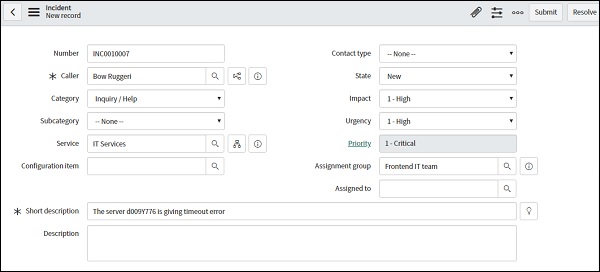
Open the incident again from the incident list and scroll down to the Tasks SLA section. You can see that, our new SLA is attached and showing the time left to breach the response SLA.
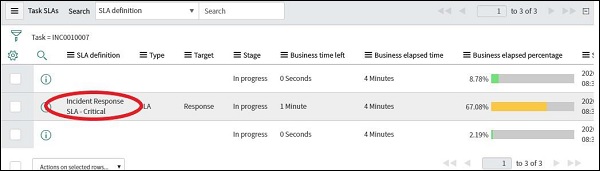
Similarly, Resolution SLA can also be created, post which, you can see two separate SLAs namely Response and Resolution, attached to the incidents in Task SLA section.
Workflows
The ServiceNow defines workflow as sequence of activities to automate processes in applications. It is basically a flowchart, which records all the activities to be triggered step by step, once the desired event has occurred. Let us try to understand this, with an example of BookWorm ltd.
We have to add a new workflow to every change request, that is assigned to the Frontend IT team, the workflow includes two activities −
If the Assignment group is selected as Frontend IT team in the change request, then, the value in the Service field should be automatically set to IT Services.
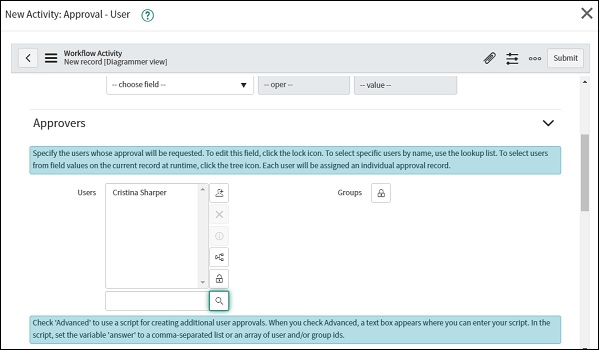
Each change request for the Frontend IT team required approval from its Manager Cristina Sharper.
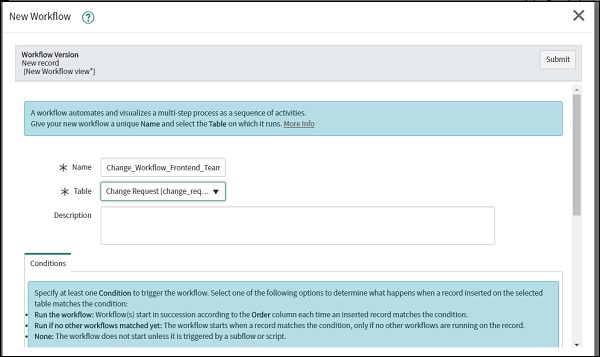
For Workflows we have a module called Workflow editor. Search in the navigation bar and click on the Workflow editor. Click on new to create a new Workflow. In this screen, we can also see the existing workflows and we can edit them as well. You can see the screen below −
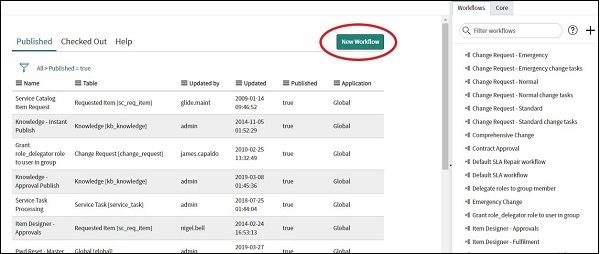
Give the name of the Workflow and table for which, we have to create the workflow. We can also give, the conditions for workflow at this point of time, but we can also give the conditions later.
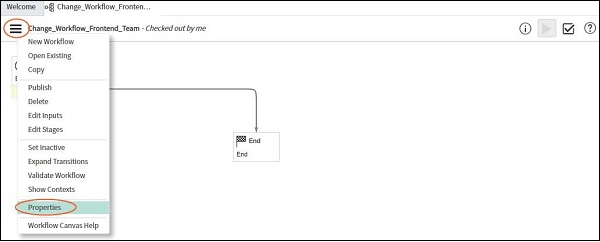
Now that, the workflow is created, let us add conditions and activities in this workflow. Click on the top left menu bar and go to properties.
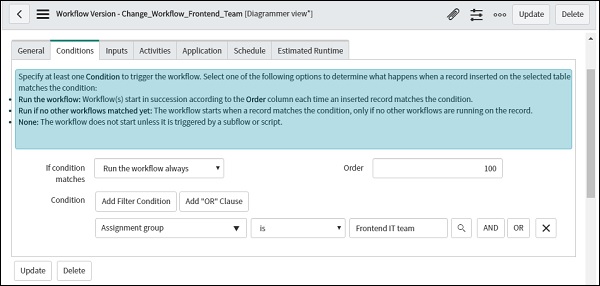
From the properties, go to Conditions tab to give the condition for the workflow to be triggered. Here, we will select If assignment group is Frontend IT team. We can add multiple conditions combined with AND/OR. Then, click on Update.
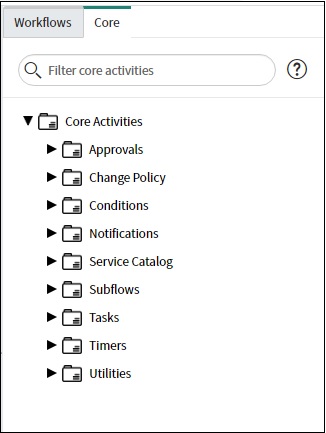
In the right frame, go to Core tab. Here, you will see a list of activities, which we can add in our workflow, like approval, conditions, tasks, etc. You can go ahead and try them. For this example, we will use Approval user under Approval main activity and Set values under Utilities main activity.
First, let's drag Set values in our workflow. Once you drag the Set values activity, a popup will open and we have to mention, the fields for which we need to set the value. We will select the Services field and set value as IT services.

Now, you will see our activity in the workflow but, it is not connected as of now by any arrow. So first, we have to delete the existing arrow between Begin and End activity and insert our Set values activity between Begin and End.
Select the existing arrow between Begin and End and click delete button from the keyboard. Then drag an arrow, from the yellow dot of Begin activity to the Set value activity. A new arrow will be generated.
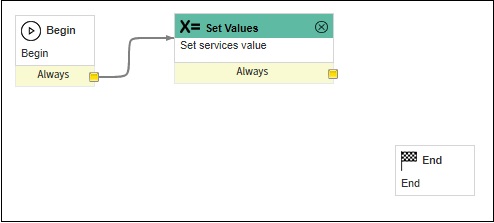
Now, we have to add another activity for the approval-user. Drag the approval-user activity and perform the same as above.
This is how our final workflow looks like −

Now, click on the top left menu bar and click on Publish to make our workflow live.
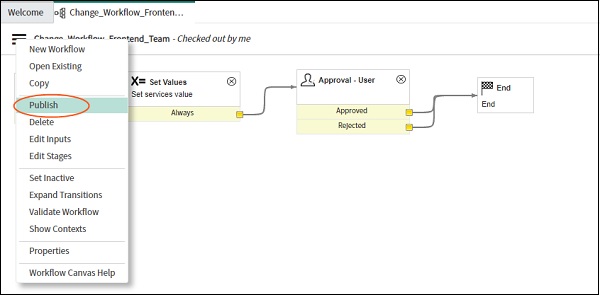
After publishing, our workflow will become active and when any change request will be assigned to the Frontend IT team, our new workflow will get triggered.
Notifications
Notifications are used to notify or send an alert to the user on the occurrence of certain events, like change in the priority of incident, change in the state of incident, etc. Notifications are generally sent via emails.
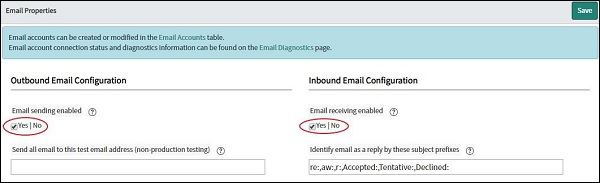
First of all, to start setting up the notification, check whether the email settings are configured in the ServiceNow. Go to Email properties module of System mailboxes and check on Email sending enabled box and Email receiving enabled box. Click Save.
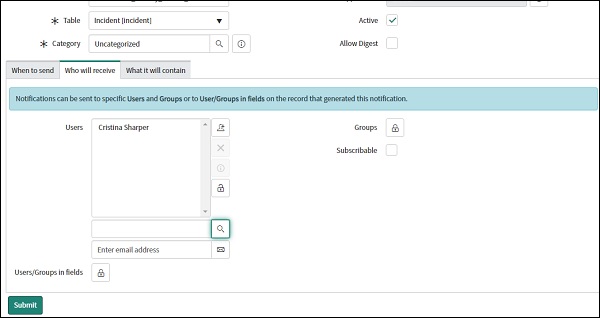
Now, lets create a notification that whenever, any Critical incident is assigned to the Frontend IT team group, an email will be sent to the manager of the team Cristina Sharper. Go to Notification module under System notification application.
Now, give the name of the notification, followed by the table for which this notification is created and then under the When to send tab set the conditions.

Now, go to Who will receive tab and set the users who will receive the email.
Finally, in the What it will contain tab, we can give the body/text of the email.
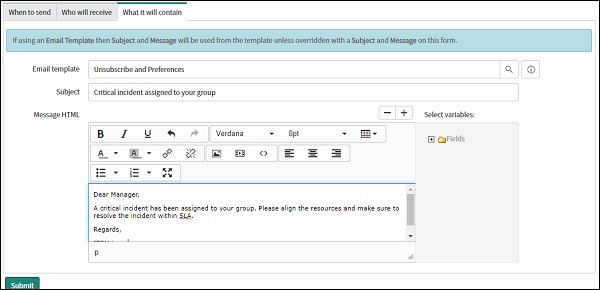
Now, once any critical incident is assigned to the Frontend IT team, its manager will receive an email notification regarding the same.
Reporting and Scheduled Jobs
Reporting is used to create a report based on the data available in the ServiceNow. The report can give information related to incident, user, change, problem, etc. We can generate the report in bar chart, pie chart, graphical format or as per the business requirement. The reports can also be generated automatically by the scheduled jobs based on the defined frequency.
Let us create a report for BookWorm ltd. wherein, the manager of the Frontend IT team will receive the weekly report (via scheduled job) having a number of Critical, High, Medium and Low priority incidents open and assigned to the Frontend IT team.
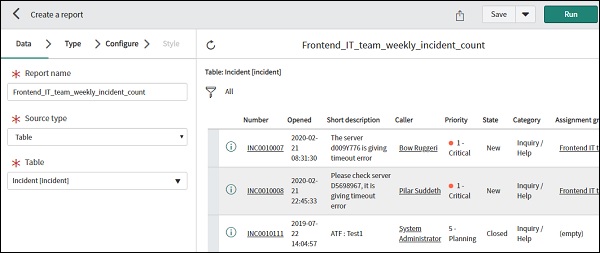
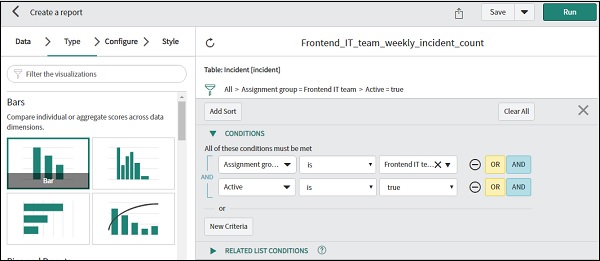
Let's start by creating the report. Navigate to Create new module under Report application. Give the report name. In the Source type, select table, as we have to extract data from the incident table. Finally, click Run. You will see entire data from the table.
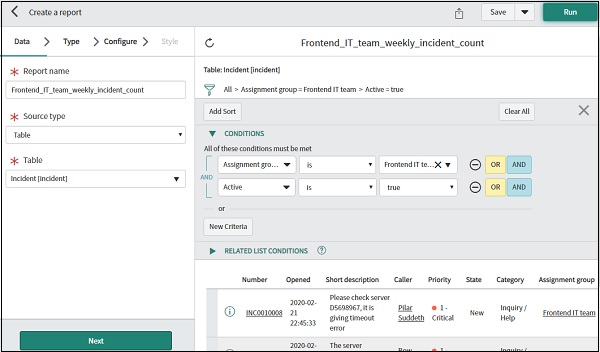
Now, we can add the filters to add the conditions so that only specific data, based on our requirements should be extracted.
Click next and select the type of report you need, like - bars, pie chart, time series, etc. We will use bars here. Select bar and click Next.
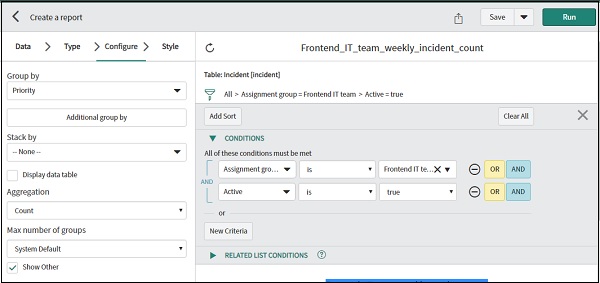
Click on next, you will now be able to configure the report. In the group by option, we will select priority and in the aggregation by, we will select count.
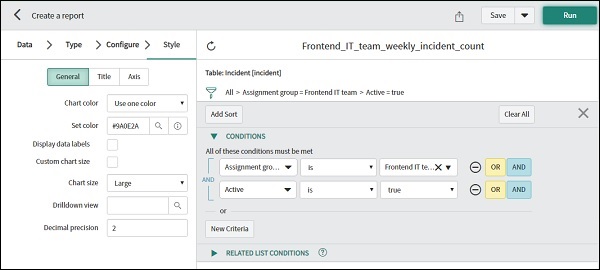
Click next and you will be asked to customise the style for your report. You can change the colour of bars, fonts of heading, location on heading, etc.
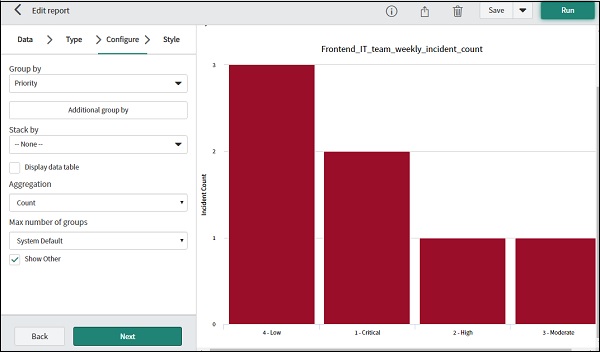
Finally, click on Save to save this report. You can Run your report by using, the button at the top right to see the result.
Next, we have to schedule this report weekly using the scheduled jobs. Go to scheduled jobs module under System definition application and click on New.
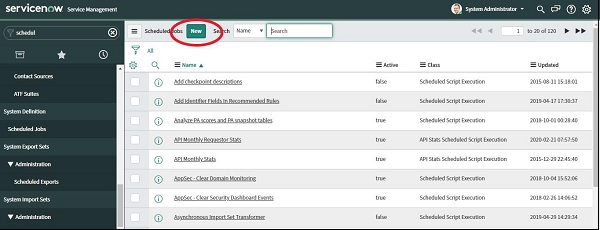
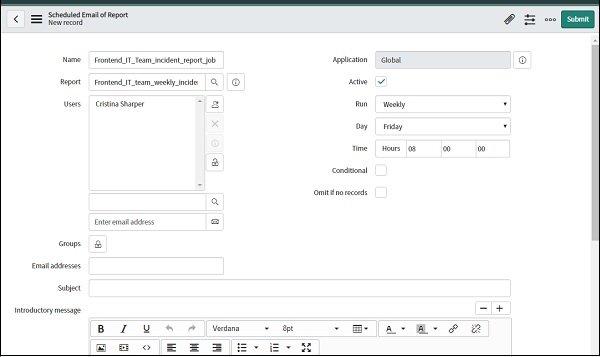
On the next screen, select Automate the generation and distribution of a report. Then give the name of the scheduled job, select the report which, we have just created and add the user receiving the report. Change the Run field to make it run weekly. We can also give the introductory message about the report. Finally, click on submit.
You can find this new report in the list of reports inside the scheduled jobs module.
Service Catalogs
Service catalogs provide self-service opportunities to the users. The users can select the desired services from the list (catalog) and submit the request. It has look and feel like online shopping, wherein, users can add the services (hardware, software or any other listed services) in the cart and finally order them.
We can also bundle the items under the package and order the package directly. For example, in BookWorm ltd., if a new member joins the Frontend IT team, he/she can simply order a package Frontend IT kit, which has software used within the team like Rational developer, Notepad ++, Winscp and Sql developer.
So, the user will be raising one request, which has four items in it (Rational developer, Notepad ++, Winscp and Sql developer). For each item, there may be different tasks like, there can be task for procurement team to get the new license of the software, then a task for the IT team to install the software in the machine or a task for additional approval for some software, etc.

Accordingly, there are three tables in ServiceNow service catalog for this −
The Requests table
The Items table
The tasks table
All these tables are co-related and you can find these tables in the Service catalog application → Open records module.
ServiceNow has provided some default categories and items. Go to Service catalog module of Self-service application. You can find the homepage of service catalog in content frame.
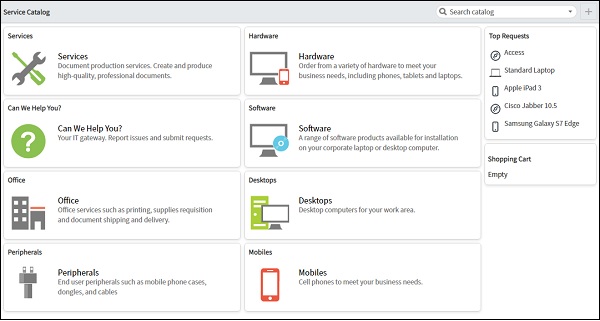
Let's place a sample request for Microsoft access and Cisco jabber. Go to Software and click on Microsoft access. You can add to the cart or directly order the item.
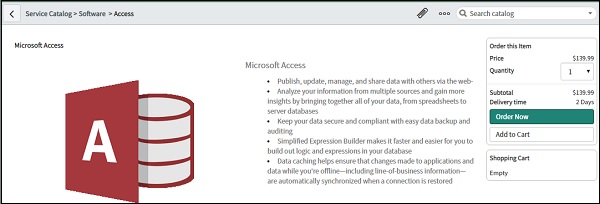
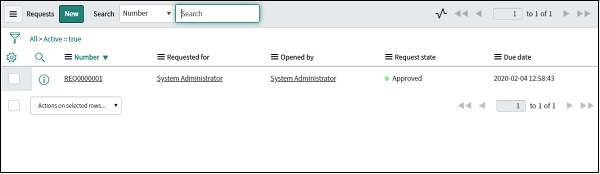
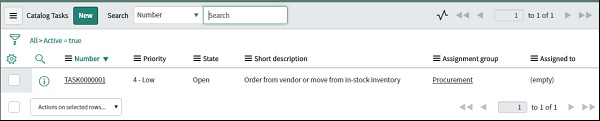
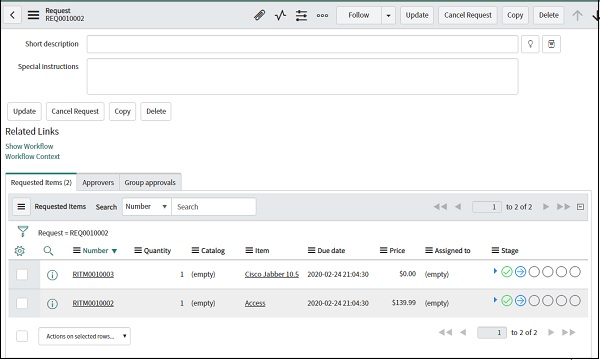
Here, we have to add Cisco jabber as well, so we will choose Add to cart and continue shopping. Follow similar steps to add Cisco jabber and finally, click on Proceed to check out. After submitting a request, you will see the following page and entries in the three tables.
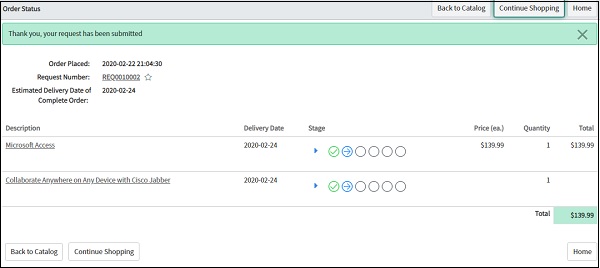
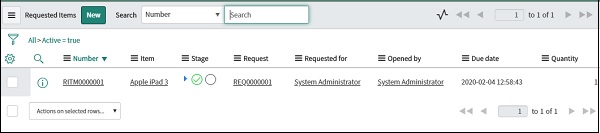
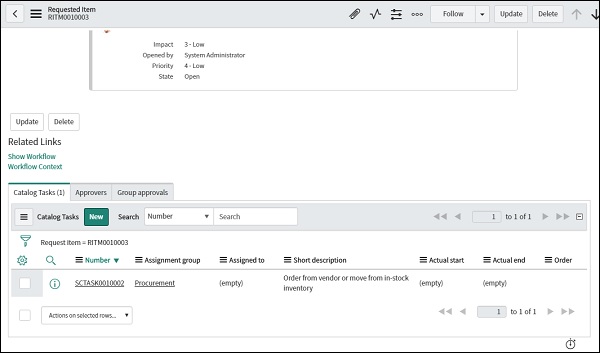
Open the request table and select your request. You will see the items attached to this request. Click on the items and you will see the tasks associated with the item.
You can also create your own service catalog and items in ServiceNow using Catalog definition application inside My catalogs, My categories and My items modules.
Diagnostics and Troubleshooting
The responsibility of system administrator is not limited to the setup and configuration of applications and modules. The system administrator is also responsible for the performance and response time of the system by referring to the logs, stats, memory utilization, CPU consumption, etc.
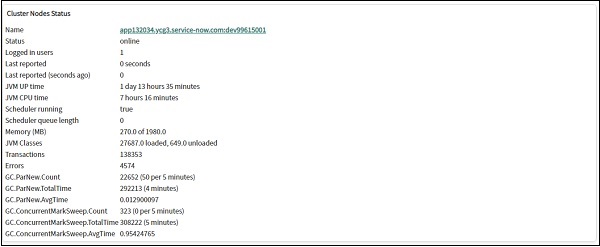
ServiceNow has provided an application called System diagnostics which is a collection of many useful modules for the system administrators. A module called Diagnostics page lists the entire configuration of server, database, stats, etc. The diagnostics page is divided in four main parts −
Cluster node status
System overview
Database overview
Database connections
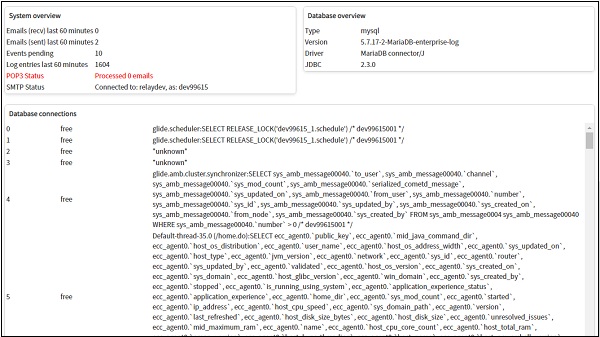
The cluster is a collection of nodes and node is a single system, which is responsible to store and process the data. In the cluster node status section, you will find the details of memory utilisation, number of transactions hit, logged in users, JVM uptime, etc. The system overview section lists the details related to events, POP3, SMTP, etc.
The database overview section gives the details related to the database version, driver, type, etc. and finally, the database connections give the logs of the queries executed in ServiceNow, connection details, etc.
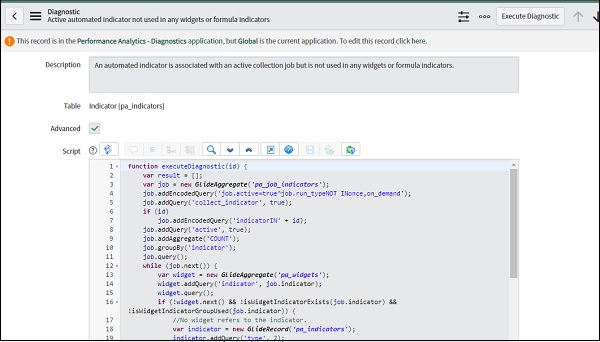
Another important application is Performance analytics. Its Diagnostics module under the troubleshooting lists down each and every error and exception received in ServiceNow.
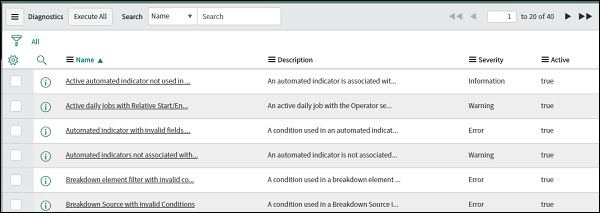
Click on any error to find the underlying script which caused the error.