- Python Pyramid - Home
- Python Pyramid - Overview
- Pyramid - Environment Setup
- Python Pyramid - Hello World
- Pyramid - Application Configuration
- Python Pyramid - Url Routing
- Python Pyramid - View Configuration
- Python Pyramid - Route Prefix
- Python Pyramid - Templates
- Pyramid - HTML Form Template
- Python Pyramid - Static Assets
- Python Pyramid - Request Object
- Python Pyramid - Response Object
- Python Pyramid - Sessions
- Python Pyramid - Events
- Python Pyramid - Message Flashing
- Pyramid - Using SQLAlchemy
- Python Pyramid - Cookiecutter
- Python Pyramid - Creating A Project
- Python Pyramid - Project Structure
- Python Pyramid - Package Structure
- Creating A Project Manually
- Command Line Pyramid
- Python Pyramid - Testing
- Python Pyramid - Logging
- Python Pyramid - Security
- Python Pyramid - Deployment
- Python Pyramid Useful Resources
- Python Pyramid - Quick Guide
- Python Pyramid - Useful Resources
- Python Pyramid - Discussion
Python Pyramid - Templates
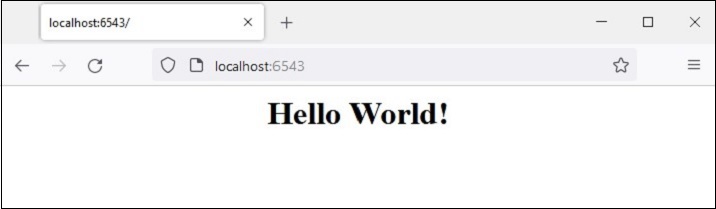
By default, the content-type of the response of a view function is in plain text. In order to render HTML, the text of the response body may include HTML tags, as in the following example −
Example
from wsgiref.simple_server import make_server
from pyramid.config import Configurator
from pyramid.response import Response

def hello_world(request):
   return Response('<h1 style="text-align:center;">Hello World!</h1>')

if __name__ == '__main__':
   with Configurator() as config:
      config.add_route('hello', '/')
      config.add_view(hello_world, route_name='hello')
      app = config.make_wsgi_app()
   server = make_server('0.0.0.0', 6543, app)
   server.serve_forever()
Output
After starting the server (by running the above code), visit to http://localhost:6543/, the browser renders following output −
However, this method of rendering HTML, especially if it is likely to contain certain variable data, is extremely cumbersome. For this purpose, web frameworks use templating libraries. A template library merges the variable data with the otherwise static HTML code to generate and render web pages dynamically.
Template Bindings
Pyramid provides templating support with the help of bindings to popular template libraries such as jinja2, Mako and Chameleon.
| Template Language | Pyramid Bindings | Default Extensions |
|---|---|---|
| Chameleon | pyramid_chameleon | .pt, .txt |
| Jinja2 | pyramid_jinja2 | .jinja2 |
| Mako | pyramid_mako | .mak, .mako |
First of all, we need to install the corresponding Python library for using the required template library. For example, to use jinja2 template, install pyramid_jinja2 using PIP installer.
pip3 install pyramid_jinja2
Then we need to include it in the application configuration.
config.include('pyramid_jinja2')
The pyramid.renderers module defines render_to_response() function. It is used with following parameters −
render_to_response(renderer_name, value, request)
The renderer_name is the template web page, usually saved in the templates subfolder of the application directory, the value parameter is a dictionary passed as a context to the template, and the request object obtained from WSGI environment.
Save the following HTML script as hello.jinja2 in the templates folder.
<html>
   <body>
      <h1>Hello, {{ name }}!</h1>
   </body>
</html>
Jinja2 Template Library
Here, 'name' is a jinja2 template variable. The jinja2 template language inserts variables and programming constructs in the HTML scripts using following syntax −
Expressions
{{ ... }} for Expressions to print to the template output.
{% ... %} for Statements.
{# ... #} for Comments not included in the template output.
Conditionals
{% if expr %}
{% else %}
{% endif %}
Loop
{% for var in iterable %}
{% endfor %}
In hello.jinja2 {{ name }}, the value of 'name' context variable is dynamically rendered in the view response.
Rendering Template
The hello_world() view function directly renders this template by calling render_to_response() function. It also sends a context value to the template.
from pyramid.renderers import render_to_response

def hello_world(request):
   return render_to_response('templates/hello.jinja2',{'name':'Tutorialspoint'},
request=request)
Example
As usual, this view is added to the hello route, pointing to / URL. The complete application code is as follows −
from wsgiref.simple_server import make_server
from pyramid.config import Configurator
from pyramid.response import Response
from pyramid.renderers import render_to_response

def hello_world(request):
   return render_to_response('templates/hello.jinja2', {'name':'Tutorialspoint'}, request=request)

if __name__ == '__main__':
   with Configurator() as config:
      config.add_route('hello', '/')
      config.include('pyramid_jinja2')
      config.add_view(hello_world, route_name='hello')
      app = config.make_wsgi_app()
   server = make_server('0.0.0.0', 6543, app)
   server.serve_forever()
Output
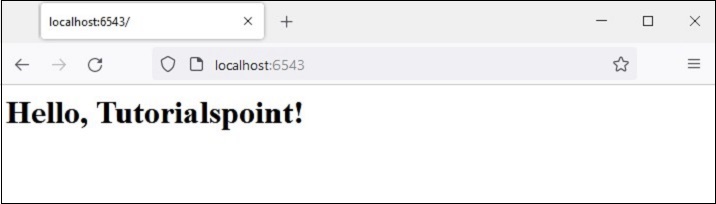
Run the server and visit http://localhost:6543/. The browser shows following result −
Every view must return a response object. The render_to_response() function is a shortcut function that actually returns a response object. This allows the hello_world view above to simply return the result of its call to render_to_response() directly.
On the other hand, pyramid.renderers.render() function renders a template to a string. We can manufacture a response object directly, and use that string as the body of the response.
Let us change the hello_world() view function as follows −
from pyramid.renderers import render

def hello_world(request):
   retval = render('templates/hello.jinja2',
   {'name':'Tutorialspoint'}, request=request)
   return Response(retval)
Remaining code being same, the browser also shows the same output as above.
Rendering via Configuration
As mentioned earlier, the content_type of HTTP response returned by Pyramid's view callable id text/plain. However, it can be altered to string, JSON or JSONP if the renderer parameter of the @view_config decorator is assigned with any of these values. Pyramid thus have following built-in renderers −
JSON
String
JSONP
Example
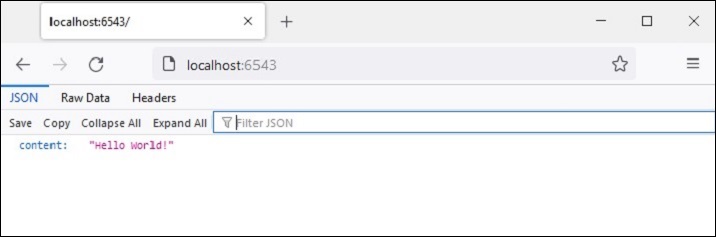
In the following example, the hello_world() view function is configured to render JSON response.
from pyramid.view import view_config

@view_config(route_name='hello',renderer='json')
def hello_world(request):
   return {'content':'Hello World!'}
Output
The setting of renderer type to JSON also sets the content_type header of the HTTP response to application/json. The browser displays the JSON response as in the following figure −
The renderer parameter of the @view_config() decorator can be set to a template web page (which must be present in the templates folder). The prerequisite conditions are that the appropriate Python binding of the template library must be installed, and the application configuration must include the binding.
We have already installed python_jinja2 package, so that we can use jinja2 template to be rendered by the hello_world() view function, decorated by @view_config() with renderer parameter.
The hello.jinja2 template HTML code is as follows −
<html>
   <body>
      <h1>Hello, {{ name }}!</h1>
   </body>
</html>
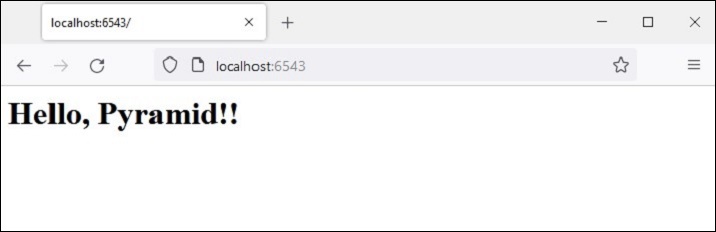
The decorated hello_world() function is written as −
from pyramid.view import view_config

@view_config(route_name='hello', renderer='templates/hello.jinja2')
def hello_world(request):
   return {'name':'Pyramid!'}
Example
In this case, the view function returns a dictionary object. It is made available to the template as the context data, that can be inserted in the HTML text with the help of template language syntax elements.
The complete code to render a jinja2 template is as follows −
from wsgiref.simple_server import make_server
from pyramid.config import Configurator
from pyramid.response import Response
from pyramid.view import view_config

@view_config(route_name='hello', renderer='templates/hello.jinja2')
def hello_world(request):
   return {'name':'Pyramid!'}

if __name__ == '__main__':
   with Configurator() as config:
      config.include('pyramid_jinja2')
      config.add_route('hello', '/')
      config.scan()
      app = config.make_wsgi_app()
   server = make_server('0.0.0.0', 6543, app)
   server.serve_forever()
Output
The template webpage with variable data supplied by the view function looks as below −
Add/Change Renderer
Templates are nothing but web pages interspersed with template language syntax. Even though Pyramid uses the default extension of a jinja2 template as ".jinja2", the established practice is to use the ".html" extension of web pages.
We can change the application configuration to let the .html extension be used in addition to ".jinja2". This is done by the add_jinja2_renderer.
config.add_jinja2_renderer(".html")
The hello.jinja2 template is now renamed as hello.html. To be able to use this template, let us change the view function definition to the following code −
from pyramid.view import view_config

@view_config(route_name='hello', renderer='templates/hello.html')
def hello_world(request):
   return {'name':'Pyramid!'}
Simultaneously, we modify the Configurator object's properties by adding the ".html" renderer.
if __name__ == '__main__':
   with Configurator() as config:
      config.include('pyramid_jinja2')
      config.add_jinja2_renderer(".html")
      config.add_route(hello, '/')
      config.scan()
      app = config.make_wsgi_app()
   server = make_server('0.0.0.0', 6543, app)
   server.serve_forever()
Template Context from matchdict
As explained earlier, if the URL pattern in the route configuration consists of one or more placeholder parameters, their values from the request URL are passed along with the request as a matchdict object, which in turn can be passed as context data to the template to be rendered.
For our next example, the hello.html - the jinja2 template remains the same.
<html>
   <body>
      <h1>Hello, {{ name }}!</h1>
   </body>
</html>
We know that the value for the context variable 'name' is passed by the view function. However, instead of passing a hardcoded value (as in the previous example), its value is fetched from the matchict object. This object is populated by the path parameters in the URL string.
from pyramid.view import view_config

@view_config(route_name='index', renderer='templates/hello.html')
def index(request):
   return {'name':request.matchdict['name']}
Example
The modified application code is given below −
from wsgiref.simple_server import make_server
from pyramid.config import Configurator
from pyramid.response import Response
from pyramid.view import view_config

@view_config(route_name='index', renderer='templates/hello.html')
def index(request):
   return {'name':request.matchdict['name']}
if __name__ == '__main__':
   with Configurator() as config:
      config.include('pyramid_jinja2')
      config.add_jinja2_renderer(".html")
      config.add_route('index', '/{name}')
      config.scan()
      app = config.make_wsgi_app()
   server = make_server('0.0.0.0', 6543, app)
   server.serve_forever()
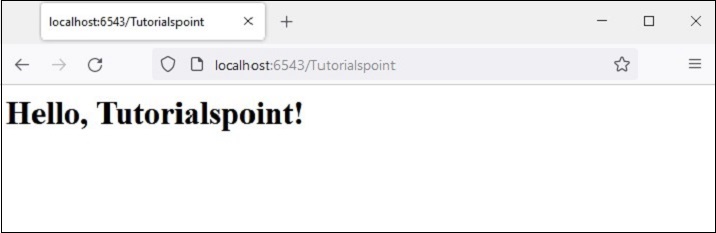
Output
Start the server, open the browser and enter the URL http://localhost:6543/Tutorialspoint. The tailing string becomes the value of 'name' key in the matchdict. It is utilized by the jinja2 template and following output is rendered.
Conditionals and Loops in Template
The jinja2 template language allows conditional statements and looping constructs to be included in the HTML script. The jinja2 syntax for these programming elements is as follows −
Conditionals
{% if expr %}
HTML
{% else %}
HTML
{% endif %}
Loop
{% for var in iterable %}
HTML
{% endfor %}
It can be seen that the jinja2 syntax is very much similar to Python's if and for statements. Except that, jinja2 doesn't use the indentations to mark the blocks. Instead, for each if there has to be an endif statement. Similarly, for each for statement, there has to be a endfor statement.
Example
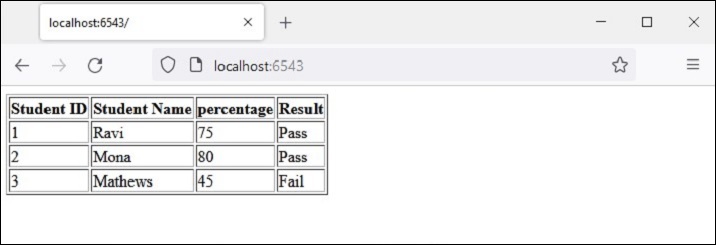
Following example demonstrates the use of template conditional and loop statements. First, the Pyramid code uses a students as a list of dictionary objects, each dictionary having id, name and percentage of a student. This list object is passed as a context to the marklist.html template
from wsgiref.simple_server import make_server
from pyramid.config import Configurator
from pyramid.response import Response
from pyramid.view import view_config

students = [
   {"id": 1, "name": "Ravi", "percent": 75},
   {"id": 2, "name": "Mona", "percent": 80},
   {"id": 3, "name": "Mathews", "percent": 45},
]

@view_config(route_name='index', renderer='templates/marklist.html')

def index(request):
   return {'students':students}
if __name__ == '__main__':
   with Configurator() as config:
      config.include('pyramid_jinja2')
      config.add_jinja2_renderer(".html")
      config.add_route('index', '/')
      config.scan()
   app = config.make_wsgi_app()
   server = make_server('0.0.0.0', 6543, app)
   server.serve_forever()
Save this program as marklist.py. Now, the following HTML script has to be save as marklist.html. It traverses the students list object received from the view function, and renders the student data in the form of a HTML table. The fourth column shows pass/fail result, using the jinja2 if statement syntax.
<html>
<body>
   <table border=1>
      <thead>
         <tr>
            <th>Student ID</th> <th>Student Name</th>
            <th>percentage</th>
            <th>Result</th>
         </tr>
      </thead>
      <tbody>
         {% for Student in students %}
            <tr>
               <td>{{ Student.id }}</td>
               <td>{{ Student.name }</td>
               <td>{{ Student.percent }}</td>
               <td>
                  {% if Student.percent>=50 %}
                  Pass
                  {% else %}
                  Fail
                  {% endif %}
               </td>
            </tr>
         {% endfor %}
      </tbody>
   </table>
</body>
</html>
Output
Run the marklist.py code. The http://localhost:6543/ link renders the following tabular result −