- Python Falcon - Home
- Python Falcon - Introduction
- Python Falcon - Environment Setup
- Python Falcon - WSGI vs ASGI
- Python Falcon - Hello World(WSGI)
- Python Falcon - Waitress
- Python Falcon - ASGI
- Python Falcon - Uvicorn
- Python Falcon - API Testing Tools
- Request & Response
- Python Falcon - Resource Class
- Python Falcon - App Class
- Python Falcon - Routing
- Falcon - Suffixed Responders
- Python Falcon - Inspect Module
- Python Falcon - Jinja2 Template
- Python Falcon - Cookies
- Python Falcon - Status Codes
- Python Falcon - Error Handling
- Python Falcon - Hooks
- Python Falcon - Middleware
- Python Falcon - CORS
- Python Falcon - Websocket
- Python Falcon - Sqlalchemy Models
- Python Falcon - Testing
- Python Falcon - Deployment
- Python Falcon Useful Resources
- Python Falcon - Quick Guide
- Python Falcon - Useful Resources
- Python Falcon - Discussion
Python Falcon - Quick Guide
Python Falcon - Introduction
Falcon is a Python library for developing mission-critical REST APIs and microservices. It supports both WSGI and ASGI specifications. Falcon framework has been developed by Kurt Griffiths in Jan. 2013. The latest version of Falcon is 3.1.0, released in March 2022.
Falcon is a lightweight web development framework. Its minimalist design allows the developer to select the best strategies and 3rd-party packages as required.
Falcon - Important Features
Falcon is released under the terms of the Apache 2.0 License.
Some of the important features of Falcon include −
Latest version of Falcon supports ASGI, WSGI, as well as WebSocket.
Falcon provides native support for asyncio.
Its stable interfaces ensure backwards-compatibility
Falcon follows REST architectural style for building APIs.
Class based construction of HTTP resources.
Highly-optimized, extensible code base.
Falcon provides easy access to headers and bodies through request and response classes
Middleware components and hooks available for DRY request processing.
Idiomatic HTTP error responses and exception handling.
Falcon - Design Philosophy
Falcon minimizes the instantiation of number of objects so as to avoid the expense of creating the object, and to reduce memory usage. The same instance will be used to serve all requests coming in on that route.
Exceptions are properly handled by the resource responders (methods such as on_get(), on_post(), etc.). Falcon doesn't try very hard to protect responder code from itself. A high-quality Falcon API should fulfil following requirements −
Resource responders set response variables to sane values.
Your code is well-tested, with high code coverage.
Custom error handlers are provided within each responder to anticipate, detect, and handle errors.
The Falcon framework is thread-safe. Separate new Request and Response objects are created for each incoming HTTP request. However, a single instance of each resource class attached to a route is shared among all requests. Middleware objects, hooks, and custom error handlers, are also shared. Therefore, your WSGI app as a whole will be thread-safe.
Starting with version 3.0, Falcon supports asyncio. Use the falcon.asgi.App class to create an async application, and serve it via an ASGI application server such as Uvicorn.
The async version of Falcon supports the ASGI WebSocket protocol.
Falcon - Comparison with Other Frameworks
There are two major categories of Python web frameworks − full-stack and micro frameworks.
Full-stack frameworks come with built-in features and libraries. Django, Turbogears, and Web2Py are full-stack frameworks.
In contrast, micro-frameworks are minimalistic, only providing the bare minimum; thus gives developers the freedom to choose official or third-party extensions and only include plugins which they need. Flask, Falcon, Pyramid belong to micro framework category.
We compare Falcon framework against different frameworks on the basis of the following parameters −
Performance
Falcon application is very fast, in comparison with micro frameworks such as Flask and pyramid. The full stack frameworks are generally slow.
REST Support
Falcon is intended to be a framework of choice for development of REST APIs and microservices. FastAPI also encourages REST development. Flask and Django don't have built-in REST support. However, it can be enabled using extensions.
Templating
Falcon app is not supposed to serve template web pages. It is not bundled with any templating library. However, one can use jinja2 or Macho libraries. On the other hand, Flask has a built-in support for jinja2. Django has its own templating library. FastAPI also can handle any template library of choice.
Database Support
In Falcon database support is not built-in. It is possible to use SQLAlchemy models to interact with relational databases like MyQL, PostgreSQL, SQLite etc. Django on the other hand has its own ORM framework for use out of the box.
A Flask application also can interact with databases through Flask extensions. Earlier versions of TurboGears had compatibility with SQLObject ORM library. The newer version is compatible with SQLAlchemy.
Flexibility
Falcon applications are very flexible. It is ideal for applications that require a high degree of customization and performance tuning. FastAPI and Flask too are flexible to code and doesn't restrict users to a particular project or code layout.
Security
Falcon has no built-in support to ensure security. Other frameworks like Django and FastAPI ensure high degree of security. Flask also provides excellent protection against security threats such as CSRF and XSS attacks.
Testing
Falcon offers built-in testing support using unittest and Pytest. Flask and Django also supports unittest. FastAPI supports unittest and starlette testing features.
Python Falcon - Environment Setup
The latest version of Falcon requires Python 3.5 or newer version. The easiest as well as recommended way to install Falcon is with PIP installer, preferably in a virtual environment.
The latest stable version can be installed by running the following command −
pip3 install falcon
To verify if the installation has been performed successfully, import the library and check its version.
>>> import falcon
>>>falcon.__version__
'3.1.0'
To install the latest beta version, following command should be used −
pip3 install --pre falcon
Right from the early version, Falcon supports WSGI. A Falcon app can be run with the help of built-in WSGI server in Python's standard library module wsgiref. However, it is not suitable for production environment, for which WSGI servers such as gunicorn, waitress or uwsgi are required.
For Falcon on Windows, one can use Waitress, a production-quality, pure-Python WSGI server. As usual, install it with pip installer.
pip3 install waitress
The Gunicorn server can't be installed on Windows. However, it can be used inside a Windows Subsystem Linux (WSL) environment on Windows 10. For using gunicorn on Linux, WSL or inside Docker containers, use
pip3 install gunicorn
If you want to run an asynchronous Falcon app, an ASGI compliant application server is required. The Uvicorn server can be used on Windows as well as Linux systems.
pip3 install uvicorn
Python Falcon - WSGI vs ASGI
Web Server Gateway Interface(WSGI)
Some of the most popular Python web frameworks implement WSGI (stands for Web Server Gateway Interface). WSGI is essentially a set of specifications for a universal interface between web server and web applications, to be implemented by web server software for handling requests from Python-based web application. WSGI specifications were first introduced in 2003 (PEP 333) and later updated in 2010 (PEP 3333).
A WSGI Application object is invoked by the server by passing the following arguments −
environ − A Python dict object which is similar to CGI environment variables and certain WSGI specific variables.
start_response − A callback function to be used by the application to return its response along with headers and status code.
This object can be any callable object as in Python such as a function, method, a class or its instance with __call__() method available to it. This application object must return an iterator consisting of a single byte string.
def application (environ, start_response):
   ...
   ...
   return [("Hello World!".encode("utf-8")]
However, WSGI-enabled servers are synchronous in operation, because of which the applications are not that efficient. Python started asynchronous programming support with version 3.4 by introducing the asyncio module as a part of the standard library.
The asyncio module provides the ability to incorporate in Python applications a style of concurrent programming (which is often called cooperative multitasking). In this approach, the operating system doesnt obstruct the context switching among different processes. Instead, a process yields periodically to accommodate other processes so that many applications can run simultaneously.
In Pythons version 3.5, these two keywords async and await were added. A Python function defined with the async keyword becomes a coroutine and hence cant be run like a normal function. Instead, we need to call it using asyncio.run (coroutine). The execution of a coroutine can be made to pause till the completion of another coroutine by the await keyword.
import asyncio
async def main():
   print('hello')
   await asyncio.sleep(5)
   print('world')

asyncio.run(main())
Asynchronous Server Gateway Interface(ASGI)
ASGI stands for Asynchronous Server Gateway Interface (as per its official documentation, it is a spiritual successor to WSGI), it adds the async capabilities to Python web servers, applications and frameworks.
An ASGI application is an asynchronous callable object (a user-defined function or an object of a class having __call__() method). It takes three arguments as follows −
Scope − A dict containing details of a specific connection
Send − An asynchronous callable, by which event messages can be sent to the client
Receive − Another asynchronous callable. The application can receive event messages from the client.
Following is the prototype of a simple ASGI application represented by an asynchronous function −
async def app(scope, receive, send):
   assert scope['type'] == 'http'
   await send({
   'type': 'http.response.start',
   'status': 200,
   'headers': [
      [b'content-type', b'text/plain'],
   ],
})
await send({
   'type': 'http.response.body',
   'body': b'Hello, world!',
})
Python Falcon - Hello World(WSGI)
To create a simple Hello World Falcon app, start with importing the library and declaring an instance of App object.
import falcon
app = falcon.App()
Falcon follows REST architectural style. Declare a resource class that includes one or more methods representing the standard HTTP verbs. The following HelloResource class contains on_get() method that is expected to get called when the server receives GET request. The method returns Hello World response.
class HelloResource:
   def on_get(self, req, resp):
   """Handles GET requests"""
   resp.status = falcon.HTTP_200
   resp.content_type = falcon.MEDIA_TEXT
   resp.text = (
      'Hello World'
   )
To invoke this method, we need to register it to a route or URL. The Falcon application object handles the incoming requests by assigning the handler methods to corresponding URLs by add_rule method.
hello = HelloResource()
app.add_route('/hello', hello)
The Falcon application object is nothing but a WSGI application. We can use the built-in WSGI server in the wsgiref module of Python's standard library.
from wsgiref.simple_server import make_server

if __name__ == '__main__':
   with make_server('', 8000, app) as httpd:
   print('Serving on port 8000...')
# Serve until process is killed
httpd.serve_forever()
Example
Let us put all these code fragments in hellofalcon.py
from wsgiref.simple_server import make_server

import falcon

app = falcon.App()

class HelloResource:
   def on_get(self, req, resp):
      """Handles GET requests"""
      resp.status = falcon.HTTP_200
      resp.content_type = falcon.MEDIA_TEXT
      resp.text = (
         'Hello World'
      )
hello = HelloResource()

app.add_route('/hello', hello)

if __name__ == '__main__':
   with make_server('', 8000, app) as httpd:
   print('Serving on port 8000...')
# Serve until process is killed
httpd.serve_forever()
Run this code from the command prompt.
(falconenv) E:\falconenv>python hellofalcon.py
Serving on port 8000...
Output
In another terminal, run the Curl command as follows −
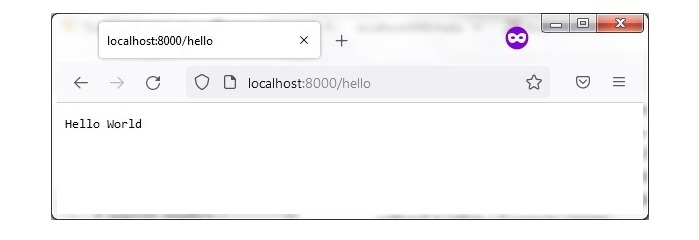
C:\Users\user>curl localhost:8000/hello
Hello World
You can also open a browser window and enter the above URL to obtain the "Hello World" response.
Python Falcon - Waitress
The development server is not recommended to be used in production environment. The development server is not efficient, stable, or secure.
Waitress is a production-quality pure-Python WSGI server with very acceptable performance. It has no dependencies except ones that live in the Python standard library. It runs on CPython on Unix and Windows.
Make sure that Waitress server has been installed in the working environment. The library contains serve class whose object is responsible for serving the incoming requests. The constructor of serve class requires three parameters.
serve (app, host, port)
The falcon application object is the app parameter. The default values of host and port are localhost 8080 by default. The listen parameter is a string as a combination of host:port parameter defaulting to '0.0.0.0:8080'
Example
In the hellofalcon.py code, we import the serve class instead of simple_server and instantiate its object as follows −
from waitress import serve
import falcon
class HelloResource:
   def on_get(self, req, resp):
   """Handles GET requests"""
   resp.status = falcon.HTTP_200
   resp.content_type = falcon.MEDIA_TEXT
   resp.text = (
      'Hello World'
   )
app = falcon.App()
hello = HelloResource()
app.add_route('/hello', hello)
if __name__ == '__main__':
   serve(app, host='0.0.0.0', port=8000)
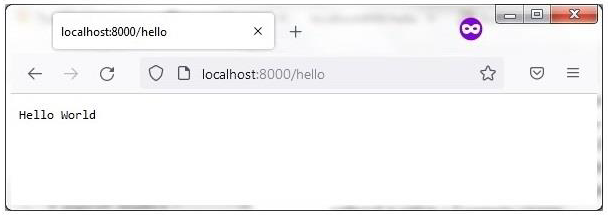
Execute hellofalcon.py and visit the http://localhost:8000/hellolink in the browser as before. Note that the host 0.0.0.0 makes the localhost publicly visible.
The Waitress server can be launched from the command line also, as shown below −
waitress-serve --port=8000 hellofalcon:app
Python Falcon - ASGI
ASGI stands for Asynchronous Server Gateway Interface (as per its official documentation, it is a spiritual successor to WSGI), it adds the async capabilities to Python web servers, applications and frameworks.
For running an async web application, we'll need an ASGI application server. Popular choices include −
- Uvicorn
- Daphne
- Hypercorn
We shall use Uvicorn server for async examples in this tutorial.
Hello World - ASGI
The ASGI related functionality of Falcon is available in the falcon.asgi module. Hence, we need to import it in the beginning.
import falcon
import falcon.asgi
While the resource class remains the same as in the previous example, the on_get() method must be declared with async keyword. we have to obtain the instance of Falson's ASGI app.
app = falcon.asgi.App()
Example
Hence, the hellofalcon.py for ASGI will be as follows −
import falcon
import falcon.asgi
class HelloResource:
   async def on_get(self, req, resp):
      """Handles GET requests"""
      resp.status = falcon.HTTP_200
      resp.content_type = falcon.MEDIA_TEXT
      resp.text = (
         'Hello World'
      )
app = falcon.asgi.App()
hello = HelloResource()
app.add_route('/hello', hello)
To run the application, start the Uvicorn server from the command line as follows −
uvicorn hellofalcon:app reload
Output
Open the browser and visit http://localhost:/8000/hello. You will see the response in the browser window.
Python Falcon - Uvicorn
Uvicorn uses uvloop and httptools libraries. It also provides support for HTTP/2 and WebSockets, which cannot be handled by WSGI. uvloop is similar to the built-in asyncio event loop. httptools library handles the http protocols.
Falcon's ASGI compliant application is launched on Uvicorn server with following command −
Uvicorn hellofalcon:app reload
The --reload option enables the debug mode, so that any changes in app.py will be automatically reflected and the display on the client browser will be automatically refreshed. In addition, the following command-line options may be used −
| --host TEXT | Bind socket to this host. [default 127.0.0.1] |
| --port INTEGER | Bind socket to this port. [default 8000] |
| --uds TEXT | Bind to a UNIX domain socket. |
| --fd INTEGER | Bind to socket from this file descriptor. |
| --reload | Enable auto-reload. |
| --reload-dir PATH | Set reload directories explicitly, default current working directory. |
| --reload-include TEXT | Include files while watching. Includes '*.py' by default |
| --reload-exclude TEXT | Exclude while watching for files. |
| --reload-delay FLOAT | Delay between previous and next check default 0.25 |
| --loop [auto|asyncio|uvloop] | Event loop implementation. [default auto] |
| --http [auto|h11|httptools] | HTTP protocol implementation. [default auto] |
| --interface auto|asgi|wsgi | Select application interface. [default auto] |
| --env-file PATH | Environment configuration file. |
| --log-config PATH | Logging configuration file. Supported formats .ini, .json, .yaml. |
| --version | Display the Uvicorn version and exit. |
| --app-dir TEXT | Look for APP in the specified directory default current directory |
| --help | Show this message and exit. |
The Uvicorn server can also be launched from within the program instead of the above command line. To do that, import uvicorn module and call uvicorn.run() method as shown below −
import uvicorn
if __name__ == "__main__":
   uvicorn.run("hellofalcon:app", host="0.0.0.0", port=8000, reload=True)
Change the hellofalcon.py code accordingly, and execute the same from command prompt. The result can be verified by the curl command or in the browser as explained earlier.
Python Falcon - API Testing Tools
Falcon is a minimalistic framework suitable for developing APIs. An API is an interface between two applications. The API developer needs to test its functionality, reliability, stability, scalability, and performance etc. before releasing it for use in production environment.
Various API testing tools are available for this purpose. In this section, we shall learn how to use command line tools Curl and HTTPie, and a GUI tool called Postman.
cURL
cURL is an open source project that provides libcurl library and a command line tool called curl that enables transferring data using various protocols. More than 20 protocols including HTTP are supported. The acronym cURL stands for Client URL. The syntax for using Curl from command line is −
curl [options] [URL1, URL2,..]
The URL parameter consists of protocol dependent, one or more URL strings. The Curl command can be customized with various options. Some of the important command line options are as follows −
X: Mention the request method. By default, Curl assumes GET to be the request method. To send POST, PUT or DELTETE requests, this option must be used. For example −
Curl X DELETE http://localhost:8000/student/1
H: This option is used to add headers in the request. For example −
Curl H "Content-Type: application/json" -X GET
http://localhost:8000/students
i: When this option is included in the command line, all the response headers are displayed. For example −
Curl I X DELETE http://localhost:8000/student/2
d: To include data in the HTTP request for processing, we have to use this option, particularly when POST or PUT request is needed.
Curl H "Content-Type: application/json" -X PUT -d
"{"""marks""":"""50"""}" http://localhost:8000/students/3
HTTPie
The HTTPie is a command line tool written in Python. It is said to be a "cURLlike tool for humans". It supports forms and file uploads and generates nicely formatted colorized terminal output. Its expressive and intuitive syntax makes it easier to use as compared to Curl.
Examples
GET request − http GET localhost:8000/students
POST request − http POST localhost:8000/students id=4 name="aaa" percent=50
PUT request − http PUT localhost:8000/students/2 id=3 name="Mathews" percent=55
DEETE request − http DELETE localhost:8000/students/2
Postman
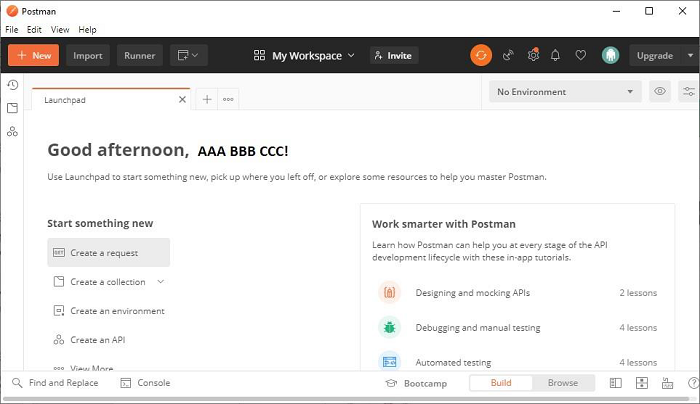
Postman is a very popular API testing tool. It is a GUI app as against Curl and HTTPie. It is available in the form of a browser plugin as well as a desktop application. As the browser plugin doesn't accept requests for localhost based APIs, we need to download the desktop version from https://www.postman.com/downloads.
After completing the wizard based installation, start the Postman app and create a new request.
The dropdown shows various HTTP request types to choose from.
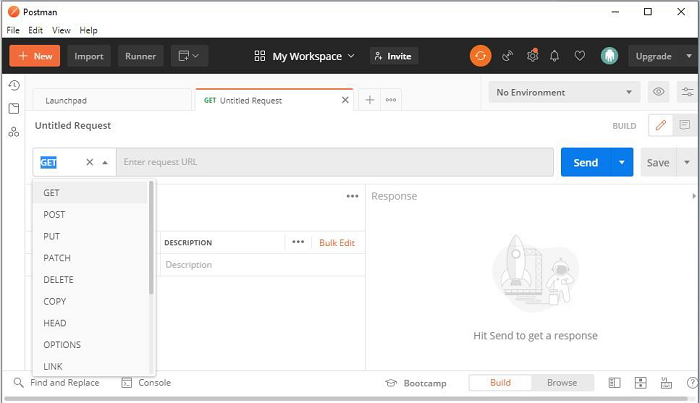
Enter http://localhost:8000/hello in the request URL field. The response pane on the right shows the result.

We shall use the corresponding request types later when we test the Falcon API for CRUD operations on a SQLite database.
Python Falcon - Request & Response
The HTTP protocol states that the client sends a HTTP request to the server where certain business logic is applied and a response is formulated, which is redirected towards the client. In case of synchronous transfer between the two, Python frameworks use WSGI standard, while asynchronous transfer follows ASGI standard. Falcon supports both.
The WSGI/ASGI server provides Request and Response objects in the context data. These objects are used by the responders, hooks, middleware etc. as the parameters. For WSGI apps, the instance of falcon.Request class is processed. In ASGI apps, it represents falcon.asgi.Request class. though different, both the classes are designed to have similar properties and methods so as to minimize the confusion and allow easier portability.
Request
The Request object represents the HTTP request. Since it is provided by the server, this object is not meant to be instantiated directly by the responder methods. This object provides the following properties and methods to be used inside the responder, hooks and middleware methods −
method − HTTP method requested (e.g., 'GET', 'POST', etc.)
host − Host request header field
port − Port used for the request. Default one for the given schema is returned (80 for HTTP and 443 for HTTPS)
uri − The fully-qualified URI for the request.
path − Path portion of the request URI (not including query string).
query_string − Query string portion of the request URI, without the preceding '?' character.
cookies − A dict of name/value cookie pairs.
content_type − Value of the Content-Type header, or None if the header is missing.
stream − File-like input object for reading the body of the request, if any. This object provides direct access to the server's data stream and is non-seekable.
bounded_stream − file-like wrapper around stream
headers − Raw HTTP headers from the request
params − The mapping of request query parameter names to their values.
get_cookie_values(name) − Return all values provided in the Cookie header for the named cookie. Alias for the cookies property.
get_media() − Return a deserialized form of the request stream. Similar to media property.
get_param(name) − Return the raw value of a query string parameter as a string. If an HTML form with application/x-wwwform-urlencoded media type is POSTed, Falcon can automatically parse the parameters from the request body and merge them into the query string parameters. To enable this functionality, set auto_parse_form_urlencoded to True via App.req_options.
Response
The Response object represents the server's HTTP response to the client. Like the Request object, the Response object too is not meant to be directly instantiated by the responder.
The responder, hook function or middleware method manipulates this object by accessing following properties and methods −
status − HTTP status code e.g., '200 OK'. This may be set to a member of http.HTTPStatus, an HTTP status line string or byte string, or an int. Falcon provides a number of constants for common status codes, starting with the HTTP_ prefix, as in − falcon.HTTP_204.
media − A serializable object supported by the media handlers configured via falcon.RequestOptions.
text − A string representing response content.
body − Deprecated alias for text.
data − A Byte string representing response content.
stream − A file-like object representing response content.
content_length − Set the Content-Length header. It sets the content length manually when either text or data property are not set.
content_type − Sets the Content-Type header. Falcon's predefined constants for common media types include falcon.MEDIA_JSON, falcon.MEDIA_MSGPACK, falcon.MEDIA_YAML, falcon.MEDIA_XML, falcon.MEDIA_HTML, falcon.MEDIA_JS, falcon.MEDIA_TEXT, falcon.MEDIA_JPEG, falcon.MEDIA_PNG, and falcon.MEDIA_GIF.
append_header (name, value) − Set or append a header for this response. Used to set cookies.
delete_header (name) − Delete a header that was previously set for this response.
get_header (name) − Retrieve the raw string value for the given header.
set_cookie (name, value) − Set a response cookie. This method can be called multiple times to add one or more cookies to the response.
set_header (name, value) − Set a header for this response to a given value.
set_stream (stream, content_length) − Set both stream and content_length.
unset_cookie (name, domain=None, path=None) − Unset a cookie in the response. This method clears the contents of the cookie, and instructs the user agent to immediately expire its own copy of the cookie.
Python Falcon - Resource Class
Falcon's design borrows several key concepts from the REST architectural style. REST stands for Relational State Transfer. REST defines how the architecture of web applications should behave.
REST is a resource-based architecture. Here, everything that the REST server hosts, be it a file, an image or row in a table of a database, is treated as a resource, which may have many representations. The REST API provides a controlled access to these resources so that the client can retrieve and modify them.
A resource with the server should have only one uniform resource identifier (URI). It only identifies the resource; it does not specify what action to take on that resource. Instead, users choose from a set of standard methods. HTTP verb or method to be used for the operation on the resources. The POST, GET, PUT and DELETE methods perform CREATE, READ, UPDATE and DELETE operations respectively.
Falcon uses normal Python classes to represent resources. Such a class acts as a controller in your application. It converts an incoming request into one or more internal actions, and then compose a response back to the client based on the results of those actions.
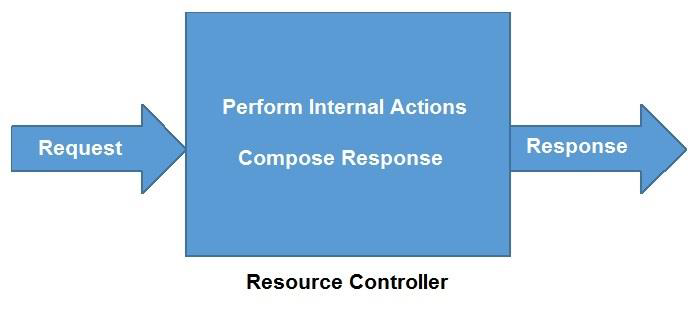
Each resource class defines various "responder" methods, one for each HTTP method the resource allows. Responder names start with "on_" and are named according to which HTTP method they handle, as in on_get(), on_post(), on_put(), etc.
In the hellofalcon.py example code used above, HelloResource (the resource class) has an on_get() responder method. Responders must always define at least two arguments to receive Request and Response objects.
import falcon
class HelloResource:
   def on_get(self, req, resp):
      """Handles GET requests"""
      resp.status = falcon.HTTP_200
      resp.content_type = falcon.MEDIA_TEXT
      resp.text = (
         'Hello World'
      )
For ASGI apps, the responder must be a coroutine function, i.e. must be defined with async keyword.
class HelloResource:
   async def on_get(self, req, resp):
      """Handles GET requests"""
      resp.status = falcon.HTTP_200
      resp.content_type = falcon.MEDIA_TEXT
      resp.text = (
         'Hello World'
      )
The Request object represents the incoming HTTP request. Request headers, query string parameters, and other metadata associated with the request can be accessed through this object.
The Response object represents the application's HTTP response to the request. Properties and methods of this object set status, header and body data. It also exposes a dict-like context property for passing arbitrary data to hooks and other middleware methods.
Note that HelloResource in the above example is just a normal Python class. It can have any name; however, the convention is to name it as xxxResource.
Python Falcon - App Class
This class is the main entry point into a Falcon-based WSGI app. An instance of this class provides a callable WSGI interface and a routing engine.
import falcon
app = falcon.App()
The __init__() constructor of this class takes the following keyword arguments −
media_type − media type to use when initializing RequestOptions and ResponseOptions. Falcon allows for easy and customizable internet media type handling. By default, Falcon only enables handlers for JSON and HTML (URL-encoded and multipart) forms.
falcon.MEDIA_JSON
falcon.MEDIA_MSGPACK
falcon.MEDIA_MULTIPART
falcon.MEDIA_URLENCODED
falcon.MEDIA_YAML
falcon.MEDIA_XML
falcon.MEDIA_HTML
falcon.MEDIA_JS
falcon.MEDIA_TEXT
falcon.MEDIA_JPEG
falcon.MEDIA_PNG
falcon.MEDIA_GIF
request_type − Default value of this argument is falcon.Request class.
response_type − Default value of this argument is falcon.Response class.
Other media types supported by Falcon are represented by the following constants −
In order to make the App object callable, its class has a __call__() method.
__call__(self, env, start_response)
This is a WSGI app method. The WSGI development server or other production servers (Waitress/Uvicorn) use this object to launch the server instance and listen to the requests from the client.
The App class also defines the add_route() method.
add_route(self, uri_template, resource)
This method helps in associating a URI path with an object of resource class. Incoming requests are routed to resources based on a set of URI templates. If the path matches the template for a given route, the request is then passed on to the associated resource for processing. Depending on the request method, the respective responder methods are called.
Example
Let us add on_post() responder method to HelloResource class and test the endpoints for GET as well as POST requests.
from waitress import serve
import falcon
import json
class HelloResource:
   def on_get(self, req, resp):
      resp.status = falcon.HTTP_200
      resp.content_type = falcon.MEDIA_TEXT
      resp.text = (
         'Hello World'
      )
   def on_post(self, req, resp):
      data=req.media
      nm=data['name']
      resp.status = falcon.HTTP_200
      resp.content_type = falcon.MEDIA_TEXT
      resp.text = (
         'Hello '+nm
      )
app = falcon.App()
hello = HelloResource()
app.add_route('/hello', hello)
if __name__ == '__main__':
   serve(app, host='0.0.0.0', port=8000)
Output
Run the application using Waitress server and check the responses using Curl. For response to GET request, using following command −
C:\Users\User>curl localhost:8000/hello
Hello World
We send some data to the /hello URL by POST method as follows −
C:\Users\User>curl -i -H "Content-Type:application/json" -X
POST -d "{"""name""":"""John"""}" http://localhost:8000/hello
HTTP/1.1 200 OK
Content-Length: 10
Content-Type: text/plain; charset=utf-8
Date: Sun, 17 Apr 2022 07:06:20 GMT
Server: waitress
Hello John
To add a route to a directory of static files, Falcon has add_static_route() method.
add_static_route(self, prefix, directory, downloadable=False,
fallback_filename=None)
The prefix argument is the path prefix to match for this route. The directory argument is the source directory from which to serve files. The downloadable argument is set to True if you want to include a ContentDisposition header in the response. The fallback_filename is by default None but can be specified when the requested file is not found.
The add_error_handler() method is used to register a handler for one or more exception types.
add_error_handler(self, exception, handler=None)
The ASGI callable App class possesses the same methods. It is defined in falcon.asgi module.
import falcon.asgi
app=falcon.asgi.App()
Note that the responders of the resource class in an ASGI application must be coroutines (defined with async keyword) instead of normal methods.
class HelloResource:
   async def on_get(self, req, resp):
      """Handles GET requests"""
      resp.status = falcon.HTTP_200
      resp.content_type = falcon.MEDIA_TEXT
      resp.text = (
         'Hello World'
      )
Python Falcon - Routing
Falcon adopts RESTful architectural style. Hence it uses resource based routing. A resource class is responsible for handling the HTTP methods by the responders, which are essentially class methods with a name that starts with on_ and ends in the lowercased HTTP method name (e.g., on_get(), on_patch(), on_delete(), etc.). The add_route() method of the Falcon Application object associates its router with an instance of resource class.
In the Hellofalcon.py example used above, the on_get() and on_post() responders are invoked when the /hello route is requested by the client by GET and POST method respectively.
If no route matches the request, an instance of HTTPRouteNotFound is raised. On the other hand, if a route is matched but the resource does not implement a responder for the requested HTTP method, a default responder raises an instance of HTTPMethodNotAllowed.
Field Converters
Falcon's routing mechanism allows URLs to pass parameters to the responders. The URL comprises of three parts: The protocol (such as http:// or https://) followed by the IP address or hostname. The remaining part of the URL after first / after the hostname is called as the path or endpoint. Parameters to be passed are after the endpoint.
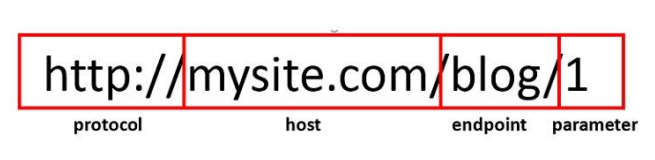
This acts as a resource identifier such as a unique ID or primary key. The parameter names are enclosed in curly brackets. Value of a path parameter goes to the argument defined in the responder method in addition to request and response.
In the following example, the router associates the resource class object with a URL consisting of a parameter after the endpoint.
from waitress import serve
import falcon
import json
class HelloResource:
   def on_get(self, req, resp, nm):
      """Handles GET requests"""
      resp.status = falcon.HTTP_200
      resp.content_type = falcon.MEDIA_TEXT
      resp.text = (
         'Hello '+nm
      )
app = falcon.App()
hello = HelloResource()
app.add_route('/hello/{nm}', hello)
if __name__ == '__main__':
   serve(app, host='0.0.0.0', port=8000)
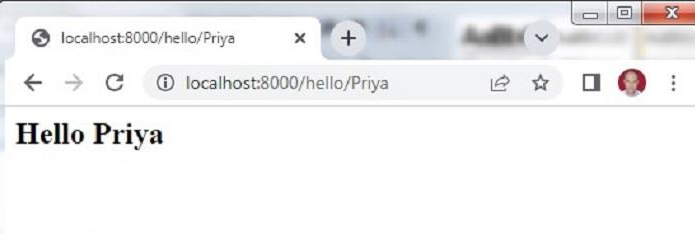
We can see that the on_get() responder method has an additional parameter nm to accept the data parsed from the URL route. Let us test http://localhost:8000/hello/Priya with HTTPie tool.
>http GET localhost:8000/hello/Priya
HTTP/1.1 200 OK
Content-Length: 11
Content-Type: text/plain; charset=utf-8
Date: Mon, 18 Apr 2022 12:27:35 GMT
Server: waitress
Hello Priya
The default data type to which the path parameters are parsed to is str (i.e. string). However, Falcon's router engine has the following built-in field converters using which they can be read into other data types as well.
IntConverter − This class is defined in falcon.routing module. The constructor uses the following arguments −
IntConverter(num_digits=None, min=None, max=None)
num_digits − The value must have given number of digits.
min − minimum required value of the parameter
max − maximum allowed value of the parameter.
Where,
For example, the following add_route() function accepts an integer between 1 to 100 as rollno.
app.add_route('/student/{rollno:int(1,1,100}', StudentResource())
UUIDConverter − This class in the falcon.routing module gives converts a string of 32 hexadecimal digits into a UUID (Universal Unique Identifier).
DateTimeConverter − Converts the parameter string to a datetime variable. The parameter must be a string in any format recognized by strptime() function, the default being '%Y-%m-%dT%H:%M:%SZ'.
Format string uses the following format codes −
| %a | Abbreviated weekday name | Sun, Mon |
| %A | Full weekday name | Sunday, Monday |
| %d | Day of the month as a zero-padded decimal | 01, 02 |
| %-d | day of the month as decimal number | 1, 2.. |
| %b | Abbreviated month name | Jan, Feb |
| %m | month as a zero padded decimal number | 01, 02 |
| %B | Full month name | January, February |
| %-y | year without century as a decimal number | 0, 99 |
| %Y | year with century as a decimal number | 2000, 1999 |
| %H | hour(24 hour clock) as a zero padded decimal number | 01, 23 |
| %p | locale's AM or PM | AM, PM |
| %-M | Minute as a decimal number | 1, 59 |
| %-S | Second as a decimal number | 1, 59 |
In the following example, the add_route() function associates a URL with two parameters with the Resource object. First parameter nm is a string by default. The second parameter age uses IntConverter.
from waitress import serve
import falcon
import json
class HelloResource:
   def on_get(self, req, resp, nm,age):
      """Handles GET requests"""
      retvalue={"name":nm, "age":age}
      resp.body=json.dumps(retvalue)
      resp.status = falcon.HTTP_200
      resp.content_type = falcon.MEDIA_JSON
app = falcon.App()
hello = HelloResource()
app.add_route('/hello/{nm}/{age:int}', hello)
if __name__ == '__main__':
   serve(app, host='0.0.0.0', port=8000)
Note that the on_get() responder uses the path parameters to form a dict object retvalue. Its JSON representation is then assigned as the value of response body and returned to the client. As mentioned earlier, JSON is the default content type of Falcon's response object.
Start the Waitress server and check the response for the URL http://localhost:8000/hello/Priya/21 with the help of HTTPie.
http GET localhost:8000/hello/Priya/21
HTTP/1.1 200 OK
Content-Length: 28
Content-Type: application/json
Date: Fri, 22 Apr 2022 14:22:47 GMT
Server: waitress {
   "age": 21,
   "name": "Priya"
}
You can also check the response in a browser as follows −

Python Falcon - Suffixed Responders
To understand the concept and the need of suffixed responders, let us define a StudentResource class. It consists of an on_get() responder that converts the students a list of dict objects to JSON and returns as its response.
Let us also add on_post() responder that reads the data from the incoming request and adds a new dict object in the list.
import falcon
import json
from waitress import serve
students = [
   {"id": 1, "name": "Ravi", "percent": 75.50},
   {"id": 2, "name": "Mona", "percent": 80.00},
   {"id": 3, "name": "Mathews", "percent": 65.25},
]
class StudentResource:
   def on_get(self, req, resp):
      resp.text = json.dumps(students)
      resp.status = falcon.HTTP_OK
      resp.content_type = falcon.MEDIA_JSON
   def on_post(self, req, resp):
      student = json.load(req.bounded_stream)
      students.append(student)
      resp.text = "Student added successfully."
      resp.status = falcon.HTTP_OK
      resp.content_type = falcon.MEDIA_TEXT
Using add_route() function of the Falcon's App object, we add /students route.
app = falcon.App()
app.add_route("/students", StudentResource())
After starting the server, we can test the GET and POST requests from HTTPie command line −
http GET localhost:8000/students
HTTP/1.1 200 OK
Content-Length: 187
Content-Type: application/json
Date: Mon, 18 Apr 2022 06:21:02 GMT
Server: waitress
[
   {
      "id": 1,
      "name": "Ravi",
      "percent": 75.5
   },
   {
      "id": 2,
      "name": "Mona",
      "percent": 80.0
   },
   {
      "id": 3,
      "name": "Mathews",
      "percent": 65.25
   }
]
http POST localhost:8000/students id=4 name="Prachi"
percent=59.90
HTTP/1.1 200 OK
Content-Length: 27
Content-Type: text/plain; charset=utf-8
Date: Mon, 18 Apr 2022 06:20:51 GMT
Server: waitress
Student added successfully.
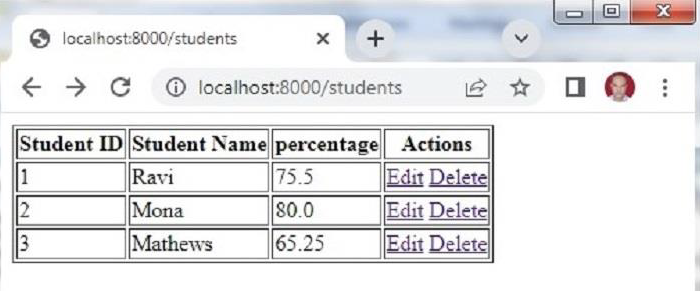
Invoking on_get() again confirms the addition of new students resource.
http GET localhost:8000/students
HTTP/1.1 200 OK
Content-Length: 187
Content-Type: application/json
Date: Mon, 18 Apr 2022 06:21:02 GMT
Server: waitress
[
   {
      "id": 1,
      "name": "Ravi",
      "percent": 75.5
   },
   {
      "id": 2,
      "name": "Mona",
      "percent": 80.0
   },
   {
      "id": 3,
      "name": "Mathews",
      "percent": 65.25
   },
   {
      "id": "4",
      "name": "Prachi",
      "percent": "59.90"
   }
]
At this stage, we would like to have a GET responder method in StudentResource class that reads the id parameter from the URL and retrieves a corresponding dict object of from the list.
In other words, the URL of the format /student/{id} should be associated to the GET method in the resource class. But obviously, a class cannot have two methods of same name. Hence, we define to use suffix parameter for the add_route() method to distinguish between the two definitions of on_get() responders.
A route with id parameter is added to the Application object by specifying suffix ='student'.
app.add_route("/students/{id:int}", StudentResource(), suffix='student')
We can now add another definition of on_get() method with this suffix, so that the name of this responder is on_get_student(), as follows −
def on_get_student(self, req, resp, id):
   resp.text = json.dumps(students[id-1])
   resp.status = falcon.HTTP_OK
   resp.content_type = falcon.MEDIA_JSON
Start the Waitress server after adding the new route and on_get_student() responder and test this URL as follows −
http GET localhost:8000/students/2
HTTP/1.1 200 OK
Content-Length: 42
Content-Type: application/json
Date: Mon, 18 Apr 2022 06:21:05 GMTy
Server: waitress
{
   "id": 2,
   "name": "Mona",
   "percent": 80.0
}
Note that the on_put() responder (to update a resource) and on_delete() responder (to delete a resource) will also get invoked when the URL route /students/{id:int} is requested by the client with appropriate request header.
We have already added this route with student as the suffix. Hence, on_put_student() method parses the path parameter in an integer variable. The JSON representation of the item with given id is fetched and updated with the data provided in the PUT request.
def on_put_student(self, req, resp, id):
   student=students[id-1]
   data = json.load(req.bounded_stream)

   student.update(data)
   resp.text = json.dumps(student)
   resp.status = falcon.HTTP_OK
   resp.content_type = falcon.MEDIA_JSON
The on_delete_student() responder simply deletes the item with the id specified in the DELETE request. The list of remaining resources is returned.
def on_delete_student(self, req, resp, id):
   students.pop(id-1)
   resp.text = json.dumps(students)
   resp.status = falcon.HTTP_OK
   resp.content_type = falcon.MEDIA_JSON
We can test the PUT and DELETE operations of the API with HTTPie commands −
http PUT localhost:8000/students/2 id=3 name="Mathews"
percent=55
HTTP/1.1 200 OK
Content-Length: 46
Content-Type: application/json
Date: Sat, 18 Apr 2022 10:13:00 GMT
Server: waitress
{
   "id": "3",
   "name": "Mathews",
   "percent": "55"
}
http DELETE localhost:8000/students/2
HTTP/1.1 200 OK
Content-Length: 92
Content-Type: application/json
Date: Sat, 18 Apr 2022 10:18:00 GMT
Server: waitress
[
   {
      "id": 1,
      "name": "Ravi",
      "percent": 75.5
   },
   {
      "id": 3,
      "name": "Mathews",
      "percent": 65.25
   }
]
The complete code of this API (studentapi.py) is as under −
import falcon
import json
from waitress import serve
students = [
   {"id": 1, "name": "Ravi", "percent": 75.50},
   {"id": 2, "name": "Mona", "percent": 80.00},
   {"id": 3, "name": "Mathews", "percent": 65.25},
]
class StudentResource:
   def on_get(self, req, resp):
      resp.text = json.dumps(students)
      resp.status = falcon.HTTP_OK
      resp.content_type = falcon.MEDIA_JSON
   def on_post(self, req, resp):
      student = json.load(req.bounded_stream)
      students.append(student)
      resp.text = "Student added successfully."
      resp.status = falcon.HTTP_OK
      resp.content_type = falcon.MEDIA_TEXT
   def on_get_student(self, req, resp, id):
      resp.text = json.dumps(students[id-1])
      resp.status = falcon.HTTP_OK
      resp.content_type = falcon.MEDIA_JSON
   def on_put_student(self, req, resp, id):
      student=students[id-1]
      data = json.load(req.bounded_stream)

      student.update(data)

      resp.text = json.dumps(student)
      resp.status = falcon.HTTP_OK
      resp.content_type = falcon.MEDIA_JSON
   def on_delete_student(self, req, resp, id):
      students.pop(id-1)
      print (students)
      resp.text = json.dumps(students)
      resp.status = falcon.HTTP_OK
      resp.content_type = falcon.MEDIA_JSON
app = falcon.App()
app.add_route("/students", StudentResource())
app.add_route("/students/{id:int}", StudentResource(), suffix='student')
if __name__ == '__main__':
   serve(app, host='0.0.0.0', port=8000)
Python Falcon - Inspect Module
The inspect module is a handy tool that provides information about registered routes and other components of a Falcon application such as middleware, sinks etc.
The inspection of an application can be done by two ways CLI tool and programmatically. The falcon-inspect-tool CLI script is executed from the command line giving the name of Python script in which Falcon application object is declared.
For example, to inspect application object in studentapi.py −
falcon-inspect-app studentapi:app
Falcon App (WSGI)
Routes:
    /students - StudentResource:
    GET - on_get
    POST - on_post
    /students/{id:int} - StudentResource:
    DELETE - on_delete_student
    GET - on_get_student
    PUT - on_put_student
The output shows registered routes and the responder methods in the resource class. To perform the inspection programmatically, use the application object as argument to inspect_app() function in the inspect module.
from falcon import inspect
from studentapi import app
app_info = inspect.inspect_app(app)
print(app_info)
Save the above script as inspectapi.py and run it from the command line.
python inspectapi.py
Falcon App (WSGI)
Routes:
    /students - StudentResource:
    GET - on_get
    POST - on_post
    /students/{id:int} - StudentResource:
    DELETE - on_delete_student
    GET - on_get_student
    PUT - on_put_student
Python Falcon - Jinja2 Template
The Falcon library is primarily used to build APIs and microservices. Hence, by default, a Falcon responder returns a JSON response. However, if the content type is changed to falcon.MEDIA_HTML, it is possible to render HTML output.
Rendering a HTML content with variable data is very tedious. For this purpose, web templating libraries are used. Many Python web frameworks are bundled with specific template library. But Falcon being a minimalist micro framework doesn't come pre-bundled with anyone.
Jinja2 is one of the most popular template libraries used by many python frameworks. In this section, we shall see how to use inja2 with Falcon application. The jinja2 is a fast and designer-friendly templating language that is easy to configure and debug. Its sandboxed environment makes it easy to prevent the execution of untrusted code, prohibit potentially unsafe data, and prevent cross-site scripting attacks (called XSS attacks).
Another very powerful feature of jinja2 is the template inheritance, wherein You can define a base template having common design features which child templates can override.
First of all, install jinja2 in the current Python environment with the use of PIP utility.
pip3 install jinja2
Hello World Template
The jinja2 module defines a Template class. A Template object is obtained by reading the contents of a file containing HTML script (one with .html extension). By invoking the render() method of this Template object, HTML response can be rendered to the client browser. The content_type property of Response object must be set to falcon.MEDIA_HTML.
Let us save the following HTML script as hello.py in the application folder.
<html>
   <body>
      <h2>Hello World</h2>
   </body>
</html>
Example
The on_get() responder in the resource class below reads this file and renders it as HTML response.
import uvicorn
import falcon
import falcon.asgi
from jinja2 import Template
class HelloResource:
   async def on_get(self, req, resp):
      resp.status = falcon.HTTP_200
      resp.content_type = 'text/html'
      fp=open("hello.html","r")
      tempobj=Template(fp.read())
      resp.body=tempobj.render()
app = falcon.asgi.App()
hello = HelloResource()
app.add_route('/hello', hello)
if __name__ == "__main__":
   uvicorn.run("hello:app", host="0.0.0.0", port=8000, reload=True)
Output
Run the above Python code and visit http://localhost:8000/hello link in the browser.

Template Variable
jinja2 is a server-side templating library. The web page is constructed as a template by putting various elements of jinja2 templating language as place-holders within appropriate delimiters inside the HTML script. The template engine reads the HTML script, substitutes the place-holders with context data on the server, reassembles the HTML, and renders it to the client.
The Template.render() function has an optional context dictionary parameter. The key attributes of this dictionary become the template variables. This helps in rendering the data passed by the responders in the web page.
Example
In the following example, the route /hello/nm is registered with the resource object, where nm is the path parameter. The on_get() responder passes it as a context to the template object obtained from a web page.
import uvicorn
import falcon
import falcon.asgi
from jinja2 import Template
class HelloResource:
   async def on_get(self, req, resp, nm):
      resp.status = falcon.HTTP_200
      resp.content_type = 'text/html'
      fp=open("hello.html","r")
      tempobj=Template(fp.read())
      resp.body=tempobj.render({'name':nm})
app = falcon.asgi.App()
hello = HelloResource()
app.add_route('/hello/{nm}', hello)
if __name__ == "__main__":
   uvicorn.run("hello:app", host="0.0.0.0", port=8000, reload=True)
The hello.html reads the path parameter in a template variable name. It acts as a place holder in the HTML script. It is put in {{ and }} symbols so that its value appears as a HTML response.
<html>
   <body>
      <h2>Hello {{ name }}</h2>
   </body>
</html>
Output
Run the Python code and enter http://localhost:8000/hello/Priya as the URL. The browser displays the following output −
Loop in jinja2 Template
If the responder passes any Python iterable object such as a list, tuple or a dictionary, its elements can be traversed inside the jinja2 template using its looping construct syntax.
{% for item in collection %}
HTML block
{% endfor %}
In the following example, the on_get() responder sends students object which is a list of dict objects, to the template list.html. It in turn traverses the data and renders it as a HTML table.
import falcon
import json
from waitress import serve
from jinja2 import Template
students = [
   {"id": 1, "name": "Ravi", "percent": 75.50},
   {"id": 2, "name": "Mona", "percent": 80.00},
   {"id": 3, "name": "Mathews", "percent": 65.25},
]
class StudentResource:
   def on_get(self, req, resp):
      resp.status = falcon.HTTP_OK
      resp.content_type = falcon.MEDIA_HTML
      fp=open("list.html","r")
      tempobj=Template(fp.read())
      resp.body=tempobj.render({'students':students})
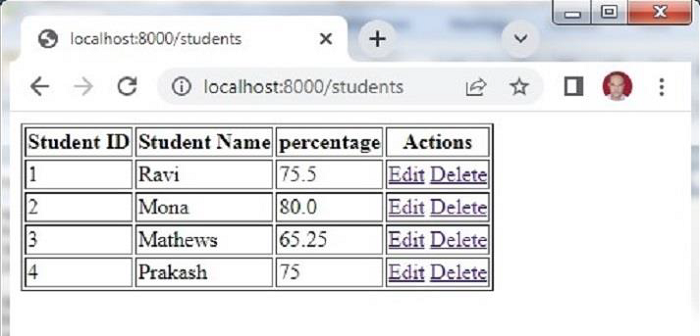
list.html is a jinja2 template. It receives the students object as list of dictionary objects and puts the value of each key inside <td>..<.td> element of a table.
<html>
<body>
<table border=1>
   <thead> <tr>
      <th>Student ID</th> <th>Student Name</th>
      <th>percentage</th>
      <th>Actions</th>
   </tr> </thead>
   <tbody>
   {% for Student in students %}
   <tr> <td>{{ Student.id }}</td> <td>{{ Student.name }}</td>
      <td>{{ Student.percent }}</td>
      <td>
         <a href="#">Edit</a>
         <a href="#">Delete</a>
      </td> </tr>
   {% endfor %}
   </tbody>
</table>
</body>
</html>
Visit the /students route in the browser's address bar. The list of students is rendered in the browser.
HTML Form Template
In this section, we shall see how Falcon reads the data from HTML form. Let us save the following HTML script as myform.html. We shall use it for obtaining Template object and render it.
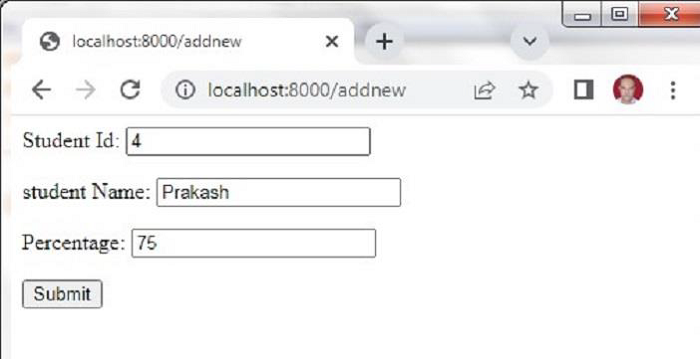
<html>
<body>
   <form method="POST" action="http://localhost:8000/students">
   <p>Student Id: <input type="text" name="id"/> </p>
   <p>student Name: <input type="text" name="name"/> </p>
   <p>Percentage: <input type="text" name="percent"/> </p>
   <p><input type="submit"> </p>
</body>
</html>
The Falcon App object is declared in Hello.py file which also has a resource class mapped to /adddnew route. The on_get() responder reads the myform.html and renders the same. The HTML form will be displayed. The form is submitted to /students route by POST method.
To be able to read the form data, the auto_parse_form_urlencoded property of falcon.RequestOptions class must be set to True.
app = falcon.App()
app.req_options.auto_parse_form_urlencoded = True
Here, we also import StudentResource class from student.py. The on_get() responder renders the list of students.
The on_post() responder will be called when the user fills and submits the form. This method collects the form data in the req.params property, which is nothing but a dictionary of form elements and their values. The students dictionary is then appended.
def on_post(self, req, resp):
   student=req.params
   students.append(student)
The complete code of hello.py is as follows −
import falcon
import json
from waitress import serve
from jinja2 import Template
from student import StudentResource
class MyResource:
   def on_get(self, req, resp):
      resp.status = falcon.HTTP_200
      resp.content_type = 'text/html'
      fp=open("myform.html","r")
      tempobj=Template(fp.read())
      resp.body=tempobj.render()
app = falcon.App()
app.req_options.auto_parse_form_urlencoded = True
form = MyResource()
app.add_route('/addnew', form)
app.add_route("/students", StudentResource())
if __name__ == '__main__':
   serve(app, host='0.0.0.0', port=8000)
The student.py having StudentResource class and on_get() and on_post() responders is as follows −
import falcon
import json
from waitress import serve
from jinja2 import Template
students = [
   {"id": 1, "name": "Ravi", "percent": 75.50},
   {"id": 2, "name": "Mona", "percent": 80.00},
   {"id": 3, "name": "Mathews", "percent": 65.25},
]
class StudentResource:
   def on_get(self, req, resp):
      resp.status = falcon.HTTP_OK
      resp.content_type = falcon.MEDIA_HTML
      fp=open("list.html","r")
      tempobj=Template(fp.read())
      resp.body=tempobj.render({'students':students})

   def on_post(self, req, resp):
      student = req.params
      students.append(student)
      resp.text = "Student added successfully."
      resp.status = falcon.HTTP_OK
      resp.content_type = falcon.MEDIA_JSON
Run hello.py from the command line. Open the HTML form in the browser by entering http://locLhost:8000/addnew.
The students database dictionary will be appended. Visit /students route. You will find a new row appended.
Multipart Forms
In order to let the user select files from the local filesystem, the enctype attribute of HTML form must be set to multipart/form-data. Falcon uses MultipartFormHandler to handle the multipart/form-data media type, allowing it to iterate over the body parts in the form.
The BodyPart class has the following properties −
stream − stream wrapper just for the current body part
data − body part content bytes
content_type would default to text/plain if not specified, as per RFC
text − the current body part decoded as text string (only provided it is of type text/plain, None otherwise)
media − automatically parsed by media handlers in the same way as req.media
name, filename − relevant parts from the Content-Disposition header
secure_filename − sanitized filename that could safely be used on the server filesystem.
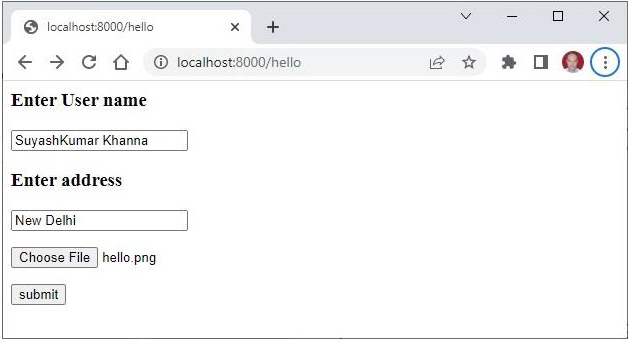
The following HTML script (index.html) is a multi-part form.
<html>
   <body>
      <form action="http://localhost:8000/hello" method="POST" enctype="multipart/form-data">
         <h3>Enter User name</h3>
         <p><input type='text' name='name'/></p>
         <h3>Enter address</h3>
         <p><input type='text' name='addr'/></p>
         <p><input type="file" name="file" /></p>
         <p><input type='submit' value='submit'/></p>
      </form>
   </body>
</html>
This form is rendered by the on_get() responder of the HelloResource class in the code below. The form data is submitted to on_post() method which iterates over the parts and sends a JSON response of the form data.
import waitress
import falcon
import json
from jinja2 import Template
class HelloResource:
   def on_get(self, req, resp):
      resp.status = falcon.HTTP_200
      resp.content_type = 'text/html'
      fp=open("index.html","r")
      tempobj=Template(fp.read())
      resp.body=tempobj.render()

   def on_post(self, req, resp):
      result=[]
      for part in req.media:
         data={"name" :part.name,
            "content type":part.content_type,
            "value":part.text, "file":part.filename}
         result.append(data)
         resp.text = json.dumps(result)
         resp.status = falcon.HTTP_OK
         resp.content_type = falcon.MEDIA_JSON
app = falcon.App()
hello = HelloResource()
app.add_route('/hello', hello)
if __name__ == '__main__':
   waitress.serve(app, host='0.0.0.0', port=8000)
Run the above program and visit http://localhost:8000/hello link to render the form as shown below −
When the form is submitted after filling the data, the JSON response is rendered in the browser as shown below −
[
   {
      "name": "name",
      "content type": "text/plain",
      "value": "SuyashKumar Khanna",
      "file": null
   },
   {
      "name": "addr",
      "content type": "text/plain",
      "value": "New Delhi",
      "file": null
   },
   {
      "name": "file",
      "content type": "image/png",
      "value": null,
      "file": "hello.png"
   }
]
Python Falcon - Cookies
A cookie is stored on a client's computer in the form of a text file. Its purpose is to remember and track data pertaining to a client's usage for better visitor experience and site statistics.
A Request object contains a cookie's attribute. It is a dictionary object of all the cookie variables and their corresponding values, a client has transmitted. In addition to it, a cookie also stores its expiry time, path and domain name of the site.
In Falcon, cookies are set on response object using set_cookie() method.
resp.set_cookie('cookiename', 'cookievalue')
Additionally, the arguments max_age of cookie in seconds and domain name can also be given.
import falcon
import json
from waitress import serve
class resource1:
   def on_post(self, req, resp):
      resp.set_cookie("user", 'admin')
      resp.text = "cookie set successfully."
      resp.status = falcon.HTTP_OK
      resp.content_type = falcon.MEDIA_TEXT
From the command line, invoke the responder method as −
http POST localhost:8000/cookie
HTTP/1.1 200 OK
Content-Length: 24
Content-Type: text/plain; charset=utf-8
Date: Tue, 26 Apr 2022 06:56:30 GMT
Server: waitress
Set-Cookie: user=admin; HttpOnly; Secure
cookie set successfully.
The cookie Set-cookie header can also be set using append_header() method of response object.
To retrieve the cookies, the request object has request.cookies property as well as get_cookie_values() method.
def on_get(self, req, resp):
   cookies=req.cookies
   values = req.get_cookie_values('user')
   if values:
      v = values[0]
      resp.body={"user":v}
   resp.status = falcon.HTTP_OK
   resp.content_type = falcon.MEDIA_JSON
The unset_cookie method of response object clears the cookie for the current request.
resp.unset_cookie('user')
For ASGI applications, falcon.asgi.Request implements the same cookie methods and properties as falcon.Request. The ASGI versions of set_cookie() and append_header() are synchronous, so they do not need to be awaited.
Python Falcon - Status Codes
By default, the HTTP server's response to a client's request is having 200 OK status. Falcon provides its own list of status constant for more convenience and readability.
For example, 200 OK status code is represented by,
resp.status = falcon.HTTP_OK
These predefined Falcon constants avoid typos and cuts down on the number of string objects that must be created when preparing responses. However, starting with Falcon version 3.0, using bare int codes is allowed as well.
resp.status = 200
For ASGI application, same status codes are applicable.
Some of the status codes defined in Falcon library are listed below −
Informational Codes
HTTP_CONTINUE = HTTP_100
HTTP_SWITCHING_PROTOCOLS = HTTP_101
HTTP_PROCESSING = HTTP_102
Success Status Codes
HTTP_OK = HTTP_200
HTTP_CREATED = HTTP_201
HTTP_ACCEPTED = HTTP_202
HTTP_NON_AUTHORITATIVE_INFORMATION = HTTP_203
HTTP_NO_CONTENT = HTTP_204
HTTP_RESET_CONTENT = HTTP_205
HTTP_PARTIAL_CONTENT = HTTP_206
HTTP_MULTI_STATUS = HTTP_207
HTTP_ALREADY_REPORTED = HTTP_208
HTTP_IM_USED = HTTP_226
Redirection Error Codes
HTTP_MULTIPLE_CHOICES = HTTP_300
HTTP_MOVED_PERMANENTLY = HTTP_301
HTTP_FOUND = HTTP_302
HTTP_SEE_OTHER = HTTP_303
HTTP_NOT_MODIFIED = HTTP_304
HTTP_USE_PROXY = HTTP_305
HTTP_TEMPORARY_REDIRECT = HTTP_307
HTTP_PERMANENT_REDIRECT = HTTP_308
Client Error Codes
HTTP_BAD_REQUEST = HTTP_400
HTTP_UNAUTHORIZED = HTTP_401 # "unauthenticated"
HTTP_PAYMENT_REQUIRED = HTTP_402
HTTP_FORBIDDEN = HTTP_403 # "unauthorized"
HTTP_NOT_FOUND = HTTP_404
HTTP_METHOD_NOT_ALLOWED = HTTP_405
HTTP_NOT_ACCEPTABLE = HTTP_406
HTTP_PROXY_AUTHENTICATION_REQUIRED = HTTP_407
HTTP_REQUEST_TIMEOUT = HTTP_408
HTTP_CONFLICT = HTTP_409
Server Error Codes
HTTP_INTERNAL_SERVER_ERROR = HTTP_500
HTTP_NOT_IMPLEMENTED = HTTP_501
HTTP_BAD_GATEWAY = HTTP_502
HTTP_SERVICE_UNAVAILABLE = HTTP_503
HTTP_GATEWAY_TIMEOUT = HTTP_504
HTTP_HTTP_VERSION_NOT_SUPPORTED = HTTP_505
HTTP_INSUFFICIENT_STORAGE = HTTP_507
HTTP_LOOP_DETECTED = HTTP_508
HTTP_NETWORK_AUTHENTICATION_REQUIRED = HTTP_511
Python Falcon - Error Handling
To handle various error situations, the above status codes can be used for the response object. Falcon also provides set of error classes. Their object can be raised when corresponding runtime error situation arises.
These error classes are derived from HTTPError class as their base class. The error object is raised as shown in the following example −
import falcon
class MyResource:
   def on_get(self, req, resp):
      # some Python code
      raise falcon.HTTPBadRequest(
         title="Value Out of Range",
         description="The value is not between permissible range"
      )
Predefined Error Classes
Some of the predefined error classes provided by Falcon are as follows −
HTTPBadRequest − 400 Bad Request. The server is unable to process the request due to a client error such as malformed request syntax, invalid request message framing etc.
HTTPInvalidHeader − Results in 400 Bad Request because one of the headers in the request is invalid.
HTTPInvalidParam − Represents 400 Bad Request. This error may refer to an invalid parameter in a query string, form, or document that was submitted with the request.
HTTPMissingParam − 00 Bad Request is raised when a parameter is missing from the request.
HTTPForbidden − The server understood the request but refuses to authorize it. The status code is 403 Forbidden.
HTTPNotFound − When the server did not find a current representation for the target resource, a 404 status code is raised. It does not indicate whether this lack of representation is temporary or permanent.
HTTPMethodNotAllowed − 405 Method Not Allowed. The method received in the request-line is not supported by the target resource.
HTTPLengthRequired − When The server refuses to accept the request without a defined Content- Length. 411 Length Required. Error code.
HTTPUnsupportedMediaType − If the origin server is refusing to service the request because the payload is in a format not supported by this method on the target resource. Equivalent status code is 415 Unsupported Media Type.
HTTPUnprocessableEntity − If the server understands the content type of the request entity and the syntax of the request entity is correct but was unable to process the contained instructions, the error status code raised is 422 Unprocessable Entity. For example, if an XML request body contains well-formed, but semantically erroneous, XML instructions.
HTTPTooManyRequests − A 429 Too Many Requests status code is raised when the user has sent too many requests in a given amount of time (rate limiting).
HTTPInternalServerError − A very common error situation resulting in 500 Internal Server Error. The server encountered an unexpected condition that prevented it from fulfilling the request.
HTTPNotImplemented − The 501 (Not Implemented) status code indicates that the server does not support the functionality required to fulfill the request. This is the appropriate response when the server does not recognize the request method and is not capable of supporting it for any resource.
HTTPServiceUnavailable − 503 Service Unavailable means that the server is currently unable to handle the request due to a temporary overload or scheduled maintenance.
MediaNotFoundError − 400 Bad Request. This Exception is raised by a media handler when trying to parse an empty body.
MediaMalformedError − 400 Bad Request. This Exception is raised by a media handler when trying to parse a malformed body.
Redirection
There are also a set of exceptions, which when raised, trigger a redirection response to the client. The status codes are of the type 3xx. These exceptions, represented by following classes, shot-circuit the request processing as a subclass of HttpError.
HTTPMovedPermanently − 301 Moved Permanently. This status code indicates that the target resource has been assigned a new permanent URI.
HTTPFound − 302 Found status code meaning that the target resource resides temporarily under a different URI.
HTTPTemporaryRedirect − This class raises the 307 (Temporary Redirect) status code, which means that the target resource resides temporarily under a different URI and the user agent MUST NOT change the request method if it performs an automatic redirection to that URI.
HTTPPermanentRedirect − Results ib 308 Permanent Redirect, indicating that the target resource has been assigned a new permanent URI.
Python Falcon - Hooks
Hooks are the user defined functions that are executed automatically when a specific responder method in the resource class is invoked in response to the client request. Falcon supports before and after hooks.
A function to be used as a hook is defined with the request, response and resource class as parameters, in additional to any optional parameters as may be necessary.
def hookfunction(req, resp, resource):
   . . . . .
   . . . . .
Such a function is attached to either an individual responder or the entire resource class by applying one of the following decorators −
@falcon.before(hookfunction)
@falcon.after(hookfunction)
To apply the before hook to the on_post() responder −
@falcon.before(hookfunction)
def on_post(self, req, resp):
   . . .
   . . .
To apply an after hook −
@falcon.after(hookfunction)
def on_get(self, req, resp):
   . . .
   . . .
To decorate the entire resource class, use the decorator above the declaration of the class −
@falcon.after(hookfunction)
class SomeResource:
 def on_get(self, req, resp):
   . . .
   . . .
   def on_post(self, req, resp):
   . . .
   . . .
In the following example, we have the StudentResource class in which on_get() and on_post() responders have been defined. The on_post() responder is invoked when a POST request sends some data and a new dict object created with it is added in the Students list.
The data received needs to be validated before processing. For this purpose, the following function has been defined. It checks whether value of percent parameter is between 0 and 100. Only if the data passes this condition, it is passed to the responder.
def checkinput(req, resp, resource,params):
   student = json.load(req.bounded_stream)
   if "name" not in student:
      raise falcon.HTTPBadRequest(
         title="Bad request", description="Bad input, name must be provided."
      )

   per=int(student['percent'])
   if per<0 or per>100:
      raise falcon.HTTPBadRequest(
         title="Bad request", description="Bad input, invalid percentage"
      )
      req.context.data = student
This function is applied as a hook on the on_post() responder of the StudentResource class.
import falcon
import json
from waitress import serve
students = [
   {"id": 1, "name": "Ravi", "percent": 75.50},
   {"id": 2, "name": "Mona", "percent": 80.00},
   {"id": 3, "name": "Mathews", "percent": 65.25},
]
class StudentResource:
   def on_get(self, req, resp):
      resp.text = json.dumps(students)
      resp.status = falcon.HTTP_OK
      resp.content_type = falcon.MEDIA_JSON
   @falcon.before(checkinput)
   def on_post(self, req, resp):
      student = json.load(req.context.data)
      students.append(student)
      resp.text = "Student added successfully."
      resp.status = falcon.HTTP_OK
      resp.content_type = falcon.MEDIA_TEXT

   def on_get_student(self, req, resp, id):
      resp.text = json.dumps(students[id-1])
      resp.status = falcon.HTTP_OK
      resp.content_type = falcon.MEDIA_JSON
app = falcon.App()
app.add_route("/students", StudentResource())
if __name__ == '__main__':
   serve(app, host='0.0.0.0', port=8000)
Let us run the Waitress server and initiate the POST request.
http POST localhost:8000/students id=4 percent=50
HTTP/1.1 400 Bad Request
Content-Length: 76
Content-Type: application/json
Date: Tue, 26 Apr 2022 14:49:07 GMT
Server: waitress
Vary: Accept {
   "description": "Bad input, name must be provided.",
   "title": "Bad request"
}
Since the data doesn't contain value of name parameter, the exception is raised.
In another POST request as shown below, the value of percent parameter fails to meet the required criteria, hence the exception.
http POST localhost:8000/students id=4 name="aaa" percent=500
HTTP/1.1 400 Bad Request
Content-Length: 72
Content-Type: application/json
Date: Tue, 26 Apr 2022 15:01:20 GMT
Server: waitress
Vary: Accept {
   "description": "Bad input, invalid percentage",
   "title": "Bad request"
}
Python Falcon - Middleware
A "middleware" is a function that is processed with every request (before being processed by any specific responder) as well as with every response before returning it. This function takes each request that comes to your application.
A middleware works similar to hooks. However, unlike hooks, middleware methods apply globally to the entire App. It may perform some process with the request by running a code defined in it, and then passes the request to be processed the corresponding operation function. It can also process the response generated by the operation function before returning it.
A middleware is a class that implements one or more of the following even handler methods. For a WSGI app, the methods are −
process_request (self, req, resp) − This method processes the request before routing it.
process_resource (self, req, resp, resource, params) − processes the request after routing. A dict object representing any additional params derived from the route's URI template fields may be passed.
process_response (self, req, resp, resource, req_succeeded) − This method is for post-processing of the response (after routing). The req_succeeded parameter is True if no exceptions were raised otherwise False.
In case of the ASGI app, in addition to the above methods, the middleware class may define some more methods.
To account for lifespan events, an optional part of ASGI specification, the startup and shutdown event handlers may be included.
process_startup (self, scope, event) − This method processes the ASGI lifespan startup event. It is invoked when the server is ready to start up and receive connections, but before it has started to do so.
process_shutdown(self, scope, event) − This method processes the ASGI lifespan shutdown event. It is invoked when the server has stopped accepting connections and closed all active connections.
Since the ASGI application also responds to the requests under Websocket protocol, the middleware may define following coroutine methods −
process_request_ws (self, req, ws) − This method processes a WebSocket handshake request before routing it.
process_resource_ws (self, req, ws, resource, params) − This method processes a WebSocket handshake request after routing. A dict object derived from the route's URI template fields may be passed to the resource's responder.
An instance of the middleware class has to be added to the Falcon application object at the time of initialization. For a WSGI Falcon app −
class MyMiddleware:
   def process_request(self, req, resp):
      pass
   def process_resource(self, req, resp, resource, params):
      pass
   def process_response(self, req, resp, resource, req_succeeded):
      pass
from falcon import App
app=App(middleware=[MyMiddleware()])
For the ASGI app −
class MyMiddleware:
   async def process_startup(self, scope, event):
      pass
   async def process_shutdown(self, scope, event):
      pass
   async def process_request(self, req, resp):
      pass
   async def process_resource(self, req, resp, resource, params):
      pass
   async def process_response(self, req, resp, resource, req_succeeded):
      pass
   async def process_request_ws(self, req, ws):
      pass
   async def process_resource_ws(self, req, ws, resource, params):
      pass
from falcon.asgi import App
app=App(middleware=[MyMiddleware()])
Python Falcon - CORS
"Cross-Origin Resource Sharing" (CORS) is a situation when a frontend application that is running on one client browser tries to communicate with a backend through JavaScript code, and the backend is in a different "origin"than the frontend. The origin here is a combination of protocol, domain name and port numbers. As a result, http://localhost and https://localhost have different origins.
If the browser with URL of one origin sends request for execution of JavaScript code from another origin, the browser sends OPTIONS http request. If the backend authorizes the communication from this different origin by sending the appropriate headers it will let the JavaScript in the frontend send its request to the backend.
To enable the CORS policy for all responses, the Falcon app is configured as follows −
from falcon import App
app=App(cors_enable=True)
To specify explicitly the allowed origins, import CORSMiddleware and add the list of origins to the app's middleware, along with respective credentials.
from falcon import App
app = falcon.App(middleware=falcon.CORSMiddleware(allow_origins='example.com', allow_credentials='*')
Python Falcon - Websocket
A WebSocket is a persistent connection between a client and server to provide a bidirectional, full-duplex communication between the two. The communication takes place over HTTP through a single TCP/IP socket connection. It can be seen as an upgrade of HTTP instead of a protocol itself.
One of the limitations of HTTP is that it is a strictly half-duplex or unidirectional protocol. With WebSockets, on the other hand, we can send message-based data, similar to UDP, but with the reliability of TCP. WebSocket uses HTTP as the initial transport mechanism, but keeps the TCP connection alive the connection after the HTTP response is received. Same connection object it can be used two-way communication between client and server. Thus, real-time applications can be built using WebSocket APIs.
Falcon's Websocket support is available only for ASGI applications. To provide Websocket capability, the resource class should have on_websocket() responder coroutine.
async def on_websocket(self, req, ws):
   . . .
Websocket requests can also be intercepted by hooks and middleware. Instead of the Response object, a falcon.asgi.WebSocket object is passed.
How Does a WebSocket Function in Falcon?
The following example demonstrates the functioning of WebSocket in Falcon application. First we have an on_get() responder that renders a template.
Example
The client browser displays a form with a text field and a button, When the button is clicked, a websocket object is created, and the on_websocket() responder is fired. It accepts the message input by the user and echoes it back to the client with a prefix The message text was.
import falcon
import falcon.asgi
import jinja2
html = """
<!DOCTYPE html>
<html>
   <head>
      <title>Chat</title>
   </head>
   <body>
      <script>
         var ws = new WebSocket("ws://localhost:8000/hello");
         ws.onmessage = function(event) {
            var messages =document.getElementById('messages')
            var message = document.createElement('li')
            var content = document.createTextNode(event.data)
            message.appendChild(content)
            messages.appendChild(message)
         };
         function sendMessage(event) {
            var input = document.getElementById("messageText")
            ws.send(input.value)
            input.value = ''
            event.preventDefault()
         }
      </script>
      <h1>WebSocket Chat</h1>
      <form action="" onsubmit="sendMessage(event)">
         <input type="text" id="messageText" autocomplete="off"/>
         <button>Send</button>
      </form>
      <ul id='messages'></ul>
   </body>
</html>
"""
class HelloResource:
   async def on_get(self, req, resp):
      """Handles GET requests"""
      resp.status = falcon.HTTP_200
      resp.content_type = 'text/html'
      template=jinja2.Template(html)
      resp.body=template.render()
   async def on_websocket(self, req, websocket):
      await websocket.accept()
      while True:
         data = await websocket.receive_text()
         await websocket.send_text(f"Message text was: {data}")
app = falcon.asgi.App()
hello = HelloResource()
app.add_route('/hello', hello)
import uvicorn
if __name__ == "__main__":
   uvicorn.run("main:app", host="0.0.0.0", port=8000, reload=True)
Output
Start the Uvicorn server and visit http://localhost:8000/ws URL to display the chat form.

Enter some text and press the Send button.
Python Falcon - SQLAlchemy Models
To demonstrate how the Falcon's responder functions (on_post(), on_get(), on_put() and on_delete()), we had done CRUD (which stands for Create, Retrieve, Update and Delete) operations on an in-memory database in the form of a Python list of dictionary objects. Instead, we can use any relational database (such as MySQL, Oracle etc.) to perform store, retrieve, update and delete operations.
Instead of using a DB-API compliant database driver, we shall use SQLAlchemy as an interface between Python code and a database (we are going to use SQLite database as Python has in-built support for it). SQLAlchemy is a popular SQL toolkit and Object Relational Mapper.
Object Relational Mapping is a programming technique for converting data between incompatible type systems in object-oriented programming languages. Usually, the type system used in an Object Oriented language like Python contains non-scalar types. However, data types in most of the database products such as Oracle, MySQL, etc., are of primitive types such as integers and strings.
In an ORM system, each class maps to a table in the underlying database. Instead of writing tedious database interfacing code yourself, an ORM takes care of these issues for you while you can focus on programming the logics of the system.
In order to use SQLALchemy, we need to first install the library using PIP installer.
pip install sqlalchemy
SQLAlchemy is designed to operate with a DBAPI implementation built for a particular database. It uses dialect system to communicate with various types of DBAPI implementations and databases. All dialects require that an appropriate DBAPI driver is installed.
The following are the dialects included −
Firebird
Microsoft SQL Server
MySQL
Oracle
PostgreSQL
SQLite
Sybase
Database Engine
Since we are going to use SQLite database, we need to create a database engine for our database called test.db. Import create_engine() function from sqlalchemy module.
from sqlalchemy import create_engine
from sqlalchemy.dialects.sqlite import *
SQLALCHEMY_DATABASE_URL = "sqlite:///./test.db"
engine = create_engine(SQLALCHEMY_DATABASE_URL, connect_args =
{"check_same_thread": False})
In order to interact with the database, we need to obtain its handle. A session object is the handle to database. Session class is defined using sessionmaker() a configurable session factory method which is bound to the engine object.
from sqlalchemy.orm import sessionmaker, Session
session = sessionmaker(autocommit=False, autoflush=False, bind=engine)
Next, we need a declarative base class that stores a catalog of classes and mapped tables in the Declarative system.
from sqlalchemy.ext.declarative import declarative_base
Base = declarative_base()
Model class
Students, a subclass of Base is mapped to a students table in the database. Attributes in the Books class correspond to the data types of the columns in the target table. Note that the id attribute corresponds to the primary key in the book table.
class Students(Base):
   __tablename__ = 'student'
   id = Column(Integer, primary_key=True, nullable=False)
   name = Column(String(63), unique=True)
   marks = Column(Integer)
Base.metadata.create_all(bind=engine)
The create_all() method creates the corresponding tables in the database. It can be confirmed by using a SQLite Visual tool such as SQLiteStudio.
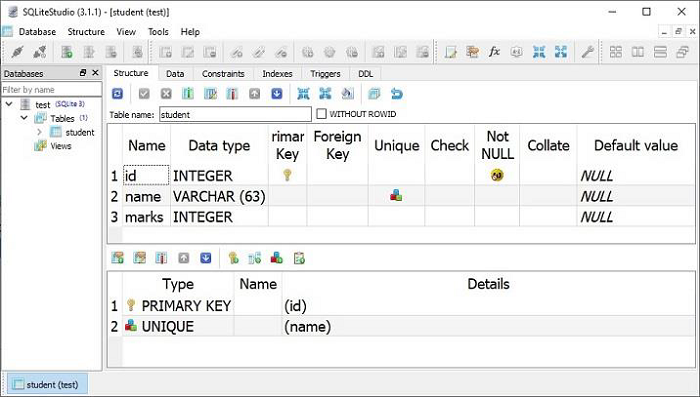
We now need to declare a StudentResource class in which the HTTP responder methods are defined to perform CRUD operations on students table. The object of this class is associated to routes as shown in the following snippet −
import falcon
import json
from waitress import serve
class StudentResource:
   def on_get(self, req, resp):
      pass
   def on_post(self, req, resp):
      pass
   def on_put_student(self, req, resp, id):
      pass
   def on_delete_student(self, req, resp, id):
      pass
app = falcon.App()
app.add_route("/students", StudentResource())
app.add_route("/students/{id:int}", StudentResource(), suffix='student')
on_post()
Rest of the code is just similar to in-memory CRUD operations, with the difference being the operation functions interact with the database through SQLalchemy interface.
The on_post() responder method first constructs an object of Students class from the request parameters and adds it the Students model. Since this model is mapped to the students table in the database, corresponding row is added. The on_post() method is as follows −
def on_post(self, req, resp):
   data = json.load(req.bounded_stream)
   student=Students(id=data['id'], name=data['name'], marks=data['marks'])
   session.add(student)
   session.commit()
   resp.text = "Student added successfully."
   resp.status = falcon.HTTP_OK
   resp.content_type = falcon.MEDIA_TEXT
As mentioned earlier, the on_post() responder is invoked when a POST request is received. We shall use Postman app to pass the POST request.
Start Postman, select POST method and pass the values (id=1, name="Manan" and marks=760 as the body parameters. The request is processed successfully and a row is added to the students table.
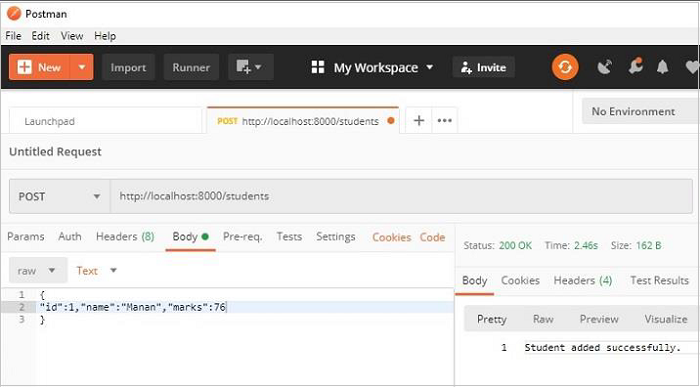
Go ahead and send multiple POST requests to add records.
on_get()
This responder is meant to retrieve all the objects in the Students model. query() method on Session object retrieves the objects.
rows = session.query(Students).all()
Since the default response of Falcon responder is in JSON format, we have to convert the result of above query in a list of dict objects.
data=[]
for row in rows:
   data.append({"id":row.id, "name":row.name, "marks":row.marks})
In the StudentResource class, let us add the on_get() method that performs this operation and sends its JSON response as follows −
def on_get(self, req, resp):
   rows = session.query(Students).all()
   data=[]
   for row in rows:
      data.append({"id":row.id, "name":row.name, "marks":row.marks})
      resp.text = json.dumps(data)
      resp.status = falcon.HTTP_OK
      resp.content_type = falcon.MEDIA_JSON
The GET request operation can be tested in the Postman app. The /students URL will result in displaying JSON response showing data of all objects in the students model.
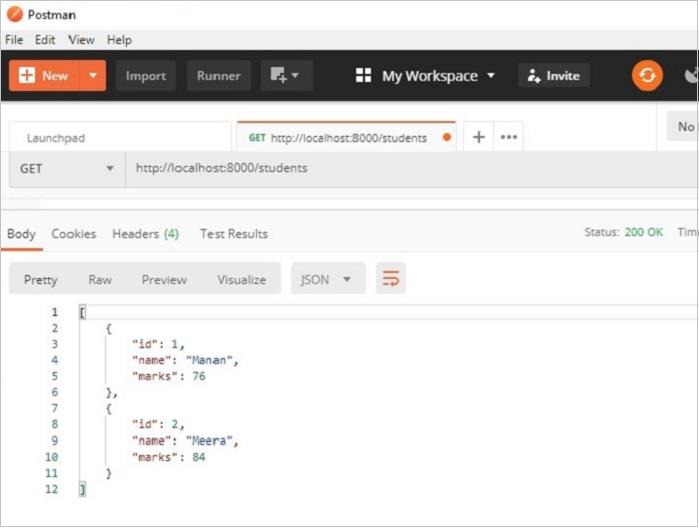
The two records shown in the result pane of Postman app can also be verified in the data view of SQLiteStudio.
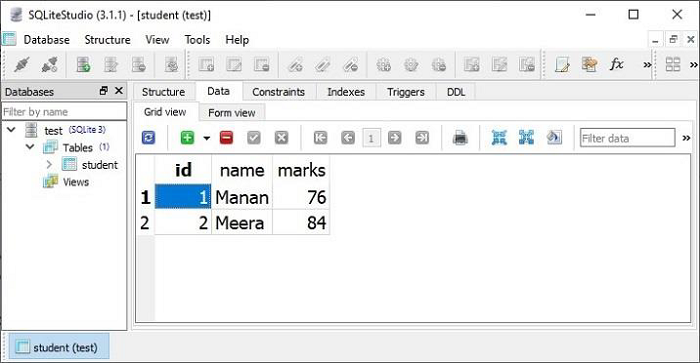
on_put()
The on_put() responder performs the UPDATE operation. It responds to the URL /students/id. To fetch the object with given id from the Students model, we apply the filter to the query result, and update the values of its attributes with the data received from the client.
student = session.query(Students).filter(Students.id == id).first()
The on_put() method's code is as follows −
def on_put_student(self, req, resp, id):
   student = session.query(Students).filter(Students.id == id).first()
   data = json.load(req.bounded_stream)
   student.name=data['name']
   student.marks=data['marks']
   session.commit()
   resp.text = "Student updated successfully."
   resp.status = falcon.HTTP_OK
   resp.content_type = falcon.MEDIA_TEXT
Let us update the object with id=2 in the Students model with the help of Postman and change the name and marks. Note that the values are passed as body parameters.
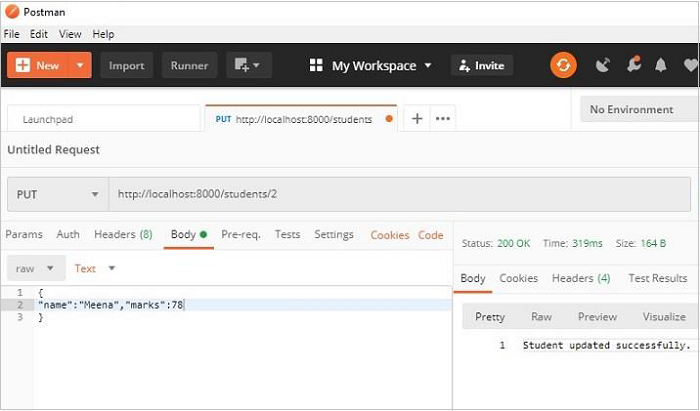
The data view in SQLiteStudio shows that the modifications have been effected.
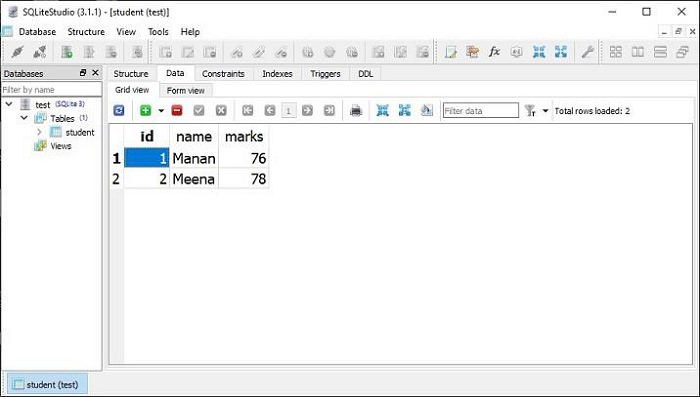
on_delete()
Lastly, the DELETE operation is easy. We need to fetch the object of the given id and call the delete() method.
def on_delete_student(self, req, resp, id):
   try:
      session.query(Students).filter(Students.id == id).delete()
      session.commit()
   except Exception as e:
      raise Exception(e)
      resp.text = "deleted successfully"
      resp.status = falcon.HTTP_OK
      resp.content_type = falcon.MEDIA_TEXT
As a test of the on_delete() responder, let us delete the object with id=2 with the help of Postman as shown below −
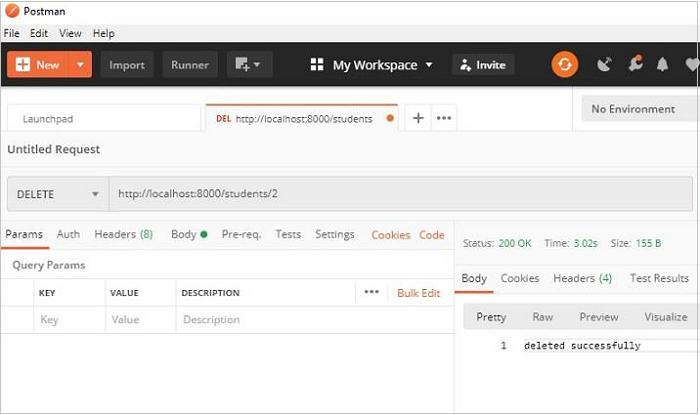
Python Falcon - Testing
Falcon's testing module is a Functional testing framework for Falcon apps. It contains various test classes and utility functions to support functional testing. The testing framework supports both unittest and pytest.
We shall use following the script (myapp.py) to demonstrate testing functionality. It contains a HelloResource class with an on_get() responder that renders a JSON response of Hello World. The create() function returns Falcon's Application object added with a route registered with '/' URL.
from waitress import serve
import falcon
import json
class HelloResource:
   def on_get(self, req, resp):
      """Handles GET requests"""
      resp.text=json.dumps({"message":"Hello World"})

   # This is the default status
   resp.status = falcon.HTTP_200

   # Default is JSON, so override
   resp.content_type = falcon.MEDIA_JSON
def create():
   app = falcon.App()
   hello = HelloResource()
   app.add_route('/', hello)
   return app
app=create()
if __name__ == '__main__':
   serve(app, host='0.0.0.0', port=8000)
Using unittest
The testing.TestCase extends unittest to facilitate functional testing of WSGI/ASGI applications written with Falcon. We need to inherit from this base class and write the tests.
The test functions in the TestCase subclass are of the name simulate_*() where '*' stands for HTTP methods like GET, POST etc. It means, we have to fetch the result of simulate_get() function and compare it with the expected result by assertion functions.
The simulate_*() functions receive two arguments.
simulate_*(app, route)
Following is the code for test-myapp.py. It executes simulate_get() function and asserts its result with the anticipated result and indicates whether the test has failed or passed.
from falcon import testing
import myapp
class MyTestCase(testing.TestCase):
   def setUp(self):
      super(MyTestCase, self).setUp()
      self.app = myapp.create()
class TestMyApp(MyTestCase):
   def test_get_message(self):
      doc = {'message': 'Hello world!'}
      result = self.simulate_get('/')
      self.assertEqual(result.json, doc)
if '__name__'=='__main__':
   unittest.main()
Run the above test with the help of the following command −
python -m unittest test-myapp.py
F
==============================================================
FAIL: test_get_message (test-myapp.TestMyApp)
--------------------------------------------------------------
Traceback (most recent call last):
   File "E:\falconenv\test-myapp.py", line 17, in test_get_message
   self.assertEqual(result.json, doc)
AssertionError: {'message': 'Hello World'} != {'message':
'Hello world!'}
- {'message': 'Hello World'}
? ^
+ {'message': 'Hello world!'}
? ^ +
--------------------------------------------------------------
Ran 1 test in 0.019s
FAILED (failures=1)
Using Pytest
To perform testing using PyTest framework, you need to install it using PIP utility.
pip3 install pytest
To run a test function, we need an object of testing.TestClient class. It simulates the requests for WSGI and ASGI applications. This object is first obtained by giving Falcon application object as the argument.
We run the simulate_*() functions and assert its result with the anticipated output to decide whether the test has failed or passed. In both the examples, the test fails because of difference in case of 'W' in Hello World message. The responder returns it with uppercase 'W' whereas the test function has it in lowercase.
from falcon import testing
import pytest
import myapp
@pytest.fixture()
def client():
   return testing.TestClient(myapp.create())
def test_get_message(client):
   doc = {'message': 'Hello world!'}
   result = client.simulate_get('/')
   assert result.json == doc
Run the above test using the following command −
pytest test-myapp.py v
=========== test session starts ==========================
platform win32 -- Python 3.8.6, pytest-7.1.2, pluggy-1.0.0 --
e:\falconenv\scripts\python.exe
cachedir: .pytest_cache
rootdir: E:\falconenv
plugins: anyio-3.5.0
collected 1 item
test-myapp.py::test_get_message FAILED
[100%]
==================== FAILURES =======================
_____________________________________________________
test_get_message
_____________________________________________________
client = <falcon.testing.client.TestClient object at 0x0000000003EAA6A0>
def test_get_message(client):
   doc = {'message': 'Hello world!'}
   result = client.simulate_get('/')
> assert result.json == doc
E AssertionError: assert {'message': 'Hello World'} ==
{'message': 'Hello world!'}
E Differing items:
E {'message': 'Hello World'} != {'message': 'Hello world!'}
E Full diff:
E - {'message': 'Hello world!'}
E ? ^ -
E + {'message': 'Hello World'}
E ? ^
test-myapp.py:42: AssertionError
============ short test summary info ==================
FAILED test-myapp.py::test_get_message - AssertionError:
assert {'message': 'Hello World'} == {'message': 'Hello
world!'}
============ 1 failed in 4.11s ========================
Python Falcon - Deployment
It is possible to use Apache server enabled with the mod_wsgi module to deploy a Falcon web app, just as any WSGI app. Another alternative is to use uWSGI or gunicorn for deployment.
The uWSGI is a fast and highly configurable WSGI server. If used along with NGNIX, it gives better performance in the form of speed in the production ready environment.
First, install Falcon and uWSGI in a Python virtual environment with PIP installer and expose the Falcon's application object to uWSGI it with wsgi.py as below −
import os
import myapp
config = myproject.get_config(os.environ['MYAPP_CONFIG'])
application = myapp.create(config)
To configure uWSGI, prepare a uwsgi.ini script as below −
[uwsgi]
master = 1
vacuum = true
socket = 127.0.0.1:8080
enable-threads = true
thunder-lock = true
threads = 2
processes = 2
virtualenv = /path/to/venv
wsgi-file = venv/src/wsgi.py
chdir = venv/src
uid = myapp-runner
gid = myapp-runner
You can now start the uWSGI like this −
venv/bin/uwsgi -c uwsgi.ini
Although uWSGI may serve HTTP requests directly, it can be helpful to use a reverse proxy such as NGINX. NGINX natively supports the uwsgi protocol, for efficiently proxying requests to uWSGI.
Install Ngnix and then create an NGINX conf file that looks something like this −
server {
   listen 80;
   server_name myproject.com;
   access_log /var/log/nginx/myproject-access.log;
   error_log /var/log/nginx/myproject-error.log warn;
   location / {
      uwsgi_pass 127.0.0.1:8080
      include uwsgi_params;
   }
}
Finally start the Ngnix server. You should have a working application running.