- PySpark - Home
- PySpark - Introduction
- PySpark - Environment Setup
- PySpark - SparkContext
- PySpark - RDD
- PySpark - Broadcast & Accumulator
- PySpark - SparkConf
- PySpark - SparkFiles
- PySpark - StorageLevel
- PySpark - MLlib
- PySpark - Serializers
PySpark - SparkContext
SparkContext is the entry point to any spark functionality. When we run any Spark application, a driver program starts, which has the main function and your SparkContext gets initiated here. The driver program then runs the operations inside the executors on worker nodes.
SparkContext uses Py4J to launch a JVM and creates a JavaSparkContext. By default, PySpark has SparkContext available as sc, so creating a new SparkContext won't work.

The following code block has the details of a PySpark class and the parameters, which a SparkContext can take.
class pyspark.SparkContext (
   master = None,
   appName = None,
   sparkHome = None,
   pyFiles = None,
   environment = None,
   batchSize = 0,
   serializer = PickleSerializer(),
   conf = None,
   gateway = None,
   jsc = None,
   profiler_cls = <class 'pyspark.profiler.BasicProfiler'>
)
Parameters
Following are the parameters of a SparkContext.
Master − It is the URL of the cluster it connects to.
appName − Name of your job.
sparkHome − Spark installation directory.
pyFiles − The .zip or .py files to send to the cluster and add to the PYTHONPATH.
Environment − Worker nodes environment variables.
batchSize − The number of Python objects represented as a single Java object. Set 1 to disable batching, 0 to automatically choose the batch size based on object sizes, or -1 to use an unlimited batch size.
Serializer − RDD serializer.
Conf − An object of L{SparkConf} to set all the Spark properties.
Gateway − Use an existing gateway and JVM, otherwise initializing a new JVM.
JSC − The JavaSparkContext instance.
profiler_cls − A class of custom Profiler used to do profiling (the default is pyspark.profiler.BasicProfiler).
Among the above parameters, master and appname are mostly used. The first two lines of any PySpark program looks as shown below −
from pyspark import SparkContext
sc = SparkContext("local", "First App")
SparkContext Example PySpark Shell
Now that you know enough about SparkContext, let us run a simple example on PySpark shell. In this example, we will be counting the number of lines with character 'a' or 'b' in the README.md file. So, let us say if there are 5 lines in a file and 3 lines have the character 'a', then the output will be → Line with a: 3. Same will be done for character b.
Note − We are not creating any SparkContext object in the following example because by default, Spark automatically creates the SparkContext object named sc, when PySpark shell starts. In case you try to create another SparkContext object, you will get the following error "ValueError: Cannot run multiple SparkContexts at once".
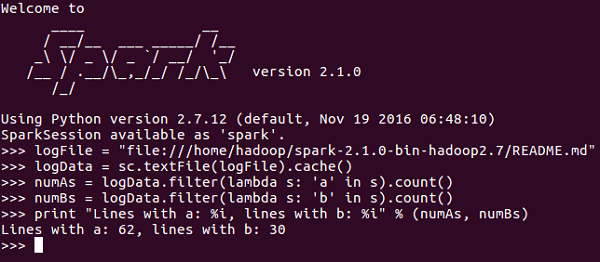
<<< logFile = "file:///home/hadoop/spark-2.1.0-bin-hadoop2.7/README.md"
<<< logData = sc.textFile(logFile).cache()
<<< numAs = logData.filter(lambda s: 'a' in s).count()
<<< numBs = logData.filter(lambda s: 'b' in s).count()
<<< print "Lines with a: %i, lines with b: %i" % (numAs, numBs)
Lines with a: 62, lines with b: 30
SparkContext Example - Python Program
Let us run the same example using a Python program. Create a Python file called firstapp.py and enter the following code in that file.
----------------------------------------firstapp.py---------------------------------------
from pyspark import SparkContext
logFile = "file:///home/hadoop/spark-2.1.0-bin-hadoop2.7/README.md"
sc = SparkContext("local", "first app")
logData = sc.textFile(logFile).cache()
numAs = logData.filter(lambda s: 'a' in s).count()
numBs = logData.filter(lambda s: 'b' in s).count()
print "Lines with a: %i, lines with b: %i" % (numAs, numBs)
----------------------------------------firstapp.py---------------------------------------
Then we will execute the following command in the terminal to run this Python file. We will get the same output as above.
$SPARK_HOME/bin/spark-submit firstapp.py
Output: Lines with a: 62, lines with b: 30