
- PPT - Home
- PPT - Getting Started
- PPT - Explore Windows
- PPT - Backstage View
- PPT - Create Presentation
- PPT - Add New Slides
- PPT - Adding Text in Boxes
- PPT - Adding New Text Boxes
- PPT - Deleting Existing Slide
- PPT - Rearranging Slides
- PPT - Adding Slide Notes
- PPT - Managing Sections
- PPT - Working with Outlines
- PPT - Powerpoint Sidebar
- PPT - Presentation Views
- PPT - Setting Backgrounds
- PPT - Slide Orientations
- PPT - Saving Presentation
- PPT - Review Presentation
- PPT - Adding Slide Numbers
- PPT - Adding Header & Footer
- PPT - Running Slide Show
- PPT - Keyboard Shortcuts
- PPT - Get Context Help
- PPT - Copy & Paste Content
- PPT - Find & Replace Content
- PPT - Undo Edited Changes
- PPT - Spelling Check
- PPT - Content Translation
- PPT - Setting Language Type
- PPT - Duplicating Content
- PPT - Special Characters
- PPT - Slides Zoom In-Out
- Formatting Presentation
- PPT - Font Management
- PPT - Setting Text Fonts
- PPT - Text Decoration
- PPT - Change Text Case
- PPT - Change Text Size
- PPT - Change Text Color
- PPT - Text Alignments
- PPT - Indent Paragraphs
- PPT - Set Line Spacing
- Borders and Shades
- PPT - Apply Formatting
- PPT - Using Slide Master
- PPT - Save Design Template
- Working with Multimedia
- PPT - Add Pictures to Slide
- PPT - Editing Added Pictures
- PPT - Format Added Pictures
- PPT - Inserting a Screenshot
- PPT - Adding Shapes to Slide
- PPT - Editing Added Shapes
- PPT - Format Added Shapes
- PPT - Adding Text to Shapes
- PPT - Arrange Shapes/Images
- PPT - Group/Ungroup Objects
- PPT - Adding Audio & Video
- PPT - Add & Format Tables
- PPT - Add & Format Charts
- PPT - Add & Format SmartArt
- PPT - Add & Preview Animations
- PPT - Add & Preview Transitions
- Sharing Presentation
- PPT - Create a PDF File
- PPT - Create a Video File
- PPT - Create Image File
- PPT - Printing Presentation
- PPT - Broadcast Slide Show
- PPT - Packaging Presentation
- PPT - Setting Document Password
- PPT - Email Slide Show
- MS Powerpoint Useful Resources
- PPT - Quick Guide
- PPT - Useful Resources
- PPT - Discussion
Find & Replace Content in Powerpoint 2010
PowerPoint offers its users the ability to search for specific text and if required replace it automatically. This is a very useful tool when you need to review a very large presentation or correct the same error in multiple places in the slide. Given below are the steps to find and replace text in PowerPoint. Although, you can only use this function for text, the text itself can be present in a text box, in another shape, as a WordArt, in SmartArt or tables.
Finding Content
The following steps will show you how to find content in PowerPoint.
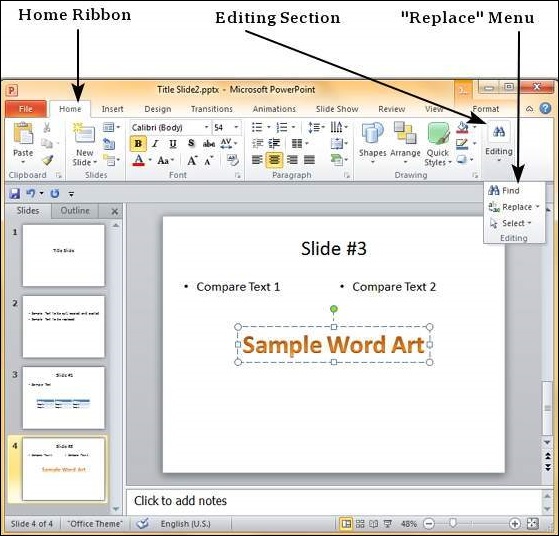
Step 1 − In the Home tab, under the Editing section click on Find.

Step 2 − Type the text you want to search in the "Find what:" field.
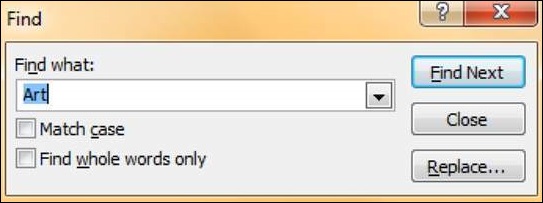
Step 3 − You can narrow your search by selecting "Match Case" - to find exact case match - and "Find whole words only" - to find whole words and not words where typed word is just a part of the word.
Step 4 − Press on "Find Next" to find the next occurrence of the search word.
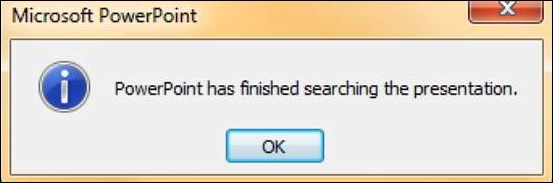
Step 5 − The Find dialog does not disappear after finding the first instance, so you can keep pressing "Find Next" multiple times till you reach the end of the search. At this point, you will receive a message from PowerPoint indicating the end of the search.
Replacing Content
Here are the steps to replace content in PowerPoint.
Step 1 − In the Home tab, under the Editing section click on the Replace button.
Step 2 − Type the text you want to replace in the "Find what:" field and the replaced text in "Replace with:" field
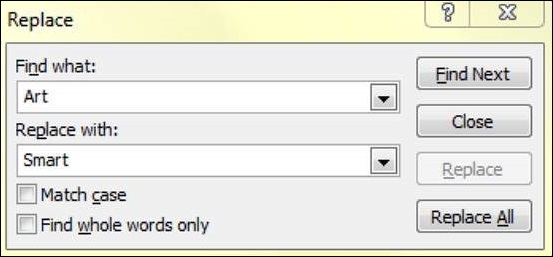
Step 3 − You can narrow your search by selecting "Match Case" - to find the exact case match - and "Find whole words only" - to find the whole words and not words where typed word is just a part of the word.
Step 4 − Press on "Find Next" to find the next occurrence of the search word. PowerPoint will show you the next occurrence and you can then click on "Replace" to replace the word. If you want to skip the occurrence, you can press "Find Next" again without pressing "Replace"
Step 5 − The Replace dialog does not disappear after finding the first instance, so you can keep pressing "Find Next" multiple times till you reach the end of the search. At this point, you will receive a message from PowerPoint indicating the end of the search.