- MongoEngine - Home
- MongoEngine - MongoDB
- MongoEngine - MongoDB Compass
- MongoEngine - Object Document Mapper
- MongoEngine - Installation
- MongoEngine - Connecting to MongoDB Database
- MongoEngine - Document Class
- MongoEngine - Dynamic Schema
- MongoEngine - Fields
- MongoEngine - Add/Delete Document
- MongoEngine - Querying Database
- MongoEngine - Filters
- MongoEngine - Query Operators
- MongoEngine - QuerySet Methods
- MongoEngine - Sorting
- MongoEngine - Custom Query Sets
- MongoEngine - Indexes
- MongoEngine - Aggregation
- MongoEngine - Advanced Queries
- MongoEngine - Document Inheritance
- MongoEngine - Atomic Updates
- MongoEngine - Javascript
- MongoEngine - GridFS
- MongoEngine - Signals
- MongoEngine - Text Search
- MongoEngine - Extensions
MongoEngine Useful Resources
MongoEngine - Quick Guide
MongoEngine - MongoDB Setup
NoSQL databases have seen rise in popularity in the last decade. In todays world of real time web applications, huge amount of data is being generated with mobile and embedded devices. Traditional relational databases (like Oracle, MySQL, etc.) are not suitable for strings. The processing of such data is also difficult as they have fixed and predefined schema, and are not scalable. NOSQL databases have flexible schema and are stored in distributed manner on a large number of community servers.
NOSQL databases are classified on the basis of organization of data. MongoDB is a popular Document Store NOSQL database. Fundamental constituent of a MongoDB database is called a document. A document is a collection of key-value pairs stored in JSON format. More than one documents are stored in a collection. A collection can be considered as analogous to a table in any relational database, and a Document as row in a table. However, it should be noted that since MongoDB is schema less, number of key-value pairs in each document of a Collection need not be the same.
MongoDB is developed by MongoDB Inc. It is a general-purpose, distributed document based database. It is available in enterprise as well as community edition.
Install MongoDB On Windows
To install MongoDB on Windows, first download the latest release of MongoDB from https://www.mongodb.com/try/download/community.
Enter the required details, choose the version of MongoDB, operating system and, packaging as:

Now install the downloaded file, by default, it will be installed in the folder C:\Program Files\MongoDB.
By default, MongoDB will be installed as a Service and Installer downloads and installs MongDB Compass as a default GUI (Graphical User Interface).
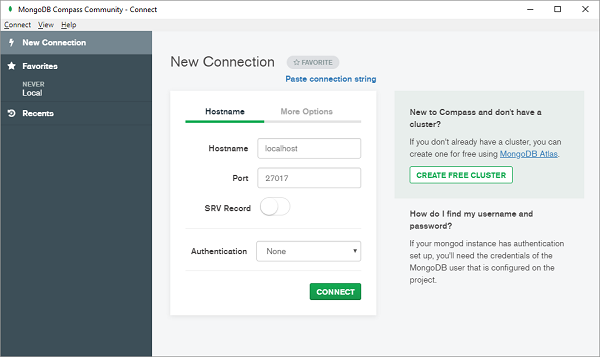
Once MongoDB server and MongoDB Compass are installed, you can open MongoDB Compass and use the following connectio string to connect to locally installed MongoDB Server.
mongodb://localhost:27017/
Using MongoDB Shell
MongoDB Shell is a Command Line Tool and is a quickest way to connect to MongoDB. It is a standalone tool from MongoDB Server and is open source licensed under Apache 2.0.
Download MongoDB shell using https://www.mongodb.com/try/download/shell.

We've downloaded mongosh-2.5.10-win32-x64.zip and extracted it to D:\mongosh-2.5.10-win32-x64 folder. Open mongosh application from D:\mongosh-2.5.10-win32-x64\bin folder. It will open a command prompt which initially prompt to connect to local mongodb instance.
D:\mongosh-2.5.10-win32-x64\bin>mongosh
Current Mongosh Log ID: 6969f1784daa1172e11e2620
Connecting to:          mongodb://127.0.0.1:27017/?directConnection=true&serverSelectionTimeoutMS=2000&appName=mongosh+2.5.10
Using MongoDB:          8.2.3
Using Mongosh:          2.5.10
mongosh 2.6.0 is available for download: https://www.mongodb.com/try/download/shell

For mongosh info see: https://www.mongodb.com/docs/mongodb-shell/

------
   The server generated these startup warnings when booting
   2026-01-12T12:37:51.203+05:30: Access control is not enabled for the database. Read and write access to data and configuration is unrestricted
------

test>
MongoEngine - MongoDB Compass
MongoDB has also developed a GUI tool for handling MongoDB databases. It is called MongoDB Compass. It is a convenient tool for performing all CRUD operations without manually writing queries. It helps in many activities such as indexing, document validation, etc.
Download community edition of MongoDB Compass from https://www.mongodb.com/download-center/compass and start MongoDBCompassCommunity.exe (Ensure that MongoDB server is running before starting Compass). Connect to the local server by giving correct host and port number.
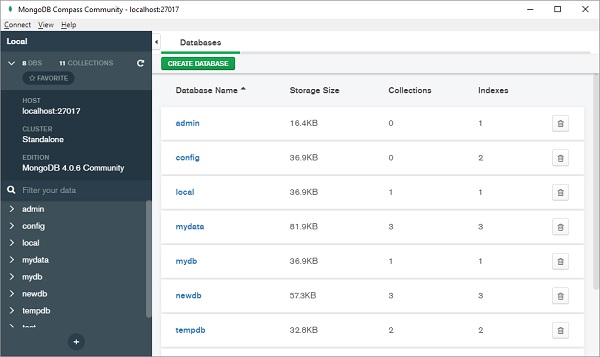
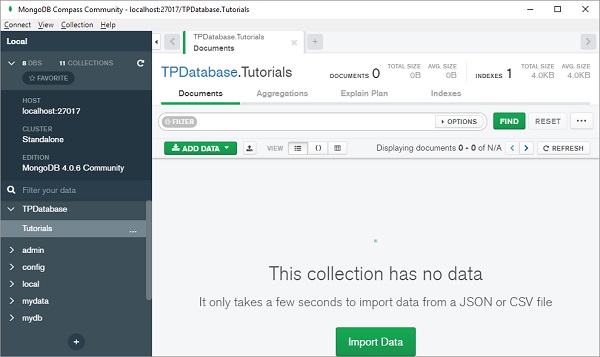
All the databases currently available will be listed as below −
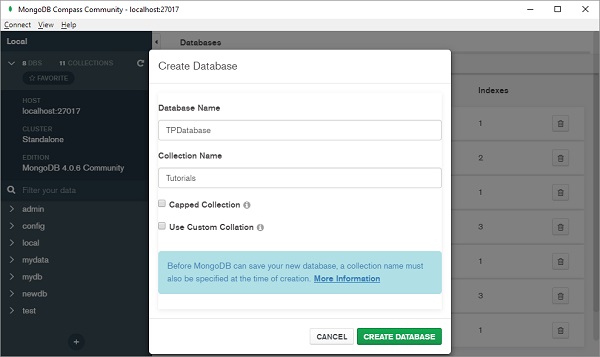
Click on + button (shown at the bottom of left panel) to create new database.
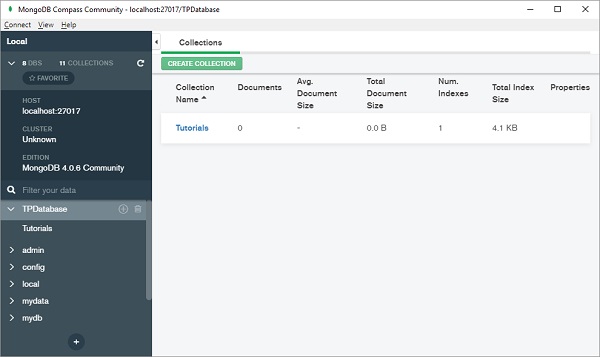
Choose name of database from list and select a Collection as shown below −
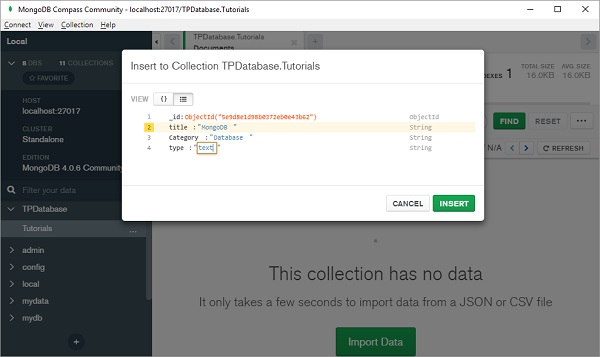
You can add document directly or import from CSV or JSON file.
Choose Insert Document from Add data drop down.
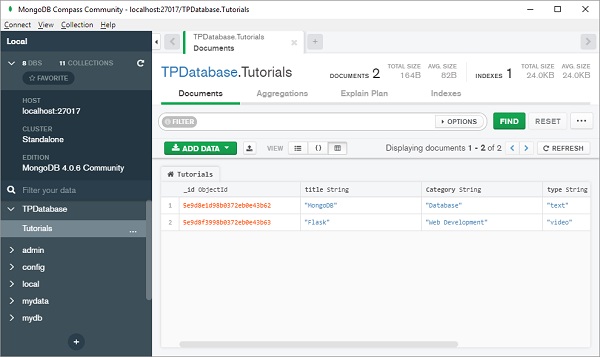
Documents added will be displayed in JSON, list or tabular form −
Note that, just as a table in relational database has a primary key, document in MongoDB database has a special key called "_id" that is automatically generated.
MongoDB Inc. provides a Python driver for connection with MongoDB databases. It is called PyMongo whose usage is similar to standard SQL queries.
After installing PyMongo module, we need object of MongoClient class for interacting with MongoDB server.
<<< from pymongo import MongoClient
<<< client=MongoClient()
New database is created with the following statement −
db=client.mydatabase
CRUD operations on this database are performed with methods such as insert_one() (or insert_many()), find(), update() and delete() methods. Detailed discussion of PyMongo library is available at https://www.tutorialspoint.com/python_data_access/python_mongodb_introduction.htm.
However, Pythons user defined objects cannot be stored in database unless it is converted in MongoDBs data types. This is where we need MongoEngine library.
MongoEngine - Object Document Mapper
MongoDB is a document based database. Each document is a JSON like representation of fields and values. A document in MongoDB is roughly equivalent to a row in RDBMS table (MongoDB equivalent of table is Collection). Even though MongoDB does not enforce any predefined schema, the field objects in a document have certain data type. MongoDB data types are very much similar to Pythons primary data types. If one has to store object of Pythons user defined class, its attributes have to be manually parsed to equivalent MongoDB data types.
MongoEngine provides a convenient abstraction layer over PyMongo and maps each object of Document class to a document in MongoDB database. MongoEngine API has been developed by Hary Marr in August 2013. Latest version of MongoEngine is 0.29.1.
MongoEngine is to MongoDB what SQLAlchemy is to RDBMS databases. MongoEngine library provides a Document class that is used as base for defining custom class. Attributes of this class form the fields of MongoDB document. The Document class defines methods to perform CRUD operations. In subsequent topics, we shall learn how to use them.
MongoEngine - Installation
To use MongoEngine, you need to have already installed MongoDB and MongoDB server should be running as described earlier.
Easiest way to install MongoEngine is by using PIP installer.
pip3 install mongoengine Collecting mongoengine Downloading mongoengine-0.29.1-py3-none-any.whl.metadata (6.7 kB) Collecting pymongo<5.0,>=3.4 (from mongoengine) Downloading pymongo-4.16.0-cp314-cp314-win_amd64.whl.metadata (10.0 kB) Collecting dnspython<3.0.0,>=2.6.1 (from pymongo<5.0,>=3.4->mongoengine) Downloading dnspython-2.8.0-py3-none-any.whl.metadata (5.7 kB) Downloading mongoengine-0.29.1-py3-none-any.whl (112 kB) Downloading pymongo-4.16.0-cp314-cp314-win_amd64.whl (1.0 MB) ââââââââââââââââââââââââââââââââââââââââ 1.0/1.0 MB 2.8 MB/s 0:00:00 Downloading dnspython-2.8.0-py3-none-any.whl (331 kB) Installing collected packages: dnspython, pymongo, mongoengine Successfully installed dnspython-2.8.0 mongoengine-0.29.1 pymongo-4.16.0
If your Python installation does not have Setuptools installed, you will have to download MongoEngine from https://github.com/MongoEngine/mongoengine and run the following command −
python setup.py install
MongoEngine has the following dependencies −
pymongo>=3.4
dnspython>=3.6.1
To verify the correct installation, run import command and check version as follows −
>>> import mongoengine
>>> mongoengine.__version__
'0.29.1'
MongoEngine - Connecting to MongoDB Database
As mentioned earlier, you should first start MongoDB server using mongod command.
MongoEngine provides connect() function to connect to a running instance of mongodb server.
>>>from mongoengine import connect
>>>connect(mydata.db)
MongoClient(host=['localhost:27017'], document_class=dict, tz_aware=False, connect=True, read_preference=Primary(), uuidrepresentation=3, driver=DriverInfo(name='MongoEngine', version='0.29.1', platform=None))
By default, MongoDB server is running on localhost and on port 27017. To customize, you should provide the host and port arguments to connect() −
connect('mydata.db', host='192.168.1.1', port=12345)
In case the database requires authentication, its credentials such as username, password and authentication_source arguments should be provided.
connect('mydata.db', username='user1', password='***', authentication_source='admin')
MongoEngine also supports URI style connections instead of IP address.
connect('mydata.db', host='mongodb://localhost/database_name')
The connect() function has another optional parameter called replicaset. MongoDB is a distributed database. Data stored in one server is usually replicated in many server instances in order to ensure high availability. A replica set in MongoDB is a group of mongod processes on which the same data set is maintained. Replica sets are the basis for all production deployments.
connect(host='mongodb://localhost/dbname?replicaSet=rs-name')
Following replica set methods are defined as follows:
| rs.add() | Adds a member to a replica set. |
| rs.conf() | Returns the replica set configuration document. |
| rs.freeze() | Prevents the current member from seeking election as primary for a period of time. |
| rs.initiate() | Initializes a new replica set. |
| rs.reconfig() | Re-configures a replica set by applying a new replica set configuration object. |
| rs.remove() | Removes a member from a replica set. |
MongoEngine also allows connection with multiple databases. You need to provide unique alias name for each database. For example, following code connects Python script to two MongoDB databases.
connect(alias='db1', db='db1.db')
connect(alias='db2', db='db2.db')
MongoEngine - Document Class
MongoEngine is termed as ODM (Object Document Mapper). MongoEngine defines a Document class. This is a base class whose inherited class is used to define structure and properties of collection of documents stored in MongoDB database. Each object of this subclass forms Document in Collection in database.
Attributes in this Document subclass are objects of various Field classes. Following is an example of a typical Document class −
from mongoengine import *

class Student(Document):
   studentid = StringField(required=True)
   name = StringField(max_length=50)
   age = IntField()
   def _init__(self, id, name, age):
      self.studentid=id,
      self.name=name
      self.age=age
This appears similar to a model class in SQLAlchemy ORM. By default, name of Collection in database is the name of Python class with its name converted to lowercase. However, a different name of collection can be specified in meta attribute of Document class.
meta={collection': 'student_collection'}
Now declare object of this class and call save() method to store the document in a database.
>>>s1=Student('A001', 'Tara', 20)
>>>s1.save()
<student: student object>
MongoEngine - Dynamic Schema
One of the advantages of MongoDB database is that it supports dynamic schema. To create a class that supports dynamic schema, subclass it from DynamicDocument base class. Following is the Student class with dynamic schema −
>>> class student(DynamicDocument):
... name=StringField()
...
>>>
The first step is to add first Document as before.
>>> s1=student()
>>> s1.name="Tara"
>>> connect('mydb')
>>> s1.save()
<student: student object>
Now add another attribute to second document and save.
>>> s2=student()
>>> setattr(s2,'age',20)
>>> s2.name='Lara'
>>> s2.save()
<student: student object>
In the database, student collection will show two documents with dynamic schema.
The meta dictionary of document class can use a Capped Collection by specifying max_documents and max_size.
max_documents − The maximum number of documents that is allowed to be stored in the collection.
max_size − The maximum size of the collection in bytes. max_size is rounded up to the next multiple of 256 by MongoDB internally and mongoengine before.
If max_size is not specified and max_documents is, max_size defaults to 10485760 bytes (10MB).
Other parameters of Document class are listed below −
| objects | A QuerySet object that is created lazily on access. |
| cascade_save() | Recursively save any references and generic references on the document. |
| clean() | Hook for doing document level data cleaning before validation is run. |
| create_index() | Creates the given indexes if required. |
| drop_collection() | Drops the entire collection associated with this Document type from the database. |
| from_json() | Converts json data to a Document instance. |
| modify() | Perform an atomic update of the document in the database and reload the document object using updated version. |
| pk | Get the primary key. |
| save() | Save the Document to the database. If the document already exists, it will be updated, otherwise it will be created. Returns the saved object instance. |
| delete() | Delete current document from database. |
| insert() | Performs bulk insert operation. |
MongoEngine - Fields
A MongoEngine document class has one or more attributes. Each attribute is an object of Field class. BaseField is the base class or all field types. The BaseField class constructor has the following arguments −
BaseField(db_field, required, default, unique, primary_key)
The db_field represents name of database field.
The required parameter decides whether value for this field is required, default is false.
The default parameter contains default value of this field
The unique parameter is false by default. Set to true if you want this field to have unique value for each document.
The primary_key parameter defaults to false. True makes this field primary key.
There are a number of Field classes derived from BaseField.
Numeric Fields
IntField (32bit integer), LongField (64 bit integer), FloatField (floating point number) field constructors have min_value and max_value parameters.
There is also DecimalField class. Value of this fields object is a float whose precision can be specified. Following arguments are defined for DecimalField class −
DecimalField(min_value, max_value, force_string, precision, rounding)
| min_value | specifies minimum acceptable value |
| max_value | specifies maximum value the field can have |
| force_string | If True, value of this field is stored as a string |
| precision | limits the floating representation to number of digits |
| rounding | Number is rounded as per following predefined constants decimal.ROUND_CEILING (towards Infinity) decimal.ROUND_DOWN (towards zero) decimal.ROUND_FLOOR (towards -Infinity) decimal.ROUND_HALF_DOWN (to nearest with ties going towards zero) decimal.ROUND_HALF_EVEN (to nearest with ties going to nearest even integer) decimal.ROUND_HALF_UP (to nearest with ties going away from zero) decimal.ROUND_UP (away from zero) decimal.ROUND_05UP (away from zero if last digit after rounding towards zero would have been 0 or 5; otherwise towards zero) |
Text Fields
StringField object can store any Unicode value. You can specify min_length and max_length of the string in the constructor. URLField object is a StringField with capability to validate input as a URL. EmailField validates the string as a valid email representation.
StringField(max-length, min_length)
URLField(url_regex)
EmailField(domain_whiltelist, allow_utf8_user, allow_ip_domain)
The domain_whitelist argument contains list of invalid domains which you would not support. If set to True, allow_utf8_user parameter allows the string to contain UTF8 characters as a part of email. The allow_ip_domain parameter is false by default, but if true, it can be a valid IPV4 or IPV6 address.
Following example uses numeric and string fields −
from mongoengine import *
connect('studentDB')
class Student(Document):
   studentid = StringField(required=True)
   name = StringField()
   age=IntField(min_value=6, max-value=20)
   percent=DecimalField(precision=2)
   email=EmailField()
s1=Student()
s1.studentid='001'
s1.name='Mohan Lal'
s1.age=20
s1.percent=75
s1.email='mohanlal@gmail.com'
s1.save()
When above code is executed, the student collection shows a document as below −

ListField
This type of field wraps any standard field, thus allowing multiple objects to be used as a list object in a database. This field can be used with ReferenceField to implement one to many relationships.
The student document class from above example is modified as below −
from mongoengine import *
connect('studentDB')
class Student(Document):
   studentid = StringField(required=True)
   name = StringField(max_length=50)
   subjects = ListField(StringField())
s1=Student()
s1.studentid='A001'
s1.name='Mohan Lal'
s1.subjects=['phy', 'che', 'maths']
s1.save()
The document added is shown in JSON format as follows −
{
"_id":{"$oid":"5ea6a1f4d8d48409f9640319"},
"studentid":"A001",
"name":"Mohan Lal",
"subjects":["phy","che","maths"]
}
DictField
An object of DictField class stores a Python dictionary object. In the corresponding database field as well, this will be stored.
In place of ListField in the above example, we change its type to DictField.
from mongoengine import *
connect('studentDB')
class Student(Document):
   studentid = StringField(required=True)
   name = StringField(max_length=50)
   subjects = DictField()
s1=Student()
s1.studentid='A001'
s1.name='Mohan Lal'
s1.subjects['phy']=60
s1.subjects['che']=70
s1.subjects['maths']=80
s1.save()
Document in the database appears as follows −
{
"_id":{"$oid":"5ea6cfbe1788374c81ccaacb"},
"studentid":"A001",
"name":"Mohan Lal",
"subjects":{"phy":{"$numberInt":"60"},
            "che":{"$numberInt":"70"},
            "maths":{"$numberInt":"80"}
            }
}
ReferenceField
A MongoDB document can store reference to another document using this type of field. This way, we can implement join as in RDBMS. A ReferenceField constructor uses name of other document class as parameter.
class doc1(Document):
   field1=StringField()
class doc2(Document):
   field1=StringField()
   field2=ReferenceField(doc1)
In following example, StudentDB database contains two document classes, student and teacher. Document of Student class contains reference to an object of teacher class.
from mongoengine import *
connect('studentDB')
class Teacher (Document):
   tid=StringField(required=True)
   name=StringField()
class Student(Document):
   sid = StringField(required=True)
   name = StringField()
   tid=ReferenceField(Teacher)

t1=Teacher()
t1.tid='T1'
t1.name='Murthy'
t1.save()

s1=Student()
s1.sid='S1'
s1.name='Mohan'
s1.tid=t1
s1.save()
Run above code and verify result in Compass GUI. Two collections corresponding to two document classes are created in StudentDB database.
The teacher document added is as follows −
{
"_id":{"$oid":"5ead627463976ea5159f3081"},
"tid":"T1",
"name":"Murthy"
}
The student document shows the contents as below −
{
"_id":{"$oid":"5ead627463976ea5159f3082"},
"sid":"S1",
"name":"Mohan",
"tid":{"$oid":"5ead627463976ea5159f3081"}
}
Note that ReferenceField in Student document stores _id of corresponding Teacher document. When accessed, Student object is automatically turned into a reference, and dereferenced when corresponding Teacher object is accessed.
To add reference to document being defined, use self instead of other document class as argument to ReferenceField. It may be noted that use of ReferenceField may cause poor performance as far retrieval of documents is concerned.
The ReferenceField constructor also has one optional argument as reverse_delete_rule. Its value determines what to be done if the referred document is deleted.
The possible values are as follows −
DO_NOTHING (0) - dont do anything (default).
NULLIFY (1) - Updates the reference to null.
CASCADE (2) - Deletes the documents associated with the reference.
DENY (3) - Prevent the deletion of the reference object.
PULL (4) - Pull the reference from a ListField of references
You can implement one to many relationship using list of references. Assuming that a student document has to be related with one or more teacher documents, the Student class must have a ListField of ReferenceField instances.
from mongoengine import *
connect('studentDB')
class Teacher (Document):
tid=StringField(required=True)
name=StringField()
class Student(Document):
   sid = StringField(required=True)
   name = StringField()
   tid=ListField(ReferenceField(Teacher))
t1=Teacher()
t1.tid='T1'
t1.name='Murthy'
t1.save()
t2=Teacher()
t2.tid='T2'
t2.name='Saxena'
t2.save()
s1=Student()
s1.sid='S1'
s1.name='Mohan'
s1.tid=[t1,t2]
s1.save()
On verifying result of the above code in Compass, you will find the student document having reference of two teacher documents −
Teacher Collection
{
"_id":{"$oid":"5eaebcb61ae527e0db6d15e4"},
"tid":"T1","name":"Murthy"
}
{
"_id":{"$oid":"5eaebcb61ae527e0db6d15e5"},
"tid":"T2","name":"Saxena"
}
Student collection
{
"_id":{"$oid":"5eaebcb61ae527e0db6d15e6"},
"sid":"S1","name":"Mohan",
"tid":[{"$oid":"5eaebcb61ae527e0db6d15e4"},{"$oid":"5eaebcb61ae527e0db6d15e5"}]
}
DateTimeField
An instance of DateTimeField class allows data in date format in MongoDB database. MongoEngine looks for Python-DateUtil library for parsing data in appropriate date format. If it is not available in current installation, date is represented using built-in time modules time.strptime() function. Default value of field of this type is current datetime instance.
DynamicField
Different and varying type of data can be handled by this field. This type of field is internally used by DynamicDocument class.
ImageField
This type of field corresponds to field in document that can store an image file. Constructor of this class can accept size and thumbnail_size parameters (both in terms of pixel size).
MongoEngine - Add/Delete Document
We have already used save() method of Document class to add a document in the collection. The save() method can be further customized with the help of following arguments −
| force_insert | Default is False, if set to True doesnt allow updates of existing documents. |
| validate | validates the document; set to False to skip. |
| clean | call the document clean method, validate argument should be True. |
| write_concern | will be used as options for the resultant getLastError command. For example, save(..., write_concern={w: 2, fsync: True}, ...) will wait until at least two servers have recorded the write and will force an fsync on the primary server. |
| cascade | Sets the flag for cascading saves. You can set a default by setting cascade in the document __meta__. |
| cascade_kwargs | optional keyword arguments to be passed throw to cascading saves. Equivalent to cascade=True. |
| _refs | A list of processed references used in cascading saves |
| save_condition | only perform save if matching record in db satisfies condition(s). Raises OperationError if the conditions are not satisfied |
| signal_kwargs | kwargs dictionary to be passed to the signal calls. |
You can set cleaning rules for validation of documents before calling save(). By providing a custom clean() method, you can do any pre validation/data cleaning.
class MyDocument(Document):
   ...
   ...

   def clean(self):
      if <condition>==True:
         msg = 'error message.'
         raise ValidationError(msg)
Note that Cleaning is only called if validation is turned on and when calling save().
Document class also has insert() method to perform bulk insert. It has following parameters −
| doc_or_docs | A document or list of documents to be inserted |
| load_bulk | If True, returns the list of document instances |
| write_concern | Extra keyword arguments are passed down to insert() which will be used as options for the resultant getLastError command. |
| signal_kwargs | (optional) kwargs dictionary to be passed to the signal calls |
If document contains any ReferenceField objects, then by default the save() method will not save any changes to those objects. If you want all references to be saved also, noting each save is a separate query, then passing cascade as True to the save method will cascade any saves.
Deleting a document from its collection is very easy, by calling delete() method. Remember that it will only take effect if the document has been previously saved. The delete() method has following arguments −
| signal_kwargs | (optional) kwargs dictionary to be passed to the signal calls. |
| write_concern | Extra keyword arguments are passed down which will be used as options for the resultant getLastError command. |
To delete entire collection from database use drop_collection() method. It drops the entire collection associated with this Document type from the database. The method raises OperationError if the document has no collection set (i.g. if it is abstract).
The modify() method in document class performs atomic update of the document in the database and reloads its updated version. It returns True if the document has been updated or False if the document in the database does not match the query. Note that all unsaved changes that have been made to the document are rejected if the method returns True.
Parameters
| query | The update will be performed only if the document in the database matches the query |
| update | Django-style update keyword arguments |
Example - Adding/Deleting Documents
main.py
from mongoengine import *

con = connect('myDb')

class Product(Document):
   productID = IntField(required=True)
   name = StringField()
   price = IntField()

product_list = [
   Product(productID=1, name="Laptop", price=25000),
   Product(productID=2, name="TV", price=50000),
   Product(productID=3, name="Router", price=2000),
   Product(productID=4, name="Scanner", price=5000),
   Product(productID=5, name="Printer", price=12500),
]
inserted_products = Product.objects.insert(product_list)

print(f"Inserted {len(inserted_products)} products.")

for product in Product.objects:
   print ('ID:',product.productID, 'Name:',product.name, 'Price:',product.price)

deleted_count = Product.objects().delete()
print(f"Number of product deleted: {deleted_count}")
Output
Compile and run the above code and verify the output −
Inserted 5 products.
ID: 1 Name: Laptop Price: 25000
ID: 2 Name: TV Price: 50000
ID: 3 Name: Router Price: 2000
ID: 4 Name: Scanner Price: 5000
ID: 5 Name: Printer Price: 12500
Number of product deleted: 5
MongoEngine - Querying Database
The connect() function returns a MongoClient object. Using list_database_names() method available to this object, we can retrieve number of databases on the server.
>>> disconnect()
>>> con=connect()
>>> dbs=con.list_database_names()
>>> for db in dbs:
...     print(db)
...
admin
config
local
myDb
sampleDB
test
>>>
It is also possible to obtain list of collections in a database, using list_collection_names() method.
>>> collections=con["myDb"].list_collection_names()
>>> for collection in collections:
...     print(collection)
...
mycol
sampleCollection
student
>>>
As mentioned earlier, the Document class has objects attribute that enable access to objects associated with the database.
The myDb database has a products collection corresponding to Document class below. To get all documents, we use objects attribute as follows −
main.py
from mongoengine import *

con = connect('myDb')

class Product(Document):
   productID = IntField(required=True)
   name = StringField()
   price = IntField()

product_list = [
   Product(productID=1, name="Laptop", price=25000),
   Product(productID=2, name="TV", price=50000),
   Product(productID=3, name="Router", price=2000),
   Product(productID=4, name="Scanner", price=5000),
   Product(productID=5, name="Printer", price=12500),
]
inserted_products = Product.objects.insert(product_list)

print(f"Inserted {len(inserted_products)} products.")

for product in Product.objects:
   print ('ID:',product.productID, 'Name:',product.name, 'Price:',product.price)
Output
Compile and run the above code and verify the output −
Inserted 5 products.
ID: 1 Name: Laptop Price: 25000
ID: 2 Name: TV Price: 50000
ID: 3 Name: Router Price: 2000
ID: 4 Name: Scanner Price: 5000
ID: 5 Name: Printer Price: 12500
MongoEngine - Filters
The objects attribute is a QuerySet manager. It creates and returns a QuerySet when accessed. A query can be subjected to filter with the help of field names as keyword arguments. For example, from above products collection, to print details of document with name of product as TV, we use Name as keyword argument.
main.py
from mongoengine import *

con = connect('myDb')

class Product(Document):
   productID = IntField(required=True)
   name = StringField()
   price = IntField()

for product in Product.objects(name='TV'):
   print ('ID:',product.productID, 'Name:',product.name, 'Price:',product.price)
Output
Compile and run the above code and verify the output −
ID: 2 Name: TV Price: 50000
You can use filter method of QuerySet object to apply filter to query. Following code snippet also returns product details with name=TV.
main.py
from mongoengine import *

con = connect('myDb')

class Product(Document):
   productID = IntField(required=True)
   name = StringField()
   price = IntField()

qset=Product.objects
for product in qset.filter(name='TV'):
   print ('ID:',product.productID, 'Name:',product.name, 'Price:',product.price)
Output
Compile and run the above code and verify the output −
ID: 2 Name: TV Price: 50000
MongoEngine - Query Operators
In addition to = operator to check equality, the following logical operators are defined in MongoEngine.
| Operator | Description |
|---|---|
| ne | not equal to |
| lt | less than |
| lte | less than or equal to |
| gt | greater than |
| gte | greater than or equal to |
| not | negate a standard check, may be used before other operators |
| in | value is in list |
| nin | value is not in list |
| mod | value % x == y, where x and y are two provided values |
| all | every item in list of values provided is in array |
| size | the size of the array is |
| exists | value for field exists |
These operators must be attached to field name with double underscore __.
To use greater than (gt) operator, use the following format −
main.py
from mongoengine import *

con = connect('myDb')

class Product(Document):
   productID = IntField(required=True)
   name = StringField()
   price = IntField()

#using greater than operator
for product in Product.objects(price__gt=10000):
   print ('ID:',product.productID, 'Name:',product.name, 'Price:',product.price)
Output
ID: 1 Name: Laptop Price: 25000
ID: 2 Name: TV Price: 50000
ID: 5 Name: Printer Price: 12500
The in operator is like Pythons in operator. For name of product matching with names in list, the following code is used −
main.py
from mongoengine import *

con = connect('myDb')

class Product(Document):
   productID = IntField(required=True)
   name = StringField()
   price = IntField()

for product in Product.objects(name__in=['TV', 'Printer']):
   print ('ID:',product.productID, 'Name:',product.name, 'Price:',product.price)
Output
ID: 2 Name: TV Price: 50000
ID: 5 Name: Printer Price: 12500
You can use following operators as shortcut for regex expressions for applying filter to queries −
| Operator | Description |
|---|---|
| exact | string field exactly matches value |
| iexact | string field exactly matches value (case insensitive) |
| contains | string field contains value |
| icontains | string field contains value (case insensitive) |
| startswith | string field starts with value |
| istartswith | string field starts with value (case insensitive) |
| endswith | string field ends with value |
| iendswith | string field ends with value (case insensitive) |
| match | performs an $elemMatch so you can match an entire document within an array |
For example, the following code prints product details for name containing o in name −
main.py
from mongoengine import *

con = connect('myDb')

class Product(Document):
   productID = IntField(required=True)
   name = StringField()
   price = IntField()

for product in Product.objects(name__contains='o'):
   print ('ID:',product.productID, 'Name:',product.name, 'Price:',product.price)
Output
ID: 1 Name: Laptop Price: 25000
ID: 3 Name: Router Price: 2000
In another example of string query, the following code displays name ending with er−
main.py
from mongoengine import *

con = connect('myDb')

class Product(Document):
   productID = IntField(required=True)
   name = StringField()
   price = IntField()

for product in Product.objects(name__endswith='er'):
   print ('ID:',product.productID, 'Name:',product.name, 'Price:',product.price)
Output
ID: 3 Name: Router Price: 2000
ID: 4 Name: Scanner Price: 5000
ID: 5 Name: Printer Price: 12500
MongoEngine - QuerySet Methods
The QuerySet object possesses following useful methods for querying the database.
first()
First document satisfying the query is returned. Following code will return first document in products collection, that has price < 20000.
main.py
from mongoengine import *

con = connect('myDb')

class Product(Document):
   productID = IntField(required=True)
   name = StringField()
   price = IntField()

qset=Product.objects(price__lt=20000)
doc=qset.first()
print ('Name:',doc.name, 'Price:',doc.price)
Output
Name: Router Price: 2000
exclude()
This will cause mentioned fields to be excluded from Query Set. Here, to_json() mehod of Document class is used to obtain JSONified version of Document. ProductID field will not appear in the result.
main.py
from mongoengine import *

con = connect('myDb')

class Product(Document):
   productID = IntField(required=True)
   name = StringField()
   price = IntField()

for product in Product.objects.exclude('productID'):
   print (product.to_json())
Output
{"_id": {"$oid": "5c8dec275405c12e3402423c"}, "Name": "Laptop", "price": 25000}
{"_id": {"$oid": "5c8dec275405c12e3402423d"}, "Name": "TV", "price": 50000}
{"_id": {"$oid": "5c8dec275405c12e3402423e"}, "Name": "Router", "price": 2000}
{"_id": {"$oid": "5c8dec275405c12e3402423f"}, "Name": "Scanner", "price": 5000}
{"_id": {"$oid": "5c8dec275405c12e34024240"}, "Name": "Printer", "price": 12500}
fields()
Use this method to manipulate which fields to load in the query set. Use field names as keyword arguments and set to 1 to include, 0 to exclude.
main.py
from mongoengine import *

con = connect('myDb')

class Product(Document):
   productID = IntField(required=True)
   name = StringField()
   price = IntField()

for product in Product.objects.fields(productID=1,price=1):
   print (product.to_json())
Output
{"_id": {"$oid": "5c8dec275405c12e3402423c"}, "ProductID": 1, "price": 25000}
{"_id": {"$oid": "5c8dec275405c12e3402423d"}, "ProductID": 2, "price": 50000}
{"_id": {"$oid": "5c8dec275405c12e3402423e"}, "ProductID": 3, "price": 2000}
{"_id": {"$oid": "5c8dec275405c12e3402423f"}, "ProductID": 4, "price": 5000}
{"_id": {"$oid": "5c8dec275405c12e34024240"}, "ProductID": 5, "price": 12500}
Setting field keyword argument to 0 in fields() method works similar to exclude() method.
main.py
from mongoengine import *

con = connect('myDb')

class Product(Document):
   productID = IntField(required=True)
   name = StringField()
   price = IntField()

for product in Product.objects.fields(price=0):
   print (product.to_json())
Output
{"_id": {"$oid": "5c8dec275405c12e3402423c"}, "ProductID": 1, "Name": "Laptop"}
{"_id": {"$oid": "5c8dec275405c12e3402423d"}, "ProductID": 2, "Name": "TV"}
{"_id": {"$oid": "5c8dec275405c12e3402423e"}, "ProductID": 3, "Name": "Router"}
{"_id": {"$oid": "5c8dec275405c12e3402423f"}, "ProductID": 4, "Name": "Scanner"}
{"_id": {"$oid": "5c8dec275405c12e34024240"}, "ProductID": 5, "Name": "Printer"}
only()
Effect of this method is similar to fields() method. Fields corresponding to keyword arguments only will appear in the query set.
main.py
from mongoengine import *

con = connect('myDb')

class Product(Document):
   productID = IntField(required=True)
   name = StringField()
   price = IntField()

for product in Product.objects.only('name'):
   print (product.to_json())
Output
{"_id": {"$oid": "5c8dec275405c12e3402423c"}, "Name": "Laptop"}
{"_id": {"$oid": "5c8dec275405c12e3402423d"}, "Name": "TV"}
{"_id": {"$oid": "5c8dec275405c12e3402423e"}, "Name": "Router"}
{"_id": {"$oid": "5c8dec275405c12e3402423f"}, "Name": "Scanner"}
{"_id": {"$oid": "5c8dec275405c12e34024240"}, "Name": "Printer"}
sum()
This method computes sum of given field in the query set.
average()
This method calculates average of given field in the query set.
main.py
from mongoengine import *

con = connect('myDb')

class Product(Document):
   productID = IntField(required=True)
   name = StringField()
   price = IntField()

avg=Product.objects.average('price')
ttl=Product.objects.sum('price')
print ('sum of price field',ttl)
print ('average of price field',avg)
Output
sum of price field 94500
average of price field 18900.0
MongoEngine - Sorting
QuerySets order_by() function is used to obtain the query result in a sorted manner. The usage is as follows −
Qset.order_by(fieldname)
By default, the sort order is ascending. For descending order, attach sign to name of field. For example, to get price wise list in ascending order −
main.py
from mongoengine import *

con = connect('myDb')

class Product(Document):
   productID = IntField(required=True)
   name = StringField()
   price = IntField()

for product in Product.objects.order_by('price'):
   print ("Name:{} price:{}".format(product.name, product.price))
Output
Name:Router price:2000
Name:Scanner price:5000
Name:Printer price:12500
Name:Laptop price:25000
Name:TV price:50000
Following code will get the list in descending order of name −
main.py
from mongoengine import *

con = connect('myDb')

class Product(Document):
   productID = IntField(required=True)
   name = StringField()
   price = IntField()

for product in Product.objects.order_by('-name'):
   print ("Name:{} price:{}".format(product.name, product.price))
Output
Name:TV price:50000
Name:Scanner price:5000
Name:Router price:2000
Name:Printer price:12500
Name:Laptop price:25000
You can also get sorting done on multiple fields. This code will get you namewise, pricelist in ascending order.
main.py
from mongoengine import *

con = connect('myDb')

class Product(Document):
   productID = IntField(required=True)
   name = StringField()
   price = IntField()

for product in Product.objects.order_by('name','price'):
   print ("Name:{} price:{}".format(product.name, product.price))
Output
Name:Laptop price:25000
Name:Printer price:12500
Name:Router price:2000
Name:Scanner price:5000
Name:TV price:50000
MongoEngine - Custom Query Sets
By default, the objects attribute on a document class returns a QuerySet without applying any filter. However, you can define a classmethod on a document that modifies a queryset. Such a method should accept two arguments doc_cls and queryset and it needs to be decorated with queryset_manager() in order for it to be recognized.
@queryset_manager
   def qry_method(docs_cls,queryset):
       .
       ----
In the following example, the document class called products has an expensive_prods() method which is decorated by @queryset_manager. The method itself applies a filter to queryset such that only objects with price >20000 are returned. This method is now the default document query and objects attribute of products class returns filtered documents.
Example - Filtering using Custom Method
main.py
from mongoengine import *

con = connect('myDb')

class Product(Document):
   productID = IntField(required=True)
   name = StringField()
   price = IntField()

   @queryset_manager
   def expensive_prods(doc_cls,queryset):
      return queryset.filter(price__gt=20000)

for product in Product.expensive_prods():
   print ("Name:{} price:{}".format(product.name, product.price))
Output
Name:Laptop price:25000
Name:TV price:50000
If you wish to customize methods for filtering documents, first declare a subclass of QuerySet class, and use it as value of queryset_class property in meta dictionary.
The example below uses MyQuerySet class as definition of custom queryset. The myqrymethod() in this class filters the documents whose name field ends with er. In products class, meta attribute refers to this queryset subclass is used as value of queryset_class property.
Example - Filtering using Custom QuerySet
main.py
from mongoengine import *

con=connect('myDb')

class MyQuerySet(QuerySet):
   def myQuery(self):
      return self.filter(name__endswith='top')

class Product (Document):
   meta = {'queryset_class': MyQuerySet}
   productID = IntField(required=True)
   name = StringField()
   price = IntField()

for product in Product.objects.myQuery():
   print ("Name:{} price:{}".format(product.name, product.price))
Output
Name:Laptop price:25000
MongoEngine - Indexes
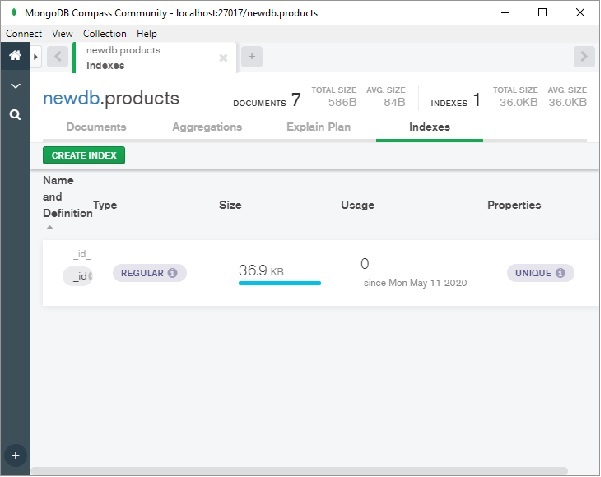
An indexed collection results in faster processing of queries. By default, every collection is automatically indexed on _id field. In addition, you can create index on one or more fields.
Using Compass, we can build index very easily. Click on CREATE INDEX button on Indexes tab as shown in figure below−
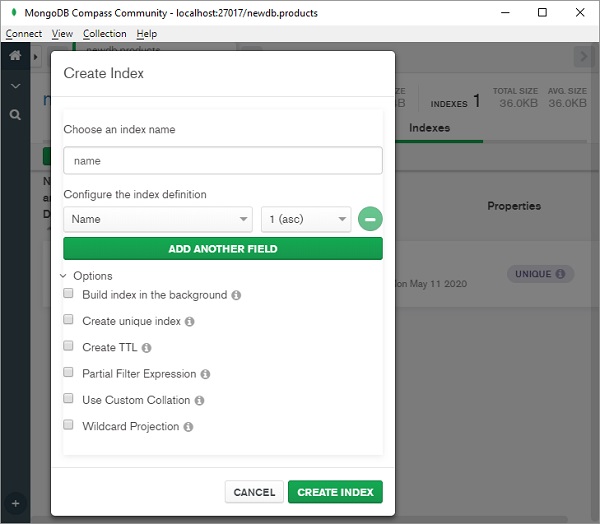
A dialog box appears as shown. Choose name of index, field on which to index, order of index (ascending or descending) and other options.
While using MongoEngine, indexes are created by specifying indexes key in meta dictionary of definition of Document class.
Example - Creating Index
Value of indexes property is a list of fields. In the following example, we ask documents in student collection be indexed according to name field.
main.py
from mongoengine import *

con=connect('mydata')

class Student(Document):
   name=StringField(required=True)
   course=StringField()
   meta = {'indexes':['name']}

s1=Student()
s1.name='Avinash'
s1.course='DataScience'
s1.save()

s2=student()
s2.name='Anita'
s2.course='WebDesign'
s2.save()
By default, indexing order is ascending. Order may be specified by prepending + for ascending or - for descending order.
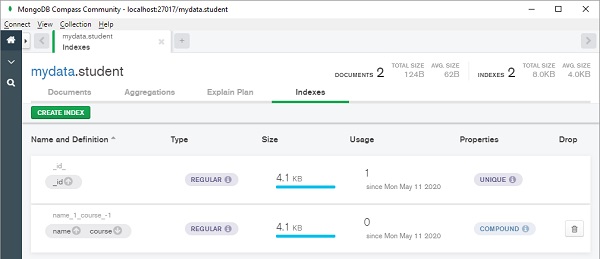
Example - Creating Compounding Index
To create compound index, use a tuple of field names, optionally having + or symbol attached to indicate sort order.
In the following example, student document class contains definition of compound index on name and course (note - symbol prefixed to course field which means index is built namewise ascending and coursewise descending order.
main.py
from mongoengine import *

con=connect('mydata')

class Student(Document):
   name=StringField(required=True)
   course=StringField()
   meta = {'indexes':[('name','-course')]}

s1=Student()
s1.name='Avinash'
s1.course='DataScience'
s1.save()

s2=Student()
s2.name='Anita'
s2.course='WebDesign'
s2.save()
Output
MongoDB Compass will show indexes as below −
Value of indexes may be a dictionary of various options as below −
| fields | The fields to index. |
| cls | If allow_inheritance is turned on, you can configure whether the index should have the _cls field added automatically. |
| sparse | Whether the index should be sparse. |
| unique | Whether the index should be unique. |
| expireAfterSeconds | automatically expire data from a collection by setting the time in seconds |
| name | Allows you to specify a name for the index |
| collation | Allows to create case insensitive indexes |
Following example creates index on name field that expires after 3600 seconds.
main.py
from mongoengine import *

con=connect('mydata')

class Student(Document):
   name=StringField(required=True)
   course=StringField()
   meta = {'indexes':[{
            'fields': ['name'],
            'expireAfterSeconds': 3600
           }
    ]
}
To specify text index, prefix field name with $ sign and for hashed index, use # as prefix.
Indexes so specified are created automatically as documents are added in the collection. To disable automatic creation, set auto_create_index to False in meta attribute.
Example - Listing Indexes
We have list_indexes() method with Document class that displays list of available indexes.
from mongoengine import *

con=connect('mydata')

class Student(Document):
   name=StringField(required=True)
   course=StringField()
   meta = {'indexes':[('name','-course')]}

print (Student.list_indexes())
Output
[[('name', 1), ('course', -1)], [('_id', 1)]]
To create index on a field not in the meta dictionary, use create_index() method. The following code will create index on course field −
class Student(Document):
   name=StringField(required=True)
   course=StringField()
   meta = {'indexes':[{
          'fields': ['name'],
          'expireAfterSeconds': 3600
        }
]}
student.create_index(['course'])
MongoEngine - Aggregation
The term aggregation is used for the operation that processes data and returns computed result. Finding sum, count and average on one or more fields of documents in a collection can be called as aggregation functions.
MongoEngine provides aggregate() function that encapsulates PyMongos aggregation framework. Aggregation operation uses a collection as input and returns one or more documents as a result.
MongoDB uses concept of data processing pipelines. A pipeline can have multiple stages. Basic stage provides that provide filter and operate like queries. Others provide tools for grouping and/or sorting by one or more fields, string concatenation tasks, array aggregation tools, etc.
Following stages are defined in MongoDB pipeline creation −
| Name | Description |
|---|---|
| $project | Reshapes each document in the stream, by adding new fields or removing existing fields. |
| $match | Filters the document stream to allow only matching documents to pass unmodified into the next stage. $match uses standard MongoDB queries. |
| $redact | Reshapes each document by restricting the content for each document based on information stored in the documents themselves. |
| $limit | Limits documents to be passed unmodified to the pipeline |
| $skip | Skips the first n documents and passes the remaining documents unmodified to the pipeline. |
| $group | Groups input documents by a given identifier expression and applies the accumulator expressions to each group. The output documents only contain the identifier field and accumulated fields. |
| $sort | Reorders the document stream by a specified sort key. |
| $out | Writes the resulting documents of the aggregation pipeline to a collection. |
Aggregation expressions use field path to access fields in the input documents. To specify a field path, use a string that prefixes with a dollar sign $$$ the field name. Expression can use one or more Boolean operators ($and, $or, $not) and comparison operators ($eq, $gt, $lt, $gte, $lte and $ne).
Following arithmetic expressions are also used for aggregation −
| $add | Adds numbers to return the sum. Accepts any number of argument expressions |
| $subtract | Returns the result of subtracting the second value from the first |
| $multiply | Multiplies numbers to return the product. Accepts any number of argument expressions |
| $divide | Returns the result of dividing the first number by the second. Accepts two argument expressions |
| $mod | Returns the remainder of the first number divided by the second. Accepts two argument expressions |
Following string expression can also be used in aggregation −
| $concat | Concatenates any number of strings |
| $substr | Returns a substring of a string, starting at a specified index position up to a specified length |
| $toLower | Converts a string to lowercase. Accepts a single argument expression |
| $toUpper | Converts a string to uppercase. Accepts a single argument expression |
| $strcasecmp | Performs string comparison and returns 0 if two strings are equivalent, 1 if first is greater than second, and -1 if first string is less than second |
To demonstrate how aggregate() function works in MongoEngine, let us first define a Document class called orders.
from mongoengine import *
con=connect('mydata')

class Order(Document):
   custID = StringField()
   amount= IntField()
   status = StringField()
We then add following documents in orders collection −
| _id | custID | amount | status |
|---|---|---|---|
| ObjectId("5eba52d975fa1e26d4ec01d0") | A123 | 500 | A |
| ObjectId("5eba536775fa1e26d4ec01d1") | A123 | 250 | A |
| ObjectId("5eba53b575fa1e26d4ec01d2") | B212 | 200 | D |
| ObjectId("5eba540e75fa1e26d4ec01d3") | B212 | 400 | A |
The aggregate() function is to be used to find sum of amount field for each custID only when status equals A. Accordingly, the pipeline is constructed as follows.
First stage in pipeline uses $match to filter documents with status=A. Second stage uses $group identifier to group documents on CustID and performs sum of amount.
 pipeline = [
   {"$match" : {"status" : "A"}},
   {"$group": {"_id": "$custID", "total": {"$sum": "$amount"}}}
]
This pipeline is now used as argument to aggregate() function.
docs = Order.objects().aggregate(pipeline)
We can iterate over the document cursor with a for loop. The complete code is given below −
main.py
from mongoengine import *

con=connect('mydata')

class Order(Document):
   custID = StringField()
   amount= IntField()
   status = StringField()

order_list = [
   Order(custID='A123', amount=500, status='A'),
   Order(custID='A123', amount=250, status='A'),
   Order(custID='B212', amount=200, status='D'),
   Order(custID='B212', amount=400, status='A')
]
inserted_orders = Order.objects.insert(order_list)

print(f"Inserted {len(inserted_orders)} orders.")

pipeline = [
   {"$match" : {"status" : "A"}},
   {"$group": {"_id": "$custID", "total": {"$sum": "$amount"}}}
]
docs = Order.objects().aggregate(pipeline)
for doc in docs:
   print (doc)
Output
For the given data, the following output is generated −
Inserted 4 orders.
{'_id': 'B212', 'total': 800}
{'_id': 'A123', 'total': 1500}
MongoEngine - Advanced Queries
In order to get more efficiency in retrieving a subset of fields in a document, use only() method of Objects attribute. This will significantly improve performance especially for fields with extremely large length such as ListField. Pass the required field to only() function. If other fields are accessed after executing only() query, default value is returned.
Example - Save and Retrieve an Object
main.py
from mongoengine import *

con=connect('newdata')

class Person(Document):
   name=StringField(required=True)
   city=StringField(default='Mumbai')
   pin=IntField()

p1 = Person(name='Himanshu', city='Delhi', pin=110012).save()

doc = Person.objects.only('name').first()

print ('name:',doc.name)
print ('city:', doc.city)
print ('PIN:', doc.pin)
Output
name: Himanshu
city: Mumbai
PIN: None
Note − The value of city attribute is used as default. As default is not specified for PIN, it prints None.
You may call reload() function if you need missing fields.
When a document class has a ListField or DictField, while iterating through it, any DBREf objects are automatically dereferenced. To increase the efficiency further, especially if the document has ReferenceField, number of queries can be limited by using select_related() function which converts QuerySet in a list and effects dereferencing.
MongoEngine API contains Q class which is useful for constructing advanced queries consisting of number of constraints. Q represents a part of query which can be initialized by keyword argument syntax and binary & and | operators.
main.py
from mongoengine import *

con=connect('newdata')

class Person(Document):
   name=StringField(required=True)
   city=StringField(default='Mumbai')
   pin=IntField()

Person.objects(Q(name__startswith='H') &Q(city='Mumbai'))
Output
name: Himanshu
city: Mumbai
PIN: None
MongoEngine - Document Inheritance
It is possible to define an inherited class of any user defined Document class. The inherited class may add extra fields if required. However, since such as a class is not a direct subclass of Document class, it will not create a new collection, instead its objects are stored in a collection used by its parent class. In the parent class, meta attribute allow_inheritance the following example, we first define employee as a document class and set allow_inheritance to true. The salary class is derived from employee, adding two more fields dept and sal. Objects of Employee as well as salary classes are stored in employee collection.
In the following example, we first define employee as a document class and set allow_inheritance to true. The salary class is derived from employee, adding two more fields dept and sal. Objects of Employee as well as salary classes are stored in employee collection.
main.py
from mongoengine import *

con=connect('newdata')

class Employee (Document):
   name=StringField(required=True)
   branch=StringField()
   meta={'allow_inheritance':True}

class Salary(Employee):
   dept=StringField()
   sal=IntField()

e1=Employee(name='Bharat', branch='Chennai').save()

s1=Salary(name='Deep', branch='Hyderabad', dept='Accounts', sal=25000).save()
Output
We can verify that two documents are stored in employee collection as follows −
{
"_id":{"$oid":"5ebc34f44baa3752530b278a"},
"_cls":"employee",
"name":"Bharat",
"branch":"Chennai"
}
{
"_id":{"$oid":"5ebc34f44baa3752530b278b"},
"_cls":"employee.salary",
"name":"Deep",
"branch":"Hyderabad",
"dept":"Accounts",
"sal":{"$numberInt":"25000"}
}
Note that, in order to identify the respective Document class, MongoEngine adds a _cls field and sets its value as "employee" and "employee.salary".
If you want to provide extra functionality to a group of Document classes, but without overhead of inheritance, you can first create an abstract class and then derive one or more classes from the same. To make a class abstract, meta attribute abstract is set to True.
main.py
from mongoengine import *

con=connect('newdata')

class Shape (Document):
   meta={'abstract':True}
   def area(self):
      pass

class Rectangle(Shape):
   width=IntField()
   height=IntField()
   def area(self):
      return self.width*self.height

r1=Rectangle(width=20, height=30).save()
MongoEngine - Atomic Updates
Atomicity is one of the ACID transaction properties. A database transaction has to be indivisible and irreducible so that it either occurs completely or doesnt occur at all. This property is called Atomicity. MongoDB supports Atomicity only on single documents and not on multi-document transactions.
MongoEngine provides the following methods for atomic updates on a queryset.
update_one() − Overwrites or adds first document matched by query.
update() − Performs atomic update on fields matched by query.
modify() − Update a document and return it.
Following modifiers may be used with these methods. (These modifiers come before the field, not after).
| set | set a particular value |
| unset | delete a particular value |
| inc | increment a value by a given amount |
| dec | decrement a value by a given amount |
| push | append a value to a list |
| push_all | append several values to a list |
| pop | remove the first or last element of a list depending on the value |
| pull | remove a value from a list |
| pull_all | remove several values from a list |
| add_to_set | add value to a list only if its not in the list already |
Example - Atomic Updates
The following is an example of atomic update, we first create a Document class called tests and add a document in it.
main.py
from mongoengine import *

con=connect('newdata')

class Test (Document):
   name=StringField()
   attempts=IntField()
   scores=ListField(IntField())

t1 = Test()
t1.name='XYZ'
t1.attempts=0
t1.scores=[]
t1.save()

test = Test.objects().first()

print ('name:',test.name)
print ('attempt:', test.attempts)
print ('scores:', test.scores)
Output
Run the code and verify the output −
name: XYZ
attempt: 0
scores: []
Let us use update_one() method to update name field from XYZ to MongoDB.
Test.objects(name='XYZ').update_one(set__name='MongoDB')
The push modifier is used to add data in ListField (scores).
Test.objects(name='MongoDB').update_one(push__scores=50)
To increment attempts field by one, we can use inc modifier.
Test.objects(name='MongoDB').update_one(inc__attempts=1)
main.py
from mongoengine import *

con=connect('newdata')

class Test (Document):
   name=StringField()
   attempts=IntField()
   scores=ListField(IntField())

Test.objects(name='XYZ').update_one(set__name='MongoDB')
Test.objects(name='MongoDB').update_one(push__scores=50)
Test.objects(name='MongoDB').update_one(inc__attempts=1)

test = Test.objects().first()

print ('name:',test.name)
print ('attempt:', test.attempts)
print ('scores:', test.scores)
Output
Run the code and verify the output −
name: MongoDB
attempt: 1
scores: [50]
MongoEngine - JavaScript
QuerySet object of MongoEngine has exec_js() method that allows execution of a Javascript function on MongoDB server. This function processes the following arguments −
exec_js(code, *field_names, **options)
Where,
code − a string containing Javascript code to execute
fields − to be used in your function, which will be passed as arguments
options − options that you want available to the function (accessed in Javascript through the options object)
In addition, some more variables are also made available to the functions scope as given below −
collection − name of the collection corresponding to the Document class. This should be used to get the Collection object from db in Javascript code.
query − the query that has been generated by the QuerySet object; passed into the find() method on a Collection object in the Javascript function.
options − an object containing the keyword arguments passed into exec_js().
Note that attributes in MongoEngine document class may use different names in the database (set using the db_field keyword argument to a Field constructor).
class BlogPost(Document):
title = StringField(db_field='doctitle')
For this purpose, a mechanism exists for replacing MongoEngine field attribute with the database field names in Javascript code.
When accessing a field on a collection object, use square-bracket notation, and prefix the MongoEngine field name with a tilde (~) symbol. The field name that follows the tilde will be translated to the name used in the database.
document': doc[~title];
Note that when Javascript code refers to fields on embedded documents, the name of the EmbeddedDocumentField, followed by a dot, should be used before the name of the field on the embedded document.
MongoEngine - GridFS
In MongoDB, the files with size larger than 16 MB are stored using GridFS specifications. A file is divided into multiple chunks each with a default size of 255KB. Large chunk may be as large as necessary. GridFS uses two collections, one for chunks and other for metadata.
GridFS may be used to store any file if you want to access it without having to load it entirely in the memory.
MongoEngine API supports GridFS through FileField object. Using this object, it is possible to insert and retrieve data. The FileField objects put() method helps writing the file as a part of Document.
Example - Writing Image
main.py
from mongoengine import *

con=connect('newdata')

class lang (Document):
   name=StringField()
   developer=StringField()
   logo=FileField()

l1=lang()
l1.name='Python'
l1.developer='Van Rossum'
f=open('pylogo.png','rb')
l1.logo.put(f,content_type='image/png')
l1.save()
Example - Reading Image
Contents of FileField can be retrieved by read() method of Pythons File object.
main.py
from mongoengine import *

con=connect('newdata')

class lang (Document):
   name=StringField()
   developer=StringField()
   logo=FileField()

l1=lang()
l1.name='Python'
l1.developer='Van Rossum'
f=open('pylogo.png','rb')
l1.logo.put(f,content_type='image/png')
l1.save()

logo = l1.logo.read()
Example - Deleting Image
There is also delete() method to delete the stored file.
main.py
from mongoengine import *

con=connect('newdata')

class lang (Document):
   name=StringField()
   developer=StringField()
   logo=FileField()

l1 = lang.objects(name='Python').first()
l1.logo.delete()
l1.save()
Note that the FileField stores only the ID of file in a separate GridFS collection. Hence delete() method does not delete the file physically.
Example - Replacing Image
The replace() method helps in replacing reference of file with another file.
main.py
from mongoengine import *

con=connect('newdata')

class lang (Document):
   name=StringField()
   developer=StringField()
   logo=FileField()

l1 = lang.objects(name='Python').first()
f=open('newlogo.png','rb')
l1.logo.replace(f,content_type='image/png')
l1.save()
MongoEngine - Signals
Signals are events dispatched by a sender object, any number of receiver objects can subscribe to such events. A signal receiver can subscribe to a specific sender or may receive signals from many senders.
In MongoEngine, signal handling is supported by blinker library, which means you need to install it using pip utility. The mongoengine.signals module has the definitions of following signals −
| pre_init | Called during the creation of a new Document or EmbeddedDocument instance and executed after the constructor arguments have been collected but before any additional processing has been done to them. |
| post_init | Called after all processing of a new Document or EmbeddedDocument instance has been completed. |
| pre_save | Called within save() prior to performing any actions. |
| pre_save_post_validation | Called within save() after validation has taken place but before saving. |
| post_save | Called within save() after most actions (validation, insert/update) have completed successfully. An additional Boolean keyword argument is passed to indicate if the save was an insert or an update. |
| pre_delete | Called within delete() prior to attempting the delete operation. |
| post_delete | Called within delete() upon successful deletion of the record. |
| pre_bulk_insert | Called after validation of the documents to insert, but prior to any data being written. |
| post_bulk_insert | Called after a successful bulk insert operation. An additional Boolean argument, loaded, identifies the contents of documents as either Document instances when True or a list of primary key values for the inserted records if False. |
An event handler function is then attached to Document class. Note that EmbeddedDocument only supports pre/post_init signals. pre/post_save, etc., should be attached to Documents class only.
You can also use a decorator to quickly create a number of signals and attach them to your Document or EmbeddedDocument subclasses as class decorators.
In the following example, used as demonstration of signal handlers, we also use Pythons standard library module logging and set the logging level to debug.
from mongoengine import *
from mongoengine import signals
import logging
logging.basicConfig(level=logging.DEBUG)
We then write a document class so that corresponding collection is created in newdb database. Inside the class, two class mehods pre_save() and post_save() methods are defined which are intended to be invoked before and after a document is saved in Author collection.
class Author(Document):
   name = StringField()

   def __unicode__(self):
      return self.name

   @classmethod
   def pre_save(cls, sender, document, **kwargs):
      logging.debug("Pre Save: %s" % document.name)

   @classmethod
   def post_save(cls, sender, document, **kwargs):
      logging.debug("Post Save: %s" % document.name)
      if 'created' in kwargs:
         if kwargs['created']:
            logging.debug("Created")
         else:
            logging.debug("Updated")
Both the class methods are defined with arguments for classname, sender object and document with optional list of keyword arguments.
Finally, we register the signal handlers.
signals.pre_save.connect(Author.pre_save, sender=Author)
signals.post_save.connect(Author.post_save, sender=Author)
As we create an instance of Document subclass, the console log will show the pre and post save signals being processed by respective event handlers.
Author(name="Lathkar").save()
Complete Example
main.py
from mongoengine import *
from mongoengine import signals
import logging

connect('newdata')

logging.basicConfig(level=logging.DEBUG)

class Author(Document):
   name = StringField()

   def __unicode__(self):
      return self.name

   @classmethod
   def pre_save(cls, sender, document, **kwargs):
      logging.debug("Pre Save: %s" % document.name)

   @classmethod
   def post_save(cls, sender, document, **kwargs):
      logging.debug("Post Save: %s" % document.name)
      if 'created' in kwargs:
         if kwargs['created']:
            logging.debug("Created")
         else:
            logging.debug("Updated")

signals.pre_save.connect(Author.pre_save, sender=Author)
signals.post_save.connect(Author.post_save, sender=Author)

Author(name="Lathkar").save()
Output
Python console reports the log as shown below −
DEBUG:root:Pre Save: Lathkar
...
DEBUG:root:Post Save: Lathkar
DEBUG:root:Created
MongoEngine - Text Search
MongoDB supports use of query operators that can perform text search on a string content. As described earlier, to set a text index prefix name of index with $ symbol. For a text index, the weight of an indexed field denotes the significance of the field relative to the other indexed fields in terms of the text search score. You can also specify default language in meta dictionary of the class.
List of supported languages can be found at https://docs.mongodb.com/manual/reference/text-search-languages/ MongoEngine API consists of search_text() method for QuerySet object. The string to be searched in indexed fields is given as argument.
Example - Text Search
In the following example, we first define a Document class called lang with two string fields, name of language and its features. We also create indexes on both fields with respective weights.
main.py
from mongoengine import *

con=connect('newdata')

class lang (Document):
   name=StringField()
   features=StringField()
   meta = {'indexes': [
      {'fields': ['$name', "$features"],
         'default_language': 'english',
         'weights': {'name': 2, 'features': 10}
      }]
   }

l1=lang()
l1.name='C++'
l1.features='Object oriented language for OS development'
l1.save()

l2=lang()
l2.name='Python'
l2.features='dynamically typed and object oriented for data science, AI and ML'
l2.save()

l3=lang()
l3.name='HTML'
l3.features='scripting language for web page development'
l3.save()

docs=lang.objects.search_text('oriented')
for doc in docs:
   print (doc.name)
Output
In order to perform search for word oriented, we employed search_text() method as follows −
docs=lang.objects.search_text('oriented')
for doc in docs:
   print (doc.name)
Output of the above code will be names of languages in whose description the word oriented occurs (Python and C++ in this case).
C++
Python
MongoEngine - Extensions
MongoEngine integrates beautifully with the following libraries −
marshmallow_mongoengine
marshmallow is an ORM/ODM/framework independent serialization/deserialization library for converting complex datatypes, such as objects, to and from native Python datatypes. Using this extension of MongoEngine, we can easily perform serialize/deserialize operations.
First, create a Document class as usual as follows −
import mongoengine as me
class Book(me.Document):
title = me.StringField()
Then generate marshmallow schema with the code below −
from marshmallow_mongoengine import ModelSchema
class BookSchema(ModelSchema):
   class Meta:
      model = Book

b_s = BookSchema()
Save a document using the code:
book = Book(title='MongoEngine Book').save()
And perform serialization/deserialization using dump(0 and load() using the code below −
data = b_s.dump(book).data
b_s.load(data).data
Flask-MongoEngine
This is a Flask extension that provides integration with MongoEngine. Connection management of MongoDB database for your app is handled easily by this library. You can also use WTForms as model forms for your models.
After installation of flask-mongoengine package, initialize flask app with the following settings −
from flask import Flask
from flask_mongoengine import MongoEngine

app = Flask(__name__)
app.config['MONGODB_SETTINGS'] = {
   'db': 'mydata',
   'host': 'localhost',
   'port':27017
}
db = MongoEngine(app)
Then define a Document sub class using the below code −
class book(me.Document):
name=me.StringField(required=True)
Declare an object of above class and call save() method when a particular route is visited.
@app.route('/')
def index():
b1=book(name='Introduction to MongoEngine')
b1.save()
return 'success'
extras-mongoengine
This extension contains additional Field Types and any other wizardry.
Eve-MongoEngine
Eve is an open source Python REST API framework designed for human beings. It allows to effortlessly build and deploy highly customizable, fully featured RESTful Web Services.
Eve is powered by Flask and Cerberus and it offers native support for MongoDB data stores. Eve-MongoEngine provides MongoEngine integration with Eve.
Install and import the extension using the code below −
import mongoengine
from eve import Eve
from eve_mongoengine import EveMongoengine
Configure the settings and initialize the Eve instance.
my_settings = {
'MONGO_HOST': 'localhost',
'MONGO_PORT': 27017,
'MONGO_DBNAME': 'eve_db'
app = Eve(settings=my_settings)
# init extension
ext = EveMongoengine(app)
Define a Document class as shown below −
class Person(mongoengine.Document):
name = mongoengine.StringField()
age = mongoengine.IntField()
Add the model and run the application, finally using the below code −
ext.add_model(Person)
app.run()
Django-MongoEngine
This extension aims to integrate MongoEngine with Django API, a very popular Python web development framework. This project is still under development.