- Cypress - Home
- Cypress - Introduction
- Cypress - Architecture and Environment Setup
- Cypress - Test Runner
- Cypress - Build First Test
- Cypress - Supported Browsers
- Cypress - Basic Commands
- Cypress - Variables
- Cypress - Aliases
- Cypress - Locators
- Cypress - Assertions
- Cypress - Text Verification
- Cypress - Asynchronous Behavior
- Cypress - Working with XHR
- Cypress - jQuery
- Cypress - Checkbox
- Cypress - Tabs
- Cypress - Dropdown
- Cypress - Alerts
- Cypress - Child Windows
- Cypress - Hidden Elements
- Cypress - Frames
- Cypress - Web Tables
- Cypress - Mouse Actions
- Cypress - Cookies
- Cypress - Get and Post
- Cypress - File Upload
- Cypress - Data Driven Testing
- Cypress - Prompt Pop-up Window
- Cypress - Dashboards
- Cypress - Screenshots and Videos
- Cypress - Debugging
- Cypress - Custom Commands
- Cypress - Fixtures
- Cypress - Environment Variables
- Cypress - Hooks
- Cypress - Configuration of JSON File
- Cypress - Reports
- Cypress - Plugins
- Cypress - GitHub
- Cypress Useful Resources
- Cypress - Quick Guide
- Cypress - Useful Resources
- Cypress - Discussion
Cypress - Quick Guide
Cypress - Introduction
Cypress is an open-source and free test automation tool, which can be used extensively in the long run. It is mainly used for front end test automation. This tool is mainly developed to solve the issues that the teams face, while automating an application.
Cypress helps to achieve the following −
Configure tests.
Configure tests.
Execute tests.
Identify errors (if any).
Selenium and Cypress are often compared in terms of their functionalities. However, Cypress is different in architecture and features. Moreover, it resolves some of the issues we face in Selenium.
Cypress is based on Javascript and executes tests within the browser. It helps to develop the tests which include −
Unit tests.
End to end tests.
Integration tests.
Features
The important features of Cypress are listed below −
Supports Test-Driven development.
Provides Dashboard services.
Efficient debugging with Developer Tools accompanied with generation of stack trace and errors.
Provides the screenshots for failed tests.
Not necessary to add waits to stop the execution for some time. By-default, the waits are applied, prior to executing the following step or assertion.
Able to monitor and control the characteristics of server response, functions, and timers, which are essentially needed for unit testing.
Check and manage network traffic.
Allows the multi-browser support.
In-built feature to capture videos of execution is available.
Can be integrated with continuous integration tools.
Page responsiveness with viewport sizing.
Reloads changes applied to tests by default.
Friendly Application Programming Interfaces (APIs) are available.
Test runner available, which allows the test execution straight from the User Interface (UI).
Disadvantages
There are some disadvantages of using Cypress and they are listed below −
It is only based on JavaScript.
A relatively new tool and hence, the community support is not extensive.
It cannot perform mobile testing.
Shadow Document Object Model (DOM) cannot be accessed.
Tabs/child windows are managed by workarounds.
Cypress - Architecture and Environment Setup
Cypress architecture is illustrated in the below diagram −
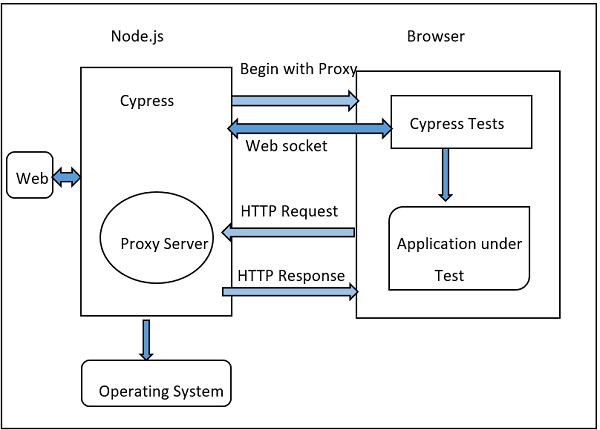
The source of the above diagram is https://www.tutorialspoint.com/cypress-architecturetest-automation
Automation tools like Selenium work by running outside the browser. However, the Cypress has a different architecture. It runs within the browser. Cypress is basically based on the server - Node.js.
There is a continued interaction of Cypress with the Node.js and they work in coordination with each other. As a result, Cypress can be utilised for testing both the front and backend of the application.
Cypress is thus, capable of handling the tasks performed at a real time on the UI and simultaneously can also perform the actions outside of the browser.
Difference between Cypress and Selenium
The basic differences between Cypress and Selenium are listed below −
| Cypress | Selenium |
|---|---|
| It is based on Javascript. | It is based on Java, C#, Python and JavaScript. |
| It has small community support | It has big community support. |
| It includes an in-built video capture feature. | There is no in-built video capture feature. |
| No APIs are available to handle the tabs/child windows. | APIs available to handle tabs/child windows. |
| No parallel execution can be performed. | Parallel execution can be performed. |
| Only installation of npm needed. | Supplemental Jars, libraries, and so on are required to be added as project dependencies. |
Cypress Environment Setup
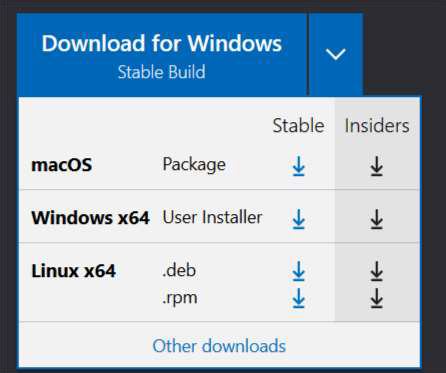
For Cypress environment setup, visit the link −https://nodejs.org/en/download/. The screen that will appear is given below −
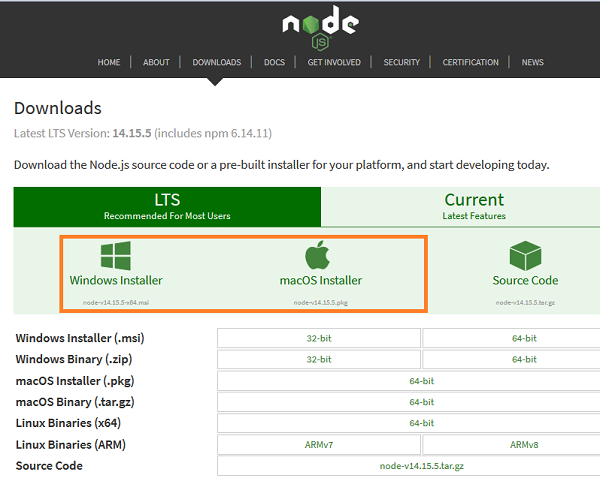
There shall be both Windows and macOS Installer. We have to get the package as per the local operating system.
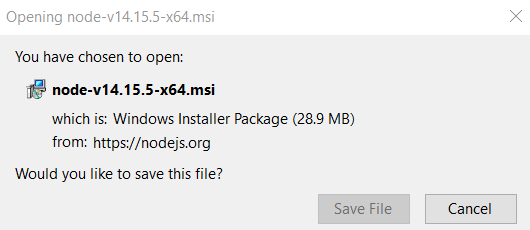
For a 64- bit Windows configuration, the following pop-up comes up to save the installer.
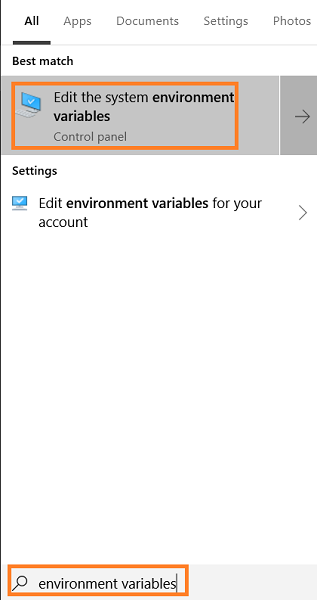
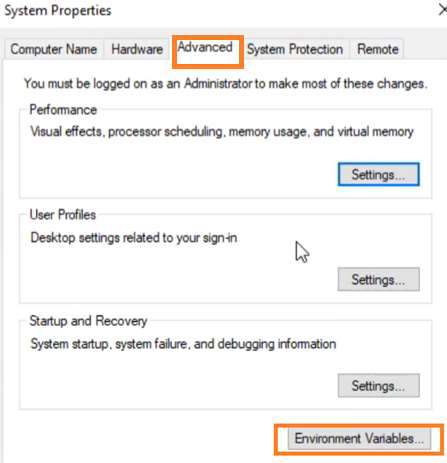
Once the installation is done, a nodejs file gets created in the Program files. The path of this file should be noted. Then, enter environment variables from the Start, as shown below −
In the System Properties pop-up, move to Advanced, click on Environment Variables. Then click on OK.
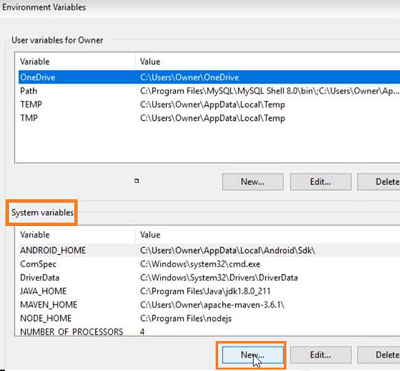
In the Environment Variables pop-up, move to the System variables section and click on New.
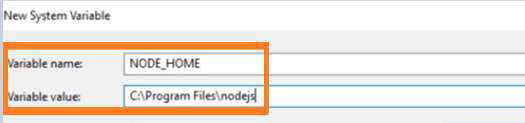
Enter NODE_HOME and the node.js path (noted earlier) in the Variable name and the Variable value fields respectively in the New System Variable pop-up.
Once the path of the node.js file is set, we shall create an empty folder (say cypressautomation) in any desired location.
Next, we need to have a JavaScript editor to write the code for Cypress. For this, we can download Visual Studio Code from the link https://code.visualstudio.com/
As per the local operating system, choose the correct package −
Once the executable file is downloaded, and all the installation steps are completed, the Visual Studio Code gets launched.
Select the option Open Folder from the File menu. Then, add the CypressAutomation folder (that we have created before) to the Visual Studio Code.

We need to create the package.json file with the below command from terminal −
We have to enter details like the package name, description, and so on, as mentioned in the image given below −
npm init
Once done, the package.json file gets created within the project folder with the information we have provided.

Once done, the package.json file gets created within the project folder with the information we have provided.

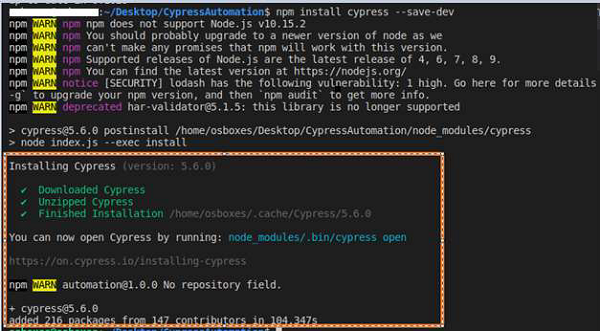
Finally, to install Cypress run the command given below −
npm install cypress --save-dev
You will get the following output −
Cypress - Test Runner
Cypress Test Runner helps to trigger the test execution. As we complete Cypress installation, there comes a suggestion from the tool on the terminal, as mentioned below −
You can open Cypress by running − node_modules/.bin/cypress open
To open the Test Runner, we have to run the below mentioned command −
node_modules/.bin/cypress open
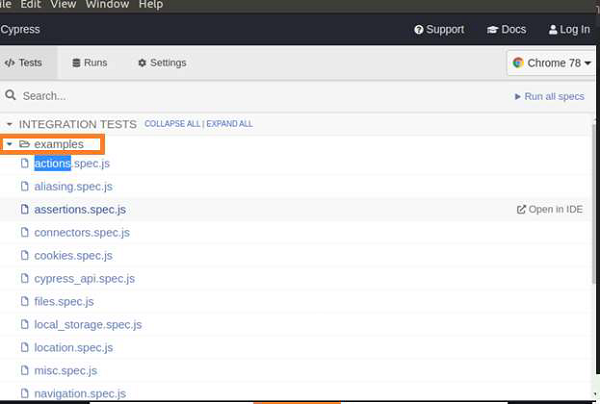
The Test Runner window opens up after some time with the message that a sample project folder structure has been provided by Cypress under examples folder.
Click on the OK, got it! button. The screen that will appear on your computer would be as follows −

Then the Test Runner is launched, with the more than one spec files available under the examples folder, as stated below −
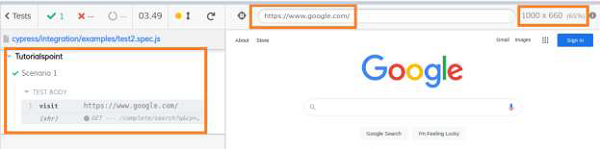
To run a specific file, for example, test2.spec.js, we have to click it. Also, the browser and the option to Stop the execution are available.
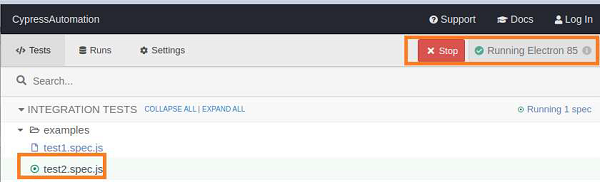
The execution shall begin with the following screen showing the test steps, name of test case, test suite, URL, test duration, dimension of browser, and so on.
Cypress - Build First Test
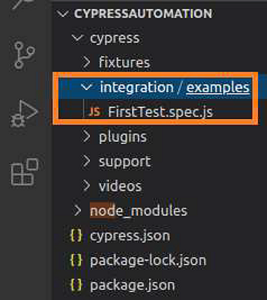
Once Cypress has been configured, a framework gets created within the project which is automatically visible in the Explorer. The new test file (say FirstTest.spec.js) should be created within the integration folder, as mentioned below.
Cypress Folder Structure
Let us understand the folder structure in Cypress. The factors that are included in a Cypress folder are explained below −
fixtures − Test data in form of key-value pairs for the tests are maintained here.
integration − Test cases for the framework are maintained here.
plugins − Cypress events (prior and post events to be executed for a test) are maintained here.
support − Reusable methods or customized commands, which can be utilised by test cases directly, without object creation are created here.
videos − Executed test steps are recorded in the form of videos and maintained here.
node_modules − Project dependencies from the npm are maintained in this folder.It is the heart of the Cypress project execution.
cypress.json − Default configurations are set in this folder. The values of the current configurations can be modified here, which overrules the default configurations.
package.json − Dependencies and scripts for the projects are maintained in this folder.
Structure of a Basic Test
Cypress follows the JavaScript test frameworks (Mocha, Jasmine, and so on). To create a test in Cypress, we have to adhere to the below mentioned framework guidelines −
Test suite name has to be provided within the describe function.
Test case names within a test suite have to be provided within the same or you have to specify the function.
Test steps within a test case have to be implemented inside the it/specify block.
Basic Test Implementation
The basic test implementation can be done by using the following command −
// test suite name
describe('Tutorialspoint Test', function () {
// Test case
   it('Scenario 1', function (){
      // test step for URL launching
      cy.visit("https://www.google.com/");
   });
});
The cy command used above does not require an object invocation. It becomes available by default on installing the node modules.
Test Execution
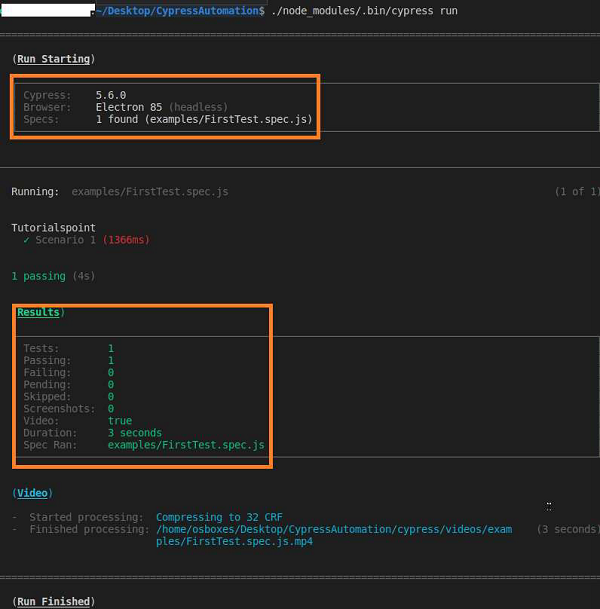
For execution from the command line, run the command given below −
./node_modules/.bin/cypress run
Here, all the files within the integration folder get triggered.
For execution from the Test Runner, run the command stated below −
./node_modules/.bin/cypress open
Then, click on the spec file that we want to trigger for execution.
To trigger execution for a specific file from command line, run the command mentioned below −
cypress run --spec "<spec file path>"
The following screen will appear on your computer −
Cypress - Supported Browsers
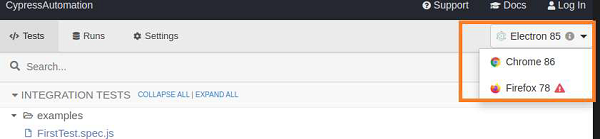
Cypress can run tests in browsers like Chrome, Electron, and Firefox. In the Test Runner,we have the option to choose the browser from the right upper corner.
Also, it must be noted that if a browser option is not available, it means we do not have the latest version of that browser in our system.
Execution from Other Browsers
The execution from other browsers from Command Line is explained below −
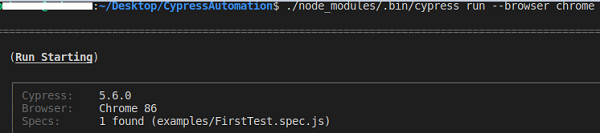
To run the execution in Chrome, you need to run the below mentioned command −
./node_modules/.bin/cypress run -- browser chrome
You can see the following screen −
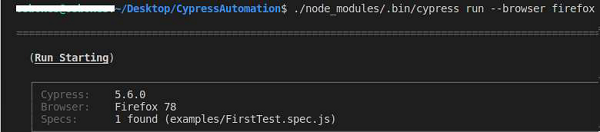
To run the execution in Firefox, run the command given below −
./node_modules/.bin/cypress run -- browser firefox
You can see the following screen −
To run the execution in headed mode, run the command given below −
./node_modules/.bin/cypress run -- headed
From the command line, Cypress executes tests in headless mode, if no option is specified.
Cypress - Basic Commands
Cypress basic commands are listed below −
and
It is used to create an assertion and is an alias of .should ().
The usage is as follows −
//element is visible & enabled
cy.get('#txt').should('be.visible').and('be.enabled')
//element is checked
cy.contains('Subject').and('be.checked')
as
It provides an alias for later usage.
The usage is as follows −
//alias element as parent
cy.get('#txt').find('li').first().as('parent')
blur
It blurs an element in focus.
The usage is as follows −
//blur input
cy.get('#txt'). type('abc').blur()
check
It checks radio buttons or checkboxes and is applied to elements having input tags.
The usage is as follows −
//checks element having class attribute chkbox
cy.get('.chkbox').check()
children
It obtains the sub elements of an element.
The usage is as follows −
//obtains children of element n
cy.get('n').children()
clear
It removes the value from textarea or input.
The usage is as follows −
//removes input abc
cy.get('#txt'). type('abc').clear()
clearCookie
It removes a particular browser cookie.
The usage is as follows −
//clear abc cookie
cy.clearCookie('abc')
clearCookies
It removes the browser cookies from an existing domain and subdomain.
The usage is as follows −
//clear all cookies
cy.clearCookies()
clearLocalStorage
It removes the local Storage data from an existing domain and subdomain.
The usage is as follows −
//clear all local storage
cy. clearLocalStorage ()
click
It clicks an element in Document Object Model (DOM).
The usage is as follows −
//click on element with id txt
cy.get('#txt').click()
contains
It obtains an element having a specific text. The element can have more than the text and still match.
The usage is as follows −
//returns element in #txt having Tutor text
cy.get('#txt').contains('Tutor')
dblclick
It double-clicks an element in Document Object Model (DOM).
The usage is as follows −
//double clicks element with id txt
cy.get('#txt').dblclick()
debug
It fixes a debugger and log values are returned by prior command.
The usage is as follows −
//pause to debug at start of command
cy.get('#txt').debug()
document
It obtains window.document on the active page.
The usage is as follows −
cy.document()
each
It iterates through an array having the property length.
The usage is as follows −
//iterate through individual li
cy.get('li').each(() => {...})
end
It ends a command chain.
The usage is as follows −
//obtain null instead of input
cy.contains('input').end()
eq
It refers to an element at a particular index in an array of elements.
The usage is as follows −
//obtain third td in tr
cy.get('tr>td').eq(2)
exec
It runs a system command.
The usage is as follows −
cy.exec('npm init')
find
It obtains the descendant elements of a particular locator.
The usage is as follows −
//obtain td from tr
cy.get('tr').find('td')
first
It obtains the first element from a group of elements.
The usage is as follows −
//obtain first td in tr
cy.get('tr>td').first()
get
It obtains single or multiple elements by locator.
The usage is as follows −
//obtain td from tr
find
It obtains the descendant elements of a particular locator.
The usage is as follows −
//obtain all td from tr in list
cy.get('tr>td')
getCookie
It obtains a particular browser cookie by its name.
The usage is as follows −
cy.getCookie('abc')
getCookies
It obtains all the cookies
The usage is as follows −
cy.getCookies()
go
It moves forward or backward to the next or previous URL in browser history.
The usage is as follows −
//like clicking back button
cy.go('back')
//like clicking forward button
cy.go('forward')
visit
It launches an URL.
The usage is as follows −
cy.visit('https://www.tutorialspoint.com/index.htm')
next
It obtains the immediate sibling of an element within a group of elements in Document Object Model (DOM).
The usage is as follows −
//gives the following link in element l.
cy.get('l a:first').next()
parent
It obtains the parent element from a group of elements in DOM.
The usage is as follows −
//get parent of element with class h
cy.get('.h').parent()
should
It is used to create an assertion and is an alias of .and ().
The usage is as follows −
//assert element is visible & enabled
cy.get('#txt').should('be.visible').and('be.enabled')
wait
Wait for a certain time in milliseconds or for an aliased element prior to moving the following step.
The usage is as follows −
cy.wait(1000)
title
It obtains the document.title of the active page.
The usage is as follows −
cy.title()
viewport
It manages the dimension and positioning of the screen.
The usage is as follows −
// viewport to 100px and 500px
cy.viewport(100, 500)
log
It prints the messages to the Command Log.
The usage is as follows −
cy.log('Cypress logging ')
reload
It is used for page reloading.
The usage is as follows −
cy.reload()
Cypress - Variables
In Cypress, there is usage of variables like var, let, and const. While working with closures,we can use the objects that were obtained without assignment. But, this is not the case,when we are working with mutable objects.
When an object modifies its characteristics, we may need to compare its prior value to its new value.
Code Implementation
We can do the code implementation by using the below mentioned command −
cy.get('.btn').then(($span) => {
   // value capture before button click and stored in const
   const n = parseInt($span.text())
   cy.get('b').click().then(() => {
      // value capture after button click and stored in const
      const m = parseInt($span.text())
      // comparison
      expect(n).to.eq(m)
   })
})
In the above case, we are using const variables since object $span is undergoing change. While dealing with mutable objects and its value, it is recommended to use variables of type const.
Cypress - Aliases
Cypress aliases are an important component that have multiple uses. These uses are listed below −
Sharing Context
We have to use .as() to alias something that we have to share. To alias objects and primitives, Mocha context objects are used. The alias object can be accessed with this.*.
Mocha by default, shares context for all the hooks applicable for the test and the alias properties are flushed post the execution of a test.
describe('element', () => {
   beforeEach(() => {
      cy.wrap('eleone').as('x')
   })
   context('subelement', () => {
      beforeEach(() => {
         cy.wrap('eletwo').as('y')
      })
         it('aliases properties', function () {
            expect(this.x).to.eq(' eleone ')
            expect(this.y).to.eq(' eleone ')
         })
      })
   })
})
We can handle fixtures by sharing context. We can also use cy.get(), which is an asynchronous command, to access an alias with the help of @ symbol (instead of using this.*) This is a synchronous command.
beforeEach(() => {
   // alias fixtures
   cy.fixture('users.json').as('u')
})
it('scenario', function () {
   // '@' to handle aliases
   cy.get('@u').then((u) => {
      // access element argument
      const i = u[0]
      //verification
      cy.get('header').should('contain', u.name)
   })
})
Elements
Alias can be used with Document Object Model (DOM) elements and later be reused. Here in the below example, by default Cypress makes a reference to td collection obtained as the alias cols. To use the same cols, we have to use cy.get() command.
// alias td in tr
cy.get('tr').find('td').as('cols')
cy.get('@cols').first().click()
As we used @ in cy.get(), Cypress searches for the present alias (cols) and yields its reference.
Routes
Aliases can be utilised with routes. It makes sure that the application has made the requests. Then, it awaits a response from the server and accesses the request for verification.
cy.intercept('POST', '/users', { id: 54 }).as('u')
cy.get('#btn').click()
cy.wait('@u').then(({ request }) =>{
//assertion
   expect(request.body).to.have.property('name', 'User')
})
cy.contains('User added')
Requests
Aliases can be utilised with requests. We can alias a request and later use its properties.This can be done as follows −
cy.request('https://jsonplaceholder.cypress.io/comments').as('c')
// other implementations if any
cy.get('@c').should((response) => {
   if (response.status === 404) {
      // assertion
         expect(response).to.have.property('duration')
      } else {
         // do something else
      }
   })
})
Cypress - Locators
Cypress only supports the Cascading Style Sheets (CSS) selectors to identify the elements.However, it can also work with xpath, with the help of the 'Cypress-Xpath' plugin.
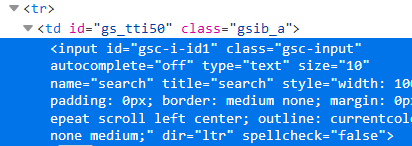
Let us consider an html code snippet and understand some of the rules of css expression.
Rules of CSS expression
The rules of Cascading Style Sheets (CSS) expression are as follows −
Syntax with attribute-id and tagname is tagname#id − Here, the css expression should be -input#gsc-i-id1.
Syntax with attribute-class and tagname is tagname.class − Here, the css expression should be - input.gsc-input.
Syntax with any attribute value and tagname is tagname[attribute='value' − Here,the css expression should be - input[title='search'].
Syntax with parent to child traversal is parent child − Here, the css expression should be -tr td.
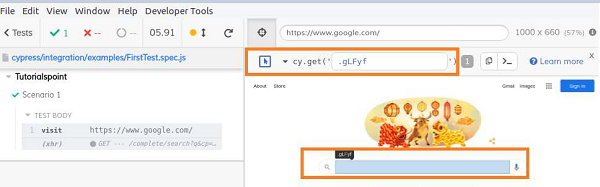
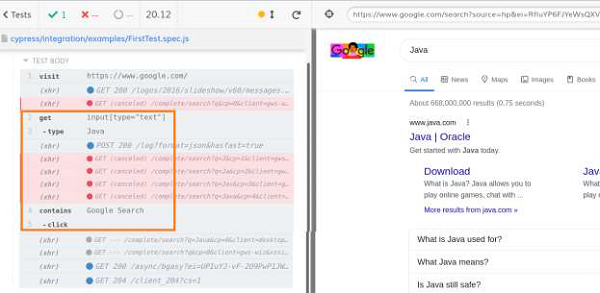
Cypress gives the feature of Open Selector Playground from which we can locate and identify elements automatically. This feature resides inside the Test Runner window which is highlighted in the below image.

On clicking on the Open Selector Playground, an arrow gets visible. Click on it and move it to the element, which we have to identify. The css expression gets populated in the field cy.get available just to the right of the arrow.
Simultaneously, the element gets highlighted, as shown in the following image −
Cypress - Assertions
Cypress has more than one type of assertions obtained from various libraries like Mocha,Chai, and so on. The assertion types are explicit and implicit.
Implicit Assertions
If an assertion is applicable to the object obtained from the parent command in a chain, it is known as the implicit assertion. The popular implicit assertions include .and/.should.
These commands cannot be used as standalone. Generally, they are used when we have to verify multiple checks on a particular object.
Let us illustrate implicit assertion with an example given below −
// test suite
describe('Tutorialspoint', function () {
   it('Scenario 1', function (){
      // test step to launch a URL
      cy.visit("https://www.tutorialspoint.com/videotutorials/index.php")
		// assertion to validate count of sub-elements and class attribute value
		cy.get('.toc chapters').find('li').should('have.length',5)
		.and('have.class', 'dropdown')
   });
});
Execution Results
The output is as follows −
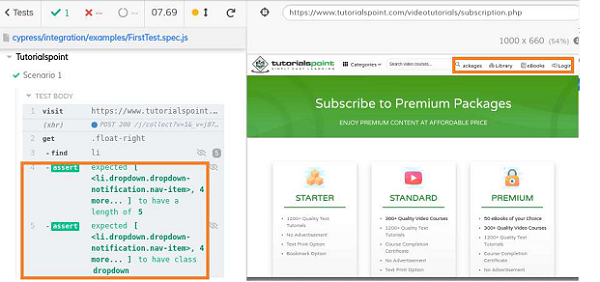
The output logs show two assertions obtained with should, and commands.
Explicit Assertions
If an assertion is applicable to an object directly, it is known as the explicit assertion. The popular explicit assertions include assert/expect.
The command for explicit assertion is as follows −
// test suite
describe('Tutorialspoint', function () {
// it function to identify test
   it('Scenario 1', function (){
      // test step to launch a URL
      cy.visit("https://accounts.google.com")
		// identify element
      cy.get('h1#headingText').find('span').then(function(e){
         const t = e.text()
         // assertion expect
         expect(t).to.contains('Sign')
      })
   })
})
Execution Results
The output is given below −
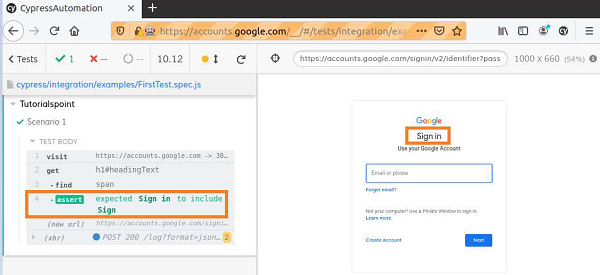
The output logs show assertions directly applied to objects with the expect command.
Cypress has Default Assertions which are internally handled and do not require to be invoked specifically.
Few examples are as follows −
cy.visit () − Expects the page to show the content with 200 status code.
cy.request () − Expects the remote server to be available and sends a response.
cy.contains () − Expects the web element with its properties to be available in DOM.
cy.get () − Expects the web element to be available in DOM.
.find () − Expects the web element to be available in DOM.
.type () − Expects the web element to turn to a type able state.
.click () − Expects the web element to turn to a clickable state.
.its () − Expects for a web element property on the existing subject.
Other Cypress assertions
The other Cypress assertions are as follows −
length
It checks the count of elements obtained from the previously chained command.
For example,
cy.get('#txt-fld').should('have.length',5)
value
It checks whether the web element has a certain value.
For example,
cy.get('#txt-fld').should('have.length',5)
value
It checks whether the web element has a certain value.
For example,
cy.get(' #txt-fld').should('have.value', 'Cypress')
class
It checks whether the web element possesses a certain class.
For example,
cy.get('#txt-fld'').should('have.class', 'txt')
contain
It checks whether the web element possesses a certain text.
For example,
cy.get('#txt-fld'').should('contain', 'Cypress')
visible
It checks whether the web element is visible.
For example,
cy.get('#txt-fld'').should('be.visible')
exist
It checks whether the web element is available in Document Object Model (DOM).
For example,
cy.get('#txt-fld'').should('not.exist');
css
It checks whether the web element possesses a certain css property.
For example,
cy.get('#txt-fld'').should('have.css', 'display', 'block');
Cypress - Text Verification
The method text can be used to obtain text of a webelement. Assertions can also be added to verify the text content.
Implementation with text()
Given below is the command for the implementation with text() with regards to verification −
// test suite
describe('Tutorialspoint', function () {
   // it function to identify test
   it('Scenario 1', function (){
      // test step to launch a URL
      cy.visit("https://accounts.google.com")
      // identify element
      cy.get('h1#headingText').find('span').then(function(e){
         //method text to obtain text content
         const t = e.text()
         expect(t).to.contains('Sign')
      })
   })
})
Execution Results
The output is as follows −
.jpg)
The output logs show the text Sign in obtained with the text method.
Implementation with text assertions
We can also implement assertions on web element text with the help of the following command −
// test suite
describe('Tutorialspoint', function () {
   // it function to identify test
   it('Scenario 1', function (){
      // test step to launch a URL
      cy.visit("https://accounts.google.com")
      // verify text with have.text
      cy.get('h1#headingText').find('span').should('have.text','Sign in')
   })
})
Execution Results
The output is mentioned below −
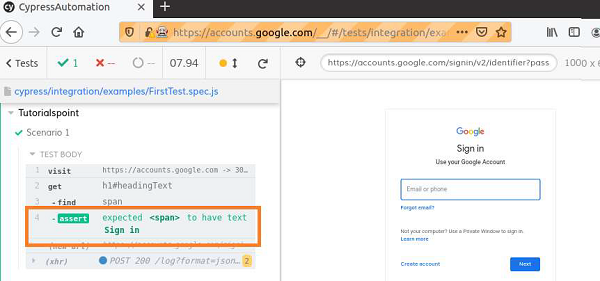
The output logs show the text verification done with should assertion.
Cypress - Asynchronous Behavior
Cypress is derived from node.js, which is based on JavaScript. Cypress commands are synchronous in nature, since they are dependent on node server. Asynchronous flow means that the test step does not depend on its prior step for execution.
There is no dependency and each of the steps is executed as a standalone identity. Though the test steps are arranged in a sequence, an individual test step does not consider the outcome of the previous step and simply executes itself.
Example
Following is an example of asynchronous behavior in Cypress −
// test suite
describe('Tutorialspoint', function () {
it('Scenario 1', function (){
// test step to launch a URL
cy.visit("https://accounts.google.com")
// identify element
cy.get('h1#headingText').find('span').should('have.text', 'Sign in')
cy.get('h1#headingText').find('span').then(function(e){
const t = e.text()
// get in Console
console.log(t)
})
// Console message
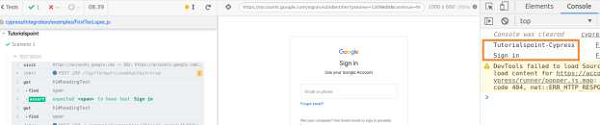
console.log("Tutorialspoint-Cypress")
})
})
Execution Results
The output is given below −
Promise
Right-click on Test Runner and click on Inspect, and we can verify results in the Console.Here, Tutorialspoint-Cypress (an earlier step) is logged in the Console before Sign in (step added later).
Cypress commands are designed in such a way that every step is executed in sequence and they are not triggered simultaneously. But, they are lined up one behind another.Thereby, it makes the flow as synchronous. This is achieved with Promise.
In the above example, console.log is a pure JavaScript statement. It does not have the ability to line up and wait similar to Cypress commands. Promise allows us to execute Cypress commands in a serial mode.
Modes in Promise
A Promise has three modes to categorise the state of a command execution. They are as follows −
Resolved − This outcome occurs, if the test step runs successfully.
Pending − This is the outcome, if the test step run result is being awaited.
Rejected − This is the outcome, if the test step runs unsuccessfully.
A Cypress command gets executed, only if the prior step has been executed successfully or a resolved promise response is received. Then, the method is used to implement Promise in Cypress.
Example
Following is an example of Promise in Cypress −
describe('Tutorialspoint Test', function () {
   it('Promise', function (){
      return cy.visit('https://accounts.google.com')
      .then(() => {
         return cy.get('h1#heading');
      })
   })
})
Cypress implementation for Promise is encapsulated and not visible. Thus, it helps to have a more compact code. Also, we do not have to consider the state of Promise, while automating the tests.
Implementation without Promise
Following command explains how an implementation can be done without promise in Cypress −
describe('Tutorialspoint Test', function () {
   it('Without Promise', function (){
      cy.visit('https://accounts.google.com')
      cy.get('h1#heading')
   })
})
Cypress - Working with XHR
XHR is XML HTTP Request. It is an Application Programming Interface (API) which is available as an object, whose methods send data between a web browser and server. An object in XHR can request data from a server in the form of a response.
Cypress can not only be used for front end automation, but also can control the network traffic by directly accessing the XHR objects. Then, it applies the assertions on the objects.It can mock or stub a response. An XHR details can be seen in the Network tab in the browser.
XHR response Header is as follows −
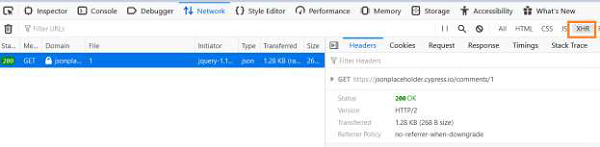
The response is as follows −

To make an XHR request, the cy.request() command is used. The method cy.intercept() is used to redirect the responses to the matching requests.
Implementation of XHR request
Given below is the command to explain the implementation of XHR request in Cypress −
cy.request('https://jsonplaceholder.cypress.io/comments').as('c')
//aliasing request
cy.get('@c').should((response) => {
   expect(response.body).to.have.length(100)
   expect(response).to.have.property('headers')
})
Cypress - jQuery
Cypress can act upon jQuery objects and its methods along with its internal commands.While Cypress uses the get method to identify a web element, JQuery uses the $() method for the same purpose.
In Cypress, the command for identifying a web element is as follows −
cy.get('h1#heading')
Whereas in case of jQuery, the command for identification of a web element is as follows −
$('h1#heading')
Cypress is based on JavaScript which is of asynchronous nature. However, Cypress commands behave synchronously by resolving the Promise internally, which is hidden from the end user.
Nevertheless, when Cypress acts upon jQuery objects and its methods, the Promise logic has to be implemented specifically, to make flow synchronous (with the help of method then).
For instance, while we want to extract the text content of a web element (with jQuery method - text), we require to implement Promise with the then method.
Promise Implementation in jQuery
Following is the command for the Promise Cypress implementation in jQuery −
// test suite
describe('Tutorialspoint', function () {
// it function to identify test
   it('Scenario 1', function (){
      // test step to launch a URL
      cy.visit("https://accounts.google.com")
      // Promise implementation with then()
      cy.get('h1#headingText').find('span').then(function(e){
         //method text to obtain text content
         const t = e.text()
         expect(t).to.contains('Sign')
      })
   })
})
In jQuery, an empty collection is returned, if the locator which is provided, does not match with any of the web elements in DOM.
In order to avoid exceptions, it is recommended to verify the length of the jQuery collection yielded by $(). The command for the same is as follows −
const e = $('#txt')
if (e.length > 0){
   //proceed
}
However, in case, there are no matching web elements in DOM, the Cypress automatically goes to the retry mode till the element is available or there is a timeout, as shown below −
cy.get('#txt')
   .then((e) => { //proceed working on element })
The method yields a Promise. Also, the Promise shall be in resolved mode, only if a web element is matched with the locator. If the Promise is in a reject state, the logic within the then block will never be executed.
We can access jQuery methods in Cypress, with the following expression −
Cypress.$( '#txt'), where #txt is the locator.
Implementation of jQuery methods
Given below is a command for the identification and execution of the test in Cypress with jQuery −
// test suite
describe('Tutorialspoint', function () {
// it function to identify test
   it('Scenario 1', function (){
      // test step to launch a URL
      cy.visit("https://accounts.google.com")
      // access web element with Cypress.$
      cy.request('/').get('h1#headingText').then(function(e){
         Cypress.$(e).find('span')
         const t = e.text()
         cy.log(t)
      })
   })
})
As the above test is executed, if we open the Console (pressing F12), and find for the required web element, with the expression Cypress.$ ('h1#headingText').text(), we can verify our test, as shown below −

The log message Sign in is obtained from the cy.log command in Cypress.
Cypress - Checkbox
The commands check and uncheck are used to work with checkbox. In the html code, a checkbox has an input tag and its type attribute has the value as checkbox.
Cypress Commands
The checkbox related Cypress commands is as follows −
The command used to click all the checkboxes is as follows −
cy.get('input[type="checkbox"]').check()
The command used to click a checkbox with id check is as follows −
cy.get('#chk').check()
The command used to click a checkbox with value Cypress is as follows −
cy.get('input[type="checkbox"]').check('Cypress')
The command used to click the checkboxes with values - Java and Python is as follows −
cy.get('input[type="checkbox"]').check(['Java','Python'])
The command used to click the checkbox having value Java with options is as follows −
cy.get('.chk').check('Java', options)
The command used to click the checkboxes with values Java and Python with options is as follows:
cy.get('input[type="checkbox"]').check(['Java','Python'], options)
The command used to click the checkbox having class check with an option is as follows −
cy.get('.chk').check({force : true})
The command used to uncheck all the checkboxes is as follows −
cy.get('input[type="checkbox"]').uncheck()
The command used to uncheck a checkbox with id check is as follows −
cy.get('#chk').uncheck()
The command used to uncheck the checkbox with value Cypress is as follows −
cy.get('input[type="checkbox"]').uncheck('Cypress')
The command used to uncheck the checkboxes with values - Java and Python is as follows −
cy.get('input[type="checkbox"]').uncheck(['Java','Python'])
The command used to uncheck the checkbox having value Java with options is as follows −
cy.get('.chk').uncheck('Java', options)
The command used to uncheck the checkboxes with values Java and Python with options is as follows −
cy.get('input[type="checkbox"]').uncheck(['Java','Python'], options)
The command used to uncheck the checkbox having class check with an option is as follows −
cy.get('.chk').uncheck({force : true)
Options in Cypress
The options which are available in Cypress are as follows −
log Default value true − This is used to turn on/off console log.
timeout Default value defaultCommandTimeout(4000ms) − This is used to provide the maximum wait time prior to throwing an error.
force Default value false − This is used to enforce an action.
scrollBehaviour Default value scrollBehaviour(top) − This is for the position of viewport up to which element to be scrolled prior command execution.
waitForAnimations Default value waitForAnimations(true) − This is used to wait for elements to complete animation prior running the commands.
animationDistanceThreshold - Default value animationDistanceThreshold (5) − This is for the pixel distance of an element that should be exceeded to qualify for animation.
Both check/uncheck commands require to be chained with commands that yield DOM elements and assertions can be applied to these commands.
Implementation of Cypress Commands
The implementation of the commands in Cypress is explained below −
// test suite
describe('Tutorialspoint', function () {
   // it function to identify test
   it('Scenario 1', function (){
      // test step to launch a URL
      cy.visit("https://accounts.google.com/signup")
      //checkbox with assertion
      cy.get('input[type="checkbox"]').check().should('be.checked')
      //identify checkbox with class with assertion
      cy.get('.VfPpkd-muHVFf-bMcfAe').uncheck().should('not.be.checked')
   })
})
Execution Results
The output is mentioned below −
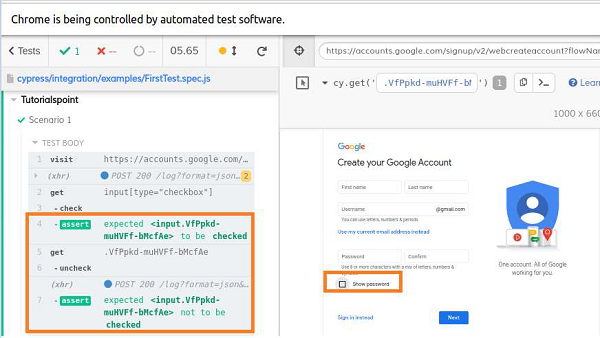
The above results show the checkbox to the left of the Show password, first getting checked with the check command (verified with assertion-should).
Then, it is unchecked with the uncheck command (also verified with assertion-should).
Cypress - Tabs
Cypress does not have a specific command to work with tabs. It has a workaround method in jQuery through which it handles the tabs. In the html code, a link or button opens to a new tab, because of the attribute target.
If the target attribute has value blank, it opens to a new tab. Cypress uses the jQuery method removeAttr, which is invoked by the invoke command. The removeAttr deletes the attribute, which is passed as one of the parameters to the invoke method.
Once the target=blank is removed, then a link/button opens in the parent window. Later on after performing the operations on it, we can shift back to the parent URL with the go command.
The Html code for the same is as follows −

Implementation
Given below is the implementation of the use of commands with regards to tabs in Cypress −
describe('Tutorialspoint', function () {
   // test case
   it('Scenario 1', function (){
      // url launch
      cy.visit("https://the-internet.herokuapp.com/windows")
      // delete target attribute with invoke for link
      cy.get('.example > a')
      .invoke('removeAttr', 'target').click()
      // verify tab url
      cy.url()
      .should('include', 'https://the-internet.herokuapp.com/windows/new')
      // shift to parent window
     cy.go('back');
   });
});
Execution Results
The output is as follows −
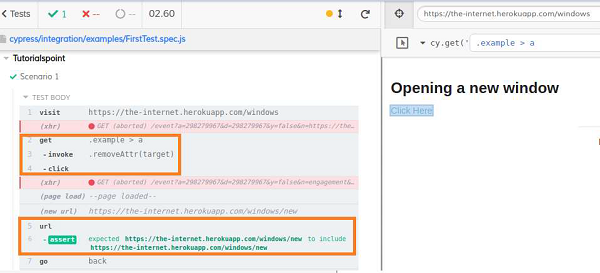
The output logs show the deletion of the target attribute and launch of the new tab within the parent window.
Cypress - Dropdown
The command select is used to work with static dropdown. In the html code, a dropdown has a select tag and the dropdown elements are represented by option tagname.
Dropdown Cypress Commands
The dropdown related Cypress commands are as follows −
The command used to choose the option Cypress is as follows −
cy.get('select').select('Cypress')
The command that chooses options Tutorialspoint and JavaScript is as follows −
cy.get('select').select(['Tutorialspoint', 'JavaScript'])
The command which can choose a value of a dropdown option along with options (to modify default characteristics) is as follows −
cy.get('select').select('option1', options )
The command that chooses the multiple values with options is as follows −
cy.get('select').select(['option1', 'option2'], options)
Options for dropdown in Cypress
The options which are available for the dropdown in Cypress are as follows −
log Default value true− This is used to turn on/off the console log.
timeout Default value defaultCommandTimeout(4000)− This is used to provide the maximum wait time for the selection prior to throwing an error.
force Default value false− This is used to enforce an action.
Assertion can be applied to the select commands in Cypress.
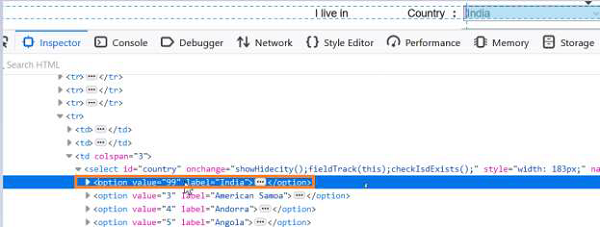
Let us make an attempt to select the option India from the dropdown having value as 99 in the html code.
Implementation
The implementation of the dropdown commands to select the option India in Cypress is explained below −
// test suite
describe('Tutorialspoint', function () {
   // it function to identify test
   it('Scenario 1', function (){
      // test step to launch a URL
      cy.visit("https://register.rediff.com/register/register.php")
      //select option India with value then verify with assertion
      cy.get('select[id="country"]').select('99').should('have.value', '99')
   })
})
Execution Results
The output is stated below −
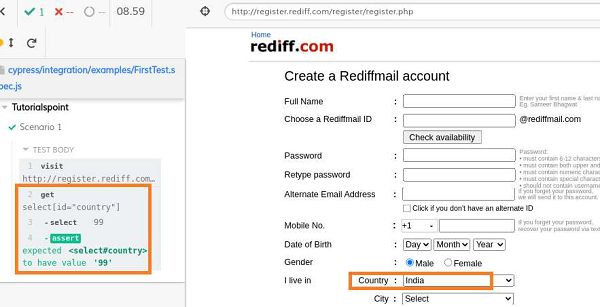
The output shows that the Country dropdown selects the option India (in the html code, this option is identified with the value as 99).
Cypress - Alerts
Cypress can work with alerts by default. The pop-up can be an alert or confirmation popup.Cypress is designed in such a way that it shall always click on the OK button on the pop-up. Moreover, Cypress has the ability to fire the browser events.
An alert is triggered by window:alert event. This is by default handled by Cypress and the OK button on the alert gets clicked, without being visible during execution.
However, the execution logs will show the presence of the alert.
Implementation Alerts
The implementation of alerts in Cypress is given below −
describe('Tutorialspoint Test', function () {
   // test case
   it('Scenario 1', function (){
      // launch url
      cy.visit("https://register.rediff.com/register/register.php");
      // click submit
      cy.get('input[type="submit"]').click();
   });
});
Execution Results
The output is as follows −
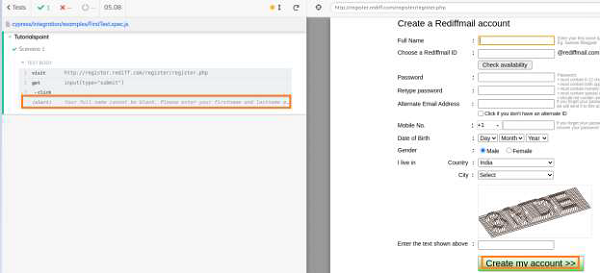
The alert message gets displayed on the Cypress execution logs.
Cypress has the ability to fire the window:alert event by utilising the method on. Then, we can verify the alert text.
However, this event shall happen in the back end and will not be visible during the execution.
Implementation Alert text verification
Given below is the implementation for the alert text verification in Cypress −
describe('Tutorialspoint Test', function () {
   // test case
   it('Scenario 1', function (){
      // launch url
      cy.visit("https://register.rediff.com/register/register.php");
      // click submit
      cy.get('input[type="submit"]').click();
      // fire event with method on
      cy.on('window:alert',(t)=>{
         //assertions
         expect(t).to.contains('Your full name');
      })
   });
});
Execution Results
The output is mentioned below −
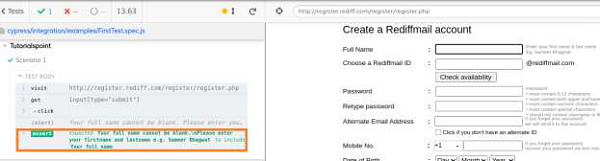
The output logs show the successful verification of the alert text, produced by firing the alert event by Cypress.
For a confirmation pop-up, the browser event window:confirm is triggered. Just like alert pop-ups, Cypress can fire this event with the method on and clicks on the OK button by default.
Example
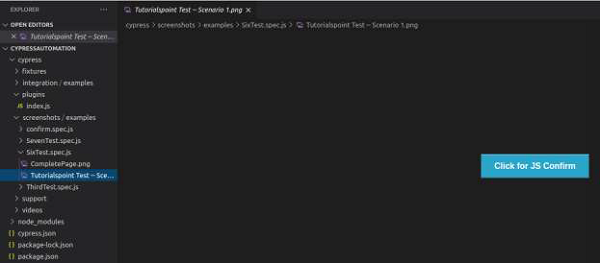
Let us have a look at the below example. Here, on clicking the Click for JS Confirm button, a confirmation pop up gets displayed.
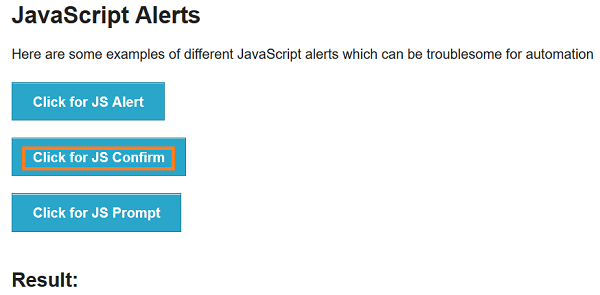
The following confirmation pop-up with OK and Cancel buttons getting displayed.
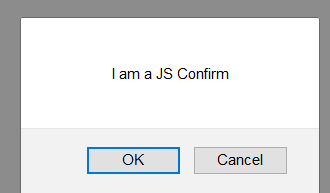
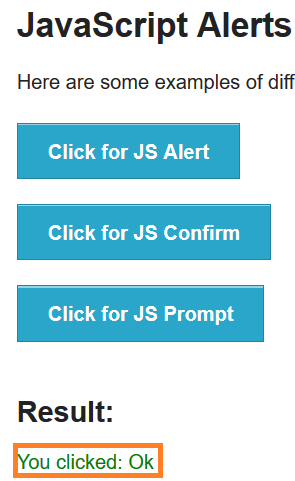
On clicking the OK button, the following is displayed −
You clicked: Ok
An image like the one given below will be displayed −
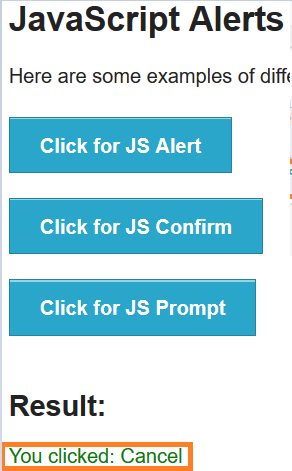
On clicking the Cancel button, the following is displayed below Result −
You clicked: Cancel
An image like the one given below will be displayed −
Implementation Confirmation verification
Given below is an implementation for the confirmation verification of alerts in Cypress −
describe('Tutorialspoint Test', function () {
   // test case
   it("Scenario 1", function () {
      //URL launched
      cy.visit("https://the-internet.herokuapp.com/javascript_alerts")
      //fire confirm browser event and accept
      cy.get(':nth-child(2) > button').click()
      cy.on("window:confirm", (t) => {
         //verify text on pop-up
         expect(t).to.equal("I am a JS Confirm");
      });
   });
});
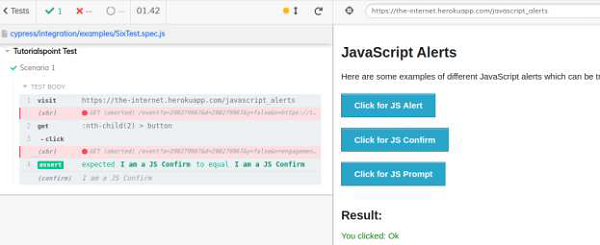
Execution Results
The output is stated below −
Implementation Confirmation verification
Given below is an implementation for the confirmation verification of alerts in Cypress −
describe('Tutorialspoint Test', function () {
   // test case
   it("Scenario 1", function () {
      //URL launched
      cy.visit("https://the-internet.herokuapp.com/javascript_alerts")
      //fire confirm browser event and accept
      cy.get(':nth-child(2) > button').click()
      cy.on("window:confirm", (t) => {
         //verify text on pop-up
         expect(t).to.equal("I am a JS Confirm");
      });
   });
});
Execution Results
The output is stated below −

The output logs show the successful verification of the confirmation text, produced by firing the confirm event by Cypress.
Implementation Cancel click
The implementation of cancel click on confirmation pop up in Cypress is as follows −
describe('Tutorialspoint Test', function () {
   // test case
   it("Scenario 1", function () {
      // URL launched
      cy.visit("https://the-internet.herokuapp.com/javascript_alerts")
      //fire confirm browser event
      cy.on("window:confirm", (s) => {
         return false;
      });
      // click on Click for JS Confirm button
      cy.get(':nth-child(2) > button').click()
      // verify application message on Cancel button click
      cy.get('#result').should('have.text', 'You clicked: Cancel')
   });
});
Execution Results
The output is given below −
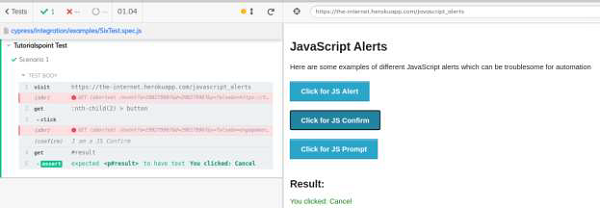
The output logs show the successful verification of the text You clicked: Cancel, which is produced on clicking the Cancel button on the confirmation pop up.
Cypress - Child Windows
Cypress does not have a specific command to work with child windows. It has a workaround method in jQuery through which it handles the child windows. In the html code, a link or button opens to a child window, because of the attribute target.
If the target attribute has value blank, it opens to a child window. Cypress uses the jQuery method removeAttr, which is invoked by the invoke command in Cypress. The removeAttr deletes the attribute, which is passed as one of the parameters to the invoke method.
Once the target=blank is removed, then a link/button opens in the parent window and after performing operations on it, we can shift back to the parent URL with the go command.
The Html code for opening a child window in Cypress is as follows −

Implementation
Given below is an implementation of the commands for child windows in Cypress −
describe('Tutorialspoint', function () {
   // test case
   it('Scenario 1', function (){
      // url launch
      cy.visit("https://the-internet.herokuapp.com/windows")
      // delete target attribute with invoke for link
      cy.get('.example > a')
      .invoke('removeAttr', 'target').click()
      // verify child window url
      cy.url()
      .should('include', 'https://the-internet.herokuapp.com/windows/new')
      // shift to parent window
      cy.go('back');
   });
});
Execution Results
The output is as follows −

The output logs show the deletion of the target attribute and launching of the child window within the parent window.
Cypress - Hidden Elements
Cypress can handle the hidden elements. There are occasions, when the submenus get displayed only on hovering over the main menu. These submenus are initially made hidden with the Cascading Style Sheets (CSS) property display:none.
For handling the hidden elements, Cypress takes the help of the jQuery method show. It has to be invoked with the help of the Cypress command (invoke['show']).
For example, on hovering over the Sign in menu, the Sign in button gets displayed, as shown below −

On moving the mouse out of the Sign in menu, the Sign in button gets hidden, as displayed below −

Implementation
The implementation of the hidden elements with jQuery show method is as follows −
describe('Tutorialspoint Test', function () {
   // test case
   it('Scenario 1', function (){
      // launch URL
      cy.visit("https://www.amazon.com/");
      // show hidden element with invoke
      cy.get('#nav-flyout-ya-signin').invoke('show');
      //click hidden element
      cy.contains('Sign').click();
   });
});
Execution Results
The output is given below −
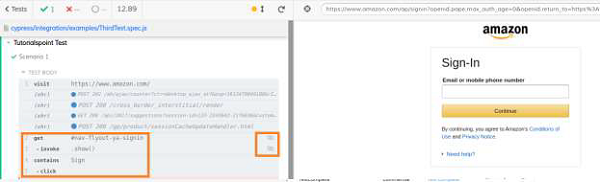
The execution logs show the hidden elements represented by an icon at the right of the steps.
Cypress has another technique for handling hidden elements.
For example, to click a hidden element we can use the Cypress command click and pass the option {force : true} as a parameter to it - click({ force: true }).
This modifies the hidden characteristics of the hidden element and we can click it.
Implementation with click
Given below is the implementation with click having option in Cypress −
describe('Tutorialspoint Test', function () {
   // test case
   it('Scenario 1', function (){
      // launch URL
      cy.visit("https://www.amazon.com/");
      //click hidden element
      cy.contains('Sign').click({force:true});
   });
});
Execution Results
The output is mentioned below −
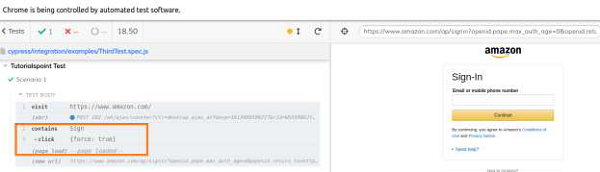
The execution logs show the hidden element clicked (Sign in) and we are navigated to the next page.
Cypress - Frames
The earlier versions of Cypress were unable to access the elements inside frames. But, the recent versions have a solution for frame.
To work with frames, first, we have to install a Cypress plugin with the command given below −
npm install D cypress-iframe
The screen which will be displayed is given below −

For the frame implementation in Cypress, we have to add the statement import 'cypressiframe'in the code. A tagname called frame/iframe is used to represent frames in the html code.
The following screen will appear on your computer −
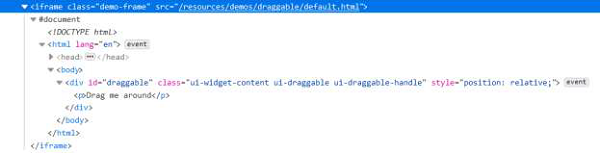
Cypress command frameload is used to move the focus from the main page to the frame.Once the focus is shifted, we can interact with the elements inside the frame.
This is done with the cy.iframe method.
Implementation
Given below is the implementation of the Cypress command for frames, by using the cy.iframe method −
import 'cypress-iframe'
describe('Tutorialspoint Test', function () {
   // test case
   it('Test Case6', function (){
      // launch URL
      cy.visit("https://jqueryui.com/draggable/");
      // frame loading
      cy.frameLoaded('.demo-frame');
      //shifting focus
      cy.iframe().find("#draggable").then(function(t){
         const frmtxt = t.text()
         //assertion to verify text
         expect(frmtxt).to.contains('Drag me around');
         cy.log(frmtxt);
      })
   });
});
Execution Results
The output is as follows −
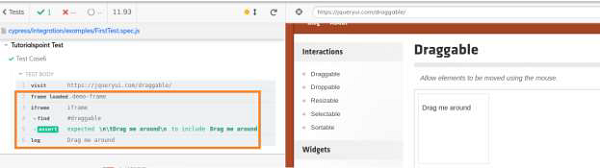
The execution logs show the accessing elements inside a frame and the text grabbed within it.
Cypress cannot handle more than one frame in a page.
Also, for frame Intellisense to Cypress, we can add /// <reference types = "Cypressiframe"/> to the code.
Cypress - Web Tables
Cypress is capable of handling the web tables. A table is basically of two types, which are dynamic and static. A static table has a fixed number of columns and rows unlike a dynamic table.
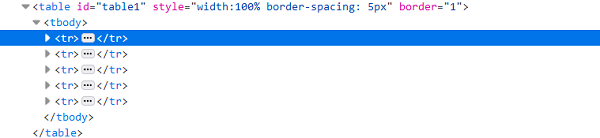
In an html code, a table is represented by table tagname, while rows are represented by tr, and columns by td.
To access the rows, the Cypress command is as follows −
cy.get("tr")
To access the columns, the Cypress command is as follows −
cy.get("td") or cy.get("tr td")
To access a particular column, the CSS expression should be as follows −
td:nth-child(column number)
To iterate through the rows/columns of the table, the Cypress command each is used.
In Cypress, we have the command next to shift to the immediate following sibling element. This command has to be chained with get command. The command prev is used to shift to the immediate preceding sibling element.
The Html structure of a table is given below −
Example
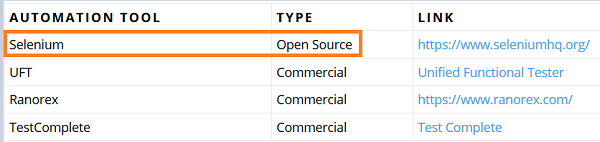
Let us take an example of a table, and verify the content of the second column TYPE (Open Source) corresponding to the value Selenium, which is in the first column AUTOMATION TOOL.
The following screen will appear on your computer −
Implementation
Given below is the implementation of the Cypress commands related to tables −
describe('Tutorialspoint Test', function () {
   // test case
   it('Scenario 1', function (){
      //URL launch
      cy.visit("https://sqengineer.com/practice-sites/practice-tables-selenium/")
      // identify first column
      cy.get('#table1> tbody > tr > td:nth-child(1)').each(($elm, index, $list)=> {
         // text captured from column1
         const t = $elm.text();
         // matching criteria
         if (t.includes('Selenium')){
            // next sibling captured
            cy.get('#table1 > tbody > tr > td:nth-child(1)')
            .eq(index).next().then(function(d) {
               // text of following sibling
               const r = d.text()
               //assertion
               expect(r).to.contains('Commercial');
            })
         }
      })
   });
});
Execution Results
The output is as follows −
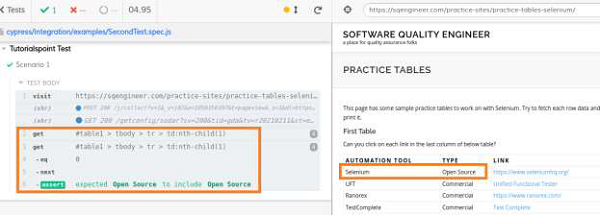
The execution logs show that the value in the column TYPE is captured as Open Source.This happens as it is the immediate following sibling to the element Selenium (first column)which appears in the same row.
Cypress - Mouse Actions
Cypress can handle hidden elements. There are occasions when submenus get displayed only on hovering over the main menu. These submenus are initially made hidden with the CSS property display:none.
For handling hidden elements, Cypress takes the help of the jQuery method show. It has to be invoked with the help of the Cypress command (invoke['show']).
For example, on hovering over the Mouse Hover button, the Top and Reload buttons get displayed, as shown below −
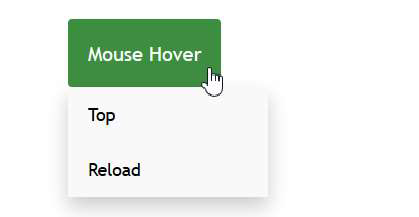
On moving the mouse out of the Mouse Hover button, the Top and Reload buttons get hidden, as shown below −

Implementation with jQuery show method
Given below is the implementation with jQuery show method in Cypress −
describe('Tutorialspoint Test', function () {
   // test case
   it('Scenario 1', function (){
      // launch URL
      cy.visit("https://learn.letskodeit.com/p/practice");
      // show hidden element with invoke
      cy.get('div.mouse-hover-content').invoke('show');
      //click hidden element
      cy.contains('Top').click();
   });
});
Execution Results
The output is as follows −
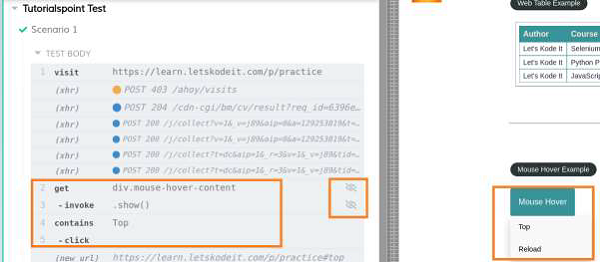
The execution logs show the hidden element Top button represented by an icon at the right of the steps.
Cypress - Cookies
Cypress handles cookies with the methods Cookies.preserveOnce() and Cookies.defaults(). The method Cookies.debug() produces logs to the console, if there are any changes to the cookies.
By default, Cypress removes all cookies prior to each test execution.We can utilise Cypress.Cookies.preserveOnce() to preserve the cookies with their names to be used for other tests.
Syntax
The syntax for the commands related to the cookies in Cypress are as follows −
This will produce console logs, if cookie values are configured or cleared.
Cypress.Cookies.debug(enable, option)
Here,
enable if debug of cookie should be enabled.
option configure default values for cookies, for example, preserve cookies.
Cypress.Cookies.debug(true) // logs will generate if cookies are modified
cy.clearCookie('cookie1')
cy.setCookie('cookie2', 'val')
To reduce the level of logging.
Cypress.Cookies.debug(true, { verbose: false })
Cypress.Cookies.debug(false) // logs will not generate if cookies are modified
The syntax given below will preserve the cookies and they will not be cleared prior execution of another test.
Cypress.Cookies.preserveOnce(cookie names...)
This syntax is used to modify global configuration and to maintain a group of cookies that are preserved for a test. Any modification will be applicable for that particular test.(maintained in cypress/support/index.js file and are loaded prior to test execution).
Cypress.Cookies.defaults(option)
Cypress.Cookies.defaults({
   preserve: 'cookie1'
})
Here, the cookie named cookie1 will not be cleared before running the test.
Cookie Methods
Some of the cookie methods in Cypress are as follows −
cy.clearCookies() − It removes all the cookies from present domain and subdomain.
cy.clearCookie(name) − It removes a cookie from the browser by name.
cy.getCookie(name) − It is used to obtain a cookie from the browser by name.
cy.getCookies() − It is used to obtain all the cookies.
cy.setCookie(name) − It can configure a cookie.
Implementation
Given below is the implementation of the cookie methods in Cypress −
describe('Tutorialspoint Test', function () {
   // test case
   it('Scenario 1', function (){
      // launch the application
      cy.visit("https://accounts.google.com");
      // enable cookie logging
      Cypress.Cookies.debug(true)
      //set cookie
      cy.setCookie('cookie1', 'value1')
      //get cookie by name and verify value
      cy.getCookie('cookie1').should('have.property', 'value', 'value1')
      //clear cookie by name
      cy.clearCookie('cookie')
      //get all cookies
      cy.getCookies()
      //clear all cookies
      cy.clearCookies()
      //verify no cookies
      cy.getCookies().should('be.empty')
   });
});
Execution Results
The output is mentioned below −
Cypress - Get and Post
The Get and Post methods are a part of the Application Programming Interface (API) testing, which can be performed by Cypress.
Get Method
To perform a Get operation, we shall make a HTTP request with the cy.request() and pass the method Get and URL as parameters to that method.
The status code reflects, if the request has been accepted and handled correctly. The code 200(means ok) and 201(means created).
Implementation of Get
The implementation of Get method in Cypress is explained below −
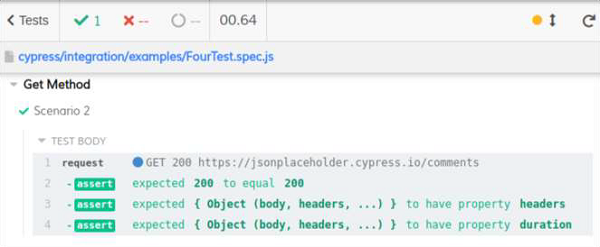
describe("Get Method", function(){
   it("Scenario 2", function(){
      cy.request("GET", "https://jsonplaceholder.cypress.io/comments", {
      }).then((r) => {
         expect(r.status).to.eq(200)
         expect(r).to.have.property('headers')
         expect(r).to.have.property('duration')
      });
   })
})
Execution Results
The output is as follows −
Post Method
While using the Post method, we are actually sending information. If we have a group of entities, we can append new ones at the end, with the help of Post.
To perform a Post operation, we shall make a HTTP request with the cy.request() and pass the method Post and URL as parameters to that method.
Implementation of Post
Given below is an implementation of Post method in Cypress −
describe("Post Method", function(){
   it("Scenario 3", function(){
      cy.request('https://jsonplaceholder.cypress.io/users?_limit=1')
      .its('body.0') // yields the first element of the returned list
      // make a new post on behalf of the user
      cy.request('POST', 'https://jsonplaceholder.cypress.io/posts', {
         title: 'Cypress',
         body: 'Automation Tool',
      })
   })
});
Execution Results
The output is given below −
Cypress - File Upload
To perform file upload task in Cypress, we have to first install a plugin with the command mentioned below −
npm install dev cypress-file-upload
The following screen will appear on your computer −

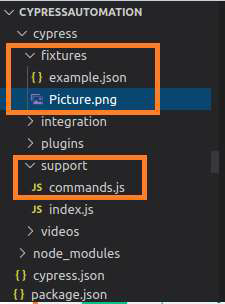
Once the installation is done, we have to add the statement import 'cypress-file-upload' in the command.js file. This file resides inside the support folder within our Cypress project.
Also, we shall add the file that we want to upload within the fixtures folder (Picture.png file). The following screen will be displayed −
To upload a file, we have to use the Cypress command, attachFile and pass the path of the file to be uploaded as a parameter to it.
Implementation
The implementation of the commands for uploading a file in Cypress is as follows −
describe('Tutorialspoint Test', function () {
   // test case
   it('Test Case6', function (){
      //file to be uploaded path in project folder
      const p = 'Picture.png'
      // launch URL
      cy.visit("https://the-internet.herokuapp.com/upload")
      //upload file with attachFile
      cy.get('#file-upload').attachFile(p)
      //click on upload
      cy.get('#file-submit').click()
      //verify uploaded file
      cy.get('#uploaded-files').contains('Picture')
   });
});
Execution Results
The output is as follows −
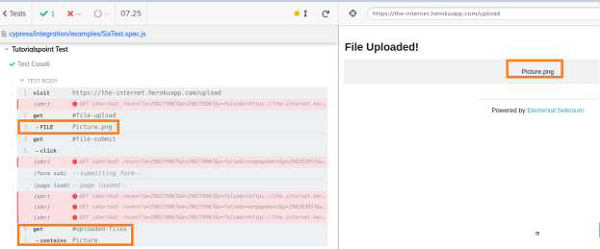
The execution logs show that the file Picture.png got uploaded and the file name got reflected on the page.
Cypress - Data Driven Testing
Cypress data driven testing is achieved with the help of fixtures. Cypress fixtures are added to maintain and hold the test data for automation.
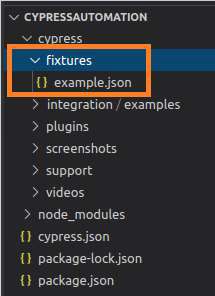
The fixtures are kept inside the fixtures folder (example.json file) in the Cypress project.Basically, it helps us to get data input from external files.

Cypress fixtures folder can have files in JavaScript Object Notation (JSON) or other formats and the data is maintained in "key:value" pairs.
All the test data can be utilised by more than one test. All fixture data has to be declared within the before hook block.
Syntax
The syntax for Cypress data driven testing is as follows −
cy.fixture(path of test data)
cy.fixture(path of test data, encoding type)
cy.fixture(path of test data, opts)
cy.fixture(path of test data, encoding type, options)
Here,
path of test data is the path of test data file within fixtures folder.
encoding type − Encoding type (utf-8, asci, and so on) is used to read the file.
Opts − Modifies the timeout for response. The default value is 30000ms. The wait time for cy.fixture(), prior throws an exception.
Implementation in example.json
Given below is the implementation of data driven testing with example.json in Cypress −
{
   "email": "abctest@gmail.com",
   "password": "Test@123"
}
Implementation of Actual Test
The implementation of actual data driven testing in Cypress is as follows −
describe('Tutorialspoint Test', function () {
   //part of before hook
   before(function(){
      //access fixture data
      cy.fixture('example').then(function(signInData){
         this.signInData = signInData
      })
   })
   // test case
   it('Test Case1', function (){
      // launch URL
      cy.visit("https://www.linkedin.com/")
      //data driven from fixture
      cy.get('#session_key ')
      .type(this.signInData.email)
      cy.get('# session_password').type(this.signInData.password)
   });
});
Execution Results
The output is as follows
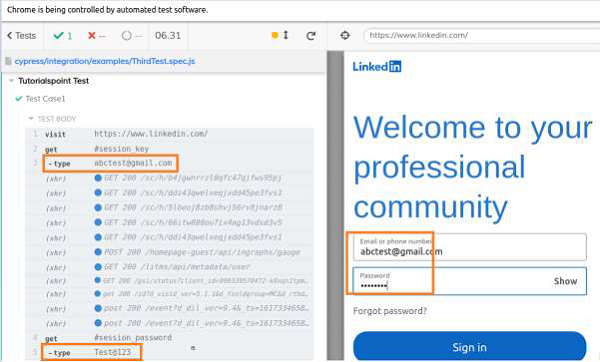
The output logs show the values abctest@gmail.com and Test@123 being fed to the Email and Password fields respectively. These data have been passed to the test from the fixtures.
Cypress - Prompt Pop-up Window
Cypress can handle prompt pop-up windows, where users can input values. A prompt has a text field, where the input is taken. To handle a prompt pop-up, cy.window() method is used.
It obtains the value of the object of the prompt (remote window). In a confirmation/alert pop-up, we have to fire a browser event. But for prompt pop-up, we have to use cy.stub() method.
Example
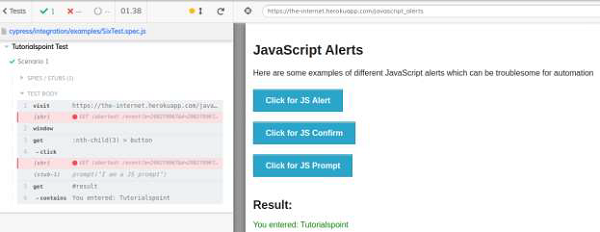
Let us look at the below example, on clicking the Click for JS Prompt button, a prompt pop up gets displayed, as shown below −
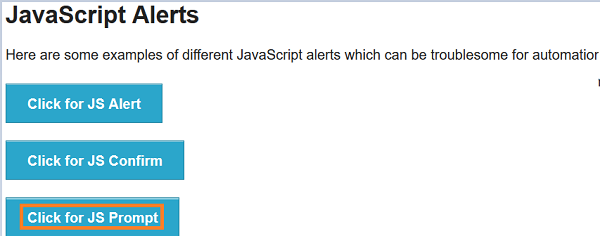
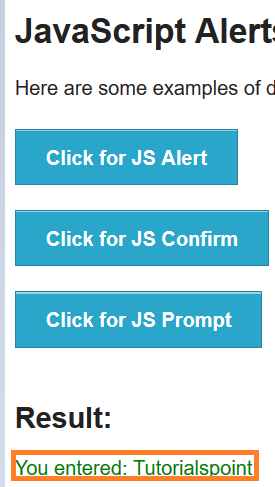
The following prompt with the user input field gets displayed. Tutorialspoint is entered in the prompt pop-up, as shown below.

You entered − Tutorialspoint gets displayed under Result.
This can be seen in the screen displayed below −
Implementation
Given below is an implementation of the commands for displaying prompt pop-up windows in Cypress −
describe('Tutorialspoint Test', function () {
   // test case
   it("Scenario 1", function () {
      //URL launch
      cy.visit("https://the-internet.herokuapp.com/javascript_alerts")
      //handling prompt alert
      cy.window().then(function(p){
         //stubbing prompt window
         cy.stub(p, "prompt").returns("Tutorialspoint");
         // click on Click for JS Prompt button
         cy.get(':nth-child(3) > button').click()
         // verify application message on clicking on OK
         cy.get('#result').contains('You entered: Tutorialspoint')
      });
   });
});
Execution Results
The output is as follows −
The output logs show the successful verification of the text.
You entered − Tutorialspoint, is produced on clicking OK button on prompt pop up. Also, the stub applied on the prompt window is visible on the output log.
Cypress - Dashboards
Cypress Dashboard Service has to be set up to create a link between Cypress tests running in our system and the dashboard which is hosted on the cloud.
Features
The features of Cypress Dashboard are explained below −
It provides data on the total number of passed, failed and skipped test cases.
The stack trace and screenshots of the failed tests are available.
The video of test execution is available.
Management of test data, framework and their access is possible.
The usage trends in the organization is provided.
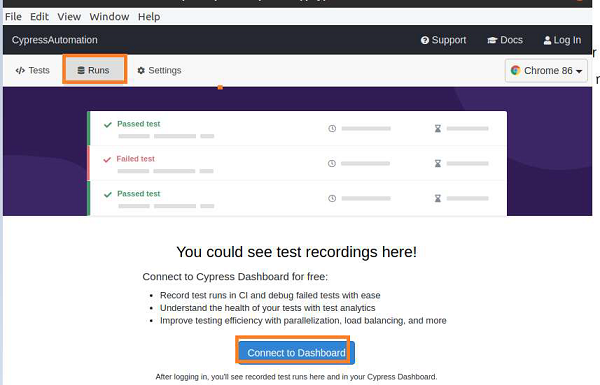
Setup Cypress Dashboard
To set up the process, first, we should go to the Runs tab in the Cypress Test Runner window. Then, click on Connect to Dashboard. The following screen will appear −
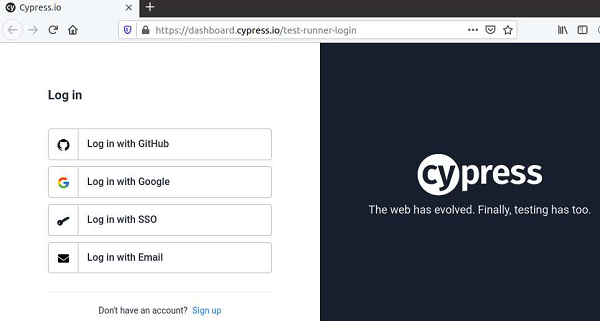
We shall get various options of logging on to the Dashboard, as shown below −
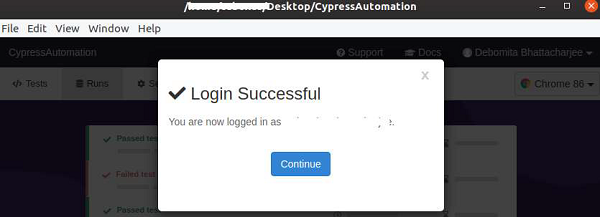
After successful sign in, we shall get the success message. Click on Continue.
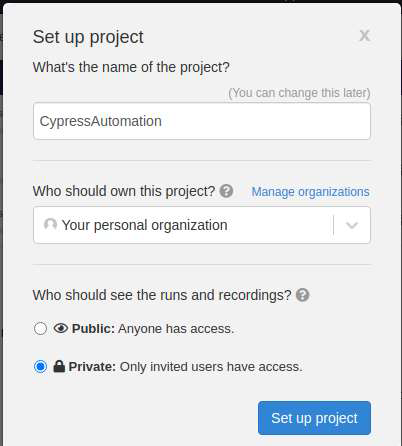
Enter the project name, owner and users, who can see the project.
Then, click on Set up project.
Cypress shall then give the following suggestions −
project Id
unique project key (in form of command to be executed in terminal)
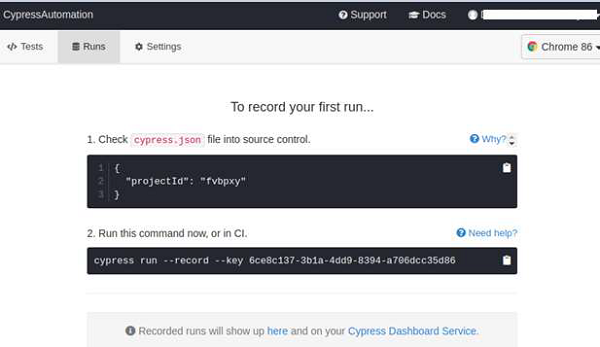
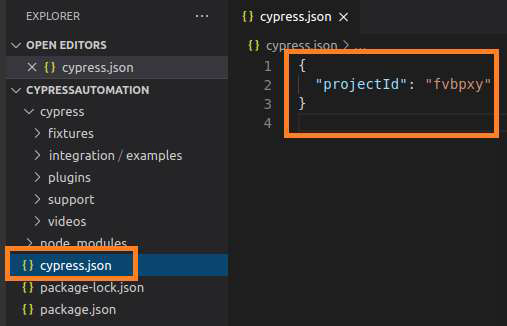
The projectId obtained from the Cypress suggestion should match with the project id available in the cypress.json file within the project folder.
Next, we have to run the below mentioned command as suggested by Cypress −
node_modules/cypress/bin/cypress run --record --key <project key>
The screen given below will appear −

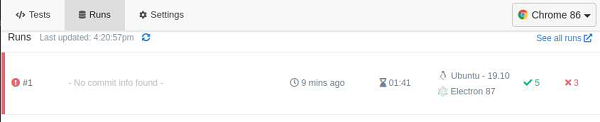
Once the execution is done, we have to open the Runs tab of the Test Runner. It has the information on platform, browser, and duration of the tests.
The test records shall be visible. Click on a record.
The record is opened in a browser, with the test result Overview (count of passed, failed, pending, skipped), as shown below.
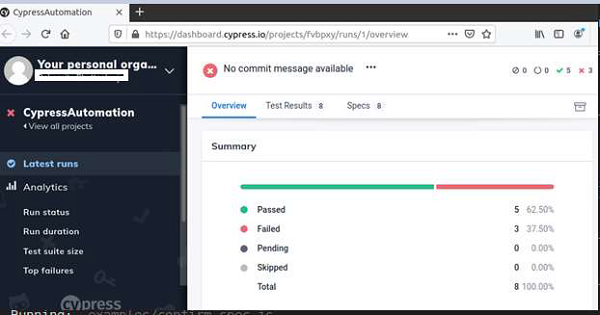
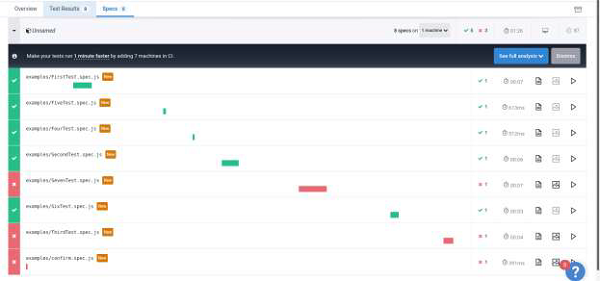
In the Specs tab, we should have the details of each test and its result.
Additionally, there are features like output, failed test screenshot, videos, and so on.
Cypress - Screenshots and Videos
Cypress can work on screenshots and videos. First, let us understand how Cypress can help in capturing the screenshot.
Screenshots
We can capture both the complete page and particular element screenshot with the screenshot command in Cypress.
In addition to that Cypress has the in-built feature to capture the screenshots of failed tests. To capture a screenshot of a particular scenario, we use the command screenshot.
Screenshot Implementation
The implementation of the screenshot commands in Cypress is as follows −
describe('Tutorialspoint Test', function () {
   // test case
   it("Scenario 1", function () {
      //URL launched
      cy.visit("https://the-internet.herokuapp.com/javascript_alerts")
      //complete page screenshot with filename - CompletePage
      cy.screenshot('CompletePage')
      //screenshot of particular element
      cy.get(':nth-child(2) > button').screenshot()
   });
});
Execution Results
The output is given below −
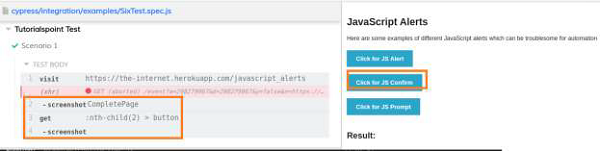
The execution logs show that complete full page screenshot captured (with filename as CompletePage.png) and also screenshot a particular element (Click for JS Confirm).
These screenshots got captured inside the screenshots folder (in the plugins folder) within the project. The location where the screenshots got captured, can be modified by changing the Global configurations.
CompletePage.png file created for full page image.
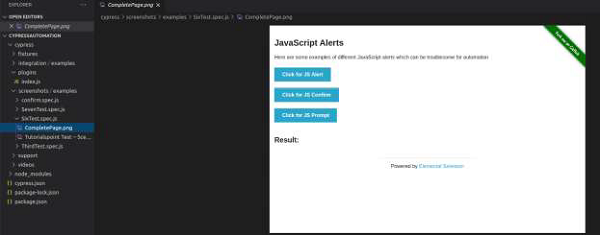
The screenshot of the button Click for JS Confirm got captured.
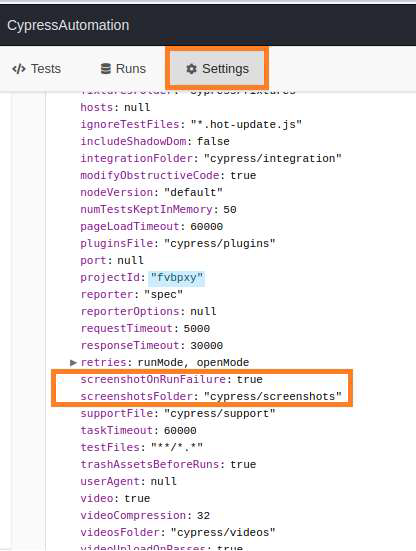
In the Test Runner Settings tab, the parameter screenshotOnRunFailure, set to true value by default. Due to which, the screenshots are always captured for failure tests.
Also, the screenshotsFolder parameter has the value cypress/screenshots value. So, the screenshots are captured within the screenshots folder.
To disable feature of capturing failed screenshots, we have to add the below values in the cypress.json file −
Cypress.Screenshot.defaults({
   screenshotOnRunFailure: false
})
Videos
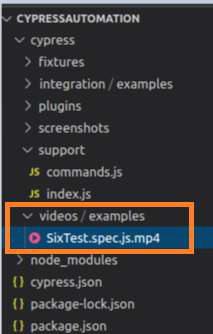
The video capturing of Cypress is turned on for tests, by default. They are stored in the videos folder within the project.
Once a Cypress test is run with the below mentioned command −
node_modules/.bin/cypress run
We get the console message along with the location of the video, compression details, and so on −
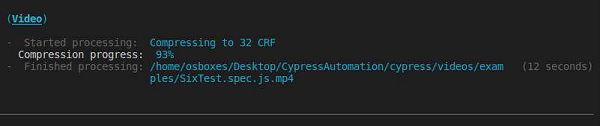
We get the corresponding video in the same location within the project.
To disable the video capture feature, we have to add the below value in the cypress.json file −
{
   "video": false
}
Cypress - Debugging
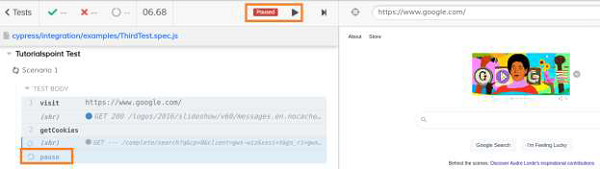
Cypress has a very good debugging feature, where we can time travel and see what has actually happened during the test execution. This can be done by hovering the mouse over the Test Runner logs.
As we move through the steps in the Test Runner window, the elements get highlighted.We can also use the Cypress command pause. This pauses the execution, during which we can debug the previous steps. After that, we can again resume execution.
Implementation
The implementation of commands for debugging in Cypress is as follows −
describe('Tutorialspoint Test', function () {
   // test case
   it('Scenario 1', function (){
      // launch the application
      cy.visit("https://accounts.google.com");
      // enable cookie logging
      Cypress.Cookies.debug(true)
      cy.getCookies
      //pause execution
      cy.pause()
      cy.setCookie('cookie1', 'value1' )
   });
});
Execution Results
The output is as follows −
The output logs show that the execution has been paused (denoted by Paused button).Then again, we can resume it after debugging the previous steps by clicking the Resume button (appear beside Paused button).
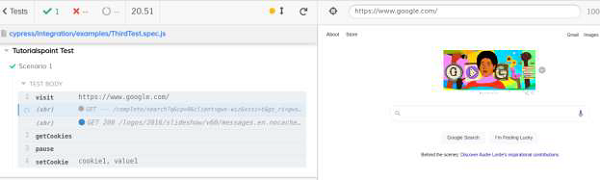
The output logs now have all the steps executed after resume from pause.
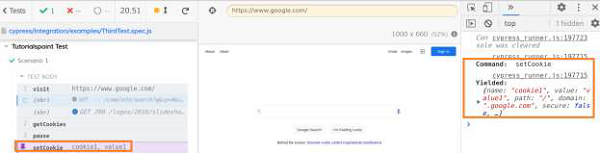
If we open the Developer Console (pressing F12) on the browser, and select a step from the Test Runner, the Console shall show the Command used and the valued Yielded.
For example, for the setCookie step, the Console shows Command − setCookie and Yielded shows the cookie name − cookie1 and value − value1.
Cypress - Custom Commands
Cypress custom commands are described by users and not the default commands from Cypress. These customized commands are used to create the test steps that are repeated in an automation flow.
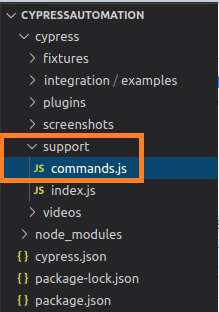
We can add and overwrite an already pre-existing command. They should be placed in the commands.js file within the support folder present in the Cypress project.
Syntax
The syntax for the custom commands in Cypress is as follows −
Cypress.Commands.add(function-name, func)

Cypress.Commands.add(function-name, opts, func)

Cypress.Commands.overwrite(function-name, func)
Here,
function-name is the command that is being added/overwritten.
func is the function passing that gets arguments passed to command.
opts is used to pass an option to describe the implicit characteristics of custom command. It is also used to determine how to handle a prior yielded subject (only applicable to Cypress.Commands.add()) and default value of option is false. The option prevSubject accepts false to ignore prior subjects, accepts true to accept prior subject and accepts optional to either begin a chain or utilize a pre-existing chain. An option accepts string, array, or Boolean.
Implementation of custom command
Given below is the implementation of custom command in commands.js
Cypress.Commands.add("userInput", (searchTxt) => {
   //to input search text in Google and perform search
   cy.get("input[type='text']").type(searchTxt);
   cy.contains("Google Search").click();
});
Implementation of Actual Test
Given below is the implementation of actual test in Cypress with custom command −
describe('Tutorialspoint Test', function () {
   // test case
   it('Test Case 6', function (){
      // launch the application
      cy.visit("https://www.google.com/");
      //custom parent command
      cy.userInput('Java')
   });
});
Execution Results
The output is as follows −
The output logs show the custom command userInput (having get, type and click commands) getting executed.
It is recommended that a custom command should not be too lengthy. It should be brief,because, adding too many actions within a custom command tends to show the execution.
Cypress - Fixtures
Cypress fixtures are added to maintain and hold the test data for automation. The fixtures are kept inside the fixtures folder (example.json file) in the Cypress project. Basically, it helps us to get the data input from external files.
Cypress fixtures folder can have files in JSON or other formats and the data is maintained in "key:value" pairs.
All the test data can be utilised by more than one test. All fixture data has to be declared within the before hook block.
Syntax
The syntax for Cypress data driven testing is as follows −
cy.fixture(path of test data)
cy.fixture(path of test data, encoding type)
cy.fixture(path of test data, opts)
cy.fixture(path of test data, encoding type, options)
Here,
path of test data is the path of test data file within fixtures folder.
encoding type − Encoding type (utf-8, asci, and so on) is used to read the file.
Opts − Modifies the timeout for response. The default value is 30000ms. The wait time for cy.fixture(), prior throws an exception.
Implementation in example.json
Given below is the implementation of data driven testing with example.json in Cypress −
{
   "fullName": "Robert",
   "number": "789456123"
}
Implementation of Actual Test
The implementation of actual data driven testing in Cypress is as follows −
describe('Tutorialspoint Test', function () {
   //part of before hook
   before(function(){
      //access fixture data
      cy.fixture('example').then(function(regdata){
         this.regdata=regdata
      })
   })
   // test case
   it('Test Case1', function (){
      // launch URL
      cy.visit("https://register.rediff.com/register/register.php")
      //data driven from fixture
      cy.get(':nth-child(3) > [width="185"] > input')
      .type(this.regdata.fullName)
      cy.get('#mobno').type(this.regdata.number)
   });
});
Execution Results
The output is as follows −
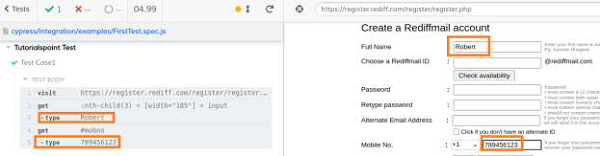
The output logs show the values Robert and 789456123 being fed to the Full Name and Mobile No. fields respectively. This data has been passed to the test from the fixtures.
Cypress - Environment Variables
We can define environment variables that can be globally declared for the test automation framework and all the test cases can access it. This type of customized environment variable can be stored in the cypress.json file within our project.

Since, a customized variable is not exposed by default configurations from Cypress, we have to mention the key as "evn" in the cypress.json file and then, set the value.
Also, to access this variable in the actual test, we have to use the Cypress.env and pass the value declared in the json file.
Implementation in cypress.json
The implementation of commands for environment variables in cypress.json format is as follows −
{
   "projectId": "fvbpxy",
   "env" :
   {
      "url" : "https://www.google.com/"
   }
}
Implementation of Actual Test
The implementation of actual test for environmental variables in Cypress is as follows −
describe('Tutorialspoint Test', function () {
   // test case
   it('Scenario 1', function (){
      // launch application from environment variable
      cy.visit(Cypress.env('url'))
      cy.getCookies()
      cy.setCookie('cookie1', 'value1')
   });
});
Execution Results
The output is as follows −

The output logs show the URL launched which has been set as a customized environment variable from the cypress.json file.
Configure Environment Variables
We can configure or modify the environment values from the command line with the flag --env.
To run a particular file (for example: Test1.js) with URL: https://accounts.google.com in a headed mode, the command shall be as follows:
./node_modules/.bin/cypress run --spec cypress/integration/examples/Test1.js --
env url=https://accounts.google.com headed
If we have a value set for the environment variable url in the cypress.json file, which is different from the value set from the command line, Cypress shall give preference to the value set from the command line.
Cypress - Hooks
Cypress Hooks are used to carry out the certain operations prior/post every/each test.Some of the common hooks are as follows −
before − It is executed, once the prior execution of any tests within a describe block is carried out.
after − It is executed, once the post execution of all the tests within a describe block is carried out.
beforeEach − It is executed prior to the execution of an individual, it blocks within a describe block.
afterEach − It is executed post execution of the individual, it blocks within a describe block.
Implementation
The implementation of commands for the Cypress Hooks is explained below −
describe('Tutorialspoint', function() {
   before(function() {
      // executes once prior all tests in it block
      cy.log("Before hook")
   })
   after(function() {
      // executes once post all tests in it block
      cy.log("After hook")
   })
   beforeEach(function() {
      // executes prior each test within it block
      cy.log("BeforeEach hook")
   })
   afterEach(function() {
      // executes post each test within it block
      cy.log("AfterEac hook")
   })
   it('First Test', function() {
      cy.log("First Test")
   })
   it('Second Test', function() {
      cy.log("Second Test")
   })
})
Execution Results
The output is mentioned below −
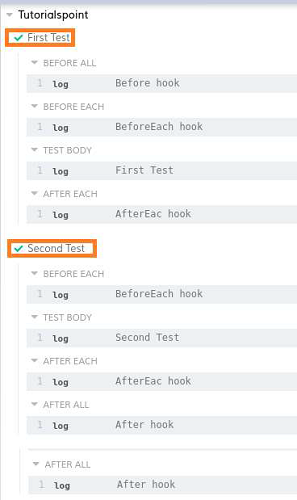
The output logs show that the first executed step is the BEFORE ALL.
The last executed step is the AFTER ALL. Both of them ran only once.
The step executed under BEFORE EACH ran twice (before each TEST BODY).
Also, step executed under AFTER EACH ran twice (after each TEST BODY).
Both the it blocks are executed in order, in which they are implemented.
TAG
Apart from hooks, Cypress has tags - .only and .skip.
While the .only tag is utilised to execute the it block to which it is tagged, the .skip tag is utilised to exclude the it block to which it is tagged.
Implementation with .only
The implementation of .only tag in Cypress is as follows −
describe('Tutorialspoint', function()
   //it block with tag .only
   it.only('First Test', function() {
      cy.log("First Test")
   })
   //it block with tag .only
   It.only('Second Test', function() {
      cy.log("Second Test")
   })
   it('Third Test', function() {
      cy.log("Third Test")
   })
})
Execution Results
The output is given below −
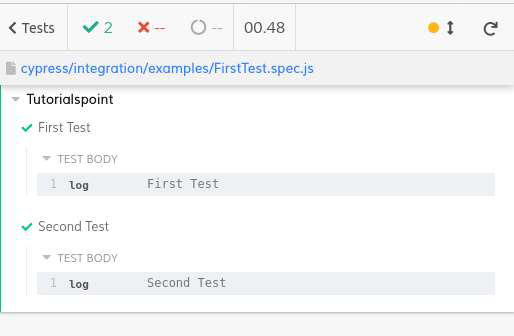
The output logs show that the it blocks (First and Second Test) with the .only tags only got executed.
Implementation with .skip
The implementation of .skip tag in Cypress is as follows −
describe('Tutorialspoint', function()
   it('First Test', function() {
      cy.log("First Test")
   })
   it('Second Test', function() {
      cy.log("Second Test")
   })
   //it block with tag .skip
   it.skip('Third Test', function() {
      cy.log("Third Test")
   })
})
Execution Results
The output is as follows −
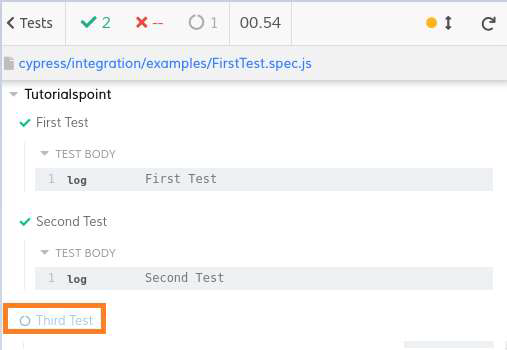
The output logs show that the it block (Third Test) with the .skip tag got skipped from the execution.
Cypress - Configuration of JSON File
Cypress configurations consist of some key-value pairs that are applicable to all tests within a framework. Cypress default configurations are available under the Settings tab->Configuration (expand it) in the Test Runner window.
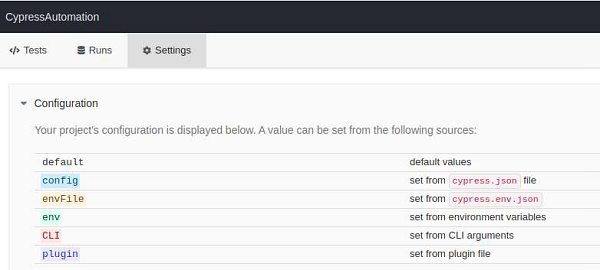
If we look further down in the same window, we shall have the existing values of multiple configurations given by Cypress like the timeouts, environment variables, folder path, and so on.
It is displayed below −
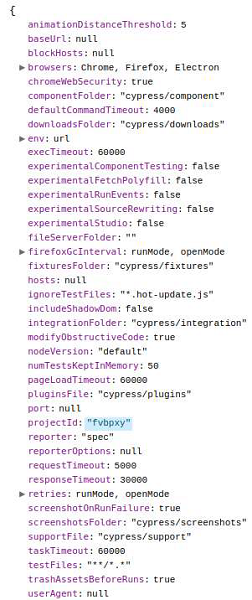
If we look further down in the same window, we shall have the existing values of multiple configurations given by Cypress like the timeouts, environment variables, folder path, and so on.
It is displayed below −
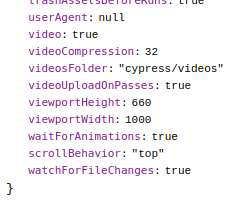
Override Default values
To override the default configurations from the cypress.json file, we have to specify the key-value pairs.
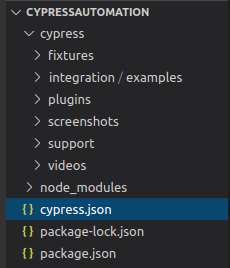
Implementation in cypress.json
The implementation for overriding the default values for JSON file is as follows −
{
   "baseUrl" : "https://www.google.com/"
}
Here, the key is baseUrl and the value is https://www.google.com/. Once the tests are run again, the changes are reflected in the global configurations, as shown below −
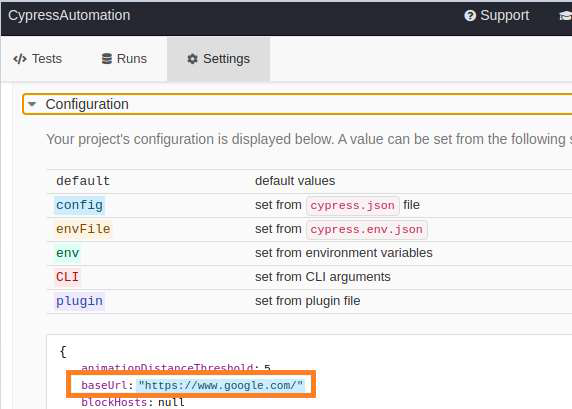
Implementation of Actual Test
The implementation of actual test for overriding default values of the JSON file is as follows −
describe('Tutorialspoint', function () {
// test case
   it('First Test', function (){
      // launch application from configuration
      cy.visit("/")
   });
});
Execution Results
The output is as follows −
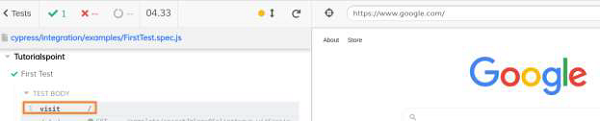
The execution logs show that the baseUrl has been obtained from the cypress.json file and it is applicable to all tests within the framework.
Override Default configurations
We can override the default configurations from the test scripts, which become applicable to an individual test step, within the test case and not to the complete framework.
This is done with the help of the config command in Cypress.
For example, if we want to increase the default timeout for a particular test step, implementation shall be as follows −
//set default time out to nine seconds from following steps in test
Cypress.config('defaultCommandTimeout',9000)
landPage.selectUser().click()
Simultaneously if the defaultCommandTimeout value is set to seven seconds in the cypress.json file, then Cypress shall give preference to the timeout applied to the test step(i.e nine seconds).
Finally, it gives preference to the default configurations.
Disable Overriding Default configurations
We can disable the feature to override the default configurations from the cypress.json.
The configuration in cypress.json is as follows −
{
   "defaultCommandTimeout" : "9000"
}
To disable the above configuration, run the below mentioned command −
npx cypress open --config-file false
After running the above command, the Settings tab of the Test Runner window will show the config flag set to false.
Also, defaultCommandTimeout is set to four seconds, which is set by the default configuration and not overridden by cypress.json value of nine seconds.
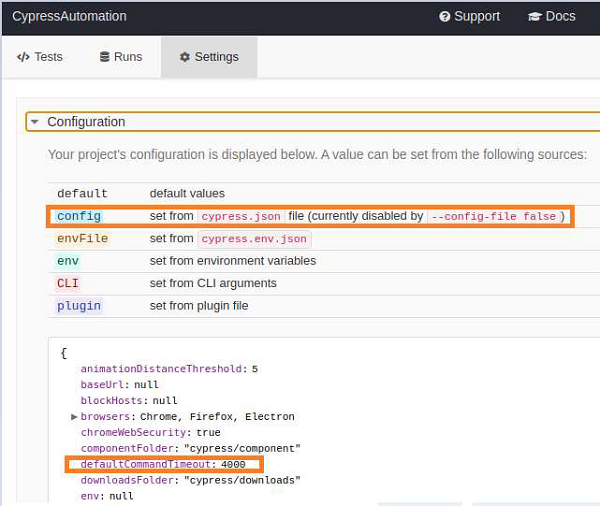
Cypress - Reports
Cypress is bundled with Mocha. So, any reports that can be generated for Mocha, can also be utilised with Cypress. In addition to that Cypress has other third party reporters like JUnit and teamcity.
Mochawesome Report
The Mochawesome report is one of the most important reports in Cypress.
To install mochawesome, run the command given herewith −
npm install mochawesome --save-dev
The following screen will appear on your computer −

To install mocha, run the command mentioned below −
npm install mocha --save-dev
The following screen will appear on your computer −

To merge mochawesome json reports, run the following command −
npm install mochawesome-merge --save-dev
The following screen will appear on your computer −

All these packages after installation, should get reflected on the package.json file.
To merge multiple reports in a single report, run the following command −
npm run combine-reports
Configurations in cypress.json file
In the cypress.json file, we can set the following configurations for the mochawesome reports −
overwrite − If its value is set to false, there should not be any overwriting from the prior generated reports.
reportDir − It is the location, where reports are to be saved.
quiet − If its value is set to true, there should not be any Cypress related output. Only the mochawesome output has to be printed.
html − If its value is set to false, there should not be any generation of html reports after execution.
json − If its value is set to true, a json file with execution details will be generated.
Implementation in cypress.json
The implementation for mochawesome report in cypress.json is as follows −
{
   "reporter": "mochawesome",
   "reporterOptions": {
      "reportDir": "cypress/results",
      "overwrite": false,
      "html": false,
      "json": true
   }
}
To generate a report for all specs in the integration folder of the Cypress project, run the command given below −
npx cypress run
For running a particular test, run the following command −
npx cypress run --spec "<path of spec file>"
After the execution is completed, the mochawesome-report folder gets generated within the Cypress project containing reports in html and json formats.
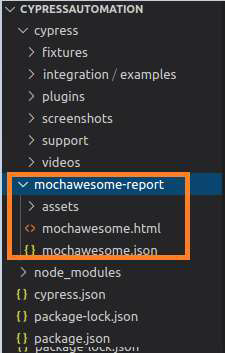
Right-click on the mochawesome.html report. Then, select the Copy Path option and open the path copied on the browser.
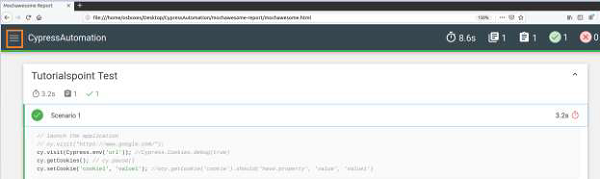
The mochawesome report gets opened with details of the execution results, duration, test case name, test steps, and so on.
On clicking on the icon (highlighted in the above image) on the left upper corner of the screen, more options are displayed.
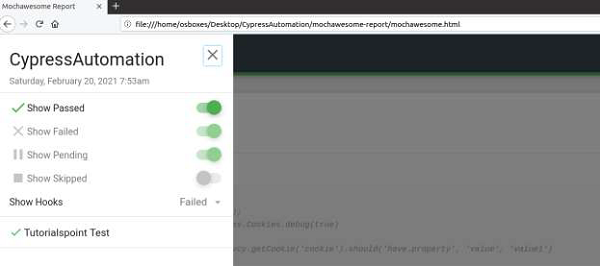
We can get the different views to select the passed, failed, pending, skipped test cases, and the hooks applied to the test.
JUnit Report
Cypress provides one more type of report known as the JUnit report.
To install the package for JUnit report, run the command stated below −
npm install cypress-junit-reporter --save-dev
The following screen will appear on your computer −

Implementation in cypress.json
Given below is an implementation of JUnit report in cypress.json −
{
   "reporter": "junit",
   "reporterOptions": {
      "mochaFile": "cypress/results/results.xml",
      "toConsole": true
   }
}
If we run multiple tests in a run, and wish to have a unique report for the individual spec files, we have to add [hash] in the mochaFile parameter in cypress.json.
Implementation to avoid overriding report
Following is an implementation in cypress.json to avoid an overriding report in Cypress −
{
   "reporter": "junit",
   "reporterOptions": {
      "mochaFile": "cypress/results/results-[hash].xml",
      "toConsole": true
   }
}
To generate report for all specs in the integration folder of the Cypress project, run the following command −
npx cypress run --reporter junit
The following screen will appear on your computer −
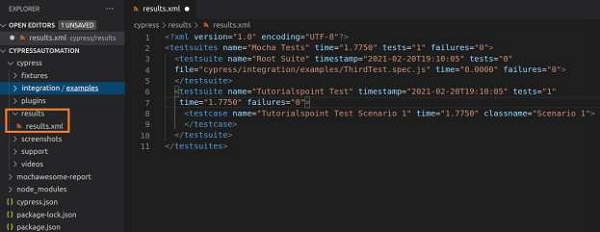
After execution is completed, the results folder gets generated within the Cypress project containing reports in xml format.
teamcity Report
Cypress provides one more type of report known as the teamcity report.
To install the package for teamcity report, run the following command −
npm install cypress-teamcity-reporter --save-dev
The following screen will appear on your computer −
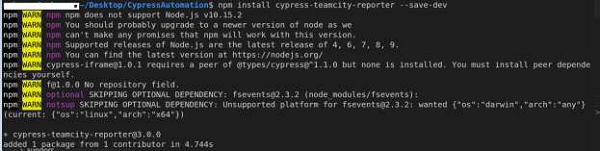
To generate report for all specs in the integration folder of the Cypress project, run the following command −
npx cypress run --reporter teamcity
The following screen will appear on your computer −

Cypress - Plugins
Cypress has multiple plugins to add to its features. There are multiple types of plugins like the authentication, component testing, custom commands, development tools and so on.
Some of the prominent plugins include −
To perform file upload task in Cypress, we have to first install a plugin with the command mentioned below −
npm install dev cypress-file-upload
Once the installation is done, we have to add the statement import 'cypress-file-upload' in the command.js file, which resides inside the support folder within the Cypress project.
To work with frames, first, we have to install the Cypress plugin for frames with the command given below −
npm install D cypress-iframe
Then, we have to add the statement import 'cypress-iframe' in the code.
To identify elements with xpath locator, run the following command −
npm install cypress-xpath
Once the installation is done, we have to add the statement require ("cypress-xpath") within the index.js file, which resides inside the support folder within the Cypress project.
Also, we have to use the cy.xpath command to identify elements.
To enable themes, we have to install a plugin with the command mentioned below −
npm install --save-dev cypress-dark
Once the installation is done, we have to add the statement require ("cypress-dark") within the index.js file, which resides inside the support folder within the Cypress project.
Cypress - GitHub
To integrate Cypress with GitHub, we have to first install Cypress GitHub App. This can be done either from the organization integration settings or from the project settings in the Cypress Dashboard.
Installation
The installation of Cypress GitHub App can be done in two ways. They are explained below in detail.
Installation via organization integration settings
Follow the steps mentioned below to install GitHub via organization integration settings −
Navigate to the Dashboard Organization page.
Choose an organization that you want to integrate with a GitHub account or organization.
Navigate to the chosen organizations integration option from the navigation to the side.
Then, click the GitHub Integration button.
Installation via project settings
Follow the steps mentioned below to install GitHub via project settings −
Choose organization inside organization switcher.
Choose the project that you want to integrate with the repo in GitHub.
Move to the Project settings page.
Go to the GitHub Integration.
Click on Install the Cypress GitHub App.
Once the GitHub App installation is done, we shall be directed to GitHub.com to proceed with further steps, which are as follows −
Choose the GitHub organization or account for integration with the organization Cypress Dashboard.
Next, we have to combine either all GitHub repositories or a particular repository with the Cypress GitHub App.
Click on the Install button to finish installation.
GitHub Integration Enabling
The process to enable the GitHub integration in Cypress is explained below −
Move to the project settings page.
Navigate to the GitHub Integration section, then click on Configure.
Select a repository from GitHub to integrate with the project.
As GitHub repo is connected to a Cypress project, the GitHub integration shall be enabled.