- Home
- Introduction
- Environment Setup
- Concurrency vs Parallelism
- System & Memory Architecture
- Threads
- Implementation of Threads
- Synchronizing Threads
- Threads Intercommunication
- Testing Thread Applications
- Debugging Thread Applications
- Benchmarking & Profiling
- Pool of Threads
- Pool of Processes
- Multiprocessing
- Processes Intercommunication
- Event-Driven Programming
- Reactive Programming
Python Resources
Concurrency in Python - Quick Guide
Concurrency in Python - Introduction
In this chapter, we will understand the concept of concurrency in Python and learn about the different threads and processes.
What is Concurrency?
In simple words, concurrency is the occurrence of two or more events at the same time. Concurrency is a natural phenomenon because many events occur simultaneously at any given time.
In terms of programming, concurrency is when two tasks overlap in execution. With concurrent programming, the performance of our applications and software systems can be improved because we can concurrently deal with the requests rather than waiting for a previous one to be completed.
Historical Review of Concurrency
Following points will give us the brief historical review of concurrency −
From the concept of railroads
Concurrency is closely related with the concept of railroads. With the railroads, there was a need to handle multiple trains on the same railroad system in such a way that every train would get to its destination safely.
Concurrent computing in academia
The interest in computer science concurrency began with the research paper published by Edsger W. Dijkstra in 1965. In this paper, he identified and solved the problem of mutual exclusion, the property of concurrency control.
High-level concurrency primitives
In recent times, programmers are getting improved concurrent solutions because of the introduction of high-level concurrency primitives.
Improved concurrency with programming languages
Programming languages such as Googles Golang, Rust and Python have made incredible developments in areas which help us get better concurrent solutions.
What is thread & multithreading?
Thread is the smallest unit of execution that can be performed in an operating system. It is not itself a program but runs within a program. In other words, threads are not independent of one other. Each thread shares code section, data section, etc. with other threads. They are also known as lightweight processes.
A thread consists of the following components −
Program counter which consist of the address of the next executable instruction
Stack
Set of registers
A unique id
Multithreading, on the other hand, is the ability of a CPU to manage the use of operating system by executing multiple threads concurrently. The main idea of multithreading is to achieve parallelism by dividing a process into multiple threads. The concept of multithreading can be understood with the help of the following example.
Example
Suppose we are running a particular process wherein we open MS Word to type content into it. One thread will be assigned to open MS Word and another thread will be required to type content in it. And now, if we want to edit the existing then another thread will be required to do the editing task and so on.
What is process & multiprocessing?
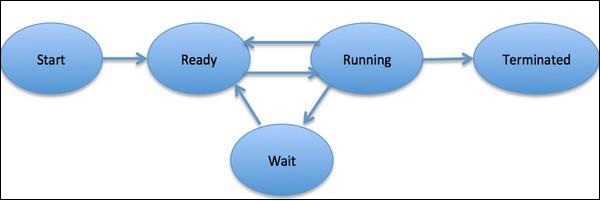
Aprocessis defined as an entity, which represents the basic unit of work to be implemented in the system. To put it in simple terms, we write our computer programs in a text file and when we execute this program, it becomes a process that performs all the tasks mentioned in the program. During the process life cycle, it passes through different stages Start, Ready, Running, Waiting and Terminating.
Following diagram shows the different stages of a process −
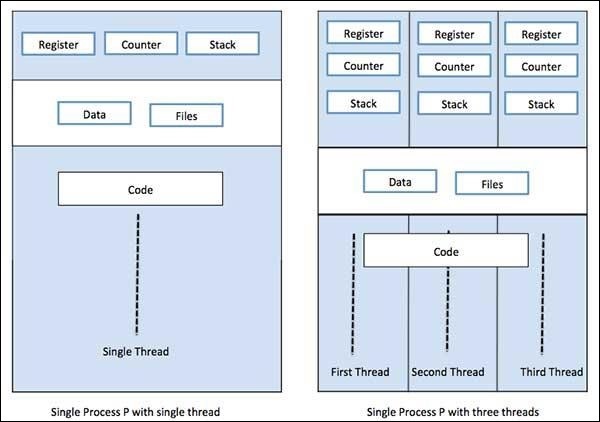
A process can have only one thread, called primary thread, or multiple threads having their own set of registers, program counter and stack. Following diagram will show us the difference −
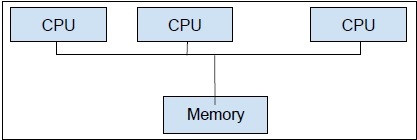
Multiprocessing, on the other hand, is the use of two or more CPUs units within a single computer system. Our primary goal is to get the full potential from our hardware. To achieve this, we need to utilize full number of CPU cores available in our computer system. Multiprocessing is the best approach to do so.
Python is one of the most popular programming languages. Followings are some reasons that make it suitable for concurrent applications −
Syntactic sugar
Syntactic sugar is syntax within a programming language that is designed to make things easier to read or to express. It makes the language sweeter for human use: things can be expressed more clearly, more concisely, or in an alternative style based on preference. Python comes with Magic methods, which can be defined to act on objects. These Magic methods are used as syntactic sugar and bound to more easy-to-understand keywords.
Large Community
Python language has witnessed a massive adoption rate amongst data scientists and mathematicians, working in the field of AI, machine learning, deep learning and quantitative analysis.
Useful APIs for concurrent programming
Python 2 and 3 have large number of APIs dedicated for parallel/concurrent programming. Most popular of them are threading, concurrent.features, multiprocessing, asyncio, gevent and greenlets, etc.
Limitations of Python in implementing concurrent applications
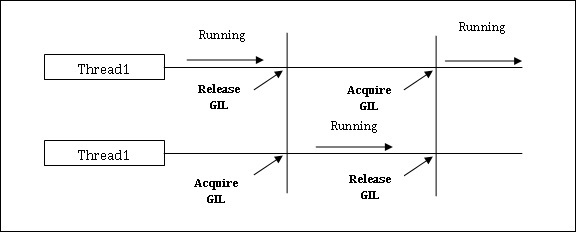
Python comes with a limitation for concurrent applications. This limitation is called GIL (Global Interpreter Lock) is present within Python. GIL never allows us to utilize multiple cores of CPU and hence we can say that there are no true threads in Python. We can understand the concept of GIL as follows −
GIL (Global Interpreter Lock)
It is one of the most controversial topics in the Python world. In CPython, GIL is the mutex - the mutual exclusion lock, which makes things thread safe. In other words, we can say that GIL prevents multiple threads from executing Python code in parallel. The lock can be held by only one thread at a time and if we want to execute a thread then it must acquire the lock first. The diagram shown below will help you understand the working of GIL.
However, there are some libraries and implementations in Python such as Numpy, Jpython and IronPytbhon. These libraries work without any interaction with GIL.
Python - Environment Setup
First step in the journey of learning Python is to install it on your machine. Today most computer machines, especially having Linux OS, have Python pre-installed. However, it may not be the latest version.
Python is available on a wide variety of platforms including Linux and Mac OS X. Let's understand how to set up our Python environment.
- Unix (Solaris, Linux, FreeBSD, AIX, HP/UX, SunOS, IRIX, etc.)
- Win 9x/NT/2000
- Macintosh (Intel, PPC, 68K)
- OS/2
- DOS (multiple versions)
- PalmOS
- Nokia mobile phones
- Windows CE
- Acorn/RISC OS
- BeOS
- Amiga
- VMS/OpenVMS
- QNX
- VxWorks
- Psion
Python has also been ported to the Java and .NET virtual machines
Local Environment Setup
Open a terminal window and type "python" to find out if it is already installed and which version is installed. If Python is already installed then you will get a message something like as follows:
$ py
Python 3.14.2 (tags/v3.14.2:df79316, Dec  5 2025, 17:18:21) [MSC v.1944 64 bit (AMD64)] on win32
Type "help", "copyright", "credits" or "license" for more information.
>>>
Downloading Python
The most up-to-date and current source code, binaries, documentation, news, etc., is available on the official website of Python https://www.python.org/
You can download Python documentation from https://www.python.org/doc/. The documentation is available in HTML, PDF, and PostScript formats.
Installing Python
Python distribution is available for a wide variety of platforms. You need to download only the binary code applicable for your platform and install Python.
If the binary code for your platform is not available, you need a C compiler to compile the source code manually. Compiling the source code offers more flexibility in terms of choice of features that you require in your installation.
Here is a quick overview of installing Python on various platforms −
Install Python on Ubuntu Linux
To check whether Python is already installed, open the Linux terminal and enter the following command −
$ py --version
Python 3.14.2
In Ubuntu Linux, the easiest way to install Python is to use apt, Advanced Packaging Tool. It is always recommended to update the list of packages in all the configured repositories.
$ sudo apt update
Even after the update, the latest version of Python may not be available for install, depending upon the version of Ubuntu you are using. To overcome this, add the deadsnakes repository.
$ sudo apt-get install software-properties-common
$ sudo add-apt-repository ppa:deadsnakes/ppa
Update the package list again.
$ sudo apt update
To install the latest Python 3.14 version, enter the following command in the terminal −
$ sudo apt-get install python3.14
Check whether it has been properly installed.
$ py
Python 3.14.2 (tags/v3.14.2:df79316, Dec  5 2025, 17:18:21) [GCC 9.4.0] on linux
Type "help", "copyright", "credits" or "license" for more information.

>>> print ("Hello World")
Hello World

>>>
Install Python on other Linux
Here are the simple steps to install Python on Unix/Linux machine.
Open a Web browser and go to https://www.python.org/downloads/.
Follow the link to download zipped source code available for Unix/Linux.
Download and extract files.
Editing the Modules/Setup file if you want to customize some options.
Now issue the following commands:
$ run ./configure script
$ make
$ make install
This installs Python at standard location /usr/local/bin and its libraries at /usr/local/lib/pythonXX where XX is the version of Python.
Using Yum Command
Red Hat Enterprise Linux (RHEL 8) does not install Python 3 by default. We usually use yum command on CentOS and other related variants. The procedure for installing Python-3 on RHEL 8 is as follows:
$ sudo yum install python3
Install Python on Windows
It should be noted that Python's version 3.10 onwards cannot be installed on Windows 7 or earlier operating systems.
The recommended way to install Python is to use the official installer. A link to the latest stable version is given on the home page itself. It is also found at https://www.python.org/downloads/windows/.
You can find embeddable packages and installers for 32 as well as 64-bit architecture.
Let us download 64-bit Windows installer −
(https://www.python.org/ftp/python/3.14.2/python-3.14.2-amd64.exe)
Double click on the file where it has been downloaded to start the installation.
Although you can straight away proceed by clicking the Install Now button, it is advised to choose the installation folder with a relatively shorter path, and tick the second check box to update the PATH variable.
Accept defaults for rest of the steps in this installation wizard to complete the installation.
Open the Window Command Prompt terminal and run Python to check the success of installation.
C:\Users\mahes>py
Python 3.14.2 (tags/v3.14.2:df79316, Dec  5 2025, 17:18:21) [MSC v.1944 64 bit (AMD64)] on win32
Type "help", "copyright", "credits" or "license" for more information.
>>>
Python's standard library has an executable module called IDLE short for Integrated Development and Learning Environment. Find it from Window start menu and launch.
IDLE contains Python shell (interactive interpreter) and a customizable multi-window text editor with features such as syntax highlighting, smart indent, auto completion etc. It is cross-platform so works the same on Windows, MacOS and Linux. It also has a debugger with provision to set breakpoints, stepping, and viewing of global and local namespaces.
Here are the steps to install Python on Windows machine.
Open a Web browser and go to https://www.python.org/downloads/.
Follow the link for the Windows installer python-XYZ.msi file where XYZ is the version you need to install.
To use this installer python-XYZ.msi, the Windows system must support Microsoft Installer 2.0. Save the installer file to your local machine and then run it to find out if your machine supports MSI.
Run the downloaded file. This brings up the Python install wizard, which is really easy to use. Just accept the default settings, wait until the install is finished, and you are done.
Macintosh Installation
Recent Macs come with Python installed, but it may be several years out of date. See http://www.python.org/download/mac/ for instructions on getting the current version along with extra tools to support development on the Mac. For older Mac OS's before Mac OS X 10.3 (released in 2003), MacPython is available.
Jack Jansen maintains it and you can have full access to the entire documentation at his website − https://homepages.cwi.nl/~jack/macpython/index.html. You can find complete installation details for Mac OS installation.
Setting up PATH
Programs and other executable files can be in many directories, so operating systems provide a search path that lists the directories that the OS searches for executables.
The path is stored in an environment variable, which is a named string maintained by the operating system. This variable contains information available to the command shell and other programs.
The path variable is named as PATH in Unix or Path in Windows (Unix is case sensitive; Windows is not).
In Mac OS, the installer handles the path details. To invoke the Python interpreter from any particular directory, you must add the Python directory to your path.
Setting path at Unix/Linux
To add the Python directory to the path for a particular session in Unix −
In the csh shell − type setenv PATH "$PATH:/usr/local/bin/python" and press Enter.
In the bash shell (Linux) − type export PATH="$PATH:/usr/local/bin/python" and press Enter.
In the sh or ksh shell − type PATH="$PATH:/usr/local/bin/python" and press Enter.
Note − /usr/local/bin/python is the path of the Python directory
Setting path at Windows
To add the Python directory to the path for a particular session in Windows −
At the command prompt − type path %path%;C:\Python and press Enter.
Note − C:\Python is the path of the Python directory
Python Environment Variables
Here are important environment variables, which can be recognized by Python −
| Sr.No. | Variable & Description |
|---|---|
| 1 |
PYTHONPATH It has a role similar to PATH. This variable tells the Python interpreter where to locate the module files imported into a program. It should include the Python source library directory and the directories containing Python source code. PYTHONPATH is sometimes preset by the Python installer. |
| 2 |
PYTHONSTARTUP It contains the path of an initialization file containing Python source code. It is executed every time you start the interpreter. It is named as .pythonrc.py in Unix and it contains commands that load utilities or modify PYTHONPATH. |
| 3 |
PYTHONCASEOK It is used in Windows to instruct Python to find the first case-insensitive match in an import statement. Set this variable to any value to activate it. |
| 4 |
PYTHONHOME It is an alternative module search path. It is usually embedded in the PYTHONSTARTUP or PYTHONPATH directories to make switching module libraries easy. |
Running Python
There are three different ways to start Python −
Interactive Interpreter
You can start Python from Unix, DOS, or any other system that provides you a command-line interpreter or shell window.
Enter py the command line.
Start coding right away in the interactive interpreter.
$py # Unix/Linux
or
py% # Unix/Linux
or
C:> py # Windows/DOS
Here is the list of all the available command line options −
| Sr.No. | Option & Description |
|---|---|
| 1 |
-d It provides debug output. |
| 2 |
-O It generates optimized bytecode (resulting in .pyo files). |
| 3 |
-S Do not run import site to look for Python paths on startup. |
| 4 |
-v verbose output (detailed trace on import statements). |
| 5 |
-X disable class-based built-in exceptions (just use strings); obsolete starting with version 1.6. |
| 6 |
-c cmd run Python script sent in as cmd string |
| 7 |
file run Python script from given file |
Script from the Command-line
A Python script can be executed at command line by invoking the interpreter on your application, as in the following −
$py script.py # Unix/Linux

or

py% # script.py Unix/Linux

C: >py script.py # Windows/DOS
Note − Be sure the file permission mode allows execution.
Integrated Development Environment
You can run Python from a Graphical User Interface (GUI) environment as well, if you have a GUI application on your system that supports Python.
Unix − IDLE is the very first Unix IDE for Python.
Windows − PythonWin is the first Windows interface for Python and is an IDE with a GUI.
Macintosh − The Macintosh version of Python along with the IDLE IDE is available from the main website, downloadable as either MacBinary or BinHex'd files.
If you are not able to set up the environment properly, then you can take help from your system admin. Make sure the Python environment is properly set up and working perfectly fine.
We have provided Python Online Compiler/Interpreter which helps you to Edit and Execute the code directly from your browser. Try to click the icon  to run the following Python code to print conventional "Hello, World!".
Below code box allows you to change the value of the code. Try to change the value inside print() and run it again to verify the result.
# This is my first Python program.
# This will print 'Hello, World!' as the output

print ("Hello, World!");
Concurrency vs Parallelism
Both concurrency and parallelism are used in relation to multithreaded programs but there is a lot of confusion about the similarity and difference between them. The big question in this regard: is concurrency parallelism or not? Although both the terms appear quite similar but the answer to the above question is NO, concurrency and parallelism are not same. Now, if they are not same then what is the basic difference between them?
In simple terms, concurrency deals with managing the access to shared state from different threads and on the other side, parallelism deals with utilizing multiple CPUs or its cores to improve the performance of hardware.
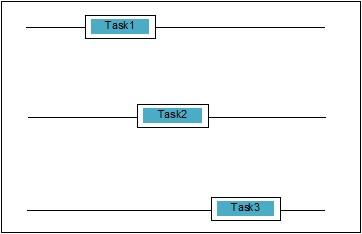
Concurrency in Detail
Concurrency is when two tasks overlap in execution. It could be a situation where an application is progressing on more than one task at the same time. We can understand it diagrammatically; multiple tasks are making progress at the same time, as follows −
Levels of Concurrency
In this section, we will discuss the three important levels of concurrency in terms of programming −
Low-Level Concurrency
In this level of concurrency, there is explicit use of atomic operations. We cannot use such kind of concurrency for application building, as it is very error-prone and difficult to debug. Even Python does not support such kind of concurrency.
Mid-Level Concurrency
In this concurrency, there is no use of explicit atomic operations. It uses the explicit locks. Python and other programming languages support such kind of concurrency. Mostly application programmers use this concurrency.
High-Level Concurrency
In this concurrency, neither explicit atomic operations nor explicit locks are used. Python has concurrent.futures module to support such kind of concurrency.
Properties of Concurrent Systems
For a program or concurrent system to be correct, some properties must be satisfied by it. Properties related to the termination of system are as follows −
Correctness property
The correctness property means that the program or the system must provide the desired correct answer. To keep it simple, we can say that the system must map the starting program state to final state correctly.
Safety property
The safety property means that the program or the system must remain in a good or safe state and never does anything bad.
Liveness property
This property means that a program or system must make progress and it would reach at some desirable state.
Actors of concurrent systems
This is one common property of concurrent system in which there can be multiple processes and threads, which run at the same time to make progress on their own tasks. These processes and threads are called actors of the concurrent system.
Resources of Concurrent Systems
The actors must utilize the resources such as memory, disk, printer etc. in order to perform their tasks.
Certain set of rules
Every concurrent system must possess a set of rules to define the kind of tasks to be performed by the actors and the timing for each. The tasks could be acquiring of locks, memory sharing, modifying the state, etc.
Barriers of Concurrent Systems
While implementing concurrent systems, the programmer must take into consideration the following two important issues, which can be the barriers of concurrent systems −Sharing of data
An important issue while implementing the concurrent systems is the sharing of data among multiple threads or processes. Actually, the programmer must ensure that locks protect the shared data so that all the accesses to it are serialized and only one thread or process can access the shared data at a time. In case, when multiple threads or processes are all trying to access the same shared data then not all but at least one of them would be blocked and would remain idle. In other words, we can say that we would be able to use only one process or thread at a time when lock is in force. There can be some simple solutions to remove the above-mentioned barriers −
Data Sharing Restriction
The simplest solution is not to share any mutable data. In this case, we need not to use explicit locking and the barrier of concurrency due to mutual data would be solved.
Data Structure Assistance
Many times the concurrent processes need to access the same data at the same time. Another solution, than using of explicit locks, is to use a data structure that supports concurrent access. For example, we can use the queue module, which provides thread-safe queues. We can also use multiprocessing.JoinableQueue classes for multiprocessing-based concurrency.
Immutable Data Transfer
Sometimes, the data structure that we are using, say concurrency queue, is not suitable then we can pass the immutable data without locking it.
Mutable Data Transfer
In continuation of the above solution, suppose if it is required to pass only mutable data, rather than immutable data, then we can pass mutable data that is read only.
Sharing of I/O Resources
Another important issue in implementing concurrent systems is the use of I/O resources by threads or processes. The problem arises when one thread or process is using the I/O for such a long time and other is sitting idle. We can see such kind of barrier while working with an I/O heavy application. It can be understood with the help of an example, the requesting of pages from web browser. It is a heavy application. Here, if the rate at which the data is requested is slower than the rate at which it is consumed then we have I/O barrier in our concurrent system.
Example - Printing Time taken for loading a Web Page
The following Python script is for requesting a web page and getting the time our network took to get the requested page −
main.py
import urllib.request

import time

ts = time.time()

req = urllib.request.urlopen('https://www.tutorialspoint.com')

pageHtml = req.read()

te = time.time()

print("Page Fetching Time : {} Seconds".format (te-ts))
After executing the above script, we can get the page fetching time as shown below.
Output
Run the above code and verify the output.
Page Fetching Time : 0.15655970573425293 Seconds
We can see that the time to fetch the page is more than one second. Now what if we want to fetch thousands of different web pages, you can understand how much time our network would take.
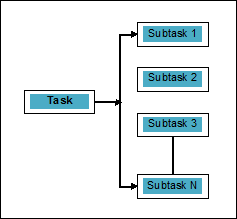
What is Parallelism?
Parallelism may be defined as the art of splitting the tasks into subtasks that can be processed simultaneously. It is opposite to the concurrency, as discussed above, in which two or more events are happening at the same time. We can understand it diagrammatically; a task is broken into a number of subtasks that can be processed in parallel, as follows −
To get more idea about the distinction between concurrency and parallelism, consider the following points −
Concurrent but not parallel
An application can be concurrent but not parallel means that it processes more than one task at the same time but the tasks are not broken down into subtasks.
Parallel but not concurrent
An application can be parallel but not concurrent means that it only works on one task at a time and the tasks broken down into subtasks can be processed in parallel.
Neither parallel nor concurrent
An application can be neither parallel nor concurrent. This means that it works on only one task at a time and the task is never broken into subtasks.
Both parallel and concurrent
An application can be both parallel and concurrent means that it both works on multiple tasks at a time and the task is broken into subtasks for executing them in parallel.
Necessity of Parallelism
We can achieve parallelism by distributing the subtasks among different cores of single CPU or among multiple computers connected within a network.
Consider the following important points to understand why it is necessary to achieve parallelism −
Efficient code execution
With the help of parallelism, we can run our code efficiently. It will save our time because the same code in parts is running in parallel.
Faster than sequential computing
Sequential computing is constrained by physical and practical factors due to which it is not possible to get faster computing results. On the other hand, this issue is solved by parallel computing and gives us faster computing results than sequential computing.
Less execution time
Parallel processing reduces the execution time of program code.
If we talk about real life example of parallelism, the graphics card of our computer is the example that highlights the true power of parallel processing because it has hundreds of individual processing cores that work independently and can do the execution at the same time. Due to this reason, we are able to run high-end applications and games as well.
Understanding of the processors for implementation
We know about concurrency, parallelism and the difference between them but what about the system on which it is to be implemented. It is very necessary to have the understanding of the system, on which we are going to implement, because it gives us the benefit to take informed decision while designing the software. We have the following two kinds of processors −
Single-core processors
Single-core processors are capable of executing one thread at any given time. These processors use context switching to store all the necessary information for a thread at a specific time and then restoring the information later. The context switching mechanism helps us make progress on a number of threads within a given second and it looks as if the system is working on multiple things.
Single-core processors come with many advantages. These processors require less power and there is no complex communication protocol between multiple cores. On the other hand, the speed of single-core processors is limited and it is not suitable for larger applications.
Multi-core processors
Multi-core processors have multiple independent processing units also called cores.
Such processors do not need context switching mechanism as each core contains everything it needs to execute a sequence of stored instructions.
Fetch-Decode-Execute Cycle
The cores of multi-core processors follow a cycle for executing. This cycle is called the Fetch-Decode-Execute cycle. It involves the following steps −
Fetch
This is the first step of cycle, which involves the fetching of instructions from the program memory.
Decode
Recently fetched instructions would be converted to a series of signals that will trigger other parts of the CPU.
Execute
It is the final step in which the fetched and the decoded instructions would be executed. The result of execution will be stored in a CPU register.
One advantage over here is that the execution in multi-core processors are faster than that of single-core processors. It is suitable for larger applications. On the other hand, complex communication protocol between multiple cores is an issue. Multiple cores require more power than single-core processors.
System and Memory Architecture
There are different system and memory architecture styles that need to be considered while designing the program or concurrent system. It is very necessary because one system & memory style may be suitable for one task but may be error prone to other task.
Computer system architectures supporting concurrency
Michael Flynn in 1972 gave taxonomy for categorizing different styles of computer system architecture. This taxonomy defines four different styles as follows −
- Single instruction stream, single data stream (SISD)
- Single instruction stream, multiple data stream (SIMD)
- Multiple instruction stream, single data stream (MISD)
- Multiple instruction stream, multiple data stream (MIMD).
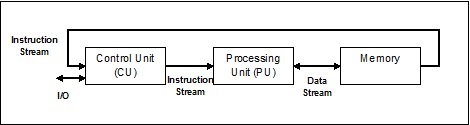
Single instruction stream, single data stream (SISD)
As the name suggests, such kind of systems would have one sequential incoming data stream and one single processing unit to execute the data stream. They are just like uniprocessor systems having parallel computing architecture. Following is the architecture of SISD −
Advantages of SISD
The advantages of SISD architecture are as follows −
- It requires less power.
- There is no issue of complex communication protocol between multiple cores.
Disadvantages of SISD
The disadvantages of SISD architecture are as follows −
- The speed of SISD architecture is limited just like single-core processors.
- It is not suitable for larger applications.
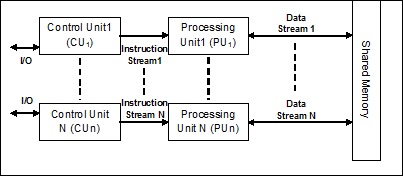
Single instruction stream, multiple data stream (SIMD)
As the name suggests, such kind of systems would have multiple incoming data streams and number of processing units that can act on a single instruction at any given time. They are just like multiprocessor systems having parallel computing architecture. Following is the architecture of SIMD −
The best example for SIMD is the graphics cards. These cards have hundreds of individual processing units. If we talk about computational difference between SISD and SIMD then for the adding arrays [5, 15, 20] and [15, 25, 10], SISD architecture would have to perform three different add operations. On the other hand, with the SIMD architecture, we can add then in a single add operation.
Advantages of SIMD
The advantages of SIMD architecture are as follows −
Same operation on multiple elements can be performed using one instruction only.
Throughput of the system can be increased by increasing the number of cores of the processor.
Processing speed is higher than SISD architecture.
Disadvantages of SIMD
The disadvantages of SIMD architecture are as follows −
- There is complex communication between numbers of cores of processor.
- The cost is higher than SISD architecture.
Multiple Instruction Single Data (MISD) stream
Systems with MISD stream have number of processing units performing different operations by executing different instructions on the same data set. Following is the architecture of MISD −
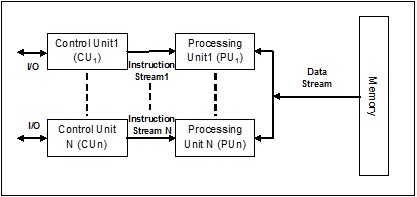
The representatives of MISD architecture do not yet exist commercially.
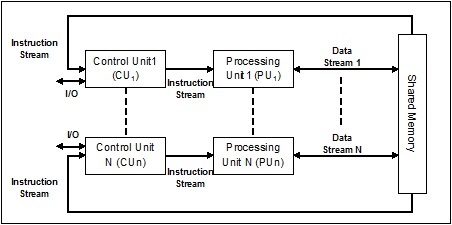
Multiple Instruction Multiple Data (MIMD) stream
In the system using MIMD architecture, each processor in a multiprocessor system can execute different sets of instructions independently on the different set of data set in parallel. It is opposite to SIMD architecture in which single operation is executed on multiple data sets. Following is the architecture of MIMD −
A normal multiprocessor uses the MIMD architecture. These architectures are basically used in a number of application areas such as computer-aided design/computer-aided manufacturing, simulation, modeling, communication switches, etc.
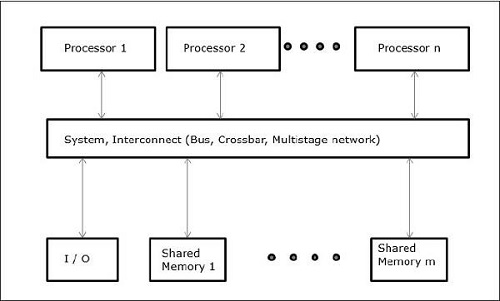
Memory architectures supporting concurrency
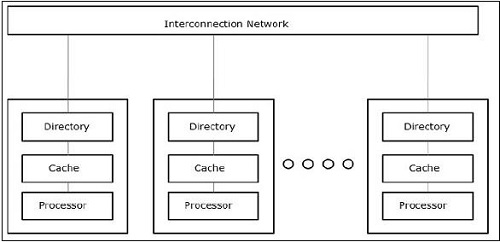
While working with the concepts like concurrency and parallelism, there is always a need to speed up the programs. One solution found by computer designers is to create shared-memory multi-computers, i.e., computers having single physical address space, which is accessed by all the cores that a processor is having. In this scenario, there can be a number of different styles of architecture but following are the three important architecture styles −
UMA (Uniform Memory Access)
In this model, all the processors share the physical memory uniformly. All the processors have equal access time to all the memory words. Each processor may have a private cache memory. The peripheral devices follow a set of rules.
When all the processors have equal access to all the peripheral devices, the system is called a symmetric multiprocessor. When only one or a few processors can access the peripheral devices, the system is called an asymmetric multiprocessor.
Non-uniform Memory Access (NUMA)
In the NUMA multiprocessor model, the access time varies with the location of the memory word. Here, the shared memory is physically distributed among all the processors, called local memories. The collection of all local memories forms a global address space which can be accessed by all the processors.

Cache Only Memory Architecture (COMA)
The COMA model is a specialized version of the NUMA model. Here, all the distributed main memories are converted to cache memories.
Threads Intercommunication
In real life, if a team of people is working on a common task then there should be communication between them for finishing the task properly. The same analogy is applicable to threads also. In programming, to reduce the ideal time of the processor we create multiple threads and assign different sub tasks to every thread. Hence, there must be a communication facility and they should interact with each other to finish the job in a synchronized manner.
Consider the following important points related to thread intercommunication −
No performance gain − If we cannot achieve proper communication between threads and processes then the performance gains from concurrency and parallelism is of no use.
Accomplish task properly − Without proper intercommunication mechanism between threads, the assigned task cannot be completed properly.
More efficient than inter-process communication − Inter-thread communication is more efficient and easy to use than inter-process communication because all threads within a process share same address space and they need not use shared memory.
Python data structures for thread-safe communication
Multithreaded code comes up with a problem of passing information from one thread to another thread. The standard communication primitives do not solve this issue. Hence, we need to implement our own composite object in order to share objects between threads to make the communication thread-safe. Following are a few data structures, which provide thread-safe communication after making some changes in them −
Sets
For using set data structure in a thread-safe manner, we need to extend the set class to implement our own locking mechanism.
Example - Extending a Class
Here is a Python example of extending the class −
class extend_class(set):
   def __init__(self, *args, **kwargs):
      self._lock = Lock()
      super(extend_class, self).__init__(*args, **kwargs)

   def add(self, elem):
      self._lock.acquire()
	  try:
      super(extend_class, self).add(elem)
      finally:
      self._lock.release()

   def delete(self, elem):
      self._lock.acquire()
      try:
      super(extend_class, self).delete(elem)
      finally:
      self._lock.release()
In the above example, a class object named extend_class has been defined which is further inherited from the Python set class. A lock object is created within the constructor of this class. Now, there are two functions - add() and delete(). These functions are defined and are thread-safe. They both rely on the super class functionality with one key exception.
Decorator
This is another key method for thread-safe communication is the use of decorators.
Example - Usage of Decorators
Consider a Python example that shows how to use decorators −
def lock_decorator(method):

   def new_deco_method(self, *args, **kwargs):
      with self._lock:
         return method(self, *args, **kwargs)
return new_deco_method

class Decorator_class(set):
   def __init__(self, *args, **kwargs):
      self._lock = Lock()
      super(Decorator_class, self).__init__(*args, **kwargs)

   @lock_decorator
   def add(self, *args, **kwargs):
      return super(Decorator_class, self).add(elem)
   @lock_decorator
   def delete(self, *args, **kwargs):
      return super(Decorator_class, self).delete(elem)
In the above example, a decorator method named lock_decorator has been defined which is further inherited from the Python method class. Then a lock object is created within the constructor of this class. Now, there are two functions - add() and delete(). These functions are defined and are thread-safe. They both rely on super class functionality with one key exception.
Lists
The list data structure is thread-safe, quick as well as easy structure for temporary, in-memory storage. In Cpython, the GIL protects against concurrent access to them. As we came to know that lists are thread-safe but what about the data lying in them. Actually, the lists data is not protected. For example, L.append(x) is not guarantee to return the expected result if another thread is trying to do the same thing. This is because, although append() is an atomic operation and thread-safe but the other thread is trying to modify the lists data in concurrent fashion hence we can see the side effects of race conditions on the output.
To resolve this kind of issue and safely modify the data, we must implement a proper locking mechanism, which further ensures that multiple threads cannot potentially run into race conditions. To implement proper locking mechanism, we can extend the class as we did in the previous examples.
Some other atomic operations on lists are as follows −
L.append(x)
L1.extend(L2)
x = L[i]
x = L.pop()
L1[i:j] = L2
L.sort()
x = y
x.field = y
D[x] = y
D1.update(D2)
D.keys()
Here −
- L,L1,L2 all are lists
- D,D1,D2 are dicts
- x,y are objects
- i, j are ints
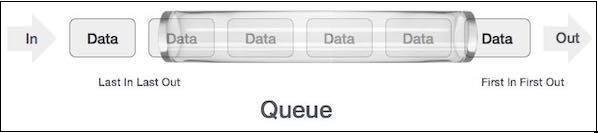
Queues
If the lists data is not protected, we might have to face the consequences. We may get or delete wrong data item, of race conditions. That is why it is recommended to use the queue data structure. A real-world example of queue can be a single-lane one-way road, where the vehicle enters first, exits first. More real-world examples can be seen of the queues at the ticket windows and bus-stops.

Queues are by default, thread-safe data structure and we need not worry about implementing complex locking mechanism. Python provides us the
Types of Queues
In this section, we will earn about the different types of queues. Python provides three options of queues to use from the <queue> module −
- Normal Queues (FIFO, First in First out)
- LIFO, Last in First Out
- Priority
We will learn about the different queues in the subsequent sections.
Normal Queues (FIFO, First in First out)
It is most commonly used queue implementations offered by Python. In this queuing mechanism whosoever will come first, will get the service first. FIFO is also called normal queues. FIFO queues can be represented as follows −
Python Implementation of FIFO Queue
In python, FIFO queue can be implemented with single thread as well as multithreads.
FIFO queue with single thread
For implementing FIFO queue with single thread, the Queue class will implement a basic first-in, first-out container. Elements will be added to one end of the sequence using put(), and removed from the other end using get().
Example - Usage of Queue in Single Threaded Program
Following is a Python program for implementation of FIFO queue with single thread −
main.py
import queue

q = queue.Queue()

for i in range(8):
   q.put("item-" + str(i))

while not q.empty():
   print (q.get(), end = " ")
Output
Run the code and verify the output −
item-0 item-1 item-2 item-3 item-4 item-5 item-6 item-7
The output shows that above program uses a single thread to illustrate that the elements are removed from the queue in the same order they are inserted.
FIFO queue with multiple threads
For implementing FIFO with multiple threads, we need to define the myqueue() function, which is extended from the queue module. The working of get() and put() methods are same as discussed above while implementing FIFO queue with single thread. Then to make it multithreaded, we need to declare and instantiate the threads. These threads will consume the queue in FIFO manner.
Example - Usage of Queue in Multi-Threaded Program
Following is a Python program for implementation of FIFO queue with multiple threads
main.py
import threading
import queue
import random
import time
def myqueue(queue):
   while not queue.empty():
      item = queue.get()
      if item is None: break
      print("{} removed {} from the queue".format(threading.current_thread(), item))
      queue.task_done()
      time.sleep(2)

q = queue.Queue()

for i in range(5):
   q.put(i)

threads = []

for i in range(4):
   thread = threading.Thread(target=myqueue, args=(q,))
   thread.start()
   threads.append(thread)

for thread in threads:
   thread.join()
Output
<Thread(Thread-3654, started 5044)> removed 0 from the queue
<Thread(Thread-3655, started 3144)> removed 1 from the queue
<Thread(Thread-3656, started 6996)> removed 2 from the queue
<Thread(Thread-3657, started 2672)> removed 3 from the queue
<Thread(Thread-3654, started 5044)> removed 4 from the queue
LIFO, Last in First Out queue
This queue uses totally opposite analogy than FIFO(First in First Out) queues. In this queuing mechanism, the one who comes last, will get the service first. This is similar to implement stack data structure. LIFO queues prove useful while implementing Depth-first search like algorithms of artificial intelligence.
Python implementation of LIFO queue
In python, LIFO queue can be implemented with single thread as well as multithreads.
LIFO queue with single thread
For implementing LIFO queue with single thread, the Queue class will implement a basic last-in, first-out container by using the structure Queue.LifoQueue. Now, on calling put(), the elements are added in the head of the container and removed from the head also on using get().
Example - Usage of LiFO in Single Threaded Program
Following is a Python program for implementation of the LIFO queue with single thread −
main.py
import queue

q = queue.LifoQueue()

for i in range(8):
   q.put("item-" + str(i))

while not q.empty():
   print (q.get(), end=" ")
Output
item-7 item-6 item-5 item-4 item-3 item-2 item-1 item-0
The output shows that the above program uses a single thread to illustrate that elements are removed from the queue in the opposite order they are inserted.
LIFO queue with multiple threads
The implementation is similar as we have done the implementation of FIFO queues with multiple threads. The only difference is that we need to use the Queue class that will implement a basic last-in, first-out container by using the structure Queue.LifoQueue.
Example - Usage of LIFO Queue in Multithreaded Program
Following is a Python program for implementation of LIFO queue with multiple threads −
main.py
import threading
import queue
import random
import time

def myqueue(queue):
   while not queue.empty():
      item = queue.get()
      if item is None: break
      print("{} removed {} from the queue".format(threading.current_thread(), item))
      queue.task_done()
      time.sleep(2)

q = queue.LifoQueue()

for i in range(5):
   q.put(i)

threads = []

for i in range(4):
   thread = threading.Thread(target=myqueue, args=(q,))
   thread.start()
   threads.append(thread)

for thread in threads:
   thread.join()
Output
Run the code and verify the output−
<Thread(Thread-3882, started 4928)> removed 4 from the queue
<Thread(Thread-3883, started 4364)> removed 3 from the queue
<Thread(Thread-3884, started 6908)> removed 2 from the queue
<Thread(Thread-3885, started 3584)> removed 1 from the queue
<Thread(Thread-3882, started 4928)> removed 0 from the queue
Priority queue
In FIFO and LIFO queues, the order of items are related to the order of insertion. However, there are many cases when the priority is more important than the order of insertion. Let us consider a real world example. Suppose the security at the airport is checking people of different categories. People of the VVIP, airline staff, custom officer, categories may be checked on priority instead of being checked on the basis of arrival like it is for the commoners.
Another important aspect that needs to be considered for priority queue is how to develop a task scheduler. One common design is to serve the most agent task on priority basis in the queue. This data structure can be used to pick up the items from the queue based on their priority value.
Python Implementation of Priority Queue
In python, priority queue can be implemented with single thread as well as multithreads.
Priority queue with single thread
For implementing priority queue with single thread, the Queue class will implement a task on priority container by using the structure Queue.PriorityQueue. Now, on calling put(), the elements are added with a value where the lowest value will have the highest priority and hence retrieved first by using get().
Example - Priority Queue with Single Threaded Program
Consider the following Python program for implementation of Priority queue with single thread −
main.py
import queue as Q
p_queue = Q.PriorityQueue()

p_queue.put((2, 'Urgent'))
p_queue.put((1, 'Most Urgent'))
p_queue.put((10, 'Nothing important'))
p_queue.put((5, 'Important'))

while not p_queue.empty():
   item = p_queue.get()
   print('%s - %s' % item)
Output
Run the code and verify the output −
1  Most Urgent
2 - Urgent
5 - Important
10  Nothing important
In the above output, we can see that the queue has stored the items based on priority less value is having high priority.
Priority queue with multi threads
The implementation is similar to the implementation of FIFO and LIFO queues with multiple threads. The only difference is that we need to use the Queue class for initializing the priority by using the structure Queue.PriorityQueue. Another difference is with the way the queue would be generated. In the example given below, it will be generated with two identical data sets.
Example - Priority Queue with Multithreaded Program
The following Python program helps in the implementation of priority queue with multiple threads −
main.py
import threading
import queue
import random
import time

def myqueue(queue):
   while not queue.empty():
      item = queue.get()
      if item is None: break
      print("{} removed {} from the queue".format(threading.current_thread(), item))
      queue.task_done()
      time.sleep(1)
q = queue.PriorityQueue()
for i in range(5):
   q.put(i,1)

for i in range(5):
   q.put(i,1)

threads = []
for i in range(2):
   thread = threading.Thread(target=myqueue, args=(q,))
   thread.start()
   threads.append(thread)
for thread in threads:
   thread.join()
Output
Run the code and verify the output −
<Thread(Thread-4939, started 2420)> removed 0 from the queue
<Thread(Thread-4940, started 3284)> removed 0 from the queue
<Thread(Thread-4939, started 2420)> removed 1 from the queue
<Thread(Thread-4940, started 3284)> removed 1 from the queue
<Thread(Thread-4939, started 2420)> removed 2 from the queue
<Thread(Thread-4940, started 3284)> removed 2 from the queue
<Thread(Thread-4939, started 2420)> removed 3 from the queue
<Thread(Thread-4940, started 3284)> removed 3 from the queue
<Thread(Thread-4939, started 2420)> removed 4 from the queue
<Thread(Thread-4940, started 3284)> removed 4 from the queue
Implementation of Threads
In this chapter, we will learn how to implement threads in Python.
Python Module for Thread Implementation
Python threads are sometimes called lightweight processes because threads occupy much less memory than processes. Threads allow performing multiple tasks at once. In Python, we have the following two modules that implement threads in a program −
<_thread>module
<threading>module
The main difference between these two modules is that <_thread> module treats a thread as a function whereas, the <threading> module treats every thread as an object and implements it in an object oriented way. Moreover, the <_thread>module is effective in low level threading and has fewer capabilities than the <threading> module.
<_thread> module
In the earlier version of Python, we had the <thread> module but it has been considered as "deprecated" for quite a long time. Users have been encouraged to use the <threading> module instead. Therefore, in Python 3 the module "thread" is not available anymore. It has been renamed to "<_thread>" for backwards incompatibilities in Python3.
To generate new thread with the help of the <_thread> module, we need to call the start_new_thread method of it. The working of this method can be understood with the help of following syntax −
_thread.start_new_thread ( function, args[, kwargs] )
Here −
args is a tuple of arguments
kwargs is an optional dictionary of keyword arguments
If we want to call function without passing an argument then we need to use an empty tuple of arguments in args.
This method call returns immediately, the child thread starts, and calls function with the passed list, if any, of args. The thread terminates as and when the function returns.
Example - Generating New Thread
Following is an example for generating new thread by using the <_thread> module. We are using the start_new_thread() method here.
import _thread
import time

def print_time( threadName, delay):
   count = 0
   while count < 5:
      time.sleep(delay)
      count += 1
      print ("%s: %s" % ( threadName, time.ctime(time.time()) ))

try:
   _thread.start_new_thread( print_time, ("Thread-1", 2, ) )
   _thread.start_new_thread( print_time, ("Thread-2", 4, ) )
except:
   print ("Error: unable to start thread")
while 1:
   pass
Output
The following output will help us understand the generation of new threads bwith the help of the <_thread> module.
Thread-1: Fri Dec 19 12:46:22 2025
Thread-2: Fri Dec 19 12:46:24 2025
Thread-1: Fri Dec 19 12:46:24 2025
Thread-1: Fri Dec 19 12:46:26 2025
Thread-2: Fri Dec 19 12:46:28 2025
Thread-1: Fri Dec 19 12:46:28 2025
Thread-1: Fri Dec 19 12:46:30 2025
Thread-2: Fri Dec 19 12:46:32 2025
Thread-2: Fri Dec 19 12:46:36 2025
Thread-2: Fri Dec 19 12:46:40 2025
<threading> module
The <threading> module implements in an object oriented way and treats every thread as an object. Therefore, it provides much more powerful, high-level support for threads than the <_thread> module. This module is included with Python 2.4.
Additional methods in the <threading> module
The <threading> module comprises all the methods of the <_thread> module but it provides additional methods as well. The additional methods are as follows −
threading.activeCount() − This method returns the number of thread objects that are active
threading.currentThread() − This method returns the number of thread objects in the caller's thread control.
threading.enumerate() − This method returns a list of all thread objects that are currently active.
For implementing threading, the <threading> module has the Thread class which provides the following methods −
run() − The run() method is the entry point for a thread.
start() − The start() method starts a thread by calling the run method.
join([time]) − The join() waits for threads to terminate.
isAlive() − The isAlive() method checks whether a thread is still executing.
getName() − The getName() method returns the name of a thread.
setName() − The setName() method sets the name of a thread.
How to create threads using the <threading> module?
In this section, we will learn how to create threads using the <threading> module. Follow these steps to create a new thread using the <threading> module −
Step 1 − In this step, we need to define a new subclass of the Thread class.
Step 2 − Then for adding additional arguments, we need to override the __init__(self [,args]) method.
Step 3 − In this step, we need to override the run(self [,args]) method to implement what the thread should do when started.
Now, after creating the new Thread subclass, we can create an instance of it and then start a new thread by invoking the start(), which in turn calls the run() method.
Example - Usage of threading Module
Consider this example to learn how to generate a new thread by using the <threading> module.
import threading
import time
exitFlag = 0

class myThread (threading.Thread):
   def __init__(self, threadID, name, counter):
      threading.Thread.__init__(self)
      self.threadID = threadID
      self.name = name
      self.counter = counter
   def run(self):
      print ("Starting " + self.name)
      print_time(self.name, self.counter, 5)
      print ("Exiting " + self.name)
def print_time(threadName, delay, counter):
   while counter:
      if exitFlag:
         threadName.exit()
      time.sleep(delay)
      print ("%s: %s" % (threadName, time.ctime(time.time())))
      counter -= 1

thread1 = myThread(1, "Thread-1", 1)
thread2 = myThread(2, "Thread-2", 2)

thread1.start()
thread2.start()
thread1.join()
thread2.join()
print ("Exiting Main Thread")
Output
Now, consider the following output −
Starting Thread-1
Starting Thread-2
Thread-1: Fri Dec 19 12:53:51 2025
Thread-2: Fri Dec 19 12:53:52 2025
Thread-1: Fri Dec 19 12:53:52 2025
Thread-1: Fri Dec 19 12:53:53 2025
Thread-2: Fri Dec 19 12:53:54 2025
Thread-1: Fri Dec 19 12:53:54 2025
Thread-1: Fri Dec 19 12:53:55 2025
Exiting Thread-1
Thread-2: Fri Dec 19 12:53:56 2025
Thread-2: Fri Dec 19 12:53:58 2025
Thread-2: Fri Dec 19 12:54:00 2025
Exiting Thread-2
Exiting Main Thread
Python Program for Various Thread States
There are five thread states - new, runnable, running, waiting and dead. Among these five Of these five, we will majorly focus on three states - running, waiting and dead. A thread gets its resources in the running state, waits for the resources in the waiting state; the final release of the resource, if executing and acquired is in the dead state.
The following Python program with the help of start(), sleep() and join() methods will show how a thread entered in running, waiting and dead state respectively.
Step 1 − Import the necessary modules, <threading> and <time>
import threading
import time
Step 2 − Define a function, which will be called while creating a thread.
def thread_states():
   print("Thread entered in running state")
Step 3 − We are using the sleep() method of time module to make our thread waiting for say 2 seconds.
time.sleep(2)
Step 4 − Now, we are creating a thread named T1, which takes the argument of the function defined above.
T1 = threading.Thread(target=thread_states)
Step 5 − Now, with the help of the start() function we can start our thread. It will produce the message, which has been set by us while defining the function.
T1.start()
Thread entered in running state
Step 6 − Now, at last we can kill the thread with the join() method after it finishes its execution.
T1.join()
Example - Starting a thread in Python
In python, we can start a new thread by different ways but the easiest one among them is to define it as a single function. After defining the function, we can pass this as the target for a new threading.Thread object and so on. Execute the following Python code to understand how the function works −
main.py
import threading
import time
import random
def Thread_execution(i):
   print("Execution of Thread {} started\n".format(i))
   sleepTime = random.randint(1,4)
   time.sleep(sleepTime)
   print("Execution of Thread {} finished".format(i))
for i in range(4):
   thread = threading.Thread(target=Thread_execution, args=(i,))
   thread.start()
   print("Active Threads:" , threading.enumerate())
Output
Run the code and verify the output
Execution of Thread 0 started
Active Threads:
   [<_MainThread(MainThread, started 6040)>,
      <HistorySavingThread(IPythonHistorySavingThread, started 5968)>,
      <Thread(Thread-3576, started 3932)>]

Execution of Thread 1 started
Active Threads:
   [<_MainThread(MainThread, started 6040)>,
      <HistorySavingThread(IPythonHistorySavingThread, started 5968)>,
      <Thread(Thread-3576, started 3932)>,
      <Thread(Thread-3577, started 3080)>]

Execution of Thread 2 started
Active Threads:
   [<_MainThread(MainThread, started 6040)>,
      <HistorySavingThread(IPythonHistorySavingThread, started 5968)>,
      <Thread(Thread-3576, started 3932)>,
      <Thread(Thread-3577, started 3080)>,
      <Thread(Thread-3578, started 2268)>]

Execution of Thread 3 started
Active Threads:
   [<_MainThread(MainThread, started 6040)>,
      <HistorySavingThread(IPythonHistorySavingThread, started 5968)>,
      <Thread(Thread-3576, started 3932)>,
      <Thread(Thread-3577, started 3080)>,
      <Thread(Thread-3578, started 2268)>,
      <Thread(Thread-3579, started 4520)>]
Execution of Thread 0 finished
Execution of Thread 1 finished
Execution of Thread 2 finished
Execution of Thread 3 finished
Example - Daemon threads in Python
Before implementing the daemon threads in Python, we need to know about daemon threads and their usage. In terms of computing, daemon is a background process that handles the requests for various services such as data sending, file transfers, etc. It would be dormant if it is not required any more. The same task can be done with the help of non-daemon threads also. However, in this case, the main thread has to keep track of the non-daemon threads manually. On the other hand, if we are using daemon threads then the main thread can completely forget about this and it will be killed when main thread exits. Another important point about daemon threads is that we can opt to use them only for non-essential tasks that would not affect us if it does not complete or gets killed in between. Following is the implementation of daemon threads in python −
main.py
import threading
import time

def nondaemonThread():
   print("starting my thread")
   time.sleep(8)
   print("ending my thread")
def daemonThread():
   while True:
      print("Hello")
      time.sleep(2)
if __name__ == '__main__':
   nondaemonThread = threading.Thread(target = nondaemonThread)
   daemonThread = threading.Thread(target = daemonThread)
   daemonThread.daemon = True
   daemonThread.start()
   nondaemonThread.start()
Output
In the above code, there are two functions namely >nondaemonThread() and >daemonThread(). The first function prints its state and sleeps after 8 seconds while the the deamonThread() function prints Hello after every 2 seconds indefinitely. We can understand the difference between nondaemon and daemon threads with the help of following output −
Hello
starting my thread
Hello
Hello
Hello
ending my thread
Synchronizing Threads
Thread synchronization may be defined as a method with the help of which we can be assured that two or more concurrent threads are not simultaneously accessing the program segment known as critical section. On the other hand, as we know that critical section is the part of the program where the shared resource is accessed. Hence we can say that synchronization is the process of making sure that two or more threads do not interface with each other by accessing the resources at the same time. The diagram below shows that four threads trying to access the critical section of a program at the same time.
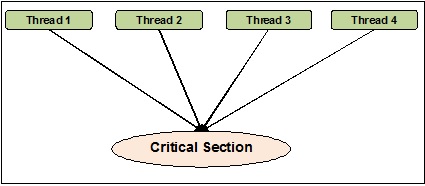
To make it clearer, suppose two or more threads trying to add the object in the list at the same time. This act cannot lead to a successful end because either it will drop one or all the objects or it will completely corrupt the state of the list. Here the role of the synchronization is that only one thread at a time can access the list.
Issues in thread synchronization
We might encounter issues while implementing concurrent programming or applying synchronizing primitives. In this section, we will discuss two major issues. The issues are −
- Deadlock
- Race condition
Race condition
This is one of the major issues in concurrent programming. Concurrent access to shared resources can lead to race condition. A race condition may be defined as the occurring of a condition when two or more threads can access shared data and then try to change its value at the same time. Due to this, the values of variables may be unpredictable and vary depending on the timings of context switches of the processes.
Example - Race Condition
Consider this example to understand the concept of race condition −
Step 1 − In this step, we need to import threading module −
import threading
Step 2 − Now, define a global variable, say x, along with its value as 0 −
x = 0
Step 3 − Now, we need to define the increment_global() function, which will do the increment by 1 in this global function x −
def increment_global():
   global x
   x += 1
Step 4 − In this step, we will define the taskofThread() function, which will call the increment_global() function for a specified number of times; for our example it is 50000 times −
def taskofThread():
   for _ in range(50000):
      increment_global()
Step 5 − Now, define the main() function in which threads t1 and t2 are created. Both will be started with the help of the start() function and wait until they finish their jobs with the help of join() function.
def main():
   global x
   x = 0

   t1 = threading.Thread(target= taskofThread)
   t2 = threading.Thread(target= taskofThread)

   t1.start()
   t2.start()

   t1.join()
   t2.join()
Step 6 − Now, we need to give the range as in for how many iterations we want to call the main() function. Here, we are calling it for 5 times.
if __name__ == "__main__":
   for i in range(5):
      main()
      print("x = {1} after Iteration {0}".format(i,x))
In the output shown below, we can see the effect of race condition as the value of x after each iteration is expected 100000. However, there is lots of variation in the value. This is due to the concurrent access of threads to the shared global variable x.
Output
x = 100000 after Iteration 0
x = 54034 after Iteration 1
x = 80230 after Iteration 2
x = 93602 after Iteration 3
x = 93289 after Iteration 4
Dealing with race condition using locks
As we have seen the effect of race condition in the above program, we need a synchronization tool, which can deal with race condition between multiple threads. In Python, the <threading> module provides Lock class to deal with race condition. Further, the Lock class provides different methods with the help of which we can handle race condition between multiple threads. The methods are described below −
acquire() method
This method is used to acquire, i.e., blocking a lock. A lock can be blocking or non-blocking depending upon the following true or false value −
With value set to True − If the acquire() method is invoked with True, which is the default argument, then the thread execution is blocked until the lock is unlocked.
With value set to False − If the acquire() method is invoked with False, which is not the default argument, then the thread execution is not blocked until it is set to true, i.e., until it is locked.
release() method
This method is used to release a lock. Following are a few important tasks related to this method −
If a lock is locked, then the release() method would unlock it. Its job is to allow exactly one thread to proceed if more than one threads are blocked and waiting for the lock to become unlocked.
It will raise a ThreadError if lock is already unlocked.
Now, we can rewrite the above program with the lock class and its methods to avoid the race condition. We need to define the taskofThread() method with lock argument and then need to use the acquire() and release() methods for blocking and non-blocking of locks to avoid race condition.
Example - Usage of Lock
Following is example of python program to understand the concept of locks for dealing with race condition −
main.py
import threading

x = 0

def increment_global():

   global x
   x += 1

def taskofThread(lock):

   for _ in range(50000):
      lock.acquire()
      increment_global()
      lock.release()

def main():
   global x
   x = 0

   lock = threading.Lock()
   t1 = threading.Thread(target = taskofThread, args = (lock,))
   t2 = threading.Thread(target = taskofThread, args = (lock,))

   t1.start()
   t2.start()

   t1.join()
   t2.join()

if __name__ == "__main__":
   for i in range(5):
      main()
      print("x = {1} after Iteration {0}".format(i,x))
Output
The following output shows that the effect of race condition is neglected; as the value of x, after each & every iteration, is now 100000, which is as per the expectation of this program.
Output
x = 100000 after Iteration 0
x = 100000 after Iteration 1
x = 100000 after Iteration 2
x = 100000 after Iteration 3
x = 100000 after Iteration 4
Deadlocks − The Dining Philosophers problem
Deadlock is a troublesome issue one can face while designing the concurrent systems. We can illustrate this issue with the help of the dining philosopher problem as follows −
Edsger Dijkstra originally introduced the dining philosopher problem, one of the famous illustrations of one of the biggest problem of concurrent system called deadlock.
In this problem, there are five famous philosophers sitting at a round table eating some food from their bowls. There are five forks that can be used by the five philosophers to eat their food. However, the philosophers decide to use two forks at the same time to eat their food.
Now, there are two main conditions for the philosophers. First, each of the philosophers can be either in eating or in thinking state and second, they must first obtain both the forks, i.e., left and right. The issue arises when each of the five philosophers manages to pick the left fork at the same time. Now they all are waiting for the right fork to be free but they will never relinquish their fork until they have eaten their food and the right fork would never be available. Hence, there would be a deadlock state at the dinner table.
Deadlock in concurrent system
Now if we see, the same issue can arise in our concurrent systems too. The forks in the above example would be the system resources and each philosopher can represent the process, which is competing to get the resources.
Solution with Python program
The solution of this problem can be found by splitting the philosophers into two types greedy philosophers and generous philosophers. Mainly a greedy philosopher will try to pick up the left fork and wait until it is there. He will then wait for the right fork to be there, pick it up, eat and then put it down. On the other hand, a generous philosopher will try to pick up the left fork and if it is not there, he will wait and try again after some time. If they get the left fork then they will try to get the right one. If they will get the right fork too then they will eat and release both the forks. However, if they will not get the right fork then they will release the left fork.
Example - Dining Philosopher Problem
The following Python program will help us find a solution to the dining philosopher problem −
main.py
import threading
import random
import time

class DiningPhilosopher(threading.Thread):

   running = True

   def __init__(self, xname, Leftfork, Rightfork):
      threading.Thread.__init__(self)
      self.name = xname
      self.Leftfork = Leftfork
      self.Rightfork = Rightfork

   def run(self):
      while(self.running):
         time.sleep( random.uniform(3,13))
         print ('%s is hungry.' % self.name)
         self.dine()

   def dine(self):
      fork1, fork2 = self.Leftfork, self.Rightfork

      while self.running:
         fork1.acquire(True)
         locked = fork2.acquire(False)
         if locked: break
         fork1.release()
         print ('%s swaps forks' % self.name)
         fork1, fork2 = fork2, fork1
      else:
         return

      self.dining()
      fork2.release()
      fork1.release()

      def dining(self):
         print ('%s starts eating '% self.name)
         time.sleep(random.uniform(1,10))
         print ('%s finishes eating and now thinking.' % self.name)

   def Dining_Philosophers():
      forks = [threading.Lock() for n in range(5)]
      philosopherNames = ('1st','2nd','3rd','4th', '5th')

      philosophers= [DiningPhilosopher(philosopherNames[i], forks[i%5], forks[(i+1)%5])
      for i in range(5)]
      random.seed()
      DiningPhilosopher.running = True
      for p in philosophers: p.start()
      time.sleep(30)
      DiningPhilosopher.running = False
      print (" It is finishing.")

   Dining_Philosophers()
Output
The above program uses the concept of greedy and generous philosophers. The program has also used the acquire() and release() methods of the Lock class of the <threading> module. We can see the solution in the following output −
4th is hungry.
4th starts eating
1st is hungry.
1st starts eating
2nd is hungry.
5th is hungry.
3rd is hungry.
1st finishes eating and now thinking.3rd swaps forks
2nd starts eating
4th finishes eating and now thinking.
3rd swaps forks5th starts eating
5th finishes eating and now thinking.
4th is hungry.
4th starts eating
2nd finishes eating and now thinking.
3rd swaps forks
1st is hungry.
1st starts eating
4th finishes eating and now thinking.
3rd starts eating
5th is hungry.
5th swaps forks
1st finishes eating and now thinking.
5th starts eating
2nd is hungry.
2nd swaps forks
4th is hungry.
5th finishes eating and now thinking.
3rd finishes eating and now thinking.
2nd starts eating 4th starts eating
It is finishing.
Threads Intercommunication
In real life, if a team of people is working on a common task then there should be communication between them for finishing the task properly. The same analogy is applicable to threads also. In programming, to reduce the ideal time of the processor we create multiple threads and assign different sub tasks to every thread. Hence, there must be a communication facility and they should interact with each other to finish the job in a synchronized manner.
Consider the following important points related to thread intercommunication −
No performance gain − If we cannot achieve proper communication between threads and processes then the performance gains from concurrency and parallelism is of no use.
Accomplish task properly − Without proper intercommunication mechanism between threads, the assigned task cannot be completed properly.
More efficient than inter-process communication − Inter-thread communication is more efficient and easy to use than inter-process communication because all threads within a process share same address space and they need not use shared memory.
Python data structures for thread-safe communication
Multithreaded code comes up with a problem of passing information from one thread to another thread. The standard communication primitives do not solve this issue. Hence, we need to implement our own composite object in order to share objects between threads to make the communication thread-safe. Following are a few data structures, which provide thread-safe communication after making some changes in them −
Sets
For using set data structure in a thread-safe manner, we need to extend the set class to implement our own locking mechanism.
Example - Extending a Class
Here is a Python example of extending the class −
class extend_class(set):
   def __init__(self, *args, **kwargs):
      self._lock = Lock()
      super(extend_class, self).__init__(*args, **kwargs)

   def add(self, elem):
      self._lock.acquire()
	  try:
      super(extend_class, self).add(elem)
      finally:
      self._lock.release()

   def delete(self, elem):
      self._lock.acquire()
      try:
      super(extend_class, self).delete(elem)
      finally:
      self._lock.release()
In the above example, a class object named extend_class has been defined which is further inherited from the Python set class. A lock object is created within the constructor of this class. Now, there are two functions - add() and delete(). These functions are defined and are thread-safe. They both rely on the super class functionality with one key exception.
Decorator
This is another key method for thread-safe communication is the use of decorators.
Example - Usage of Decorators
Consider a Python example that shows how to use decorators −
def lock_decorator(method):

   def new_deco_method(self, *args, **kwargs):
      with self._lock:
         return method(self, *args, **kwargs)
return new_deco_method

class Decorator_class(set):
   def __init__(self, *args, **kwargs):
      self._lock = Lock()
      super(Decorator_class, self).__init__(*args, **kwargs)

   @lock_decorator
   def add(self, *args, **kwargs):
      return super(Decorator_class, self).add(elem)
   @lock_decorator
   def delete(self, *args, **kwargs):
      return super(Decorator_class, self).delete(elem)
In the above example, a decorator method named lock_decorator has been defined which is further inherited from the Python method class. Then a lock object is created within the constructor of this class. Now, there are two functions - add() and delete(). These functions are defined and are thread-safe. They both rely on super class functionality with one key exception.
Lists
The list data structure is thread-safe, quick as well as easy structure for temporary, in-memory storage. In Cpython, the GIL protects against concurrent access to them. As we came to know that lists are thread-safe but what about the data lying in them. Actually, the lists data is not protected. For example, L.append(x) is not guarantee to return the expected result if another thread is trying to do the same thing. This is because, although append() is an atomic operation and thread-safe but the other thread is trying to modify the lists data in concurrent fashion hence we can see the side effects of race conditions on the output.
To resolve this kind of issue and safely modify the data, we must implement a proper locking mechanism, which further ensures that multiple threads cannot potentially run into race conditions. To implement proper locking mechanism, we can extend the class as we did in the previous examples.
Some other atomic operations on lists are as follows −
L.append(x)
L1.extend(L2)
x = L[i]
x = L.pop()
L1[i:j] = L2
L.sort()
x = y
x.field = y
D[x] = y
D1.update(D2)
D.keys()
Here −
- L,L1,L2 all are lists
- D,D1,D2 are dicts
- x,y are objects
- i, j are ints
Queues
If the lists data is not protected, we might have to face the consequences. We may get or delete wrong data item, of race conditions. That is why it is recommended to use the queue data structure. A real-world example of queue can be a single-lane one-way road, where the vehicle enters first, exits first. More real-world examples can be seen of the queues at the ticket windows and bus-stops.
Queues are by default, thread-safe data structure and we need not worry about implementing complex locking mechanism. Python provides us the
Types of Queues
In this section, we will earn about the different types of queues. Python provides three options of queues to use from the <queue> module −
- Normal Queues (FIFO, First in First out)
- LIFO, Last in First Out
- Priority
We will learn about the different queues in the subsequent sections.
Normal Queues (FIFO, First in First out)
It is most commonly used queue implementations offered by Python. In this queuing mechanism whosoever will come first, will get the service first. FIFO is also called normal queues. FIFO queues can be represented as follows −
Python Implementation of FIFO Queue
In python, FIFO queue can be implemented with single thread as well as multithreads.
FIFO queue with single thread
For implementing FIFO queue with single thread, the Queue class will implement a basic first-in, first-out container. Elements will be added to one end of the sequence using put(), and removed from the other end using get().
Example - Usage of Queue in Single Threaded Program
Following is a Python program for implementation of FIFO queue with single thread −
main.py
import queue

q = queue.Queue()

for i in range(8):
   q.put("item-" + str(i))

while not q.empty():
   print (q.get(), end = " ")
Output
Run the code and verify the output −
item-0 item-1 item-2 item-3 item-4 item-5 item-6 item-7
The output shows that above program uses a single thread to illustrate that the elements are removed from the queue in the same order they are inserted.
FIFO queue with multiple threads
For implementing FIFO with multiple threads, we need to define the myqueue() function, which is extended from the queue module. The working of get() and put() methods are same as discussed above while implementing FIFO queue with single thread. Then to make it multithreaded, we need to declare and instantiate the threads. These threads will consume the queue in FIFO manner.
Example - Usage of Queue in Multi-Threaded Program
Following is a Python program for implementation of FIFO queue with multiple threads
main.py
import threading
import queue
import random
import time
def myqueue(queue):
   while not queue.empty():
      item = queue.get()
      if item is None: break
      print("{} removed {} from the queue".format(threading.current_thread(), item))
      queue.task_done()
      time.sleep(2)

q = queue.Queue()

for i in range(5):
   q.put(i)

threads = []

for i in range(4):
   thread = threading.Thread(target=myqueue, args=(q,))
   thread.start()
   threads.append(thread)

for thread in threads:
   thread.join()
Output
<Thread(Thread-3654, started 5044)> removed 0 from the queue
<Thread(Thread-3655, started 3144)> removed 1 from the queue
<Thread(Thread-3656, started 6996)> removed 2 from the queue
<Thread(Thread-3657, started 2672)> removed 3 from the queue
<Thread(Thread-3654, started 5044)> removed 4 from the queue
LIFO, Last in First Out queue
This queue uses totally opposite analogy than FIFO(First in First Out) queues. In this queuing mechanism, the one who comes last, will get the service first. This is similar to implement stack data structure. LIFO queues prove useful while implementing Depth-first search like algorithms of artificial intelligence.
Python implementation of LIFO queue
In python, LIFO queue can be implemented with single thread as well as multithreads.
LIFO queue with single thread
For implementing LIFO queue with single thread, the Queue class will implement a basic last-in, first-out container by using the structure Queue.LifoQueue. Now, on calling put(), the elements are added in the head of the container and removed from the head also on using get().
Example - Usage of LiFO in Single Threaded Program
Following is a Python program for implementation of the LIFO queue with single thread −
main.py
import queue

q = queue.LifoQueue()

for i in range(8):
   q.put("item-" + str(i))

while not q.empty():
   print (q.get(), end=" ")
Output
item-7 item-6 item-5 item-4 item-3 item-2 item-1 item-0
The output shows that the above program uses a single thread to illustrate that elements are removed from the queue in the opposite order they are inserted.
LIFO queue with multiple threads
The implementation is similar as we have done the implementation of FIFO queues with multiple threads. The only difference is that we need to use the Queue class that will implement a basic last-in, first-out container by using the structure Queue.LifoQueue.
Example - Usage of LIFO Queue in Multithreaded Program
Following is a Python program for implementation of LIFO queue with multiple threads −
main.py
import threading
import queue
import random
import time

def myqueue(queue):
   while not queue.empty():
      item = queue.get()
      if item is None: break
      print("{} removed {} from the queue".format(threading.current_thread(), item))
      queue.task_done()
      time.sleep(2)

q = queue.LifoQueue()

for i in range(5):
   q.put(i)

threads = []

for i in range(4):
   thread = threading.Thread(target=myqueue, args=(q,))
   thread.start()
   threads.append(thread)

for thread in threads:
   thread.join()
Output
Run the code and verify the output−
<Thread(Thread-3882, started 4928)> removed 4 from the queue
<Thread(Thread-3883, started 4364)> removed 3 from the queue
<Thread(Thread-3884, started 6908)> removed 2 from the queue
<Thread(Thread-3885, started 3584)> removed 1 from the queue
<Thread(Thread-3882, started 4928)> removed 0 from the queue
Priority queue
In FIFO and LIFO queues, the order of items are related to the order of insertion. However, there are many cases when the priority is more important than the order of insertion. Let us consider a real world example. Suppose the security at the airport is checking people of different categories. People of the VVIP, airline staff, custom officer, categories may be checked on priority instead of being checked on the basis of arrival like it is for the commoners.
Another important aspect that needs to be considered for priority queue is how to develop a task scheduler. One common design is to serve the most agent task on priority basis in the queue. This data structure can be used to pick up the items from the queue based on their priority value.
Python Implementation of Priority Queue
In python, priority queue can be implemented with single thread as well as multithreads.
Priority queue with single thread
For implementing priority queue with single thread, the Queue class will implement a task on priority container by using the structure Queue.PriorityQueue. Now, on calling put(), the elements are added with a value where the lowest value will have the highest priority and hence retrieved first by using get().
Example - Priority Queue with Single Threaded Program
Consider the following Python program for implementation of Priority queue with single thread −
main.py
import queue as Q
p_queue = Q.PriorityQueue()

p_queue.put((2, 'Urgent'))
p_queue.put((1, 'Most Urgent'))
p_queue.put((10, 'Nothing important'))
p_queue.put((5, 'Important'))

while not p_queue.empty():
   item = p_queue.get()
   print('%s - %s' % item)
Output
Run the code and verify the output −
1  Most Urgent
2 - Urgent
5 - Important
10  Nothing important
In the above output, we can see that the queue has stored the items based on priority less value is having high priority.
Priority queue with multi threads
The implementation is similar to the implementation of FIFO and LIFO queues with multiple threads. The only difference is that we need to use the Queue class for initializing the priority by using the structure Queue.PriorityQueue. Another difference is with the way the queue would be generated. In the example given below, it will be generated with two identical data sets.
Example - Priority Queue with Multithreaded Program
The following Python program helps in the implementation of priority queue with multiple threads −
main.py
import threading
import queue
import random
import time

def myqueue(queue):
   while not queue.empty():
      item = queue.get()
      if item is None: break
      print("{} removed {} from the queue".format(threading.current_thread(), item))
      queue.task_done()
      time.sleep(1)
q = queue.PriorityQueue()
for i in range(5):
   q.put(i,1)

for i in range(5):
   q.put(i,1)

threads = []
for i in range(2):
   thread = threading.Thread(target=myqueue, args=(q,))
   thread.start()
   threads.append(thread)
for thread in threads:
   thread.join()
Output
Run the code and verify the output −
<Thread(Thread-4939, started 2420)> removed 0 from the queue
<Thread(Thread-4940, started 3284)> removed 0 from the queue
<Thread(Thread-4939, started 2420)> removed 1 from the queue
<Thread(Thread-4940, started 3284)> removed 1 from the queue
<Thread(Thread-4939, started 2420)> removed 2 from the queue
<Thread(Thread-4940, started 3284)> removed 2 from the queue
<Thread(Thread-4939, started 2420)> removed 3 from the queue
<Thread(Thread-4940, started 3284)> removed 3 from the queue
<Thread(Thread-4939, started 2420)> removed 4 from the queue
<Thread(Thread-4940, started 3284)> removed 4 from the queue
Testing Thread Applications
In this chapter, we will learn about testing of thread applications. We will also learn the importance of testing.
Why to Test?
Before we dive into the discussion about the importance of testing, we need to know what is testing. In general terms, testing is a technique of finding out how well something is working. On the other hand, specifically if we talk about computer programs or software then testing is the technique of accessing the functionality of a software program.
In this section, we will discuss the importance of software testing. In software development, there must be double-checking before the releasing of software to the client. That is why it is very important to test the software by experienced testing team. Consider the following points to understand the importance of software testing −
Improvement of software quality
Certainly, no company wants to deliver low quality software and no client wants to buy low quality software. Testing improves the quality of software by finding and fixing the bugs in that.
Satisfaction of customers
The most important part of any business is the satisfaction of their customers. By providing bug free and good quality software, the companies can achieve customer satisfaction.
Lessen the impact of new features
Suppose we have made a software system of 10000 lines and we need to add a new feature then the development team would have the concern about the impact of this new feature on whole software. Here, also, testing plays a vital role because if the testing team has made a good suite of tests then it can save us from any potential catastrophic breaks.
User experience
Another most important part of any business is the experience of the users of that product. Only testing can assure that the end user finds it simple and easy to use the product.
Cutting down the expenses
Testing can cut down the total cost of software by finding and fixing the bugs in testing phase of its development rather than fixing it after delivery. If there is a major bug after the delivery of the software then it would increase its tangible cost say in terms of expenses and intangible cost say in terms of customer dissatisfaction, companys negative reputation etc.
What to Test?
It is always recommended to have appropriate knowledge of what is to be tested. In this section, we will first understand be the prime motive of tester while testing any software. Code coverage, i.e., how many lines of code our test suite hits, while testing, should be avoided. It is because, while testing, focusing only on the number of lines of codes adds no real value to our system. There may remain some bugs, which reflect later at a later stage even after deployment.
Consider the following important points related to what to test −
We need to focus on testing the functionality of the code rather than the code coverage.
We need to test the most important parts of the code first and then move towards the less important parts of the code. It will definitely save time.
The tester must have multitude different tests that can push the software up to its limits.
Approaches for testing concurrent software programs
Due to the capability of utilizing the true capability of multi-core architecture, concurrent software systems are replacing sequential systems. In recent times, concurrent system programs are being used in everything from mobile phones to washing machines, from cars to airplanes, etc. We need to be more careful about testing the concurrent software programs because if we have added multiple threads to single thread application having already a bug, then we would end up with multiple bugs.
Testing techniques for concurrent software programs are extensively focusing on selecting interleaving that expose potentially harmful patterns like race conditions, deadlocks and violation of atomicity. Following are two approaches for testing concurrent software programs −
Systematic exploration
This approach aims to explore the space of the interleavings as broadly as possible. Such approaches can adopt a brute-force technique and others adopt partial order reduction technique or heuristic technique to explore the space of interleavings.
Property-driven
Property-driven approaches rely on the observation that concurrency faults are more likely to occur under interleavings that expose specific properties such as suspicious memory access pattern. Different property-driven approaches target different faults like race conditions, deadlocks and violation of atomicity, which further depends on one or other specific properties.
Testing Strategies
Test Strategy is also known as test approach. The strategy defines how testing would be carried out. Test approach has two techniques −
Proactive
An approach in which the test design process is initiated as early as possible in order to find and fix the defects before the build is created.
Reactive
An approach in which the testing does not start until the completion of the development process.
Before applying any test strategy or approach on python program, we must have a basic idea about the kind of errors a software program may have. The errors are as follows −
Syntactical errors
During program development, there can be many small errors. The errors are mostly due to typing mistakes. For example, missing colon or a wrong spelling of a keyword, etc. Such errors are due to the mistake in program syntax and not in logic. Hence, these errors are called syntactical errors.
Semantic errors
The semantic errors are also called logical errors. If there is a logical or semantic error in software program then the statement will compile and run correctly but it will not give the desired output because the logic is not correct.
Unit Testing
This is one of the most used testing strategies for testing python programs. This strategy is used for testing units or components of the code. By units or components, we mean classes or functions of the code. Unit testing simplifies the testing of large programming systems by testing small units. With the help of the above concept, unit testing may be defined as a method where individual units of source code are tested to determine if they return the desired output.
In our subsequent sections, we will learn about the different Python modules for unit testing.
unittest module
The very first module for unit testing is the unittest module. It is inspired by JUnit and by default included in Python3.6. It supports test automation, sharing of setup and shutdown code for tests, aggregation of tests into collections, and independence of the tests from the reporting framework.
Following are a few important concepts supported by the unittest module
Text fixture
It is used to set up a test so that it can be run before starting the test and tear down after the finish of test. It may involve creation of temporary database, directories, etc. needed before starting the test.
Test case
The test case checks whether a required response is coming from the specific set of inputs or not. The unittest module includes a base class named TestCase which can be used to create new test cases. It includes two by default methods −
setUp() − a hook method for setting up the test fixture before exercising it. This is called before calling the implemented test methods.
tearDown( − a hook method for deconstructing the class fixture after running all tests in the class.
Test suite
It is a collection of test suites, test cases or both.
Test runner
It controls the running of the test cases or suits and provides the outcome to the user. It may use GUI or simple text interface for providing the outcome.
Example - Unit Testing a Program
The following Python program uses the unittest module to test a module named Fibonacci. The program helps in calculating the Fibonacci series of a number. In this example, we have created a class named Fibo_test, to define the test cases by using different methods. These methods are inherited from unittest.TestCase. We are using two by default methods setUp() and tearDown(). We also define the testfibocal method. The name of the test must be started with the letter test. In the final block, unittest.main() provides a command-line interface to the test script.
main.py
import unittest

def fib(n):
   a, b = 0, 1
   for i in range(n):
      a, b = b, a + b
   return a
class Fibo_Test(unittest.TestCase):
   def setUp(self):
      print("This is run before our tests would be executed")
   def tearDown(self):
      print("This is run after the completion of execution of our tests")

   def testfibocal(self):
      self.assertEqual(fib(0), 0)
      self.assertEqual(fib(1), 1)
      self.assertEqual(fib(5), 5)
      self.assertEqual(fib(10), 55)
      self.assertEqual(fib(20), 6765)

if __name__ == "__main__":
   unittest.main()
Output
When run from the command line, the above script produces an output that looks like this −
This runs before our tests would be executed.
This runs after the completion of execution of our tests.
.
----------------------------------------------------------------------
Ran 1 test in 0.006s
OK
Now, to make it clearer, we are changing our code which helped in defining the Fibonacci module.
Consider the following code block as an example −
def fib(n):
   a, b = 0, 1
   for i in range(n):
      a, b = b, a + b
   return a
A few changes to the code block are made as shown below −
def fib(n):
   a, b = 1, 1
   for i in range(n):
      a, b = b, a + b
   return a
Output
Now, after running the script with the changed code, we will get the following output −
This is run before our tests would be executed
This is run after the completion of execution of our tests

Warnings/Errors:
F
======================================================================
FAIL: testfibocal (__main__.Fibo_Test.testfibocal)
----------------------------------------------------------------------
Traceback (most recent call last):
  File "/home/cg/root/e4ebb6fc/main.py", line 15, in testfibocal
    self.assertEqual(fib(0), 0)
AssertionError: 1 != 0

----------------------------------------------------------------------
Ran 1 test in 0.000s

FAILED (failures=1)
The above output shows that the module has failed to give the desired output.
Docktest module
The docktest module also helps in unit testing. It also comes prepackaged with python. It is easier to use than the unittest module. The unittest module is more suitable for complex tests. For using the doctest module, we need to import it. The docstring of the corresponding function must have interactive python session along with their outputs.
If everything is fine in our code then there will be no output from the docktest module; otherwise, it will provide the output.
Example - Using docktest
The following Python example uses the docktest module to test a module named Fibonacci , which helps in calculating the Fibonacci series of a number.
import doctest

def fibonacci(n):
   """
   Calculates the Fibonacci number

   >>> fibonacci(0)
   0
   >>> fibonacci(1)
   1
   >>> fibonacci(10)
   55
   >>> fibonacci(20)
   6765
   >>>

   """
   a, b = 0, 1
   for i in range(n):
      a, b = b, a + b
   return a
if __name__ == "__main__":
   doctest.testmod()
We can see that the docstring of the corresponding function named fib had interactive python session along with the outputs. If our code is fine then there would be no output from the doctest module. But to see how it works we can run it with the v option.
(base) D:\ProgramData>python dock_test.py -v
Trying:
   fibonacci(0)
Expecting:
   0
ok
Trying:
   fibonacci(1)
Expecting:
   1
ok
Trying:
   fibonacci(10)
Expecting:
   55
ok
Trying:
   fibonacci(20)
Expecting:
   6765
ok
1 items had no tests:
   __main__
1 items passed all tests:
4 tests in __main__.fibonacci
4 tests in 2 items.
4 passed and 0 failed.
Test passed.
Now, we will change the code that helped in defining the Fibonacci module
Consider the following code block as an example −
def fibonacci(n):
   a, b = 0, 1
   for i in range(n):
      a, b = b, a + b
   return a
The following code block helps with the changes −
def fibonacci(n):
   a, b = 1, 1
   for i in range(n):
      a, b = b, a + b
   return a
After running the script even without the v option, with the changed code, we will get the output as shown below.
Output
(base) D:\ProgramData>python dock_test.py
**********************************************************************
File "unitg.py", line 6, in __main__.fibonacci
Failed example:
   fibonacci(0)
Expected:
   0
Got:
   1
**********************************************************************
File "unitg.py", line 10, in __main__.fibonacci
Failed example:
   fibonacci(10)
Expected:
   55
Got:
   89
**********************************************************************
File "unitg.py", line 12, in __main__.fibonacci
Failed example:
   fibonacci(20)
Expected:
   6765
Got:
   10946
**********************************************************************
1 items had failures:
   3 of 4 in __main__.fibonacci
***Test Failed*** 3 failures.
We can see in the above output that three tests have failed.
Debugging Thread Applications
In this chapter, we will learn how to debug thread applications. We will also learn the importance of debugging.
What is Debugging?
In computer programming, debugging is the process of finding and removing the bugs, errors and abnormalities from computer program. This process starts as soon as the code is written and continues in successive stages as code is combined with other units of programming to form a software product. Debugging is part of the software testing process and is an integral part of the entire software development life cycle.
Python Debugger
The Python debugger or the pdb is part of the Python standard library. It is a good fallback tool for tracking down hard-to-find bugs and allows us to fix faulty code quickly and reliably. Followings are the two most important tasks of the pdp debugger −
- It allows us to check the values of variables at runtime.
- We can step through the code and set breakpoints also.
We can work with pdb in the following two ways −
- Through the command-line; this is also called postmortem debugging.
- By interactively running pdb.
Working with pdb
For working with the Python debugger, we need to use the following code at the location where we want to break into the debugger −
import pdb;
pdb.set_trace()
Consider the following commands to work with pdb through command-line.
- h(help)
- d(down)
- u(up)
- b(break)
- cl(clear)
- l(list))
- n(next))
- c(continue)
- s(step)
- r(return))
- b(break)
Following is a demo of the h(help) command of the Python debugger −
import pdb

pdb.set_trace()
--Call--
>d:\programdata\lib\site-packages\ipython\core\displayhook.py(247)__call__()
-> def __call__(self, result = None):
(Pdb) h

Documented commands (type help <topic>):
========================================
EOF   c         d       h        list     q       rv      undisplay
a     cl        debug   help     ll       quit    s       unt
alias clear     disable ignore   longlist r       source  until
args  commands  display interact n        restart step    up
b     condition down    j        next     return  tbreak  w
break cont      enable  jump     p        retval  u       whatis
bt    continue  exit    l        pp       run     unalias where

Miscellaneous help topics:
==========================
exec pdb
Example - Setting the Debug breakpoint
While working with Python debugger, we can set the breakpoint anywhere in the script by using the following lines −
import pdb;
pdb.set_trace()
After setting the breakpoint, we can run the script normally. The script will execute until a certain point; until where a line has been set. Consider the following example where we will run the script by using the above-mentioned lines at various places in the script −
main.py
import pdb;
a = "aaa"
pdb.set_trace()
b = "bbb"
c = "ccc"
final = a + b + c
print (final)
When the above script is run, it will execute the program till a = aaa, we can check this in the following output.
Output
--Return--
> <ipython-input-7-8a7d1b5cc854>(3)<module>()->None
-> pdb.set_trace()
(Pdb) p a
'aaa'
(Pdb) p b
*** NameError: name 'b' is not defined
(Pdb) p c
*** NameError: name 'c' is not defined
After using the command p(print) in pdb, this script is only printing aaa. This is followed by an error because we have set the breakpoint till a = "aaa".
Similarly, we can run the script by changing the breakpoints and see the difference in the output −
import pdb
a = "aaa"
b = "bbb"
c = "ccc"
pdb.set_trace()
final = a + b + c
print (final)
Output
--Return--
> <ipython-input-9-a59ef5caf723>(5)<module>()->None
-> pdb.set_trace()
(Pdb) p a
'aaa'
(Pdb) p b
'bbb'
(Pdb) p c
'ccc'
(Pdb) p final
*** NameError: name 'final' is not defined
(Pdb) exit
In the following script, we are setting the breakpoint in the last line of the program −
import pdb
a = "aaa"
b = "bbb"
c = "ccc"
final = a + b + c
pdb.set_trace()
print (final)
Output
The output is as follows −
--Return--
> <ipython-input-11-8019b029997d>(6)<module>()->None
-> pdb.set_trace()
(Pdb) p a
'aaa'
(Pdb) p b
'bbb'
(Pdb) p c
'ccc'
(Pdb) p final
'aaabbbccc'
(Pdb)
Benchmarking & Profiling
In this chapter, we will learn how benchmarking and profiling help in addressing performance issues.
Suppose we had written a code and it is giving the desired result too but what if we want to run this code a bit faster because the needs have changed. In this case, we need to find out what parts of our code are slowing down the entire program. In this case, benchmarking and profiling can be useful.
What is Benchmarking?
Benchmarking aims at evaluating something by comparison with a standard. However, the question that arises here is that what would be the benchmarking and why we need it in case of software programming. Benchmarking the code means how fast the code is executing and where the bottleneck is. One major reason for benchmarking is that it optimizes the code.
How does benchmarking work?
If we talk about the working of benchmarking, we need to start by benchmarking the whole program as one current state then we can combine micro benchmarks and then decompose a program into smaller programs. In order to find the bottlenecks within our program and optimize it. In other words, we can understand it as breaking the big and hard problem into series of smaller and a bit easier problems for optimizing them.
Python module for benchmarking
In Python, we have a by default module for benchmarking which is called timeit. With the help of the timeit module, we can measure the performance of small bit of Python code within our main program.
Example - Benchmarking an Application
In the following Python script, we are importing the timeit module, which further measures the time taken to execute two functions functionA and functionB −
main.py
import timeit
import time
def functionA():
   print("Function A starts the execution:")
   print("Function A completes the execution:")
def functionB():
   print("Function B starts the execution")
   print("Function B completes the execution")
start_time = timeit.default_timer()
functionA()
print(timeit.default_timer() - start_time)
start_time = timeit.default_timer()
functionB()
print(timeit.default_timer() - start_time)
Output
After running the above script, we will get the execution time of both the functions as shown below.
Function A starts the execution:
Function A completes the execution:
0.0014599495514175942
Function B starts the execution
Function B completes the execution
0.0017024724827479076
Example - Writing our own timer using the decorator function
In Python, we can create our own timer, which will act just like the timeit module. It can be done with the help of the decorator function. Following is an example of the custom timer −
main.py
import random
import time

def timer_func(func):
   def function_timer(*args, **kwargs):
      start = time.time()
      value = func(*args, **kwargs)
      end = time.time()
      runtime = end - start
      msg = "{func} took {time} seconds to complete its execution."
      print(msg.format(func = func.__name__,time = runtime))
      return value
   return function_timer

@timer_func
def Myfunction():
   for x in range(5):
      sleep_time = random.choice(range(1,3))
   time.sleep(sleep_time)

if __name__ == '__main__':
   Myfunction()
Output
The above python script helps in importing random time modules. We have created the timer_func() decorator function. This has the function_timer() function inside it. Now, the nested function will grab the time before calling the passed in function. Then it waits for the function to return and grabs the end time. In this way, we can finally make python script print the execution time. The script will generate the output as shown below.
Myfunction took 8.000457763671875 seconds to complete its execution.
What is profiling?
Sometimes the programmer wants to measure some attributes like the use of memory, time complexity or usage of particular instructions about the programs to measure the real capability of that program. Such kind of measuring about program is called profiling. Profiling uses dynamic program analysis to do such measuring.
In the subsequent sections, we will learn about the different Python Modules for Profiling.
cProfile the inbuilt module
cProfile is a Python built-in module for profiling. The module is a C-extension with reasonable overhead that makes it suitable for profiling long-running programs. After running it, it logs all the functions and execution times. It is very powerful but sometimes a bit difficult to interpret and act on. In the following example, we are using cProfile on the code below −
Example - Profiling
import threading

def increment_global():
   global x
   x += 1

def taskofThread(lock):
   for _ in range(50000):
      lock.acquire()
      increment_global()
      lock.release()

def main():
   global x
   x = 0

   lock = threading.Lock()

   t1 = threading.Thread(target=taskofThread, args=(lock,))
   t2 = threading.Thread(target= taskofThread, args=(lock,))

   t1.start()
   t2.start()

   t1.join()
   t2.join()

if __name__ == "__main__":
   for i in range(5):
      main()
      print("x = {1} after Iteration {0}".format(i,x))
The above code is saved in the main.py file. Now, execute the code with cProfile on the command line as follows −
(base) D:\ProgramData>python -m cProfile main.py
x = 100000 after Iteration 0
x = 100000 after Iteration 1
x = 100000 after Iteration 2
x = 100000 after Iteration 3
x = 100000 after Iteration 4
      3577 function calls (3522 primitive calls) in 1.688 seconds

   Ordered by: standard name

   ncalls tottime percall cumtime percall filename:lineno(function)

   5 0.000 0.000 0.000 0.000 <frozen importlib._bootstrap>:103(release)
   5 0.000 0.000 0.000 0.000 <frozen importlib._bootstrap>:143(__init__)
   5 0.000 0.000 0.000 0.000 <frozen importlib._bootstrap>:147(__enter__)
From the above output, it is clear that cProfile prints out all the 3577 functions called, with the time spent in each and the number of times they have been called. Followings are the columns we got in output −
ncalls − It is the number of calls made.
tottime − It is the total time spent in the given function.
percall − It refers to the quotient of tottime divided by ncalls.
cumtime − It is the cumulative time spent in this and all subfunctions. It is even accurate for recursive functions.
percall − It is the quotient of cumtime divided by primitive calls.
filename:lineno(function) − It basically provides the respective data of each function.
Concurrency in Python - Pool of Threads
Suppose we had to create a large number of threads for our multithreaded tasks. It would be computationally most expensive as there can be many performance issues, due to too many threads. A major issue could be in the throughput getting limited. We can solve this problem by creating a pool of threads. A thread pool may be defined as the group of pre-instantiated and idle threads, which stand ready to be given work. Creating thread pool is preferred over instantiating new threads for every task when we need to do large number of tasks. A thread pool can manage concurrent execution of large number of threads as follows −
If a thread in a thread pool completes its execution then that thread can be reused.
If a thread is terminated, another thread will be created to replace that thread.
Python Module Concurrent.futures
Python standard library includes the concurrent.futures module. This module was added in Python 3.2 for providing the developers a high-level interface for launching asynchronous tasks. It is an abstraction layer on the top of Pythons threading and multiprocessing modules for providing the interface for running the tasks using pool of thread or processes.
In our subsequent sections, we will learn about the different classes of the concurrent.futures module.
Executor Class
Executoris an abstract class of the concurrent.futures Python module. It cannot be used directly and we need to use one of the following concrete subclasses −
- ThreadPoolExecutor
- ProcessPoolExecutor
ThreadPoolExecutor - A Concrete Subclass
It is one of the concrete subclasses of the Executor class. The subclass uses multi-threading and we get a pool of thread for submitting the tasks. This pool assigns tasks to the available threads and schedules them to run.
How to create a ThreadPoolExecutor?
With the help of concurrent.futures module and its concrete subclass Executor, we can easily create a pool of threads. For this, we need to construct a ThreadPoolExecutor with the number of threads we want in the pool. By default, the number is 5. Then we can submit a task to the thread pool. When we submit() a task, we get back a Future. The Future object has a method called done(), which tells if the future has resolved. With this, a value has been set for that particular future object. When a task finishes, the thread pool executor sets the value to the future object.
Example - Usage of ThreadPoolExecutor
main.py
from concurrent.futures import ThreadPoolExecutor
from time import sleep
def task(message):
   sleep(2)
   return message

def main():
   executor = ThreadPoolExecutor(5)
   future = executor.submit(task, ("Completed"))
   print(future.done())
   sleep(2)
   print(future.done())
   print(future.result())
if __name__ == '__main__':
   main()
Output
Run the code and verify the output −
False
True
Completed
In the above example, a ThreadPoolExecutor has been constructed with 5 threads. Then a task, which will wait for 2 seconds before giving the message, is submitted to the thread pool executor. As seen from the output, the task does not complete until 2 seconds, so the first call to done() will return False. After 2 seconds, the task is done and we get the result of the future by calling the result() method on it.
Instantiating ThreadPoolExecutor Context Manager
Another way to instantiate ThreadPoolExecutor is with the help of context manager. It works similar to the method used in the above example. The main advantage of using context manager is that it looks syntactically good. The instantiation can be done with the help of the following code −
with ThreadPoolExecutor(max_workers = 5) as executor
Example - Usage of Futures
The following example is borrowed from the Python docs. In this example, first of all the concurrent.futures module has to be imported. Then a function named load_url() is created which will load the requested url. The function then creates ThreadPoolExecutor with the 5 threads in the pool. The ThreadPoolExecutor has been utilized as context manager. We can get the result of the future by calling the result() method on it.
main.py
import concurrent.futures
import urllib.request

URLS = ['http://www.foxnews.com/',
   'http://www.cnn.com/',
   'http://europe.wsj.com/',
   'http://www.bbc.co.uk/',
   'http://some-made-up-domain.com/']

def load_url(url, timeout):
   with urllib.request.urlopen(url, timeout = timeout) as conn:
      return conn.read()

with concurrent.futures.ThreadPoolExecutor(max_workers = 5) as executor:

   future_to_url = {executor.submit(load_url, url, 60): url for url in URLS}
   for future in concurrent.futures.as_completed(future_to_url):
      url = future_to_url[future]
      try:
         data = future.result()
      except Exception as exc:
         print('%r generated an exception: %s' % (url, exc))
      else:
         print('%r page is %d bytes' % (url, len(data)))
Output
Following would be the output of the above Python script −
'http://www.cnn.com/' generated an exception: <urlopen error [SSL: CERTIFICATE_VERIFY_FAILED] certificate verify failed: unable to get local issuer certificate (_ssl.c:1081)>
'http://some-made-up-domain.com/' page is 56053 bytes
'http://europe.wsj.com/' generated an exception: HTTP Error 403: Forbidden
'http://www.bbc.co.uk/' page is 767008 bytes
'http://www.foxnews.com/' page is 801469 bytes
Example - Use of Executor.map() function
The Python map() function is widely used in a number of tasks. One such task is to apply a certain function to every element within iterables. Similarly, we can map all the elements of an iterator to a function and submit these as independent jobs to out ThreadPoolExecutor. Consider the following example of Python script to understand how the function works.
main.py
In this example below, the map function is used to apply the square() function to every value in the values array.
from concurrent.futures import ThreadPoolExecutor
from concurrent.futures import as_completed
values = [2,3,4,5]
def square(n):
   return n * n
def main():
   with ThreadPoolExecutor(max_workers = 3) as executor:
      results = executor.map(square, values)
      for result in results:
         print(result)
if __name__ == '__main__':
   main()
Output
The above Python script generates the following output −
4
9
16
25
Concurrency in Python - Pool of Processes
Pool of process can be created and used in the same way as we have created and used the pool of threads. Process pool can be defined as the group of pre-instantiated and idle processes, which stand ready to be given work. Creating process pool is preferred over instantiating new processes for every task when we need to do a large number of tasks.
Python Module Concurrent.futures
Python standard library has a module called the concurrent.futures. This module was added in Python 3.2 for providing the developers a high-level interface for launching asynchronous tasks. It is an abstraction layer on the top of Pythons threading and multiprocessing modules for providing the interface for running the tasks using pool of thread or processes.
In our subsequent sections, we will look at the different subclasses of the concurrent.futures module.
Executor Class
Executor is an abstract class of the concurrent.futures Python module. It cannot be used directly and we need to use one of the following concrete subclasses −
- ThreadPoolExecutor
- ProcessPoolExecutor
ProcessPoolExecutor A concrete subclass
It is one of the concrete subclasses of the Executor class. It uses multi-processing and we get a pool of processes for submitting the tasks. This pool assigns tasks to the available processes and schedule them to run.
How to create a ProcessPoolExecutor?
With the help of the concurrent.futures module and its concrete subclass Executor, we can easily create a pool of process. For this, we need to construct a ProcessPoolExecutor with the number of processes we want in the pool. By default, the number is 5. This is followed by submitting a task to the process pool.
Example - Usage of ProcessPoolExecutor
We will now consider the same example that we used while creating thread pool, the only difference being that now we will use ProcessPoolExecutor instead of ThreadPoolExecutor.
main.py
from concurrent.futures import ProcessPoolExecutor
from time import sleep

def task(message):
   sleep(2)
   return message

def main():
   executor = ProcessPoolExecutor(5)
   future = executor.submit(task, ("Completed"))
   print(future.done())
   sleep(2)
   print(future.done())
   print(future.result())
if __name__ == '__main__':
   main()
Output
Run the code and verify the output −
False
False
Completed
In the above example, a ProcessPoolExecutor has been constructed with 5 threads. Then a task, which will wait for 2 seconds before giving the message, is submitted to the process pool executor. As seen from the output, the task does not complete until 2 seconds, so the first call to done() will return False. After 2 seconds, the task is done and we get the result of the future by calling the result() method on it.
Instantiating ProcessPoolExecutor Context Manager
Another way to instantiate ProcessPoolExecutor is with the help of context manager. It works similar to the method used in the above example. The main advantage of using context manager is that it looks syntactically good. The instantiation can be done with the help of the following code −
with ProcessPoolExecutor(max_workers = 5) as executor
Example - Using ProcessPoolExecutor with help of Context Manager
For better understanding, we are taking the same example as used while creating thread pool. In this example, we need to start by importing the concurrent.futures module. Then a function named load_url() is created which will load the requested url. The ProcessPoolExecutor is then created with the 5 number of threads in the pool. The ProcessPoolExecutor has been utilized as context manager. We can get the result of the future by calling the result() method on it.
main.py
import concurrent.futures
from concurrent.futures import ProcessPoolExecutor
import urllib.request

URLS = ['http://www.foxnews.com/',
   'http://www.cnn.com/',
   'http://europe.wsj.com/',
   'http://www.bbc.co.uk/',
   'http://some-made-up-domain.com/']

def load_url(url, timeout):
   with urllib.request.urlopen(url, timeout = timeout) as conn:
      return conn.read()

def main():
   with concurrent.futures.ProcessPoolExecutor(max_workers=5) as executor:
      future_to_url = {executor.submit(load_url, url, 60): url for url in URLS}
      for future in concurrent.futures.as_completed(future_to_url):
         url = future_to_url[future]
      try:
         data = future.result()
      except Exception as exc:
         print('%r generated an exception: %s' % (url, exc))
      else:
         print('%r page is %d bytes' % (url, len(data)))

if __name__ == '__main__':
   main()
Output
The above Python script will generate the following output −
'http://www.cnn.com/' generated an exception: <urlopen error [SSL: CERTIFICATE_VERIFY_FAILED] certificate verify failed: unable to get local issuer certificate (_ssl.c:1081)>
'http://europe.wsj.com/' generated an exception: cannot pickle 'BufferedReader' instances
'http://some-made-up-domain.com/' page is 56053 bytes
'http://www.bbc.co.uk/' page is 758529 bytes
'http://www.foxnews.com/' page is 783055 bytes
Use of the Executor.map() function
The Python map() function is widely used to perform a number of tasks. One such task is to apply a certain function to every element within iterables. Similarly, we can map all the elements of an iterator to a function and submit these as independent jobs to the ProcessPoolExecutor. Consider the following example of Python script to understand this.
Example - Usage of Executor.map Function
We will consider the same example that we used while creating thread pool using the Executor.map() function. In the example givenbelow, the map function is used to apply square() function to every value in the values array.
main.py
from concurrent.futures import ProcessPoolExecutor
from concurrent.futures import as_completed

values = [2,3,4,5]
def square(n):
   return n * n
def main():
   with ProcessPoolExecutor(max_workers = 3) as executor:
      results = executor.map(square, values)
   for result in results:
      print(result)
if __name__ == '__main__':
   main()
Output
The above Python script will generate the following output
4
9
16
25
When to use ProcessPoolExecutor and ThreadPoolExecutor?
Now that we have studied about both the Executor classes ThreadPoolExecutor and ProcessPoolExecutor, we need to know when to use which executor. We need to choose ProcessPoolExecutor in case of CPU-bound workloads and ThreadPoolExecutor in case of I/O-bound workloads.
If we use ProcessPoolExecutor, then we do not need to worry about GIL because it uses multiprocessing. Moreover, the execution time will be less when compared to ThreadPoolExecution. Consider the following Python script example to understand this.
Example - ProcessPoolExecutor vs ThreadPoolExecutor
main.py
import time
import concurrent.futures

value = [8000000, 7000000]

def counting(n):
   start = time.time()
   while n > 0:
      n -= 1
   return time.time() - start

def main():
   start = time.time()
   with concurrent.futures.ProcessPoolExecutor() as executor:
      for number, time_taken in zip(value, executor.map(counting, value)):
         print('Start: {} Time taken: {}'.format(number, time_taken))
   print('Total time taken: {}'.format(time.time() - start))

if __name__ == '__main__':
   main()
Output
Run the code and verify the outptu
Start: 8000000 Time taken: 1.5509998798370361
Start: 7000000 Time taken: 1.3259999752044678
Total time taken: 2.0840001106262207
Example - Python script with ThreadPoolExecutor
main.py
import time
import concurrent.futures

value = [8000000, 7000000]

def counting(n):
   start = time.time()
   while n > 0:
      n -= 1
   return time.time() - start

def main():
   start = time.time()
   with concurrent.futures.ThreadPoolExecutor() as executor:
      for number, time_taken in zip(value, executor.map(counting, value)):
         print('Start: {} Time taken: {}'.format(number, time_taken))
      print('Total time taken: {}'.format(time.time() - start))

if __name__ == '__main__':
   main()
Output
Run the code and verify the output −
Start: 8000000 Time taken: 3.8420000076293945
Start: 7000000 Time taken: 3.6010000705718994
Total time taken: 3.8480000495910645
From the outputs of both the programs above, we can see the difference of execution time while using ProcessPoolExecutor and ThreadPoolExecutor.
Concurrency in Python - Multiprocessing
In this chapter, we will focus more on the comparison between multiprocessing and multithreading.
Multiprocessing
It is the use of two or more CPUs units within a single computer system. It is the best approach to get the full potential from our hardware by utilizing full number of CPU cores available in our computer system.
Multithreading
It is the ability of a CPU to manage the use of operating system by executing multiple threads concurrently. The main idea of multithreading is to achieve parallelism by dividing a process into multiple threads.
Difference between Multiprocessing and Multiprogramming
The following table shows some of the important differences between them −
| Multiprocessing | Multiprogramming |
|---|---|
| Multiprocessing refers to processing of multiple processes at same time by multiple CPUs. | Multiprogramming keeps several programs in main memory at the same time and execute them concurrently utilizing single CPU. |
| It utilizes multiple CPUs. | It utilizes single CPU. |
| It permits parallel processing. | Context switching takes place. |
| Less time taken to process the jobs. | More Time taken to process the jobs. |
| It facilitates much efficient utilization of devices of the computer system. | Less efficient than multiprocessing. |
| Usually more expensive. | Such systems are less expensive. |
Eliminating impact of global interpreter lock (GIL)
While working with concurrent applications, there is a limitation present in Python called the GIL (Global Interpreter Lock). GIL never allows us to utilize multiple cores of CPU and hence we can say that there are no true threads in Python. GIL is the mutex mutual exclusion lock, which makes things thread safe. In other words, we can say that GIL prevents multiple threads from executing Python code in parallel. The lock can be held by only one thread at a time and if we want to execute a thread then it must acquire the lock first.
With the use of multiprocessing, we can effectively bypass the limitation caused by GIL −
By using multiprocessing, we are utilizing the capability of multiple processes and hence we are utilizing multiple instances of the GIL.
Due to this, there is no restriction of executing the bytecode of one thread within our programs at any one time.
Starting Processes in Python
The following three methods can be used to start a process in Python within the multiprocessing module −
- Fork
- Spawn
- Forkserver
Creating a process with Fork
Fork command is a standard command found in UNIX. It is used to create new processes called child processes. This child process runs concurrently with the process called the parent process. These child processes are also identical to their parent processes and inherit all of the resources available to the parent. The following system calls are used while creating a process with Fork −
fork() − It is a system call generally implemented in kernel. It is used to create a copy of the process.p>
getpid() − This system call returns the process ID(PID) of the calling process.
Example - Creating a Child Process using fork() method
os.fork is available on unix and linux based machines.
main.py
from multiprocessing import Process
import os

def child():
   n = os.fork()

   if n > 0:
      print("PID of Parent process is : ", os.getpid())

   else:
      print("PID of Child process is : ", os.getpid())
child()
Output
Run the code and verify the output −
PID of Parent process is :  178462
PID of Child process is :  178463
Example - Creating a Child Process in platform independent way
The following Python script example will help you understand how to create a new child process and get the PIDs of child and parent processes −
main.py
from multiprocessing import Process
import os

def child():
   print("PID of Child process is : ", os.getpid())

if __name__ == "__main__":
   print("PID of Parent process is : ", os.getpid())
   # create the child process
   p = Process(target=child)

   # start the child process
   p.start()
Output
Run the code and verify the output −
PID of Parent process is : 25989
PID of Child process is : 25990
Creating a process with Spawn
Spawn means to start something new. Hence, spawning a process means the creation of a new process by a parent process. The parent process continues its execution asynchronously or waits until the child process ends its execution. Follow these steps for spawning a process −
Importing multiprocessing module.
Creating the object process.
Starting the process activity by calling start() method.
Waiting until the process has finished its work and exit by calling join() method.
Example - Creating Process with Spawn
The following example of Python script helps in spawning three processes
import multiprocessing

def spawn_process(i):
   print ('This is process: %s' %i)
   return

if __name__ == '__main__':
   Process_jobs = []
   for i in range(3):
      p = multiprocessing.Process(target = spawn_process, args = (i,))
      Process_jobs.append(p)
      p.start()
      p.join()
Output
Run the code and verify the output −
This is process: 0
This is process: 1
This is process: 2
Creating a process with Forkserver
Forkserver mechanism is only available on those selected UNIX platforms that support passing the file descriptors over Unix Pipes. Consider the following points to understand the working of Forkserver mechanism −
A server is instantiated on using Forkserver mechanism for starting new process.
The server then receives the command and handles all the requests for creating new processes.
For creating a new process, our python program will send a request to Forkserver and it will create a process for us.
At last, we can use this new created process in our programs.
Daemon processes in Python
Python multiprocessing module allows us to have daemon processes through its daemonic option. Daemon processes or the processes that are running in the background follow similar concept as the daemon threads. To execute the process in the background, we need to set the daemonic flag to true. The daemon process will continue to run as long as the main process is executing and it will terminate after finishing its execution or when the main program would be killed.
Example - Creating Daemon Processes
Here, we are using the same example as used in the daemon threads. The only difference is the change of module from multithreading to multiprocessing and setting the daemonic flag to true. However, there would be a change in output as shown below −
main.py
import multiprocessing
import time

def nondaemonProcess():
   print("starting my Process")
   time.sleep(8)
   print("ending my Process")
def daemonProcess():
   while True:
      print("Hello")
      time.sleep(2)
if __name__ == '__main__':
   nondaemonProcess = multiprocessing.Process(target = nondaemonProcess)
   daemonProcess = multiprocessing.Process(target = daemonProcess)
   daemonProcess.daemon = True
   nondaemonProcess.daemon = False
   daemonProcess.start()
   nondaemonProcess.start()
Output
Run the code and verify the output −
starting my Process
ending my Process
The output is different when compared to the one generated by daemon threads, because the process in no daemon mode have an output. Hence, the daemonic process ends automatically after the main programs end to avoid the persistence of running processes.
Terminating processes in Python
We can kill or terminate a process immediately by using the terminate() method. We will use this method to terminate the child process, which has been created with the help of function, immediately before completing its execution.
Example - Terminating a Process
main.py
import multiprocessing
import time
def Child_process():
   print ('Starting function')
   time.sleep(5)
   print ('Finished function')
P = multiprocessing.Process(target = Child_process)
P.start()
print("My Process has terminated, terminating main process")
print("Terminating Child Process")
P.terminate()
print("Child Process successfully terminated")
Output
Run the code and verify the output −
My Process has terminated, terminating main process
Terminating Child Process
Child Process successfully terminated
The output shows that the program terminates before the execution of child process that has been created with the help of the Child_process() function. This implies that the child process has been terminated successfully.
Identifying the current process in Python
Every process in the operating system is having process identity known as PID. In Python, we can find out the PID of current process with the help of the following command −
import multiprocessing
print(multiprocessing.current_process().pid)
Example - Getting PID of current process
The following example of Python script helps find out the PID of main process as well as PID of child process −
main.py
import multiprocessing
import time

def Child_process():
   print("PID of Child Process is: {}".format(multiprocessing.current_process().pid))

if __name__ == '__main__':
    print("PID of Main process is: {}".format(multiprocessing.current_process().pid))
    P = multiprocessing.Process(target=Child_process)
    P.start()
    P.join()
Output
Run the code and verify the output −
PID of Main process is: 9401
PID of Child Process is: 9402
Using a process in subclass
We can create threads by sub-classing the threading.Thread class. In addition, we can also create processes by sub-classing the multiprocessing.Process class. For using a process in subclass, we need to consider the following points −
We need to define a new subclass of the Process class.
We need to override the _init_(self [,args] ) class.
We need to override the of the run(self [,args] ) method to implement what Process
We need to start the process by invoking thestart() method.
Example - Creating Process by subclassing Process class
main.py
import multiprocessing

class MyProcess(multiprocessing.Process):
   def run(self):
      print ('called run method in process: %s' %self.name)
      return

if __name__ == '__main__':
   jobs = []
   for i in range(5):
      P = MyProcess()
      jobs.append(P)
      P.start()
      P.join()
Output
Run the code and verify the output −
called run method in process: MyProcess-1
called run method in process: MyProcess-2
called run method in process: MyProcess-3
called run method in process: MyProcess-4
called run method in process: MyProcess-5
Python Multiprocessing Module Pool Class
If we talk about simple parallel processing tasks in our Python applications, then multiprocessing module provide us the Pool class. The following methods of Pool class can be used to spin up number of child processes within our main program
apply() method
This method is similar to the.submit()method of .ThreadPoolExecutor.It blocks until the result is ready.
apply_async() method
When we need parallel execution of our tasks then we need to use theapply_async()method to submit tasks to the pool. It is an asynchronous operation that will not lock the main thread until all the child processes are executed.
map() method
Just like the apply() method, it also blocks until the result is ready. It is equivalent to the built-in map() function that splits the iterable data in a number of chunks and submits to the process pool as separate tasks.
map_async() method
It is a variant of the map() method as apply_async() is to the apply() method. It returns a result object. When the result becomes ready, a callable is applied to it. The callable must be completed immediately; otherwise, the thread that handles the results will get blocked.
Example - Usage of Process Pool
The following example will help you implement a process pool for performing parallel execution. A simple calculation of square of number has been performed by applying the square() function through the multiprocessing.Pool method. Then pool.map() has been used to submit the 5, because input is a list of integers from 0 to 4. The result would be stored in p_outputs and it is printed.
main.py
import multiprocessing

def square(n):
   result = n*n
   return result
if __name__ == '__main__':
   inputs = list(range(5))
   pool = multiprocessing.Pool(processes = 4)
   pool_outputs = pool.map(square, inputs)
   pool.close()
   pool.join()
   print ('Pool :', pool_outputs)
Output
Run the code and verify the output −
Pool : [0, 1, 4, 9, 16]
Concurrency in Python - Process Intercommunication
Process intercommunication means the exchange of data between processes. It is necessary to exchange the data between processes for the development of parallel application. Following diagram shows the various communication mechanisms for synchronization between multiple sub processes −
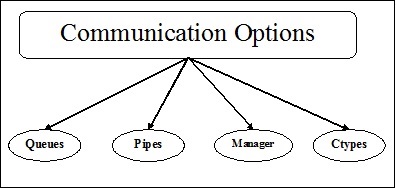
Various Communication Mechanisms
In this section, we will learn about the various communication mechanisms. The mechanisms are described below −
Queues
Queues can be used with multi-process programs. The Queue class of multiprocessing module is similar to the Queue.Queue class. Hence, the same API can be used. Multiprocessing.Queue provides us a thread and process safe FIFO (first-in first-out) mechanism of communication between processes.
Example - Usage of Queue
Following is a simple example taken from python official docs on multiprocessing to understand the concept of Queue class of multiprocessing.
main.py
from multiprocessing import Process, Queue
import queue
import random

def f(q):
   q.put([42, None, 'hello'])
def main():
   q = Queue()
   p = Process(target = f, args = (q,))
   p.start()
   print (q.get())
if __name__ == '__main__':
   main()
Output
Run the code and verify the output −
[42, None, 'hello']
Pipes
It is a data structure, which is used to communicate between processes in multi-process programs. The Pipe() function returns a pair of connection objects connected by a pipe which by default is duplex(two way). It works in the following manner −
It returns a pair of connection objects that represent the two ends of pipe.
Every object has two methods send() and recv(), to communicate between processes.
Example - Usage of Pipe
Following is a simple example taken from python official docs on multiprocessing to understand the concept of Pipe() function of multiprocessing.
main.py
from multiprocessing import Process, Pipe

def f(conn):
   conn.send([42, None, 'hello'])
   conn.close()

if __name__ == '__main__':
   parent_conn, child_conn = Pipe()
   p = Process(target = f, args = (child_conn,))
   p.start()
   print (parent_conn.recv())
   p.join()
Output
Run the code and verify the output −
[42, None, 'hello']
Manager
Manager is a class of multiprocessing module that provides a way to coordinate shared information between all its users. A manager object controls a server process, which manages shared objects and allows other processes to manipulate them. In other words, managers provide a way to create data that can be shared between different processes. Following are the different properties of manager object −
The main property of manager is to control a server process, which manages the shared objects.
Another important property is to update all the shared objects when any process modifies it.
Example - Usage of Manager
Following is an example which uses the manager object for creating a list record in server process and then adding a new record in that list.
import multiprocessing

def print_records(records):
   for record in records:
      print("Name: {0}\nScore: {1}\n".format(record[0], record[1]))

def insert_record(record, records):
   records.append(record)
   print("A New record is added\n")

if __name__ == '__main__':
   with multiprocessing.Manager() as manager:
      records = manager.list([('Computers', 1), ('Histoty', 5), ('Hindi',9)])
   new_record = ('English', 3)

   p1 = multiprocessing.Process(target = insert_record, args = (new_record, records))
   p2 = multiprocessing.Process(target = print_records, args = (records,))
   p1.start()
   p2.start()
   p1.join()
   p2.join()
Output
Run the code and verify the output −
A New record is added

Name: Computers
Score: 1

Name: Histoty
Score: 5

Name: Hindi
Score: 9

Name: English
Score: 3
Concept of Namespaces in Manager
Manager Class comes with the concept of namespaces, which is a quick way method for sharing several attributes across multiple processes. Namespaces do not feature any public method, which can be called, but they have writable attributes.
Example - Usage of Namespace
The following Python script example helps us utilize namespaces for sharing data across main process and child process −
main.py
import multiprocessing

def Mng_NaSp(using_ns):

   using_ns.x +=5
   using_ns.y *= 10

if __name__ == '__main__':
   manager = multiprocessing.Manager()
   using_ns = manager.Namespace()
   using_ns.x = 1
   using_ns.y = 1

   print ('before', using_ns)
   p = multiprocessing.Process(target = Mng_NaSp, args = (using_ns,))
   p.start()
   p.join()
   print ('after', using_ns)
Output
Run the code and verify the output −
before Namespace(x = 1, y = 1)
after Namespace(x = 6, y = 10)
Ctypes-Array and Value
Multiprocessing module provides Array and Value objects for storing the data in a shared memory map. Array is a ctypes array allocated from shared memory and Value is a ctypes object allocated from shared memory.
To being with, import Process, Value, Array from multiprocessing.
Example - Using CTypes Array
Following Python script is an example taken from python docs to utilize Ctypes Array and Value for sharing some data between processes.
main.py
import array
from multiprocessing import Process

def f(n, a):
   n = 3.1415927
   for i in range(len(a)):
      a[i] = -a[i]

if __name__ == '__main__':
   num = 0.0
   arr = array.array('i', range(10))

   p = Process(target = f, args = (num, arr))
   p.start()
   p.join()
   print (num)
   print (arr[:])
Output
Run the code and verify the output −
3.1415927
[0, -1, -2, -3, -4, -5, -6, -7, -8, -9]
Communicating Sequential Processes (CSP)
CSP is used to illustrate the interaction of systems with other systems featuring concurrent models. CSP is a framework for writing concurrent or program via message passing and hence it is effective for describing concurrency.
Python library PyCSP
For implementing core primitives found in CSP, Python has a library called PyCSP. It keeps the implementation very short and readable so that it can be understood very easily. Following is the basic process network of PyCSP −
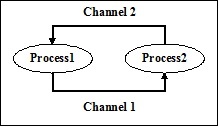
In the above PyCSP process network, there are two processes Process1 and Process 2. These processes communicate by passing messages through two channels channel 1 and channel 2.
Installing PyCSP
With the help of following command, we can install Python library PyCSP −
pip install PyCSP
Example - Running Processes in Parallel fashion
Following Python script is a simple example for running two processes in parallel to each other. It is done with the help of the PyCSP python library −
main.py
from pycsp.parallel import *
import time
@process
def P1():
   time.sleep(1)
   print('P1 exiting')
@process
def P2():
   time.sleep(1)
   print('P2 exiting')
def main():
   Parallel(P1(), P2())
   print('Terminating')
if __name__ == '__main__':
   main()
In the above script, two functions namely P1 and P2 have been created and then decorated with @process for converting them into processes.
Output
Run the code and verify the output −
P2 exiting
P1 exiting
Terminating
Concurrency in Python - Event Driven Programming
Event-driven programming focuses on events. Eventually, the flow of program depends upon events. Until now, we were dealing with either sequential or parallel execution model but the model having the concept of event-driven programming is called asynchronous model. Event-driven programming depends upon an event loop that is always listening for the new incoming events. The working of event-driven programming is dependent upon events. Once an event loops, then events decide what to execute and in what order. Following flowchart will help you understand how this works −
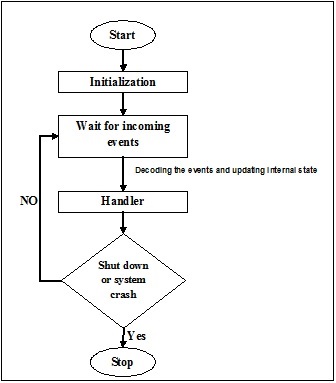
Python Module - Asyncio
Asyncio module was added in Python 3.4 and it provides infrastructure for writing single-threaded concurrent code using co-routines. Following are the different concepts used by the Asyncio module −
The event loop
Event-loop is a functionality to handle all the events in a computational code. It acts round the way during the execution of whole program and keeps track of the incoming and execution of events. The Asyncio module allows a single event loop per process. Followings are some methods provided by Asyncio module to manage an event loop −
loop = get_event_loop() − This method will provide the event loop for the current context.
loop.call_later(time_delay,callback,argument) − This method arranges for the callback that is to be called after the given time_delay seconds.
loop.call_soon(callback,argument) − This method arranges for a callback that is to be called as soon as possible. The callback is called after call_soon() returns and when the control returns to the event loop.
loop.time() − This method is used to return the current time according to the event loops internal clock.
asyncio.set_event_loop() − This method will set the event loop for the current context to the loop.
asyncio.new_event_loop() − This method will create and return a new event loop object.
loop.run_forever() − This method will run until stop() method is called.
Example - Calling a async method
The following example helps in printing hello world by using the run() method to call a method in async way.
import asyncio

async def main():
    print("Hello World")

# Run the async method
asyncio.run(main())
Output
Hello World
Futures
This is compatible with the concurrent.futures.Future class that represents a computation that has not been accomplished. There are following differences between asyncio.futures.Future and concurrent.futures.Future −
result() and exception() methods do not take a timeout argument and raise an exception when the future isnt done yet.
Callbacks registered with add_done_callback() are always called via the event loops call_soon().
asyncio.futures.Future class is not compatible with the wait() and as_completed() functions in the concurrent.futures package.
Example - Usage of Asyncio Future
The following is an example that will help you understand how to use asyncio.futures.future class.
main.py
import asyncio

async def MyOperation(future):
   await asyncio.sleep(2)
   future.set_result('Completed')

async def main():
    # get running loop and create a future object
    loop = asyncio.get_running_loop()
    future = loop.create_future()

    # create a task and complete the future
    asyncio.create_task(MyOperation(future))

    # Await for the future to complete
    print("Waiting for future to complete...")
    result = await future

    # once future is done, print the result.
    print(f"Future result: {result}")

# Run the main method
if __name__ == "__main__":
    asyncio.run(main())
Output
Run the code and verify the output −
Waiting for future to complete...
Future result: Completed
Coroutines
The concept of coroutines in Asyncio is similar to the concept of standard Thread object under threading module. This is the generalization of the subroutine concept. A coroutine can be suspended during the execution so that it waits for the external processing and returns from the point at which it had stopped when the external processing was done. The following two ways help us in implementing coroutines −
Example - async def function()
This is a method for implementation of coroutines under Asyncio module. Following is a Python script for the same −
main.py
import asyncio

async def MyOperation():
   print("First Coroutine")

# Run the async method
asyncio.run(MyOperation())
Output
Run the code and verify the output −
First Coroutine
Example - Tasks
This subclass of Asyncio module is responsible for execution of coroutines within an event loop in parallel manner. Following Python script is an example of processing some tasks in parallel.
main.py
import asyncio
import time
async def Task_ex(n):
   time.sleep(1)
   print("Processing {}".format(n))
async def Generator_task():
   for i in range(10):
      asyncio.ensure_future(Task_ex(i))
   print("Tasks Completed")
   asyncio.sleep(2)

# Run the async method
asyncio.run(Generator_task())
Output
Run the above code and verify the output −
Tasks Completed
Processing 0
Processing 1
Processing 2
Processing 3
Processing 4
Processing 5
Processing 6
Processing 7
Processing 8
Processing 9
Transports
Asyncio module provides transport classes for implementing various types of communication. These classes are not thread safe and always paired with a protocol instance after establishment of communication channel.
Following are distinct types of transports inherited from the BaseTransport −
ReadTransport − This is an interface for read-only transports.
WriteTransport − This is an interface for write-only transports.
DatagramTransport − This is an interface for sending the data.
BaseSubprocessTransport − Similar to BaseTransport class.
Followings are five distinct methods of BaseTransport class that are subsequently transient across the four transport types −
close() − It closes the transport.
is_closing() − This method will return true if the transport is closing or is already closed.transports.
get_extra_info(name, default = none) − This will give us some extra information about transport.
get_protocol() − This method will return the current protocol.
Protocols
Asyncio module provides base classes that you can subclass to implement your network protocols. Those classes are used in conjunction with transports; the protocol parses incoming data and asks for the writing of outgoing data, while the transport is responsible for the actual I/O and buffering. Following are three classes of Protocol −
Protocol − This is the base class for implementing streaming protocols for use with TCP and SSL transports.
DatagramProtocol − This is the base class for implementing datagram protocols for use with UDP transports..
SubprocessProtocol − This is the base class for implementing protocols communicating with child processes through a set of unidirectional pipes.
Concurrency in Python - Reactive Programming
Reactive programming is a programming paradigm that deals with data flows and the propagation of change. It means that when a data flow is emitted by one component, the change will be propagated to other components by reactive programming library. The propagation of change will continue until it reaches the final receiver. The difference between event-driven and reactive programming is that event-driven programming revolves around events and reactive programming revolves around data.
ReactiveX or RX for reactive programming
ReactiveX or Raective Extension is the most famous implementation of reactive programming. The working of ReactiveX depends upon the following two classes −
Observable class
This class is the source of data stream or events and it packs the incoming data so that the data can be passed from one thread to another. It will not give data until some observer subscribe to it.
Observer class
This class consumes the data stream emitted by observable. There can be multiple observers with observable and each observer will receive each data item that is emitted. The observer can receive three type of events by subscribing to observable −
on_next() event − It implies there is an element in the data stream.
on_completed() event − It implies end of emission and no more items are coming.
on_error() event − It also implies end of emission but in case when an error is thrown by observable.
RxPY - Python Module for Reactive Programming
RxPY is a Python module which can be used for reactive programming. We need to ensure that the module is installed. The following command can be used to install the RxPY module −
pip install RxPY
Example - Usage of RxPy library
Following is a Python script, which uses RxPY module and its classes Observable and Observe for reactive programming. There are basically two classes −
get_strings() − for getting the strings from observer.
PrintObserver() − for printing the strings from observer. It uses all three events of observer class. It also uses subscribe() class.
main.py
from rx import Observable, Observer

def get_strings(observer):
   observer.on_next("Ram")
   observer.on_next("Mohan")
   observer.on_next("Shyam")
   observer.on_completed()
class PrintObserver(Observer):
   def on_next(self, value):
      print("Received {0}".format(value))
   def on_completed(self):
      print("Finished")
   def on_error(self, error):
      print("Error: {0}".format(error))
source = Observable.create(get_strings)
source.subscribe(PrintObserver())
Output
Run the code and verify the output −
Received Ram
Received Mohan
Received Shyam
Finished
PyFunctional library for reactive programming
PyFunctionalis another Python library that can be used for reactive programming. It enables us to create functional programs using the Python programming language. It is useful because it allows us to create data pipelines by using chained functional operators.
Difference between RxPY and PyFunctional
Both the libraries are used for reactive programming and handle the stream in similar fashion but the main difference between both of them depends upon the handling of data. RxPY handles data and events in the system while PyFunctional is focused on transformation of data using functional programming paradigms.
Installing PyFunctional Module
We need to install this module before using it. It can be installed with the help of pip command as follows −
pip install pyfunctional
Example - Usage of PyFunctional Library
Following example uses the PyFunctional module and its seq class which act as the stream object with which we can iterate and manipulate. In this program, it maps the sequence by using the lamda function that doubles every value, then filters the value where x is greater than 4 and finally it reduces the sequence into a sum of all the remaining values.
main.py
from functional import seq

result = seq(1,2,3).map(lambda x: x*2).filter(lambda x: x > 4).reduce(lambda x, y: x + y)

print ("Result: {}".format(result))
Output
Run the code and verify the output −
Result: 6