- Rust - Home
- Rust - Introduction
- Rust - Environment Setup
- Rust - HelloWorld Example
- Rust - Data Types
- Rust - Variables
- Rust - Constant
- Rust - String
- Rust - Operators
- Rust - Decision Making
- Rust - Loop
- Rust - Functions
- Rust - Tuple
- Rust - Array
- Rust - Ownership
- Rust - Borrowing
- Rust - Slices
- Rust - Structure
- Rust - Enums
- Rust - Modules
- Rust - Collections
- Rust - Error Handling
- Rust - Generic Types
- Rust - Input Output
- Rust - File Input/ Output
- Rust - Package Manager
- Rust - Iterator and Closure
- Rust - Smart Pointers
- Rust - Concurrency
- Rust Useful Resources
- Rust - Quick Guide
- Rust - Useful Resources
- Rust - Discussion
Rust - Quick Guide
Rust - Introduction
Rust is a systems level programming language, developed by Graydon Hoare. Mozilla Labs later acquired the programme.
Application v/s Systems Programming Languages
Application programming languages like Java/C# are used to build software, which provide services to the user directly. They help us build business applications like spreadsheets, word processors, web applications or mobile applications.
Systems programming languages like C/C++ are used to build software and software platforms. They can be used to build operating systems, game engines, compilers, etc. These programming languages require a great degree of hardware interaction.
Systems and application programming languages face two major problems −
- It is difficult to write secure code.
- It is difficult to write multi-threaded code.
Why Rust?
Rust focuses on three goals −
- Safety
- Speed
- Concurrency
The language was designed for developing highly reliable and fast software in a simple way. Rust can be used to write high-level programs down to hardware-specific programs.
Performance
Rust programming language does not have a Garbage Collector (GC) by design. This improves the performance at runtime.
Memory safety at compile time
Software built using Rust is safe from memory issues like dangling pointers, buffer overruns and memory leaks.
Multi-threaded applications
Rusts ownership and memory safety rules provide concurrency without data races.
Support for Web Assembly (WASM)
Web Assembly helps to execute high computation intensive algorithms in the browser, on embedded devices, or anywhere else. It runs at the speed of native code. Rust can be compiled to Web Assembly for fast, reliable execution.
Rust - Environment Setup
Installation of Rust is made easy through rustup, a console-based tool for managing Rust versions and associated tools.
Installation on Windows
Let us learn how to install RUST on Windows.
Installation of Visual Studio 2013 or higher with C++ tools is mandatory to run the Rust program on windows. First, download Visual Studio from here VS 2013 Express
Download and install rustup tool for windows. rustup-init.exe is available for download here − Rust Lang
Double-click rustup-init.exe file. Upon clicking, the following screen will appear.
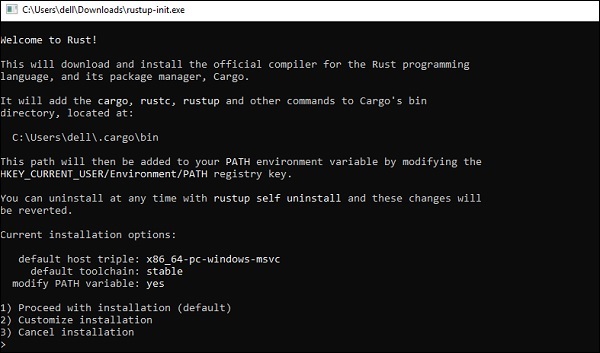
Press enter for default installation. Once installation is completed, the following screen appears.
From the installation screen, it is clear that Rust related files are stored in the folder −
C:\Users\{PC}\.cargo\bin
The contents of the folder are −
cargo-fmt.exe
cargo.exe
rls.exe
rust-gdb.exe
rust-lldb.exe
rustc.exe // this is the compiler for rust
rustdoc.exe
rustfmt.exe
rustup.exe
Cargo is the package manager for Rust. To verify if cargo is installed, execute the following command −
C:\Users\Admin>cargo -V
cargo 1.29.0 (524a578d7 2018-08-05)
The compiler for Rust is rustc. To verify the compiler version, execute the following command −
C:\Users\Admin>cargo -V
cargo 1.29.0 (524a578d7 2018-08-05)
Installation on Linux / Mac
To install rustup on Linux or macOS, open a terminal and enter the following command.
$ curl https://sh.rustup.rs -sSf | sh
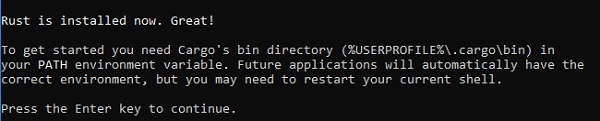
The command downloads a script and starts the installation of the rustup tool, which installs the latest stable version of Rust. You might be prompted for your password. If the installation is successful, the following line will appear −
Rust is installed now. Great!
The installation script automatically adds Rust to your system PATH after your next login. To start using Rust right away instead of restarting your terminal, run the following command in your shell to add Rust to your system PATH manually −
$ source $HOME/.cargo/env
Alternatively, you can add the following line to your ~/.bash_profile −
$ export PATH="$HOME/.cargo/bin:$PATH"
NOTE − When you try to compile a Rust program and get errors indicating that a linker could not execute, that means a linker is not installed on your system and you will need to install one manually.
Using Tutorials Point Coding Ground for RUST
A Read-Evaluate-Print Loop (REPL) is an easy to use interactive shell to compile and execute computer programs. If you want to compile and execute Rust programs online within the browser, use Tutorialspoint Coding Ground.
Rust - HelloWorld Example
This chapter explains the basic syntax of Rust language through a HelloWorld example.
Create a HelloWorld-App folder and navigate to that folder on terminal
C:\Users\Admin>mkdir HelloWorld-App
C:\Users\Admin>cd HelloWorld-App
C:\Users\Admin\HelloWorld-App>
To create a Rust file, execute the following command −
C:\Users\Admin\HelloWorld-App>notepad Hello.rs
Rust program files have an extension .rs. The above command creates an empty file Hello.rs and opens it in NOTEpad. Add the code given below to this file −
fn
main(){
   println!("Rust says Hello to TutorialsPoint !!");
}
The above program defines a function main fn main(). The fn keyword is used to define a function. The main() is a predefined function that acts as an entry point to the program. println! is a predefined macro in Rust. It is used to print a string (here Hello) to the console. Macro calls are always marked with an exclamation mark !.
Compile the Hello.rs file using rustc.
C:\Users\Admin\HelloWorld-App>rustc Hello.rs
Upon successful compilation of the program, an executable file (file_name.exe) is generated. To verify if the .exe file is generated, execute the following command.
C:\Users\Admin\HelloWorld-App>dir
//lists the files in folder
Hello.exe
Hello.pdb
Hello.rs
- Execute the Hello.exe file and verify the output.
What is a macro?
Rust provides a powerful macro system that allows meta-programming. As you have seen in the previous example, macros look like functions, except that their name ends with a bang(!), but instead of generating a function call, macros are expanded into source code that gets compiled with the rest of the program. Therefore, they provide more runtime features to a program unlike functions. Macros are an extended version of functions.
Using the println! Macro - Syntax
println!(); // prints just a newline
println!("hello ");//prints hello
println!("format {} arguments", "some"); //prints format some arguments
Comments in Rust
Comments are a way to improve the readability of a program. Comments can be used to include additional information about a program like author of the code, hints about a function/ construct, etc. The compiler ignores comments.
Rust supports the following types of comments −
Single-line comments ( // ) − Any text between a // and the end of a line is treated as a comment
Multi-line comments (/* */) These comments may span multiple lines.
Example
//this is single line comment

/* This is a
   Multi-line comment
*/
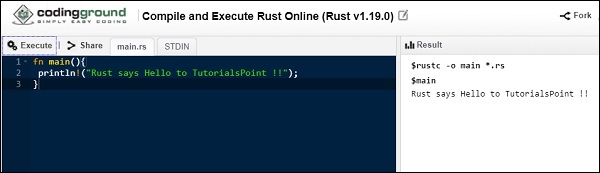
Execute online
Rust programs can be executed online through Tutorialspoint Coding Ground. Write the HelloWorld program in the Editor tab and click Execute to view result.
Rust - Data Types
The Type System represents the different types of values supported by the language. The Type System checks validity of the supplied values, before they are stored or manipulated by the program. This ensures that the code behaves as expected. The Type System further allows for richer code hinting and automated documentation too.
Rust is a statically typed language. Every value in Rust is of a certain data type. The compiler can automatically infer data type of the variable based on the value assigned to it.
Declare a Variable
Use the let keyword to declare a variable.
fn main() {
   let company_string = "TutorialsPoint";  // string type
   let rating_float = 4.5;                 // float type
   let is_growing_boolean = true;          // boolean type
   let icon_char = '';                    //unicode character type

   println!("company name is:{}",company_string);
   println!("company rating on 5 is:{}",rating_float);
   println!("company is growing :{}",is_growing_boolean);
   println!("company icon is:{}",icon_char);
}
In the above example, data type of the variables will be inferred from the values assigned to them. For example, Rust will assign string data type to the variable company_string, float data type to rating_float, etc.
The println! macro takes two arguments −
- A special syntax { }, which is the placeholder
- The variable name or a constant
The placeholder will be replaced by the variables value
The output of the above code snippet will be −
company name is: TutorialsPoint
company rating on 5 is:4.5
company is growing: true
company icon is:
Scalar Types
A scalar type represents a single value. For example, 10,3.14,'c'. Rust has four primary scalar types.
- Integer
- Floating-point
- Booleans
- Characters
We will learn about each type in our subsequent sections.
Integer
An integer is a number without a fractional component. Simply put, the integer data type is used to represent whole numbers.
Integers can be further classified as Signed and Unsigned. Signed integers can store both negative and positive values. Unsigned integers can only store positive values. A detailed description if integer types is given below −
| Sr.No. | Size | Signed | Unsigned |
|---|---|---|---|
| 1 | 8 bit | i8 | u8 |
| 2 | 16 bit | i16 | u16 |
| 3 | 32 bit | i32 | u32 |
| 4 | 64 bit | i64 | u64 |
| 5 | 128 bit | i128 | u128 |
| 6 | Arch | isize | usize |
The size of an integer can be arch. This means the size of the data type will be derived from the architecture of the machine. An integer the size of which is arch will be 32 bits on an x86 machine and 64 bits on an x64 machine. An arch integer is primarily used when indexing some sort of collection.
Illustration
fn main() {
   let result = 10;    // i32 by default
   let age:u32 = 20;
   let sum:i32 = 5-15;
   let mark:isize = 10;
   let count:usize = 30;
   println!("result value is {}",result);
   println!("sum is {} and age is {}",sum,age);
   println!("mark is {} and count is {}",mark,count);
}
The output will be as given below −
result value is 10
sum is -10 and age is 20
mark is 10 and count is 30
The above code will return a compilation error if you replace the value of age with a floating-point value.
Integer Range
Each signed variant can store numbers from -(2^(n-1) to 2^(n-1) -1, where n is the number of bits that variant uses. For example, i8 can store numbers from -(2^7) to 2^7 -1 − here we replaced n with 8.
Each unsigned variant can store numbers from 0 to (2^n)-1. For example, u8 can store numbers from 0 to (2^8)-1, which is equal to 0 to 255.
Integer Overflow
An integer overflow occurs when the value assigned to an integer variable exceeds the Rust defined range for the data type. Let us understand this with an example −
fn main() {
   let age:u8 = 255;

   // 0 to 255 only allowed for u8
   let weight:u8 = 256;   //overflow value is 0
   let height:u8 = 257;   //overflow value is 1
   let score:u8 = 258;    //overflow value is 2

   println!("age is {} ",age);
   println!("weight is {}",weight);
   println!("height is {}",height);
   println!("score is {}",score);
}
The valid range of unsigned u8 variable is 0 to 255. In the above example, the variables are assigned values greater than 255 (upper limit for an integer variable in Rust). On execution, the above code will return a warning − warning − literal out of range for u8 for weight, height and score variables. The overflow values after 255 will start from 0, 1, 2, etc. The final output without warning is as shown below −
age is 255
weight is 0
height is 1
score is 2
Float
Float data type in Rust can be classified as f32 and f64. The f32 type is a single-precision float, and f64 has double precision. The default type is f64. Consider the following example to understand more about the float data type.
fn main() {
   let result = 10.00;        //f64 by default
   let interest:f32 = 8.35;
   let cost:f64 = 15000.600;  //double precision

   println!("result value is {}",result);
   println!("interest is {}",interest);
   println!("cost is {}",cost);
}
The output will be as shown below −
interest is 8.35
cost is 15000.6
Automatic Type Casting
Automatic type casting is not allowed in Rust. Consider the following code snippet. An integer value is assigned to the float variable interest.
fn main() {
   let interest:f32 = 8;   // integer assigned to float variable
   println!("interest is {}",interest);
}
The compiler throws a mismatched types error as given below.
error[E0308]: mismatched types
   --> main.rs:2:22
   |
 2 | let interest:f32=8;
   |    ^ expected f32, found integral variable
   |
   = note: expected type `f32`
      found type `{integer}`
error: aborting due to previous error(s)
Number Separator
For easy readability of large numbers, we can use a visual separator _ underscore to separate digits. That is 50,000 can be written as 50_000 . This is shown in the below example.
fn main() {
   let float_with_separator = 11_000.555_001;
   println!("float value {}",float_with_separator);

   let int_with_separator = 50_000;
   println!("int value {}",int_with_separator);
}
The output is given below −
float value 11000.555001
int value 50000
Boolean
Boolean types have two possible values true or false. Use the bool keyword to declare a boolean variable.
Illustration
fn main() {
   let isfun:bool = true;
   println!("Is Rust Programming Fun ? {}",isfun);
}
The output of the above code will be −
Is Rust Programming Fun ? true
Character
The character data type in Rust supports numbers, alphabets, Unicode and special characters. Use the char keyword to declare a variable of character data type. Rusts char type represents a Unicode Scalar Value, which means it can represent a lot more than just ASCII. Unicode Scalar Values range from U+0000 to U+D7FF and U+E000 to U+10FFFF inclusive.
Let us consider an example to understand more about the Character data type.
fn main() {
   let special_character = '@'; //default
   let alphabet:char = 'A';
   let emoji:char = '';

   println!("special character is {}",special_character);
   println!("alphabet is {}",alphabet);
   println!("emoji is {}",emoji);
}
The output of the above code will be −
special character is @
alphabet is A
emoji is
Rust - Variables
A variable is a named storage that programs can manipulate. Simply put, a variable helps programs to store values. Variables in Rust are associated with a specific data type. The data type determines the size and layout of the variable's memory, the range of values that can be stored within that memory and the set of operations that can be performed on the variable.
Rules for Naming a Variable
In this section, we will learn about the different rules for naming a variable.
The name of a variable can be composed of letters, digits, and the underscore character.
It must begin with either a letter or an underscore.
Upper and lowercase letters are distinct because Rust is case-sensitive.
Syntax
The data type is optional while declaring a variable in Rust. The data type is inferred from the value assigned to the variable.
The syntax for declaring a variable is given below.
let variable_name = value;            // no type specified
let variable_name:dataType = value;   //type specified
Illustration
fn main() {
   let fees = 25_000;
   let salary:f64 = 35_000.00;
   println!("fees is {} and salary is {}",fees,salary);
}
The output of the above code will be fees is 25000 and salary is 35000.
Immutable
By default, variables are immutable − read only in Rust. In other words, the variable's value cannot be changed once a value is bound to a variable name.
Let us understand this with an example.
fn main() {
   let fees = 25_000;
   println!("fees is {} ",fees);
   fees = 35_000;
   println!("fees changed is {}",fees);
}
The output will be as shown below −
error[E0384]: re-assignment of immutable variable `fees`
 --> main.rs:6:3
   |
 3 | let fees = 25_000;
   | ---- first assignment to `fees`
...
 6 | fees=35_000;
   | ^^^^^^^^^^^ re-assignment of immutable variable

error: aborting due to previous error(s)
The error message indicates the cause of the error you cannot assign values twice to immutable variable fees. This is one of the many ways Rust allows programmers to write code and takes advantage of the safety and easy concurrency.
Mutable
Variables are immutable by default. Prefix the variable name with mut keyword to make it mutable. The value of a mutable variable can be changed.
The syntax for declaring a mutable variable is as shown below −
let mut variable_name = value;
let mut variable_name:dataType = value;
Let us understand this with an example

fn main() {
   let mut fees:i32 = 25_000;
   println!("fees is {} ",fees);
   fees = 35_000;
   println!("fees changed is {}",fees);
}
The output of the snippet is given below −
fees is 25000
fees changed is 35000
Rust - Constant
Constants represent values that cannot be changed. If you declare a constant then there is no way its value changes. The keyword for using constants is const. Constants must be explicitly typed. Following is the syntax to declare a constant.
const VARIABLE_NAME:dataType = value;
Rust Constant Naming Convention
The naming convention for Constants are similar to that of variables. All characters in a constant name are usually in uppercase. Unlike declaring variables, the let keyword is not used to declare a constant.
We have used constants in Rust in the example below −
fn main() {
   const USER_LIMIT:i32 = 100;    // Declare a integer constant
   const PI:f32 = 3.14;           //Declare a float constant

   println!("user limit is {}",USER_LIMIT);  //Display value of the constant
   println!("pi value is {}",PI);            //Display value of the constant
}
Constants v/s Variables
In this section, we will learn about the differentiating factors between constants and variables.
Constants are declared using the const keyword while variables are declared using the let keyword.
A variable declaration can optionally have a data type whereas a constant declaration must specify the data type. This means const USER_LIMIT=100 will result in an error.
A variable declared using the let keyword is by default immutable. However, you have an option to mutate it using the mut keyword. Constants are immutable.
Constants can be set only to a constant expression and not to the result of a function call or any other value that will be computed at runtime.
Constants can be declared in any scope, including the global scope, which makes them useful for values that many parts of the code need to know about.
Shadowing of Variables and Constants
Rust allows programmers to declare variables with the same name. In such a case, the new variable overrides the previous variable.
Let us understand this with an example.
fn main() {
   let salary = 100.00;
   let salary = 1.50 ;
   // reads first salary
   println!("The value of salary is :{}",salary);
}
The above code declares two variables by the name salary. The first declaration is assigned a 100.00 while the second declaration is assigned value 1.50. The second variable shadows or hides the first variable while displaying output.
Output
The value of salary is :1.50
Rust supports variables with different data types while shadowing.
Consider the following example.
The code declares two variables by the name uname. The first declaration is assigned a string value, whereas the second declaration is assigned an integer. The len function returns the total number of characters in a string value.
fn main() {
   let uname = "Mohtashim";
   let uname = uname.len();
   println!("name changed to integer : {}",uname);
}
Output
name changed to integer: 9
Unlike variables, constants cannot be shadowed. If variables in the above program are replaced with constants, the compiler will throw an error.
fn main() {
   const NAME:&str = "Mohtashim";
   const NAME:usize = NAME.len();
   //Error : `NAME` already defined
   println!("name changed to integer : {}",NAME);
}
Rust - String
The String data type in Rust can be classified into the following −
String Literal(&str)
String Object(String)
String Literal
String literals (&str) are used when the value of a string is known at compile time. String literals are a set of characters, which are hardcoded into a variable. For example, let company="Tutorials Point". String literals are found in module std::str. String literals are also known as string slices.
The following example declares two string literals − company and location.
fn main() {
   let company:&str="TutorialsPoint";
   let location:&str = "Hyderabad";
   println!("company is : {} location :{}",company,location);
}
String literals are static by default. This means that string literals are guaranteed to be valid for the duration of the entire program. We can also explicitly specify the variable as static as shown below −
fn main() {
   let company:&'static str = "TutorialsPoint";
   let location:&'static str = "Hyderabad";
   println!("company is : {} location :{}",company,location);
}
The above program will generate the following output −
company is : TutorialsPoint location :Hyderabad
String Object
The String object type is provided in Standard Library. Unlike string literal, the string object type is not a part of the core language. It is defined as public structure in standard library pub struct String. String is a growable collection. It is mutable and UTF-8 encoded type. The String object type can be used to represent string values that are provided at runtime. String object is allocated in the heap.
Syntax
To create a String object, we can use any of the following syntax −
String::new()
The above syntax creates an empty string
String::from()
This creates a string with some default value passed as parameter to the from() method.
The following example illustrates the use of a String object.
fn main(){
   let empty_string = String::new();
   println!("length is {}",empty_string.len());

   let content_string = String::from("TutorialsPoint");
   println!("length is {}",content_string.len());
}
The above example creates two strings − an empty string object using the new method and a string object from string literal using the from method.
The output is as shown below −
length is 0
length is 14
Common Methods - String Object
| Sr.No. | Method | Signature | Description |
|---|---|---|---|
| 1 | new() | pub const fn new() → String | Creates a new empty String. |
| 2 | to_string() | fn to_string(&self) → String | Converts the given value to a String. |
| 3 | replace() | pub fn replace<'a, P>(&'a self, from: P, to: &str) → String | Replaces all matches of a pattern with another string. |
| 4 | as_str() | pub fn as_str(&self) → &str | Extracts a string slice containing the entire string. |
| 5 | push() | pub fn push(&mut self, ch: char) | Appends the given char to the end of this String. |
| 6 | push_str() | pub fn push_str(&mut self, string: &str) | Appends a given string slice onto the end of this String. |
| 7 | len() | pub fn len(&self) → usize | Returns the length of this String, in bytes. |
| 8 | trim() | pub fn trim(&self) → &str | Returns a string slice with leading and trailing whitespace removed. |
| 9 | split_whitespace() | pub fn split_whitespace(&self) → SplitWhitespace | Splits a string slice by whitespace and returns an iterator. |
| 10 | split() | pub fn split<'a, P>(&'a self, pat: P) → Split<'a, P> , where P is pattern can be &str, char, or a closure that determines the split. | Returns an iterator over substrings of this string slice, separated by characters matched by a pattern. |
| 11 | chars() | pub fn chars(&self) → Chars | Returns an iterator over the chars of a string slice. |
Illustration: new()
An empty string object is created using the new() method and its value is set to hello.
fn main(){
   let mut z = String::new();
   z.push_str("hello");
   println!("{}",z);
}
Output
The above program generates the following output −
hello
Illustration: to_string()
To access all methods of String object, convert a string literal to object type using the to_string() function.
fn main(){
   let name1 = "Hello TutorialsPoint ,
   Hello!".to_string();
   println!("{}",name1);
}
Output
The above program generates the following output −
Hello TutorialsPoint , Hello!
Illustration: replace()
The replace() function takes two parameters − the first parameter is a string pattern to search for and the second parameter is the new value to be replaced. In the above example, Hello appears two times in the name1 string.
The replace function replaces all occurrences of the string Hello with Howdy.
fn main(){
   let name1 = "Hello TutorialsPoint ,
   Hello!".to_string();         //String object
   let name2 = name1.replace("Hello","Howdy");    //find and replace
   println!("{}",name2);
}
Output
The above program generates the following output −
Howdy TutorialsPoint , Howdy!
Illustration: as_str()
The as_str() function extracts a string slice containing the entire string.
fn main() {
   let example_string = String::from("example_string");
   print_literal(example_string.as_str());
}
fn print_literal(data:&str ){
   println!("displaying string literal {}",data);
}
Output
The above program generates the following output −
displaying string literal example_string
Illustration: push()
The push() function appends the given char to the end of this String.
fn main(){
   let mut company = "Tutorial".to_string();
   company.push('s');
   println!("{}",company);
}
Output
The above program generates the following output −
Tutorials
Illustration: push_str()
The push_str() function appends a given string slice onto the end of a String.
fn main(){
   let mut company = "Tutorials".to_string();
   company.push_str(" Point");
   println!("{}",company);
}
Output
The above program generates the following output −
Tutorials Point
Illustration: len()
The len() function returns the total number of characters in a string (including spaces).
fn main() {
   let fullname = " Tutorials Point";
   println!("length is {}",fullname.len());
}
Output
The above program generates the following output −
length is 20
Illustration: trim()
The trim() function removes leading and trailing spaces in a string. NOTE that this function will not remove the inline spaces.
fn main() {
   let fullname = " Tutorials Point \r\n";
   println!("Before trim ");
   println!("length is {}",fullname.len());
   println!();
   println!("After trim ");
   println!("length is {}",fullname.trim().len());
}
Output
The above program generates the following output −
Before trim
length is 24

After trim
length is 15
Illustration:split_whitespace()
The split_whitespace() splits the input string into different strings. It returns an iterator so we are iterating through the tokens as shown below −
fn main(){
   let msg = "Tutorials Point has good t
   utorials".to_string();
   let mut i = 1;

   for token in msg.split_whitespace(){
      println!("token {} {}",i,token);
      i+=1;
   }
}
Output
token 1 Tutorials
token 2 Point
token 3 has
token 4 good
token 5 tutorials
Illustration: split() string
The split() string method returns an iterator over substrings of a string slice, separated by characters matched by a pattern. The limitation of the split() method is that the result cannot be stored for later use. The collect method can be used to store the result returned by split() as a vector.
fn main() {
   let fullname = "Kannan,Sudhakaran,Tutorialspoint";

   for token in fullname.split(","){
      println!("token is {}",token);
   }

   //store in a Vector
   println!("\n");
   let tokens:Vec<&str>= fullname.split(",").collect();
   println!("firstName is {}",tokens[0]);
   println!("lastname is {}",tokens[1]);
   println!("company is {}",tokens[2]);
}
The above example splits the string fullname, whenever it encounters a comma (,).
Output
token is Kannan
token is Sudhakaran
token is Tutorialspoint

firstName is Kannan
lastname is Sudhakaran
company is Tutorialspoint
Illustration: chars()
Individual characters in a string can be accessed using the chars method. Let us consider an example to understand this.
fn main(){
   let n1 = "Tutorials".to_string();

   for n in n1.chars(){
      println!("{}",n);
   }
}
Output
T
u
t
o
r
i
a
l
s
Concatenation of Strings with + operator
A string value can be appended to another string. This is called concatenation or interpolation. The result of string concatenation is a new string object. The + operator internally uses an add method. The syntax of the add function takes two parameters. The first parameter is self the string object itself and the second parameter is a reference of the second string object. This is shown below −
//add function
add(self,&str)->String {
   // returns a String object
}
Illustration: String Concatenation
fn main(){
   let n1 = "Tutorials".to_string();
   let n2 = "Point".to_string();

   let n3 = n1 + &n2; // n2 reference is passed
   println!("{}",n3);
}
The Output will be as given below
TutorialsPoint
Illustration: Type Casting
The following example illustrates converting a number to a string object −
fn main(){
   let number = 2020;
   let number_as_string = number.to_string();

   // convert number to string
   println!("{}",number_as_string);
   println!("{}",number_as_string=="2020");
}
The Output will be as given below
2020
true
Illustration: Format! Macro
Another way to add to String objects together is using a macro function called format. The use of Format! is as shown below.
fn main(){
   let n1 = "Tutorials".to_string();
   let n2 = "Point".to_string();
   let n3 = format!("{} {}",n1,n2);
   println!("{}",n3);
}
The Output will be as given below
Tutorials Point
Rust - Operators
An operator defines some function that will be performed on the data. The data on which operators work are called operands. Consider the following expression −
7 + 5 = 12
Here, the values 7, 5, and 12 are operands, while + and = are operators.
The major operators in Rust can be classified as −
- Arithmetic
- Bitwise
- Comparison
- Logical
- Bitwise
- Conditional
Arithmetic Operators
Assume the values in variables a and b are 10 and 5 respectively.
| Sr.No | Operator | Description | Example |
|---|---|---|---|
| 1 | +(Addition) | returns the sum of the operands | a+b is 15 |
| 2 | -(Subtraction) | returns the difference of the values | a-b is 5 |
| 3 | * (Multiplication) | returns the product of the values | a*b is 50 |
| 4 | / (Division) | performs division operation and returns the quotient | a / b is 2 |
| 5 | % (Modulus) | performs division operation and returns the remainder | a % b is 0 |
NOTE − The ++ and -- operators are not supported in Rust.
Relational Operators
Relational Operators test or define the kind of relationship between two entities. Relational operators are used to compare two or more values. Relational operators return a Boolean value − true or false.
Assume the value of A is 10 and B is 20.
| Sr.No | Operator | Description | Example |
|---|---|---|---|
| 1 | > | Greater than | (A > B) is False |
| 2 | < | Lesser than | (A < B) is True |
| 3 | >= | Greater than or equal to | (A >= B) is False |
| 4 | <= | Lesser than or equal to | (A <= B) is True |
| 5 | == | Equality | (A == B) is fals |
| 6 | != | Not equal | (A != B) is True |
Logical Operators
Logical Operators are used to combine two or more conditions. Logical operators too, return a Boolean value. Assume the value of variable A is 10 and B is 20.
| Sr.No | Operator | Description | Example |
|---|---|---|---|
| 1 | && (And) | The operator returns true only if all the expressions specified return true | (A > 10 && B > 10) is False |
| 2 | ||(OR) | The operator returns true if at least one of the expressions specified return true | (A > 10 || B >10) is True |
| 3 | ! (NOT) | The operator returns the inverse of the expressions result. For E.g.: !(>5) returns false | !(A >10 ) is True |
Bitwise Operators
Assume variable A = 2 and B = 3.
| Sr.No | Operator | Description | Example |
|---|---|---|---|
| 1 | & (Bitwise AND) | It performs a Boolean AND operation on each bit of its integer arguments. | (A & B) is 2 |
| 2 | | (BitWise OR) | It performs a Boolean OR operation on each bit of its integer arguments. | (A | B) is 3 |
| 3 | ^ (Bitwise XOR) | It performs a Boolean exclusive OR operation on each bit of its integer arguments. Exclusive OR means that either operand one is true or operand two is true, but not both. | (A ^ B) is 1 |
| 4 | ! (Bitwise Not) | It is a unary operator and operates by reversing all the bits in the operand. | (!B) is -4 |
| 5 | << (Left Shift) | It moves all the bits in its first operand to the left by the number of places specified in the second operand. New bits are filled with zeros. Shifting a value left by one position is equivalent to multiplying it by 2, shifting two positions is equivalent to multiplying by 4, and so on. | (A << 1) is 4 |
| 6 | >> (Right Shift) | Binary Right Shift Operator. The left operands value is moved right by the number of bits specified by the right operand. | (A >> 1) is 1 |
| 7 | >>> (Right shift with Zero) | This operator is just like the >> operator, except that the bits shifted to the left are always zero. | (A >>> 1) is 1 |
Rust - Decision Making
Decision-making structures require that the programmer specify one or more conditions to be evaluated or tested by the program, along with a statement or statements to be executed if the condition is determined to be true, and optionally, other statements to be executed if the condition is determined to be false.
Shown below is the general form of a typical decision-making structure found in most of the programming languages −
| Sr.No | Statement & Description |
|---|---|
| 1 | if statement An if statement consists of a Boolean expression followed by one or more statements. |
| 2 | if...else statement An if statement can be followed by an optional else statement, which executes when the Boolean expression is false. |
| 3 | else...if and nested ifstatement You can use one if or else if statement inside another if or else if statement(s). |
| 4 | match statement A match statement allows a variable to be tested against a list of values. |
If Statement
The ifelse construct evaluates a condition before a block of code is executed.
Syntax
if boolean_expression {
   // statement(s) will execute if the boolean expression is true
}
If the Boolean expression evaluates to true, then the block of code inside the if statement will be executed. If the Boolean expression evaluates to false, then the first set of code after the end of the if statement (after the closing curly brace) will be executed.
fn main(){
   let num:i32 = 5;
   if num > 0 {
      println!("number is positive") ;
   }
}
The above example will print number is positive as the condition specified by the if block is true.
if else statement
An if can be followed by an optional else block. The else block will execute if the Boolean expression tested by the if statement evaluates to false.
Syntax
if boolean_expression {
   // statement(s) will execute if the boolean expression is true
} else {
   // statement(s) will execute if the boolean expression is false
}
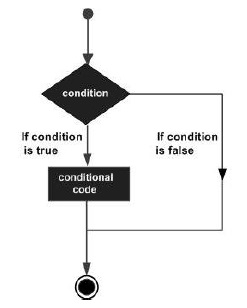
FlowChart
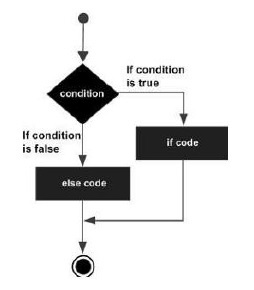
The if block guards the conditional expression. The block associated with the if statement is executed if the Boolean expression evaluates to true.
The if block may be followed by an optional else statement. The instruction block associated with the else block is executed if the expression evaluates to false.
Illustration - Simple ifelse
fn main() {
   let num = 12;
   if num % 2==0 {
      println!("Even");
   } else {
      println!("Odd");
   }
}
The above example prints whether the value in a variable is even or odd. The if block checks the divisibility of the value by 2 to determine the same. Here is the output of the above code −
Even
Nested If
The elseif ladder is useful to test multiple conditions. The syntax is as shown below −
Syntax
if boolean_expression1 {
   //statements if the expression1 evaluates to true
} else if boolean_expression2 {
   //statements if the expression2 evaluates to true
} else {
   //statements if both expression1 and expression2 result to false
}
When using ifelseif and else statements, there are a few points to keep in mind.
- An if can have zero or one else's and it must come after any else..if.
- An if can have zero to many else..if and they must come before the else.
- Once an else..if succeeds, none of the remaining else..if or else will be tested.
Example: elseif ladder
fn main() {
   let num = 2 ;
   if num > 0 {
      println!("{} is positive",num);
   } else if num < 0 {
      println!("{} is negative",num);
   } else {
      println!("{} is neither positive nor negative",num) ;
   }
}
The snippet displays whether the value is positive, negative or zero.
Output
2 is positive
Match Statement
The match statement checks if a current value is matching from a list of values, this is very much similar to the switch statement in C language. In the first place, notice that the expression following the match keyword does not have to be enclosed in parentheses.
The syntax is as shown below.
let expressionResult = match variable_expression {
   constant_expr1 => {
      //statements;
   },
   constant_expr2 => {
      //statements;
   },
   _ => {
      //default
   }
};
In the example given below, state_code is matched with a list of values MH, KL, KA, GA − if any match is found, a string value is returned to variable state. If no match is found, the default case _ matches and value Unkown is returned.
fn main(){
   let state_code = "MH";
   let state = match state_code {
      "MH" => {println!("Found match for MH"); "Maharashtra"},
      "KL" => "Kerala",
      "KA" => "Karnadaka",
      "GA" => "Goa",
      _ => "Unknown"
   };
   println!("State name is {}",state);
}
Output
Found match for MH
State name is Maharashtra
Rust - Loop
There may be instances, where a block of code needs to be executed repeatedly. In general, programming instructions are executed sequentially: The first statement in a function is executed first, followed by the second, and so on.
Programming languages provide various control structures that allow for more complicated execution paths.
A loop statement allows us to execute a statement or group of statements multiple times. Given below is the general form of a loop statement in most of the programming languages.
Rust provides different types of loops to handle looping requirements −
- while
- loop
- for
Definite Loop
A loop the number of iterations of which is definite/fixed is termed as a definite loop. The for loop is an implementation of a definite loop.
For Loop
The for loop executes the code block for a specified number of times. It can be used to iterate over a fixed set of values, such as an array. The syntax of the for loop is as given below
Syntax
for temp_variable in lower_bound..upper_bound {
   //statements
}
An example of a for loop is as shown below
fn main(){
   for x in 1..11{ // 11 is not inclusive
      if x==5 {
         continue;
      }
      println!("x is {}",x);
   }
}
NOTE: that the variable x is only accessible within the for block.
Output
x is 1
x is 2
x is 3
x is 4
x is 6
x is 7
x is 8
x is 9
x is 10
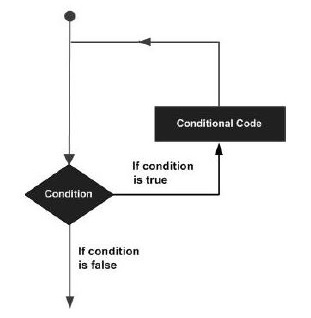
Indefinite Loop
An indefinite loop is used when the number of iterations in a loop is indeterminate or unknown.
Indefinite loops can be implemented using −
| Sr.No | Name & Description |
|---|---|
| 1 | While The while loop executes the instructions each time the condition specified evaluates to true |
| 2 | Loop The loop is a while(true) indefinite loop |
Illustration − for while
fn main(){
   let mut x = 0;
   while x < 10{
      x+=1;
      println!("inside loop x value is {}",x);
   }
   println!("outside loop x value is {}",x);
}
The output is as shown below −
inside loop x value is 1
inside loop x value is 2
inside loop x value is 3
inside loop x value is 4
inside loop x value is 5
inside loop x value is 6
inside loop x value is 7
inside loop x value is 8
inside loop x value is 9
inside loop x value is 10
outside loop x value is 10
Illustration −loop
fn main(){
   //while true

   let mut x = 0;
   loop {
      x+=1;
      println!("x={}",x);

      if x==15 {
         break;
      }
   }
}
The break statement is used to take the control out of a construct. Using break in a loop causes the program to exit the loop.
Output
x=1
x=2
x=3
x=4
x=5
x=6
x=7
x=8
x=9
x=10
x=11
x=12
x=13
x=14
x=15
Continue Statement
The continue statement skips the subsequent statements in the current iteration and takes the control back to the beginning of the loop. Unlike the break statement, the continue does not exit the loop. It terminates the current iteration and starts the subsequent iteration.
An example of the continue statement is given below.
fn main() {

   let mut count = 0;

   for num in 0..21 {
      if num % 2==0 {
         continue;
      }
      count+=1;
   }
   println! (" The count of odd values between 0 and 20 is: {} ",count);
   //outputs 10
}
The above example displays the number of even values between 0 and 20. The loop exits the current iteration if the number is even. This is achieved using the continue statement.
The count of odd values between 0 and 20 is 10
Rust - Functions
Functions are the building blocks of readable, maintainable, and reusable code. A function is a set of statements to perform a specific task. Functions organize the program into logical blocks of code. Once defined, functions may be called to access code. This makes the code reusable. Moreover, functions make it easy to read and maintain the programs code.
A function declaration tells the compiler about a function's name, return type, and parameters. A function definition provides the actual body of the function.
| Sr.No | Function & Description |
|---|---|
| 1 |
Defining a function A function definition specifies what and how a specific task would be done. |
| 2 |
Calling or invoking a Function A function must be called so as to execute it. |
| 3 |
Returning Functions Functions may also return value along with control, back to the caller. |
| 4 |
Parameterized Function Parameters are a mechanism to pass values to functions. |
Defining a Function
A function definition specifies what and how a specific task would be done. Before using a function, it must be defined. The function body contains code that should be executed by the function. The rules for naming a function are similar to that of a variable. Functions are defined using the fn keyword. The syntax for defining a standard function is given below
Syntax
fn function_name(param1,param2..paramN) {
   // function body
}
A function declaration can optionally contain parameters/arguments. Parameters are used to pass values to functions.
Example - Simple function definition
//Defining a function
fn fn_hello(){
   println!("hello from function fn_hello ");
}
Invoking a Function
A function must be called so as to execute it. This process is termed as function invocation. Values for parameters should be passed when a function is invoked. The function that invokes another function is called the caller function.
Syntax
function_name(val1,val2,valN)
Example: Invoking a Function
fn main(){
   //calling a function
   fn_hello();
}
Here, the main() is the caller function.
Illustration
The following example defines a function fn_hello(). The function prints a message to the console. The main() function invokes the fn_hello() function.
fn main(){
   //calling a function
   fn_hello();
}
//Defining a function
fn fn_hello(){
   println!("hello from function fn_hello ");
}
Output
hello from function fn_hello
Returning Value from a Function
Functions may also return a value along with control, back to the caller. Such functions are called returning functions.
Syntax
Either of the following syntax can be used to define a function with return type.
With return statement
// Syntax1
function function_name() -> return_type {
   //statements
   return value;
}
Shorthand syntax without return statement
//Syntax2
function function_name() -> return_type {
   value //no semicolon means this value is returned
}
lllustration
fn main(){
   println!("pi value is {}",get_pi());
}
fn get_pi()->f64 {
   22.0/7.0
}
Output
pi value is 3.142857142857143
Function with Parameters
Parameters are a mechanism to pass values to functions. Parameters form a part of the functions signature. The parameter values are passed to the function during its invocation. Unless explicitly specified, the number of values passed to a function must match the number of parameters defined.
Parameters can be passed to a function using one of the following techniques −
Pass by Value
When a method is invoked, a new storage location is created for each value parameter. The values of the actual parameters are copied into them. Hence, the changes made to the parameter inside the invoked method have no effect on the argument.
The following example declares a variable no, which is initially 5. The variable is passed as parameter (by value) to the mutate_no_to_zero()functionnction, which changes the value to zero. After the function call when control returns back to main method the value will be the same.
fn main(){
   let no:i32 = 5;
   mutate_no_to_zero(no);
   println!("The value of no is:{}",no);
}

fn mutate_no_to_zero(mut param_no: i32) {
   param_no = param_no*0;
   println!("param_no value is :{}",param_no);
}
Output
param_no value is :0
The value of no is:5
Pass by Reference
When you pass parameters by reference, unlike value parameters, a new storage location is not created for these parameters. The reference parameters represent the same memory location as the actual parameters that are supplied to the method. Parameter values can be passed by reference by prefixing the variable name with an & .
In the example given below, we have a variable no, which is initially 5. A reference to the variable no is passed to the mutate_no_to_zero() function. The function operates on the original variable. After the function call, when control returns back to main method, the value of the original variable will be the zero.
fn main() {
   let mut no:i32 = 5;
   mutate_no_to_zero(&mut no);
   println!("The value of no is:{}",no);
}
fn mutate_no_to_zero(param_no:&mut i32){
   *param_no = 0; //de reference
}
The * operator is used to access value stored in the memory location that the variable param_no points to. This is also known as dereferencing.
The output will be −
The value of no is 0.
Passing string to a function
The main() function passes a string object to the display() function.
fn main(){
   let name:String = String::from("TutorialsPoint");
   display(name);
   //cannot access name after display
}
fn display(param_name:String){
   println!("param_name value is :{}",param_name);
}
Output
param_name value is :TutorialsPoint
Rust - Tuple
Tuple is a compound data type. A scalar type can store only one type of data. For example, an i32 variable can store only a single integer value. In compound types, we can store more than one value at a time and it can be of different types.
Tuples have a fixed length - once declared they cannot grow or shrink in size. The tuple index starts from 0.
Syntax
//Syntax1
let tuple_name:(data_type1,data_type2,data_type3) = (value1,value2,value3);

//Syntax2
let tuple_name = (value1,value2,value3);
Illustration
The following example displays the values in a tuple.
fn main() {
   let tuple:(i32,f64,u8) = (-325,4.9,22);
   println!("{:?}",tuple);
}
The println!("{ }",tuple) syntax cannot be used to display values in a tuple. This is because a tuple is a compound type. Use the println!("{:?}", tuple_name) syntax to print values in a tuple.
Output
(-325, 4.9, 22)
Illustration
The following example prints individual values in a tuple.
fn main() {
   let tuple:(i32,f64,u8) = (-325,4.9,22);
   println!("integer is :{:?}",tuple.0);
   println!("float is :{:?}",tuple.1);
   println!("unsigned integer is :{:?}",tuple.2);
}
Output
integer is :-325
float is :4.9
unsigned integer is :2
Illustration
The following example passes a tuple as parameter to a function. Tuples are passed by value to functions.
fn main(){
   let b:(i32,bool,f64) = (110,true,10.9);
   print(b);
}
//pass the tuple as a parameter

fn print(x:(i32,bool,f64)){
   println!("Inside print method");
   println!("{:?}",x);
}
Output
Inside print method
(110, true, 10.9)
Destructing
Destructing assignment is a feature of rust wherein we unpack the values of a tuple. This is achieved by assigning a tuple to distinct variables.
Consider the following example −
fn main(){
   let b:(i32,bool,f64) = (30,true,7.9);
   print(b);
}
fn print(x:(i32,bool,f64)){
   println!("Inside print method");
   let (age,is_male,cgpa) = x; //assigns a tuple to
   distinct variables
   println!("Age is {} , isMale? {},cgpa is
   {}",age,is_male,cgpa);
}
Variable x is a tuple which is assigned to the let statement. Each variable - age, is_male and cgpa will contain the corresponding values in a tuple.
Output
Inside print method
Age is 30 , isMale? true,cgpa is 7.9
Rust - Array
In this chapter, we will learn about an array and the various features associated with it. Before we learn about arrays, let us see how an array is different from a variable.
Variables have the following limitations −
Variables are scalar in nature. In other words, a variable declaration can only contain a single value at a time. This means that to store n values in a program n variable declaration will be needed. Hence, the use of variables is not feasible when one needs to store a larger collection of values.
Variables in a program are allocated memory in random order, thereby making it difficult to retrieve/read the values in the order of their declaration.
An array is a homogeneous collection of values. Simply put, an array is a collection of values of the same data type.
Features of an Array
The features of an array are as listed below −
An array declaration allocates sequential memory blocks.
Arrays are static. This means that an array once initialized cannot be resized.
Each memory block represents an array element.
Array elements are identified by a unique integer called the subscript/ index of the element.
Populating the array elements is known as array initialization.
Array element values can be updated or modified but cannot be deleted.
Declaring and Initializing Arrays
Use the syntax given below to declare and initialize an array in Rust.
Syntax
//Syntax1
let variable_name = [value1,value2,value3];

//Syntax2
let variable_name:[dataType;size] = [value1,value2,value3];

//Syntax3
let variable_name:[dataType;size] = [default_value_for_elements,size];
In the first syntax, type of the array is inferred from the data type of the arrays first element during initialization.
Illustration: Simple Array
The following example explicitly specifies the size and the data type of the array. The {:?} syntax of the println!() function is used to print all values in the array. The len() function is used to compute the size of the array.
fn main(){
   let arr:[i32;4] = [10,20,30,40];
   println!("array is {:?}",arr);
   println!("array size is :{}",arr.len());
}
Output
array is [10, 20, 30, 40]
array size is :4
Illustration: Array without data type
The following program declares an array of 4 elements. The datatype is not explicitly specified during the variable declaration. In this case, the array will be of type integer. The len() function is used to compute the size of the array.
fn main(){
   let arr = [10,20,30,40];
   println!("array is {:?}",arr);
   println!("array size is :{}",arr.len());
}
Output
array is [10, 20, 30, 40]
array size is :4
Illustration: Default values
The following example creates an array and initializes all its elements with a default value of -1.
fn main() {
   let arr:[i32;4] = [-1;4];
   println!("array is {:?}",arr);
   println!("array size is :{}",arr.len());
}
Output
array is [-1, -1, -1, -1]
array size is :4
Illustration: Array with for loop
The following example iterates through an array and prints the indexes and their corresponding values. The loop retrieves values from index 0 to 4 (index of the last array element).
fn main(){
   let arr:[i32;4] = [10,20,30,40];
   println!("array is {:?}",arr);
   println!("array size is :{}",arr.len());

   for index in 0..4 {
      println!("index is: {} & value is : {}",index,arr[index]);
   }
}
Output
array is [10, 20, 30, 40]
array size is :4
index is: 0 & value is : 10
index is: 1 & value is : 20
index is: 2 & value is : 30
index is: 3 & value is : 40
Illustration: Using the iter() function
The iter() function fetches values of all elements in an array.
fn main(){

let arr:[i32;4] = [10,20,30,40];
   println!("array is {:?}",arr);
   println!("array size is :{}",arr.len());

   for val in arr.iter(){
      println!("value is :{}",val);
   }
}
Output
array is [10, 20, 30, 40]
array size is :4
value is :10
value is :20
value is :30
value is :40
Illustration: Mutable array
The mut keyword can be used to declare a mutable array. The following example declares a mutable array and modifies value of the second array element.
fn main(){
   let mut arr:[i32;4] = [10,20,30,40];
   arr[1] = 0;
   println!("{:?}",arr);
}
Output
[10, 0, 30, 40]
Passing Arrays as Parameters to Functions
An array can be passed by value or by reference to functions.
Illustration: Pass by value
fn main() {
   let arr = [10,20,30];
   update(arr);

   print!("Inside main {:?}",arr);
}
fn update(mut arr:[i32;3]){
   for i in 0..3 {
      arr[i] = 0;
   }
   println!("Inside update {:?}",arr);
}
Output
Inside update [0, 0, 0]
Inside main [10, 20, 30]
Illustration: Pass by reference
fn main() {
   let mut arr = [10,20,30];
   update(&mut arr);
   print!("Inside main {:?}",arr);
}
fn update(arr:&mut [i32;3]){
   for i in 0..3 {
      arr[i] = 0;
   }
   println!("Inside update {:?}",arr);
}
Output
Inside update [0, 0, 0]
Inside main [0, 0, 0]
Array Declaration and Constants
Let us consider an example given below to understand array declaration and constants.
fn main() {
   let N: usize = 20;
   let arr = [0; N]; //Error: non-constant used with constant
   print!("{}",arr[10])
}
The compiler will result in an exception. This is because an array's length must be known at compile time. Here, the value of the variable "N" will be determined at runtime. In other words, variables cannot be used to define the size of an array.
However, the following program is valid −
fn main() {
   const N: usize = 20;
   // pointer sized
   let arr = [0; N];

   print!("{}",arr[10])
}
The value of an identifier prefixed with the const keyword is defined at compile time and cannot be changed at runtime. usize is pointer-sized, thus its actual size depends on the architecture you are compiling your program for.
Rust - Ownership
The memory for a program can be allocated in the following −
- Stack
- Heap
Stack
A stack follows a last in first out order. Stack stores data values for which the size is known at compile time. For example, a variable of fixed size i32 is a candidate for stack allocation. Its size is known at compile time. All scalar types can be stored in stack as the size is fixed.
Consider an example of a string, which is assigned a value at runtime. The exact size of such a string cannot be determined at compile time. So it is not a candidate for stack allocation but for heap allocation.
Heap
The heap memory stores data values the size of which is unknown at compile time. It is used to store dynamic data. Simply put, a heap memory is allocated to data values that may change throughout the life cycle of the program. The heap is an area in the memory which is less organized when compared to stack.
What is Ownership?
Each value in Rust has a variable that is called owner of the value. Every data stored in Rust will have an owner associated with it. For example, in the syntax − let age = 30, age is the owner of the value 30.
Each data can have only one owner at a time.
Two variables cannot point to the same memory location. The variables will always be pointing to different memory locations.
Transferring Ownership
The ownership of value can be transferred by −
Assigning value of one variable to another variable.
Passing value to a function.
Returning value from a function.
Assigning value of one variable to another variable
The key selling point of Rust as a language is its memory safety. Memory safety is achieved by tight control on who can use what and when restrictions.
Consider the following snippet −
fn main(){
   let v = vec![1,2,3];
   // vector v owns the object in heap

   //only a single variable owns the heap memory at any given time
   let v2 = v;
   // here two variables owns heap value,
   //two pointers to the same content is not allowed in rust

   //Rust is very smart in terms of memory access ,so it detects a race condition
   //as two variables point to same heap

   println!("{:?}",v);
}
The above example declares a vector v. The idea of ownership is that only one variable binds to a resource, either v binds to resource or v2 binds to the resource. The above example throws an error − use of moved value: `v`. This is because the ownership of the resource is transferred to v2. It means the ownership is moved from v to v2 (v2=v) and v is invalidated after the move.
Passing value to a function
The ownership of a value also changes when we pass an object in the heap to a closure or function.
fn main(){
   let v = vec![1,2,3];     // vector v owns the object in heap
   let v2 = v;              // moves ownership to v2
   display(v2);             // v2 is moved to display and v2 is invalidated
   println!("In main {:?}",v2);    //v2 is No longer usable here
}
fn display(v:Vec<i32>){
   println!("inside display {:?}",v);
}
Returning value from a function
Ownership passed to the function will be invalidated as function execution completes. One work around for this is let the function return the owned object back to the caller.
fn main(){
   let v = vec![1,2,3];       // vector v owns the object in heap
   let v2 = v;                // moves ownership to v2
   let v2_return = display(v2);
   println!("In main {:?}",v2_return);
}
fn display(v:Vec<i32>)->Vec<i32> {
   // returning same vector
   println!("inside display {:?}",v);
}
Ownership and Primitive Types
In case of primitive types, contents from one variable is copied to another. So, there is no ownership move happening. This is because a primitive variable needs less resources than an object. Consider the following example −
fn main(){
   let u1 = 10;
   let u2 = u1;  // u1 value copied(not moved) to u2

   println!("u1 = {}",u1);
}
The output will be 10.
Rust - Borrowing
It is very inconvenient to pass the ownership of a variable to another function and then return the ownership. Rust supports a concept, borrowing, where the ownership of a value is transferred temporarily to an entity and then returned to the original owner entity.
Consider the following −
fn main(){
   // a list of nos
   let v = vec![10,20,30];
   print_vector(v);
   println!("{}",v[0]); // this line gives error
}
fn print_vector(x:Vec<i32>){
   println!("Inside print_vector function {:?}",x);
}
The main function invokes a function print_vector(). A vector is passed as parameter to this function. The ownership of the vector is also passed to the print_vector() function from the main(). The above code will result in an error as shown below when the main() function tries to access the vector v.
|  print_vector(v);
|     - value moved here
|  println!("{}",v[0]);
|     ^ value used here after move
This is because a variable or value can no longer be used by the function that originally owned it once the ownership is transferred to another function.
What is Borrowing?
When a function transfers its control over a variable/value to another function temporarily, for a while, it is called borrowing. This is achieved by passing a reference to the variable (& var_name) rather than passing the variable/value itself to the function. The ownership of the variable/ value is transferred to the original owner of the variable after the function to which the control was passed completes execution.
fn main(){
   // a list of nos
   let v = vec![10,20,30];
   print_vector(&v); // passing reference
   println!("Printing the value from main() v[0]={}",v[0]);
}
fn print_vector(x:&Vec<i32>){
   println!("Inside print_vector function {:?}",x);
}
Output
Inside print_vector function [10, 20, 30]
Printing the value from main() v[0] = 10
Mutable References
A function can modify a borrowed resource by using a mutable reference to such resource. A mutable reference is prefixed with &mut. Mutable references can operate only on mutable variables.
Illustration: Mutating an integer reference
fn add_one(e: &mut i32) {
   *e+= 1;
}
fn main() {
   let mut i = 3;
   add_one(&mut i);
   println!("{}", i);
}
The main() function declares a mutable integer variable i and passes a mutable reference of i to the add_one(). The add_one() increments the value of the variable i by one.
Illustration: Mutating a string reference
fn main() {
   let mut name:String = String::from("TutorialsPoint");
   display(&mut name);
   //pass a mutable reference of name
   println!("The value of name after modification is:{}",name);
}
fn display(param_name:&mut String){
   println!("param_name value is :{}",param_name);
   param_name.push_str(" Rocks");
   //Modify the actual string,name
}
The main() function passes a mutable reference of the variable name to the display() function. The display function appends an additional string to the original name variable.
Output
param_name value is :TutorialsPoint
The value of name after modification is:TutorialsPoint Rocks
Rust - Slices
A slice is a pointer to a block of memory. Slices can be used to access portions of data stored in contiguous memory blocks. It can be used with data structures like arrays, vectors and strings. Slices use index numbers to access portions of data. The size of a slice is determined at runtime.
Slices are pointers to the actual data. They are passed by reference to functions, which is also known as borrowing.
For example, slices can be used to fetch a portion of a string value. A sliced string is a pointer to the actual string object. Therefore, we need to specify the starting and ending index of a String. Index starts from 0 just like arrays.
Syntax
let sliced_value = &data_structure[start_index..end_index]
The minimum index value is 0 and the maximum index value is the size of the data structure. NOTE that the end_index will not be included in final string.
The diagram below shows a sample string Tutorials, that has 9 characters. The index of the first character is 0 and that of the last character is 8.
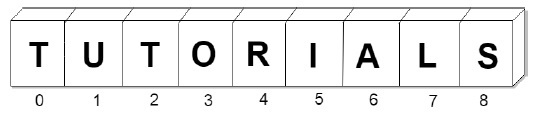
The following code fetches 5 characters from the string (starting from index 4).
fn main() {
   let n1 = "Tutorials".to_string();
   println!("length of string is {}",n1.len());
   let c1 = &n1[4..9];

   // fetches characters at 4,5,6,7, and 8 indexes
   println!("{}",c1);
}
Output
length of string is 9
rials
Illustration - Slicing an integer array
The main() function declares an array with 5 elements. It invokes the use_slice() function and passes to it a slice of three elements (points to the data array). The slices are passed by reference. The use_slice() function prints the value of the slice and its length.
fn main(){
   let data = [10,20,30,40,50];
   use_slice(&data[1..4]);
   //this is effectively borrowing elements for a while
}
fn use_slice(slice:&[i32]) {
   // is taking a slice or borrowing a part of an array of i32s
   println!("length of slice is {:?}",slice.len());
   println!("{:?}",slice);
}
Output
length of slice is 3
[20, 30, 40]
Mutable Slices
The &mut keyword can be used to mark a slice as mutable.
fn main(){
   let mut data = [10,20,30,40,50];
   use_slice(&mut data[1..4]);
   // passes references of
   20, 30 and 40
   println!("{:?}",data);
}
fn use_slice(slice:&mut [i32]) {
   println!("length of slice is {:?}",slice.len());
   println!("{:?}",slice);
   slice[0] = 1010; // replaces 20 with 1010
}
Output
length of slice is 3
[20, 30, 40]
[10, 1010, 30, 40, 50]
The above code passes a mutable slice to the use_slice() function. The function modifies the second element of the original array.
Rust - Structure
Arrays are used to represent a homogeneous collection of values. Similarly, a structure is another user defined data type available in Rust that allows us to combine data items of different types, including another structure. A structure defines data as a key-value pair.
Syntax - Declaring a structure
The struct keyword is used to declare a structure. Since structures are statically typed, every field in the structure must be associated with a data type. The naming rules and conventions for a structure is like that of a variable. The structure block must end with a semicolon.
struct Name_of_structure {
   field1:data_type,
   field2:data_type,
   field3:data_type
}
Syntax - Initializing a structure
After declaring a struct, each field should be assigned a value. This is known as initialization.
let instance_name = Name_of_structure {
   field1:value1,
   field2:value2,
   field3:value3
};
//NOTE the semicolon
Syntax: Accessing values in a structure
Use the dot notation to access value of a specific field.
instance_name.field1
Illustration
struct Employee {
   name:String,
   company:String,
   age:u32
}
fn main() {
   let emp1 = Employee {
      company:String::from("TutorialsPoint"),
      name:String::from("Mohtashim"),
      age:50
   };
   println!("Name is :{} company is {} age is {}",emp1.name,emp1.company,emp1.age);
}
The above example declares a struct Employee with three fields name, company and age of types. The main() initializes the structure. It uses the println! macro to print values of the fields defined in the structure.
Output
Name is :Mohtashim company is TutorialsPoint age is 50
Modifying a struct instance
To modify an instance, the instance variable should be marked mutable. The below example declares and initializes a structure named Employee and later modifies value of the age field to 40 from 50.
let mut emp1 = Employee {
   company:String::from("TutorialsPoint"),
   name:String::from("Mohtashim"),
   age:50
};
emp1.age = 40;
println!("Name is :{} company is {} age is
{}",emp1.name,emp1.company,emp1.age);
Output
Name is :Mohtashim company is TutorialsPoint age is 40
Passing a struct to a function
The following example shows how to pass instance of struct as a parameter. The display method takes an Employee instance as parameter and prints the details.
fn display( emp:Employee) {
   println!("Name is :{} company is {} age is
   {}",emp.name,emp.company,emp.age);
}
Here is the complete program −
//declare a structure
struct Employee {
   name:String,
   company:String,
   age:u32
}
fn main() {
   //initialize a structure
   let emp1 = Employee {
      company:String::from("TutorialsPoint"),
      name:String::from("Mohtashim"),
      age:50
   };
   let emp2 = Employee{
      company:String::from("TutorialsPoint"),
      name:String::from("Kannan"),
      age:32
   };
   //pass emp1 and emp2 to display()
   display(emp1);
   display(emp2);
}
// fetch values of specific structure fields using the
// operator and print it to the console
fn display( emp:Employee){
   println!("Name is :{} company is {} age is
   {}",emp.name,emp.company,emp.age);
}
Output
Name is :Mohtashim company is TutorialsPoint age is 50
Name is :Kannan company is TutorialsPoint age is 32
Returning struct from a function
Let us consider a function who_is_elder(), which compares two employees age and returns the elder one.
fn who_is_elder (emp1:Employee,emp2:Employee)->Employee {
   if emp1.age>emp2.age {
      return emp1;
   } else {
      return emp2;
   }
}
Here is the complete program −
fn main() {
   //initialize structure
   let emp1 = Employee{
      company:String::from("TutorialsPoint"),
      name:String::from("Mohtashim"),
      age:50
   };
   let emp2 = Employee {
      company:String::from("TutorialsPoint"),
      name:String::from("Kannan"),
      age:32
   };
   let elder = who_is_elder(emp1,emp2);
   println!("elder is:");

   //prints details of the elder employee
   display(elder);
}
//accepts instances of employee structure and compares their age
fn who_is_elder (emp1:Employee,emp2:Employee)->Employee {
   if emp1.age>emp2.age {
      return emp1;
   } else {
      return emp2;
   }
}
//display name, comapny and age of the employee
fn display( emp:Employee) {
   println!("Name is :{} company is {} age is {}",emp.name,emp.company,emp.age);
}
//declare a structure
struct Employee {
   name:String,
   company:String,
   age:u32
}
Output
elder is:
Name is :Mohtashim company is TutorialsPoint age is 50
Method in Structure
Methods are like functions. They are a logical group of programming instructions. Methods are declared with the fn keyword. The scope of a method is within the structure block.
Methods are declared outside the structure block. The impl keyword is used to define a method within the context of a structure. The first parameter of a method will be always self, which represents the calling instance of the structure. Methods operate on the data members of a structure.
To invoke a method, we need to first instantiate the structure. The method can be called using the structure's instance.
Syntax
struct My_struct {}
impl My_struct {
   //set the method's context
   fn method_name() {
      //define a method
   }
}
Illustration
The following example defines a structure Rectangle with fields − width and height. A method area is defined within the structure's context. The area method accesses the structure's fields via the self keyword and calculates the area of a rectangle.
//define dimensions of a rectangle
struct Rectangle {
   width:u32, height:u32
}

//logic to calculate area of a rectangle
impl Rectangle {
   fn area(&self)->u32 {
      //use the . operator to fetch the value of a field via the self keyword
      self.width * self.height
   }
}

fn main() {
   // instanatiate the structure
   let small = Rectangle {
      width:10,
      height:20
   };
   //print the rectangle's area
   println!("width is {} height is {} area of Rectangle
   is {}",small.width,small.height,small.area());
}
Output
width is 10 height is 20 area of Rectangle is 200
Static Method in Structure
Static methods can be used as utility methods. These methods exist even before the structure is instantiated. Static methods are invoked using the structure's name and can be accessed without an instance. Unlike normal methods, a static method will not take the &self parameter.
Syntax - Declaring a static method
A static method like functions and other methods can optionally contain parameters.
impl Structure_Name {
   //static method that creates objects of the Point structure
   fn method_name(param1: datatype, param2: datatype) -> return_type {
      // logic goes here
   }
}
Syntax - Invoking a static method
The structure_name :: syntax is used to access a static method.
structure_name::method_name(v1,v2)
Illustration
The following example uses the getInstance method as a factory class that creates and returns instances of the structure Point.
//declare a structure
struct Point {
   x: i32,
   y: i32,
}
impl Point {
   //static method that creates objects of the Point structure
   fn getInstance(x: i32, y: i32) -> Point {
      Point { x: x, y: y }
   }
   //display values of the structure's field
   fn display(&self){
      println!("x ={} y={}",self.x,self.y );
   }
}
fn main(){
   // Invoke the static method
   let p1 = Point::getInstance(10,20);
   p1.display();
}
Output
x =10 y=20
Rust - Enums
In Rust programming, when we have to select a value from a list of possible variants we use enumeration data types. An enumerated type is declared using the enum keyword. Following is the syntax of enum −
enum enum_name {
   variant1,
   variant2,
   variant3
}
Illustration: Using an Enumeration
The example declares an enum − GenderCategory, which has variants as Male and Female. The print! macro displays value of the enum. The compiler will throw an error the trait std::fmt::Debug is not implemented for GenderCategory. The attribute #[derive(Debug)] is used to suppress this error.
// The `derive` attribute automatically creates the implementation
// required to make this `enum` printable with `fmt::Debug`.
#[derive(Debug)]
enum GenderCategory {
   Male,Female
}
fn main() {
   let male = GenderCategory::Male;
   let female = GenderCategory::Female;

   println!("{:?}",male);
   println!("{:?}",female);
}
Output
Male
Female
Struct and Enum
The following example defines a structure Person. The field gender is of the type GenderCategory (which is an enum) and can be assigned either Male or Female as value.
// The `derive` attribute automatically creates the
implementation
// required to make this `enum` printable with
`fmt::Debug`.

#[derive(Debug)]
enum GenderCategory {
   Male,Female
}

// The `derive` attribute automatically creates the implementation
// required to make this `struct` printable with `fmt::Debug`.
#[derive(Debug)]
struct Person {
   name:String,
   gender:GenderCategory
}

fn main() {
   let p1 = Person {
      name:String::from("Mohtashim"),
      gender:GenderCategory::Male
   };
   let p2 = Person {
      name:String::from("Amy"),
      gender:GenderCategory::Female
   };
   println!("{:?}",p1);
   println!("{:?}",p2);
}
The example creates objects p1 and p2 of type Person and initializes the attributes, name and gender for each of these objects.
Output
Person { name: "Mohtashim", gender: Male }
Person { name: "Amy", gender: Female }
Option Enum
Option is a predefined enum in the Rust standard library. This enum has two values − Some(data) and None.
Syntax
enum Option<T> {
   Some(T),      //used to return a value
   None          // used to return null, as Rust doesn't support
   the null keyword
}
Here, the type T represents value of any type.
Rust does not support the null keyword. The value None, in the enumOption, can be used by a function to return a null value. If there is data to return, the function can return Some(data).
Let us understand this with an example −
The program defines a function is_even(), with a return type Option. The function verifies if the value passed is an even number. If the input is even, then a value true is returned, else the function returns None.
fn main() {
   let result = is_even(3);
   println!("{:?}",result);
   println!("{:?}",is_even(30));
}
fn is_even(no:i32)->Option<bool> {
   if no%2 == 0 {
      Some(true)
   } else {
      None
   }
}
Output
None
Some(true)
Match Statement and Enum
The match statement can be used to compare values stored in an enum. The following example defines a function, print_size, which takes CarType enum as parameter. The function compares the parameter values with a pre-defined set of constants and displays the appropriate message.
enum CarType {
   Hatch,
   Sedan,
   SUV
}
fn print_size(car:CarType) {
   match car {
      CarType::Hatch => {
         println!("Small sized car");
      },
      CarType::Sedan => {
         println!("medium sized car");
      },
      CarType::SUV =>{
         println!("Large sized Sports Utility car");
      }
   }
}
fn main(){
   print_size(CarType::SUV);
   print_size(CarType::Hatch);
   print_size(CarType::Sedan);
}
Output
Large sized Sports Utility car
Small sized car
medium sized car
Match with Option
The example of is_even function, which returns Option type, can also be implemented with match statement as shown below −
fn main() {
   match is_even(5) {
      Some(data) => {
         if data==true {
            println!("Even no");
         }
      },
      None => {
         println!("not even");
      }
   }
}
fn is_even(no:i32)->Option<bool> {
   if no%2 == 0 {
      Some(true)
   } else {
      None
   }
}
Output
not even
Match & Enum with Data Type
It is possible to add data type to each variant of an enum. In the following example, Name and Usr_ID variants of the enum are of String and integer types respectively. The following example shows the use of match statement with an enum having a data type.
// The `derive` attribute automatically creates the implementation
// required to make this `enum` printable with `fmt::Debug`.
#[derive(Debug)]
enum GenderCategory {
   Name(String),Usr_ID(i32)
}
fn main() {
   let p1 = GenderCategory::Name(String::from("Mohtashim"));
   let p2 = GenderCategory::Usr_ID(100);
   println!("{:?}",p1);
   println!("{:?}",p2);

   match p1 {
      GenderCategory::Name(val)=> {
         println!("{}",val);
      }
      GenderCategory::Usr_ID(val)=> {
         println!("{}",val);
      }
   }
}
Output
Name("Mohtashim")
Usr_ID(100)
Mohtashim
Rust - Modules
A logical group of code is called a Module. Multiple modules are compiled into a unit called crate. Rust programs may contain a binary crate or a library crate. A binary crate is an executable project that has a main() method. A library crate is a group of components that can be reused in other projects. Unlike a binary crate, a library crate does not have an entry point (main() method). The Cargo tool is used to manage crates in Rust. For example, the network module contains networking related functions and the graphics module contains drawing-related functions. Modules are similar to namespaces in other programming languages. Third-party crates can be downloaded using cargo from crates.io.
| Sr.No | Term & Description |
|---|---|
| 1 | crate Is a compilation unit in Rust; Crate is compiled to binary or library. |
| 2 | cargo The official Rust package management tool for crates. |
| 3 | module Logically groups code within a crate. |
| 4 |
The official Rust package registry. |
Syntax
//public module
pub mod a_public_module {
   pub fn a_public_function() {
      //public function
   }
   fn a_private_function() {
      //private function
   }
}
//private module
mod a_private_module {
   fn a_private_function() {
   }
}
Modules can be public or private. Components in a private module cannot be accessed by other modules. Modules in Rust are private by default. On the contrary, functions in a public module can be accessed by other modules. Modules should be prefixed with pub keyword to make it public. Functions within a public module must also be made public.
Illustration: Defining a Module
The example defines a public module − movies. The module contains a function play() that accepts a parameter and prints its value.
pub mod movies {
   pub fn play(name:String) {
      println!("Playing movie {}",name);
   }
}
fn main(){
   movies::play("Herold and Kumar".to_string());
}
Output
Playing movie Herold and Kumar
Use Keyword
The use keyword helps to import a public module.
Syntax
use public_module_name::function_name;
Illustration
pub mod movies {
   pub fn play(name:String) {
      println!("Playing movie {}",name);
   }
}
use movies::play;
fn main(){
   play("Herold and Kumar ".to_string());
}
Output
Playing movie Herold and Kumar
Nested Modules
Modules can also be nested. The comedy module is nested within the english module, which is further nested in the movies module. The example given below defines a function play inside the movies/english/comedy module.
pub mod movies {
   pub mod english {
      pub mod comedy {
         pub fn play(name:String) {
            println!("Playing comedy movie {}",name);
         }
      }
   }
}
use movies::english::comedy::play;
// importing a public module

fn main() {
   // short path syntax
   play("Herold and Kumar".to_string());
   play("The Hangover".to_string());

   //full path syntax
   movies::english::comedy::play("Airplane!".to_string());
}
Output
Playing comedy movie Herold and Kumar
Playing comedy movie The Hangover
Playing comedy movie Airplane!
Illustration - Create a Library Crate and Consume in a Binary Crate
Let us create a library crate named movie_lib, which contains a module movies. To build the movie_lib library crate, we will use the tool cargo.
Step 1 - Create Project folder
Create a folder movie-app followed by a sub-folder movie-lib. After the folder and sub-folder are created, create an src folder and a Cargo.toml file in this directory. The source code should go in the src folder. Create the files lib.rs and movies.rs in the src folder. The Cargo.toml file will contain the metadata of the project like version number, author name, etc.
The project directory structure will be as shown below −
movie-app
   movie-lib/
      -->Cargo.toml
      -->src/
         lib.rs
         movies.rs
Step 2 - Edit the Cargo.toml file to add project metadata
[package]
name = "movies_lib"
version = "0.1.0"
authors = ["Mohtashim"]
Step 3 - Edit the lib.rs file.
Add the following module definition to this file.
pub mod movies;
The above line creates a public module − movies.
Step 4 - Edit the movies.rs file
This file will define all functions for the movies module.
pub fn play(name:String){
   println!("Playing movie {} :movies-app",name);
}
The above code defines a function play() that accepts a parameter and prints it to the console.
Step 5 - Build the library crate
Build app using the cargo build command to verify if the library crate is structured properly. Make sure you are at root of project − the movie-app folder. The following message will be displayed in the terminal if the build succeeds.
D:\Rust\movie-lib> cargo build
   Compiling movies_lib v0.1.0 (file:///D:/Rust/movie-lib)
   Finished dev [unoptimized + debuginfo] target(s) in 0.67s
Step 6 - Create a test application
Create another folder movie-lib-test in the movie-app folder followed by a Cargo.toml file and the src folder. This project should have main method as this is a binary crate, which will consume the library crate created previously. Create a main.rs file in the src folder. The folder structure will be as shown.
movie-app
   movie-lib
   // already completed

   movie-lib-test/
      -->Cargo.toml
      -->src/
         main.rs
Step 7 - Add the following in the Cargo.toml file
[package]
name = "test_for_movie_lib"
version = "0.1.0"
authors = ["Mohtashim"]

[dependencies]
movies_lib = { path = "../movie-lib" }
NOTE − The path to the library folder is set as dependencies. The following diagram shows the contents of both the projects.
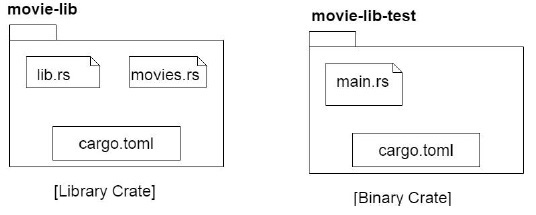
Step 8 - Add the following to main.rs file
extern crate movies_lib;
use movies_lib::movies::play;
fn main() {
   println!("inside main of test ");
   play("Tutorialspoint".to_string())
}
The above code imports an external package called movies_lib. Check the Cargo.toml of current project to verify the crate name.
Step 9 - Use of cargo build and cargo run
We will use the cargo build and cargo run to build the binary project and execute it as shown below −
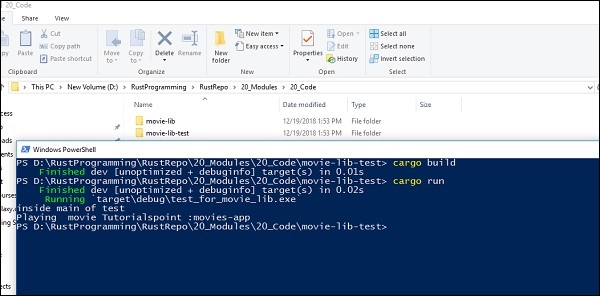
Rust - Collections
Rust's standard collection library provides efficient implementations of the most common general-purpose programming data structures. This chapter discusses the implementation of the commonly used collections − Vector, HashMap and HashSet.
Vector
A Vector is a resizable array. It stores values in contiguous memory blocks. The predefined structure Vec can be used to create vectors. Some important features of a Vector are −
A Vector can grow or shrink at runtime.
A Vector is a homogeneous collection.
A Vector stores data as sequence of elements in a particular order. Every element in a Vector is assigned a unique index number. The index starts from 0 and goes up to n-1 where, n is the size of the collection. For example, in a collection of 5 elements, the first element will be at index 0 and the last element will be at index 4.
A Vector will only append values to (or near) the end. In other words, a Vector can be used to implement a stack.
Memory for a Vector is allocated in the heap.
Syntax - Creating a Vector
let mut instance_name = Vec::new();
The static method new() of the Vecstructure is used to create a vector instance.
Alternatively, a vector can also be created using the vec! macro. The syntax is as given below −
let vector_name = vec![val1,val2,val3]
The following table lists some commonly used functions of the Vec structure.
| Sr.No | Method | Signature & Description |
|---|---|---|
| 1 | new() | pub fn new()->Vect Constructs a new, empty Vec. The vector will not allocate until elements are pushed onto it. |
| 2 | push() | pub fn push(&mut self, value: T) Appends an element to the back of a collection. |
| 3 | remove() | pub fn remove(&mut self, index: usize) -> T Removes and returns the element at position index within the vector, shifting all elements after it to the left. |
| 4 | contains() | pub fn contains(&self, x: &T) -> bool Returns true if the slice contains an element with the given value. |
| 5 | len() | pub fn len(&self) -> usize Returns the number of elements in the vector, also referred to as its 'length'. |
Illustration: Creating a Vector - new()
To create a vector, we use the static method new−
fn main() {
   let mut v = Vec::new();
   v.push(20);
   v.push(30);
   v.push(40);

   println!("size of vector is :{}",v.len());
   println!("{:?}",v);
}
The above example creates a Vector using the static method new() that is defined in structure Vec. The push(val) function appends the value passed as parameter to the collection. The len() function returns the length of the vector.
Output
size of vector is :3
[20, 30, 40]
Illustration: Creating a Vector - vec! Macro
The following code creates a vector using the vec! macro. The data type of the vector is inferred the first value that is assigned to it.
fn main() {
   let v = vec![1,2,3];
   println!("{:?}",v);
}
Output
[1, 2, 3]
As mentioned earlier, a vector can only contain values of the same data type. The following snippet will throw a error[E0308]: mismatched types error.
fn main() {
   let v = vec![1,2,3,"hello"];
   println!("{:?}",v);
}
Illustration: push()
Appends an element to the end of a collection.
fn main() {
   let mut v = Vec::new();
   v.push(20);
   v.push(30);
   v.push(40);

   println!("{:?}",v);
}
Output
[20, 30, 40]
Illustration: remove()
Removes and returns the element at position index within the vector, shifting all elements after it to the left.
fn main() {
   let mut v = vec![10,20,30];
   v.remove(1);
   println!("{:?}",v);
}
Output
[10, 30]
Illustration - contains()
Returns true if the slice contains an element with the given value −
fn main() {
   let v = vec![10,20,30];
   if v.contains(&10) {
      println!("found 10");
   }
   println!("{:?}",v);
}
Output
found 10
[10, 20, 30]
Illustration: len()
Returns the number of elements in the vector, also referred to as its 'length'.
fn main() {
   let v = vec![1,2,3];
   println!("size of vector is :{}",v.len());
}
Output
size of vector is :3
Accessing values from a Vector
Individual elements in a vector can be accessed using their corresponding index numbers. The following example creates a vector ad prints the value of the first element.
fn main() {
   let mut v = Vec::new();
   v.push(20);
   v.push(30);

   println!("{:?}",v[0]);
}
Output: `20`
Values in a vector can also be fetched using reference to the collection.
fn main() {
   let mut v = Vec::new();
   v.push(20);
   v.push(30);
   v.push(40);
   v.push(500);

   for i in &v {
      println!("{}",i);
   }
   println!("{:?}",v);
}
Output
20
30
40
500
[20, 30, 40, 500]
HashMap
A map is a collection of key-value pairs (called entries). No two entries in a map can have the same key. In short, a map is a lookup table. A HashMap stores the keys and values in a hash table. The entries are stored in an arbitrary order. The key is used to search for values in the HashMap. The HashMap structure is defined in the std::collections module. This module should be explicitly imported to access the HashMap structure.
Syntax: Creating a HashMap
let mut instance_name = HashMap::new();
The static method new() of the HashMap structure is used to create a HashMap object. This method creates an empty HashMap.
The commonly used functions of HashMap are discussed below −
| Sr.No | Method | Signature & Description |
|---|---|---|
| 1 | insert() | pub fn insert(&mut self, k: K, v: V) -> Option Inserts a key/value pair, if no key then None is returned. After update, old value is returned. |
| 2 | len() | pub fn len(&self) -> usize Returns the number of elements in the map. |
| 3 | get() | pub fn get<Q: ?Sized>(&lself, k: &Q) -> Option<&V> where K:Borrow Q:Hash+ Eq Returns a reference to the value corresponding to the key. |
| 4 | iter() | pub fn iter(&self) -> Iter<K, V> An iterator visiting all key-value pairs in arbitrary order. The iterator element type is (&'a K, &'a V). |
| 5 | contains_key | pub fn contains_key<Q: ?Sized>(&self, k: &Q) -> bool Returns true if the map contains a value for the specified key. |
| 6 | remove() | pub fn remove_entry<Q: ?Sized>(&mut self, k: &Q) -> Option<(K, V)> Removes a key from the map, returning the stored key and value if the key was previously in the map. |
Illustration: insert()
Inserts a key/value pair into the HashMap.
use std::collections::HashMap;
fn main(){
   let mut stateCodes = HashMap::new();
   stateCodes.insert("KL","Kerala");
   stateCodes.insert("MH","Maharashtra");
   println!("{:?}",stateCodes);
}
The above program creates a HashMap and initializes it with 2 key-value pairs.
Output
{"KL": "Kerala", "MH": "Maharashtra"}
Illustration: len()
Returns the number of elements in the map
use std::collections::HashMap;
fn main() {
   let mut stateCodes = HashMap::new();
   stateCodes.insert("KL","Kerala");
   stateCodes.insert("MH","Maharashtra");
   println!("size of map is {}",stateCodes.len());
}
The above example creates a HashMap and prints the total number of elements in it.
Output
size of map is 2
Illustration - get()
Returns a reference to the value corresponding to the key. The following example retrieves the value for key KL in the HashMap.
use std::collections::HashMap;
fn main() {
   let mut stateCodes = HashMap::new();
   stateCodes.insert("KL","Kerala");
   stateCodes.insert("MH","Maharashtra");
   println!("size of map is {}",stateCodes.len());
   println!("{:?}",stateCodes);

   match stateCodes.get(&"KL") {
      Some(value)=> {
         println!("Value for key KL is {}",value);
      }
      None => {
         println!("nothing found");
      }
   }
}
Output
size of map is 2
{"KL": "Kerala", "MH": "Maharashtra"}
Value for key KL is Kerala
Illustration − iter()
Returns an iterator containing reference to all key-value pairs in an arbitrary order.
use std::collections::HashMap;
fn main() {
   let mut stateCodes = HashMap::new();
   stateCodes.insert("KL","Kerala");
   stateCodes.insert("MH","Maharashtra");

   for (key, val) in stateCodes.iter() {
      println!("key: {} val: {}", key, val);
   }
}
Output
key: MH val: Maharashtra
key: KL val: Kerala
Illustration: contains_key()
Returns true if the map contains a value for the specified key.
use std::collections::HashMap;
fn main() {
   let mut stateCodes = HashMap::new();
   stateCodes.insert("KL","Kerala");
   stateCodes.insert("MH","Maharashtra");
   stateCodes.insert("GJ","Gujarat");

   if stateCodes.contains_key(&"GJ") {
      println!("found key");
   }
}
Output
found key
Illustration: remove()
Removes a key from the map.
use std::collections::HashMap;
fn main() {
   let mut stateCodes = HashMap::new();
   stateCodes.insert("KL","Kerala");
   stateCodes.insert("MH","Maharashtra");
   stateCodes.insert("GJ","Gujarat");

   println!("length of the hashmap {}",stateCodes.len());
   stateCodes.remove(&"GJ");
   println!("length of the hashmap after remove() {}",stateCodes.len());
}
Output
length of the hashmap 3
length of the hashmap after remove() 2
HashSet
HashSet is a set of unique values of type T. Adding and removing values is fast, and it is fast to ask whether a given value is in the set or not. The HashSet structure is defined in the std::collections module. This module should be explicitly imported to access the HashSet structure.
Syntax: Creating a HashSet
let mut hash_set_name = HashSet::new();
The static method, new, of HashSet structure is used to create a HashSet. This method creates an empty HashSet.
The following table lists some of the commonly used methods of the HashSet structure.
| Sr.No | Method | Signature & Description |
|---|---|---|
| 1 | insert() | pub fn insert(&mut self, value: T) -> bool Adds a value to the set. If the set did not have this value present, true is returned else false. |
| 2 | len() | pub fn len(&self) -> usize Returns the number of elements in the set. |
| 3 | get() | pub fn get<Q:?Sized>(&self, value: &Q) -> Option<&T> where T: Borrow,Q: Hash + Eq, Returns a reference to the value in the set, if any that is equal to the given value. |
| 4 | iter() | pub fn iter(&self) -> Iter Returns an iterator visiting all elements in arbitrary order. The iterator element type is &'a T. |
| 5 | contains_key | pub fn contains<Q: ?Sized>(&self, value: &Q) -> bool Returns true if the set contains a value. |
| 6 | remove() | pub fn remove<Q: ?Sized>(&mut self, value: &Q) -> bool Removes a value from the set. Returns true if the value was present in the set. |
Illustration - insert()
Adds a value to the set. A HashSet does not add duplicate values to the collection.
use std::collections::HashSet;
fn main() {
   let mut names = HashSet::new();

   names.insert("Mohtashim");
   names.insert("Kannan");
   names.insert("TutorialsPoint");
   names.insert("Mohtashim");//duplicates not added

   println!("{:?}",names);
}
Output
{"TutorialsPoint", "Kannan", "Mohtashim"}
Illustration: len()
Returns the number of elements in the set.
use std::collections::HashSet;
fn main() {
   let mut names = HashSet::new();
   names.insert("Mohtashim");
   names.insert("Kannan");
   names.insert("TutorialsPoint");
   println!("size of the set is {}",names.len());
}
Output
size of the set is 3
Illustration - iter()
Retruns an iterator visiting all elements in arbitrary order.
use std::collections::HashSet;
fn main() {
   let mut names = HashSet::new();
   names.insert("Mohtashim");
   names.insert("Kannan");
   names.insert("TutorialsPoint");
   names.insert("Mohtashim");

   for name in names.iter() {
      println!("{}",name);
   }
}
Output
TutorialsPoint
Mohtashim
Kannan
Illustration: get()
Returns a reference to the value in the set, if any, which is equal to the given value.
use std::collections::HashSet;
fn main() {
   let mut names = HashSet::new();
   names.insert("Mohtashim");
   names.insert("Kannan");
   names.insert("TutorialsPoint");
   names.insert("Mohtashim");

   match names.get(&"Mohtashim"){
      Some(value)=>{
         println!("found {}",value);
      }
      None =>{
         println!("not found");
      }
   }
   println!("{:?}",names);
}
Output
found Mohtashim
{"Kannan", "Mohtashim", "TutorialsPoint"}
Illustration - contains()
Returns true if the set contains a value.
use std::collections::HashSet;

fn main() {
   let mut names = HashSet::new();
   names.insert("Mohtashim");
   names.insert("Kannan");
   names.insert("TutorialsPoint");

   if names.contains(&"Kannan") {
      println!("found name");
   }
}
Output
found name
Illustration: remove()
Removes a value from the set.
use std::collections::HashSet;

fn main() {
   let mut names = HashSet::new();
   names.insert("Mohtashim");
   names.insert("Kannan");
   names.insert("TutorialsPoint");
   println!("length of the Hashset: {}",names.len());
   names.remove(&"Kannan");
   println!("length of the Hashset after remove() : {}",names.len());
}
Output
length of the Hashset: 3
length of the Hashset after remove() : 2
Rust - Error Handling
In Rust, errors can be classified into two major categories as shown in the table below.
| Sr.No | Name & Description | Usage |
|---|---|---|
| 1 | Recoverable Errors which can be handled | Result enum |
| 2 | UnRecoverable Errors which cannot be handled | panic macro |
A recoverable error is an error that can be corrected. A program can retry the failed operation or specify an alternate course of action when it encounters a recoverable error. Recoverable errors do not cause a program to fail abruptly. An example of a recoverable error is File Not Found error.
Unrecoverable errors cause a program to fail abruptly. A program cannot revert to its normal state if an unrecoverable error occurs. It cannot retry the failed operation or undo the error. An example of an unrecoverable error is trying to access a location beyond the end of an array.
Unlike other programming languages, Rust does not have exceptions. It returns an enum Result<T, E> for recoverable errors, while it calls the panic macro if the program encounters an unrecoverable error. The panic macro causes the program to exit abruptly.
Panic Macro and Unrecoverable Errors
panic! macro allows a program to terminate immediately and provide feedback to the caller of the program. It should be used when a program reaches an unrecoverable state.
fn main() {
   panic!("Hello");
   println!("End of main"); //unreachable statement
}
In the above example, the program will terminate immediately when it encounters the panic! macro.
Output
thread 'main' panicked at 'Hello', main.rs:3
Illustration: panic! macro
fn main() {
   let a = [10,20,30];
   a[10]; //invokes a panic since index 10 cannot be reached
}
Output is as shown below −
warning: this expression will panic at run-time
--> main.rs:4:4
  |
4 | a[10];
  | ^^^^^ index out of bounds: the len is 3 but the index is 10

$main
thread 'main' panicked at 'index out of bounds: the len
is 3 but the index is 10', main.rs:4
note: Run with `RUST_BACKTRACE=1` for a backtrace.
A program can invoke the panic! macro if business rules are violated as shown in the example below −
fn main() {
   let no = 13;
   //try with odd and even
   if no%2 == 0 {
      println!("Thank you , number is even");
   } else {
      panic!("NOT_AN_EVEN");
   }
   println!("End of main");
}
The above example returns an error if the value assigned to the variable is odd.
Output
thread 'main' panicked at 'NOT_AN_EVEN', main.rs:9 note: Run with `RUST_BACKTRACE=1` for a backtrace.
Result Enum and Recoverable Errors
Enum Result <T,E> can be used to handle recoverable errors. It has two variants − OK and Err. T and E are generic type parameters. T represents the type of the value that will be returned in a success case within the OK variant, and E represents the type of the error that will be returned in a failure case within the Err variant.
enum Result<T,E> {
OK(T),
Err(E)
}
Let us understand this with the help of an example −
use std::fs::File;
fn main() {
let f = File::open("main.jpg");
//this file does not exist
println!("{:?}",f);
}
The program returns OK(File) if the file already exists and Err(Error) if the file is not found.
Err(Error { repr: Os { code: 2, message: "No such file or directory" } })
Let us now see how to handle the Err variant.
The following example handles an error returned while opening file using the match statement
use std::fs::File;
fn main() {
let f = File::open("main.jpg"); // main.jpg doesn't exist
match f {
Ok(f)=> {
println!("file found {:?}",f);
},
Err(e)=> {
println!("file not found \n{:?}",e); //handled error
}
}
println!("end of main");
}
NOTE − The program prints end of the main event though file was not found. This means the program has handled error gracefully.
Output
file not found
Os { code: 2, kind: NotFound, message: "The system cannot find the file specified." }
end of main
Illustration
The is_even function returns an error if the number is not an even number. The main() function handles this error.
fn main(){
let result = is_even(13);
match result {
Ok(d)=>{
println!("no is even {}",d);
},
Err(msg)=>{
println!("Error msg is {}",msg);
}
}
println!("end of main");
}
fn is_even(no:i32)->Result<bool,String> {
if no%2==0 {
return Ok(true);
} else {
return Err("NOT_AN_EVEN".to_string());
}
}
NOTE − Since the main function handles error gracefully, the end of main statement is printed.
Output
Error msg is NOT_AN_EVEN end of main
unwrap() and expect()
The standard library contains a couple of helper methods that both enums − Result<T,E> and Option<T> implement. You can use them to simplify error cases where you really do not expect things to fail. In case of success from a method, the "unwrap" function is used to extract the actual result.
| Sr.No | Method | Signature & Description |
|---|---|---|
| 1 | unwrap | unwrap(self): T Expects self to be Ok/Some and returns the value contained within. If it is Err or None instead, it raises a panic with the contents of the error displayed. |
| 2 | expect | expect(self, msg: &str): T Behaves like unwrap, except that it outputs a custom message before panicking in addition to the contents of the error. |
unwrap()
The unwrap() function returns the actual result an operation succeeds. It returns a panic with a default error message if an operation fails. This function is a shorthand for match statement. This is shown in the example below −
fn main(){
let result = is_even(10).unwrap();
println!("result is {}",result);
println!("end of main");
}
fn is_even(no:i32)->Result<bool,String> {
if no%2==0 {
return Ok(true);
} else {
return Err("NOT_AN_EVEN".to_string());
}
}
result is true
end of main
Modify the above code to pass an odd number to the is_even() function.
The unwrap() function will panic and return a default error message as shown below
thread 'main' panicked at 'called `Result::unwrap()` on an `Err` value: "NOT_AN_EVEN"', libcore\result.rs:945:5 note: Run with `RUST_BACKTRACE=1` for a backtrace
expect()
The program can return a custom error message in case of a panic. This is shown in the following example −
use std::fs::File;
fn main(){
let f = File::open("pqr.txt").expect("File not able to open");
//file does not exist
println!("end of main");
}
The function expect() is similar to unwrap(). The only difference is that a custom error message can be displayed using expect.
Output
thread 'main' panicked at 'File not able to open: Error { repr: Os
{ code: 2, message: "No such file or directory" } }', src/libcore/result.rs:860
note: Run with `RUST_BACKTRACE=1` for a backtrace.
Rust - Generic Types
Generics are a facility to write code for multiple contexts with different types. In Rust, generics refer to the parameterization of data types and traits. Generics allows to write more concise and clean code by reducing code duplication and providing type-safety. The concept of Generics can be applied to methods, functions, structures, enumerations, collections and traits.
The <T> syntax known as the type parameter, is used to declare a generic construct. T represents any data-type.
Illustration: Generic Collection
The following example declares a vector that can store only integers.
fn main(){
let mut vector_integer: Vec<i32> = vec![20,30];
vector_integer.push(40);
println!("{:?}",vector_integer);
}
Output
[20, 30, 40]
Consider the following snippet −
fn main() {
let mut vector_integer: Vec<i32> = vec![20,30];
vector_integer.push(40);
vector_integer.push("hello");
//error[E0308]: mismatched types
println!("{:?}",vector_integer);
}
The above example shows that a vector of integer type can only store integer values. So, if we try to push a string value into the collection, the compiler will return an error. Generics make collections more type safe.
Illustration: Generic Structure
The type parameter represents a type, which the compiler will fill in later.
struct Data<T> {
value:T,
}
fn main() {
//generic type of i32
let t:Data<i32> = Data{value:350};
println!("value is :{} ",t.value);
//generic type of String
let t2:Data<String> = Data{value:"Tom".to_string()};
println!("value is :{} ",t2.value);
}
The above example declares a generic structure named Data. The <T> type indicates some data type. The main() function creates two instances − an integer instance and a string instance, of the structure.
Output
value is :350 value is :Tom
Traits
Traits can be used to implement a standard set of behaviors (methods) across multiple structures. Traits are like interfaces in Object-oriented Programming. The syntax of trait is as shown below −
Declare a Trait
trait some_trait {
//abstract or method which is empty
fn method1(&self);
// this is already implemented , this is free
fn method2(&self){
//some contents of method2
}
}
Traits can contain concrete methods (methods with body) or abstract methods (methods without a body). Use a concrete method if the method definition will be shared by all structures implementing the Trait. However, a structure can choose to override a function defined by the trait.
Use abstract methods if the method definition varies for the implementing structures.
Syntax - Implement a Trait
impl some_trait for structure_name {
// implement method1() there..
fn method1(&self ){
}
}
The following examples defines a trait Printable with a method print(), which is implemented by the structure book.
fn main(){
//create an instance of the structure
let b1 = Book {
id:1001,
name:"Rust in Action"
};
b1.print();
}
//declare a structure
struct Book {
name:&'static str,
id:u32
}
//declare a trait
trait Printable {
fn print(&self);
}
//implement the trait
impl Printable for Book {
fn print(&self){
println!("Printing book with id:{} and name {}",self.id,self.name)
}
}
Output
Printing book with id:1001 and name Rust in Action
Generic Functions
The example defines a generic function that displays a parameter passed to it. The parameter can be of any type. The parameters type should implement the Display trait so that its value can be printed by the println! macro.
use std::fmt::Display;
fn main(){
print_pro(10 as u8);
print_pro(20 as u16);
print_pro("Hello TutorialsPoint");
}
fn print_pro<T:Display>(t:T){
println!("Inside print_pro generic function:");
println!("{}",t);
}
Output
Inside print_pro generic function: 10 Inside print_pro generic function: 20 Inside print_pro generic function: Hello TutorialsPoint
Rust - Input Output
This chapter discusses how to accept values from the standard input (keyboard) and display values to the standard output (console). In this chapter, we will also discuss passing command line arguments.
Reader and Writer Types
Rusts standard library features for input and output are organized around two traits −
- Read
- Write
| Sr.No | Trait & Description | Example |
|---|---|---|
| 1 | Read Types that implement Read have methods for byte-oriented input. Theyre called readers | Stdin,File |
| 2 | Write Types that implement Write support both byte-oriented and UTF-8 text output. Theyre called writers. | Stdout,File |
Read Trait
Readers are components that your program can read bytes from. Examples include reading input from the keyboard, files, etc. The read_line() method of this trait can be used to read data, one line at a time, from a file or standard input stream.
| Sr.No | Trait | Method & Description |
|---|---|---|
| 1 | Read | read_line(&mut line)->Result Reads a line of text and appends it to line, which is a String. The return value is an io::Result, the number of bytes read. |
Illustration − Reading from the Console − stdin()
Rust programs might have to accept values from the user at runtime. The following example reads values from the standard input (Keyboard) and prints it to the console.
fn main(){
let mut line = String::new();
println!("Enter your name :");
let b1 = std::io::stdin().read_line(&mut line).unwrap();
println!("Hello , {}", line);
println!("no of bytes read , {}", b1);
}
The stdin() function returns a handle to the standard input stream of the current process, to which the read_line function can be applied. This function tries to read all the characters present in the input buffer when it encounters an end-of-line character.
Output
Enter your name : Mohtashim Hello , Mohtashim no of bytes read , 10
Write Trait
Writers are components that your program can write bytes to. Examples include printing values to the console, writing to files, etc. The write() method of this trait can be used to write data to a file or standard output stream.
| Sr.No | Trait | Method & Description |
|---|---|---|
| 1 | Write | write(&buf)->Result Writes some of the bytes in the slice buf to the underlying stream. It returns an io::Result, the number of bytes written. |
Illustration - Writing to the Console - stdout()
The print! or println! macros can be used to display text on the console. However, you can also use the write() standard library function to display some text to the standard output.
Let us consider an example to understand this.
use std::io::Write;
fn main() {
let b1 = std::io::stdout().write("Tutorials ".as_bytes()).unwrap();
let b2 = std::io::stdout().write(String::from("Point").as_bytes()).unwrap();
std::io::stdout().write(format!("\nbytes written {}",(b1+b2)).as_bytes()).unwrap();
}
Output
Tutorials Point bytes written 15
The stdout() standard library function returns a handle to the standard output stream of the current process, to which the write function can be applied. The write() method returns an enum, Result. The unwrap() is a helper method to extract the actual result from the enumeration. The unwrap method will send panic if an error occurs.
NOTE − File IO is discussed in the next chapter.
CommandLine Arguments
CommandLine arguments are passed to a program before executing it. They are like parameters passed to functions. CommandLine parameters can be used to pass values to the main() function. The std::env::args() returns the commandline arguments.
Illustration
The following example passes values as commandLine arguments to the main() function. The program is created in a file name main.rs.
//main.rs
fn main(){
let cmd_line = std::env::args();
println!("No of elements in arguments is :{}",cmd_line.len());
//print total number of values passed
for arg in cmd_line {
println!("[{}]",arg); //print all values passed
as commandline arguments
}
}
The program will generate a file main.exe once compiled. Multiple command line parameters should be separated by space. Execute main.exe from the terminal as main.exe hello tutorialspoint.
NOTE − hello and tutorialspoint are commandline arguments.
Output
No of elements in arguments is :3 [main.exe] [hello] [tutorialspoint]
The output shows 3 arguments as the main.exe is the first argument.
Illustration
The following program calculates the sum of values passed as commandline arguments. A list integer values separated by space is passed to program.
fn main(){
let cmd_line = std::env::args();
println!("No of elements in arguments is
:{}",cmd_line.len());
// total number of elements passed
let mut sum = 0;
let mut has_read_first_arg = false;
//iterate through all the arguments and calculate their sum
for arg in cmd_line {
if has_read_first_arg { //skip the first argument since it is the exe file name
sum += arg.parse::<i32>().unwrap();
}
has_read_first_arg = true;
// set the flag to true to calculate sum for the subsequent arguments.
}
println!("sum is {}",sum);
}
On executing the program as main.exe 1 2 3 4, the output will be −
No of elements in arguments is :5 sum is 10
Rust - File Input/ Output
In addition to reading and writing to console, Rust allows reading and writing to files.
The File struct represents a file. It allows a program to perform read-write operations on a file. All methods in the File struct return a variant of the io::Result enumeration.
The commonly used methods of the File struct are listed in the table below −
| Sr.No | Module | Method | Signature | Description |
|---|---|---|---|---|
| 1 | std::fs::File | open() | pub fn open<P: AsRef>(path: P) -> Result | The open static method can be used to open a file in read-only mode. |
| 2 | std::fs::File | create() | pub fn create<P: AsRef>(path: P) -> Result | Static method opens a file in write-only mode. If the file already existed, the old content is destroyed. Otherwise, a new file is created. |
| 3 | std::fs::remove_file | remove_file() | pub fn remove_file<P: AsRef>(path: P) -> Result<()> | Removes a file from the filesystem. There is no guarantee that the file is immediately deleted. |
| 4 | std::fs::OpenOptions | append() | pub fn append(&mut self, append: bool) -> &mut OpenOptions | Sets the option for the append mode of file. |
| 5 | std::io::Writes | write_all() | fn write_all(&mut self, buf: &[u8]) -> Result<()> | Attempts to write an entire buffer into this write. |
| 6 | std::io::Read | read_to_string() | fn read_to_string(&mut self, buf: &mut String) -> Result | Reads all bytes until EOF in this source, appending them to buf. |
Write to a File
Let us see an example to understand how to write a file.
The following program creates a file 'data.txt'. The create() method is used to create a file. The method returns a file handle if the file is created successfully. The last line write_all function will write bytes in newly created file. If any of the operations fail, the expect() function returns an error message.
use std::io::Write;
fn main() {
let mut file = std::fs::File::create("data.txt").expect("create failed");
file.write_all("Hello World".as_bytes()).expect("write failed");
file.write_all("\nTutorialsPoint".as_bytes()).expect("write failed");
println!("data written to file" );
}
Output
data written to file
Read from a File
The following program reads the contents in a file data.txt and prints it to the console. The "open" function is used to open an existing file. An absolute or relative path to the file is passed to the open() function as a parameter. The open() function throws an exception if the file does not exist, or if it is not accessible for whatever reason. If it succeeds, a file handle to such file is assigned to the "file" variable.
The "read_to_string" function of the "file" handle is used to read contents of that file into a string variable.
use std::io::Read;
fn main(){
let mut file = std::fs::File::open("data.txt").unwrap();
let mut contents = String::new();
file.read_to_string(&mut contents).unwrap();
print!("{}", contents);
}
Output
Hello World TutorialsPoint
Delete a file
The following example uses the remove_file() function to delete a file. The expect() function returns a custom message in case an error occurs.
use std::fs;
fn main() {
fs::remove_file("data.txt").expect("could not remove file");
println!("file is removed");
}
Output
file is removed
Append data to a file
The append() function writes data to the end of the file. This is shown in the example given below −
use std::fs::OpenOptions;
use std::io::Write;
fn main() {
let mut file = OpenOptions::new().append(true).open("data.txt").expect(
"cannot open file");
file.write_all("Hello World".as_bytes()).expect("write failed");
file.write_all("\nTutorialsPoint".as_bytes()).expect("write failed");
println!("file append success");
}
Output
file append success
Copy a file
The following example copies the contents in a file to a new file.
use std::io::Read;
use std::io::Write;
fn main() {
let mut command_line: std::env::Args = std::env::args();
command_line.next().unwrap();
// skip the executable file name
// accept the source file
let source = command_line.next().unwrap();
// accept the destination file
let destination = command_line.next().unwrap();
let mut file_in = std::fs::File::open(source).unwrap();
let mut file_out = std::fs::File::create(destination).unwrap();
let mut buffer = [0u8; 4096];
loop {
let nbytes = file_in.read(&mut buffer).unwrap();
file_out.write(&buffer[..nbytes]).unwrap();
if nbytes < buffer.len() { break; }
}
}
Execute the above program as main.exe data.txt datacopy.txt. Two command line arguments are passed while executing the file −
- the path to the source file
- the destination file
Rust - Package Manager
Cargo is the package manager for RUST. This acts like a tool and manages Rust projects.
Some commonly used cargo commands are listed in the table below −
| Sr.No | Command & Description |
|---|---|
| 1 | cargo build Compiles the current project. |
| 2 | cargo check Analyzes the current project and report errors, but don't build object files. |
| 3 | cargo run Builds and executes src/main.rs. |
| 4 | cargo clean Removes the target directory. |
| 5 | cargo update Updates dependencies listed in Cargo.lock. |
| 6 | cargo new Creates a new cargo project. |
Cargo helps to download third party libraries. Therefore, it acts like a package manager. You can also build your own libraries. Cargo is installed by default when you install Rust.
To create a new cargo project, we can use the commands given below.
Create a binary crate
cargo new project_name --bin
Create a library crate
cargo new project_name --lib
To check the current version of cargo, execute the following command −
cargo --version
Illustration - Create a Binary Cargo project
The game generates a random number and prompts the user to guess the number.
Step 1 - Create a project folder
Open the terminal and type the following command cargo new guess-game-app --bin.
This will create the following folder structure.
guess-game-app/
-->Cargo.toml
-->src/
main.rs
The cargo new command is used to create a crate. The --bin flag indicates that the crate being created is a binary crate. Public crates are stored in a central repository called crates.io https://crates.io/.
Step 2 - Include references to external libraries
This example needs to generate a random number. Since the internal standard library does not provide random number generation logic, we need to look at external libraries or crates. Let us use rand crate which is available at crates.io website crates.io
The rand is a rust library for random number generation. Rand provides utilities to generate random numbers, to convert them to useful types and distributions, and some randomness-related algorithms.
The following diagram shows crate.io website and search result for rand crate.
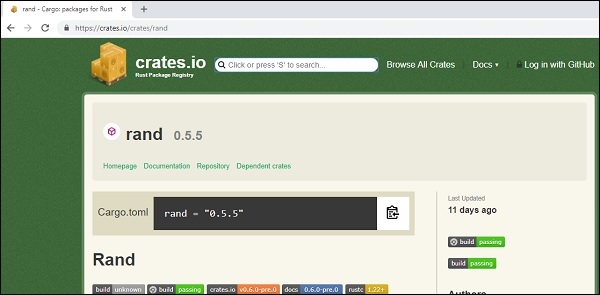
Copy the version of rand crate to the Cargo.toml file rand = "0.5.5".
[package] name = "guess-game-app" version = "0.1.0" authors = ["Mohtashim"] [dependencies] rand = "0.5.5"
Step 3: Compile the Project
Navigate to the project folder. Execute the command cargo build on the terminal window −
Updating registry `https://github.com/rust-lang/crates.io-index` Downloading rand v0.5.5 Downloading rand_core v0.2.2 Downloading winapi v0.3.6 Downloading rand_core v0.3.0 Compiling winapi v0.3.6 Compiling rand_core v0.3.0 Compiling rand_core v0.2.2 Compiling rand v0.5.5 Compiling guess-game-app v0.1.0 (file:///E:/RustWorks/RustRepo/Code_Snippets/cargo-projects/guess-game-app) Finished dev [unoptimized + debuginfo] target(s) in 1m 07s
The rand crate and all transitive dependencies (inner dependencies of rand) will be automatically downloaded.
Step 4 - Understanding the Business Logic
Let us now see how the business logic works for the number guessing game −
Game initially generates a random number.
A user is asked to enter input and guess the number.
If number is less than the generated number, a message Too low is printed.
If number is greater than the generated number, a message Too high is printed.
If the user enters the number generated by the program, the game exits.
Step 5 - Edit the main.rs file
Add the business logic to main.rs file.
use std::io;
extern crate rand;
//importing external crate
use rand::random;
fn get_guess() -> u8 {
loop {
println!("Input guess") ;
let mut guess = String::new();
io::stdin().read_line(&mut guess)
.expect("could not read from stdin");
match guess.trim().parse::<u8>(){ //remember to trim input to avoid enter spaces
Ok(v) => return v,
Err(e) => println!("could not understand input {}",e)
}
}
}
fn handle_guess(guess:u8,correct:u8)-> bool {
if guess < correct {
println!("Too low");
false
} else if guess> correct {
println!("Too high");
false
} else {
println!("You go it ..");
true
}
}
fn main() {
println!("Welcome to no guessing game");
let correct:u8 = random();
println!("correct value is {}",correct);
loop {
let guess = get_guess();
if handle_guess(guess,correct){
break;
}
}
}
Step 6 - Compile and Execute the Project
Execute the command cargo run on the terminal. Make sure that the terminal points to the Project directory.
Welcome to no guessing game correct value is 97 Input guess 20 Too low Input guess 100 Too high Input guess 97 You got it ..
Rust - Iterator and Closure
In this chapter, we will learn how iterators and closures work in RUST.
Iterators
An iterator helps to iterate over a collection of values such as arrays, vectors, maps, etc. Iterators implement the Iterator trait that is defined in the Rust standard library. The iter() method returns an iterator object of the collection. Values in an iterator object are called items. The next() method of the iterator can be used to traverse through the items. The next() method returns a value None when it reaches the end of the collection.
The following example uses an iterator to read values from an array.
fn main() {
//declare an array
let a = [10,20,30];
let mut iter = a.iter();
// fetch an iterator object for the array
println!("{:?}",iter);
//fetch individual values from the iterator object
println!("{:?}",iter.next());
println!("{:?}",iter.next());
println!("{:?}",iter.next());
println!("{:?}",iter.next());
}
Output
Iter([10, 20, 30]) Some(10) Some(20) Some(30) None
If a collection like array or Vector implements Iterator trait then it can be traversed using the for...in syntax as shown below-
fn main() {
let a = [10,20,30];
let iter = a.iter();
for data in iter{
print!("{}\t",data);
}
}
Output
10 20 30
The following 3 methods return an iterator object from a collection, where T represents the elements in a collection.
| Sr.No | Methods & Description |
|---|---|
| 1 | iter() gives an iterator over &T(reference to T) |
| 2 | into_iter() gives an iterator over T |
| 3 | iter_mut() gives an iterator over &mut T |
Illustration:iter()
The iter() function uses the concept of borrowing. It returns a reference to each element of the collection, leaving the collection untouched and available for reuse after the loop.
fn main() {
let names = vec!["Kannan", "Mohtashim", "Kiran"];
for name in names.iter() {
match name {
&"Mohtashim" => println!("There is a rustacean among us!"),
_ => println!("Hello {}", name),
}
}
println!("{:?}",names);
// reusing the collection after iteration
}
Output
Hello Kannan There is a rustacean among us! Hello Kiran ["Kannan", "Mohtashim", "Kiran"]
Illustration - into_iter()
This function uses the concept of ownership. It moves values in the collection into an iter object, i.e., the collection is consumed and it is no longer available for reuse.
fn main(){
let names = vec!["Kannan", "Mohtashim", "Kiran"];
for name in names.into_iter() {
match name {
"Mohtashim" => println!("There is a rustacean among us!"),
_ => println!("Hello {}", name),
}
}
// cannot reuse the collection after iteration
//println!("{:?}",names);
//Error:Cannot access after ownership move
}
Output
Hello Kannan There is a rustacean among us! Hello Kiran
Illustration - for and iter_mut()
This function is like the iter() function. However, this function can modify elements within the collection.
fn main() {
let mut names = vec!["Kannan", "Mohtashim", "Kiran"];
for name in names.iter_mut() {
match name {
&mut "Mohtashim" => println!("There is a rustacean among us!"),
_ => println!("Hello {}", name),
}
}
println!("{:?}",names);
//// reusing the collection after iteration
}
Output
Hello Kannan There is a rustacean among us! Hello Kiran ["Kannan", "Mohtashim", "Kiran"]
Closure
Closure refers to a function within another function. These are anonymous functions functions without a name. Closure can be used to assign a function to a variable. This allows a program to pass a function as a parameter to other functions. Closure is also known as an inline function. Variables in the outer function can be accessed by inline functions.
Syntax: Defining a Closure
A closure definition may optionally have parameters. Parameters are enclosed within two vertical bars.
let closure_function = |parameter| {
//logic
}
The syntax invoking a Closure implements Fn traits. So, it can be invoked with () syntax.
closure_function(parameter); //invoking
Illustration
The following example defines a closure is_even within the function main(). The closure returns true if a number is even and returns false if the number is odd.
fn main(){
let is_even = |x| {
x%2==0
};
let no = 13;
println!("{} is even ? {}",no,is_even(no));
}
Output
13 is even ? false
Illustration
fn main(){
let val = 10;
// declared outside
let closure2 = |x| {
x + val //inner function accessing outer fn variable
};
println!("{}",closure2(2));
}
The main() function declares a variable val and a closure. The closure accesses the variable declared in the outer function main().
Output
12
Rust - Smart Pointers
Rust allocates everything on the stack by default. You can store things on the heap by wrapping them in smart pointers like Box. Types like Vec and String implicitly help heap allocation. Smart pointers implement traits listed in the table below. These traits of the smart pointers differentiate them from an ordinary struct −
| Sr.No | Trait name | Package & Description |
|---|---|---|
| 1 | Deref | std::ops::Deref Used for immutable dereferencing operations, like *v. |
| 2 | Drop | std::ops::Drop Used to run some code when a value goes out of scope. This is sometimes called a destructor |
In this chapter, we will learn about the Box smart pointer. We will also learn how to create a custom smart pointer like Box.
Box
The Box smart pointer also called a box allows you to store data on the heap rather than the stack. The stack contains the pointer to the heap data. A Box does not have performance overhead, other than storing their data on the heap.
Let us see how to use a box to store an i32 value on the heap.
fn main() {
let var_i32 = 5;
//stack
let b = Box::new(var_i32);
//heap
println!("b = {}", b);
}
Output
b = 5
In order to access a value pointed by a variable, use dereferencing. The * is used as a dereference operator. Let us see how to use dereference with Box.
fn main() {
let x = 5;
//value type variable
let y = Box::new(x);
//y points to a new value 5 in the heap
println!("{}",5==x);
println!("{}",5==*y);
//dereferencing y
}
The variable x is a value-type with the value 5. So, the expression 5==x will return true. Variable y points to the heap. To access the value in heap, we need to dereference using *y. *y returns value 5. So, the expression 5==*y returns true.
Output
true true
Illustration - Deref Trait
The Deref trait, provided by the standard library, requires us to implement one method named deref, that borrows self and returns a reference to the inner data. The following example creates a structure MyBox, which is a generic type. It implements the trait Deref. This trait helps us access heap values wrapped by y using *y.
use std::ops::Deref;
struct MyBox<T>(T);
impl<T> MyBox<T> {
// Generic structure with static method new
fn new(x:T)-> MyBox<T> {
MyBox(x)
}
}
impl<T> Deref for MyBox<T> {
type Target = T;
fn deref(&self) -> &T {
&self.0 //returns data
}
}
fn main() {
let x = 5;
let y = MyBox::new(x);
// calling static method
println!("5==x is {}",5==x);
println!("5==*y is {}",5==*y);
// dereferencing y
println!("x==*y is {}",x==*y);
//dereferencing y
}
Output
5==x is true 5==*y is true x==*y is true
Illustration - Drop Trait
The Drop trait contains the drop() method. This method is called when a structure that implemented this trait goes out of scope. In some languages, the programmer must call code to free memory or resources every time they finish using an instance of a smart pointer. In Rust, you can achieve automatic memory deallocation using Drop trait.
use std::ops::Deref;
struct MyBox<T>(T);
impl<T> MyBox<T> {
fn new(x:T)->MyBox<T>{
MyBox(x)
}
}
impl<T> Deref for MyBox<T> {
type Target = T;
fn deref(&self) -< &T {
&self.0
}
}
impl<T> Drop for MyBox<T>{
fn drop(&mut self){
println!("dropping MyBox object from memory ");
}
}
fn main() {
let x = 50;
MyBox::new(x);
MyBox::new("Hello");
}
In the above example, the drop method will be called twice as we are creating two objects in the heap.
dropping MyBox object from memory dropping MyBox object from memory
Rust - Concurrency
In Concurrent programming, different parts of a program execute independently. On the other hand, in parallel programming, different parts of a program execute at the same time. Both the models are equally important as more computers take advantage of their multiple processors.
Threads
We can use threads to run codes simultaneously. In current operating systems, an executed programs code is run in a process, and the operating system manages multiple processes at once. Within your program, you can also have independent parts that run simultaneously. The features that run these independent parts are called threads.
Creating a Thread
The thread::spawn function is used to create a new thread. The spawn function takes a closure as parameter. The closure defines code that should be executed by the thread. The following example prints some text from a main thread and other text from a new thread.
//import the necessary modules
use std::thread;
use std::time::Duration;
fn main() {
//create a new thread
thread::spawn(|| {
for i in 1..10 {
println!("hi number {} from the spawned thread!", i);
thread::sleep(Duration::from_millis(1));
}
});
//code executed by the main thread
for i in 1..5 {
println!("hi number {} from the main thread!", i);
thread::sleep(Duration::from_millis(1));
}
}
Output
hi number 1 from the main thread! hi number 1 from the spawned thread! hi number 2 from the main thread! hi number 2 from the spawned thread! hi number 3 from the main thread! hi number 3 from the spawned thread! hi number 4 from the spawned thread! hi number 4 from the main thread!
The main thread prints values from 1 to 4.
NOTE − The new thread will be stopped when the main thread ends. The output from this program might be a little different every time.
The thread::sleep function forces a thread to stop its execution for a short duration, allowing a different thread to run. The threads will probably take turns, but that is not guaranteed it depends on how the operating system schedules the threads. In this run, the main thread is printed first, even though the print statement from the spawned thread appears first in the code. Moreover, even if the spawned thread is programmed to print values till 9, it only got to 5 before the main thread shut down.
Join Handles
A spawned thread may not get a chance to run or run completely. This is because the main thread completes quickly. The function spawn<F, T>(f: F) -> JoinHandlelt;T> returns a JoinHandle. The join() method on JoinHandle waits for the associated thread to finish.
use std::thread;
use std::time::Duration;
fn main() {
let handle = thread::spawn(|| {
for i in 1..10 {
println!("hi number {} from the spawned thread!", i);
thread::sleep(Duration::from_millis(1));
}
});
for i in 1..5 {
println!("hi number {} from the main thread!", i);
thread::sleep(Duration::from_millis(1));
}
handle.join().unwrap();
}
Output
hi number 1 from the main thread! hi number 1 from the spawned thread! hi number 2 from the spawned thread! hi number 2 from the main thread! hi number 3 from the spawned thread! hi number 3 from the main thread! hi number 4 from the main thread! hi number 4 from the spawned thread! hi number 5 from the spawned thread! hi number 6 from the spawned thread! hi number 7 from the spawned thread! hi number 8 from the spawned thread! hi number 9 from the spawned thread!
The main thread and spawned thread continue switching.
NOTE − The main thread waits for spawned thread to complete because of the call to the join() method.