- Python Web Scraping - Home
- Python Web Scraping - Introduction
- Python Web Scraping - Environment Setup
- Python Web Scraping - Modules for Web Scraping
- Python Web Scraping - Legality
- Python Web Scraping - Data Extraction
- Python Web Scraping - Data Processing
- Python Web Scraping - Processing Images and Videos
- Python Web Scraping - Dealing with Text
- Python Web Scraping - Scraping Dynamic Websites
- Python Web Scraping - Scraping Form based Websites
- Python Web Scraping - Processing CAPTCHA
- Python Web Scraping - Testing with Scrapers
Python Web Scraping Resources
Python Web Scraping - Quick Guide
Python Web Scraping - Introduction
Web scraping is an automatic process of extracting information from web. This chapter will give you an in-depth idea of web scraping, its comparison with web crawling, and why you should opt for web scraping. You will also learn about the components and working of a web scraper.
What is Web Scraping?
The dictionary meaning of word Scrapping implies getting something from the web. Here two questions arise: What we can get from the web and How to get that.
The answer to the first question is data. Data is indispensable for any programmer and the basic requirement of every programming project is the large amount of useful data.
The answer to the second question is a bit tricky, because there are lots of ways to get data. In general, we may get data from a database or data file and other sources. But what if we need large amount of data that is available online? One way to get such kind of data is to manually search (clicking away in a web browser) and save (copy-pasting into a spreadsheet or file) the required data. This method is quite tedious and time consuming. Another way to get such data is using web scraping.
Web scraping, also called web data mining or web harvesting, is the process of constructing an agent which can extract, parse, download and organize useful information from the web automatically. In other words, we can say that instead of manually saving the data from websites, the web scraping software will automatically load and extract data from multiple websites as per our requirement.
Origin of Web Scraping
The origin of web scraping is screen scrapping, which was used to integrate non-web based applications or native windows applications. Originally screen scraping was used prior to the wide use of World Wide Web (WWW), but it could not scale up WWW expanded. This made it necessary to automate the approach of screen scraping and the technique called Web Scraping came into existence.
Web Crawling v/s Web Scraping
The terms Web Crawling and Scraping are often used interchangeably as the basic concept of them is to extract data. However, they are different from each other. We can understand the basic difference from their definitions.
Web crawling is basically used to index the information on the page using bots aka crawlers. It is also called indexing. On the hand, web scraping is an automated way of extracting the information using bots aka scrapers. It is also called data extraction.
To understand the difference between these two terms, let us look into the comparison table given hereunder −
| Web Crawling | Web Scraping |
|---|---|
| Refers to downloading and storing the contents of a large number of websites. | Refers to extracting individual data elements from the website by using a site-specific structure. |
| Mostly done on large scale. | Can be implemented at any scale. |
| Yields generic information. | Yields specific information. |
| Used by major search engines like Google, Bing, Yahoo. Googlebot is an example of a web crawler. | The information extracted using web scraping can be used to replicate in some other website or can be used to perform data analysis. For example the data elements can be names, address, price etc. |
Uses of Web Scraping
The uses and reasons for using web scraping are as endless as the uses of the World Wide Web. Web scrapers can do anything like ordering online food, scanning online shopping website for you and buying ticket of a match the moment they are available etc. just like a human can do. Some of the important uses of web scraping are discussed here −
E-commerce Websites − Web scrapers can collect the data specially related to the price of a specific product from various e-commerce websites for their comparison.
Content Aggregators − Web scraping is used widely by content aggregators like news aggregators and job aggregators for providing updated data to their users.
Marketing and Sales Campaigns − Web scrapers can be used to get the data like emails, phone number etc. for sales and marketing campaigns.
Search Engine Optimization (SEO) − Web scraping is widely used by SEO tools like SEMRush, Majestic etc. to tell business how they rank for search keywords that matter to them.
Data for Machine Learning Projects − Retrieval of data for machine learning projects depends upon web scraping.
Data for Research − Researchers can collect useful data for the purpose of their research work by saving their time by this automated process.
Components of a Web Scraper
A web scraper consists of the following components −
Web Crawler Module
A very necessary component of web scraper, web crawler module, is used to navigate the target website by making HTTP or HTTPS request to the URLs. The crawler downloads the unstructured data (HTML contents) and passes it to extractor, the next module.
Extractor
The extractor processes the fetched HTML content and extracts the data into semistructured format. This is also called as a parser module and uses different parsing techniques like Regular expression, HTML Parsing, DOM parsing or Artificial Intelligence for its functioning.
Data Transformation and Cleaning Module
The data extracted above is not suitable for ready use. It must pass through some cleaning module so that we can use it. The methods like String manipulation or regular expression can be used for this purpose. Note that extraction and transformation can be performed in a single step also.
Storage Module
After extracting the data, we need to store it as per our requirement. The storage module will output the data in a standard format that can be stored in a database or JSON or CSV format.
Working of a Web Scraper
Web scraper may be defined as a software or script used to download the contents of multiple web pages and extracting data from it.
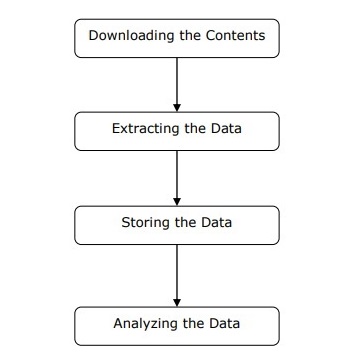
We can understand the working of a web scraper in simple steps as shown in the diagram given above.
Step 1: Downloading Contents from Web Pages
In this step, a web scraper will download the requested contents from multiple web pages.
Step 2: Extracting Data
The data on websites is HTML and mostly unstructured. Hence, in this step, web scraper will parse and extract structured data from the downloaded contents.
Step 3: Storing the Data
Here, a web scraper will store and save the extracted data in any of the format like CSV, JSON or in database.
Step 4: Analyzing the Data
After all these steps are successfully done, the web scraper will analyze the data thus obtained.
Python Web Scraping - Introduction
In the first chapter, we have learnt what web scraping is all about. In this chapter, let us see how to implement web scraping using Python.
Why Python for Web Scraping?
Python is a popular tool for implementing web scraping. Python programming language is also used for other useful projects related to cyber security, penetration testing as well as digital forensic applications. Using the base programming of Python, web scraping can be performed without using any other third party tool.
Python programming language is gaining huge popularity and the reasons that make Python a good fit for web scraping projects are as below −
Syntax Simplicity
Python has the simplest structure when compared to other programming languages. This feature of Python makes the testing easier and a developer can focus more on programming.
Inbuilt Modules
Another reason for using Python for web scraping is the inbuilt as well as external useful libraries it possesses. We can perform many implementations related to web scraping by using Python as the base for programming.
Open Source Programming Language
Python has huge support from the community because it is an open source programming language.
Wide range of Applications
Python can be used for various programming tasks ranging from small shell scripts to enterprise web applications.
Installation of Python
Python distribution is available for platforms like Windows, MAC and Unix/Linux. We need to download only the binary code applicable for our platform to install Python. But in case if the binary code for our platform is not available, we must have a C compiler so that source code can be compiled manually.
We can install Python on various platforms as follows −
Installing Python on Unix and Linux
You need to followings steps given below to install Python on Unix/Linux machines −
Step 1 − Go to the link https://www.python.org/downloads/
Step 2 − Download the zipped source code available for Unix/Linux on above link.
Step 3 − Extract the files onto your computer.
Step 4 − Use the following commands to complete the installation −
run ./configure script
make
make install
You can find installed Python at the standard location /usr/local/bin and its libraries at /usr/local/lib/pythonXX, where XX is the version of Python.
Installing Python on Windows
You need to followings steps given below to install Python on Windows machines −
Step 1 − Go to the link https://www.python.org/downloads/
Step 2 − Download the Windows installer python-XYZ.msi file, where XYZ is the version we need to install.
Step 3 − Now, save the installer file to your local machine and run the MSI file.
Step 4 − At last, run the downloaded file to bring up the Python install wizard.
Installing Python on Macintosh
We must use Homebrew for installing Python 3 on Mac OS X. Homebrew is easy to install and a great package installer.
Homebrew can also be installed by using the following command −
$ ruby -e "$(curl -fsSL
https://raw.githubusercontent.com/Homebrew/install/master/install)"
For updating the package manager, we can use the following command −
$ brew update
With the help of the following command, we can install Python3 on our MAC machine −
$ brew install python3
Setting Up the PATH
You can use the following instructions to set up the path on various environments −
Setting Up the Path on Unix/Linux
Use the following commands for setting up paths using various command shells −
For csh shell
setenv PATH "$PATH:/usr/local/bin/python".
For bash shell (Linux)
ATH="$PATH:/usr/local/bin/python".
For sh or ksh shell
PATH="$PATH:/usr/local/bin/python".
Setting Up the Path on Windows
For setting the path on Windows, we can use the path %path%;C:\Python at the command prompt and then press Enter.
Running Python
We can start Python using any of the following three ways −
Interactive Interpreter
An operating system such as UNIX and DOS that is providing a command-line interpreter or shell can be used for starting Python.
We can start coding in interactive interpreter as follows −
Step 1 − Enter python at the command line.
Step 2 − Then, we can start coding right away in the interactive interpreter.
$python # Unix/Linux
or
python% # Unix/Linux
or
C:> python # Windows/DOS
Script from the Command-line
We can execute a Python script at command line by invoking the interpreter. It can be understood as follows −
$python script.py # Unix/Linux
or
python% script.py # Unix/Linux
or
C: >python script.py # Windows/DOS
Integrated Development Environment
We can also run Python from GUI environment if the system is having GUI application that is supporting Python. Some IDEs that support Python on various platforms are given below −
IDE for UNIX − UNIX, for Python, has IDLE IDE.
IDE for Windows − Windows has PythonWin IDE which has GUI too.
IDE for Macintosh − Macintosh has IDLE IDE which is downloadable as either MacBinary or BinHex'd files from the main website.
Python Web Scraping - Modules for Web Scraping
In this chapter, let us learn various Python modules that we can use for web scraping.
Python Development Environments using virtualenv
Virtualenv is a tool to create isolated Python environments. With the help of virtualenv, we can create a folder that contains all necessary executables to use the packages that our Python project requires. It also allows us to add and modify Python modules without access to the global installation.
You can use the following command to install virtualenv −
(myenv) D:\Projects\python\myenv>pip3 install virtualenv
Collecting virtualenv
  Downloading virtualenv-20.36.1-py3-none-any.whl.metadata (4.7 kB)
Collecting distlib<1,>=0.3.7 (from virtualenv)
  Downloading distlib-0.4.0-py2.py3-none-any.whl.metadata (5.2 kB)
Collecting filelock<4,>=3.20.1 (from virtualenv)
  Downloading filelock-3.20.3-py3-none-any.whl.metadata (2.1 kB)
Requirement already satisfied: platformdirs<5,>=3.9.1 in .\Lib\site-packages (from virtualenv) (4.5.1)
Downloading virtualenv-20.36.1-py3-none-any.whl (6.0 MB)
Downloading distlib-0.4.0-py2.py3-none-any.whl (469 kB)
Downloading filelock-3.20.3-py3-none-any.whl (16 kB)
Installing collected packages: distlib, filelock, virtualenv
Successfully installed distlib-0.4.0 filelock-3.20.3 virtualenv-20.36.1
Now, we need to create a directory which will represent the project with the help of following command −
(myenv) D:\Projects\python\myenv>mkdir webscrap
Now, enter into that directory with the help of this following command −
(myenv) D:\Projects\python\myenv>cd webscrap
Now, we need to initialize virtual environment folder of our choice as follows −
(base) D:\ProgramData\webscrap>virtualenv websc
created virtual environment CPython3.14.2.final.0-64 in 981ms
  creator CPython3Windows(dest=D:\Projects\python\myenv\webscrap\websc, clear=False, no_vcs_ignore=False, global=False)
  seeder FromAppData(download=False, pip=bundle, via=copy, app_data_dir=C:\Users\mahes\AppData\Local\pypa\virtualenv)
    added seed packages: pip==25.3
  activators BashActivator,BatchActivator,FishActivator,NushellActivator,PowerShellActivator,PythonActivator
Now, activate the virtual environment with the command given below. Once successfully activated, you will see the name of it on the left hand side in brackets.
(myenv) D:\Projects\python\myenv\webscrap>websc\scripts\activate
We can install any module in this environment as follows −
(websc) D:\Projects\python\myenv\webscrap>pip3 install requests
Collecting requests
  Using cached requests-2.32.5-py3-none-any.whl.metadata (4.9 kB)
Collecting charset_normalizer<4,>=2 (from requests)
  Using cached charset_normalizer-3.4.4-cp314-cp314-win_amd64.whl.metadata (38 kB)
Collecting idna<4,>=2.5 (from requests)
  Using cached idna-3.11-py3-none-any.whl.metadata (8.4 kB)
Collecting urllib3<3,>=1.21.1 (from requests)
  Downloading urllib3-2.6.3-py3-none-any.whl.metadata (6.9 kB)
Collecting certifi>=2017.4.17 (from requests)
  Downloading certifi-2026.1.4-py3-none-any.whl.metadata (2.5 kB)
Using cached requests-2.32.5-py3-none-any.whl (64 kB)
Using cached charset_normalizer-3.4.4-cp314-cp314-win_amd64.whl (107 kB)
Using cached idna-3.11-py3-none-any.whl (71 kB)
Downloading urllib3-2.6.3-py3-none-any.whl (131 kB)
Downloading certifi-2026.1.4-py3-none-any.whl (152 kB)
Installing collected packages: urllib3, idna, charset_normalizer, certifi, requests
Successfully installed certifi-2026.1.4 charset_normalizer-3.4.4 idna-3.11 requests-2.32.5 urllib3-2.6.3
For deactivating the virtual environment, we can use the following command −
(websc) D:\Projects\python\myenv\webscrap>deactivate
D:\Projects\python\myenv\webscrap>
You can see that (websc) has been deactivated.
Python Modules for Web Scraping
Web scraping is the process of constructing an agent which can extract, parse, download and organize useful information from the web automatically. In other words, instead of manually saving the data from websites, the web scraping software will automatically load and extract data from multiple websites as per our requirement.
In this section, we are going to discuss about useful Python libraries for web scraping.
Requests
It is a simple python web scraping library. It is an efficient HTTP library used for accessing web pages. With the help of Requests, we can get the raw HTML of web pages which can then be parsed for retrieving the data. Before using requests, let us understand its installation.
Installing Requests
We can install it in either on our virtual environment or on the global installation. With the help of pip command, we can easily install it as follows −
(myenv) D:\Projects\python\myenv>pip3 install requests
Requirement already satisfied: requests in .\Lib\site-packages (2.32.5)
Requirement already satisfied: charset_normalizer=2 in .\Lib\site-packages (from requests) (3.4.4)
Requirement already satisfied: idna=2.5 in .\Lib\site-packages (from requests) (3.11)
Requirement already satisfied: urllib3=1.21.1 in .\Lib\site-packages (from requests) (2.6.2)
Requirement already satisfied: certifi>=2017.4.17 in .\Lib\site-packages (from requests) (2025.11.12)
Example
In this example, we are making a GET HTTP request for a web page. For this we need to first import requests library as follows −
(websc) D:\Projects\python\myenv\webscrap>py
Python 3.14.2 (tags/v3.14.2:df79316, Dec  5 2025, 17:18:21) [MSC v.1944 64 bit (AMD64)] on win32
Type "help", "copyright", "credits" or "license" for more information.
>>> import requests
In this following line of code, we use requests to make a GET HTTP requests for the url: https://authoraditiagarwal.com/ by making a GET request.
>>> r = requests.get('https://authoraditiagarwal.com/')
Now we can retrieve the content by using .text property as follows −
>>> r.text[:200]
'<!DOCTYPE html><html lang="en-US" id="html"><head><meta charset="UTF-8" /><meta http-equiv="X-UA-Compatible" content="IE=10" /><link rel="profile" href="http://gmpg.org/xfn/11" /><link rel="pingback" '
Observe that in the following output, we got the first 200 characters.
Out[5]: '<!DOCTYPE html>\n<html lang="en-US"\n\titemscope
\n\titemtype="http://schema.org/WebSite" \n\tprefix="og: http://ogp.me/ns#"
>\n<head>\n\t<meta charset
="UTF-8" />\n\t<meta http-equiv="X-UA-Compatible" content="IE'
Urllib3
It is another Python library that can be used for retrieving data from URLs similar to the requests library. You can read more on this at its technical documentation at https://urllib3.readthedocs.io/en/latest/.
Installing Urllib3
Using the pip command, we can install urllib3 either in our virtual environment or in global installation.
(websc) D:\Projects\python\myenv\webscrap>pip3 install urllib3 bs4
Requirement already satisfied: urllib3 in d:\projects\python\myenv\webscrap\websc\lib\site-packages (2.6.3)
Collecting bs4
  Downloading bs4-0.0.2-py2.py3-none-any.whl.metadata (411 bytes)
Collecting beautifulsoup4 (from bs4)
  Using cached beautifulsoup4-4.14.3-py3-none-any.whl.metadata (3.8 kB)
Collecting soupsieve>=1.6.1 (from beautifulsoup4->bs4)
  Downloading soupsieve-2.8.3-py3-none-any.whl.metadata (4.6 kB)
Collecting typing-extensions>=4.0.0 (from beautifulsoup4->bs4)
  Using cached typing_extensions-4.15.0-py3-none-any.whl.metadata (3.3 kB)
Downloading bs4-0.0.2-py2.py3-none-any.whl (1.2 kB)
Using cached beautifulsoup4-4.14.3-py3-none-any.whl (107 kB)
Downloading soupsieve-2.8.3-py3-none-any.whl (37 kB)
Using cached typing_extensions-4.15.0-py3-none-any.whl (44 kB)
Installing collected packages: typing-extensions, soupsieve, beautifulsoup4, bs4
Successfully installed beautifulsoup4-4.14.3 bs4-0.0.2 soupsieve-2.8.3 typing-extensions-4.15.0
Example: Scraping using Urllib3 and BeautifulSoup
In the following example, we are scraping the web page by using Urllib3 and BeautifulSoup. We are using Urllib3 at the place of requests library for getting the raw data (HTML) from web page. Then we are using BeautifulSoup for parsing that HTML data.
main.py
import urllib3
from bs4 import BeautifulSoup
http = urllib3.PoolManager()
r = http.request('GET', 'https://authoraditiagarwal.com')
soup = BeautifulSoup(r.data, 'html.parser')
print (soup.title)
print (soup.title.text)
This is the output you will observe when you run this code −
<title>Learn and Grow with Aditi Agarwal</title>
Learn and Grow with Aditi Agarwal
Selenium
It is an open source automated testing suite for web applications across different browsers and platforms. It is not a single tool but a suite of software. We have selenium bindings for Python, Java, C#, Ruby and JavaScript. Here we are going to perform web scraping by using selenium and its Python bindings. You can learn more about Selenium with Java on the link Selenium.
Selenium Python bindings provide a convenient API to access Selenium WebDrivers like Firefox, IE, Chrome, Remote etc. The current supported Python versions are 2.7, 3.5 and above.
Installing Selenium
Using the pip command, we can install urllib3 either in our virtual environment or in global installation.
pip install selenium
As selenium requires a driver to interface with the chosen browser, we need to download it. The following table shows different browsers and their links for downloading the same.
Chrome |
|
Edge |
|
Firefox |
|
Safari |
Example
This example shows web scraping using selenium. It can also be used for testing which is called selenium testing.
After downloading the particular driver for the specified version of browser, we need to do programming in Python.
First, need to import webdriver from selenium as follows −
from selenium import webdriver
Now, provide the path of web driver which we have downloaded as per our requirement −
path = r'C:\\Users\\gaurav\\Desktop\\Chromedriver'
browser = webdriver.Chrome(executable_path = path)
Now, provide the url which we want to open in that web browser now controlled by our Python script.
browser.get('https://authoraditiagarwal.com/leadershipmanagement')
We can also scrape a particular element by providing the xpath as provided in lxml.
browser.find_element_by_xpath('/html/body').click()
You can check the browser, controlled by Python script, for output.
Scrapy
Scrapy is a fast, open-source web crawling framework written in Python, used to extract the data from the web page with the help of selectors based on XPath. Scrapy was first released on June 26, 2008 licensed under BSD, with a milestone 1.0 releasing in June 2015. It provides us all the tools we need to extract, process and structure the data from websites.
Installing Scrapy
Using the pip command, we can install urllib3 either in our virtual environment or in global installation.
pip3 install scrapy
For more detail study of Scrapy you can go to the link Scrapy
Python Web Scraping - Legality
With Python, we can scrape any website or particular elements of a web page but do you have any idea whether it is legal or not? Before scraping any website we must have to know about the legality of web scraping. This chapter will explain the concepts related to legality of web scraping.
Introduction
Generally, if you are going to use the scraped data for personal use, then there may not be any problem. But if you are going to republish that data, then before doing the same you should make download request to the owner or do some background research about policies as well about the data you are going to scrape.
Research Required Prior to Scraping
If you are targeting a website for scraping data from it, we need to understand its scale and structure. Following are some of the files which we need to analyze before starting web scraping.
Analyzing robots.txt
Actually most of the publishers allow programmers to crawl their websites at some extent. In other sense, publishers want specific portions of the websites to be crawled. To define this, websites must put some rules for stating which portions can be crawled and which cannot be. Such rules are defined in a file called robots.txt.
robots.txt is human readable file used to identify the portions of the website that crawlers are allowed as well as not allowed to scrape. There is no standard format of robots.txt file and the publishers of website can do modifications as per their needs. We can check the robots.txt file for a particular website by providing a slash and robots.txt after url of that website. For example, if we want to check it for Google.com, then we need to type https://www.google.com/robots.txt and we will get something as follows −
User-agent: *
Disallow: /search
Allow: /search/about
Allow: /search/static
Allow: /search/howsearchworks
Disallow: /sdch
Disallow: /groups
Disallow: /index.html?
Disallow: /?
Allow: /?hl=
Disallow: /?hl=*&
Allow: /?hl=*&gws_rd=ssl$
and so on..
Some of the most common rules that are defined in a websites robots.txt file are as follows −
   User-agent: BadCrawler
Disallow: /
The above rule means the robots.txt file asks a crawler with BadCrawler user agent not to crawl their website.
User-agent: *
Crawl-delay: 5
Disallow: /trap
The above rule means the robots.txt file delays a crawler for 5 seconds between download requests for all user-agents for avoiding overloading server. The /trap link will try to block malicious crawlers who follow disallowed links. There are many more rules that can be defined by the publisher of the website as per their requirements. Some of them are discussed here −
Analyzing Sitemap files
What you supposed to do if you want to crawl a website for updated information? You will crawl every web page for getting that updated information, but this will increase the server traffic of that particular website. That is why websites provide sitemap files for helping the crawlers to locate updating content without needing to crawl every web page. Sitemap standard is defined at http://www.sitemaps.org/protocol.html.
Content of Sitemap file
The following is the content of sitemap file of https://www.microsoft.com/robots.txt that is discovered in robot.txt file −
Sitemap: https://www.microsoft.com/en-us/explore/msft_sitemap_index.xml
Sitemap: https://www.microsoft.com/learning/sitemap.xml
Sitemap: https://www.microsoft.com/en-us/licensing/sitemap.xml
Sitemap: https://www.microsoft.com/en-us/legal/sitemap.xml
Sitemap: https://www.microsoft.com/filedata/sitemaps/RW5xN8
Sitemap: https://www.microsoft.com/store/collections.xml
Sitemap: https://www.microsoft.com/store/productdetailpages.index.xml
Sitemap: https://www.microsoft.com/en-us/store/locations/store-locationssitemap.xml
The above content shows that the sitemap lists the URLs on website and further allows a webmaster to specify some additional information like last updated date, change of contents, importance of URL with relation to others etc. about each URL.
What is the Size of Website?
Is the size of a website, i.e. the number of web pages of a website affects the way we crawl? Certainly yes. Because if we have less number of web pages to crawl, then the efficiency would not be a serious issue, but suppose if our website has millions of web pages, for example Microsoft.com, then downloading each web page sequentially would take several months and then efficiency would be a serious concern.
Checking Websites Size
By checking the size of result of Googles crawler, we can have an estimate of the size of a website. Our result can be filtered by using the keyword site while doing the Google search. For example, estimating the size of https://authoraditiagarwal.com/ is given below −
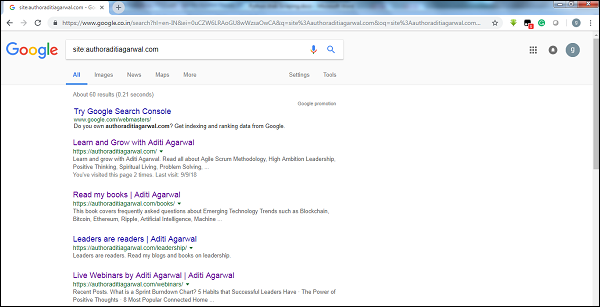
You can see there are around 60 results which mean it is not a big website and crawling would not lead the efficiency issue.
Which technology is used by website?
Another important question is whether the technology used by website affects the way we crawl? Yes, it affects. But how we can check about the technology used by a website? There is a Python library named builtwith with the help of which we can find out about the technology used by a website.
Example
In this example we are going to check the technology used by the website https://authoraditiagarwal.com with the help of Python library builtwith. But before using this library, we need to install it as follows −
(websc) D:\Projects\python\myenv\webscrap>pip3 install builtwith
Collecting builtwith
  Downloading builtwith-1.3.4.tar.gz (34 kB)
  Installing build dependencies ... done
  Getting requirements to build wheel ... done
  Preparing metadata (pyproject.toml) ... done
Collecting six (from builtwith)
  Using cached six-1.17.0-py2.py3-none-any.whl.metadata (1.7 kB)
Using cached six-1.17.0-py2.py3-none-any.whl (11 kB)
Building wheels for collected packages: builtwith
  Building wheel for builtwith (pyproject.toml) ... done
  Created wheel for builtwith: filename=builtwith-1.3.4-py3-none-any.whl size=36093 sha256=651c662ae9443281e2f95e30df6720a9b2a7fe97262c5c6b3f20e1b450456e46
  Stored in directory: c:\users\mahes\appdata\local\pip\cache\wheels\3e\b2\2d\9634130410d5305d730610ecd67ee4ea15f61bc445a97109fb
Successfully built builtwith
Installing collected packages: six, builtwith
Successfully installed builtwith-1.3.4 six-1.17.0
Now, with the help of following simple line of codes we can check the technology used by a particular website −
(websc) D:\Projects\python\myenv\webscrap>py
Python 3.14.2 (tags/v3.14.2:df79316, Dec  5 2025, 17:18:21) [MSC v.1944 64 bit (AMD64)] on win32
Type "help", "copyright", "credits" or "license" for more information.
>>> import builtwith
>>> builtwith.parse('http://authoraditiagarwal.com')
{'web-servers': ['Apache'], 'advertising-networks': ['Google AdSense'], 'javascript-frameworks': ['RequireJS', 'jQuery'], 'ecommerce': ['WooCommerce'], 'cms': ['WordPress'], 'programming-languages': ['PHP'], 'blogs': ['PHP', 'WordPress'], 'cache-tools': ['WordPress Super Cache']}
>>>
Who is the owner of website?
The owner of the website also matters because if the owner is known for blocking the crawlers, then the crawlers must be careful while scraping the data from website. There is a protocol named Whois with the help of which we can find out about the owner of the website.
Example
In this example we are going to check the owner of the website say microsoft.com with the help of Whois. But before using this library, we need to install it as follows −
(base) D:\ProgramData>pip3 install python-whois
(websc) D:\Projects\python\myenv\webscrap>pip3 install python-whois
Collecting python-whois
  Downloading python_whois-0.9.6-py3-none-any.whl.metadata (3.0 kB)
Collecting python-dateutil (from python-whois)
  Using cached python_dateutil-2.9.0.post0-py2.py3-none-any.whl.metadata (8.4 kB)
Requirement already satisfied: six>=1.5 in d:\projects\python\myenv\webscrap\websc\lib\site-packages (from python-dateutil->python-whois) (1.17.0)
Downloading python_whois-0.9.6-py3-none-any.whl (116 kB)
Using cached python_dateutil-2.9.0.post0-py2.py3-none-any.whl (229 kB)
Installing collected packages: python-dateutil, python-whois
Successfully installed python-dateutil-2.9.0.post0 python-whois-0.9.6
Now, with the help of following simple line of codes we can check the technology used by a particular website −
(websc) D:\Projects\python\myenv\webscrap>py
Python 3.14.2 (tags/v3.14.2:df79316, Dec  5 2025, 17:18:21) [MSC v.1944 64 bit (AMD64)] on win32
Type "help", "copyright", "credits" or "license" for more information.
>>> import whois
>>> print (whois.whois('microsoft.com'))
{
  "domain_name": "MICROSOFT.COM",
  "registrar": "MarkMonitor, Inc.",
  "registrar_url": "http://www.markmonitor.com",
  "reseller": null,
  "whois_server": "whois.markmonitor.com",
  "referral_url": null,
  "updated_date": "2026-01-29 18:46:57+00:00",
  "creation_date": "1991-05-02 04:00:00+00:00",
  "expiration_date": [
    "2027-05-03 04:00:00+00:00",
    "2027-05-03 00:00:00+00:00"
  ],
  "name_servers": [
    "NS1-39.AZURE-DNS.COM",
    "NS2-39.AZURE-DNS.NET",
    "NS3-39.AZURE-DNS.ORG",
    "NS4-39.AZURE-DNS.INFO"
  ],
  "status": [
    "clientDeleteProhibited https://icann.org/epp#clientDeleteProhibited",
    "clientTransferProhibited https://icann.org/epp#clientTransferProhibited",
    "clientUpdateProhibited https://icann.org/epp#clientUpdateProhibited",
    "serverDeleteProhibited https://icann.org/epp#serverDeleteProhibited",
    "serverTransferProhibited https://icann.org/epp#serverTransferProhibited",
    "serverUpdateProhibited https://icann.org/epp#serverUpdateProhibited",
    "clientUpdateProhibited (https://www.icann.org/epp#clientUpdateProhibited)",
    "clientTransferProhibited (https://www.icann.org/epp#clientTransferProhibited)",
    "clientDeleteProhibited (https://www.icann.org/epp#clientDeleteProhibited)",
    "serverUpdateProhibited (https://www.icann.org/epp#serverUpdateProhibited)",
    "serverTransferProhibited (https://www.icann.org/epp#serverTransferProhibited)",
    "serverDeleteProhibited (https://www.icann.org/epp#serverDeleteProhibited)"
  ],
  "emails": [
    "abusecomplaints@markmonitor.com",
    "admin@domains.microsoft",
    "msnhst@microsoft.com",
    "whoisrequest@markmonitor.com"
  ],
  "dnssec": "unsigned",
  "name": "Domain Administrator",
  "org": "Microsoft Corporation",
  "address": "One Microsoft Way,",
  "city": "Redmond",
  "state": "WA",
  "registrant_postal_code": "98052",
  "country": "US",
  "tech_name": "MSN Hostmaster",
  "tech_org": null,
  "admin_name": null,
  "admin_org": null
}
>>>
Python Web Scraping - Data Extraction
Analyzing a web page means understanding its sructure . Now, the question arises why it is important for web scraping? In this chapter, let us understand this in detail.
Web page Analysis
Web page analysis is important because without analyzing we are not able to know in which form we are going to receive the data from (structured or unstructured) that web page after extraction. We can do web page analysis in the following ways −
Viewing Page Source
This is a way to understand how a web page is structured by examining its source code. To implement this, we need to right click the page and then must select the View page source option. Then, we will get the data of our interest from that web page in the form of HTML. But the main concern is about whitespaces and formatting which is difficult for us to format.
Inspecting Page Source by Clicking Inspect Element Option
This is another way of analyzing web page. But the difference is that it will resolve the issue of formatting and whitespaces in the source code of web page. You can implement this by right clicking and then selecting the Inspect or Inspect element option from menu. It will provide the information about particular area or element of that web page.
Different Ways to Extract Data from Web Page
The following methods are mostly used for extracting data from a web page −
Regular Expression
They are highly specialized programming language embedded in Python. We can use it through re module of Python. It is also called RE or regexes or regex patterns. With the help of regular expressions, we can specify some rules for the possible set of strings we want to match from the data.
If you want to learn more about regular expression in general, go to the link https://www.tutorialspoint.com/automata_theory/regular_expressions.htm and if you want to know more about re module or regular expression in Python, you can follow the link https://www.tutorialspoint.com/python/python_reg_expressions.htm.
Example - Scraping Data
In the following example, we are going to scrape data about a tag from https://authoraditiagarwal.com/ after matching the contents of <i> with the help of regular expression.
import re
import urllib.request
response = urllib.request.urlopen('https://authoraditiagarwal.com/')
html = response.read()
text = html.decode()
result = re.findall('<i>(.*?)</i>',text)
print(result)
Output
The corresponding output will be as shown here −
['', '', '', '', 'My Blog']
Observe that in the above output you can see the details.
Beautiful Soup
Suppose we want to collect all the hyperlinks from a web page, then we can use a parser called BeautifulSoup which can be known in more detail at https://www.crummy.com/software/BeautifulSoup/bs4/doc/. In simple words, BeautifulSoup is a Python library for pulling data out of HTML and XML files. It can be used with requests, because it needs an input (document or url) to create a soup object asit cannot fetch a web page by itself. You can use the following Python script to gather the title of web page and hyperlinks.
Installing Beautiful Soup
Using the pip command, we can install beautifulsoup either in our virtual environment or in global installation.
(websc) D:\Projects\python\myenv\webscrap>pip3 install bs4
Requirement already satisfied: bs4 in d:\projects\python\myenv\webscrap\websc\lib\site-packages (0.0.2)
Requirement already satisfied: beautifulsoup4 in d:\projects\python\myenv\webscrap\websc\lib\site-packages (from bs4) (4.14.3)
Requirement already satisfied: soupsieve>=1.6.1 in d:\projects\python\myenv\webscrap\websc\lib\site-packages (from beautifulsoup4->bs4) (2.8.3)
Requirement already satisfied: typing-extensions>=4.0.0 in d:\projects\python\myenv\webscrap\websc\lib\site-packages (from beautifulsoup4->bs4) (4.15.0)
Example
Note that in this example, we are extending the above example implemented with requests python module. we are using r.text for creating a soup object which will further be used to fetch details like title of the webpage.
First, we need to import necessary Python modules −
import requests
from bs4 import BeautifulSoup
In this following line of code we use requests to make a GET HTTP requests for the url: https://authoraditiagarwal.com/ by making a GET request.
r = requests.get('https://authoraditiagarwal.com')
Now we need to create a Soup object as follows −
main.py
import requests
from bs4 import BeautifulSoup
r = requests.get('https://authoraditiagarwal.com')

soup = BeautifulSoup(r.text, 'html.parser')
print (soup.title)
print (soup.title.text)
Output
The corresponding output will be as shown here −
<title>Learn and Grow with Aditi Agarwal</title>
Learn and Grow with Aditi Agarwal
Lxml
Another Python library we are going to discuss for web scraping is lxml. It is a highperformance HTML and XML parsing library. It is comparatively fast and straightforward. You can read about it more on https://lxml.de/.
Installing lxml
Using the pip command, we can install lxml either in our virtual environment or in global installation.
(websc) D:\Projects\python\myenv\webscrap>pip3 install lxml
Collecting lxml
  Downloading lxml-6.0.2-cp314-cp314-win_amd64.whl.metadata (3.7 kB)
Downloading lxml-6.0.2-cp314-cp314-win_amd64.whl (4.1 MB)
   ━━━━━━━━━━━━━━━━━━━━━━━━━━━━━━━━━━━━━━━━ 4.1/4.1 MB 3.9 MB/s  0:00:01
Installing collected packages: lxml
Successfully installed lxml-6.0.2
Example: Data extraction using lxml and requests
In the following example, we are scraping a particular element of the web page from authoraditiagarwal.com by using lxml and requests −
First, we need to import the requests and html from lxml library as follows −
import requests
from lxml import html
Now we need to provide the url of web page to scrap
url = "https://authoraditiagarwal.com/"
Now we need to provide the path (Xpath) to particular element of that web page −
main.py
import requests
from lxml import html

url = "https://authoraditiagarwal.com/"

path = '//*[@id="pgc-58-3-3"]/div/div/h3[1]'
response = requests.get(url)
byte_string = response.content
source_code = html.fromstring(byte_string)
tree = source_code.xpath(path)
print(tree[0].text_content())
Output
The corresponding output will be as shown here −
Virtual PI Planning
Python Web Scraping - Data Processing
In earlier chapters, we learned about extracting the data from web pages or web scraping by various Python modules. In this chapter, let us look into various techniques to process the data that has been scraped.
Introduction
To process the data that has been scraped, we must store the data on our local machine in a particular format like spreadsheet (CSV), JSON or sometimes in databases like MySQL.
CSV and JSON Data Processing
First, we are going to write the information, after grabbing from web page, into a CSV file or a spreadsheet. Let us first understand through a simple example in which we will first grab the information using BeautifulSoup module, as did earlier, and then by using Python CSV module we will write that textual information into CSV file.
First, we need to import the necessary Python libraries as follows −
import requests
from bs4 import BeautifulSoup
import csv
In this following line of code, we use requests to make a GET HTTP requests for the url: https://authoraditiagarwal.com/ by making a GET request.
r = requests.get('https://authoraditiagarwal.com/')
Now, we need to create a Soup object as follows −
soup = BeautifulSoup(r.text, 'lxml')
Now, with the help of next lines of code, we will write the grabbed data into a CSV file named dataprocessing.csv.
f = csv.writer(open(' dataprocessing.csv ','w'))
f.writerow(['Title'])
f.writerow([soup.title.text])
After running this script, the textual information or the title of the webpage will be saved in the above mentioned CSV file on your local machine.
Similarly, we can save the collected information in a JSON file. The following is an easy to understand Python script for doing the same in which we are grabbing the same information as we did in last Python script, but this time the grabbed information is saved in JSONfile.txt by using JSON Python module.
import requests
from bs4 import BeautifulSoup
import csv
import json
r = requests.get('https://authoraditiagarwal.com/')
soup = BeautifulSoup(r.text, 'lxml')
y = json.dumps(soup.title.text)
with open('JSONFile.txt', 'wt') as outfile:
   json.dump(y, outfile)
After running this script, the grabbed information i.e. title of the webpage will be saved in the above mentioned text file on your local machine.
Data Processing using AWS S3
Sometimes we may want to save scraped data in our local storage for archive purpose. But what if the we need to store and analyze this data at a massive scale? The answer is cloud storage service named Amazon S3 or AWS S3 (Simple Storage Service). Basically AWS S3 is an object storage which is built to store and retrieve any amount of data from anywhere.
We can follow the following steps for storing data in AWS S3 −
Step 1 − First we need an AWS account which will provide us the secret keys for using in our Python script while storing the data. It will create a S3 bucket in which we can store our data.
Step 2 − Next, we need to install boto3 Python library for accessing S3 bucket. It can be installed with the help of the following command −
pip3 install boto3
Step 3 − Next, we can use the following Python script for scraping data from web page and saving it to AWS S3 bucket.
First, we need to import Python libraries for scraping, here we are working with requests, and boto3 saving data to S3 bucket.
import requests
import boto3
Now we can scrape the data from our URL.
data = requests.get("Enter the URL").text
Now for storing data to S3 bucket, we need to create S3 client as follows −
s3 = boto3.client('s3')
bucket_name = "our-content"
Next line of code will create S3 bucket as follows −
s3.create_bucket(Bucket = bucket_name, ACL = 'public-read')
s3.put_object(Bucket = bucket_name, Key = '', Body = data, ACL = "public-read")
Now you can check the bucket with name our-content from your AWS account.
Data processing using MySQL
Let us learn how to process data using MySQL. If you want to learn about MySQL, then you can follow the link https://www.tutorialspoint.com/mysql/.
With the help of following steps, we can scrape and process data into MySQL table −
Step 1 − First, by using MySQL we need to create a database and table in which we want to save our scraped data. For example, we are creating the table with following query −
CREATE TABLE Scrap_pages (id BIGINT(7) NOT NULL AUTO_INCREMENT,
title VARCHAR(200), content VARCHAR(10000),PRIMARY KEY(id));
Step 2 − Next, we need to deal with Unicode. Note that MySQL does not handle Unicode by default. We need to turn on this feature with the help of following commands which will change the default character set for the database, for the table and for both of the columns −
ALTER DATABASE scrap CHARACTER SET = utf8mb4 COLLATE = utf8mb4_unicode_ci;
ALTER TABLE Scrap_pages CONVERT TO CHARACTER SET utf8mb4 COLLATE
utf8mb4_unicode_ci;
ALTER TABLE Scrap_pages CHANGE title title VARCHAR(200) CHARACTER SET utf8mb4
COLLATE utf8mb4_unicode_ci;
ALTER TABLE pages CHANGE content content VARCHAR(10000) CHARACTER SET utf8mb4
COLLATE utf8mb4_unicode_ci;
Step 3 − Now, integrate MySQL with Python. For this, we will need PyMySQL which can be installed with the help of the following command
pip3 install PyMySQL
Step 4 − Now, our database named Scrap, created earlier, is ready to save the data, after scraped from web, into table named Scrap_pages. Here in our example we are going to scrape data from Wikipedia and it will be saved into our database.
First, we need to import the required Python modules.
from urllib.request import urlopen
from bs4 import BeautifulSoup
import datetime
import random
import pymysql
import re
Now, make a connection, that is integrate this with Python.
conn = pymysql.connect(host='127.0.0.1',user='root', passwd = None, db = 'mysql',
charset = 'utf8')
cur = conn.cursor()
cur.execute("USE scrap")
random.seed(datetime.datetime.now())
def store(title, content):
   cur.execute('INSERT INTO scrap_pages (title, content) VALUES ''("%s","%s")', (title, content))
   cur.connection.commit()
Now, connect with Wikipedia and get data from it.
def getLinks(articleUrl):
   html = urlopen('http://en.wikipedia.org'+articleUrl)
   bs = BeautifulSoup(html, 'html.parser')
   title = bs.find('h1').get_text()
   content = bs.find('div', {'id':'mw-content-text'}).find('p').get_text()
   store(title, content)
   return bs.find('div', {'id':'bodyContent'}).findAll('a',href=re.compile('^(/wiki/)((?!:).)*$'))
links = getLinks('/wiki/Kevin_Bacon')
try:
   while len(links) > 0:
      newArticle = links[random.randint(0, len(links)-1)].attrs['href']
      print(newArticle)
      links = getLinks(newArticle)
Lastly, we need to close both cursor and connection.
finally:
   cur.close()
   conn.close()
This will save the data gather from Wikipedia into table named scrap_pages. If you are familiar with MySQL and web scraping, then the above code would not be tough to understand.
Data processing using PostgreSQL
PostgreSQL, developed by a worldwide team of volunteers, is an open source relational database Management system (RDMS). The process of processing the scraped data using PostgreSQL is similar to that of MySQL. There would be two changes: First, the commands would be different to MySQL and second, here we will use psycopg2 Python library to perform its integration with Python.
If you are not familiar with PostgreSQL then you can learn it at https://www.tutorialspoint.com/postgresql/. And with the help of following command we can install psycopg2 Python library −
pip3 install psycopg2
Python Web Scraping - Processing Images and Videos
Web scraping usually involves downloading, storing and processing the web media content. In this chapter, let us understand how to process the content downloaded from the web.
Introduction
The web media content that we obtain during scraping can be images, audio and video files, in the form of non-web pages as well as data files. But, can we trust the downloaded data especially on the extension of data we are going to download and store in our computer memory? This makes it essential to know about the type of data we are going to store locally.
Getting Media Content from Web Page
In this section, we are going to learn how we can download media content which correctly represents the media type based on the information from web server. We can do it with the help of Python requests module as we did in previous chapter.
First, we need to import necessary Python modules as follows −
import requests
Now, provide the URL of the media content we want to download and store locally.
url = "https://authoraditiagarwal.com/wpcontent/uploads/2018/05/MetaSlider_ThinkBig-1080x180.jpg"
Use the following code to create HTTP response object.
r = requests.get(url)
With the help of following line of code, we can save the received content as .png file.
with open("ThinkBig.png",'wb') as f:
   f.write(r.content)
After running the above Python script, we will get a file named ThinkBig.png, which would have the downloaded image.
Extracting Filename from URL
After downloading the content from web site, we also want to save it in a file with a file name found in the URL. But we can also check, if numbers of additional fragments exist in URL too. For this, we need to find the actual filename from the URL.
With the help of following Python script, using urlparse, we can extract the filename from URL −
import urllib3
import os
url = "https://authoraditiagarwal.com/wpcontent/uploads/2018/05/MetaSlider_ThinkBig-1080x180.jpg"
a = urlparse(url)
a.path
You can observe the output as shown below −
'/wp-content/uploads/2018/05/MetaSlider_ThinkBig-1080x180.jpg'
os.path.basename(a.path)
You can observe the output as shown below −
'MetaSlider_ThinkBig-1080x180.jpg'
Once you run the above script, we will get the filename from URL.
Information about Type of Content from URL
While extracting the contents from web server, by GET request, we can also check its information provided by the web server. With the help of following Python script we can determine what web server means with the type of the content −
First, we need to import necessary Python modules as follows −
import requests
Now, we need to provide the URL of the media content we want to download and store locally.
url = "https://authoraditiagarwal.com/wpcontent/uploads/2018/05/MetaSlider_ThinkBig-1080x180.jpg"
Following line of code will create HTTP response object.
r = requests.get(url, allow_redirects=True)
Now, we can get what type of information about content can be provided by web server.
for headers in r.headers: print(headers)
You can observe the output as shown below −
Date
Server
Upgrade
Connection
Last-Modified
Accept-Ranges
Content-Length
Keep-Alive
Content-Type
With the help of following line of code we can get the particular information about content type, say content-type −
print (r.headers.get('content-type'))
You can observe the output as shown below −
image/jpeg
With the help of following line of code, we can get the particular information about content type, say EType −
print (r.headers.get('ETag'))
You can observe the output as shown below −
None
Observe the following command −
print (r.headers.get('content-length'))
You can observe the output as shown below −
12636
With the help of following line of code we can get the particular information about content type, say Server −
print (r.headers.get('Server'))
You can observe the output as shown below −
Apache
Generating Thumbnail for Images
Thumbnail is a very small description or representation. A user may want to save only thumbnail of a large image or save both the image as well as thumbnail. In this section we are going to create a thumbnail of the image named ThinkBig.png downloaded in the previous section Getting media content from web page.
For this Python script, we need to install Python library named Pillow, a fork of the Python Image library having useful functions for manipulating images. It can be installed with the help of following command −
pip install pillow
The following Python script will create a thumbnail of the image and will save it to the current directory by prefixing thumbnail file with Th_
import glob
from PIL import Image
for infile in glob.glob("ThinkBig.png"):
   img = Image.open(infile)
   img.thumbnail((128, 128), Image.ANTIALIAS)
   if infile[0:2] != "Th_":
      img.save("Th_" + infile, "png")
The above code is very easy to understand and you can check for the thumbnail file in the current directory.
Screenshot from Website
In web scraping, a very common task is to take screenshot of a website. For implementing this, we are going to use selenium and webdriver. The following Python script will take the screenshot from website and will save it to current directory.
From selenium import webdriver
path = r'C:\\Users\\gaurav\\Desktop\\Chromedriver'
browser = webdriver.Chrome(executable_path = path)
browser.get('https://tutorialspoint.com/')
screenshot = browser.save_screenshot('screenshot.png')
browser.quit
You can observe the output as shown below −
DevTools listening on ws://127.0.0.1:1456/devtools/browser/488ed704-9f1b-44f0-
a571-892dc4c90eb7
<bound method WebDriver.quit of <selenium.webdriver.chrome.webdriver.WebDriver
(session="37e8e440e2f7807ef41ca7aa20ce7c97")>>
After running the script, you can check your current directory for screenshot.png file.

Thumbnail Generation for Video
Suppose we have downloaded videos from website and wanted to generate thumbnails for them so that a specific video, based on its thumbnail, can be clicked. For generating thumbnail for videos we need a simple tool called ffmpeg which can be downloaded from www.ffmpeg.org. After downloading, we need to install it as per the specifications of our OS.
The following Python script will generate thumbnail of the video and will save it to our local directory −
import subprocess
video_MP4_file = C:\Users\gaurav\desktop\solar.mp4
thumbnail_image_file = 'thumbnail_solar_video.jpg'
subprocess.call(['ffmpeg', '-i', video_MP4_file, '-ss', '00:00:20.000', '-
   vframes', '1', thumbnail_image_file, "-y"])
After running the above script, we will get the thumbnail named thumbnail_solar_video.jpg saved in our local directory.
Ripping an MP4 video to an MP3
Suppose you have downloaded some video file from a website, but you only need audio from that file to serve your purpose, then it can be done in Python with the help of Python library called moviepy which can be installed with the help of following command −
pip install moviepy
Now, after successfully installing moviepy with the help of following script we can convert and MP4 to MP3.
import moviepy.editor as mp
clip = mp.VideoFileClip(r"C:\Users\gaurav\Desktop\1234.mp4")
clip.audio.write_audiofile("movie_audio.mp3")
You can observe the output as shown below −
[MoviePy] Writing audio in movie_audio.mp3
100%|
| 674/674 [00:01<00:00,
476.30it/s]
[MoviePy] Done.
The above script will save the audio MP3 file in the local directory.
Python Web Scraping - Dealing with Text
In the previous chapter, we have seen how to deal with videos and images that we obtain as a part of web scraping content. In this chapter we are going to deal with text analysis by using Python library and will learn about this in detail.
Introduction
You can perform text analysis in by using Python library called Natural Language Tool Kit (NLTK). Before proceeding into the concepts of NLTK, let us understand the relation between text analysis and web scraping.
Analyzing the words in the text can lead us to know about which words are important, which words are unusual, how words are grouped. This analysis eases the task of web scraping.
Getting started with NLTK
The Natural language toolkit (NLTK) is collection of Python libraries which is designed especially for identifying and tagging parts of speech found in the text of natural language like English.
Installing NLTK
You can use the following command to install NLTK in Python −
pip install nltk
If you are using Anaconda, then a conda package for NLTK can be built by using the following command −
conda install -c anaconda nltk
Downloading NLTKs Data
After installing NLTK, we have to download preset text repositories. But before downloading text preset repositories, we need to import NLTK with the help of import command as follows −
import nltk
Now, with the help of following command NLTK data can be downloaded −
nltk.download()
Installation of all available packages of NLTK will take some time, but it is always recommended to install all the packages.
Installing Other Necessary packages
We also need some other Python packages like gensim and pattern for doing text analysis as well as building building natural language processing applications by using NLTK.
gensim − A robust semantic modeling library which is useful for many applications. It can be installed by the following command −
pip3 install gensim
pattern − Used to make gensim package work properly. It can be installed by the following command −
pip3 install pattern
Tokenization
The Process of breaking the given text, into the smaller units called tokens, is called tokenization. These tokens can be the words, numbers or punctuation marks. It is also called word segmentation.
Example

NLTK module provides different packages for tokenization. We can use these packages as per our requirement. Some of the packages are described here −
sent_tokenize package − This package will divide the input text into sentences. You can use the following command to import this package −
from nltk.tokenize import sent_tokenize
word_tokenize package − This package will divide the input text into words. You can use the following command to import this package −
from nltk.tokenize import word_tokenize
WordPunctTokenizer package − This package will divide the input text as well as the punctuation marks into words. You can use the following command to import this package −
from nltk.tokenize import WordPuncttokenizer
Stemming
In any language, there are different forms of a words. A language includes lots of variations due to the grammatical reasons. For example, consider the words democracy, democratic, and democratization. For machine learning as well as for web scraping projects, it is important for machines to understand that these different words have the same base form. Hence we can say that it can be useful to extract the base forms of the words while analyzing the text.
This can be achieved by stemming which may be defined as the heuristic process of extracting the base forms of the words by chopping off the ends of words.
NLTK module provides different packages for stemming. We can use these packages as per our requirement. Some of these packages are described here −
PorterStemmer package − Porters algorithm is used by this Python stemming package to extract the base form. You can use the following command to import this package −
from nltk.stem.porter import PorterStemmer
For example, after giving the word writing as the input to this stemmer, the output would be the word write after stemming.
LancasterStemmer package − Lancasters algorithm is used by this Python stemming package to extract the base form. You can use the following command to import this package −
from nltk.stem.lancaster import LancasterStemmer
For example, after giving the word writing as the input to this stemmer then the output would be the word writ after stemming.
SnowballStemmer package − Snowballs algorithm is used by this Python stemming package to extract the base form. You can use the following command to import this package −
from nltk.stem.snowball import SnowballStemmer
For example, after giving the word writing as the input to this stemmer then the output would be the word write after stemming.
Lemmatization
An other way to extract the base form of words is by lemmatization, normally aiming to remove inflectional endings by using vocabulary and morphological analysis. The base form of any word after lemmatization is called lemma.
NLTK module provides following packages for lemmatization −
WordNetLemmatizer package − It will extract the base form of the word depending upon whether it is used as noun as a verb. You can use the following command to import this package −
from nltk.stem import WordNetLemmatizer
Chunking
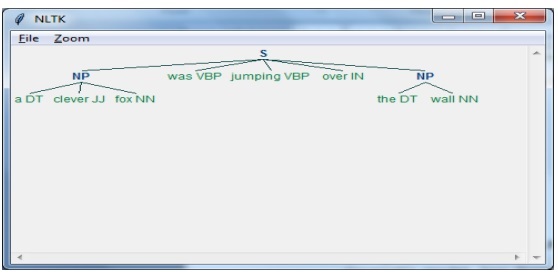
Chunking, which means dividing the data into small chunks, is one of the important processes in natural language processing to identify the parts of speech and short phrases like noun phrases. Chunking is to do the labeling of tokens. We can get the structure of the sentence with the help of chunking process.
Example
In this example, we are going to implement Noun-Phrase chunking by using NLTK Python module. NP chunking is a category of chunking which will find the noun phrases chunks in the sentence.
Steps for implementing noun phrase chunking
We need to follow the steps given below for implementing noun-phrase chunking −
Step 1 − Chunk grammar definition
In the first step we will define the grammar for chunking. It would consist of the rules which we need to follow.
Step 2 − Chunk parser creation
Now, we will create a chunk parser. It would parse the grammar and give the output.
Step 3 − The Output
In this last step, the output would be produced in a tree format.
First, we need to import the NLTK package as follows −
import nltk
Next, we need to define the sentence. Here DT: the determinant, VBP: the verb, JJ: the adjective, IN: the preposition and NN: the noun.
sentence = [("a", "DT"),("clever","JJ"),("fox","NN"),("was","VBP"),("jumping","VBP"),("over","IN"),("the","DT"),("wall","NN")]
Next, we are giving the grammar in the form of regular expression.
grammar = "NP:{<DT>?<JJ>*<NN>}"
Now, next line of code will define a parser for parsing the grammar.
parser_chunking = nltk.RegexpParser(grammar)
Now, the parser will parse the sentence.
parser_chunking.parse(sentence)
Next, we are giving our output in the variable.
Output = parser_chunking.parse(sentence)
With the help of following code, we can draw our output in the form of a tree as shown below.
output.draw()
Bag of Word (BoW) Model Extracting and converting the Text into Numeric Form
Bag of Word (BoW), a useful model in natural language processing, is basically used to extract the features from text. After extracting the features from the text, it can be used in modeling in machine learning algorithms because raw data cannot be used in ML applications.
Working of BoW Model
Initially, model extracts a vocabulary from all the words in the document. Later, using a document term matrix, it would build a model. In this way, BoW model represents the document as a bag of words only and the order or structure is discarded.
Example
Suppose we have the following two sentences −
Sentence1 − This is an example of Bag of Words model.
Sentence2 − We can extract features by using Bag of Words model.
Now, by considering these two sentences, we have the following 14 distinct words −
- This
- is
- an
- example
- bag
- of
- words
- model
- we
- can
- extract
- features
- by
- using
Building a Bag of Words Model in NLTK
Let us look into the following Python script which will build a BoW model in NLTK.
First, import the following package −
from sklearn.feature_extraction.text import CountVectorizer
Next, define the set of sentences −
Sentences=['This is an example of Bag of Words model.', ' We can extract
   features by using Bag of Words model.']
   vector_count = CountVectorizer()
   features_text = vector_count.fit_transform(Sentences).todense()
   print(vector_count.vocabulary_)
Output
It shows that we have 14 distinct words in the above two sentences −
{
   'this': 10, 'is': 7, 'an': 0, 'example': 4, 'of': 9,
   'bag': 1, 'words': 13, 'model': 8, 'we': 12, 'can': 3,
   'extract': 5, 'features': 6, 'by': 2, 'using':11
}
Topic Modeling: Identifying Patterns in Text Data
Generally documents are grouped into topics and topic modeling is a technique to identify the patterns in a text that corresponds to a particular topic. In other words, topic modeling is used to uncover abstract themes or hidden structure in a given set of documents.
You can use topic modeling in following scenarios −
Text Classification
Classification can be improved by topic modeling because it groups similar words together rather than using each word separately as a feature.
Recommender Systems
We can build recommender systems by using similarity measures.
Topic Modeling Algorithms
We can implement topic modeling by using the following algorithms −
Latent Dirichlet Allocation(LDA) − It is one of the most popular algorithm that uses the probabilistic graphical models for implementing topic modeling.
Latent Semantic Analysis(LDA) or Latent Semantic Indexing(LSI) − It is based upon Linear Algebra and uses the concept of SVD (Singular Value Decomposition) on document term matrix.
Non-Negative Matrix Factorization (NMF) − It is also based upon Linear Algebra as like LDA.
The above mentioned algorithms would have the following elements −
- Number of topics: Parameter
- Document-Word Matrix: Input
- WTM (Word Topic Matrix) & TDM (Topic Document Matrix): Output
Python Web Scraping - Dynamic Websites
In this chapter, let us learn how to perform web scraping on dynamic websites and the concepts involved in detail.
Introduction
Web scraping is a complex task and the complexity multiplies if the website is dynamic. According to United Nations Global Audit of Web Accessibility more than 70% of the websites are dynamic in nature and they rely on JavaScript for their functionalities.
Dynamic Website Example
Let us look at an example of a dynamic website and know about why it is difficult to scrape. Here we are going to take example of searching from a website named http://example.webscraping.com/places/default/search. But how can we say that this website is of dynamic nature? It can be judged from the output of following Python script which will try to scrape data from above mentioned webpage −
import re
import urllib.request
response = urllib.request.urlopen('http://example.webscraping.com/places/default/search')
html = response.read()
text = html.decode()
re.findall('<td class="w2p_fw">(.*?)</td>',text)
Output
[ ]
The above output shows that the example scraper failed to extract information because the <div> element we are trying to find is empty.
Approaches for Scraping data from Dynamic Websites
We have seen that the scraper cannot scrape the information from a dynamic website because the data is loaded dynamically with JavaScript. In such cases, we can use the following two techniques for scraping data from dynamic JavaScript dependent websites −
- Reverse Engineering JavaScript
- Rendering JavaScript
Reverse Engineering JavaScript
The process called reverse engineering would be useful and lets us understand how data is loaded dynamically by web pages.
For doing this, we need to click the inspect element tab for a specified URL. Next, we will click NETWORK tab to find all the requests made for that web page including search.json with a path of /ajax. Instead of accessing AJAX data from browser or via NETWORK tab, we can do it with the help of following Python script too −
import requests
url=requests.get('http://example.webscraping.com/ajax/search.json?page=0&page_size=10&search_term=a')
url.json()
Example
The above script allows us to access JSON response by using Python json method. Similarly we can download the raw string response and by using pythons json.loads method, we can load it too. We are doing this with the help of following Python script. It will basically scrape all of the countries by searching the letter of the alphabet a and then iterating the resulting pages of the JSON responses.
main.py
import requests
import string
PAGE_SIZE = 15
url = 'http://example.webscraping.com/ajax/' + 'search.json?page={}&page_size={}&search_term=a'
countries = set()
for letter in string.ascii_lowercase:
   print('Searching with %s' % letter)
   page = 0
   while True:
   response = requests.get(url.format(page, PAGE_SIZE, letter))
   data = response.json()
   print('adding %d records from the page %d' %(len(data.get('records')),page))
   for record in data.get('records'):countries.add(record['country'])
   page += 1
   if page >= data['num_pages']:
      break
   with open('countries.txt', 'w') as countries_file:
   countries_file.write('n'.join(sorted(countries)))
After running the above script, we will get the following output and the records would be saved in the file named countries.txt.
Output
Searching with a
adding 15 records from the page 0
adding 15 records from the page 1
...
Rendering JavaScript
In the previous section, we did reverse engineering on web page that how API worked and how we can use it to retrieve the results in single request. However, we can face following difficulties while doing reverse engineering −
Sometimes websites can be very difficult. For example, if the website is made with advanced browser tool such as Google Web Toolkit (GWT), then the resulting JS code would be machine-generated and difficult to understand and reverse engineer.
Some higher level frameworks like React.js can make reverse engineering difficult by abstracting already complex JavaScript logic.
The solution to the above difficulties is to use a browser rendering engine that parses HTML, applies the CSS formatting and executes JavaScript to display a web page.
Example
In this example, for rendering Java Script we are going to use a familiar Python module Selenium. The following Python code will render a web page with the help of Selenium −
First, we need to import webdriver from selenium as follows −
from selenium import webdriver
Now, provide the path of web driver which we have downloaded as per our requirement −
path = r'C:\\Users\\gaurav\\Desktop\\Chromedriver'
driver = webdriver.Chrome(executable_path = path)
Now, provide the url which we want to open in that web browser now controlled by our Python script.
driver.get('http://example.webscraping.com/search')
Now, we can use ID of the search toolbox for setting the element to select.
driver.find_element_by_id('search_term').send_keys('.')
Next, we can use java script to set the select box content as follows −
js = "document.getElementById('page_size').options[1].text = '100';"
driver.execute_script(js)
The following line of code shows that search is ready to be clicked on the web page −
driver.find_element_by_id('search').click()
Next line of code shows that it will wait for 45 seconds for completing the AJAX request.
driver.implicitly_wait(45)
Now, for selecting country links, we can use the CSS selector as follows −
links = driver.find_elements_by_css_selector('#results a')
Now the text of each link can be extracted for creating the list of countries −
countries = [link.text for link in links]
print(countries)
driver.close()
Python Web Scraping - Form Based Websites
In the previous chapter, we have seen scraping dynamic websites. In this chapter, let us understand scraping of websites that work on user based inputs, that is form based websites.
Introduction
These days WWW (World Wide Web) is moving towards social media as well as usergenerated contents. So the question arises how we can access such kind of information that is beyond login screen? For this we need to deal with forms and logins.
In previous chapters, we worked with HTTP GET method to request information but in this chapter we will work with HTTP POST method that pushes information to a web server for storage and analysis.
Interacting with Login forms
While working on Internet, you must have interacted with login forms many times. They may be very simple like including only a very few HTML fields, a submit button and an action page or they may be complicated and have some additional fields like email, leave a message along with captcha for security reasons.
In this section, we are going to deal with a simple submit form with the help of Python requests library.
First, we need to import requests library as follows −
import requests
Now, we need to provide the information for the fields of login form.
parameters = {Name:Enter your name, Email-id:Your Emailid,Message:Type your message here}
In next line of code, we need to provide the URL on which action of the form would happen.
r = requests.post(enter the URL, data = parameters)
print(r.text)
After running the script, it will return the content of the page where action has happened.
Suppose if you want to submit any image with the form, then it is very easy with requests.post(). You can understand it with the help of following Python script −
import requests
file = {Uploadfile: open(C:\Usres\desktop\123.png,rb)}
r = requests.post(enter the URL, files = file)
print(r.text)
Loading Cookies from the Web Server
A cookie, sometimes called web cookie or internet cookie, is a small piece of data sent from a website and our computer stores it in a file located inside our web browser.
In the context of dealings with login forms, cookies can be of two types. One, we dealt in the previous section, that allows us to submit information to a website and second which lets us to remain in a permanent logged-in state throughout our visit to the website. For the second kind of forms, websites use cookies to keep track of who is logged in and who is not.
What do cookies do?
These days most of the websites are using cookies for tracking. We can understand the working of cookies with the help of following steps −
Step 1 − First, the site will authenticate our login credentials and stores it in our browsers cookie. This cookie generally contains a server-generated toke, time-out and tracking information.
Step 2 − Next, the website will use the cookie as a proof of authentication. This authentication is always shown whenever we visit the website.
Cookies are very problematic for web scrapers because if web scrapers do not keep track of the cookies, the submitted form is sent back and at the next page it seems that they never logged in. It is very easy to track the cookies with the help of Python requests library, as shown below −
import requests
parameters = {Name:Enter your name, Email-id:Your Emailid,Message:Type your message here}
r = requests.post(enter the URL, data = parameters)
In the above line of code, the URL would be the page which will act as the processor for the login form.
print(The cookie is:)
print(r.cookies.get_dict())
print(r.text)
After running the above script, we will retrieve the cookies from the result of last request.
There is another issue with cookies that sometimes websites frequently modify cookies without warning. Such kind of situation can be dealt with requests.Session() as follows −
import requests
session = requests.Session()
parameters = {Name:Enter your name, Email-id:Your Emailid,Message:Type your message here}
r = session.post(enter the URL, data = parameters)
In the above line of code, the URL would be the page which will act as the processor for the login form.
print(The cookie is:)
print(r.cookies.get_dict())
print(r.text)
Observe that you can easily understand the difference between script with session and without session.
Automating forms with Python
In this section we are going to deal with a Python module named Mechanize that will reduce our work and automate the process of filling up forms.
Mechanize module
Mechanize module provides us a high-level interface to interact with forms. Before starting using it we need to install it with the following command −
pip install mechanize
Note that it would work only in Python 2.x.
Example
In this example, we are going to automate the process of filling a login form having two fields namely email and password −
import mechanize
brwsr = mechanize.Browser()
brwsr.open(Enter the URL of login)
brwsr.select_form(nr = 0)
brwsr['email'] = Enter email
brwsr['password'] = Enter password
response = brwsr.submit()
brwsr.submit()
The above code is very easy to understand. First, we imported mechanize module. Then a Mechanize browser object has been created. Then, we navigated to the login URL and selected the form. After that, names and values are passed directly to the browser object.
Python Web Scraping - Processing CAPTCHA
In this chapter, let us understand how to perform web scraping and processing CAPTCHA that is used for testing a user for human or robot.
What is CAPTCHA?
The full form of CAPTCHA is Completely Automated Public Turing test to tell Computers and Humans Apart, which clearly suggests that it is a test to determine whether the user is human or not.
A CAPTCHA is a distorted image which is usually not easy to detect by computer program but a human can somehow manage to understand it. Most of the websites use CAPTCHA to prevent bots from interacting.
Loading CAPTCHA with Python
Suppose we want to do registration on a website and there is form with CAPTCHA, then before loading the CAPTCHA image we need to know about the specific information required by the form. With the help of next Python script we can understand the form requirements of registration form on website named http://example.webscrapping.com.
main.py
import lxml.html
import urllib.request as urllib2
import pprint
import http.cookiejar as cookielib
def form_parsing(html):
   tree = lxml.html.fromstring(html)
   data = {}
   for e in tree.cssselect('form input'):
      if e.get('name'):
         data[e.get('name')] = e.get('value')
   return data
REGISTER_URL = 'http://example.webscraping.com/user/register';
ckj = cookielib.CookieJar()
browser = urllib2.build_opener(urllib2.HTTPCookieProcessor(ckj))
html = browser.open('http://example.webscraping.com/places/default/user/register?_next').read()
form = form_parsing(html)
pprint.pprint(form)
Output
In the above Python script, first we defined a function that will parse the form by using lxml python module and then it will print the form requirements as follows −
{
   '_formkey': '5e306d73-5774-4146-a94e-3541f22c95ab',
   '_formname': 'register',
   '_next': '/places/default/index',
   'email': '',
   'first_name': '',
   'last_name': '',
   'password': '',
   'password_two': '',
   'recaptcha_response_field': None
}
You can check from the above output that all the information except recpatcha_response_field are understandable and straightforward. Now the question arises that how we can handle this complex information and download CAPTCHA. It can be done with the help of pillow Python library as follows;
Pillow Python Package
Pillow is a fork of the Python Image library having useful functions for manipulating images. It can be installed with the help of following command −
pip install pillow
In the next example we will use it for loading the CAPTCHA −
from io import BytesIO
import lxml.html
from PIL import Image
def load_captcha(html):
   tree = lxml.html.fromstring(html)
   img_data = tree.cssselect('div#recaptcha img')[0].get('src')
   img_data = img_data.partition(',')[-1]
   binary_img_data = img_data.decode('base64')
   file_like = BytesIO(binary_img_data)
   img = Image.open(file_like)
   return img
The above python script is using pillow python package and defining a function for loading CAPTCHA image. It must be used with the function named form_parser() that is defined in the previous script for getting information about the registration form. This script will save the CAPTCHA image in a useful format which further can be extracted as string.
OCR: Extracting Text from Image using Python
After loading the CAPTCHA in a useful format, we can extract it with the help of Optical Character Recognition (OCR), a process of extracting text from the images. For this purpose, we are going to use open source Tesseract OCR engine. It can be installed with the help of following command −
pip install pytesseract
Example
Here we will extend the above Python script, which loaded the CAPTCHA by using Pillow Python Package, as follows −
import pytesseract
img = get_captcha(html)
img.save('captcha_original.png')
gray = img.convert('L')
gray.save('captcha_gray.png')
bw = gray.point(lambda x: 0 if x < 1 else 255, '1')
bw.save('captcha_thresholded.png')
The above Python script will read the CAPTCHA in black and white mode which would be clear and easy to pass to tesseract as follows −
pytesseract.image_to_string(bw)
After running the above script we will get the CAPTCHA of registration form as the output.
Python Web Scraping - Testing with Scrapers
This chapter explains how to perform testing using web scrapers in Python.
Introduction
In large web projects, automated testing of websites backend is performed regularly but the frontend testing is skipped often. The main reason behind this is that the programming of websites is just like a net of various markup and programming languages. We can write unit test for one language but it becomes challenging if the interaction is being done in another language. That is why we must have suite of tests to make sure that our code is performing as per our expectation.
Testing using Python
When we are talking about testing, it means unit testing. Before diving deep into testing with Python, we must know about unit testing. Following are some of the characteristics of unit testing −
At-least one aspect of the functionality of a component would be tested in each unit test.
Each unit test is independent and can also run independently.
Unit test does not interfere with success or failure of any other test.
Unit tests can run in any order and must contain at least one assertion.
Unittest − Python Module
Python module named Unittest for unit testing is comes with all the standard Python installation. We just need to import it and rest is the task of unittest.TestCase class which will do the followings −
SetUp and tearDown functions are provided by unittest.TestCase class. These functions can run before and after each unit test.
It also provides assert statements to allow tests to pass or fail.
It runs all the functions that begin with test_ as unit test.
Example
In this example we are going to combine web scraping with unittest. We will test Wikipedia page for searching string Python. It will basically do two tests, first weather the title page is same as the search string i.e.Python or not and second test makes sure that the page has a content div.
First, we will import the required Python modules. We are using BeautifulSoup for web scraping and of course unittest for testing.
from urllib.request import urlopen
from bs4 import BeautifulSoup
import unittest
Now we need to define a class which will extend unittest.TestCase. Global object bs would be shared between all tests. A unittest specified function setUpClass will accomplish it. Here we will define two functions, one for testing the title page and other for testing the page content.
main.py
class Test(unittest.TestCase):
   bs = None
   def setUpClass():
      url = 'https://en.wikipedia.org/wiki/Python'
      Test.bs = BeautifulSoup(urlopen(url), 'html.parser')
   def test_titleText(self):
      pageTitle = Test.bs.find('h1').get_text()
      self.assertEqual('Python', pageTitle);
   def test_contentExists(self):
      content = Test.bs.find('div',{'id':'mw-content-text'})
      self.assertIsNotNone(content)
if __name__ == '__main__':
   unittest.main()
Output
After running the above script we will get the following output −
----------------------------------------------------------------------
Ran 2 tests in 2.773s

OK
An exception has occurred, use %tb to see the full traceback.

SystemExit: False

D:\ProgramData\lib\site-packages\IPython\core\interactiveshell.py:2870:
UserWarning: To exit: use 'exit', 'quit', or Ctrl-D.
 warn("To exit: use 'exit', 'quit', or Ctrl-D.", stacklevel=1)
Example - Testing with Selenium
Let us discuss how to use Python Selenium for testing. It is also called Selenium testing. Both Python unittest and Selenium do not have much in common. We know that Selenium sends the standard Python commands to different browsers, despite variation in their browser's design. Recall that we already installed and worked with Selenium in previous chapters. Here we will create test scripts in Selenium and use it for automation.
With the help of next Python script, we are creating test script for the automation of Facebook Login page. You can modify the example for automating other forms and logins of your choice, however the concept would be same.
First for connecting to web browser, we will import webdriver from selenium module −
from selenium import webdriver
Now, we need to import Keys from selenium module.
from selenium.webdriver.common.keys import Keys
Next we need to provide username and password for login into our facebook account
user = "gauravleekha@gmail.com"
pwd = ""
Next, provide the path to web driver for Chrome.
path = r'C:\\Users\\gaurav\\Desktop\\Chromedriver'
driver = webdriver.Chrome(executable_path=path)
driver.get("http://www.facebook.com")
Now we will verify the conditions by using assert keyword.
assert "Facebook" in driver.title
With the help of following line of code we are sending values to the email section. Here we are searching it by its id but we can do it by searching it by name as driver.find_element_by_name("email").
element = driver.find_element_by_id("email")
element.send_keys(user)
With the help of following line of code we are sending values to the password section. Here we are searching it by its id but we can do it by searching it by name as driver.find_element_by_name("pass").
element = driver.find_element_by_id("pass")
element.send_keys(pwd)
Next line of code is used to press enter/login after inserting the values in email and password field.
element.send_keys(Keys.RETURN)
Now we will close the browser.
driver.close()
After running the above script, Chrome web browser will be opened and you can see email and password is being inserted and clicked on login button.
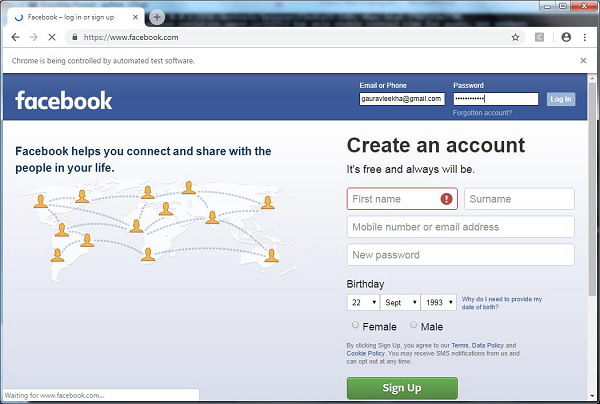
Comparison: unittest or Selenium
The comparison of unittest and selenium is difficult because if you want to work with large test suites, the syntactical rigidity of unites is required. On the other hand, if you are going to test website flexibility then Selenium test would be our first choice. But what if we can combine both of them. We can import selenium into Python unittest and get the best of both. Selenium can be used to get information about a website and unittest can evaluate whether that information meets the criteria for passing the test or not.
For example, we are rewriting the above Python script for automation of Facebook login by combining both of them as follows −
import unittest
from selenium import webdriver

class InputFormsCheck(unittest.TestCase):
   def setUp(self):
      self.driver = webdriver.Chrome(r'C:\Users\gaurav\Desktop\chromedriver')
      def test_singleInputField(self):
      user = "gauravleekha@gmail.com"
      pwd = ""
      pageUrl = "http://www.facebook.com"
      driver=self.driver
      driver.maximize_window()
      driver.get(pageUrl)
      assert "Facebook" in driver.title
      elem = driver.find_element_by_id("email")
      elem.send_keys(user)
      elem = driver.find_element_by_id("pass")
      elem.send_keys(pwd)
      elem.send_keys(Keys.RETURN)
   def tearDown(self):
      self.driver.close()
if __name__ == "__main__":
   unittest.main()