- Kubernetes Tutorial
- Kubernetes - Home
- Kubernetes - Overview
- Kubernetes - Architecture
- Kubernetes - Setup
- Kubernetes - Setup on Ubuntu
- Kubernetes - Images
- Kubernetes - Jobs
- Kubernetes - Labels & Selectors
- Kubernetes - Namespace
- Kubernetes - Node
- Kubernetes - Service
- Kubernetes - POD
- Kubernetes - Replication Controller
- Kubernetes - Replica Sets
- Kubernetes - Deployments
- Kubernetes - Volumes
- Kubernetes - Secrets
- Kubernetes - Network Policy
- Advanced Kubernetes
- Kubernetes - API
- Kubernetes - Kubectl
- Kubernetes - Kubectl Commands
- Kubernetes - Creating an App
- Kubernetes - App Deployment
- Kubernetes - Autoscaling
- Kubernetes - Dashboard Setup
- Kubernetes - Helm Package Management
- Kubernetes - CI/CD Integration
- Kubernetes - Persistent Storage and PVCs
- Kubernetes - RBAC
- Kubernetes - Logging & Monitoring
- Kubernetes - Service Mesh with Istio
- Kubernetes - Backup and Disaster Recovery
- Managing ConfigMaps and Secrets
- Running Stateful Applications
- Multi-Cluster Management
- Security Best Practices
- Kubernetes CRDs
- Debugging Pods and Nodes
- K9s for Cluster Management
- Managing Taints and Tolerations
- Horizontal and Vertical Pod Autoscaling
- Minikube for Local Development
- Kubernetes in Docker
- Deploying Microservices
- Blue-Green Deployments
- Canary Deployments with Commands
- Troubleshooting Kubernetes with Commands
- Scaling Applications with Kubectl
- Advanced Scheduling Techniques
- Upgrading Kubernetes Clusters
- Kubernetes Useful Resources
- Kubernetes - Quick Guide
- Kubernetes - Useful Resources
- Kubernetes - Discussion
Kubernetes - Quick Guide
Kubernetes - Overview
Kubernetes in an open source container management tool hosted by Cloud Native Computing Foundation (CNCF). This is also known as the enhanced version of Borg which was developed at Google to manage both long running processes and batch jobs, which was earlier handled by separate systems.
Kubernetes comes with a capability of automating deployment, scaling of application, and operations of application containers across clusters. It is capable of creating container centric infrastructure.
Features of Kubernetes
Following are some of the important features of Kubernetes.
Continues development, integration and deployment
Containerized infrastructure
Application-centric management
Auto-scalable infrastructure
Environment consistency across development testing and production
Loosely coupled infrastructure, where each component can act as a separate unit
Higher density of resource utilization
Predictable infrastructure which is going to be created
One of the key components of Kubernetes is, it can run application on clusters of physical and virtual machine infrastructure. It also has the capability to run applications on cloud. It helps in moving from host-centric infrastructure to container-centric infrastructure.
Kubernetes - Architecture
In this chapter, we will discuss the basic architecture of Kubernetes.
Kubernetes - Cluster Architecture
As seen in the following diagram, Kubernetes follows client-server architecture. Wherein, we have master installed on one machine and the node on separate Linux machines.
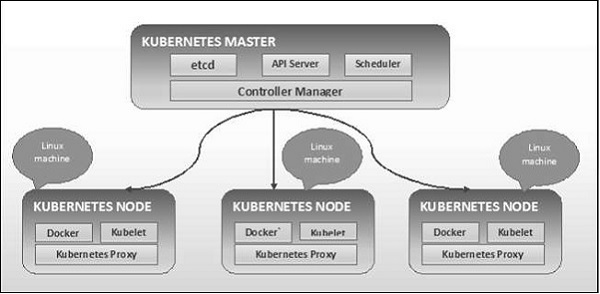
The key components of master and node are defined in the following section.
Kubernetes - Master Machine Components
Following are the components of Kubernetes Master Machine.
etcd
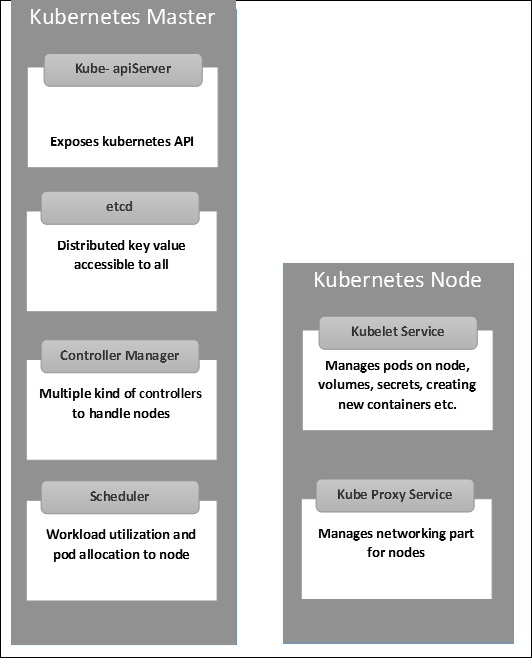
It stores the configuration information which can be used by each of the nodes in the cluster. It is a high availability key value store that can be distributed among multiple nodes. It is accessible only by Kubernetes API server as it may have some sensitive information. It is a distributed key value Store which is accessible to all.
API Server
Kubernetes is an API server which provides all the operation on cluster using the API. API server implements an interface, which means different tools and libraries can readily communicate with it. Kubeconfig is a package along with the server side tools that can be used for communication. It exposes Kubernetes API.
Controller Manager
This component is responsible for most of the collectors that regulates the state of cluster and performs a task. In general, it can be considered as a daemon which runs in nonterminating loop and is responsible for collecting and sending information to API server. It works toward getting the shared state of cluster and then make changes to bring the current status of the server to the desired state. The key controllers are replication controller, endpoint controller, namespace controller, and service account controller. The controller manager runs different kind of controllers to handle nodes, endpoints, etc.
Scheduler
This is one of the key components of Kubernetes master. It is a service in master responsible for distributing the workload. It is responsible for tracking utilization of working load on cluster nodes and then placing the workload on which resources are available and accept the workload. In other words, this is the mechanism responsible for allocating pods to available nodes. The scheduler is responsible for workload utilization and allocating pod to new node.
Kubernetes - Node Components
Following are the key components of Node server which are necessary to communicate with Kubernetes master.
Docker
The first requirement of each node is Docker which helps in running the encapsulated application containers in a relatively isolated but lightweight operating environment.
Kubelet Service
This is a small service in each node responsible for relaying information to and from control plane service. It interacts with etcd store to read configuration details and wright values. This communicates with the master component to receive commands and work. The kubelet process then assumes responsibility for maintaining the state of work and the node server. It manages network rules, port forwarding, etc.
Kubernetes Proxy Service
This is a proxy service which runs on each node and helps in making services available to the external host. It helps in forwarding the request to correct containers and is capable of performing primitive load balancing. It makes sure that the networking environment is predictable and accessible and at the same time it is isolated as well. It manages pods on node, volumes, secrets, creating new containers health checkup, etc.
Kubernetes - Master and Node Structure
The following illustrations show the structure of Kubernetes Master and Node.
Kubernetes - Setup
It is important to set up the Virtual Datacenter (vDC) before setting up Kubernetes. This can be considered as a set of machines where they can communicate with each other via the network. For hands-on approach, you can set up vDC on PROFITBRICKS if you do not have a physical or cloud infrastructure set up.
Once the IaaS setup on any cloud is complete, you need to configure the Master and the Node.
Note − The setup is shown for Ubuntu machines. The same can be set up on other Linux machines as well.
Prerequisites
Installing Docker − Docker is required on all the instances of Kubernetes. Following are the steps to install the Docker.
Step 1 − Log on to the machine with the root user account.
Step 2 − Update the package information. Make sure that the apt package is working.
Step 3 − Run the following commands.
$ sudo apt-get update
$ sudo apt-get install apt-transport-https ca-certificates
Step 4 − Add the new GPG key.
$ sudo apt-key adv \
   --keyserver hkp://ha.pool.sks-keyservers.net:80 \
   --recv-keys 58118E89F3A912897C070ADBF76221572C52609D
$ echo "deb https://apt.dockerproject.org/repo ubuntu-trusty main" | sudo tee
/etc/apt/sources.list.d/docker.list
Step 5 − Update the API package image.
$ sudo apt-get update
Once all the above tasks are complete, you can start with the actual installation of the Docker engine. However, before this you need to verify that the kernel version you are using is correct.
Install Docker Engine
Run the following commands to install the Docker engine.
Step 1 − Logon to the machine.
Step 2 − Update the package index.
$ sudo apt-get update
Step 3 − Install the Docker Engine using the following command.
$ sudo apt-get install docker-engine
Step 4 − Start the Docker daemon.
$ sudo apt-get install docker-engine
Step 5 − To very if the Docker is installed, use the following command.
$ sudo docker run hello-world
Install etcd 2.0
This needs to be installed on Kubernetes Master Machine. In order to install it, run the following commands.
$ curl -L https://github.com/coreos/etcd/releases/download/v2.0.0/etcd
-v2.0.0-linux-amd64.tar.gz -o etcd-v2.0.0-linux-amd64.tar.gz ->1
$ tar xzvf etcd-v2.0.0-linux-amd64.tar.gz ------>2
$ cd etcd-v2.0.0-linux-amd64 ------------>3
$ mkdir /opt/bin ------------->4
$ cp etcd* /opt/bin ----------->5
In the above set of command −
- First, we download the etcd. Save this with specified name.
- Then, we have to un-tar the tar package.
- We make a dir. inside the /opt named bin.
- Copy the extracted file to the target location.
Now we are ready to build Kubernetes. We need to install Kubernetes on all the machines on the cluster.
$ git clone https://github.com/GoogleCloudPlatform/kubernetes.git
$ cd kubernetes
$ make release
The above command will create a _output dir in the root of the kubernetes folder. Next, we can extract the directory into any of the directory of our choice /opt/bin, etc.
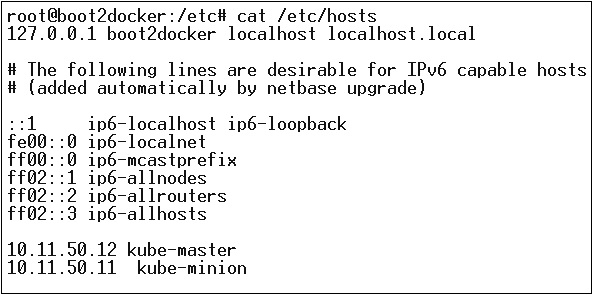
Next, comes the networking part wherein we need to actually start with the setup of Kubernetes master and node. In order to do this, we will make an entry in the host file which can be done on the node machine.
$ echo "<IP address of master machine> kube-master
< IP address of Node Machine>" >> /etc/hosts
Following will be the output of the above command.
Now, we will start with the actual configuration on Kubernetes Master.
First, we will start copying all the configuration files to their correct location.
$ cp <Current dir. location>/kube-apiserver /opt/bin/
$ cp <Current dir. location>/kube-controller-manager /opt/bin/
$ cp <Current dir. location>/kube-kube-scheduler /opt/bin/
$ cp <Current dir. location>/kubecfg /opt/bin/
$ cp <Current dir. location>/kubectl /opt/bin/
$ cp <Current dir. location>/kubernetes /opt/bin/
The above command will copy all the configuration files to the required location. Now we will come back to the same directory where we have built the Kubernetes folder.
$ cp kubernetes/cluster/ubuntu/init_conf/kube-apiserver.conf /etc/init/
$ cp kubernetes/cluster/ubuntu/init_conf/kube-controller-manager.conf /etc/init/
$ cp kubernetes/cluster/ubuntu/init_conf/kube-kube-scheduler.conf /etc/init/

$ cp kubernetes/cluster/ubuntu/initd_scripts/kube-apiserver /etc/init.d/
$ cp kubernetes/cluster/ubuntu/initd_scripts/kube-controller-manager /etc/init.d/
$ cp kubernetes/cluster/ubuntu/initd_scripts/kube-kube-scheduler /etc/init.d/

$ cp kubernetes/cluster/ubuntu/default_scripts/kubelet /etc/default/
$ cp kubernetes/cluster/ubuntu/default_scripts/kube-proxy /etc/default/
$ cp kubernetes/cluster/ubuntu/default_scripts/kubelet /etc/default/
The next step is to update the copied configuration file under /etc. dir.
Configure etcd on master using the following command.
$ ETCD_OPTS = "-listen-client-urls = http://kube-master:4001"
Configure kube-apiserver
For this on the master, we need to edit the /etc/default/kube-apiserver file which we copied earlier.
$ KUBE_APISERVER_OPTS = "--address = 0.0.0.0 \
--port = 8080 \
--etcd_servers = <The path that is configured in ETCD_OPTS> \
--portal_net = 11.1.1.0/24 \
--allow_privileged = false \
--kubelet_port = < Port you want to configure> \
--v = 0"
Configure the kube Controller Manager
We need to add the following content in /etc/default/kube-controller-manager.
$ KUBE_CONTROLLER_MANAGER_OPTS = "--address = 0.0.0.0 \
--master = 127.0.0.1:8080 \
--machines = kube-minion \ -----> #this is the kubernatics node
--v = 0
Next, configure the kube scheduler in the corresponding file.
$ KUBE_SCHEDULER_OPTS = "--address = 0.0.0.0 \
--master = 127.0.0.1:8080 \
--v = 0"
Once all the above tasks are complete, we are good to go ahead by bring up the Kubernetes Master. In order to do this, we will restart the Docker.
$ service docker restart
Kubernetes Node Configuration
Kubernetes node will run two services the kubelet and the kube-proxy. Before moving ahead, we need to copy the binaries we downloaded to their required folders where we want to configure the kubernetes node.
Use the same method of copying the files that we did for kubernetes master. As it will only run the kubelet and the kube-proxy, we will configure them.
$ cp <Path of the extracted file>/kubelet /opt/bin/
$ cp <Path of the extracted file>/kube-proxy /opt/bin/
$ cp <Path of the extracted file>/kubecfg /opt/bin/
$ cp <Path of the extracted file>/kubectl /opt/bin/
$ cp <Path of the extracted file>/kubernetes /opt/bin/
Now, we will copy the content to the appropriate dir.
$ cp kubernetes/cluster/ubuntu/init_conf/kubelet.conf /etc/init/
$ cp kubernetes/cluster/ubuntu/init_conf/kube-proxy.conf /etc/init/
$ cp kubernetes/cluster/ubuntu/initd_scripts/kubelet /etc/init.d/
$ cp kubernetes/cluster/ubuntu/initd_scripts/kube-proxy /etc/init.d/
$ cp kubernetes/cluster/ubuntu/default_scripts/kubelet /etc/default/
$ cp kubernetes/cluster/ubuntu/default_scripts/kube-proxy /etc/default/
We will configure the kubelet and kube-proxy conf files.
We will configure the /etc/init/kubelet.conf.
$ KUBELET_OPTS = "--address = 0.0.0.0 \
--port = 10250 \
--hostname_override = kube-minion \
--etcd_servers = http://kube-master:4001 \
--enable_server = true
--v = 0"
/
For kube-proxy, we will configure using the following command.
$ KUBE_PROXY_OPTS = "--etcd_servers = http://kube-master:4001 \
--v = 0"
/etc/init/kube-proxy.conf
Finally, we will restart the Docker service.
$ service docker restart
Now we are done with the configuration. You can check by running the following commands.
$ /opt/bin/kubectl get minions
Kubernetes - Images
Kubernetes (Docker) images are the key building blocks of Containerized Infrastructure. As of now, we are only supporting Kubernetes to support Docker images. Each container in a pod has its Docker image running inside it.
When we are configuring a pod, the image property in the configuration file has the same syntax as the Docker command does. The configuration file has a field to define the image name, which we are planning to pull from the registry.
Following is the common configuration structure which will pull image from Docker registry and deploy in to Kubernetes container.
apiVersion: v1
kind: pod
metadata:
   name: Tesing_for_Image_pull -----------> 1
   spec:
      containers:
         - name: neo4j-server ------------------------> 2
         image: <Name of the Docker image>----------> 3
         imagePullPolicy: Always ------------->4
         command: ["echo", "SUCCESS"] ------------------->
In the above code, we have defined −
name: Tesing_for_Image_pull − This name is given to identify and check what is the name of the container that would get created after pulling the images from Docker registry.
name: neo4j-server − This is the name given to the container that we are trying to create. Like we have given neo4j-server.
image: <Name of the Docker image> − This is the name of the image which we are trying to pull from the Docker or internal registry of images. We need to define a complete registry path along with the image name that we are trying to pull.
imagePullPolicy − Always - This image pull policy defines that whenever we run this file to create the container, it will pull the same name again.
command: [echo, SUCCESS] − With this, when we create the container and if everything goes fine, it will display a message when we will access the container.
In order to pull the image and create a container, we will run the following command.
$ kubectl create f Tesing_for_Image_pull
Once we fetch the log, we will get the output as successful.
$ kubectl log Tesing_for_Image_pull
The above command will produce an output of success or we will get an output as failure.
Note − It is recommended that you try all the commands yourself.
Kubernetes - Jobs
The main function of a job is to create one or more pod and tracks about the success of pods. They ensure that the specified number of pods are completed successfully. When a specified number of successful run of pods is completed, then the job is considered complete.
Creating a Job
Use the following command to create a job −
apiVersion: v1
kind: Job ------------------------> 1
metadata:
   name: py
   spec:
   template:
      metadata
      name: py -------> 2
      spec:
         containers:
            - name: py ------------------------> 3
            image: python----------> 4
            command: ["python", "SUCCESS"]
            restartPocliy: Never --------> 5
In the above code, we have defined −
kind: Job → We have defined the kind as Job which will tell kubectl that the yaml file being used is to create a job type pod.
Name:py → This is the name of the template that we are using and the spec defines the template.
name: py → we have given a name as py under container spec which helps to identify the Pod which is going to be created out of it.
Image: python → the image which we are going to pull to create the container which will run inside the pod.
restartPolicy: Never →This condition of image restart is given as never which means that if the container is killed or if it is false, then it will not restart itself.
We will create the job using the following command with yaml which is saved with the name py.yaml.
$ kubectl create f py.yaml
The above command will create a job. If you want to check the status of a job, use the following command.
$ kubectl describe jobs/py
The above command will create a job. If you want to check the status of a job, use the following command.
Scheduled Job
Scheduled job in Kubernetes uses Cronetes, which takes Kubernetes job and launches them in Kubernetes cluster.
- Scheduling a job will run a pod at a specified point of time.
- A parodic job is created for it which invokes itself automatically.
Note − The feature of a scheduled job is supported by version 1.4 and the betch/v2alpha 1 API is turned on by passing the runtime-config=batch/v2alpha1 while bringing up the API server.
We will use the same yaml which we used to create the job and make it a scheduled job.
apiVersion: v1
kind: Job
metadata:
   name: py
spec:
   schedule: h/30 * * * * ? -------------------> 1
   template:
      metadata
         name: py
      spec:
         containers:
         - name: py
         image: python
         args:
/bin/sh -------> 2
-c
ps eaf ------------> 3
restartPocliy: OnFailure
In the above code, we have defined −
schedule: h/30 * * * * ? → To schedule the job to run in every 30 minutes.
/bin/sh: This will enter in the container with /bin/sh
ps eaf → Will run ps -eaf command on the machine and list all the running process inside a container.
This scheduled job concept is useful when we are trying to build and run a set of tasks at a specified point of time and then complete the process.
Kubernetes - Labels & Selectors
Labels
Labels are key-value pairs which are attached to pods, replication controller and services. They are used as identifying attributes for objects such as pods and replication controller. They can be added to an object at creation time and can be added or modified at the run time.
Selectors
Labels do not provide uniqueness. In general, we can say many objects can carry the same labels. Labels selector are core grouping primitive in Kubernetes. They are used by the users to select a set of objects.
Kubernetes API currently supports two type of selectors −
- Equality-based selectors
- Set-based selectors
Equality-based Selectors
They allow filtering by key and value. Matching objects should satisfy all the specified labels.
Set-based Selectors
Set-based selectors allow filtering of keys according to a set of values.
apiVersion: v1
kind: Service
metadata:
   name: sp-neo4j-standalone
spec:
   ports:
      - port: 7474
      name: neo4j
   type: NodePort
   selector:
      app: salesplatform ---------> 1
      component: neo4j -----------> 2
In the above code, we are using the label selector as app: salesplatform and component as component: neo4j.
Once we run the file using the kubectl command, it will create a service with the name sp-neo4j-standalone which will communicate on port 7474. The ype is NodePort with the new label selector as app: salesplatform and component: neo4j.
Kubernetes - Namespace
Namespace provides an additional qualification to a resource name. This is helpful when multiple teams are using the same cluster and there is a potential of name collision. It can be as a virtual wall between multiple clusters.
Functionality of Namespace
Following are some of the important functionalities of a Namespace in Kubernetes −
Namespaces help pod-to-pod communication using the same namespace.
Namespaces are virtual clusters that can sit on top of the same physical cluster.
They provide logical separation between the teams and their environments.
Create a Namespace
The following command is used to create a namespace.
apiVersion: v1
kind: Namespce
metadata
   name: elk
Control the Namespace
The following command is used to control the namespace.
$ kubectl create f namespace.yml ---------> 1
$ kubectl get namespace -----------------> 2
$ kubectl get namespace <Namespace name> ------->3
$ kubectl describe namespace <Namespace name> ---->4
$ kubectl delete namespace <Namespace name>
In the above code,
- We are using the command to create a namespace.
- This will list all the available namespace.
- This will get a particular namespace whose name is specified in the command.
- This will describe the complete details about the service.
- This will delete a particular namespace present in the cluster.
Using Namespace in Service - Example
Following is an example of a sample file for using namespace in service.
apiVersion: v1
kind: Service
metadata:
   name: elasticsearch
   namespace: elk
   labels:
      component: elasticsearch
spec:
   type: LoadBalancer
   selector:
      component: elasticsearch
   ports:
   - name: http
      port: 9200
      protocol: TCP
   - name: transport
      port: 9300
      protocol: TCP
In the above code, we are using the same namespace under service metadata with the name of elk.
Kubernetes - Node
A node is a working machine in Kubernetes cluster which is also known as a minion. They are working units which can be physical, VM, or a cloud instance.
Each node has all the required configuration required to run a pod on it such as the proxy service and kubelet service along with the Docker, which is used to run the Docker containers on the pod created on the node.
They are not created by Kubernetes but they are created externally either by the cloud service provider or the Kubernetes cluster manager on physical or VM machines.
The key component of Kubernetes to handle multiple nodes is the controller manager, which runs multiple kind of controllers to manage nodes. To manage nodes, Kubernetes creates an object of kind node which will validate that the object which is created is a valid node.
Service with Selector
apiVersion: v1
kind: node
metadata:
   name: < ip address of the node>
   labels:
      name: <lable name>
In JSON format the actual object is created which looks as follows −
{
   Kind: node
   apiVersion: v1
   "metadata":
   {
      "name": "10.01.1.10",
      "labels"
      {
         "name": "cluster 1 node"
      }
   }
}
Node Controller
They are the collection of services which run in the Kubernetes master and continuously monitor the node in the cluster on the basis of metadata.name. If all the required services are running, then the node is validated and a newly created pod will be assigned to that node by the controller. If it is not valid, then the master will not assign any pod to it and will wait until it becomes valid.
Kubernetes master registers the node automatically, if register-node flag is true.
register-node = true
However, if the cluster administrator wants to manage it manually then it could be done by turning the flat of −
register-node = false
Kubernetes - Service
A service can be defined as a logical set of pods. It can be defined as an abstraction on the top of the pod which provides a single IP address and DNS name by which pods can be accessed. With Service, it is very easy to manage load balancing configuration. It helps pods to scale very easily.
A service is a REST object in Kubernetes whose definition can be posted to Kubernetes apiServer on the Kubernetes master to create a new instance.
Service without Selector
apiVersion: v1
kind: Service
metadata:
   name: Tutorial_point_service
spec:
   ports:
   - port: 8080
   targetPort: 31999
The above configuration will create a service with the name Tutorial_point_service.
Service Config File with Selector
apiVersion: v1
kind: Service
metadata:
   name: Tutorial_point_service
spec:
   selector:
      application: "My Application" -------------------> (Selector)
   ports:
   - port: 8080
   targetPort: 31999
In this example, we have a selector; so in order to transfer traffic, we need to create an endpoint manually.
apiVersion: v1
kind: Endpoints
metadata:
   name: Tutorial_point_service
subnets:
   address:
      "ip": "192.168.168.40" -------------------> (Selector)
   ports:
      - port: 8080
In the above code, we have created an endpoint which will route the traffic to the endpoint defined as 192.168.168.40:8080.
Multi-Port Service Creation
apiVersion: v1
kind: Service
metadata:
   name: Tutorial_point_service
spec:
   selector:
      application: My Application -------------------> (Selector)
   ClusterIP: 10.3.0.12
   ports:
      -name: http
      protocol: TCP
      port: 80
      targetPort: 31999
   -name:https
      Protocol: TCP
      Port: 443
      targetPort: 31998
Types of Services
ClusterIP − This helps in restricting the service within the cluster. It exposes the service within the defined Kubernetes cluster.
spec:
   type: NodePort
   ports:
   - port: 8080
      nodePort: 31999
      name: NodeportService
NodePort − It will expose the service on a static port on the deployed node. A ClusterIP service, to which NodePort service will route, is automatically created. The service can be accessed from outside the cluster using the NodeIP:nodePort.
spec:
   ports:
   - port: 8080
      nodePort: 31999
      name: NodeportService
      clusterIP: 10.20.30.40
Load Balancer − It uses cloud providers load balancer. NodePort and ClusterIP services are created automatically to which the external load balancer will route.
A full service yaml file with service type as Node Port. Try to create one yourself.
apiVersion: v1
kind: Service
metadata:
   name: appname
   labels:
      k8s-app: appname
spec:
   type: NodePort
   ports:
   - port: 8080
      nodePort: 31999
      name: omninginx
   selector:
      k8s-app: appname
      component: nginx
      env: env_name
Kubernetes - Pod
A pod is a collection of containers and its storage inside a node of a Kubernetes cluster. It is possible to create a pod with multiple containers inside it. For example, keeping a database container and data container in the same pod.
Types of Pod
There are two types of Pods −
- Single container pod
- Multi container pod
Single Container Pod
They can be simply created with the kubctl run command, where you have a defined image on the Docker registry which we will pull while creating a pod.
$ kubectl run <name of pod> --image=<name of the image from registry>
Example − We will create a pod with a tomcat image which is available on the Docker hub.
$ kubectl run tomcat --image = tomcat:8.0
This can also be done by creating the yaml file and then running the kubectl create command.
apiVersion: v1
kind: Pod
metadata:
   name: Tomcat
spec:
   containers:
   - name: Tomcat
    image: tomcat: 8.0
    ports:
containerPort: 7500
   imagePullPolicy: Always
Once the above yaml file is created, we will save the file with the name of tomcat.yml and run the create command to run the document.
$ kubectl create f tomcat.yml
It will create a pod with the name of tomcat. We can use the describe command along with kubectl to describe the pod.
Multi Container Pod
Multi container pods are created using yaml mail with the definition of the containers.
apiVersion: v1
kind: Pod
metadata:
   name: Tomcat
spec:
   containers:
   - name: Tomcat
    image: tomcat: 8.0
    ports:
containerPort: 7500
   imagePullPolicy: Always
   -name: Database
   Image: mongoDB
   Ports:
containerPort: 7501
   imagePullPolicy: Always
In the above code, we have created one pod with two containers inside it, one for tomcat and the other for MongoDB.
Kubernetes - Replication Controller
Replication Controller is one of the key features of Kubernetes, which is responsible for managing the pod lifecycle. It is responsible for making sure that the specified number of pod replicas are running at any point of time. It is used in time when one wants to make sure that the specified number of pod or at least one pod is running. It has the capability to bring up or down the specified no of pod.
It is a best practice to use the replication controller to manage the pod life cycle rather than creating a pod again and again.
apiVersion: v1
kind: ReplicationController --------------------------> 1
metadata:
   name: Tomcat-ReplicationController --------------------------> 2
spec:
   replicas: 3 ------------------------> 3
   template:
      metadata:
         name: Tomcat-ReplicationController
      labels:
         app: App
         component: neo4j
      spec:
         containers:
         - name: Tomcat- -----------------------> 4
         image: tomcat: 8.0
         ports:
            - containerPort: 7474 ------------------------> 5
Setup Details
Kind: ReplicationController → In the above code, we have defined the kind as replication controller which tells the kubectl that the yaml file is going to be used for creating the replication controller.
name: Tomcat-ReplicationController → This helps in identifying the name with which the replication controller will be created. If we run the kubctl, get rc < Tomcat-ReplicationController > it will show the replication controller details.
replicas: 3 → This helps the replication controller to understand that it needs to maintain three replicas of a pod at any point of time in the pod lifecycle.
name: Tomcat → In the spec section, we have defined the name as tomcat which will tell the replication controller that the container present inside the pods is tomcat.
containerPort: 7474 → It helps in making sure that all the nodes in the cluster where the pod is running the container inside the pod will be exposed on the same port 7474.
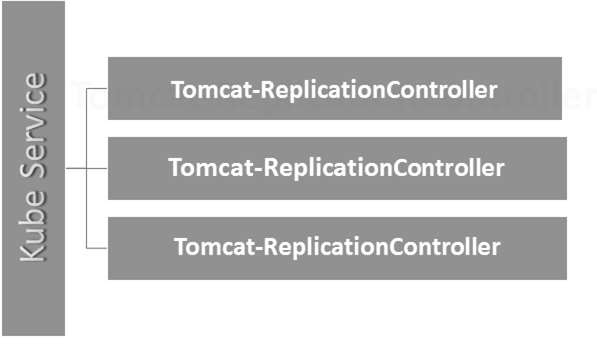
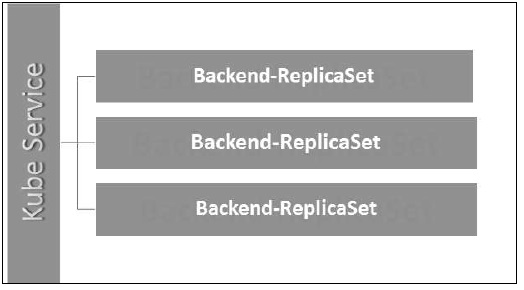
Here, the Kubernetes service is working as a load balancer for three tomcat replicas.
Kubernetes - Replica Sets
Replica Set ensures how many replica of pod should be running. It can be considered as a replacement of replication controller. The key difference between the replica set and the replication controller is, the replication controller only supports equality-based selector whereas the replica set supports set-based selector.
apiVersion: extensions/v1beta1 --------------------->1
kind: ReplicaSet --------------------------> 2
metadata:
   name: Tomcat-ReplicaSet
spec:
   replicas: 3
   selector:
      matchLables:
         tier: Backend ------------------> 3
      matchExpression:
{ key: tier, operation: In, values: [Backend]} --------------> 4
template:
   metadata:
      lables:
         app: Tomcat-ReplicaSet
         tier: Backend
      labels:
         app: App
         component: neo4j
   spec:
      containers:
      - name: Tomcat
      image: tomcat: 8.0
      ports:
      - containerPort: 7474
Setup Details
apiVersion: extensions/v1beta1 → In the above code, the API version is the advanced beta version of Kubernetes which supports the concept of replica set.
kind: ReplicaSet → We have defined the kind as the replica set which helps kubectl to understand that the file is used to create a replica set.
tier: Backend → We have defined the label tier as backend which creates a matching selector.
{key: tier, operation: In, values: [Backend]} → This will help matchExpression to understand the matching condition we have defined and in the operation which is used by matchlabel to find details.
Run the above file using kubectl and create the backend replica set with the provided definition in the yaml file.
Kubernetes - Deployments
Deployments are upgraded and higher version of replication controller. They manage the deployment of replica sets which is also an upgraded version of the replication controller. They have the capability to update the replica set and are also capable of rolling back to the previous version.
They provide many updated features of matchLabels and selectors. We have got a new controller in the Kubernetes master called the deployment controller which makes it happen. It has the capability to change the deployment midway.
Changing the Deployment
Updating − The user can update the ongoing deployment before it is completed. In this, the existing deployment will be settled and new deployment will be created.
Deleting − The user can pause/cancel the deployment by deleting it before it is completed. Recreating the same deployment will resume it.
Rollback − We can roll back the deployment or the deployment in progress. The user can create or update the deployment by using DeploymentSpec.PodTemplateSpec = oldRC.PodTemplateSpec.
Deployment Strategies
Deployment strategies help in defining how the new RC should replace the existing RC.
Recreate − This feature will kill all the existing RC and then bring up the new ones. This results in quick deployment however it will result in downtime when the old pods are down and the new pods have not come up.
Rolling Update − This feature gradually brings down the old RC and brings up the new one. This results in slow deployment, however there is no deployment. At all times, few old pods and few new pods are available in this process.
The configuration file of Deployment looks like this.
apiVersion: extensions/v1beta1 --------------------->1
kind: Deployment --------------------------> 2
metadata:
   name: Tomcat-ReplicaSet
spec:
   replicas: 3
   template:
      metadata:
         lables:
            app: Tomcat-ReplicaSet
            tier: Backend
   spec:
      containers:
         - name: Tomcatimage:
            tomcat: 8.0
            ports:
               - containerPort: 7474
In the above code, the only thing which is different from the replica set is we have defined the kind as deployment.
Create Deployment
$ kubectl create f Deployment.yaml -record
deployment "Deployment" created Successfully.
Fetch the Deployment
$ kubectl get deployments
NAME           DESIRED     CURRENT     UP-TO-DATE     AVILABLE    AGE
Deployment        3           3           3              3        20s
Check the Status of Deployment
$ kubectl rollout status deployment/Deployment
Updating the Deployment
$ kubectl set image deployment/Deployment tomcat=tomcat:6.0
Rolling Back to Previous Deployment
$ kubectl rollout undo deployment/Deployment to-revision=2
Kubernetes - Volumes
In Kubernetes, a volume can be thought of as a directory which is accessible to the containers in a pod. We have different types of volumes in Kubernetes and the type defines how the volume is created and its content.
The concept of volume was present with the Docker, however the only issue was that the volume was very much limited to a particular pod. As soon as the life of a pod ended, the volume was also lost.
On the other hand, the volumes that are created through Kubernetes is not limited to any container. It supports any or all the containers deployed inside the pod of Kubernetes. A key advantage of Kubernetes volume is, it supports different kind of storage wherein the pod can use multiple of them at the same time.
Types of Kubernetes Volume
Here is a list of some popular Kubernetes Volumes −
emptyDir − It is a type of volume that is created when a Pod is first assigned to a Node. It remains active as long as the Pod is running on that node. The volume is initially empty and the containers in the pod can read and write the files in the emptyDir volume. Once the Pod is removed from the node, the data in the emptyDir is erased.
hostPath − This type of volume mounts a file or directory from the host nodes filesystem into your pod.
gcePersistentDisk − This type of volume mounts a Google Compute Engine (GCE) Persistent Disk into your Pod. The data in a gcePersistentDisk remains intact when the Pod is removed from the node.
awsElasticBlockStore − This type of volume mounts an Amazon Web Services (AWS) Elastic Block Store into your Pod. Just like gcePersistentDisk, the data in an awsElasticBlockStore remains intact when the Pod is removed from the node.
nfs − An nfs volume allows an existing NFS (Network File System) to be mounted into your pod. The data in an nfs volume is not erased when the Pod is removed from the node. The volume is only unmounted.
iscsi − An iscsi volume allows an existing iSCSI (SCSI over IP) volume to be mounted into your pod.
flocker − It is an open-source clustered container data volume manager. It is used for managing data volumes. A flocker volume allows a Flocker dataset to be mounted into a pod. If the dataset does not exist in Flocker, then you first need to create it by using the Flocker API.
glusterfs − Glusterfs is an open-source networked filesystem. A glusterfs volume allows a glusterfs volume to be mounted into your pod.
rbd − RBD stands for Rados Block Device. An rbd volume allows a Rados Block Device volume to be mounted into your pod. Data remains preserved after the Pod is removed from the node.
cephfs − A cephfs volume allows an existing CephFS volume to be mounted into your pod. Data remains intact after the Pod is removed from the node.
gitRepo − A gitRepo volume mounts an empty directory and clones a git repository into it for your pod to use.
secret − A secret volume is used to pass sensitive information, such as passwords, to pods.
persistentVolumeClaim − A persistentVolumeClaim volume is used to mount a PersistentVolume into a pod. PersistentVolumes are a way for users to claim durable storage (such as a GCE PersistentDisk or an iSCSI volume) without knowing the details of the particular cloud environment.
downwardAPI − A downwardAPI volume is used to make downward API data available to applications. It mounts a directory and writes the requested data in plain text files.
azureDiskVolume − An AzureDiskVolume is used to mount a Microsoft Azure Data Disk into a Pod.
Persistent Volume and Persistent Volume Claim
Persistent Volume (PV) − Its a piece of network storage that has been provisioned by the administrator. Its a resource in the cluster which is independent of any individual pod that uses the PV.
Persistent Volume Claim (PVC) − The storage requested by Kubernetes for its pods is known as PVC. The user does not need to know the underlying provisioning. The claims must be created in the same namespace where the pod is created.
Creating Persistent Volume
kind: PersistentVolume ---------> 1
apiVersion: v1
metadata:
   name: pv0001 ------------------> 2
   labels:
      type: local
spec:
   capacity: -----------------------> 3
      storage: 10Gi ----------------------> 4
   accessModes:
      - ReadWriteOnce -------------------> 5
      hostPath:
         path: "/tmp/data01" --------------------------> 6
In the above code, we have defined −
kind: PersistentVolume → We have defined the kind as PersistentVolume which tells kubernetes that the yaml file being used is to create the Persistent Volume.
name: pv0001 → Name of PersistentVolume that we are creating.
capacity: → This spec will define the capacity of PV that we are trying to create.
storage: 10Gi → This tells the underlying infrastructure that we are trying to claim 10Gi space on the defined path.
ReadWriteOnce → This tells the access rights of the volume that we are creating.
path: "/tmp/data01" → This definition tells the machine that we are trying to create volume under this path on the underlying infrastructure.
Creating PV
$ kubectl create f local-01.yaml
persistentvolume "pv0001" created
Checking PV
$ kubectl get pv
NAME        CAPACITY      ACCESSMODES       STATUS       CLAIM      REASON     AGE
pv0001        10Gi            RWO         Available                            14s
Describing PV
$ kubectl describe pv pv0001
Creating Persistent Volume Claim
kind: PersistentVolumeClaim --------------> 1
apiVersion: v1
metadata:
   name: myclaim-1 --------------------> 2
spec:
   accessModes:
      - ReadWriteOnce ------------------------> 3
   resources:
      requests:
         storage: 3Gi ---------------------> 4
In the above code, we have defined −
kind: PersistentVolumeClaim → It instructs the underlying infrastructure that we are trying to claim a specified amount of space.
name: myclaim-1 → Name of the claim that we are trying to create.
ReadWriteOnce → This specifies the mode of the claim that we are trying to create.
storage: 3Gi → This will tell kubernetes about the amount of space we are trying to claim.
Creating PVC
$ kubectl create f myclaim-1
persistentvolumeclaim "myclaim-1" created
Getting Details About PVC
$ kubectl get pvc
NAME        STATUS   VOLUME   CAPACITY   ACCESSMODES   AGE
myclaim-1   Bound    pv0001     10Gi         RWO       7s
Describe PVC
$ kubectl describe pv pv0001
Using PV and PVC with POD
kind: Pod
apiVersion: v1
metadata:
   name: mypod
   labels:
      name: frontendhttp
spec:
   containers:
   - name: myfrontend
      image: nginx
      ports:
      - containerPort: 80
         name: "http-server"
      volumeMounts: ----------------------------> 1
      - mountPath: "/usr/share/tomcat/html"
         name: mypd
   volumes: -----------------------> 2
      - name: mypd
         persistentVolumeClaim: ------------------------->3
         claimName: myclaim-1
In the above code, we have defined −
volumeMounts: → This is the path in the container on which the mounting will take place.
Volume: → This definition defines the volume definition that we are going to claim.
persistentVolumeClaim: → Under this, we define the volume name which we are going to use in the defined pod.
Kubernetes - Secrets
Secrets can be defined as Kubernetes objects used to store sensitive data such as user name and passwords with encryption.
There are multiple ways of creating secrets in Kubernetes.
- Creating from txt files.
- Creating from yaml file.
Creating From Text File
In order to create secrets from a text file such as user name and password, we first need to store them in a txt file and use the following command.
$ kubectl create secret generic tomcat-passwd -from-file = ./username.txt fromfile = ./.
password.txt
Creating From Yaml File
apiVersion: v1
kind: Secret
metadata:
name: tomcat-pass
type: Opaque
data:
   password: <User Password>
   username: <User Name>
Creating the Secret
$ kubectl create f Secret.yaml
secrets/tomcat-pass
Using Secrets
Once we have created the secrets, it can be consumed in a pod or the replication controller as −
- Environment Variable
- Volume
As Environment Variable
In order to use the secret as environment variable, we will use env under the spec section of pod yaml file.
env:
- name: SECRET_USERNAME
   valueFrom:
      secretKeyRef:
         name: mysecret
         key: tomcat-pass
As Volume
spec:
   volumes:
      - name: "secretstest"
         secret:
            secretName: tomcat-pass
   containers:
      - image: tomcat:7.0
         name: awebserver
         volumeMounts:
            - mountPath: "/tmp/mysec"
            name: "secretstest"
Secret Configuration As Environment Variable
apiVersion: v1
kind: ReplicationController
metadata:
   name: appname
spec:
replicas: replica_count
template:
   metadata:
      name: appname
   spec:
      nodeSelector:
         resource-group:
      containers:
         - name: appname
            image:
            imagePullPolicy: Always
            ports:
            - containerPort: 3000
            env: -----------------------------> 1
               - name: ENV
                  valueFrom:
                     configMapKeyRef:
                        name: appname
                        key: tomcat-secrets
In the above code, under the env definition, we are using secrets as environment variable in the replication controller.
Secrets As Volume Mount
apiVersion: v1
kind: pod
metadata:
   name: appname
spec:
   metadata:
      name: appname
   spec:
   volumes:
      - name: "secretstest"
         secret:
            secretName: tomcat-pass
   containers:
      - image: tomcat: 8.0
         name: awebserver
         volumeMounts:
            - mountPath: "/tmp/mysec"
            name: "secretstest"
Kubernetes - Network Policy
Network Policy defines how the pods in the same namespace will communicate with each other and the network endpoint. It requires extensions/v1beta1/networkpolicies to be enabled in the runtime configuration in the API server. Its resources use labels to select the pods and define rules to allow traffic to a specific pod in addition to which is defined in the namespace.
First, we need to configure Namespace Isolation Policy. Basically, this kind of networking policies are required on the load balancers.
kind: Namespace
apiVersion: v1
metadata:
   annotations:
      net.beta.kubernetes.io/network-policy: |
      {
         "ingress":
         {
            "isolation": "DefaultDeny"
         }
      }
$ kubectl annotate ns <namespace> "net.beta.kubernetes.io/network-policy =
{\"ingress\": {\"isolation\": \"DefaultDeny\"}}"
Once the namespace is created, we need to create the Network Policy.
Network Policy Yaml
kind: NetworkPolicy
apiVersion: extensions/v1beta1
metadata:
   name: allow-frontend
   namespace: myns
spec:
   podSelector:
      matchLabels:
         role: backend
   ingress:
   - from:
      - podSelector:
         matchLabels:
            role: frontend
   ports:
      - protocol: TCP
         port: 6379
Kubernetes - API
Kubernetes API serves as a foundation for declarative configuration schema for the system. Kubectl command-line tool can be used to create, update, delete, and get API object. Kubernetes API acts a communicator among different components of Kubernetes.
Adding API to Kubernetes
Adding a new API to Kubernetes will add new features to Kubernetes, which will increase the functionality of Kubernetes. However, alongside it will also increase the cost and maintainability of the system. In order to create a balance between the cost and complexity, there are a few sets defined for it.
The API which is getting added should be useful to more than 50% of the users. There is no other way to implement the functionality in Kubernetes. Exceptional circumstances are discussed in the community meeting of Kubernetes, and then API is added.
API Changes
In order to increase the capability of Kubernetes, changes are continuously introduced to the system. It is done by Kubernetes team to add the functionality to Kubernetes without removing or impacting the existing functionality of the system.
To demonstrate the general process, here is an (hypothetical) example −
A user POSTs a Pod object to /api/v7beta1/...
The JSON is unmarshalled into a v7beta1.Pod structure
Default values are applied to the v7beta1.Pod
The v7beta1.Pod is converted to an api.Pod structure
The api.Pod is validated, and any errors are returned to the user
The api.Pod is converted to a v6.Pod (because v6 is the latest stable version)
The v6.Pod is marshalled into JSON and written to etcd
Now that we have the Pod object stored, a user can GET that object in any supported API version. For example −
A user GETs the Pod from /api/v5/...
The JSON is read from etcd and unmarshalled into a v6.Pod structure
Default values are applied to the v6.Pod
The v6.Pod is converted to an api.Pod structure
The api.Pod is converted to a v5.Pod structure
The v5.Pod is marshalled into JSON and sent to the user
The implication of this process is that API changes must be done carefully and backward compatibly.
API Versioning
To make it easier to support multiple structures, Kubernetes supports multiple API versions each at different API path such as /api/v1 or /apsi/extensions/v1beta1
Versioning standards at Kubernetes are defined in multiple standards.
Alpha Level
This version contains alpha (e.g. v1alpha1)
This version may be buggy; the enabled version may have bugs
Support for bugs can be dropped at any point of time.
Recommended to be used in short term testing only as the support may not be present all the time.
Beta Level
The version name contains beta (e.g. v2beta3)
The code is fully tested and the enabled version is supposed to be stable.
The support of the feature will not be dropped; there may be some small changes.
Recommended for only non-business-critical uses because of the potential for incompatible changes in subsequent releases.
Stable Level
The version name is vX where X is an integer.
Stable versions of features will appear in the released software for many subsequent versions.
Kubernetes - Kubectl
Kubectl is the command line utility to interact with Kubernetes API. It is an interface which is used to communicate and manage pods in Kubernetes cluster.
One needs to set up kubectl to local in order to interact with Kubernetes cluster.
Setting Kubectl
Download the executable to the local workstation using the curl command.
On Linux
$ curl -O https://storage.googleapis.com/kubernetesrelease/
release/v1.5.2/bin/linux/amd64/kubectl
On OS X workstation
$ curl -O https://storage.googleapis.com/kubernetesrelease/
release/v1.5.2/bin/darwin/amd64/kubectl
After download is complete, move the binaries in the path of the system.
$ chmod +x kubectl
$ mv kubectl /usr/local/bin/kubectl
Configuring Kubectl
Following are the steps to perform the configuration operation.
$ kubectl config set-cluster default-cluster --server = https://${MASTER_HOST} --
certificate-authority = ${CA_CERT}

$ kubectl config set-credentials default-admin --certificateauthority = ${
CA_CERT} --client-key = ${ADMIN_KEY} --clientcertificate = ${
ADMIN_CERT}

$ kubectl config set-context default-system --cluster = default-cluster --
user = default-admin
$ kubectl config use-context default-system
Replace ${MASTER_HOST} with the master node address or name used in the previous steps.
Replace ${CA_CERT} with the absolute path to the ca.pem created in the previous steps.
Replace ${ADMIN_KEY} with the absolute path to the admin-key.pem created in the previous steps.
Replace ${ADMIN_CERT} with the absolute path to the admin.pem created in the previous steps.
Verifying the Setup
To verify if the kubectl is working fine or not, check if the Kubernetes client is set up correctly.
$ kubectl get nodes

NAME       LABELS                                     STATUS
Vipin.com  Kubernetes.io/hostname = vipin.mishra.com    Ready
Kubernetes - Kubectl Commands
Kubectl controls the Kubernetes Cluster. It is one of the key components of Kubernetes which runs on the workstation on any machine when the setup is done. It has the capability to manage the nodes in the cluster.
Kubectl commands are used to interact and manage Kubernetes objects and the cluster. In this chapter, we will discuss a few commands used in Kubernetes via kubectl.
kubectl annotate − It updates the annotation on a resource.
$kubectl annotate [--overwrite] (-f FILENAME | TYPE NAME) KEY_1=VAL_1 ...
KEY_N = VAL_N [--resource-version = version]
For example,
kubectl annotate pods tomcat description = 'my frontend'
kubectl api-versions − It prints the supported versions of API on the cluster.
$ kubectl api-version;
kubectl apply − It has the capability to configure a resource by file or stdin.
$ kubectl apply f <filename>
kubectl attach − This attaches things to the running container.
$ kubectl attach <pod> c <container>
$ kubectl attach 123456-7890 -c tomcat-conatiner
kubectl autoscale − This is used to auto scale pods which are defined such as Deployment, replica set, Replication Controller.
$ kubectl autoscale (-f FILENAME | TYPE NAME | TYPE/NAME) [--min = MINPODS] --
max = MAXPODS [--cpu-percent = CPU] [flags]
$ kubectl autoscale deployment foo --min = 2 --max = 10
kubectl cluster-info − It displays the cluster Info.
$ kubectl cluster-info
kubectl cluster-info dump − It dumps relevant information regarding cluster for debugging and diagnosis.
$ kubectl cluster-info dump
$ kubectl cluster-info dump --output-directory = /path/to/cluster-state
kubectl config − Modifies the kubeconfig file.
$ kubectl config <SUBCOMMAD>
$ kubectl config -kubeconfig <String of File name>
kubectl config current-context − It displays the current context.
$ kubectl config current-context
#deploys the current context
kubectl config delete-cluster − Deletes the specified cluster from kubeconfig.
$ kubectl config delete-cluster <Cluster Name>
kubectl config delete-context − Deletes a specified context from kubeconfig.
$ kubectl config delete-context <Context Name>
kubectl config get-clusters − Displays cluster defined in the kubeconfig.
$ kubectl config get-cluster
$ kubectl config get-cluster <Cluser Name>
kubectl config get-contexts − Describes one or many contexts.
$ kubectl config get-context <Context Name>
kubectl config set-cluster − Sets the cluster entry in Kubernetes.
$ kubectl config set-cluster NAME [--server = server] [--certificateauthority =
path/to/certificate/authority] [--insecure-skip-tls-verify = true]
kubectl config set-context − Sets a context entry in kubernetes entrypoint.
$ kubectl config set-context NAME [--cluster = cluster_nickname] [--
user = user_nickname] [--namespace = namespace]
$ kubectl config set-context prod user = vipin-mishra
kubectl config set-credentials − Sets a user entry in kubeconfig.
$ kubectl config set-credentials cluster-admin --username = vipin --
password = uXFGweU9l35qcif
kubectl config set − Sets an individual value in kubeconfig file.
$ kubectl config set PROPERTY_NAME PROPERTY_VALUE
kubectl config unset − It unsets a specific component in kubectl.
$ kubectl config unset PROPERTY_NAME PROPERTY_VALUE
kubectl config use-context − Sets the current context in kubectl file.
$ kubectl config use-context <Context Name>
kubectl config view
$ kubectl config view
$ kubectl config view o jsonpath='{.users[?(@.name == "e2e")].user.password}'
kubectl cp − Copy files and directories to and from containers.
$ kubectl cp <Files from source> <Files to Destinatiion>
$ kubectl cp /tmp/foo <some-pod>:/tmp/bar -c <specific-container>
kubectl create − To create resource by filename of or stdin. To do this, JSON or YAML formats are accepted.
$ kubectl create f <File Name>
$ cat <file name> | kubectl create f -
In the same way, we can create multiple things as listed using the create command along with kubectl.
- deployment
- namespace
- quota
- secret docker-registry
- secret
- secret generic
- secret tls
- serviceaccount
- service clusterip
- service loadbalancer
- service nodeport
kubectl delete − Deletes resources by file name, stdin, resource and names.
$ kubectl delete f ([-f FILENAME] | TYPE [(NAME | -l label | --all)])
kubectl describe − Describes any particular resource in kubernetes. Shows details of resource or a group of resources.
$ kubectl describe <type> <type name>
$ kubectl describe pod tomcat
kubectl drain − This is used to drain a node for maintenance purpose. It prepares the node for maintenance. This will mark the node as unavailable so that it should not be assigned with a new container which will be created.
$ kubectl drain tomcat force
kubectl edit − It is used to end the resources on the server. This allows to directly edit a resource which one can receive via the command line tool.
$ kubectl edit <Resource/Name | File Name)
Ex.
$ kubectl edit rc/tomcat
kubectl exec − This helps to execute a command in the container.
$ kubectl exec POD <-c CONTAINER > -- COMMAND < args...>
$ kubectl exec tomcat 123-5-456 date
kubectl expose − This is used to expose the Kubernetes objects such as pod, replication controller, and service as a new Kubernetes service. This has the capability to expose it via a running container or from a yaml file.
$ kubectl expose (-f FILENAME | TYPE NAME) [--port=port] [--protocol = TCP|UDP]
[--target-port = number-or-name] [--name = name] [--external-ip = external-ip-ofservice]
[--type = type]
$ kubectl expose rc tomcat -port=80 target-port = 30000
$ kubectl expose f tomcat.yaml port = 80 target-port =
kubectl get − This command is capable of fetching data on the cluster about the Kubernetes resources.
$ kubectl get [(-o|--output=)json|yaml|wide|custom-columns=...|custom-columnsfile=...|
go-template=...|go-template-file=...|jsonpath=...|jsonpath-file=...]
(TYPE [NAME | -l label] | TYPE/NAME ...) [flags]
For example,
$ kubectl get pod <pod name>
$ kubectl get service <Service name>
kubectl logs − They are used to get the logs of the container in a pod. Printing the logs can be defining the container name in the pod. If the POD has only one container there is no need to define its name.
$ kubectl logs [-f] [-p] POD [-c CONTAINER]
Example
$ kubectl logs tomcat.
$ kubectl logs p c tomcat.8
kubectl port-forward − They are used to forward one or more local port to pods.
$ kubectl port-forward POD [LOCAL_PORT:]REMOTE_PORT
[...[LOCAL_PORT_N:]REMOTE_PORT_N]
$ kubectl port-forward tomcat 3000 4000
$ kubectl port-forward tomcat 3000:5000
kubectl replace − Capable of replacing a resource by file name or stdin.
$ kubectl replace -f FILENAME
$ kubectl replace f tomcat.yml
$ cat tomcat.yml | kubectl replace f -
kubectl rolling-update − Performs a rolling update on a replication controller. Replaces the specified replication controller with a new replication controller by updating a POD at a time.
$ kubectl rolling-update OLD_CONTROLLER_NAME ([NEW_CONTROLLER_NAME] --
image = NEW_CONTAINER_IMAGE | -f NEW_CONTROLLER_SPEC)
$ kubectl rolling-update frontend-v1 f freontend-v2.yaml
kubectl rollout − It is capable of managing the rollout of deployment.
$ Kubectl rollout <Sub Command>
$ kubectl rollout undo deployment/tomcat
Apart from the above, we can perform multiple tasks using the rollout such as −
- rollout history
- rollout pause
- rollout resume
- rollout status
- rollout undo
kubectl run − Run command has the capability to run an image on the Kubernetes cluster.
$ kubectl run NAME --image = image [--env = "key = value"] [--port = port] [--
replicas = replicas] [--dry-run = bool] [--overrides = inline-json] [--command] --
[COMMAND] [args...]
$ kubectl run tomcat --image = tomcat:7.0
$ kubectl run tomcat -image = tomcat:7.0 port = 5000
kubectl scale − It will scale the size of Kubernetes Deployments, ReplicaSet, Replication Controller, or job.
$ kubectl scale [--resource-version = version] [--current-replicas = count] --
replicas = COUNT (-f FILENAME | TYPE NAME )
$ kubectl scale -replica = 3 rs/tomcat
$ kubectl scale replica = 3 tomcat.yaml
kubectl set image − It updates the image of a pod template.
$ kubectl set image (-f FILENAME | TYPE NAME)
CONTAINER_NAME_1 = CONTAINER_IMAGE_1 ... CONTAINER_NAME_N = CONTAINER_IMAGE_N
$ kubectl set image deployment/tomcat busybox = busybox ngnix = ngnix:1.9.1
$ kubectl set image deployments, rc tomcat = tomcat6.0 --all
kubectl set resources − It is used to set the content of the resource. It updates resource/limits on object with pod template.
$ kubectl set resources (-f FILENAME | TYPE NAME) ([--limits = LIMITS & --
requests = REQUESTS]
$ kubectl set resources deployment tomcat -c = tomcat --
limits = cpu = 200m,memory = 512Mi
kubectl top node − It displays CPU/Memory/Storage usage. The top command allows you to see the resource consumption for nodes.
$ kubectl top node [node Name]
The same command can be used with a pod as well.
Kubernetes - Creating an App
In order to create an application for Kubernetes deployment, we need to first create the application on the Docker. This can be done in two ways −
- By downloading
- From Docker file
By Downloading
The existing image can be downloaded from Docker hub and can be stored on the local Docker registry.
In order to do that, run the Docker pull command.
$ docker pull --help
Usage: docker pull [OPTIONS] NAME[:TAG|@DIGEST]
Pull an image or a repository from the registry
   -a, --all-tags = false     Download all tagged images in the repository
   --help = false             Print usage
Following will be the output of the above code.
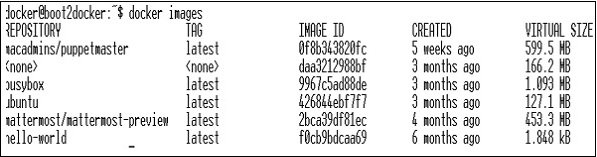
The above screenshot shows a set of images which are stored in our local Docker registry.
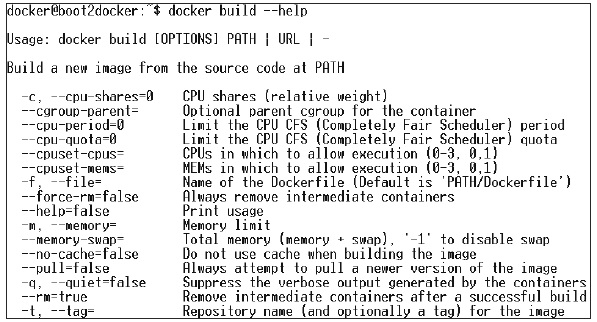
If we want to build a container from the image which consists of an application to test, we can do it using the Docker run command.
$ docker run i t unbunt /bin/bash
From Docker File
In order to create an application from the Docker file, we need to first create a Docker file.
Following is an example of Jenkins Docker file.
FROM ubuntu:14.04
MAINTAINER vipinkumarmishra@virtusapolaris.com
ENV REFRESHED_AT 2017-01-15
RUN apt-get update -qq && apt-get install -qqy curl
RUN curl https://get.docker.io/gpg | apt-key add -
RUN echo deb http://get.docker.io/ubuntu docker main > /etc/apt/
sources.list.d/docker.list
RUN apt-get update -qq && apt-get install -qqy iptables ca-
certificates lxc openjdk-6-jdk git-core lxc-docker
ENV JENKINS_HOME /opt/jenkins/data
ENV JENKINS_MIRROR http://mirrors.jenkins-ci.org
RUN mkdir -p $JENKINS_HOME/plugins
RUN curl -sf -o /opt/jenkins/jenkins.war -L $JENKINS_MIRROR/war-
stable/latest/jenkins.war
RUN for plugin in chucknorris greenballs scm-api git-client git
ws-cleanup ;\
do curl -sf -o $JENKINS_HOME/plugins/${plugin}.hpi \
-L $JENKINS_MIRROR/plugins/${plugin}/latest/${plugin}.hpi
; done
ADD ./dockerjenkins.sh /usr/local/bin/dockerjenkins.sh
RUN chmod +x /usr/local/bin/dockerjenkins.sh
VOLUME /var/lib/docker
EXPOSE 8080
ENTRYPOINT [ "/usr/local/bin/dockerjenkins.sh" ]
Once the above file is created, save it with the name of Dockerfile and cd to the file path. Then, run the following command.
$ sudo docker build -t jamtur01/Jenkins .
Once the image is built, we can test if the image is working fine and can be converted to a container.
$ docker run i t jamtur01/Jenkins /bin/bash
Kubernetes - App Deployment
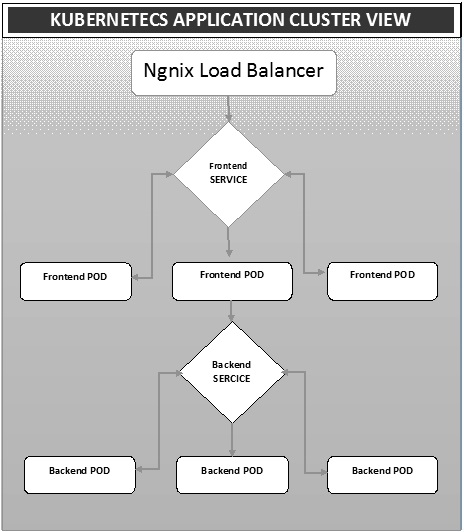
Deployment is a method of converting images to containers and then allocating those images to pods in the Kubernetes cluster. This also helps in setting up the application cluster which includes deployment of service, pod, replication controller and replica set. The cluster can be set up in such a way that the applications deployed on the pod can communicate with each other.
In this setup, we can have a load balancer setting on top of one application diverting traffic to a set of pods and later they communicate to backend pods. The communication between pods happen via the service object built in Kubernetes.
Ngnix Load Balancer Yaml File
apiVersion: v1
kind: Service
metadata:
   name: oppv-dev-nginx
      labels:
         k8s-app: omni-ppv-api
spec:
   type: NodePort
   ports:
   - port: 8080
      nodePort: 31999
      name: omninginx
   selector:
      k8s-app: appname
      component: nginx
      env: dev
Ngnix Replication Controller Yaml
apiVersion: v1
kind: ReplicationController
metadata:
   name: appname
spec:
   replicas: replica_count
   template:
      metadata:
         name: appname
         labels:
            k8s-app: appname
            component: nginx
               env: env_name
spec:
   nodeSelector:
      resource-group: oppv
   containers:
      - name: appname
      image: IMAGE_TEMPLATE
      imagePullPolicy: Always
      ports:
         - containerPort: 8080
         resources:
            requests:
               memory: "request_mem"
               cpu: "request_cpu"
            limits:
               memory: "limit_mem"
               cpu: "limit_cpu"
            env:
            - name: BACKEND_HOST
               value: oppv-env_name-node:3000
Frontend Service Yaml File
apiVersion: v1
kind: Service
metadata:
   name: appname
   labels:
      k8s-app: appname
spec:
   type: NodePort
   ports:
   - name: http
      port: 3000
      protocol: TCP
      targetPort: 3000
   selector:
      k8s-app: appname
      component: nodejs
      env: dev
Frontend Replication Controller Yaml File
apiVersion: v1
kind: ReplicationController
metadata:
   name: Frontend
spec:
   replicas: 3
   template:
      metadata:
         name: frontend
         labels:
            k8s-app: Frontend
            component: nodejs
            env: Dev
spec:
   nodeSelector:
      resource-group: oppv
   containers:
      - name: appname
         image: IMAGE_TEMPLATE
         imagePullPolicy: Always
         ports:
            - containerPort: 3000
            resources:
               requests:
                  memory: "request_mem"
                  cpu: "limit_cpu"
                  limits:
                  memory: "limit_mem"
                  cpu: "limit_cpu"
            env:
               - name: ENV
               valueFrom:
               configMapKeyRef:
               name: appname
               key: config-env
Backend Service Yaml File
apiVersion: v1
kind: Service
metadata:
   name: backend
   labels:
      k8s-app: backend
spec:
   type: NodePort
   ports:
   - name: http
      port: 9010
      protocol: TCP
      targetPort: 9000
   selector:
      k8s-app: appname
      component: play
      env: dev
Backed Replication Controller Yaml File
apiVersion: v1
kind: ReplicationController
metadata:
   name: backend
spec:
   replicas: 3
   template:
      metadata:
         name: backend
      labels:
         k8s-app: beckend
         component: play
         env: dev
spec:
   nodeSelector:
      resource-group: oppv
      containers:
         - name: appname
            image: IMAGE_TEMPLATE
            imagePullPolicy: Always
            ports:
            - containerPort: 9000
            command: [ "./docker-entrypoint.sh" ]
            resources:
               requests:
                  memory: "request_mem"
                  cpu: "request_cpu"
               limits:
                  memory: "limit_mem"
                  cpu: "limit_cpu"
            volumeMounts:
               - name: config-volume
               mountPath: /app/vipin/play/conf
         volumes:
            - name: config-volume
            configMap:
            name: appname
Kubernetes - Autoscaling
Autoscaling is one of the key features in Kubernetes cluster. It is a feature in which the cluster is capable of increasing the number of nodes as the demand for service response increases and decrease the number of nodes as the requirement decreases. This feature of auto scaling is currently supported in Google Cloud Engine (GCE) and Google Container Engine (GKE) and will start with AWS pretty soon.
In order to set up scalable infrastructure in GCE, we need to first have an active GCE project with features of Google cloud monitoring, google cloud logging, and stackdriver enabled.
First, we will set up the cluster with few nodes running in it. Once done, we need to set up the following environment variable.
Environment Variable
export NUM_NODES = 2
export KUBE_AUTOSCALER_MIN_NODES = 2
export KUBE_AUTOSCALER_MAX_NODES = 5
export KUBE_ENABLE_CLUSTER_AUTOSCALER = true
Once done, we will start the cluster by running kube-up.sh. This will create a cluster together with cluster auto-scalar add on.
./cluster/kube-up.sh
On creation of the cluster, we can check our cluster using the following kubectl command.
$ kubectl get nodes
NAME                             STATUS                       AGE
kubernetes-master                Ready,SchedulingDisabled     10m
kubernetes-minion-group-de5q     Ready                        10m
kubernetes-minion-group-yhdx     Ready                        8m
Now, we can deploy an application on the cluster and then enable the horizontal pod autoscaler. This can be done using the following command.
$ kubectl autoscale deployment <Application Name> --cpu-percent = 50 --min = 1 --
max = 10
The above command shows that we will maintain at least one and maximum 10 replica of the POD as the load on the application increases.
We can check the status of autoscaler by running the $kubclt get hpa command. We will increase the load on the pods using the following command.
$ kubectl run -i --tty load-generator --image = busybox /bin/sh
$ while true; do wget -q -O- http://php-apache.default.svc.cluster.local; done
We can check the hpa by running $ kubectl get hpa command.
$ kubectl get hpa
NAME         REFERENCE                     TARGET CURRENT
php-apache   Deployment/php-apache/scale    50%    310%

MINPODS  MAXPODS   AGE
  1        20      2m

$ kubectl get deployment php-apache
NAME         DESIRED    CURRENT    UP-TO-DATE    AVAILABLE   AGE
php-apache      7          7           7            3        4m
We can check the number of pods running using the following command.
jsz@jsz-desk2:~/k8s-src$ kubectl get pods
php-apache-2046965998-3ewo6 0/1        Pending 0         1m
php-apache-2046965998-8m03k 1/1        Running 0         1m
php-apache-2046965998-ddpgp 1/1        Running 0         5m
php-apache-2046965998-lrik6 1/1        Running 0         1m
php-apache-2046965998-nj465 0/1        Pending 0         1m
php-apache-2046965998-tmwg1 1/1        Running 0         1m
php-apache-2046965998-xkbw1 0/1        Pending 0         1m
And finally, we can get the node status.
$ kubectl get nodes
NAME                             STATUS                        AGE
kubernetes-master                Ready,SchedulingDisabled      9m
kubernetes-minion-group-6z5i     Ready                         43s
kubernetes-minion-group-de5q     Ready                         9m
kubernetes-minion-group-yhdx     Ready                         9m
Kubernetes - Dashboard Setup
Setting up Kubernetes dashboard involves several steps with a set of tools required as the prerequisites to set it up.
- Docker (1.3+)
- go (1.5+)
- nodejs (4.2.2+)
- npm (1.3+)
- java (7+)
- gulp (3.9+)
- Kubernetes (1.1.2+)
Setting Up the Dashboard
$ sudo apt-get update && sudo apt-get upgrade

Installing Python
$ sudo apt-get install python
$ sudo apt-get install python3

Installing GCC
$ sudo apt-get install gcc-4.8 g++-4.8

Installing make
$ sudo apt-get install make

Installing Java
$ sudo apt-get install openjdk-7-jdk

Installing Node.js
$ wget https://nodejs.org/dist/v4.2.2/node-v4.2.2.tar.gz
$ tar -xzf node-v4.2.2.tar.gz
$ cd node-v4.2.2
$ ./configure
$ make
$ sudo make install

Installing gulp
$ npm install -g gulp
$ npm install gulp
Verifying Versions
Java Version
$ java version
java version "1.7.0_91"
OpenJDK Runtime Environment (IcedTea 2.6.3) (7u91-2.6.3-1~deb8u1+rpi1)
OpenJDK Zero VM (build 24.91-b01, mixed mode)

$ node v
V4.2.2

$ npn -v
2.14.7

$ gulp -v
[09:51:28] CLI version 3.9.0

$ sudo gcc --version
gcc (Raspbian 4.8.4-1) 4.8.4
Copyright (C) 2013 Free Software Foundation, Inc. This is free software;
see the source for copying conditions. There is NO warranty; not even for
MERCHANTABILITY or FITNESS FOR A PARTICULAR PURPOSE.
Installing GO
$ git clone https://go.googlesource.com/go
$ cd go
$ git checkout go1.4.3
$ cd src

Building GO
$ ./all.bash
$ vi /root/.bashrc
In the .bashrc
   export GOROOT = $HOME/go
   export PATH = $PATH:$GOROOT/bin

$ go version
go version go1.4.3 linux/arm
Installing Kubernetes Dashboard
$ git clone https://github.com/kubernetes/dashboard.git
$ cd dashboard
$ npm install -g bower
Running the Dashboard
$ git clone https://github.com/kubernetes/dashboard.git
$ cd dashboard
$ npm install -g bower
$ gulp serve
[11:19:12] Requiring external module babel-core/register
[11:20:50] Using gulpfile ~/dashboard/gulpfile.babel.js
[11:20:50] Starting 'package-backend-source'...
[11:20:50] Starting 'kill-backend'...
[11:20:50] Finished 'kill-backend' after 1.39 ms
[11:20:50] Starting 'scripts'...
[11:20:53] Starting 'styles'...
[11:21:41] Finished 'scripts' after 50 s
[11:21:42] Finished 'package-backend-source' after 52 s
[11:21:42] Starting 'backend'...
[11:21:43] Finished 'styles' after 49 s
[11:21:43] Starting 'index'...
[11:21:44] Finished 'index' after 1.43 s
[11:21:44] Starting 'watch'...
[11:21:45] Finished 'watch' after 1.41 s
[11:23:27] Finished 'backend' after 1.73 min
[11:23:27] Starting 'spawn-backend'...
[11:23:27] Finished 'spawn-backend' after 88 ms
[11:23:27] Starting 'serve'...
2016/02/01 11:23:27 Starting HTTP server on port 9091
2016/02/01 11:23:27 Creating API client for
2016/02/01 11:23:27 Creating Heapster REST client for http://localhost:8082
[11:23:27] Finished 'serve' after 312 ms
[BS] [BrowserSync SPA] Running...
[BS] Access URLs:
--------------------------------------
Local: http://localhost:9090/
External: http://192.168.1.21:9090/
--------------------------------------
UI: http://localhost:3001
UI External: http://192.168.1.21:3001
--------------------------------------
[BS] Serving files from: /root/dashboard/.tmp/serve
[BS] Serving files from: /root/dashboard/src/app/frontend
[BS] Serving files from: /root/dashboard/src/app
The Kubernetes Dashboard
Kubernetes - Monitoring
Monitoring is one of the key component for managing large clusters. For this, we have a number of tools.
Monitoring with Prometheus
It is a monitoring and alerting system. It was built at SoundCloud and was open sourced in 2012. It handles the multi-dimensional data very well.
Prometheus has multiple components to participate in monitoring −
Prometheus − It is the core component that scraps and stores data.
Prometheus node explore − Gets the host level matrices and exposes them to Prometheus.
Ranch-eye − is an haproxy and exposes cAdvisor stats to Prometheus.
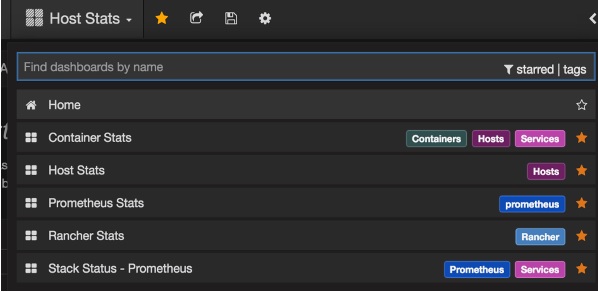
Grafana − Visualization of data.
InfuxDB − Time series database specifically used to store data from rancher.
Prom-ranch-exporter − It is a simple node.js application, which helps in querying Rancher server for the status of stack of service.
Sematext Docker Agent
It is a modern Docker-aware metrics, events, and log collection agent. It runs as a tiny container on every Docker host and collects logs, metrics, and events for all cluster node and containers. It discovers all containers (one pod might contain multiple containers) including containers for Kubernetes core services, if the core services are deployed in Docker containers. After its deployment, all logs and metrics are immediately available out of the box.
Deploying Agents to Nodes
Kubernetes provides DeamonSets which ensures pods are added to the cluster.
Configuring SemaText Docker Agent
It is configured via environment variables.
Get a free account at apps.sematext.com, if you dont have one already.
Create an SPM App of type Docker to obtain the SPM App Token. SPM App will hold your Kubernetes performance metrics and event.
Create a Logsene App to obtain the Logsene App Token. Logsene App will hold your Kubernetes logs.
Edit values of LOGSENE_TOKEN and SPM_TOKEN in the DaemonSet definition as shown below.
Grab the latest sematext-agent-daemonset.yml (raw plain-text) template (also shown below).
Store it somewhere on the disk.
Replace the SPM_TOKEN and LOGSENE_TOKEN placeholders with your SPM and Logsene App tokens.
Create DaemonSet Object
apiVersion: extensions/v1beta1
kind: DaemonSet
metadata:
   name: sematext-agent
spec:
   template:
      metadata:
         labels:
            app: sematext-agent
      spec:
         selector: {}
         dnsPolicy: "ClusterFirst"
         restartPolicy: "Always"
         containers:
         - name: sematext-agent
            image: sematext/sematext-agent-docker:latest
            imagePullPolicy: "Always"
            env:
            - name: SPM_TOKEN
               value: "REPLACE THIS WITH YOUR SPM TOKEN"
            - name: LOGSENE_TOKEN
               value: "REPLACE THIS WITH YOUR LOGSENE TOKEN"
            - name: KUBERNETES
               value: "1"
            volumeMounts:
               - mountPath: /var/run/docker.sock
                  name: docker-sock
               - mountPath: /etc/localtime
                  name: localtime
            volumes:
               - name: docker-sock
                  hostPath:
                     path: /var/run/docker.sock
               - name: localtime
                  hostPath:
                     path: /etc/localtime
Running the Sematext Agent Docker with kubectl
$ kubectl create -f sematext-agent-daemonset.yml
daemonset "sematext-agent-daemonset" created
Kubernetes Log
Kubernetes containers logs are not much different from Docker container logs. However, Kubernetes users need to view logs for the deployed pods. Hence, it is very useful to have Kubernetes-specific information available for log search, such as −
- Kubernetes namespace
- Kubernetes pod name
- Kubernetes container name
- Docker image name
- Kubernetes UID
Using ELK Stack and LogSpout
ELK stack includes Elasticsearch, Logstash, and Kibana. To collect and forward the logs to the logging platform, we will use LogSpout (though there are other options such as FluentD).
The following code shows how to set up ELK cluster on Kubernetes and create service for ElasticSearch −
apiVersion: v1
kind: Service
metadata:
   name: elasticsearch
   namespace: elk
   labels:
      component: elasticsearch
spec:
   type: LoadBalancer
   selector:
      component: elasticsearch
   ports:
   - name: http
      port: 9200
      protocol: TCP
   - name: transport
      port: 9300
      protocol: TCP
Creating Replication Controller
apiVersion: v1
kind: ReplicationController
metadata:
   name: es
   namespace: elk
   labels:
      component: elasticsearch
spec:
   replicas: 1
   template:
      metadata:
         labels:
            component: elasticsearch
spec:
serviceAccount: elasticsearch
containers:
   - name: es
      securityContext:
      capabilities:
      add:
      - IPC_LOCK
   image: quay.io/pires/docker-elasticsearch-kubernetes:1.7.1-4
   env:
   - name: KUBERNETES_CA_CERTIFICATE_FILE
   value: /var/run/secrets/kubernetes.io/serviceaccount/ca.crt
   - name: NAMESPACE
   valueFrom:
      fieldRef:
         fieldPath: metadata.namespace
   - name: "CLUSTER_NAME"
      value: "myesdb"
   - name: "DISCOVERY_SERVICE"
      value: "elasticsearch"
   - name: NODE_MASTER
      value: "true"
   - name: NODE_DATA
      value: "true"
   - name: HTTP_ENABLE
      value: "true"
ports:
- containerPort: 9200
   name: http
   protocol: TCP
- containerPort: 9300
volumeMounts:
- mountPath: /data
   name: storage
volumes:
   - name: storage
      emptyDir: {}
Kibana URL
For Kibana, we provide the Elasticsearch URL as an environment variable.
- name: KIBANA_ES_URL
value: "http://elasticsearch.elk.svc.cluster.local:9200"
- name: KUBERNETES_TRUST_CERT
value: "true"
Kibana UI will be reachable at container port 5601 and corresponding host/Node Port combination. When you begin, there wont be any data in Kibana (which is expected as you have not pushed any data).