JCL - Quick Guide
JCL - Overview
When to use JCL
JCL is used in a mainframe environment to act as a communication between a program (Example: COBOL, Assembler or PL/I) and the operating system. In a mainframe environment, programs can be executed in batch and online mode. Example of a batch system can be processing the bank transactions through a VSAM (Virtual Storage Access Method) file and applying it to the corresponding accounts. Example of an online system can be a back office screen used by staffs in a bank to open an account. In batch mode, programs are submitted to the operating system as a job through a JCL.
Batch and Online processing differ in the aspect of input, output and program execution request. In batch processing, these aspects are fed into a JCL which is in turn received by the Operating System.
Job Processing
A job is a unit of work which can be made up of many job steps. Each job step is specified in a Job Control Language (JCL) through a set of Job Control Statements.
The Operating System uses Job Entry System (JES) to receive jobs into the Operating System, to schedule them for processing and to control the output.
Job processing goes through a series of steps as given below:
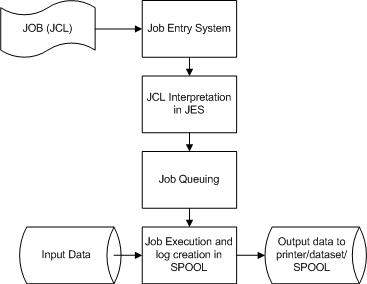
Job Submission - Submitting the JCL to JES.
Job Conversion - The JCL along with the PROC is converted into an interpreted text to be understood by JES and stored into a dataset, which we call as SPOOL.
Job Queuing - JES decides the priority of the job based on CLASS and PRTY parameters in the JOB statement (explained in JCL - JOB Statement chapter). The JCL errors are checked and the job is scheduled into the job queue if there are no errors.
Job Execution - When the job reaches its highest priority, it is taken up for execution from the job queue. The JCL is read from the SPOOL, the program is executed and the output is redirected to the corresponding output destination as specified in the JCL.
Purging - When the job is complete, the allocated resources and the JES SPOOL space is released. In order to store the job log, we need to copy the job log to another dataset before it is released from the SPOOL.
JCL - Environment Setup
Installing JCL on Windows/Linux
There are many Free Mainframe Emulators available for Windows which can be used to write and learn sample JCLs.
One such emulator is Hercules, which can be easily installed in Windows by following few simple steps given below:
Download and install the Hercules emulator, which is available from the Hercules' home site - : www.hercules-390.eu
Once you installed package on Windows machine, it will create a folder like C:\Mainframes.
Run Command Prompt (CMD) and reach the directory C:\Mainframes on CMD.
The complete guide on various commands to write and execute a JCL can be found on URL www.jaymoseley.com/hercules/installmvs/instmvs2.htm
Hercules is an open source software implementation of the mainframe System/370 and ESA/390 architectures, in addition to the latest 64-bit z/Architecture. Hercules runs under Linux, Windows, Solaris, FreeBSD, and Mac OS X.
Running JCL on Mainframes
A user can connect to a mainframe server in a number of ways such a thin client, dummy terminal, Virtual Client System (VCS) or Virtual Desktop System (VDS).
Every valid user is given a login id to enter into the Z/OS interface (TSO/E or ISPF). In the Z/OS interface, the JCL can be coded and stored as a member in a Partitioned Dataset (PDS). When the JCL is submitted, it is executed and the output received as explained in the job processing section of previous chapter.
Structure of a JCL
The basic structure of a JCL with the common statements is given below:
//SAMPJCL JOB 1,CLASS=6,MSGCLASS=0,NOTIFY=&SYSUID          (1)
//*                                                        (2)
//STEP010  EXEC PGM=SORT                                   (3)
//SORTIN   DD DSN=JCL.SAMPLE.INPUT,DISP=SHR                (4)
//SORTOUT  DD DSN=JCL.SAMPLE.OUTPUT,                       (5)
//         DISP=(NEW,CATLG,CATLG),DATACLAS=DSIZE50
//SYSOUT   DD SYSOUT=*                                     (6)
//SYSUDUMP DD SYSOUT=C                                     (6)
//SYSPRINT DD SYSOUT=*                                     (6)
//SYSIN    DD *                                            (6)
  SORT FIELDS=COPY
  INCLUDE COND=(28,3,CH,EQ,C'XXX')
/*                                                         (7)
Program Description
The numbered JCL statements have been explained below:
(1) JOB statement - Specifies the information required for SPOOLing of the job such as job id, priority of execution, user-id to be notified upon completion of the job.
(2) //* statement - This is a comment statement.
(3) EXEC statement - Specifies the PROC/Program to be executed. In the above example, a SORT program is being executed (i.e., sorting the input data in a particular order)
(4) Input DD statement - Specifies the type of input to be passed to the program mentioned in (3). In the above example, a Physical Sequential (PS) file is passed as input in shared mode (DISP = SHR).
(5) Output DD statement - Specifies the type of output to be produced by the program upon execution. In the above example, a PS file is created. If a statement extends beyond the 70th position in a line, then it is continued in the next line, which should start with "//" followed by one or more spaces.
(6) There can be other types of DD statements to specify additional information to the program (In the above example: The SORT condition is specified in the SYSIN DD statement) and to specify the destination for error/execution log (Example: SYSUDUMP/SYSPRINT). DD statements can be contained in a dataset (mainframe file) or as in stream data (information hard-coded within the JCL) as given in above example.
(7) /* marks the end of in stream data.
All the JCL statements except in stream data starts with //. There should be at least one space before and after JOB, EXEC and DD keywords and there should not be any spaces in rest of the statement.
JOB Parameter Types
Each of the JCL statements is accompanied by a set of parameters to help the Operating Systems in completing the program execution. The parameters can be of two types:
Positional Parameters
Appears at pre-defined position and order in the statement. Example: Accounting information Parameter can appear only after the JOB keyword and before the programmer name parameter and the Keyword Parameters. If a positional parameter is omitted, it has to be replaced with a comma.
Positional Parameters are present in JOB and EXEC statements. In the above example, PGM is a positional parameter coded after the EXEC keyword.
Keyword Parameters
They are coded after the positional parameters, but can appear in any order. Keyword parameters can be omitted if not required. The generic syntax is KEYWORD= value. Example: MSGCLASS=X, i.e., the job log is redirected to the output SPOOL after the job completion.
In the above example, CLASS, MSGCLASS and NOTIFY are keyword parameters of JOB statement. There can be keyword parameters in EXEC statement as well.
These parameters have been detailed out in the subsequent chapters along with appropriate examples.
JCL - JOB Statement
JOB Statement is the first control statement in a JCL. This gives the identity of the job to the Operating System (OS), in the spool and in the scheduler. The parameters in the JOB statement help the Operating Systems in allocating the right scheduler, required CPU time and issuing notifications to the user.
Syntax
Following is the basic syntax of a JCL JOB statement:
//Job-name JOB Positional-param, Keyword-param
Description
Let us see the description of the terms used in above JOB statement syntax.
Job-name
This gives an id to the job while submitting it to the OS. It is can be length of 1 to 8 with alphanumeric characters and starts just after //.
JOB
This is the keyword to identify it as a JOB statement.
Positional-param
There are positional parameters, which can be of two types:
| Positional Parameter | Description |
|---|---|
| Account information | This refers to the person or group to which the CPU time is owed. It is set as per the rules of the company owning the mainframes. If it is specified as (*), then it takes the id of the user, who has currently logged into the Mainframe Terminal. |
| Programmer name | This identifies the person or group, who is in charge of the JCL. This is not a mandatory parameter and can be replaced by a comma. |
Keyword-param
Following are the various keyword parameters, which can be used in JOB statement. You can use one or more parameters based on requirements and they are separated by comma:
| Keyword Parameter | Description |
|---|---|
| CLASS | Based on the time duration and the number of resources required by the job, companies assign different job classes. These can be visualized as individual schedulers used by the OS to receive the jobs. Placing the jobs in the right scheduler will aid in easy execution of the jobs. Some companies have different classes for jobs in test and production environment. Valid values for CLASS parameter are A to Z characters and 0 to 9 numeric (of length 1). Following is the syntax: CLASS=0 to 9 | A to Z |
| PRTY | To specify the priority of the job within a job class. If this parameter is not specified, then the job is added to the end of the queue in the specified CLASS. Following is the syntax: PRTY=N Where N is a number in between 0 to 15 and higher the number, higher is the priority. |
| NOTIFY | The system sends the success or failure message (Maximum Condition Code) to the user specified in this parameter. Following is the syntax: NOTIFY="userid | &SYSUID" Here system sends the message to the user "userid" but if we use NOTIFY = &SYSUID, then the message is sent to the user submitting the JCL. |
| MSGCLASS | To specify the output destination for the system and Job messages when the job is complete. Following is the syntax: MSGCLASS=CLASS Valid values of CLASS can be from "A" to "Z" and "0" to "9". MSGCLASS = Y can be set as a class to send the job log to the JMR (JOBLOG Management and Retrieval: a repository within mainframes to store the job statistics). |
| MSGLEVEL | Specifies the type of messages to be written to the output destination specified in the MSGCLASS. Following is the syntax: MSGLEVEL=(ST, MSG) ST = Type of statements written to output log
MSG = Type of messages written to output log.
|
| TYPRUN | Specifies a special processing for the job. Following is the syntax: TYPRUN = SCAN | HOLD Where SCAN and HOLD has the following description
|
| TIME | Specifies the time span to be used by the processor to execute the job. Following is the syntax: TIME=(mm, ss) or TIME=ss Where mm = minutes and ss = seconds This parameter can be useful while testing a newly coded program. In order to ensure that the program does not run for long because of looping errors, a time parameter can be coded so that the program abends when the specified CPU time is reached. |
| REGION | Specifies the address space required to run a job step within the job. Following is the syntax: REGION=nK | nM Here, region can be specified as nK or nM where n is a number, K is kilobyte and M is Megabyte. When REGION = 0K or 0M, largest address space is provided for execution.In critical applications, coding of 0K or 0M is prohibited to avoid wasting the address space. |
Example
//URMISAMP JOB (*),"tutpoint",CLASS=6,PRTY=10,NOTIFY=&SYSUID,
//   MSGCLASS=X,MSGLEVEL=(1,1),TYPRUN=SCAN,
//   TIME=(3,0),REGION=10K
Here, JOB statement is getting extended beyond the 70th position in a line,so we continue in the next line which should start with "//" followed by one or more spaces.
Miscellaneous Parameters
There are few other parameters, which can be used with JOB Statement but they are not frequently used:
| ADDRSPC | Type of storage used: Virtual or Real |
| BYTES | Size of data to be written to output log and the action to be taken when the size is exceeded. |
| LINES | Maximum number of lines to be printed to output log. |
| PAGES | Maximum number of pages to be printed to output log. |
| USER | User id used to submit the job |
| PASSWORD | Password of the user-id specified in the USER parameter. |
| COND and RESTART | These are used in conditional job step processing and are explained in detail while discussing conditional Processing. |
JCL - EXEC Statement
Each JCL can be made of many job steps. Each job step can execute a program directly or can call a procedure, which in turn executes one or more programs (job steps). The statement, which holds the job step program/procedure information is the EXEC statement.
The purpose of the EXEC statement is to provide required information for the program/procedure executed in the job step. Parameters coded in this statement can pass data to the program in execution, can override certain parameters of JOB statement and can pass parameters to the procedure if the EXEC statement calls a procedure instead of directly executing a program.
Syntax
Following is the basic syntax of a JCL EXEC statement:
//Step-name EXEC Positional-param, Keyword-param
Description
Let us see the description of the terms used in above EXEC statement syntax.
STEP-NAME
This identifies the job step within the JCL. It can be of length 1 to 8 with alphanumeric characters.
EXEC
This is the keyword to identify it as an EXEC statement.
POSITIONAL-PARAM
These are positional parameters, which can be of two types:
| Positional Parameter | Description |
|---|---|
| PGM | This refers to the program name to be executed in the job step. |
| PROC | This refers to the procedure name to be executed in the job step. We will discuss it a separate chapter. |
KEYWORD-PARAM
Following are the various keyword parameters for EXEC statement. You can use one or more parameters based on requirements and they are separated by comma:
| Keyword Parameter | Description |
|---|---|
| PARM | Used to provide parametrized data to the program that is being executed in the job step. This is a program dependant field and do not have definite rules, except that the PARM value has to be included within quotation in the event of having special characters. For example given below, the value "CUST1000" is passed as an alphanumeric value to the program. If the program is in COBOL, the value passed through a PARM parameter in a JCL is received in the LINKAGE SECTION of the program. |
| ADDRSPC | This is used to specify whether the job step require virtual or real storage for execution. Virtual storage is pageable whereas real storage is not and is placed in the main memory for execution. Job steps, which require faster execution can be placed in real storage. Following is the syntax: ADDRSPC=VIRT | REAL When an ADDRSPC is not coded, VIRT is the default one. |
| ACCT | This specifies the accounting information of the job step. Following is the syntax: ACCT=(userid) This is similar to the positional parameter accounting information in the JOB statement. If it is coded both in JOB and EXEC statement, then the accounting information in JOB statement applies to all job steps where an ACCT parameter is not coded. The ACCT parameter in an EXEC statement will override the one present in the JOB statement for that job step only. |
Common Keyword Parameters of EXEC and JOB Statement
| Keyword Parameter | Description |
|---|---|
| ADDRSPC | ADDRSPC coded in JOB statement overrides the ADDRSPC coded in EXEC statement of any job step. |
| TIME | If TIME is coded in an EXEC statement, then it applies to that job step only. If it is specified in both JOB and EXEC statement, then both will be in effect and can cause time-out error due to either of it. It is not recommended to use TIME parameter in both the JOB and EXEC statement together. |
| REGION | If REGION is coded in an EXEC statement, then it applies to that job step only. REGION coded in JOB statement overrides the REGION coded in EXEC statement of any job step. |
| COND | Used to control the job step execution based on the return-code of the previous step. If a COND parameter is coded in an EXEC statement of a job step, then the COND parameter of the JOB statement (if present) is ignored. The various tests that can be performed using a COND parameter is explained in conditional Processing. |
Example
Following is a simple example of JCL script along with JOB and EXEC statements:
//TTYYSAMP JOB 'TUTO',CLASS=6,MSGCLASS=X,REGION=8K,
//      NOTIFY=&SYSUID
//*
//STEP010 EXEC PGM=MYCOBOL,PARAM=CUST1000,
//      ACCT=(XXXX),REGION=8K,ADDRSPC=REAL,TIME=1440
JCL - DD Statement
Datasets are mainframe files with records organised in a specific format. Datasets are stored on the Direct Access Storage Device (DASD) or Tapes of the mainframe and are basic data storage areas. If these data are required to be used/created in a batch program, then the file (i.e., dataset) physical name along with the file format and organisation are coded in a JCL.
The definition of each dataset used in the JCL is given using the DD statement. The input and output resources required by a job step needs to be described within a DD statement with information such as the dataset organisation, storage requirements and record length.
Syntax
Following is the basic syntax of a JCL DD statement:
//DD-name DD Parameters
Description
Let us see the description of the terms used in above DD statement syntax.
DD-NAME
A DD-NAME identifies the dataset or input/output resource. If this is an input/output file used by a COBOL/Assembler program, then the file is referenced by this name within the program.
DD
This is the keyword to identify it as an DD statement.
PARAMETERS
Following are the various parameters for DD statement. You can use one or more parameters based on requirements and they are separated by comma:
| Parameter | Description |
|---|---|
| DSN | The DSN parameter refers to the physical dataset name of a newly created or existing dataset. The DSN value can be made up of sub-names each of 1 to 8 characters length, separated by periods and of total length of 44 characters (alphanumeric). Following is the syntax: DSN=Physical Dataset Name Temporary datasets need storage only for the job duration and are deleted at job completion. Such datasets are represented as DSN=&name or simply without a DSN specified. If a temporary dataset created by a job step is to be used in the next job step, then it is referenced as DSN=*.stepname.ddname. This is called Backward Referencing. |
| DISP | The DISP parameter is used to describe the status of the dataset, disposition at the end of the job step on normal and abnormal completion. DISP is not required in a DD statement only when the dataset gets created and deleted in the same job step (like the temporary datasets). Following is the syntax: DISP=(status, normal-disposition, abnormal-disposition) Following are valid values for status:
A normal-disposition parameter can take one of the following values
A abnormal-disposition parameter can take one of the following values
Here is the description of CATLG, UNCATLG, DELETE, PASS and KEEP parameters:
When any of the sub-parameters of DISP are not specified, the default values are as follows:
|
| DCB | The Data Control Block (DCB) parameter details the physical characteristics of a dataset. This parameter is required for datasets that are newly created in the job step. LRECL is the length of each record held within the dataset. RECFM is the record format of the dataset. RECFM can hold values FB, V or VB. FB is a fixed block organisation where one or more logical records are grouped within a single block. V is variable organisation where one variable length logical record is placed within one physical block. VB is Variable Block organisation where one or more variable length logical records are placed within one physical block. BLKSIZE is the size of the physical block. The larger the block, greater is the number of records for a FB or VB file. DSORG is the type of dataset organisation. DSORG can hold values PS (Physical Sequential), PO (Partitioned Organisation) and DA (Direct Organisation). When there is a need to replicate the DCB values of one dataset to another within the same jobstep or JCL, then it is specified as DCB=*.stepname.ddname where stepname is the name of the job step and ddname is the dataset from which the DCB is copied. Check below example where RECFM=FB,LRECL=80 forms the DCB of dataset OUTPUT1. |
| SPACE | The SPACE parameter specifies the space required for the dataset in the DASD (Direct Access Storage Disk). Following is the syntax: SPACE=(spcunits, (pri, sec, dir), RLSE) Here is the description of all the used parameters:
|
| UNIT | The UNIT and VOL parameters are listed in the system catalog for catalogued datasets and hence can be accessed with just the physical DSN name. But for uncataloged datasets, the DD statement should include these parameters. For new datasets to be created, the UNIT/VOL parameters can be specified or the Z/OS allocates the suitable device and volume. The UNIT parameter specifies the type of device on which the dataset is stored. The device type can be identified using Hardware Address or Device type group. Following is the syntax: UNIT=DASD | SYSDA Where DASD stands for Direct Access Storage Device and SYSDA stands for System Direct Access and refers to the next available disk storage device. |
| VOL | The VOL parameter specifies the volume number on the device identified by the UNIT parameter. Following is the syntax: VOL=SER=(v1,v2) Where v1, v2 are volume serial numbers. You can use the following syntax as well: VOL=REF=*.DDNAME Where REF is the backward reference to the volume serial number of a dataset in any of the preceding job steps in the JCL. |
| SYSOUT | The DD statement parameters discussed so far corresponds to data being stored in a dataset. The SYSOUT parameter directs the data to output device based on the class specified. Following is the syntax SYSOUT=class Where if class is A then it directs output to printer, and if class is * then it directs output to same destination as that of the MSGCLASS parameter in the JOB statement. |
Example
Following is an example, which makes use of DD statements along with various parameters explained above:
//TTYYSAMP JOB 'TUTO',CLASS=6,MSGCLASS=X,REGION=8K,
//         NOTIFY=&SYSUID
//*
//STEP010  EXEC PGM=ICETOOL,ADDRSPC=REAL
//*
//INPUT1   DD DSN=TUTO.SORT.INPUT1,DISP=SHR
//INPUT2   DD DSN=TUTO.SORT.INPUT2,DISP=SHR,UNIT=SYSDA,
//         VOL=SER=(1243,1244)
//OUTPUT1  DD DSN=MYFILES.SAMPLE.OUTPUT1,DISP=(,CATLG,DELETE),
//         RECFM=FB,LRECL=80,SPACE=(CYL,(10,20))
//OUTPUT2  DD SYSOUT=*
JCL - Base Library
Base Library is the Partitioned Dataset (PDS), which holds the load modules of the program to be executed in the JCL or the catalogued procedure, which is called in the program. Base libraries can be specified for the whole JCL in a JOBLIB library or for a particular job step in a STEPLIB statement.
JOBLIB Statement
A JOBLIB statement is used in order to identify the location of the program to be executed in a JCL. The JOBLIB statement is specified after the JOB statement and before the EXEC statement. This can be used only for the in stream procedures and programs.
Syntax
Following is the basic syntax of a JCL JOBLIB statement:
//JOBLIB DD DSN=dsnname,DISP=SHR
The JOBLIB statement is applicable to all the EXEC statements within the JCL. The program specified in the EXEC statement will be searched in the JOBLIB library followed by the system library.
For example, if the EXEC statement is executing a COBOL program, the load module of the COBOL program should be placed within the JOBLIB library.
STEPLIB Statement
A STEPLIB statement is used in order to identify the location of the program to be executed within a Job Step. The STEPLIB statement is specified after the EXEC statement and before the DD statement of the job step.
Syntax
Following is the basic syntax of a JCL STEPLIB statement:
//STEPLIB DD DSN=dsnname,DISP=SHR
The program specified in the EXEC statement will be searched in the STEPLIB library followed by the system library. STEPLIB coded in a job step overrides the JOBLIB statement.
Example
The following example shows the usage of JOBLIB and STEPLIB statements:
//MYJCL JOB ,,CLASS=6,NOTIFY=&SYSUID
//*
//JOBLIB DD DSN=MYPROC.BASE.LIB1,DISP=SHR
//*
//STEP1 EXEC PGM=MYPROG1
//INPUT1 DD DSN=MYFILE.SAMPLE.INPUT1,DISP=SHR
//OUTPUT1 DD DSN=MYFILES.SAMPLE.OUTPUT1,DISP=(,CATLG,DELETE),
//           RECFM=FB,LRECL=80
//*
//STEP2 EXEC PGM=MYPROG2
//STEPLIB DD DSN=MYPROC.BASE.LIB2,DISP=SHR
//INPUT2 DD DSN=MYFILE.SAMPLE.INPUT2,DISP=SHR
//OUTPUT2 DD DSN=MYFILES.SAMPLE.OUTPUT2,DISP=(,CATLG,DELETE),
//           RECFM=FB,LRECL=80
Here, the load module of the program MYPROG1 (in STEP1) is searched in the MYPROC.SAMPLE.LIB1. If not found, it is searched in the system library. In STEP2, STEPLIB overrides JOBLIB and load module of the program MYPROG2 is searched in MYPROC.SAMPLE.LIB2 and then in the system library.
INCLUDE Statement
A set of JCL statements coded within a member of a PDS can be included to a JCL using an INCLUDE statement. When the JES interprets the JCL, the set of JCL statements within the INCLUDE member replaces the INCLUDE statement.
Syntax
Following is the basic syntax of a JCL INCLUDE statement:
//name INCLUDE MEMBER=member-name
The main purpose of INCLUDE statement is reusability. For example, common files to be used across many JCLs can be coded as DD statements within INCLUDE member and used in a JCL.
Dummy DD statements, data card specifications, PROCs, JOB, PROC statements cannot be coded within an INCLUDE member. An INLCUDE statement can be coded within an INCLUDE member and further nesting can be done up to 15 levels.
JCLLIB Statement
A JCLLIB statement is used to identify the private libraries used in the job. It can be used both with instream and cataloged procedures.
Syntax
Following is the basic syntax of a JCL JCLLIB statement:
//name JCLLIB ORDER=(library1, library2....)
The libraries specified in the JCLLIB statement will be searched in the given order to locate the programs, procedures and INCLUDE member used in the job. There can be only one JCLLIB statement in a JCL; specified after a JOB statement and before EXEC and INCLUDE statement but it cannot be coded within an INCLUDE member.
Example
In the following example, the program MYPROG3 and INCLUDE member MYINCL is searched in the order of MYPROC.BASE.LIB1, MYPROC.BASE.LIB2, system library.
//MYJCL JOB ,,CLASS=6,NOTIFY=&SYSUID
//*
//MYLIB JCLLIB ORDER=(MYPROC.BASE.LIB1,MYPROC.BASE.LIB2)
//*
//STEP1 EXEC PGM=MYPROG3
//INC INCLUDE MEMBER=MYINCL
//OUTPUT1 DD DSN=MYFILES.SAMPLE.OUTPUT1,DISP=(,CATLG,DELETE),
//           RECFM=FB,LRECL=80
//*
JCL - Procedures
The JCL Procedures are set of statements inside a JCL grouped together to perform a particular function. Usually, the fixed part of the JCL is coded in a procedure. The varying part of the Job is coded within the JCL.
You can use a procedure to achieve parallel execution of a program using multiple input files. A JCL can be created for each input file, and a single procedure can be called simultaneously by passing the input file name as a symbolic parameter.
Syntax
Following is the basic syntax of a JCL procedure definition:
//*
//Step-name EXEC procedure name
The contents of the procedure are held within the JCL for an instream procedure. The contents are held within a different member of the base library for a cataloged procedure. This chapter is going to explain two types of procedures available in JCL and then finally we will see how we can nest various procedures.
Instream Procedure
When the procedure is coded within the same JCL member, it is called an Instream Procedure. It should start with a PROC statement and end with a PEND statement.
//SAMPINST JOB 1,CLASS=6,MSGCLASS=Y,NOTIFY=&SYSUID
//*
//INSTPROC   PROC                //*START OF PROCEDURE
//PROC1		EXEC PGM=SORT
//SORTIN	DD DSN=&DSNAME,DISP=SHR
//SORTOUT	DD SYSOUT=*MYINCL
//SYSOUT	DD SYSOUT=*
//SYSIN		DD DSN=&DATAC LRECL=80
//           PEND               //*END OF PROCEDURE
//*
//STEP1      EXEC INSTPROC,DSNME=MYDATA.URMI.INPUT1,
//           DATAC=MYDATA.BASE.LIB1(DATA1)
//*
//STEP2      EXEC INSTPROC,DSNME=MYDATA.URMI.INPUT2
//           DATAC=MYDATA.BASE.LIB1(DATA1)
//*
In the above example, the procedure INSTPROC is called in STEP1 and STEP2 using different input files. The parameters DSNAME and DATAC can be coded with different values while calling the procedure and these are called as symbolic parameters. The varying input to the JCL such as file names, datacards, PARM values, etc., are passed as symbolic parameters to procedures.
While coding symbolic parameters, do not use KEYWORDS, PARAMETERS or SUB-PARAMETERS as symbolic names. Example: Do not use TIME=&TIME but yes you can use TIME=&TM and it is assumed as a right way of coding symbolics.
User-defined symbolic parameters are called JCL Symbols. There are certain symbols called system symbols, which are used for logon job executions. The only system symbol used in batch jobs by normal users is &SYSUID and this is used in the NOTIFY parameter in the JOB statement.
Cataloged Procedure
When the procedure is separated out from the JCL and coded in a different data store, it is called a Cataloged Procedure. A PROC statement is not mandatory to be coded in a cataloged procedure. Following is an example of JCL where it's calling CATLPROC procedure:
//SAMPINST JOB 1,CLASS=6,MSGCLASS=Y,NOTIFY=&SYSUID
//*
//STEP EXEC CATLPROC,PROG=CATPRC1,DSNME=MYDATA.URMI.INPUT
//          DATAC=MYDATA.BASE.LIB1(DATA1)
Here, the procedure CATLPROC is cataloged in MYCOBOL.BASE.LIB1. PROG,DATAC and DSNAME are passed as symbolic parameters to the procedure CATLPROC.
//CATLPROC PROC PROG=,BASELB=MYCOBOL.BASE.LIB1
//*
//PROC1     EXEC PGM=&PROG
//STEPLIB   DD DSN=&BASELB,DISP=SHR
//IN1       DD DSN=&DSNAME,DISP=SHR
//OUT1      DD SYSOUT=*
//SYSOUT    DD SYSOUT=*
//SYSIN     DD DSN=&DATAC
//*
Within the procedure, the symbolic parameters PROG and BASELB are coded. Please note that the PROG parameter within the procedure is overridden by the value in the JCL and hence PGM takes the value CATPRC1 during execution.
Nested Procedures
Calling a procedure from within a procedure is called a nested procedure. Procedures can be nested up to 15 levels. The nesting can be completely in-stream or cataloged. We cannot code an instream procedure within a cataloged procedure.
//SAMPINST JOB 1,CLASS=6,MSGCLASS=Y,NOTIFY=&SYSUID
//*
//SETNM     SET DSNM1=INPUT1,DSNM2=OUTPUT1
//INSTPRC1  PROC               //* START OF PROCEDURE 1
//STEP1        EXEC PGM=SORT,DISP=SHR
//SORTIN       DD DSN=&DSNM1,DISP=SHR
//SORTOUT      DD DSN=&DSNM2,DISP=(,PASS)
//SYSOUT       DD SYSOUT=*
//SYSIN        DD DSN=&DATAC
//*
//STEP2        EXEC PROC=INSTPRC2,DSNM2=MYDATA.URMI.OUTPUT2
//          PEND               //* END OF PROCEDURE 1
//*
//INSTPRC2  PROC               //* START OF PROCEDURE 2
//STEP1        EXEC PGM=SORT
//SORTIN       DD DSN=*.INSTPRC1.STEP1.SORTOUT
//SORTOUT      DD DSN=&DSNM2,DISP=OLD
//SYSOUT       DD SYSOUT=*
//SYSIN        DD DSN=&DATAC
//          PEND               //* END OF PROCEDURE 2
//*
//JSTEP1    EXEC INSTPRC1,DSNM1=MYDATA.URMI.INPUT1,
//          DATAC=MYDATA.BASE.LIB1(DATA1)
//*
In the above example, the JCL calls the procedure INSTPRC1 in JSTEP1 and procedure INSTPRC2 is being called within the procedure INSTPRC1. Here, the output of INSTPRC1 (SORTOUT) is passed as input (SORTIN) to INSTPRC2.
A SET statement is used to define commonly used symbolics across job steps or procedures. It initializes the previous values in the symbolic names. It has to be defined before the first use of the symbolic names in the JCL.
Let's have a look at the below description to understand a little more about the above program:
SET parameter initializes DSNM1=INPUT1 and DSNM2=OUTPUT1.
When INSTPRC1 is called in JSTEP1 of JCL, DSNM1=MYDATA.URMI.INPUT1 and DSNM2=OUTPUT1., i.e., the value initialized in SET statement is reset with the value set in any of the job step/procedures.
When INSTPRC2 is called in STEP2 of INSTPRC1, DSNM1=MYDATA.URMI.INPUT1 and DSNM2=MYDATA.URMI.OUTPUT2.
JCL - Conditional Processing
The Job Entry System uses two approaches to perform conditional processing in a JCL. When a job completes, a return code is set based on the status of execution. The return code can be a number between 0 (successful execution) to 4095 (non-zero shows error condition). The most common conventional values are:
0 = Normal - all OK
4 = Warning - minor errors or problems.
8 = Error - significant errors or problems.
12 = Severe error - major errors or problems, the results should not be trusted.
16 = Terminal error - very serious problems, do not use the results.
A job step execution can be controlled based on the return code of the previous step(s) using the COND parameter and IF-THEN-ELSE construct, which has been explained in this tutorial.
COND parameter
A COND parameter can be coded in the JOB or EXEC statement of JCL. It is a test on the return code of the preceding job steps. If the test is evaluated to be true, the current job step execution is bypassed. Bypassing is just omission of the job step and not an abnormal termination. There can be at most eight conditions combined in a single test.
Syntax
Following is the basic syntax of a JCL COND Parameter:
COND=(rc,logical-operator)
or
COND=(rc,logical-operator,stepname)
or
COND=EVEN
or
COND=ONLY
Here is the description of parameters used:
rc : This is the return code
logical-operator : This can be GT (Greater Than), GE (Greater than or Equal to), EQ (Equal to), LT (Lesser Than), LE (Lesser than or Equal to) or NE (Not Equal to).
stepname : This is the job step whose return code is used in the test.
Last two conditions (a) COND=EVEN and (b) COND=ONLY, have been explained below in this tutorial.
The COND can be coded either inside JOB statement or EXEC statement, and in both the cases, it behaves differently as explained below:
COND inside JOB statement
When COND is coded in JOB statement, the condition is tested for every job step. When the condition is true at any particular job step, it is bypassed along with the job steps following it. Following is an example:
//CNDSAMP JOB CLASS=6,NOTIFY=&SYSUID,COND=(5,LE)
//*
//STEP10 EXEC PGM=FIRSTP
//* STEP10 executes without any test being performed.

//STEP20 EXEC PGM=SECONDP
//* STEP20 is bypassed, if RC of STEP10 is 5 or above.
//* Say STEP10 ends with RC4 and hence test is false.
//* So STEP20 executes and lets say it ends with RC16.

//STEP30 EXEC PGM=SORT
//* STEP30 is bypassed since 5
COND inside EXEC statement
When COND is coded in EXEC statement of a job step and found to be true, only that job step is bypassed, and execution is continued from next job step.
//CNDSAMP JOB CLASS=6,NOTIFY=&SYSUID
//*
//STP01 EXEC PGM=SORT
//* Assuming STP01 ends with RC0.

//STP02 EXEC PGM=MYCOBB,COND=(0,EQ,STP01)
//* In STP02, condition evaluates to TRUE and step bypassed.

//STP03 EXEC PGM=IEBGENER,COND=((10,LT,STP01),(10,GT,STP02))
//* In STP03, first condition fails and hence STP03 executes.
//* Since STP02 is bypassed, the condition (10,GT,STP02) in
//* STP03 is not tested.
COND=EVEN
When COND=EVEN is coded, the current job step is executed, even if any of the previous steps abnormally terminate. If any other RC condition is coded along with COND=EVEN, then the job step executes if none of the RC condition is true.
//CNDSAMP JOB CLASS=6,NOTIFY=&SYSUID
//*
//STP01 EXEC PGM=SORT
//* Assuming STP01 ends with RC0.

//STP02 EXEC PGM=MYCOBB,COND=(0,EQ,STP01)
//* In STP02, condition evaluates to TRUE and step bypassed.

//STP03 EXEC PGM=IEBGENER,COND=((10,LT,STP01),EVEN)
//* In STP03, condition (10,LT,STP01) evaluates to true,
//* hence the step is bypassed.
COND=ONLY
When COND=ONLY is coded, the current job step is executed, only when any of the previous steps abnormally terminate. If any other RC condition is coded along with COND=ONLY, then the job step executes if none of the RC condition is true and any of the previous job steps fail abnormally.
//CNDSAMP JOB CLASS=6,NOTIFY=&SYSUID
//*
//STP01 EXEC PGM=SORT
//* Assuming STP01 ends with RC0.

//STP02 EXEC PGM=MYCOBB,COND=(4,EQ,STP01)
//* In STP02, condition evaluates to FALSE, step is executed
//* and assume the step abends.

//STP03 EXEC PGM=IEBGENER,COND=((0,EQ,STP01),ONLY)
//* In STP03, though the STP02 abends, the condition
//* (0,EQ,STP01) is met. Hence STP03 is bypassed.
IF-THEN-ELSE Construct
Another approach to control the job processing is by using IF-THEN-ELSE constructs. This gives more flexibility and user-friendly way of conditional processing.
Syntax
Following is the basic syntax of a JCL IF-THEN-ELSE Construct:
//name IF condition THEN
list of statements //* action to be taken when condition is true
//name ELSE
list of statements //* action to be taken when condition is false
//name ENDIF
Following is the description of the used terms in the above IF-THEN-ELSE Construct:
name : This is optional and a name can have 1 to 8 alphanumeric characters starting with alphabet, #,$ or @.
Condition : A condition will have a format: KEYWORD OPERATOR VALUE, where KEYWORDS can be RC (Return Code), ABENDCC (System or user completion code), ABEND, RUN (step started execution). An OPERATOR can be logical operator (AND (&), OR (|)) or relational operator (, >=, ).
Example
Following is a simple example showing the usage of IF-THEN-ELSE:
//CNDSAMP JOB CLASS=6,NOTIFY=&SYSUID //* //PRC1 PROC //PST1 EXEC PGM=SORT //PST2 EXEC PGM=IEBGENER // PEND //STP01 EXEC PGM=SORT //IF1 IF STP01.RC = 0 THEN //STP02 EXEC PGM=MYCOBB1,PARM=123 // ENDIF //IF2 IF STP01.RUN THEN //STP03a EXEC PGM=IEBGENER //STP03b EXEC PGM=SORT // ENDIF //IF3 IF STP03b.!ABEND THEN //STP04 EXEC PGM=MYCOBB1,PARM=456 // ELSE // ENDIF //IF4 IF (STP01.RC = 0 & STP02.RCLet's try to look into the above program to understand it in little more detail:
The return code of STP01 is tested in IF1. If it is 0, then STP02 is executed. Else, the processing goes to the next IF statement (IF2).
In IF2, If STP01 has started execution, then STP03a and STP03b are executed.
In IF3, If STP03b does not ABEND, then STP04 is executed. In ELSE, there are no statements. It is called a NULL ELSE statement.
In IF4, if STP01.RC = 0 and STP02.RC
In IF5, if the proc-step PST1 in PROC PRC1 in jobstep STP05 ABEND, then STP06 is executed. Else STP07 is executed.
If IF4 evaluates to false, then STP05 is not executed. In that case, IF5 are not tested and the steps STP06, STP07 are not executed.
The IF-THEN-ELSE will not be executed in the case of abnormal termination of the job such as user cancelling the job, job time expiry or a dataset is backward referenced to a step that is bypassed.
Setting Checkpoints
You can set checkpoint dataset inside your JCL program using SYSCKEOV, which is a DD statement.
A CHKPT is the parameter coded for multi-volume QSAM datasets in a DD statement. When a CHKPT is coded as CHKPT=EOV, a checkpoint is written to the dataset specified in the SYSCKEOV statement at the end of each volume of the input/output multi-volume dataset.
//CHKSAMP JOB CLASS=6,NOTIFY=&SYSUID
//*
//STP01     EXEC PGM=MYCOBB
//SYSCKEOV  DD DSNAME=SAMPLE.CHK,DISP=MOD
//IN1       DD DSN=SAMPLE.IN,DISP=SHR
//OUT1      DD DSN=SAMPLE.OUT,DISP=(,CATLG,CATLG)
//          CHKPT=EOV,LRECL=80,RECFM=FB
In the above example, a checkpoint is written in dataset SAMPLE.CHK at the end of each volume of the output dataset SAMPLE.OUT.
Restart Processing
You can restart processing ether using automated way using the RD parameter or manual using the RESTART parameter.
RD parameter is coded in the JOB or EXEC statement and it helps in automated JOB/STEP restart and can hold one of the four values: R, RNC, NR or NC.
RD=R allows automated restarts and considers the checkpoint coded in the CHKPT parameter of the DD statement.
RD=RNC allows automated restarts, but overrides (ignores) the CHKPT parameter.
RD=NR specifies that the job/step cannot be automatically restarted. But when it is manually restarted using the RESTART parameter, CHKPT parameter (if any) will be considered.
RD=NC disallows automated restart and checkpoint processing.
If there is a requirement to do automated restart for specific abend codes only, then it can be specified in the SCHEDxx member of the IBM system parmlib library.
RESTART parameter is coded in the JOB or EXEC statement and it helps in manual restart of the JOB/STEP after the job failure. RESTART can be accompanied with a checkid, which is the checkpoint written in the dataset coded in the SYSCKEOV DD statement. When a checkid is coded, the SYSCHK DD statement should be coded to reference the checkpoint dataset after the JOBLIB statement (if any), else after the JOB statement.
//CHKSAMP JOB CLASS=6,NOTIFY=&SYSUID,RESTART=(STP01,chk5)
//*
//SYSCHK    DD DSN=SAMPLE.CHK,DISP=OLD
//STP01     EXEC PGM=MYCOBB
//*SYSCKEOV	DD DSNAME=SAMPLE.CHK,DISP=MOD
//IN1       DD DSN=SAMPLE.IN,DISP=SHR
//OUT1      DD DSN=SAMPLE.OUT,DISP=(,CATLG,CATLG)
//          CHKPT=EOV,LRECL=80,RECFM=FB
In the above example, chk5 is the checkid, i.e., STP01 is restarted at checkpoint5. Please note that a SYSCHK statement is added and SYSCKEOV statement is commented out in the previous program explained in Setting Checkpoint section.
JCL - Defining Datasets
A dataset name specifies the name of a file and it is denoted by DSN in JCL. The DSN parameter refers to the physical dataset name of a newly created or existing dataset. The DSN value can be made up of sub-names each of 1 to 8 characters length, separated by periods and of total length of 44 characters (alphanumeric). Following is the syntax:
DSN=&name | *.stepname.ddname
Temporary datasets need storage only for the job duration and are deleted at job completion. Such datasets are represented as DSN=&name or simply without a DSN specified.
If a temporary dataset created by a job step is to be used in the next job step, then it is referenced as DSN=*.stepname.ddname. This is called Backward Referencing.
Concatenating Datasets
If there is more than one dataset of the same format, they can be concatenated and passed as an input to the program in a single DD name.
//CONCATEX JOB CLASS=6,NOTIFY=&SYSUID
//*
//STEP10    EXEC PGM=SORT
//SORTIN    DD DSN=SAMPLE.INPUT1,DISP=SHR
//          DD DSN=SAMPLE.INPUT2,DISP=SHR
//          DD DSN=SAMPLE.INPUT3,DISP=SHR
//SORTOUT   DD DSN=SAMPLE.OUTPUT,DISP=(,CATLG,DELETE),
//          LRECL=50,RECFM=FB
In the above example, three datasets are concatenated and passed as input to the SORT program in the SORTIN DD name. The files are merged, sorted on the specified key fields and then written to a single output file SAMPLE.OUTPUT in the SORTOUT DD name.
Overriding Datasets
In a standardised JCL, the program to be executed and its related datasets are placed within a cataloged procedure, which is called in the JCL. Usually, for testing purposes or for an incident fix, there might be a need to use different datasets other than the ones specified in the cataloged procedure. In that case, the dataset in the procedure can be overridden in the JCL.
//SAMPINST JOB 1,CLASS=6,MSGCLASS=Y,NOTIFY=&SYSUID
//*
//JSTEP1    EXEC CATLPROC,PROG=CATPRC1,DSNME=MYDATA.URMI.INPUT
//          DATAC=MYDATA.BASE.LIB1(DATA1)
//STEP1.IN1 DD DSN=MYDATA.OVER.INPUT,DISP=SHR
//*
//* The cataloged procedure is as below:
//*
//CATLPROC PROC PROG=,BASELB=MYCOBOL.BASE.LIB1
//*
//STEP1     EXEC PGM=&PROG
//STEPLIB   DD DSN=&BASELB,DISP=SHR
//IN1       DD DSN=MYDATA.URMI.INPUT,DISP=SHR
//OUT1      DD SYSOUT=*
//SYSOUT    DD SYSOUT=*
//SYSIN     DD MYDATA.BASE.LIB1(DATA1),DISP=SHR
//*
//STEP2     EXEC PGM=SORT
In the above example, the dataset IN1 uses the file MYDATA.URMI.INPUT in the PROC, which is overridden in the JCL. Hence, the input file used in execution is MYDATA.OVER.INPUT. Please note that the dataset is referred as STEP1.IN1. If there is only one step in the JCL/PROC, then the dataset can be referred with just the DD name. Similarly, if there are more than one step in the JCL, then the dataset is to be overridden as JSTEP1.STEP1.IN1.
//SAMPINST  JOB 1,CLASS=6,MSGCLASS=Y,NOTIFY=&SYSUID
//*
//STEP      EXEC CATLPROC,PROG=CATPRC1,DSNME=MYDATA.URMI.INPUT
//          DATAC=MYDATA.BASE.LIB1(DATA1)
//STEP1.IN1 DD DSN=MYDATA.OVER.INPUT,DISP=SHR
//          DD DUMMY
//          DD DUMMY
//*
In the above example, out of the three datasets concatenated in IN1, the first one is overridden in the JCL and the rest is kept as that present in PROC.
Defining GDGs in a JCL
Generation Data Groups (GDGs) are group of datasets related to each other by a common name. The common name is referred as GDG base and each dataset associated with the base is called a GDG version.
For example, MYDATA.URMI.SAMPLE.GDG is the GDG base name. The datasets are named as MYDATA.URMI.SAMPLE.GDG.G0001V00, MYDATA.URMI.SAMPLE.GDG.G0002V00 and so on. The latest version of the GDG is referred as MYDATA.URMI.SAMPLE.GDG(0), previous versions are referred as (-1), (-2) and so on. The next version to be created in a program is refered as MYDATA.URMI.SAMPLE.GDG(+1) in the JCL.
Create/ Alter GDG in a JCL
The GDG versions can have same or different DCB parameters. An initial model DCB can be defined to be used by all versions, but it can be overridden when creating new versions.
//GDGSTEP1 EXEC PGM=IDCAMS
//SYSPRINT DD  SYSOUT=*
//SYSIN    DD  *
           DEFINE GDG(NAME(MYDATA.URMI.SAMPLE.GDG)   -
           LIMIT(7)                           -
           NOEMPTY                            -
           SCRATCH)
/*
//GDGSTEP2 EXEC PGM=IEFBR14
//GDGMODLD DD  DSN=MYDATA.URMI.SAMPLE.GDG,
//         DISP=(NEW,CATLG,DELETE),
//         UNIT=SYSDA,
//         SPACE=(CYL,10,20),
//         DCB=(LRECL=50,RECFM=FB)
//
In the above example, IDCAMS utility defines the GDG base in GDGSTEP1 with below parameters passed in the SYSIN DD statement:
NAME specifies the physical dataset name of the GDG base.
LIMIT specifies the maximum number of versions that the GDG base can hold.
EMPTY uncataloges all the generations when the LIMIT is reached.
NOEMPTY uncataloges the least recent generation.
SCRATCH physically deletes the generation when it is uncataloged.
NOSCRATCH do not delete the dataset, i.e., it can be referred using the UNIT and VOL parameters.
In GDGSTEP2, IEFBR14 utility specifies model DD parameters to be used by all versions.
IDCAMS can be used to alter the definition parameters of a GDG such as increasing LIMIT, changing EMPTY to NOEMPTY, etc., and its related versions using the SYSIN command is ALTER MYDATA.URMI.SAMPLE.GDG LIMIT(15) EMPTY.
Delete GDG in a JCL
Using IEFBR14 utility, we can delete a single version of a GDG.
//GDGSTEP3   EXEC PGM=IEFBR14
//GDGDEL     DD  DSN=MYDATA.URMI.SAMPLE.GDG(0),
//           DISP=(OLD,DELETE,DELETE)
In the above example, the latest version of MYDATA.URMI.SAMPLE.GDG is deleted. Please note that the DISP parameter on normal job completion is coded as DELETE. Hence, the dataset is deleted when the job completes execution.
IDCAMS can be used to delete the GDG and its related versions using the SYSIN command DELETE(MYDATA.URMI.SAMPLE.GDG) GDG FORCE/PURGE.
FORCE deletes the GDG versions and the GDG base. If any of the GDG versions are set with an expiration date which is yet to expire, then those are not deleted and hence the GDG base is retained.
PURGE deletes the GDG versions and the GDG base irrespective of the expiration date.
Using GDG in a JCL
In the following example, the latest version of MYDATA.URMI.SAMPLE.GDG is used as input to the program and a new version of MYDATA.URMI.SAMPLE.GDG is created as the output.
//CNDSAMP JOB CLASS=6,NOTIFY=&SYSUID
//*
//STP01   EXEC PGM=MYCOBB
//IN1     DD DSN=MYDATA.URMI.SAMPLE.GDG(0),DISP=SHR
//OUT1    DD DSN=MYDATA.URMI.SAMPLE.GDG(+1),DISP=(,CALTG,DELETE)
//        LRECL=100,RECFM=FB
Here, if the GDG had been referred by the actual name like MYDATA.URMI.SAMPLE.GDG.G0001V00, then it leads to changing the JCL every time before execution. Using (0) and (+1) makes it dynamically substitute the GDG version for execution.
Input-Output Methods
Any batch program executed through a JCL requires data input, which is processed and an output is created. There are different methods of feeding input to the program and writing output received from a JCL. In batch mode, there is no user interaction required but input and output devices and required organisation are defined in JCL and submitted.
Data Input in a JCL
There are various ways to feed the data to a program using JCL and these methods have been explained below:
INSTREAM DATA
Instream data to a program can be specified using a SYSIN DD statement.
//CONCATEX JOB CLASS=6,NOTIFY=&SYSUID
//* Example 1:
//STEP10 EXEC PGM=MYPROG
//IN1    DD DSN=SAMPLE.INPUT1,DISP=SHR
//OUT1   DD DSN=SAMPLE.OUTPUT1,DISP=(,CATLG,DELETE),
//       LRECL=50,RECFM=FB
//SYSIN  DD *
//CUST1  1000
//CUST2  1001
/*
//*
//* Example 2:
//STEP20 EXEC PGM=MYPROG
//OUT1   DD DSN=SAMPLE.OUTPUT2,DISP=(,CATLG,DELETE),
//       LRECL=50,RECFM=FB
//SYSIN  DD DSN=SAMPLE.SYSIN.DATA,DISP=SHR
//*
In Example 1, input to MYPROG is passed through SYSIN. The data is provided within the JCL. Two records of data are passed to the program. Please note that /* marks the end of instream SYSIN data.
"CUST1 1000" is record1 and "CUST2 1001" is record2. End of data condition is met when the symbol /* is encountered while reading the data.
In Example 2, the SYSIN data is held within a dataset, where SAMPLE.SYSIN.DATA is a PS file, which can hold one or more records of data.
Data Input through files
As mentioned in most of the examples in previous chapters, data input to a program can be provided through PS, VSAM or GDG files, with relevant DSN name and DISP parameters along with DD statements.
In Example 1, SAMPLE.INPUT1 is the input file through which data is passed to MYPROG. It is referred as IN1 within the program.
Data Output in a JCL
The output in a JCL can be cataloged into a dataset or passed to the SYSOUT. As mentioned in DD statements chapter, SYSOUT=* redirects the output to the same class as that mentioned in the MSGCLASS parameter of the JOB statement.
Saving Job Logs
Specifying MSGCLASS=Y saves the job log in the JMR (Joblog Management and Retrieval). The entire JOB log can be redirected to the SPOOL and can be saved to a dataset by giving the XDC command against the job name in the SPOOL. When the XDC command is given in the SPOOL, a dataset creation screen is opened up. The job log can then be saved by giving appropriate PS or PDS definition.
Job logs can also be saved into a dataset by mentioning an already created dataset for SYSOUT and SYSPRINT. But the entire job log cannot be captured through this way (i.e., JESMSG will not be cataloged) as done in JMR or XDC.
//SAMPINST JOB 1,CLASS=6,MSGCLASS=Y,NOTIFY=&SYSUID
//*
//STEP1    EXEC PGM=MYPROG
//IN1      DD DSN=MYDATA.URMI.INPUT,DISP=SHR
//OUT1     DD SYSOUT=*
//SYSOUT   DD DSN=MYDATA.URMI.SYSOUT,DISP=SHR
//SYSPRINT DD DSN=MYDATA.URMI.SYSPRINT,DISP=SHR
//SYSIN    DD MYDATA.BASE.LIB1(DATA1),DISP=SHR
//*
//STEP2    EXEC PGM=SORT
In the above example, SYSOUT is cataloged in MYDATA.URMI.SYSOUT and SYSPRINT in MYDATA.URMI.SYSPRINT.
Running COBOL Programs using JCL
Compiling COBOL Programs
In order to execute a COBOL program in batch mode using JCL, the program needs to be compiled and a load module is created with all the sub-programs. The JCL uses the load module and not the actual program at the time of execution. The load libraries are concatenated and given to the JCL at the time of execution using JCLLIB or STEPLIB.
There are many mainframe compiler utilities available to compile a COBOL program. Some corporate companies use Change Management tools like Endevor, which compiles and stores every version of the program. This is useful in tracking the changes made to the program.
//COMPILE   JOB ,CLASS=6,MSGCLASS=X,NOTIFY=&SYSUID
//*
//STEP1     EXEC IGYCRCTL,PARM=RMODE,DYNAM,SSRANGE
//SYSIN     DD DSN=MYDATA.URMI.SOURCES(MYCOBB),DISP=SHR
//SYSLIB    DD DSN=MYDATA.URMI.COPYBOOK(MYCOPY),DISP=SHR
//SYSLMOD   DD DSN=MYDATA.URMI.LOAD(MYCOBB),DISP=SHR
//SYSPRINT  DD SYSOUT=*
//*
IGYCRCTL is an IBM COBOL compiler utility. The compiler options are passed using PARM parameter. In the above example, RMODE instructs the compiler to use relative addressing mode in the program. The COBOL program is passed using SYSIN parameter and the copybook is the library used by the program in SYSLIB.
This JCL produces the load module of the program as output which is used as the input to the execution JCL.
Running COBOL Programs
Below a JCL example where the program MYPROG is executed using the input file MYDATA.URMI.INPUT and produces two output files written to the spool.
//COBBSTEP  JOB CLASS=6,NOTIFY=&SYSUID
//
//STEP10    EXEC PGM=MYPROG,PARM=ACCT5000
//STEPLIB   DD DSN=MYDATA.URMI.LOADLIB,DISP=SHR
//INPUT1    DD DSN=MYDATA.URMI.INPUT,DISP=SHR
//OUT1      DD SYSOUT=*
//OUT2      DD SYSOUT=*
//SYSIN     DD *
//CUST1     1000
//CUST2     1001
/*
The load module of MYPROG is located in MYDATA.URMI.LOADLIB. This is important to note that the above JCL can be used for a non-DB2 COBOL module only.
Passing Data to COBOL Programs
Data input to COBOL batch program can be through files, PARAM parameter and SYSIN DD statement. In the above example:
Data records are passed to MYPROG through file MYDATA.URMI.INPUT. This file will be referred in the program using the DD name INPUT1. The file can be opened, read and closed in the program.
The PARM parameter data ACCT5000 is received in the LINKAGE section of the program MYPROG in a variable defined within that section.
The data in the SYSIN statement is received through ACCEPT statement in the PROCEDURE division of the program. Every ACCEPT statement reads one whole record (i.e., CUST1 1000) into a working storage variable defined in the program.
Running a COBOL-DB2 program
For running COBOL DB2 program, specialised IBM utility is used in the JCL and program; DB2 region and required parameters are passed as input to the utility.
The below steps are followed in running a COBOL-DB2 program:
When a COBOL-DB2 program is compiled, a DBRM (Database Request Module) is created along with the load module. The DBRM contains the SQL statements of the COBOL programs with its syntax checked to be correct.
The DBRM is bound to the DB2 region (environment) in which the COBOL will run. This can be done using the IKJEFT01 utility in a JCL.
After the bind step, the COBOL-DB2 program is run using IKJEFT01 (again) with the load library and DBRM library as the input to the JCL.
//STEP001  EXEC PGM=IKJEFT01
//*
//STEPLIB  DD DSN=MYDATA.URMI.DBRMLIB,DISP=SHR
//*
//input files
//output files
//SYSPRINT DD SYSOUT=*
//SYSABOUT DD SYSOUT=*
//SYSDBOUT DD SYSOUT=*
//SYSUDUMP DD SYSOUT=*
//DISPLAY  DD SYSOUT=*
//SYSOUT   DD SYSOUT=*
//SYSTSPRT DD SYSOUT=*
//SYSTSIN  DD *
    DSN SYSTEM(SSID)
    RUN PROGRAM(MYCOBB) PLAN(PLANNAME) PARM(parameters to cobol program) -
    LIB('MYDATA.URMI.LOADLIB')
    END
/*
In the above example, MYCOBB is the COBOL-DB2 program run using IKJEFT01. Please note that the program name, DB2 Sub-System Id (SSID), DB2 Plan name are passed within the SYSTSIN DD statement. The DBRM library is specified in the STEPLIB.
JCL - Utility Programs
IBM Dataset Utilities
Utility programs are pre-written programs, widely used in mainframes by system programmers and application developers to achieve day-to-day requirements, organising and maintaining data. A few of them are listed below with their functionality:
| Utility Name | Functionality |
|---|---|
| IEHMOVE | Moves or copies sequential datasets. |
| IEHPROGM | Deleting and renaming datasets; catalog or uncatalog datasets other than VSAM. |
| IEHCOMPR | Compares data in sequential datasets. |
| IEBCOPY | Copy, Merge, compress, back-up or restore PDS. |
| IEFBR14 | No operation utility. Used to return control to user and terminate. It is usually used to create empty dataset or delete an existing dataset. For example, if a dataset is passed as input to a IEFBR14 program with DISP=(OLD,DELETE,DELETE), the dataset is deleted at job completion. |
| IEBEDIT | Used to copy selected parts of a JCL. For Example, if a JCL has 5 steps and we require to execute step 1 and 3 only, then a IEBEDIT JCL can be coded with a dataset which contains the actual JCL to be executed. In the SYSIN of IEBEDIT, we can specify STEP1 and STEP3 as parameters. When this JCL is executed, it executes the STEP1 and STEP3 of the actual JCL. |
| IDCAMS | Create, delete, rename, catalog, uncatalog datasets (other than PDS). Usually used to manage VSAM datasets. |
These utility programs need to be used with appropriate DD statements in a JCL in order to achieve the specified functionality.
DFSORT Overview
DFSORT is a powerful IBM utility used to copy, sort or merge datasets. SORTIN and SORTINnn DD statements are used to specify input datasets. SORTOUT and OUTFIL statements are used to specify output data.
SYSIN DD statement is used to specify the sort and merge conditions. DFSORT is generally used to achieve the below functionalities:
SORT the input file(s) in the order of the specified field(s) position in the file.
INCLUDE or OMIT records from the input file(s) based on the specified condition.
SORT MERGE input file(s) in the order of the specified field(s) position in the file.
SORT JOIN two or more input files based on a specified JOIN KEY (field(s) in each input file).
When there is additional processing to be done on the input files, a USER EXIT program can be called from the SORT program. For example, if there is a header/trailer to be added to the output file, then a USER written COBOL program can be called from the SORT program to perform this functionality. Using a control card, data can be passed to the COBOL program.
On the other way round, a SORT can be called internally from a COBOL program to arrange the input file in a particular order before being processed. Usually, this is not recommended in view of performance for large files.
ICETOOL Overview
ICETOOL is a multi-purpose DFSORT utility used to perform a variety of operations on datasets. Input and output datasets can be defined using user defined DD names. The file operations are specified in the TOOLIN DD statement. Additional conditions can be specified in user defined 'CTL' DD statements.
Few of the utilities of ICETOOL are given below:
ICETOOL can achieve all the functionalities of DFSORT in one or more conditions.
SPLICE is a powerful operation of ICETOOL which is similar to SORT JOIN, but with additional features. It can compare two or more files on specified field(s) and create one or more output files like file with matching records, file with non-matching records, etc.
Data in one file in a particular position can be OVERLAYed into another position in the same or different file.
A File can be split into n files based on a specified condition. For example, a file containing names of employees can be split into 26 files, each containing the names starting with A, B, C and so on.
Different combination of file manipulation is possible using ICETOOL with a little exploration of the tool.
SYNCSORT Overview
SYNCSORT is used to copy, merge or sort datasets with a high performance. It gives best utilization of system resources and efficient operation in 31-bit and 64-bit address spaces.
It can be used in the same lines of DFSORT and can achieve the same features. It can be invoked by a JCL or from within a program coded in COBOL, PL/1 or Assembler language. It also supports User Exit programs to be called from the SYNCSORT program.
Frequently used sort tricks using these utilities are explained in the next chapter. Complex requirements, which requires a huge programming in COBOL/ASSEMBLER can be achieved using the above utilities in simple steps.
JCL - Basic Sort Tricks
The day-to-day application requirements in a corporate world that can be achieved using Utility Programs are illustrated below:
1. A file has 100 records. The first 10 records need to be written to output file.
//JSTEP020 EXEC PGM=ICETOOL
//TOOLMSG  DD SYSOUT=*
//DFSMSG   DD SYSOUT=*
//IN1      DD DSN=MYDATA.URMI.STOPAFT,DISP=SHR
//OUT1	   DD SYSOUT=*
//TOOLIN   DD *
  COPY FROM(IN1) TO(OUT1) USING(CTL1)
/*
//CTL1CNTL DD *
  OPTION STOPAFT=10
/*
The option STOPAFT will stop reading the input file after 10th record and terminates the program. Hence, 10 records are written to output.
2. Input file has one or more records for same employee number. Write unique records to output.
//STEP010  EXEC PGM=SORT
//SYSOUT   DD SYSOUT=*
//SORTIN   DD DSN=MYDATA.URMI.DUPIN,DISP=SHR
//SORTOUT  DD SYSOUT=*
//SYSIN    DD *
  SORT FIELDS=(1,15,ZD,A)
  SUM FIELDS=NONE
/*
SUM FIELDS=NONE removes duplicates on fields specified in SORT FIELDS. In the above example, employee number is in the field position 1,15. The output file will contain the unique employee numbers sorted in ascending order.
3. Overwrite input record content.
//JSTEP010 EXEC PGM=SORT
//SORTIN   DD DSN= MYDATA.URMI.SAMPLE.MAIN,DISP=SHR
//SORTOUT  DD SYSOUT=*
//SYSPRINT DD SYSOUT=*
//SYSOUT   DD SYSOUT=*
//SYSIN    DD *
 OPTION COPY
  INREC OVERLAY=(47:1,6)
/*
In the input file, the content in position 1,6 is overwritten to the position 47,6 and then copied to the output file. INREC OVERLAY operation is used in order to rewrite data in input file before copying to output.
4. Adding a sequence number to the output file.
//JSTEP010 EXEC PGM=SORT
//SORTIN   DD *
  data1
  data2
  data3
/*
//SORTOUT  DD SYSOUT=*
//SYSPRINT DD SYSOUT=*
//SYSOUT   DD SYSOUT=*
//SYSIN    DD *
 OPTION COPY
 BUILD=(1:1,5,10:SEQNUM,4,ZD,START=1000,INCR=2)
/*
The output will be:
data1    1000
data2    1002
data3    1004
4-digit sequence number is added in output at position 10, starting at 1000 and incremented by 2 for every record.
5. Adding Header/Trailer to output file.
//JSTEP010 EXEC PGM=SORT
//SORTIN   DD *
  data1
  data2
  data3
/*
//SORTOUT  DD SYSOUT=*
//SYSPRINT DD SYSOUT=*
//SYSOUT   DD SYSOUT=*
//SYSIN    DD *
 SORT FIELDS=COPY
  OUTFIL REMOVECC,
  HEADER1=(1:C'HDR',10:X'020110131C'),
  TRAILER1=(1:C'TRL',TOT=(10,9,PD,TO=PD,LENGTH=9))
/*
The output will be:
HDR       20110131
data1
data2
data3
TRL       000000003
TOT calculates the number of records in the input file. HDR and TRL are added as identifiers to header/trailer, which is user defined and can be customised as per the users' needs.
6. Conditional Processing
//JSTEP010 EXEC PGM=SORT
//SORTIN   DD *
  data1select
  data2
  data3select
/*
//SORTOUT  DD SYSOUT=*
//SYSPRINT DD SYSOUT=*
//SYSOUT   DD SYSOUT=*
//SYSIN    DD *
  INREC  IFTHEN=(WHEN=(6,1,CH,NE,C' '),BUILD=(1:1,15),
         IFTHEN=(WHEN=(6,1,CH,EQ,C' '),BUILD=(1:1,5,7:C'EMPTY    ')
  OPTION COPY
/*
The output will be:
data1select
data2 EMPTY
data3select
Based on the 6th position of the file, the BUILD of output file varies. If 6th position is SPACES, then text "EMPTY" is appended to input record. Else, the input record is written to output, as-is.
7. Backing up a file
//JSTEP001 EXEC PGM=IEBGENER
//SYSPRINT DD SYSOUT=*
//SYSIN    DD *
//SYSOUT   DD SYSOUT=*
//SORTOUT  DD DUMMY
//SYSUT1   DD DSN=MYDATA.URMI.ORIG,DISP=SHR
//SYSUT2   DD DSN=MYDATA.URMI.BACKUP,DISP=(NEW,CATLG,DELETE),
//             DCB=*.SYSUT1,SPACE=(CYL,(50,1),RLSE)
IEBGENER copies the file in SYSUT1 to file in SYSUT2. Please note that file in SYSUT2 takes the same DCB as that of the SYSUT1 in the above example.
8. File Comparison
//STEP010  EXEC PGM=SORT
//MAIN     DD *
  1000
  1001
  1003
  1005
//LOOKUP   DD *
  1000
  1002
  1003
//MATCH    DD DSN=MYDATA.URMI.SAMPLE.MATCH,DISP=OLD
//NOMATCH1 DD DSN=MYDATA.URMI.SAMPLE.NOMATCH1,DISP=OLD
//NOMATCH2 DD DSN=MYDATA.URMI.SAMPLE.NOMATCH2,DISP=OLD
//SYSOUT   DD SYSOUT=*
//SYSIN    DD *
  JOINKEYS F1=MAIN,FIELDS=(1,4,A)
  JOINKEYS F2=LOOKUP,FIELDS=(1,4,A)
  JOIN UNPAIRED,F1,F2
  REFORMAT FIELDS=(?,F1:1,4,F2:1,4)
  OPTION COPY
  OUTFIL FNAMES=MATCH,INCLUDE=(1,1,CH,EQ,C'B'),BUILD=(1:2,4)
  OUTFIL FNAMES=NOMATCH1,INCLUDE=(1,1,CH,EQ,C'1'),BUILD=(1:2,4)
  OUTFIL FNAMES=NOMATCH2,INCLUDE=(1,1,CH,EQ,C'2'),BUILD=(1:2,4)
/*
JOINKEYS specifies the field on which the two files are compared.
REFORMAT FIELDS=? places 'B' (matched records), '1' (present in file1, but not in file2), or '2' (present in file2 but not in file1) in the 1st position of the output BUILD.
JOIN UNPAIRED does a full outer join on the two files.
The output will be:
MATCH File
1000
1003

NOMATCH1 File
1001
1005

NOMATCH2 File
1002
The same functionality can be achieved using ICETOOL also.