- Set Up SSH Keys in Gerrit
- Generate New SSH Key
- Add Your SSH Key
- Add SSH Key to your Gerrit Account
- Add SSH Key to use with Git
- Download Extension Using Git
- Prepare to work with Gerrit
- Installing Git-Review
- Configuring Git-Review
- Setting up Git-Review
- How to Submit a Patch
- Gerrit - Update Master
- Gerrit - Create Branch
- Make & Commit Your Change
- Prepare Push change set to Gerrit
- Push your change set to Gerrit
- View the Change / Next Steps
- Editing via the Web-Interface
- How Code is reviewed in Gerrit
- Review Before Merge
- Gerrit - Project Owners
- How to Comment on, review, merge
- Gerrit Useful Resources
- Gerrit - Quick Guide
- Gerrit - Useful Resources
- Gerrit - Discussion
Gerrit - Installing Git-Review
You can work with Gerrit by installing git-review on different platforms as discussed in this chapter.
Windows
In Windows, you can install the git-review as listed in the following steps.
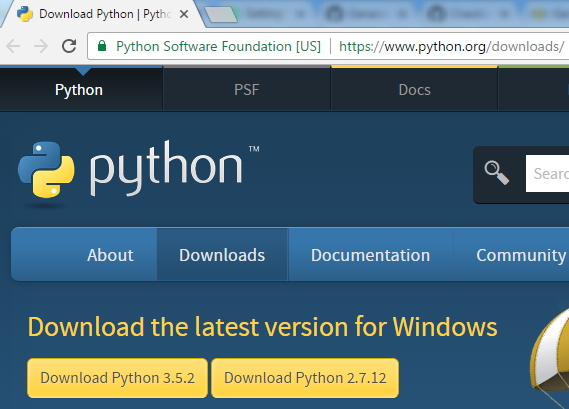
Step 1 − First install Python for installing git-review.
Step 2 − Keep the Python installation in the default directory (like C:\Python27) instead of installing in any other directory.
Step 3 − Next, set the environment variables for Python scripts directory using the path as C:\Python27\;C:\Python27\Scripts\;
git_review_install
Step 4 − With version 2.7, Python will install pip automatically. For older version of Python 2.7, you can install pip as described in this link.
Step 5 − Run open Git Bash and install the git-review using the following command.
$ pip install git-review
Linux
In Linux, you can install git-review as described in the following steps −
Step 1 Users of Linux platform do not have root access on shared host. Hence, without root access, you can install git-review locally in user directory using the following commands −
virtualenv --python=/usr/bin/python2.6 virtualenv
virtualenv/bin/pip install git-review==1.21
Step 2 − You can extend the path to the local binaries using two ways −
PATH=$PATH:~/virtualenv/bin/
PATH=~/virtualenv/bin/:$PATH
Step 3 − Now, use the following command to set up the work with Gerrit.
git review -s
 or
~/virtualenv/bin/git-review -s
Step 4 − With root access, git-review can be installed using the following command.
sudo apt-get install git-review
Step 5 − If there is no apt-get after installing Python, then use the following commands.
$ sudo easy_install pip
$ sudo pip install git-review==1.21
Step 6 − Run the following command to work with Gerrit.
git review -s
Mac OS X
In Mac, you can install the git-review using the following steps.
Step 1 − Install the Homebrew from this link.
Step 2 − Next, install the git-review using the following command.
brew install git-review