- FuelPHP - Home
- FuelPHP - Introduction
- FuelPHP - Installation
- FuelPHP - Architecture Overview
- FuelPHP - Simple Web Application
- FuelPHP - Configuration
- FuelPHP - Controllers
- FuelPHP - Routing
- FuelPHP - Requests & Response
- FuelPHP - Views
- FuelPHP - Presenters
- FuelPHP - Models & Database
- FuelPHP - Form Programming
- FuelPHP - Validation
- Advanced Form Programming
- FuelPHP - File Uploading
- FuelPHP - Ajax
- FuelPHP - HMVC Request
- FuelPHP - Themes
- FuelPHP - Modules
- FuelPHP - Packages
- Cookie & Session Management
- FuelPHP - Events
- FuelPHP - Email Management
- FuelPHP - Profiler
- Error Handling & Debugging
- FuelPHP - Unit Testing
- Complete Working Example
- FuelPHP Useful Resources
- FuelPHP - Quick Guide
- FuelPHP - Useful Resources
- FuelPHP - Discussion
FuelPHP - Installation
This chapter explains how to install FuelPHP framework on your machine. FuelPHP installation is very simple and easy. You have two methods to create FuelPHP applications −
The first method is Command line installation using FuelPHP tool called Oil.
The second method is Composer based installation. FuelPHP uses Composer, both for installation and for package dependencies, so make sure the composer is installed locally before continuing the process.
Lets go through each of the methods one by one in detail in the subsequent sections.
System Requirements
Before moving to installation, the following system requirements have to be satisfied.
Web server (Any of the following)
- WAMP (Windows)
- Microsoft IIS (Windows)
- LAMP (Linux)
- MAMP (Macintosh)
- XAMP (Multi-platform)
- Nginx (Multi-platform)
- PHP in-built development web server (Multi-platform)
Browser support (Any of the following)
- IE (Internet Explorer 8+)
- Firefox
- Google Chrome
- Safari
PHP compatibility − PHP 5.3 or later. To get the maximum benefit, use the latest version.
Let us use PHP's in-built development web server for this tutorial. The built-in development web server is easy to start as well as quite adequate to understand the basics of FuelPHP web application without getting into the complexity of the world of web server and configurations.
Command Line Installation
The command line installation of FuelPHP is very easy and takes maximum of five minutes.
Install Oil Package
Oil is a special package/command provided by FuelPHP framework to do lot of tasks needed in the development of FuelPHP application including installation, development, and testing the application.
To install the Oil package, open up a shell and run the following command −
sudo curl https://get.fuelphp.com/oil | sh
The command uses curl to download and install the oil package. The command will show result similar to the following information and finally install the oil package.
 % Total    % Received % Xferd  Average Speed   Time    Time     Time  Current
                                 Dload  Upload   Total   Spent    Left  Speed
100   479  100   479    0     0    353      0  0:00:01  0:00:01 --:--:--   353
Create a New Project
To create a new project using Oil, use the following command −
oil create <project_name>
Lets create a new project named HelloWorld using the following command.
oil create HelloWorld
Now, you can see response similar to the following and finally create a simple skeleton FuelPHP application.
composer create-project fuel/fuel HelloWorld
Installing fuel/fuel (1.8.0.1)
   - Installing fuel/fuel (1.8.0.1)
      Loading from cache

Created project in HelloWorld

Loading composer repositories with package information
Updating dependencies (including require-dev)
   - Installing composer/installers (v1.3.0)
      Loading from cache
   - Installing fuelphp/upload (2.0.6)
      Loading from cache
   - Installing michelf/php-markdown (1.4.0)
      Loading from cache
   - Installing psr/log (1.0.2)
      Loading from cache
   - Installing monolog/monolog (1.18.2)
      Loading from cache
   - Installing phpseclib/phpseclib (2.0.0)
      Loading from cache
   - Installing fuel/core (1.8.0.4)
      Loading from cache
   - Installing fuel/auth (1.8.0.4)
      Loading from cache
   - Installing fuel/email (1.8.0.4)
      Loading from cache
   - Installing fuel/oil (1.8.0.4)
      Loading from cache
   - Installing fuel/orm (1.8.0.1)
      Loading from cache
   - Installing fuel/parser (1.8.0.4)
      Loading from cache
   - Installing fuel/docs (1.8.0.4)
      Loading from cache
   .
   .
   Writing lock file
   Generating autoload files
Oil Version
To test whether Oil is available and to check the version, use the following command −
$ cd HelloWorld
$ php oil -v
The above command produces the following result −
Fuel: 1.8 running in "development" mode
Oil Help Command
To obtain Oils basic help documentation, use the following command −
$ php oil help
The above command will show the help documentation similar to the following result −
Usage:
   php oil [cell|console|generate|package|refine|help|server|test]
Runtime options:
   -f, [--force]    # Overwrite files that already exist
   -s, [--skip]     # Skip files that already exist
   -q, [--quiet]    # Supress status output
   -t, [--speak]    # Speak errors in a robot voice
Description:
   The 'oil' command can be used in several ways to facilitate quick development, help
   with testing your application and for running Tasks.
Environment:
   If you want to specify a specific environment oil has to run in, overload the
   environment variable on the commandline: FUEL_ENV=staging php oil <commands>
More information:
   You can pass the parameter "help" to each of the defined command to get
   information about that specific command: php oil package help
Documentation:
   http://docs.fuelphp.com/packages/oil/intro.html
As of now, you have an idea of how to install Fuel using Oil. Lets go through the composer based installation in the next section.
Composer-based Installation
The following command is used to install FuelPHP using Composer.
$ composer create-project fuel/fuel --prefer-dist.
Git Repository Clones
To install the latest development version as local git repository clones, use the following command.
$ composer create-project fuel/fuel:dev-1.9/develop --prefer-source.
Running the Application
Move to the project directory public folder, run the application using the production server with the following command.
$ cd path/to/HelloWorld/public
$ php -S localhost:8080 index.php
It produces the following response.
PHP 5.5.31 Development Server started at Sun May 21 12:26:10 2017
Listening on http://localhost:8080
Document root is /Users/workspace/php-fuel/HelloWorld/public
Press Ctrl-C to quit.
Now, request the URL, http://localhost:8080 and it will produce the following result.
Result
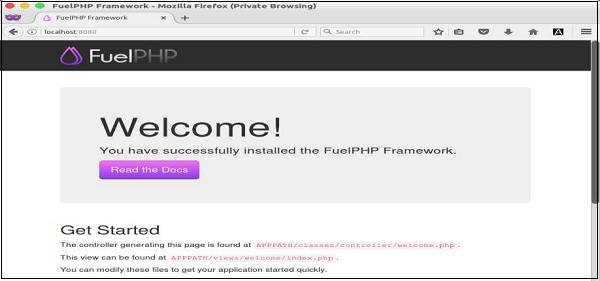
This is the simplest way to run FuelPHP application in the development environment. If you create your application in this way in the production environment, you will face security issues. The recommended way is setting up a virtual host configuration. It is explained for apache web server in the next section.
Setting Up a Virtual Host
It is more secure way to access FuelPHP application. To set up a virtual host, you need to link apache virtual host file to your application. In case of intranet application, redirect system host file URL to virtual host.
Virtual Host File
Open the virtual host and add the following changes.
<VirtualHost *:80>
   ServerName hello.app
   DocumentRoot /path/to/public
   SetEnv FUEL_ENV development

   <Directory /path/to/public>
      DirectoryIndex index.php
      AllowOverride All
      Order allow,deny
      Allow from all
   </Directory>
</VirtualHost>
System Host File
Now, add a host entry to your machine using the following command.
sudo vi /etc/hosts
Then, add the following line to the end of the file.
127.0.0.1 hello.app
To make all the changes available, restart your Apache server and request the url, http://hello.app. It produces the FuelPHP home page.