- C# - Home
- C# - Overview
- C# - Environment
- C# - Program Structure
- C# - Basic Syntax
- C# - Data Types
- C# - Type Conversion
- C# - Variables
- C# - Constants
- C# - Operators
- C# - Arithmetic Operators
- C# - Assignment Operators
- C# - Relational Operators
- C# - Logical Operators
- C# - Bitwise Operators
- C# - Miscellaneous Operators
- C# - Operators Precedence
- C# Conditional Statements
- C# - Decision Making
- C# - If
- C# - If Else
- C# - Nested If
- C# - Switch
- C# - Nested Switch
- C# - Switch Expressions
- C# Control Statements
- C# - Loops
- C# - For Loop
- C# - While Loop
- C# - Do While Loop
- C# - Nested Loops
- C# - Break
- C# - Continue
- C# - Foreach Loop
- C# - Goto Statement
- C# OOP & Data Handling
- C# - Encapsulation
- C# - Methods
- C# - Nullables
- C# - Arrays
- C# - Strings
- C# - Structure
- C# - Enums
- C# - Classes
- C# - Inheritance
- C# - Polymorphism
- C# - Operator Overloading
- C# - Interfaces
- C# - Namespaces
- C# - Preprocessor Directives
- C# - Regular Expressions
- C# - Custom Exceptions
- C# - Exception Handling
- C# - File I/O
- C# Advanced Tutorial
- C# - Attributes
- C# - Reflection
- C# - Properties
- C# - Indexers
- C# - Delegates
- C# - Events
- C# - Collections
- C# - Generics
- C# - LINQ
- C# - IEnumerable vs IEnumerator
- C# - Anonymous Methods
- C# - Unsafe Codes
- C# - Tasks and Parallel Programming
- C# - Multithreading
- C# - Extension Methods
- C# - Lambda Expressions
- C# - Async and Await
- C# Modern Features
- C# - Tuples
- C# - Records
- C# - Pattern Matching Enhancements
- C# - Top-level Statements
- C# - Nullable Reference Types
- C# - What's New in C# 11 / 12 / 13
- C# - Global Usings
- C# - File-Scoped Namespaces
- C# Practical & Advanced Usage
- C# - JSON & XML Handling
- C# - Data Serialization & Deserialization
- C# - REST API Calls with Httpclient
- C# - Dependency Injection
- C# - Unit Testing with NUnit, xUnit & MSTest
- C# - Package Management with NuGet
- C# Useful Resources
- C# - Developer's AI Tools
- C# - Questions and Answers
- C# - Cheatsheet
- C# - Quick Guide
- C# - Useful Resources
- C# - Discussion
- C# - Online Compiler
goto statement in C#
C# provides the goto statement to jump directly to a labeled line within the same method. It helps us control the flow of execution by moving to a specific part of the code when needed. Goto statements are highly useful in breaking out of multiple loops or skipping certain sections of code.
In this chapter, we will learn about the goto statement, its syntax, and examples. Below are the topics we will cover −
Understanding Labels
Labels are jump destinations in a program. A label is a name followed by a colon (:). Here's what we need to know −
- A label must be unique within a method and must be in the same method as the goto statement.
- Labels are case-sensitive and follow the same naming rules as variables.
goto statement in C#
The goto statement in C# is an unconditional jump statement. This means that when the program encounters a goto statement, it immediately moves to the labeled statement within the same method, and all the lines of code between the goto statement and the label are skipped and not executed.
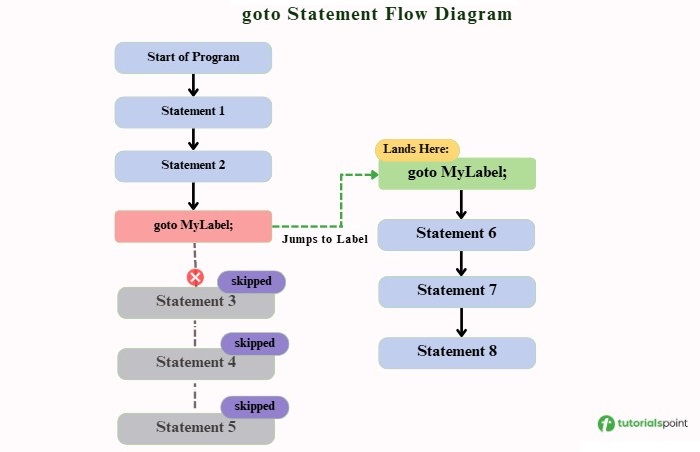
Flow Diagram of goto Statement
Here's a simple flow diagram to understand how goto works −
Syntax of goto Statement in C#
Below is the syntax for decalring the goto statement in C# −
goto label_name;  // Jump to the label

// ... some other code ...

label_name:       // Define the label
    // Code to execute
Here, label_name is the destination of the jump statement, and the statement goto label_name moves the control directly to the specified location.
Example: Using goto Statement in C#
Here's an example of using the goto statement in C#. We created a label called SkipMessage and added a goto SkipMessage statement at the start. When the program reaches the goto statement, it skips the lines in between and jumps directly to the label.
using System;

class Program {
   static void Main(){
      Console.WriteLine("Start of the program");

      goto SkipMessage;  // Jump directly to the label

      // This line will be skipped
      Console.WriteLine("This line will not be printed.");

      SkipMessage:
      Console.WriteLine("This message is printed after the goto statement.");
   }
}
When we run this program, it gives the following output −
Start of the program
This message is printed after the goto statement.
Goto Cannot Jump to Another Method
In this example, we try to use goto statement to jump from one method to another. This is not allowed in C#, and the compiler will throw an error because goto can only jump to labels within the same method.
using System;

class Program {
   static void Main(){
      goto AnotherMethod;  // Attempt to jump to another method

      Console.WriteLine("This will not be reached");
   }

   static void AnotherMethod(){
      Console.WriteLine("Inside another method");
   }
}
Here's the output of the above program which displays a compile-time error message.
Error!
error CS0159: No such label 'AnotherMethod' within the scope of the goto statement
Types of Jumps Using goto Statement
The goto statement can be used to jump in different ways. There are three main types −
Let's understand each type and see how to use them with the goto statement in C#.
Forward Jump
A forward jump moves the program ahead in the program. In the example below, we create a boolean variable and assign it true. When the condition is met, the program jumps directly to the Cleanup label, skipping all the code that comes before it.
using System;

class Program {
   static void Main(){
      bool errorOccurred = true;

      Console.WriteLine("Starting process...");

      if (errorOccurred){
         goto Cleanup;  // jump forward to Cleanup
      }

      Console.WriteLine("This line will be skipped if errorOccurred is true.");

      Cleanup:
      Console.WriteLine("Cleaning up resources...");
   }
}
Below is the output of the above program −
Starting process...
Cleaning up resources...
Backward Jump
A backward jump moves the program back to an earlier point. Backward jumps can create infinite loops if the exit condition is not handled correctly.
In this example below, we use a label called Retry to mark the start of the password attempts. If the password is entered incorrectly, the program jumps back to Retry, repeating the process until the correct password is entered.
using System;

class Program {
   static void Main(){
      int attempts = 0;
      bool passwordCorrect = false;

      Retry:
         attempts++;
         Console.WriteLine($"Attempt {attempts}: Enter password");

      if (attempts < 3){
         Console.WriteLine("Password incorrect. Try again.");
         goto Retry;  // Jump back to Retry
      }

      passwordCorrect = true;
      Console.WriteLine("Password accepted. Access granted.");
    }
}
The output shows the program repeating the password attempts until the correct password is entered.
Attempt 1: Enter password
Password incorrect. Try again.
Attempt 2: Enter password
Password incorrect. Try again.
Attempt 3: Enter password
Password accepted. Access granted.
goto with Loop
We can use the goto statement inside a loop to jump out of it or skip certain parts. It gives direct control over where the program should continue.
In this example, we created a for loop that runs from 1 to 5. When the value of i becomes 3, control jumps to the label stopLoop and exits the loop.
using System;

class Program {
   static void Main() {
      for (int i = 1; i <= 5; i++){
         if (i == 3)
            goto stopLoop;  // Jump out of the loop

            Console.WriteLine("i = " + i);
      }
      stopLoop:
      Console.WriteLine("Loop stopped using goto");
   }
}
Below is the output of the above program which shows how the loop ends when i becomes 3 −
i = 1
i = 2
Loop stopped using goto
goto in Switch Statement
We can use the goto keyword inside a switch statement to jump from one case to another. This is helpful when we want to reuse the same code instead of writing it again in multiple cases.
In this example, we have a switch statement with three cases. When the value of number is 2, the program first runs the code under case 2 and then jumps to case 3 using the goto case 3 statement.
using System;

class Program {
   static void Main(){
      int number = 2;

      switch (number){
         case 1:
            Console.WriteLine("Case 1");
         break;

         case 2:
            Console.WriteLine("Case 2");
         goto case 3;  // Jump to case 3

         case 3:
            Console.WriteLine("Case 3");
         break;

         default:
            Console.WriteLine("Default case");
         break;
      }
   }
}
Following is the output of the above program which displays how control moves from case 2 to case 3.
Case 2
Case 3
goto with Nested Blocks
The goto statement can be used inside nested or conditional blocks, but it can only jump to labels that are within the same method. It cannot jump outside the method or into another block in a different method.
In this example, we created a simple condition where x = 10. When this condition is true, the program jumps to the label named inside and executes the code that comes after it. If the condition were false, the program would continue to execute the code normally without jumping.
using System;

class Program {
   static void Main(){
      int x = 10;

      if (x == 10)
         goto inside;  // Jump to label inside

      Console.WriteLine("Outside block");

      inside:
         Console.WriteLine("Inside block");
   }
}
Below is the output of the above program which shows how control moves directly to the label.
Inside block
Drawbacks of goto Statement
The goto statement is mostly avoided in programming because it creates problems. Here are the main reasons −
- The program becomes hard to read because it jumps around.
- It is difficult for others to maintain and understand.
- It breaks structured programming, making the logic messy.
- It can skip important code and cause errors.
Best Practices for goto Statement
Even though goto is rarely used, sometimes it is necessary. To use it correctly −
- Use goto only to break out of nested loops or jump in switch cases.
- Keep jumps short and place labels close to the goto statement.
- Do not jump over any code that initializes or sets variables, because it can cause runtime errors.
- Always add comments explaining why goto is used.
Conclusion
In this chapter, we learned about the goto jump statement and how to use it in C#. It allows unconditional, conditional, and backward jumps, and can even transfer control between cases in a switch statement. However, it's rarely used in modern C# because it can make the code difficult to read and maintain, so it's best used only when truly necessary.
